Evo 2in1 2774 - Vacuum Cleaner ARIETE - Free user manual and instructions
Find the device manual for free Evo 2in1 2774 ARIETE in PDF.

| Features | Details |
|---|---|
| Vacuum type | 2-in-1 vacuum cleaner |
| Power | 1500 W |
| Tank capacity | 0.5 L |
| Filtration | HEPA filter |
| Weight | 3.5 kg |
| Cable length | 5 m |
| Included accessories | Brush for hard floors, brush for carpets, corner tool |
| Usage | Suitable for hard floors and carpets, easy and maneuverable to use |
| Maintenance | Washable tank, washable filter |
| Safety | Overheat protection |
| Warranty | 2 years |
Frequently Asked Questions - Evo 2in1 2774 ARIETE
User questions about Evo 2in1 2774 ARIETE
0 question about this device. Answer the ones you know or ask your own.
Ask a new question about this device
Download the instructions for your Vacuum Cleaner in PDF format for free! Find your manual Evo 2in1 2774 - ARIETE and take your electronic device back in hand. On this page are published all the documents necessary for the use of your device. Evo 2in1 2774 by ARIETE.
USER MANUAL Evo 2in1 2774 ARIETE
De'Langh Appianons St
Divisiome Commerie Anote
WSSN530 50123 Compl. Biscn E-1
E-Mail:info@net.
Internet: www.anet.net

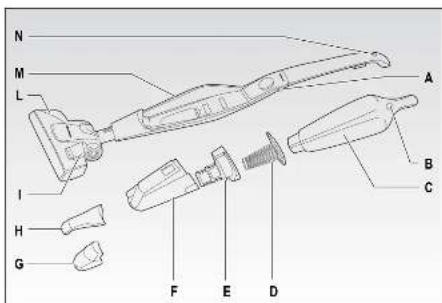
Fig.1
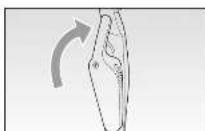
Fig.6 Fig.7
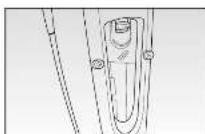
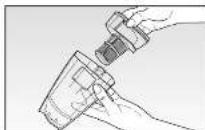
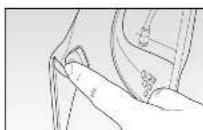
Fig.2 Fig.3
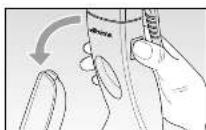
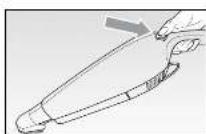
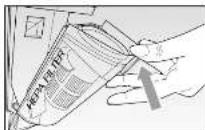
Fig.8 Fig.9
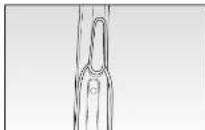
Fig. 10
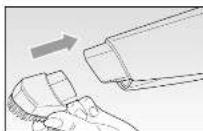
Fig.4 Fig.5
AVVERTENZE IMPORTANTI
LEGGERE QUESTE ISTRUZIONI PRIMA DELL'USO.
The necessary precautions must be taken when using electrical appliances, and these include the following:
1 Never place the appliance on or close to sources of heat.
2 Never use the appliance in proximity to people or lift to eye level, ear level, etc... as there is a serious risk of accident.
3 Never leave the appliance exposed to the elements (rain, sun, etc....).
4 Make sure that the power cord does not come into contact with hot surfaces.
5 This appliance is not intended for use by persons (including children) with reduced physical, sensory or mental capabilities, or lack of experience and knowledge, unless they have been given supervision or instruction concerning use of the appliance by a person responsible for their safety.
6 Children should be supervised to ensure that they do not play with the appliance.
7 Never insert any items in the openings of the appliance and do not allow items to obstruct air flow.
8 Keep openings free from dust, fluff, hair, etc.
9 Never use the appliance without the filter.
10 Do not use to clean up hot items or any items that are giving off smoke or which are burning, such as cigarettes, matches or hot ash.
11 Never pick up flammable or combustible materials (volatile fluids, petrol, kerosene, etc.) or use where there are large amounts of water.
12 Never use the appliance in closed environments or where there might be fumes from oil-based paints and varnishes or solvents, waterproofing treatments, flammable powders or other toxic or explosive fumes.
13 Never pick up toxic materials (bleach, ammonia, drain cleaners, petrol, etc.).
14 NEVER PLACE THE APPLIANCE BODY, PLUG OR POWER CORD IN WATER OR OTHER LIQUIDS; ALWAYS WIPE CLEAN WITH A DAMP CLOTH.
15 SWITCH OFF THE APPLIANCE AFTER USE AND BEFORE FITTING OR REMOivating SINGLE PARTS AND BEFORE CLEANING.
16 Always make sure that your hands are thoroughly dry before using or adjusting the switches on the appliance, or before touching the power plug or power connections.
17 To unplug the appliance, grip the plug and remove it directly from the power socket. Never pull the power cord to unplug the appliance.
EN
18 Never use the appliance if the power cord or plug are damaged or if the appliance itself is faulty; in this case, take it to your nearest Authorised Assistance Centre.
19 To prevent any risks, if the power cord is damaged, it must be replaced by the manufacturer, its Technical Assistance Service or a similarly qualified person.
20 This appliance is designed for HOME USE ONLY and may not be used for commercial or industrial purposes.
21 This appliance conforms to the 2006/95/EC and EMC 2004/108/EC directives.
22 Any changes to this product that have not been expressly authorised by the manufacturer may lead to the user's guarantee being rendered null and void.
23 In the event that you decide to dispose of the appliance, we advise you to make it inoperative by cutting off the power cord. We also recommend that any parts that could be dangerous be rendered harmless, especially for children, who may play with the appliance or its parts.
24 Packaging must never be left within the reach of children since it is potentially dangerous.
DO NOT THROW AWAY THESE INSTRUCTIONS
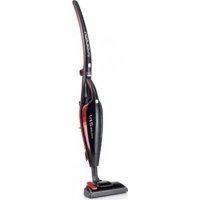
APPLIANCE DESCRIPTION (Fig. 1)
A Unlocking buttons
B ON/OFF button
C Removable body / handheld vacuum cleaner
D Filter
E Filter support
F Dust container
G Vacuum cleaner with brush
H Crevice nozzle
1 Selector for hard floors / carpets
L Brush for floors / carpets
M Appliance body
N Cord winder
The product works in two modes:
1 as a standard electric broom through the brush to clean carpets / floors (L) and, by tilting the appliance body (M) backwards, in the normal position for use,
2 as handheld vacuum cleaner, by taking off the removable part (C), suitable for cleaning surfaces and working table through the vacuum cleaner with the brush (G) or the crevice nozzle (H) in case of narrow spaces.
ATTACHMENTS
Brush for floors / carpets (L)
- Suitable for cleaning both of wide spaces and corners hard to reach.
- When cleaning carpets and though floors, never use the brush. The brush is equipped with wheels to facilitate the smoothness on every kind of surfaces. Select the required position of the bristles by pressing the lever at the end of the brush. To lift the brush, press the switch lever marked with the symbol of the carpet.
- For a better cleaning and keeping of the smooth floors, as PVC, parquet or tiles, it is recommended to use the brush. To remove the brush, press the switch lever marked with the symbol smooth floors.
- It cannot be removed from the appliance body (M).
Vacuum cleaner with brush (G) - for handheld vacuum cleaner only
Suitable for cleaning surfaces and working tables, as well as couches and fabrics.
Crevice nozzle (H) - for handheld vacuum cleaner only
Suitable for cleaning corners, crevices or areas hard to reach.
HOW TO OPERATE
- Plug the appliance into a mains power socket.
- With the handheld part (C) properly assembled in the appliance body (M), press the switching on button (B) situated on the removable body (C) and tilt the handle backwards in the standard position of use (Fig. 2).
- Clean the wide surfaces by pushing with the brush (L) forwards.
This allows the vacuum cleaner to collect the fragments and the dirt on the floor.
- For cleaning the corners and small surfaces, rotate the broom in the opposite direction. The fragments and dirt can be moved to be collected.
ATTENTION: switch the broom off immediately when something remains stuck inside the brush, as some fabric, carpet fringes, etc.
- After cleaning, switch the broom off by pressing the switching off button (B) once more.
Handheld vacuum cleaner
- By holding the handle of the appliance body (M), press the unlocking button (A) and remove the handheld vacuum cleaner complete with power cord (Fig. 3).
- At the end of the dust container (F), apply the required attachment (Fig. 4); press the switching on button (B) to start the appliance by means of the apposite handle (Fig. 5).
- For positioning the handheld vacuum cleaner back into the appliance body (M), remove the installed attachment first, by removing it outward and then position the end of the dust container (F) in the lower side of the apposite housing in the appliance body (M) and slightly push backward the handheld vacuum cleaner until it clicks into place (Fig. 6).
WARNING: Make sure the handheld vacuum cleaner is properly installed before proceeding with a new use.
CLEANING
- Clean the appliance body (M) and the removable body (C) by using only a damp cloth with mild detergent, if necessary.
Proceed with care to prevent any kind of liquid from getting into the appliance.
Never use strong cleaning agents (stain removers, solvents) that may corrode the plastic.
How to empty the dust container (F)
WARNING: Clean the dust container (F) and the filter (D) in due time. The suction power is reduced when the container is full or the filter is obstructed.
- From the back of the appliance, check whether the dust container (F) is full (Fig. 7).
- Remove the handheld vacuum cleaner as previously described.
- Press the unlocking button and remove the complete container (Fig. 8).
- Remove the filter (D) outwards (Fig. 9) and the related support (E) to clean them.
WARNING: Wash the filter (D) only with fresh water without using soap or detergents.
- Empty the dust container (A) into an apposite plastic bag and wash it with water, if necessary.
- Let the components dry and reassemble.
WARNING: Properly assemble the support (E), the filter (D), and the dust container (F) before starting the appliance.
- Reassemble the appliance and store it using the apposite rear cord winder (N) - Fig. 10.
INSTRUCTIONS IMPORTANTES
LIRE CES INSTRUCTIONS AVANT L'EMPLOI
BESCHRIJVING VAN HET APPARAAT (Fig. 1)
(B) (M) jLj (C) Joo (C)
L (L) 1
a 1 a
i 150000000000000000000000000000000000000000000000000000
.(B)JbJI JzIe biaIy aikai Jbi, jbiil Jsi
aegaaal aaisall
Jbckjzglalgokll (A) jz j z biz 2M) jz jy
J 1 J 1 J 1 J 1 J 1 J 1 J 1 J 1 J 1 J 1 J 1 J 1 J 1 J 1 J 1 J 1 J 1 J 1 J 1 J 1 J 1 J 1 J 1 J 1 J 1 J 1 J 1 J 1 J 1 J 1 J 1 J 1 J 1 J 1 J
1
J (F) 1 (D) 1 (E)
(1·J) (N) aaiiaaiaaii jlll 420 g jgj