
VXS205 - TV AIWA - Free user manual and instructions
Find the device manual for free VXS205 AIWA in PDF.
Frequently Asked Questions - VXS205 AIWA
Download the instructions for your TV in PDF format for free! Find your manual VXS205 - AIWA and take your electronic device back in hand. On this page are published all the documents necessary for the use of your device. VXS205 by AIWA.
USER MANUAL VXS205 AIWA
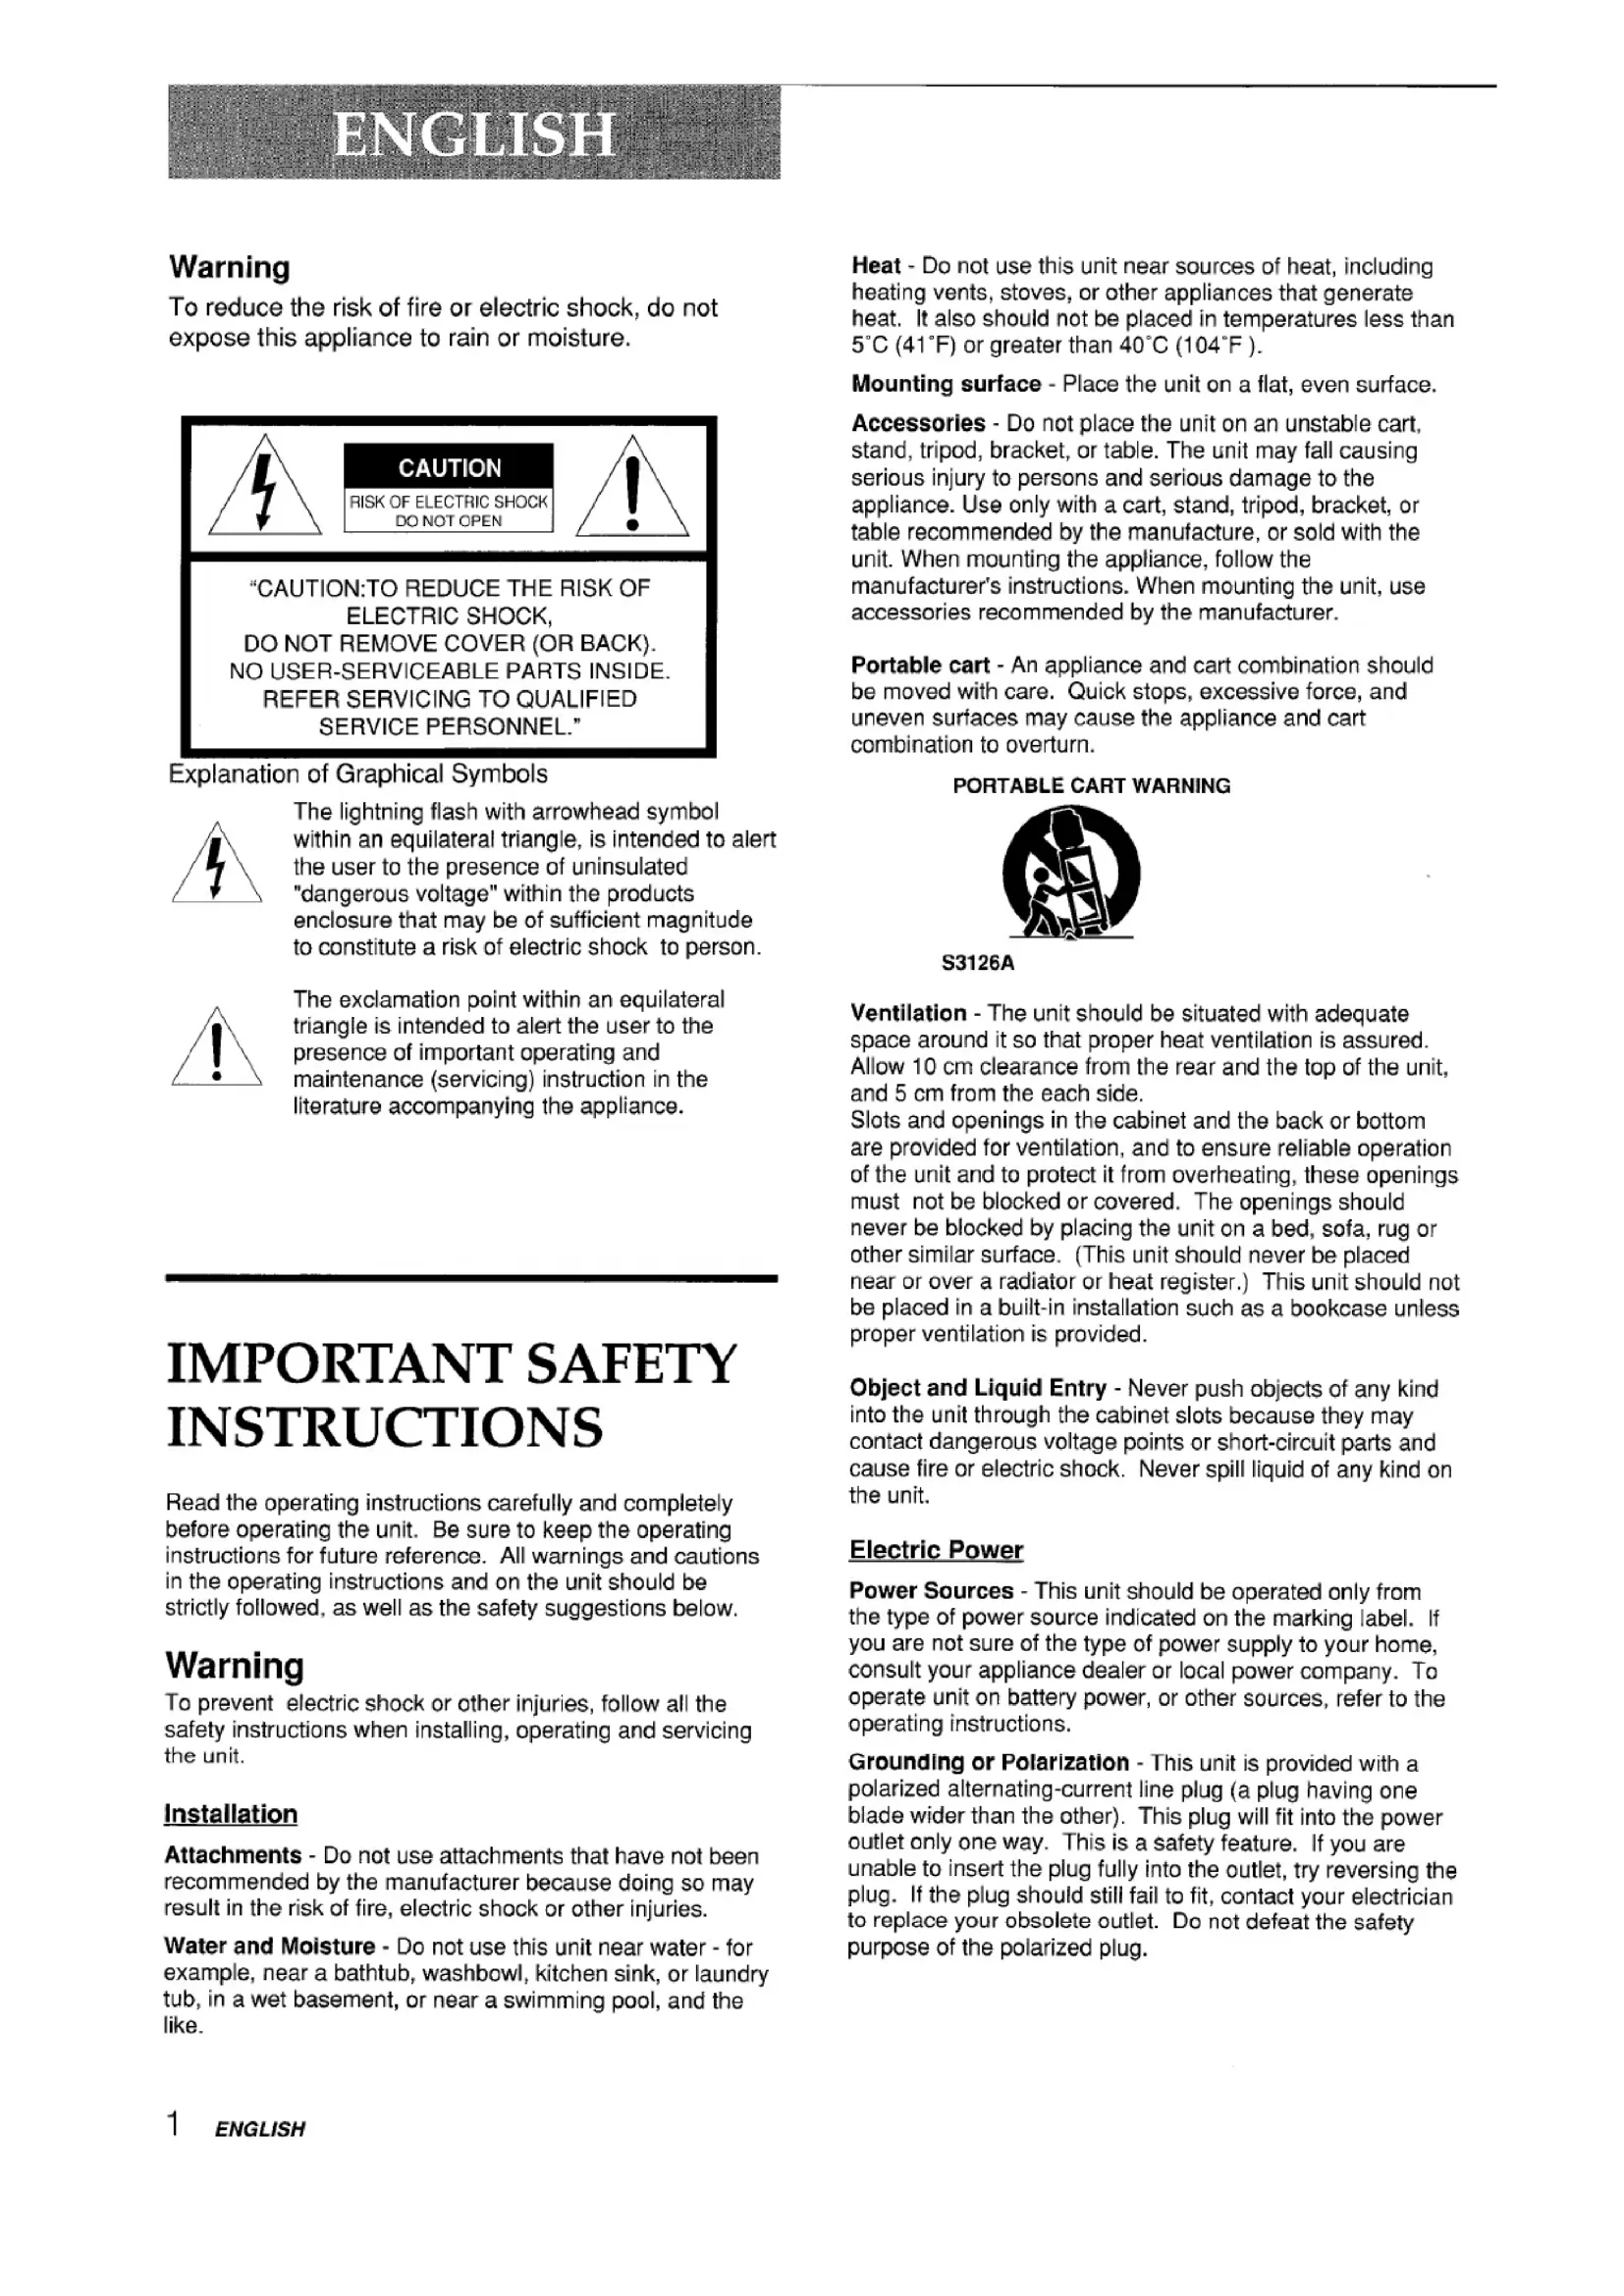
(United States and Puerto Rico) JWarning To reduce the risk of fire or electric shock, do not expose this appliance to rain or moisture. AmA
“CAUTION:TO REDUCE THE RISK OF
within an equilateral trianale, is intended to alert
/7/ the user to the presence of uninsulated “dangerous voltage” within the products enclosure that may be of sufficient magnitude to constitute a risk of electric shock to person.
The exclamation point within an equilateral triangle is intended to alert the user to the presence of important operating and
maintenance (servicing) instruction in the literature accompanying the appliance. IMPORTANT SAFETY INSTRUCTIONS Read the operating instructions carefully and completely before operating the unit. Be sure to keep the operating instructions for future reference. All warnings and cautions in the operating instructions and on the unit should be strictly followed, as well as the safety suggestions below. Warning To prevent electric shock or other injuries, follow all the safety instructions when installing, operating and servicing the unit.Installation Attachments - Do not use attachments that have not been recommended by the manufacturer because doing so may result in the risk of fire, electric shock or other injuries. Water and Moisture - Do not use this unit near water - for example, near a bathtub, washbowl, kitchen sink, or laundry tub, in a wet basement, or near a swimming pool, and thelike. Heat - Do not use this unit near sources of heat, including heating vents, stoves, or other appliances that generate heat. It also should not be placed in temperatures less than 5aC (41”F) or greater than 40°C (I04°F ). Mounting surface - Place the unit on a flat, even surface. Accessories - Do not place the unit on an unstable cart, stand, tripod, bracket, or table. The unit may fall causing serious injury to persons and serious damage to the appliance. Use only with a cart, stand, tripod, bracket, or table recommended by the manufacture, or sold with the unit. When mounting the appliance, follow the manufacturer’s instructions. When mounting the unit, use accessories recommended by the manufacturer. Portable cart - An appliance and cart combination should be moved with care. Quick stops, excessive force, and uneven surfaces may cause the appliance and cart combination to overturn.
PORTABLE CART WARNING
S3126A Ventilation - The unit should be situated with adequate space around it so that proper heat ventilation is assured. Allow 10 cm clearance from the rear and the top of the unit, and 5 cm from the each side. Slots and openings in the cabinet and the back or bottom are provided for ventilation, and to ensure reliable operation of the unit and to protect it from overheating, these openings must not be blocked or covered. The openings should never be blocked by placing the unit on a bed, sofa, rug or other similar surface. (This unit should never be placed near or over a radiator or heat register.) This unit should not be placed in a built-in installation such as a bookcase unless proper ventilation is provided. Object and Liquid Entry - Never push objects of any kind into the unit through the cabinet slots because they may contact dangerous voltage points or short-circuit parts and cause fire or electric shock. Never spill liquid of any kind on the unit.Electric Power Power Sources - This unit should be operated only from the type of power source indicated on the marking label. If you are not sure of the type of power supply to your home, consult your appliance dealer or local power company. To operate unit on battery power, or other sources, refer to the operating instructions. Grounding or Polarization - This unit is provided with a polarized alternating-current line plug (a plug having one blade wider than the other). This plug will fit into the power outlet only one way. This is a safety feature. If you are unable to inserf the plug fully into the outlet, try reversing the plug. If the plug should still fail to fit, contact your electrician to replace your obsolete outlet. Do not defeat the safety purpose of the polarized plug. 1 ENGLISHPower-cod Protection. The unit is provided with an attachment plug with overload protection. This IS a safety feature. See operating instructions for replacement or resetting of protective device. If replacement of the plug is required, be sure the service technician has used a replacement plug specified by the manufacturer that has the same overload protection as the original plug. CXmrloacting - Do not alk~w anything to rest on the power cord. Do not overload wall outlets and extension cords because this can result in fire or electric shock. Do not place the unit in an area where people will walk on the cord. Qildoor Antenna Power lines - An outside antenna system should not be located in the vicinity of overhead power lines or other electric light or power circuits, or where it can fall onto such power lines or circuits. When installing an outside antenna system, extreme care should be taken to avoid touching power lines or circuits because contact with them may be fatal. outdoor Antenna Grounding - [f an outside antenna or cable system is connected to the unit, be sure the antenna or cable system is grounded so as to provide some protection against voltage surges and built-up static charges. Section 810 of the National Electrical Code, ANS1/ NFPA No.70, provides information with regard to proper grounding of the mast anl~ supporting structure, grounding of the lead-in wire to an antenna discharge unit, size of grounding conductors, locatlon of antenna-discharge unit, connection to grounding electrodes, and requirements for the grounding electrode. See the figure. Antenna Grounding Acc xdlng to the National Electrical Cord
Lightning For added protection during a lightning storm, or when left uni~ttended and unused for long periods of time, unplug the unit from the wall outlet and disconnect the antenna or cable system. This will prevent damage to the unit due to lightning and powerlme surges.~&ntenancx3Cleaning - Unplug the unit from the wall outlet before cleaning. Do not use liquid cleaners or aerosol cleaners. Use a damp cloth for cleaning. Damaae Reauirirwt Service Unplug the unit from the wail outlet and refer servicing to qualified service personnel under the following conditions:
1) When the power cord or plug is damaged or frayed.
2) If liquid has been spilled into the unit.
3) If the unit has been exposed to rain or water.
4) If the unit does not operate normally when following
the operating instructions. Adjust only those controls that are covered by the operating instructions because Improper adjustment of other controls may result in damage to the unit and will often require extensive work by a qualified technician to restore the unit to normal operation.
5) If the unit has been dropped or the cabinet has been
6) When the unit exhibits a distinct change in
performance - this indicates a need for service. Do not attempt to service the unit yourself because opening or removing covers may expose you to high voltage or other hazards. Refer all servicing to qualified service personnel. Replacement Parts - When replacement parts are required, be sure the service technician has used replacement parts specified by the manufacturer or having the same characteristics as the original part. Unauthorized substitutions may result in fire, electric shock or other hazards. Safety Check - After completion of any service or repairs to the unit, ask the service technician to perform a safety check to ensure that the unit is in proper operating condition. Note to CATV system installer: This reminder is provided to call the CATV system installer’s attention to Article 820-40 of the NIEC that provides guidelines for proper grounding and, in particular, specifies that the cable ground should be connected to the grounding system of the building, as close to the point of cable entry as practical. OVUNER’SRECORD For your convenience, record the model number and serial number (you will find them on the rear of your set) in the space provided below. Please refer to them when you contact your AIWA dealer in case of difficulty. Model No.[—_–.]Serial No. ‘–”---1
ENGLISH 2#’----...— ---
Welcome Thank you for purchasing this AIWA product. To optimize the performance of this unit, please read through this operating instructions carefully. Main features of this unit VCR PIus+ system and One- Touch Playback You can easily set the timer with the VCR Plus+ system. The recorded TV programs can be played back quickly with One-Touch Playback. MTS (Multi-channel TV Sound) broadcast You can receive, record and play back stereo and bilingual TV programs. MBR (Multi Brand Remote control) The remote control can control the CATV converters of many manufacturers. V-chip An age limitation can be set to prevent children from viewing or listening to violent scenes or programs with adult content. This unit corresponds to “TV- RATING” and “MOVIE RATING.” Closed Caption The subtitles can be displayed on the screen when a broadcast corresponding to closed caption is received.
VCR Plus+ and PlusCode are registered trademarks of Gemstar DevelopmentCorporation. The VCR Plus+ system is manufactured under license from Gemstar DevelopmentCorporation. Table of contents Preparation Connecting the antenna ......................................4 Preparing the remote control
-AC cord hook z To AC outlet Connect the anteinna cable to the UHF/VHF connector on the unit. If the cable is a round-type 75-ohm coaxial cable, connect it directly to the UHF/VHF connector. [f the cable is a flat-type 300-ohm twin-lead cable, connect it to the antenna adaptor(supplied), and connect the adaptor to the UHF/VHF connector. When you use VX-S 135U, the antenna adaptor can be taken out from the supplied telescopic antenna. Connect the ACcord to the ACwall outlet after passing it through the AC cord hook. To use the security hook for safety (VX-S205 only) 1-0 prevent the unit from falling during earthquakes, etc., affix the unit to a wall or pillar with the security hook on the rear using the strong twine or wire. VX-S205Security hook CONTINUE “lI+Mw.-f3VGLlSH 4Connecting the antenna (Continued) To Connect the supplied telescopic antenna (VX-SI 35 only)
Antenna adaptor (Supplied)
Mount the supplied antenna in the antenna holder. Extend and adjust the ends of the antenna to get the best signal reception. @y&g For better reception, especially in outlying areas, or where ghosting or interference is a problem, use an external room-mounted antenna. 5 ENGLISHTo connect a CATV system without using a CATV converter VX-S135 CATV system
AC cord hook z To AC outlet ~ Connect the cable from the CATV system to the UHF/VHF connector on the unit. ~ Connect the AC cord to the AC wall outlet after passing it through the AC cord hook. TO Connect a CATV system using a CATV converter CATV system 75-ohm coaxial cable (not supplied) CATV converter (not supplied) [q&l
~AC cord hook (not supplied) Q=@——+ s To AC outlet ~ Connect the cable from the CATV system to the input connector on the CATV converter. ~ Connect the outputconnector on the converter to the UHF/VHF connector on the unit. ~ Connect the AC cord to the AC wall outlet after passing it through the AC cord hook. ENGLISH 6Preparing the remote control To prevent damage from leakage or explosion, follow the descriptions below. . Insert two supplied R03 (size AAA) batteries with the 0 and O marks correctly as illustrated. . Do not mix old batteries with new ones or different types of batteries. . Do not throw the batteries into a fire, apply heat to them or take them apart. . Do not carry the batteries with keys or other metallic objects. Remove the batteries when they have no more power, or when you do not use the remote control for a long period of time. Point the remote control toward the REMOTE SENSOR.
● The remote control may not operate when there is any obstruction between the remote control and the REMOTE SENSOR. ● Strong ambient light sources such as a fluorescent lamp or direct sunlight may cause unreliable operation. ● Using a TV with the same type of infrared remote control facing the same direction may cause incorrect operation. . The maximum distance for effective control between the remote control and the REMOTE SENSOR is 7 meters. ● Although you can use the remote control within an angle of up to 30 degrees in any direction from directly in front of the REMOTE SENSOR, we recommend a narrower angle for stable operation. The remote control can control the CATV converters for the CATV. To control CATV converters, set the manufacturer’s code number shown in the table on the next page.
POWER —Number —buttons— TV VCRICATV— PRESET— CHANNEL A/v Set the TV VCR/CATV selector to CATV. While holding PRESET, press the number buttonsto setthecodenumberreferringto the tableon the nextpage. Some manufacturers have more than one code number. If the remote control does not operate with the CATV after setting the code number, try another number. POWER, CHANNEL /VV and the number buttons on the remote control are activated. ● Due to the variety of codes used by manufacturers, AlWA cannot guarantee that the MBR remote control will operate with every model of the brands listed. ● The number buttons can be used only for channel selection, but they may not function correctly with some CATV converters. 7 ENGLISHSetting the language The on-screen menu can display three languages: CATV converter manufacturer Code numberiti:GRO [ 46A’RCHER 39 CABLEVIEW English, Spanish and French.TV VCRICATVCITIZEN
f!$!zz!?$l Some CATV converter manufacturers may not be listed above. Press SET/TRACKING +/- to select the desired language, then press ENTER. LANGUAGEIIDIOMAILANGUE>ENGLISHESPANOLFRANCAIS<+1-/ ENTER /hiRw> Press MENU twice to return to the normal screen.ENGLISH 8Setting the clock Set DAY, YEAR and hours in the same way as in step
Press and hold SET/TRACKING+/– to change the
You must set the date and time for timer recording. When you connect the AC cord to the AC wall outlet, the date and time will be set automatically if the unit receives the clock adjustment signal. If the unit cannot receive the clock adjustment signal or reception signal is weak, the unit may set the clock incorrectly. In this case, you must set the setting rapidly. CLOCK SETMONTH 6 DAY 20(SUN) YEAR TIME L999 -lo?@OAM Jt~ time manually.<+/-/ ENTER/CANCEL/MENU>TV VCRICATV Press SET/TRACKING +/- to set the minutes. Press and hold SET/TRACKING+/– to change the setting rapidly.CLOCK SETMONTH 6 DAY 20(SUN) YEAR i q9P/ TIME 1.?K3&4M ~t~
<+/-/ ENTECANCELEMENU>U>MENU —SET/TRACKING —
+1- Before starting— ENTER—CANCEL Press ENTER to start the clock. The normal screen returns. To correct the digits while setting Before pressing ENTER-in step 7, press CANCEL repeatedly until the item you want to correct flashes. Reset the digits using SET/TRACKING +/–. Set the TV VCR/CATV selector to TV VCR.
Press MENU. If the clock is not set, SYSTEM SET-UP menu in step 3 appears. When the power supply is interrupted for more than 5 seconds, the clock setting is cleared. In this case, you have to set the clock again. Press SET/TRACKING +/- to select SYSTEM SET-UP, then press ENTER. The date can be set from A.D.1 990 to A.D. 2081.
The unit automatically corrects the clock setting once you set AUTO CLOCK to ON. After unpacking the unit, AUTO CLOCK is set to ON. If AUTO CLOCK is set to OFF, follow the procedures below. Press SET/TRACKING +/- to select CLOCK SET, then press ENTER.\$YSTEM SET-UP■43LOCK SETb} ANGUAGE/IDIOMA/LANGUE
Press SET/TRACKING +/- to set MONTH, then press ENTER. The day of the week will automatically appear.
*’sTANDARD TIMEmDAYLIGHT SAVING TIME When you move to a different area of the country, you can adjust the clock only with selecting your new area.
mTV SET-UPmcH SET-UP
.,EI}UTO REPEA1” ON }OFF
>~$iYSTEM SET-UPI <+/-/ENTEMEWJ)J) I F’ress SET/TRACKING+/- to select DAYLIGHT SAVING TIME, then press ENTER.
Press MENU 3 times to return to the normal screen.
F%’essSET/TRACKING+/- to select AUTO, then press ENTER.Normally the AUTO setting is sufficient. If you set it to ON, you can advance the time by one hour manually.
OFF kAUTO<+1- iENTERIME14u> ~ F’ress MENU 3 times to return to the normal screen. ENGLISH 10Setting the channels b Press MENU twice to return to the nomal screen. Before Auto Channel Memory, this unit can receive all channels in your area by pressing CHANNEL A/V repeatedly. After Auto Channel Memory, you can skip the channels which are not preset with CHANNEL A/V.
Before starting ● Make sure the unit is in TV mode. ● Set the TV VC RICATV selector to TV
Once you conduct the Auto Channel Memory, the previous settings will be canceled. If the Auto Channel Memory does not set the channels correctly, add them manually for watching TV programs. Also, you can erase the unnecessary channels.
Press SET/TRACKING +/- to select ADD/DELETE, then press ENTER. CH SET-UPm TV }CATV@)UTO CH MEMORYE~DD/DELETE*%UIDE CH SET<+/-/ ENTEMENU>U> Press SET/lRACKING +/-to select the channel number to be erased or added. When the selected channel is already set, ADD appears in green. When it is not set, DEL appears in red.
Ail available channels in your area are scanned and stored in the memory of the unit. After scanning, CH SET-UP menu appears on the screen. 1I ENGLISHChecking the channel set-up to use VCR Plus+ svstem Before starting Set the TV VCR/CATV selector to TV VCR.
Press MENU. Press SET/TRACKING+/- to select CH SET-UP, then press ENTER. To set the timer using VCR Plus+ system, you have to check whether the VCR chanr,el numbers match the guide channels which are assigned to the TV stations. If they do not match, the VCR PIus+ system does not function correctly. In thi:; case, coordinate the number. MENU
nTIMER REC SET>ll;V SET-UP;m~@HSET. UFItiT-lUTO REPEAT ON FOFFmSYSTEM SET-UPTV VCR/CATVNumberbuttons Press SET/TRACKING+/- to select GUIDE CH SET, then press ENTER.CH SET-UP■ TV XAT\/
l?/ADD/DELETE~~UIDE CH SETMENU --SET,TRACKING -- +1– –- ENTER— CANCEL<+/-/ ENTEMENU)U) Press SET/TRACKING+/- or the number buttons to select GUIDE CH 6’38,’”then press ENTER. When selecting the number between 10 and 19 using the number buttons, press Oonce to enter the hundreds digit, and then press the buttons 1 through 9 to enter tens and ones digits. When selecting the numbers less than 10 using the number buttons, press Otwice to enter the hundreds and tens digits, and then press the buttons 1 through 9 to For example For each channel your VCR receives, use the channel line UIOchart to check that the channel numbers match. For example, SHOWTIME is listed in the channel line up chart (uncler the VCR F)lus+ Code) as channel 38, your VCR receives SHOWTIME on channel 14, you need to coordinate these numbers b!! Iocatmg guide channel 38 (under GUIDE CH). Next enter your SHOWTIME channel 14 (under VCR CH) Continue this process until all channels match. Sample Channel Line Up Chart enter the ones digit.GUIDE CH SETGUIDE VCRCH CH\~ld,“>o:ly - I <0-91+1-ENTERMENU>‘TV !Staticm VCR PIUS+ LocalCableCompany Code ChannelNumber-———— \NCBS New York CB!3 02 02 5 Press SET/TRACKING+/- or the number buttons to display CHANNEL “14,” then press ENTER. When you use the number buttons, select the number in WNBC New York NBC 04 04 \NNYW New York NY’N 05 05 the same way as in step 4.
CNBC ConsumerNews8 Business 23
Repeat steps 4 and 5 until all necessary channel numbers are set. [)1s Disney Chanrel53 27 MAX ~inemax
● Channel Guide listings are available in your local TV Guide and Newspaper. Press MENU 3 times to return to the normal screen..’fjp To cancel the VCR CH setting, press CANCEL in step 5. ENGLISH ~ 2Watchirw a TV txo~ram POWERNumberbuttonsMUTINGVOLUME +/–VX-S135SLEEPPREV. CHCHANNEL Alv
Press CHANNEL A/V repeatedly or the number buttons to select the channel number. To select CATV broadcast using the number buttons When selecting the number between 10 and 19, press O once to enter the hundreds digit, and then press the buttons 1 through 9 to enter tens and ones digits. When selecting the numbers less than 10, press Otwice to enter the hundreds and tens digits, and then press the buttons 1 through 9 to enter the ones digit. To select VHF/UHF broadcast using the number buttons When selecting the numbers less than 10, press Oto enter the tens digits, and then press the buttons 1 through 9 to enter the ones digit.
Press VOLUME +/-to adjust the volume. To turn off the TV Press POWER. To mute the volume Press MUTING. To restore the volume, press MUTING or VOLUME +/–. To recall a previous channel Press PREV.CH to switch back and forth between the current channel number and the previous one. To listen through the headphone, insert a headphone (not supplied) with a stereo mini plug into the headphone jack on the front. The sound from the TV speaker is muted. The power automatically turns off approximately 15 minutes after a television station has stopped broadcasting. Press SLEEP repeatedly to select the number of minutes after which to turn off. The minutes change in 10-minute intervals, down from 120 minutes. After the set amount of time has elapsed, the unit turns the power off. SLEEP
A/v jack To check the remaining sleep time Press SLEEP once. The remaining time appears on the screen. To cancel the sleep timer Press SLEEP repeatedly until “SLEEP O“ appears. 13 ENG/../SH%lectimz the closed cantions <2 1 ● After selecting a closed caption mode, it will stay in effect mode until it is changed, even if the channel is changed.
● If the captions signal is lost due to a commercial or a break in the signal, the captions will reappear when the signal is This unit can decode and display closed captioned received again.television programs orti3p&3. ● When selecting closed captions, the captioning might be delayed momentarily. ● If the channels are changed, the captions might be delayed momentarily. “ If using an indoor antenna or if TV reception is very poor, the closed caption decoder text may not appear. In this case, adjust the antenna for better reception or use an outdoor antenna.CAPTION oWhen activating the closed captioned decoder, there will be a short delay before the closed captioned text appears on the screen. . The captions will appear in places on the screen where they will least interfere with the picture, usually on the bottom of the screen. News programs will usually show three-line closed captions which scroll onto the screen. Most other shows provide two c)rthree lined captions placed near the character who is speaking so the viewer can follow the dialogue. ● If no caption signal is received, no captions will appear, but the television will remain in the caption mode. . Misspellings or unusual characters may occasionally appear during closed captioning. This is normal with closed captioning, entered live. These transmissions do not allow time for editina. Pre:;s CAPTION repeatedly to select the caption
modem r—- oWhen caption; are being displayed, on-screen displays, L-1 CAPTION CH1 The display changes as follows:
~– NrJdisplay +TEXT CH24 TEXT CHI ~ (Caption off)Captions: This closed caption mode displays text on the screen in English or another language. Generally, closed captions in Englllsh are transmitted on CAPTION CHI and closed captions in other Iangua!ges are transmitted on CAPTION CH2.
such as volume and mute may not be seen or may interfere with closed captions. Some cable systems and copy protection systems may interfere with the closed captioned signal. Words in italics or underlined describe titles, words in foreign languages or words requiring emphasis. Words that are sung usually appear enclosed by musical notes. For television programs broadcasting with closed captions, look in your TV guide for the closed captions symbol (CC). Full Screen Text: The ‘text closed caption mode TEXT CH1, TEXT CH2 will us,ually fill the screen with a programming schedule or other information.ENGLISH 14Adjusting the picture You can adiust the picture settings for brightness, contrast, color, tint and sharpness.MENU —SET/TRACKING — +1–
Before starting Set the TV VCRICATV selector to TV VCR.
MENU BTIMER REC SETk7W SET-UPhyH SET-UP
BRIGHTNESS <+/-/ ENTEcANcELEMENu>u> 5 Press SET/TRACKING +/-to adjust the setting. After several seconds from releasing the button, the display returns to the normal screen. Item Increasing theDecreasing thenumbersnumbersBRIGHTNESS makes the picturemakes the picturebrighterdarkerCONTRAST enhances thelowers the contrastcontrastCOLORenhances thelowers the intensity intensity and and brilliance of the brilliance of the color color TINT makes the flesh tone makes the flesh greener tone redderSHARPNESS makes the picturemakes the pictureclearersofterBRIGHTNESS
To adjust the other item, complete steps 4 through 5. Press MENU 3 times to return to the normal screen. Tip To reset all the items to the initial setting, press CANCEL in step 5. 15 ENGLISHAdjusting tlhe sound
You can adjust the settings for bass sound, treble sound and the balance of the sound.
MENU —SE;T/TRACKING —
+f- t3efore startingTV VCR/CATV— ENTER— CANCEL
Set the TV VCRICATV selector to TV VCR.
BALANCE 1 Press SET/TRACKING +/- to adjust the setting. After a few seconds from releasing the button, the display returns to the normal screen. Item Increasing theDecreasing thenumbersnumbers BASS makes the bassmakes the basssouncl strongersound weaker TREBLE makes the treble makes the treble sound strongersound weaker BALANCE makes the output makes the output level of right speaker level of left speaker strongerstronger BASS
Once this timer is set, the unit turns on at the programmed time to the programmed channel. (r’
SET/TRACKINGm am +1– Vx-sl TV VCRICATVENTERON-TIMERindicatorBefore starting ● Check that the clock is set correctly. ● Set the TV VCR/CATV selector to TV VCR.
Press SET/TRACKING +/- to select a kind of timer, then press ENTER. MON-FRI: Daily program from Monday to Friday. MON-SAT: Daily program from Monday to Saturday. SUN-SAT: Daily program from Sunday to Saturday. WKL-day of the week: Weekly program such as every Sunday, ON/OFF TIMERION TIMER~2J:CiOiAl$l.+4H023‘SUN-SAT—~li!l~CANCELI OFF TIMER12:OOAMCANCEL<+/-/ ENTEc ANcELEMENu>u><+/-/ ENTER/MENU> 17 ENGLISHPress SET/TRACKING +/- to display SET, then press ENTER. CIN-TIMER indicator on the unit lights,
ON/OFF TIMERION TIMER12:30AM CH02~ \ IZSUN–SAT ‘SET– /f\\ ■ OFF TIMER12:OOAM CANCEL<+/-/ ENTEc ANcELEMENu>u> ~~P’ress MENU 3 times to return to the normal screen. ● At the programmed time, the channel is changed to a programmed one. ● You can turn the urit off. The unit automatically turns on to a programmed channel at the programmed time. To (correct the data while setting Before pressing ENTER in step 9, press CANCEL repeatedly until the item you want to correct flashes. Reset the data using SET/TRACKING +/–. Tips
If you want to watch the program through the line input, press SET/TRACKING +/- to display “LINE1” (from AUDIO/ VIDEO IN jacks on the rear) or “LINE2” (from AUDIO/VIDEO IN jacks on the front) in step 7, instead of the channel number. ● Tc)cancel the On-Timer, follow the steps 1 through 4. Then press ENTER repeatedly until SET flashes and press SET/ TRACKING +/– to display CANCEL. ● To confirm the setting, follow the steps 1 through 3. Press MENU 3 times to return to the normal screen. oThe unit automatically turns off one hour after the On-Timer turns on the unit if no C}ff-Timer has been set (one hour automatic shut off). TCIcontinue watching the TV, press any bUttOfItOCatICd this fUnCtiOtI.gjj!!J!# ● If the power has been lurned on at a programmed time, the one hour automatic shut off function does not work. ● If you have played back a tape at a programmed time, the channel is not changecl. Setting the Off-Timer Once this timer is set, the unit turns off everyday at the programmed time.MENU –—SET~RACKING +f– Before startingTV VCRICATVENTER ● Check that the clock is set correctly. ● Set the TV VCR/CAW selector to TV VCR. ~ Press MENU. 2 press SET/TRA,CKING +/- to select TV SET-UP, then press ENTER.
Press MENU 3 times to return to the normal screen. The unit automatically turns off at the programmed time. To correct the data while setting Before pressing ENTER in step 7, press CANCEL repeatedly until the item you want to correct flashes. Reset the data using SET/TRACKING +/–. $#ps +To cancel the Off-Timer, follow the steps 1 through 4. Then press ENTER repeatedly until SET flashes and press SET/ TRACKING +/– to display CANCEL. ● To confirm the setting, follow the step 1 through 3. Press MENU 3 times to return to the normal screen. Plavimz back a ta~e 44 REWl@ —SET/TRACKING — +1–
● The power turns on automatically. ● Playback starts immediately if the erasure prevention tab has been removed from the cassette. z Press - PLAY to start playback. To stop playback Press ■ STOP on the remote control or WA STOP/ EJECT on the unit. 19 ENGLISHam%% ● When the tape reaches the end during playback, fast- fcxward or forward search, the unit automatically rewinds the tape to the beginning and ejects the cassette. (Auto rewind function) ● The unit selects the tape speed, SP, LP or SLP(EP.) ● The power is turned on and playback is started when ~ PLAY is pressed during power off. Although the unit adjusts the tracking automatically, you may need to adjust the tracking manually if the tape quality is too poor. If the picture and the sound have noise, try manual tracking. ‘To adjust the tracking manually During playback, press SET/TRACKING +/– repeatedly until you get the best possible picture. (Automatic Tracking is canceled and “MANUAL TR.” and tracking bar appear.) To return to auta)matic tracking Press ATR. “AUTO TR.” appears. AD-SKIP
still during playback or E PLAY. Fast-forward the - F FWD during _ tape stop Rewind the tape 44 REW during _ Stoll Eject the 4 EJECT on the cassette remote control or
~Top/EJEcT on the unit during Ston Search forward - F FWD once Press - PLAY. at low speed during playback Search forward - F FWD twice Press b PLAY. at a higher during playback speed Search reverse 44 REW once Press - PLAY. at low speed during playback Search reverse - REW twice Press - PLAY. at a higher during playback speed
You can switch the speed of forward and reverse searches by pressing > F FWD and 44 REW repeatedly. ENGLISH 20Playing back a tape (continued) To watch a picture of the tape during fast- forward or rewind — skip search Press and hold - F FWD or 4 REW during fast- forward or rewind. The unit switches forward or reverse search. Release the button to return to the fast-forward or rewind mode. To skip an advertisement Press AD-SKIP during playback. The VCR searches forward approximately 30 seconds of the recorded time. Each press changes the recorded time of forward search in 30 seconds increments to a maximum of 3 minutes. After forward search, VCR returns to the normal playback. During AD-SKIP, the counter does not register blank portions with no recorded signal. To monitor a TV program Press TV MONITOR during playback. The cassette continues to play while the picture switches to TV channel. Press TV MON ITOR again to return to playback picture. .=..$“~jps ● Even if you press A EJECT on the remote control or WA STOP/EJECT on the unit while the power is off, the unit ejects the cassette. ● Depending on the tape, noise lines may appear or color may fade during forward and reverse searches, and still. You can move the noise lines during forward and reverse searches by pressing SET/TRACKING +/– repeatedly.
● If a still picture lasts for more than 5 minutes, the unit will automatically enter playback mode to protect the tape. . The sound will be muted during forward and reverse searches, and still.POWER MENU SET/TRACKING +1- TV VCRICATVmPLAY ● REC/OTR ENTERBefore starting Set the TV VCR/CATV selector to TV VCR.
*Y5YSTEM SET-UP<+1-j ENTER/MENU> Press ENTER to select ON. OFF <+(-/ ENTERfMENU> Press MENU to return to the normal screen. Press F PLAY. The unit plays back the tape to the end, rewinds to the beginning, then repeats playback. To cancel repeat playback Press ENTER to select OFF in step 3. Repeat playback will also be canceled by pressing POWER or ● REC/OTR, using the Zero Return function or ejecting the cassette. 21 ENGLISHVarious search functions INDEX —-RESET —-ZERO- ----RETURNNW REWl@ —–TV VCR/CATV— Numberbuttons (1-9)— CALL — -F FWDl@—-ESTOP The unit automatically marks an index signal on the tape each time recording starts. You can use these signals to find the beginning of any recording. Before starting Set the TV VCR/CATV selector to TV VCR.
Press INDEX during stop or playback. Press the number buttams(l -9) to select the index number (up to 9).
0123:45 SP Press RESET at the point you want to locate later.
Press > F FW[) (for succeeding programs) or 4-4 REW (for preceding programs). The unit starts searching!. Playback starts automahcally from the beginning c)fthe specified recording. To search the next index signal Press INDEX during stop or playback, then press *- F FWD or - REW. When the next index signal is found, playback starts automatically. The tape counter resets to “00:00:00.”
00:00:00 SP After playback or recording, press ❑ STOP, then ;~ER().RETURN, The tape automatically stops when the tape counter returns to about “00:00:00.” ● Index signals should be at least 2 minutes apart. Otherwise, the unit cannot detect them properly. . Index signals may not be cjetected on damaged or worn out tapes. ● Index signal at the beginning of a recorded tape may [notbe detected. ● Index signal may not be detected if it is extremely close to the point where the search began. ● When you insert a cassette, the tape counter is reset to “00:00:00.” ● The tape counter does not work while playing unrecorded portions of tape. ENGLISH 2:2Recording a TV txomam NumberbuttonsTAPE SPEED
m an VX-S135TV VCR/CATV— TV/LINE— CHANNELA/V—OREC/OTR— II PAUSE/STILL ■ STOPREC/OTR indicator CHANNEL/WV¤/=ST~p/● REC/OTREJECTBefore starting Set the TV VCRICATV selector to TV VCR. ~ Insert a cassettewith its erasure prevention tabin place. The power turns on automatically. VX-S135 2 Press TAPE SPEED to select the tape speed, SP, LP or SLP.
00:0000 SP 3 Press CHANNEL /W~ repeatedly or the number buttons to select the channel number to record. To select CATV broadcast using the number buttons When selecting the number between 10 and 19, press O once to enter the hundreds digit, and then press the buttons 1 through 9 to enter tens and ones digits. When selecting the numbers less than 10, press Otwice to enter the hundreds and tens digits, and then press the buttons 1 through 9 to enter the ones digit. To select VHF/UHF broadcast using the number buttons When selecting the numbers less than 10, press Oto enter the tens digits, and then press the buttons 1 through 9 to enter the ones digit.
Press ● REC/OTR to start recording.
“INDEX flashes for a few seconds. See page ● The REC/OTR indicator on the unit lights.
To stop recording Press ■ ‘STOP on the r;mote control or ■/4 STOP/ EJECT on the unit. To pause recording Press 11 PAUSE/STILL. The REC/OTR indicator on the unit flashes. To resume recording, press II PAUSE/STILL or ● REC/ OTR. To prevent an accidental recording Break off the erasure prevention tab on the back edge of the cassette. To record over the tape again, cover the gap with adhesive tape. Adhesive tape Erasure prevention tab If you want to record the program through the line input, press CHANNEL A/V or TV/LINE to display “LINEI” (from the AUDIO/VIDEO IN jacks on the rear) or ‘(LINE2° (from the AUDIO/VIDEO IN jacks on the front) in step 3. . The channel cannot be changed during recording. ● If you try to record on a cassette without its erasure prevention tab, the unit will eject the cassette. ● If recording pause lasts for more than 5 minutes, the unit will automatically enter stop mode to protect the tape. ● If the power is turned off during recording, the TV turns off, but the VCR continues to record. SLP provides three as much recording time as SP, LP provides twice as much recording time as SP, although SP produces better picture and audio sounds. 23 ENGLISHRecording with One-Touch Recording Using One-Touch Playback after VCR Plus+ system (page
25) or manual timer recc}rding (page 27) is convenient. You
can make timer recordings and play back only the portion you just recorded with the timer by pressing a single button later.
OTPB ONE-TOUCH PLAYBACK Stop recording (when recording without timer). ONE-TOUCH PLAYHACK on the unit lights. If another operation button is pressed after you stop recording, One-Touch Playback will be canceled. Press ONE-TOUCH PLAYBACK on the unit or OTPB cm the remote contlrol. The tape rewinds to the start of the recorded portion and begins playback. When you set the timer for more than two timer programs The unit starts playing back from the earliest one when you use One-Touch Playback. To find the beginning of the second (or later) program, use Index Search (page 22). One-Touch Playback does not work for recordings of less than 1 minute 30 seconds. You can immediately start recording the current channel for a specified time with One-Touch Recording. VX-S135
--- ORECIOTR ,STOP // .. ..L\ TIMER REC indicator OREC/OTR ❑l/A STOP/EJECT Before starting ● Insert a cassette with its erasure prevention tab in place. Make sure the tape is longer than the recording time, ● Select the channel tc) record and tape speed. ~ Press O REC/CITR. The unit starts recording, ~ Press O RECK3TR repeatedly to set the recording duration. Each press changes the recording duration on the screen in the following way: 0:30-1 :00+1 ::30+ 2:0043:00
normal recording-– 5:00 ~4:00- After the set amount of time has elapsed, the recording stops.Recordimz with One-Touch Recording (continued) To stop recording Press ■ STOP on the remote control or WA STOP/ EJECT on the unit. To extend the recording duration while recording Press ● REC/OTR until the new duration you want appears on the screen. To confirm the remaining time of recording, press ● REC/OTR once during One-Touch Recording. Setting the timer with VCR Plus+ svstem You can greatly simplify timer recordings with VCR Plus+ system. Just enter the VCR Plus+ programming number, a number assigned to each TV program, and the unit will set the timer recording automatically. You can find VCR Plus+ programming number in most TV guide magazines. You can setup to 8 programs. - VCR PLUS+ ● If the power is turned off during One-Touch Recording, the TV turns off, but the VCR continues to record. . During One-Touch Recording, when the tape reaches the end, the TIMER REC indicator on the unit flashes.
MENU —SET/TRACKING —
+1– Before startingTV VCRICATV— number buttons— T-REC— ENTER— CANCEL ● Check that the clock is set correctlv. ● Check that the channel numbers match the guide channels which assigned to the TV stations. See page 12. ● Inserl a cassette with its erasure prevention tab in place. ● Set the TV VCR/CATV selector to TV VCR. ●lf the CATV converter is used for the timer recording, check that the CATV converter is turned on and the channel you want to record is selected.
Press SET/TRACl<lNG +/-to select ONCE, DAILY or WEEKL,Y. recordSelecta single program ONCE daily programDAILY(See right)weekly program such as every Monday (WKL-MOIN)WEEKLYPress ENTER. ● The following tirmer information appears on the screen. ● If you want to change the setting here, see on the right.PLUSCODE 123------\l;\\/DATE –2l(MON)-START z b:3d PM~ END 7:OOPM
SPEED SP<+1-l ENTERlcANcIzLIMENu> Press ENTER repeatedly until the tape speed flashes, then press SET/TRACKING +/- to select SP, LP or !3LP. r7inia
<+/-/ ENTECANCI:L:fWW J>J> Press MENU twice to return to the normal screen.PressT-REC. oThe TIMER REC irldicator on the unit lights, and the unit stands by for timer recording. o If the TIMER REC indicator does not light, a cassette is not inserted. oThe cassette is ejected if the cassette’s erasure prevention tab has been removed. oYou can turn the unit off. The unit automatically starts recording at the programmed time. To cancel a program Select TIMER REC SET in the menu. Then press SET/ l-RACKING +/– to select the unnecessary program, and press CANCEL. If the program overlaps another The overlapped portions will be deleted. The program Iistecl first on the timer program setting screen has priority c~ver the succeeding program as illustrated.
Program 1 -Program 2 -Program 3 +Actual recordedpotiions ‘“+00 Prog.1 Prog.2Prog.3 ● If “PROGRAM FULL flashes and the timer program list on step 1, 8 programs are already set, Cancel an unnecessary program. oTo confirm the setting, select TIMER REC SET in the menu to display the timer program list. Press MENU twice tc)return to the normal screen. . When the power supply is interrupted for more than 5 seconds, the preset program is cleared. In this case, you have to set the clock and the timer again. az%?s During timer recording, when the tape reaches the end, the TIMER REC indicator on the unit flashes. To set the daily program In step 4, press SET/TRACKING+/– repeatedly to display the desired daily program as follow: MON-FRI :Monday to Friday MON-SAT : Monday to Saturday SUN - SAT: Everyday
To extend the recording time After step 4, press ENTER repeatedly until the end time flashes, then press SET/TRACKING +/– to change the setting. When the TIMER REC indicator on the unit lights, the tape functions are not operable. To operate the others, press T-REC. However, remember to press it again to activate timer recordings.ENGLISH 26Setting the timer manuallv If you cannot use VCR PLUS+ system, you can set the timer manually. You can set up to 8 programs within one month of the current date.MENU —SET/TRACKING — +1- Before starting- TV VCRICATV- T-REC- ENTER- CANCEL oCheck that the clock is set correctly. ● Insert a cassette with its erasure prevention tab in place. ● Set the TV VCR/CATV selector to TV VCR. c If the CATV converter is used for the timer recording, check that the CATV converter is turned on and the channel you want to record is selected.
Press SETiTRACKING +/-to select the line on which no program has been set, then press ENTER.
Press SET/TRACKING +/- to set the date, then press ENTER. If you want to set daily/weekly recordings, see on the right.
Set the start time (hours and minutes), the end time (hours and minutes), the channel number and the tape speed in the same way as in step 4. ● To change the minutes setting in ten minutes, press and hold SET/TRACKING +/–. ● The timer program list appears. If you want to set another program, repeat steps 3 through 5. Press MENU twice to return to the normal screen. Press T-REC. ● The TIMER REC indicator on the unit lights, and the unit stands by for timer recording. ● If the TIMER REC indicator does not light, a cassette is not inserted. ● The cassette is ejected if the cassette’s erasure prevention tab has been removed. ● You can turn the unit off. The unit automatically starts recording at the programmed time. To set the daily/weekly timer In step 4, press SET/TRACKING – repeatedly before pressing ENTER. The setting changes as follows: Example The current day (Sunday) - SUN-SAT (Sunday to Saturday)
MON-SAT (Monday to Saturday)
One month laterminus two days One month laterminus one days MON-FRI (~onday to Friday) WKL-SAT (Every Saturday) WKL-FRI (Evety Friday)
Press SET/TRACKING + to change the display in reverse order.After setting, press ENTER. To cancel a program Select TIMER REC SET in the menu. And press SET/ Tracking+/– to select the unnecessary program, then press CANCEL. (,@p, ● If you want to record the program through the line input, press SET/TRACKING +/– to display “LI” (from the AUDIO/ VIDEO IN jacks on the rear) or “L2 (from the AUDIO/VIDEO IN jacks on the front) in step 5 instead of the channel number. ● To confirm the setting, select TIMER REC SET in the menu to display the timer program list. Press MENU twice to return to the normal screen. ● When the power supply is interrupted for more than 5 seconds, the preset program is cleared. In this case, you have to set the clock and timer again.
When the TIMER REC indicator lights, the tape functions are not operable. To operate the others, press T-REC. However, remember to press it again to activate timer recordings. 27 ENGLISHDubbing VX-SI 35 (Front)
To audio/video output jacks Another VCR(Player) oIf the other VCR is monaural type, connect one of the audllo plugs only to AUDIO IN L(MONO.) o If you use this VCR for playback, connect the AUDIO/VIDEO OUT jacks on this VCR and the audio/video input jacks on the recording VCR. W—-
Insert a pre-recordedl source cassette into another (playback) VCR. Insert a blank cassette with its erasure prevention tab in place into your VX-S2(D5/ S135(recording.) Press TV/LINfE repeatedly to display “LINE1 “(rear) or “LlNE2’’(front) on the screen. Set the other VCR to play back. Press ● REC/CfTR on the recording unit. ENGLISH 28Settimz the V-chi~ An age limitation can be set to prevent children from viewing or listening to violent scenes or programs with adult content. This unit corresponds to “TV-RATING” and “MOVIE RATING.” To use the V-chip function, register a password at first. Number buttons MENU — SET/TRACKING —
— ENTER — CANCEL Set the TV VCR/CATV selector to TV VCR. You cannot set the V-chip if you forget the password. We recommend you write down the password and keep it in a safe place in case you forget it.
K Enter the same password again for the safety, then “ press ENTER.
z Press SET/TRACKING +/-to display the desired setting. ● When the following programs are received, they are protected from display according to the selected setting. OFF: TV RATING is not set. TV-Y: Programs except for ones for infants TV-Y7: Programs for those older than 7 TV-G: Programs except for ones for children TV-PG: Programs not proper for infants TV-14: Programs not proper for children under 14 years old TV-MA: Programs forbidden children under 17 years old V-CHIP SETnV–CHIP
● “CALL TO SET CONTENTS” may armear according to the selected setting. If the message ‘appears, press- CALL to display the TV RATING sub menu. If not, go to step 5. s Press SET/TRACKING +/-to select the sub menu item, then press ENTER to select ON or OFF. cWhen TV-Y7 is selected, the item below appears.
{$4NTAsY vIoLENcE :OFF
● When TV-PG or TV-14 is selected, the items below appear.
RATING SET :W-PGkOLENCEhkEXUAL situations ;:K
0When TV-MA is selected, the items below appear.
Press MENU to retu lrn to the V-CHIP SET menu. Press ENTER, and press SET/TRACKING +/– to select MOVIE RATING, then press ENTER. V–CHIP SETMV-CHIP :OFF,U/TV RATING :N-Y ;E,.tilOVIE RATIN13 :OFF PCHANGE pAsswoRD<+1-i ENTERIMEI\Iu> Press SET/TRACKll\lG +/-to display the desired setting, then press ENTER. When the following movies are received, they are protected OFF:
from display according to the selected setting. MOVIE RATING is not set. Movies with no age limit Movies not proper for children Movies not proper for children of 13 years old and younger Movies those can be seen by children under 17 years old with their parents Movies forbidden children under 17 years old Movies for adultsV–CHIP SETmV–CHIP :OFF ■ TV RATING9 MOVIE RATINGI CHANGE PASSWORDJ~flI <+-/ENTERMENu> I Press SET/TRACKING +/– to select V-CHIP.
:oFF th RATING:TV–Y❑ MOVIE RATING :PG
Press ENTER to disidav ON. V–CHIP SETU V-CHIP J6kWTV RATING !~–y WMOVIE RATING ~PGfl CHANGE PASSWORD<+/-/ ENTEMEN[J>J> Press MENU 3 times to return to the normal screen. To use the TV after the TV is protected When the program applied to the V-chip setting is received, “PROTECT BY V-CHIP” is displayed. l_====l password is right, the protect will be canceld. The V-CHIP function is activated only on programs and tapes that have the rating signal. ~ Press MENU. 2 Press SET/TRACKING +/-to select TV SET-UP, then press ENTER. s Press SET/TRACKING +/-to select V-CHIP SEr, then press ENTER. g Enter the password using the number buttons (O-9,) then press ENTER. “*” appears instead of the number.
ENGLISH 30Multichannel TV Sound (MTS) and Hi-Fi audio sound system NumberbuttonsMENU —AUDIO —SET/TRACKING — +1– — TV VCRICATV— CHANNEL A/V— .REC/OTR— ENTER Multichannel TV Sound (MTS) This unit is equipped with the MTS (Multi-channel TV Sound) system which decodes stereo and SAP (Second Audio Program) broadcasting signals. It also decodes the stereo TV sound of the local CATV system if it satisfies the assigned cable frequencies and ElA-recommended MTS stereo/bilingual TV sound system. it can record and play back the audio signal in the VHS Hi-Fi audio sound system. Second Audio Program (SAP) This unit can record and play back a Second Audio Program (SAP) for the second language or additional information. Usually primary language is recorded on the primary sound channel, and the second language or additional information is recorded on the SAP channel. Audio track system This unit records a regular monaural audio signal on the normal audio track, and stereo Hi-Fi audio signal on the Hi- Fi audio track. If you use the unit equipped with the VHS Hi-Fi audio sound system to play back the tape recorded on this unit, you can enjoy stereo Hi-Fi sound or bilingual program. If you use the unit not equipped with the VHS Hi-Fi audio sound system, only a regular audio sound recorded on a normal audio track is played back.<Tape strudu rea.Monaural sound-::::d:::kBefore starting
Insert a cassette and select the tape speed. Set the TV VCRICATV selector to TV VCR. Press MENU. Press SET/lRACKING +/– to select TV SET-UP, then press ENTER. MENU !IJIMER REC SETtiW SET-UPhkH SET-UP
I AUTO REPEAT ON >OFF
mSYSTEM SET-UP<+/-/ ENTEMENU>U> Press SET/TRACKING +/- to select SAP.
TV SET-UP■ V-CHIP SET
Press MENU twice to return to the normal screen. Press CHANNEL A/V or the number buttons to select the channel number to record. STEREO andlor SAP appears on the TV screen depending upon the receiving program. Press . REC/OTR.Recording begins. To listen to the SAP sound on the TV
Follow the steps 1 through 5. The SAP sound will be heard. To return to the primary sound, select OFF in step 4. Hi-Fi sound andvideo signals Recording the Hi-Fi audio The regular audio signal and Hi-Fi audio signal are automatically recorded if the TV program is broadcasted in stereo. No special setting is required for Hi-Fi audio recording. 31 ENGL/SHRecorded and output signals of the MTS On-screen displav broadcast RecordedsignalSignal output from AUCIIOscreenBroadcast SAPHi-FiNormal OUT track track
Mono OFF “Mono MonoMono MonoLeft/Left RightSTEREOStereo OFF ye, ?+;channel channel OFF Mono Mono Mono Mono SAP Mono+ SAP L:Mono SAP SAP SAP __l__L-. I“SAPI Press AUDIO to select the sound you want. Each press change the indicator on the TV screen as follows: STEREO Indicator cm the To listen to TV screenStereo programBilingual programSTEREOStereoMixed (main andsub) soundL ch Left channelMain soundR ch I Ftignt channel I Sub sound MONO Star}dard soundStandard sounc~(usually the mainsound) If AUDIO setting is set to STEREO while playing a prerecorded SAP bilingual audio program, the primary language “L ch” and the secondary language “F?ch” will be heard simultaneously. For SAP bilingual pla~backj do not use STEREO setting. !~elect “R ch” setting.
Caseete ejectQ : Recording fll : Recording pause ❑ : stOp To change the on-screen function display Press CALL. Each press turns the display on/off. ● When you play a tape recorded in mono, the sound is always played back in mono regardless of the AUDIO setting. ● The AUDIO setting autc)matically returns to STEREO when a cassette is ejected.Troubleshooting If the unit does not seem to operate properly, read the instructions again, then check the following guide. TV reception is noisy or there is no TV reception. Connect the antenna correctly and securely. There is no picture or sound The unit is in LINE input mode. There is no sound Increase the volume level. There is poor or no color Adjust the color setting. The playback picture is noisy. ● Adjust the tracking manually when the tape quality is poor. ● Although the unit cleans the video heads automatically, dirt may be accumulated after a long period of use. Clean the video heads with a commercially available video heads cleaning tape. Tape operation buttons do not work while the power is on and the cassette is inserted. Moisture condensation may have occurred. Wait for about two hours until moisture evaporates completely before you operate the unit. Abnormal operation has occurred. External interference may have affected the internal microprocessor. Press the 1 button while holding down VOLUMEV on the unit. The unit does not work. Make sure the TV VCR/CATV selector is set to TV VCR. The timer does not operate. ● Set the clock correctly. ● Check that the channel numbers match the guide channels which assigned to the TV stations. There is no sound and picture from an input source. You may have selected the wrong input. Press TV/LINE until you select the correct input source. (e.g. You must select “LINE 2“ when you connect an input source to the AUDIO/VIDEO IN jacks on the front panel.) The remote control does not operate Replace both batteries with new ones. Note on moisture condensation Moisture may condense inside the unit and cause damage to the unit and tape when the unit is moved from a cold to a warm place, after heating a cold room, or under conditions of high humidity. If any of the above conditions apply, place the unit in a well-ventilated area and wait for about two hours until the unit is warmed to room temperature and the moisture evaporates completely before operating the unit. Clicking noise sounds. Unavoidable expansion or contraction of cabinet due to temperature changes. This is not a problem. 33 ENGLISHSpecifications Tuner system Frequency synthesized tuner TV system M Channel coverage VHF: 2 to 13 UHF: 14t069 CATV: 5A, A-1 to A-5, A to W, W+l to W+84 Program memory 181 Antenna input 75 ohms, unbalanced Picuture tube VX-S205 4136(W) x 305(H) mm (16 x 12 ‘/*in.) 508 mm (diagonal) (2o in.) VX-S135 2(38(W) x 21 l(H) mm (8 1/, x83/, in.) 335 mm (diagonal) (13 ‘/, in.) Video recording system Rotary 2 head helical scanning system Video head Azimuth 2 head Video signal system NTSC color system, 525 lines, 60 fi,elds Usable cassettes VHS video cassette Recording/Playback time SP: 3 hours with T-180 tape LP: 6 hours with T-180 tape SLP:9 hours with T-180 tape Tape speed SP: 33.35 mmfsec LP: 16.67 mm/see SLP:l 1.12 mm/see Fast-forward time Approx. 2 minutes 15 seconds with T-1 20 tape Rewind time Approx. 1 minute 48 seconds with T-1 20 tape Video input 1.OVp-p, 75 ohm, unbalanced Video output 1.OVp-p, 75 ohm, unbalanced Horizontal resolution 230 lines Video SIN 53dB (nominal) Audio track 3 tracks (Hi-Fi sound 2 tracks, Normal sound 1 track) Audio input –3.8dBs, 50K ohm Audio output –3.8dBs, less than 50K ohm Operating temperature 5°c to 40”C Power requirements 120V AC, 60Hz Power consumption VX-S205 I09W VX-S135 80 W Dimensions VX-S205 574(W) x 480(D) x502(H) mm (22’/0 x 19x 197/8 in.) VX-S135 435(W) x 365(D) x384.5(H) mm (17’/, x 143/, x 15’/, in.) Weight VX-S205 25 kg (55 Ibs.) VX-S135
h.) Supplied accessories Batteries(R03, size AAA) (2) Remote control (1) Antenna adaptor (1) (VX-S205 only) VHF/UHF telescopic antenna with antenna adaptor (1) (VX-S135 only) Design and specifications are subject to change without notice for the purpose of performance Improvement. This equipment has been tested and found to comply with the limits for a Class B digital device, pursuant to Part 15 of the FCC Rules. These limits are designed to provide reasonable protection against harmful interference in a residential installation. This equipment generates, uses, and can radiate raciio frequency energy and, if not installed and used in accordance with the instructions, may cause harmful interference to radio communications. However, there is no guarantee that interference will not occur in a particular installation. If this equipment does cause harmful interference tcj radio or television reception, which can be determined by turning the equipment off and on, the user is encouraged to try to correct the interference by one or more of the following measures: - Reorient or relocate the receiving antenna. - Increase the separation between the equipment and receiver. - Connect the equipment into an outlet on a clrcult different from that to which the receiver is connected. - Consult the dealer or an experienced radio/TV technical for help. Caution Modifications or adjustment to this product, which are not expressly approved by the manufacturer, may void the user’s right authority to operate this product. ENGLISH 34Parts and controls
“CAUTION:TO REDUCE THE RISK OF
!ti;E~~ ‘NTRADA “E fl-
PHILIPS 24, 25, 26, 27, 28PIONEER13,14PULSER 39
I <+,-,ENTER,MENU> I
SET/TRACKING — _._J—
“IGRABA POR TEMPO RIZADOR
I <+,-,ENTER,MENU> I
_ Selector TV VCR/CATV
“CAUTION:TO REDUCE THE RISK OF
PHILIPS 24, 25, 26, 27, 28
CNBC (ConsumerNews&Business 23
D!3C ‘Discovery Channel 37
GUIDE VCR CANAL CANAL “038 –
VCR PLUS+ —MENU —SET/TRACKING —
“E”PROG FONCSPROG CNL
I Mom [ OFF I Mono I Mono I McJno I MoncI I ! I I 1