
TVF2400u - TV AIWA - Free user manual and instructions
Find the device manual for free TVF2400u AIWA in PDF.
Frequently Asked Questions - TVF2400u AIWA
Download the instructions for your TV in PDF format for free! Find your manual TVF2400u - AIWA and take your electronic device back in hand. On this page are published all the documents necessary for the use of your device. TVF2400u by AIWA.
USER MANUAL TVF2400u AIWA
WelcomeThank you for purchasing this AIWA product.When you unpack your TV for the first time,follow the procedures
below for set up.You will find these accessories in the package box.Please read all of the informations and warnings on page 1 and 2 of the operating instructions before installing and/oroperating your TV. Installing Batteries in the Remote Control
Insert two R6(size AA) batteries (supplied) with the correctpolarity, as indicated inside the battery compartment.Remote control (1)Antenna adaptor (1)Batteries (2)For Assistance And Information Call Toll Free 1-800-BUY-AIWA (United States and Puerto Rico)ENGLISHAIWA CO., LTD8A-JE5-902-01991228ATN-Y9Printed in Malaysia2
Connecting The Antenna (or CATV)-TV CautionConnect the AC cord to the AC outlet after all of the connections are complete. Basic connections 1 Connect the TV antenna cable (not supplied) to the ANTENNAconnector on the TV. 2 Connect the AC cord to the AC outlet.When you are using TV-F2000, connect the ACcord after passing it through the AC cord hook onthe rear.To connect a CATV system without using a CATV converterConnect the cable from CATV to the ANTENNA connector on the TV in step 1 above. CATV connections AC outletAC outlet 1 Connect the cable from the CATV system to the input connector onthe CATV converter.CATV SystemCATV converter(not supplied)75 ohmcoaxial cable (not supplied)AC cord 2 Connect the output connector on theconverter to theANTENNA connectoron the TV.75 ohm coaxial cable(not supplied)AC cord75 ohm coaxial cable(not supplied) 3 Connect the AC cord to the AC outlet.OUTINTV-F2000AC cord hook(TV-F2000 only)When you are using TV-F2000, connect the AC cordafter passing it through the AC cord hook on the rear.TV-F2000AC cord hook(TV-F2000 only)3
Setting the language The on-screen menu can display three languages: English, Spanish or French.
Press CHANNEL Nor M to select SET UP,then press ENTER.The selected item isdisplayed in red. Press VOLUME
Setting the channels Before starting Make sure the TV is in TV mode.
to select TV orCABLE.
Press CHANNEL N or M to select AUTO SEARCH, then press ENTER. All available channels are tuned.After tuning, the first located channelappears on the TV screen.Press MENU. And press CHANNEL N or M to select SET UP, then press ENTER.
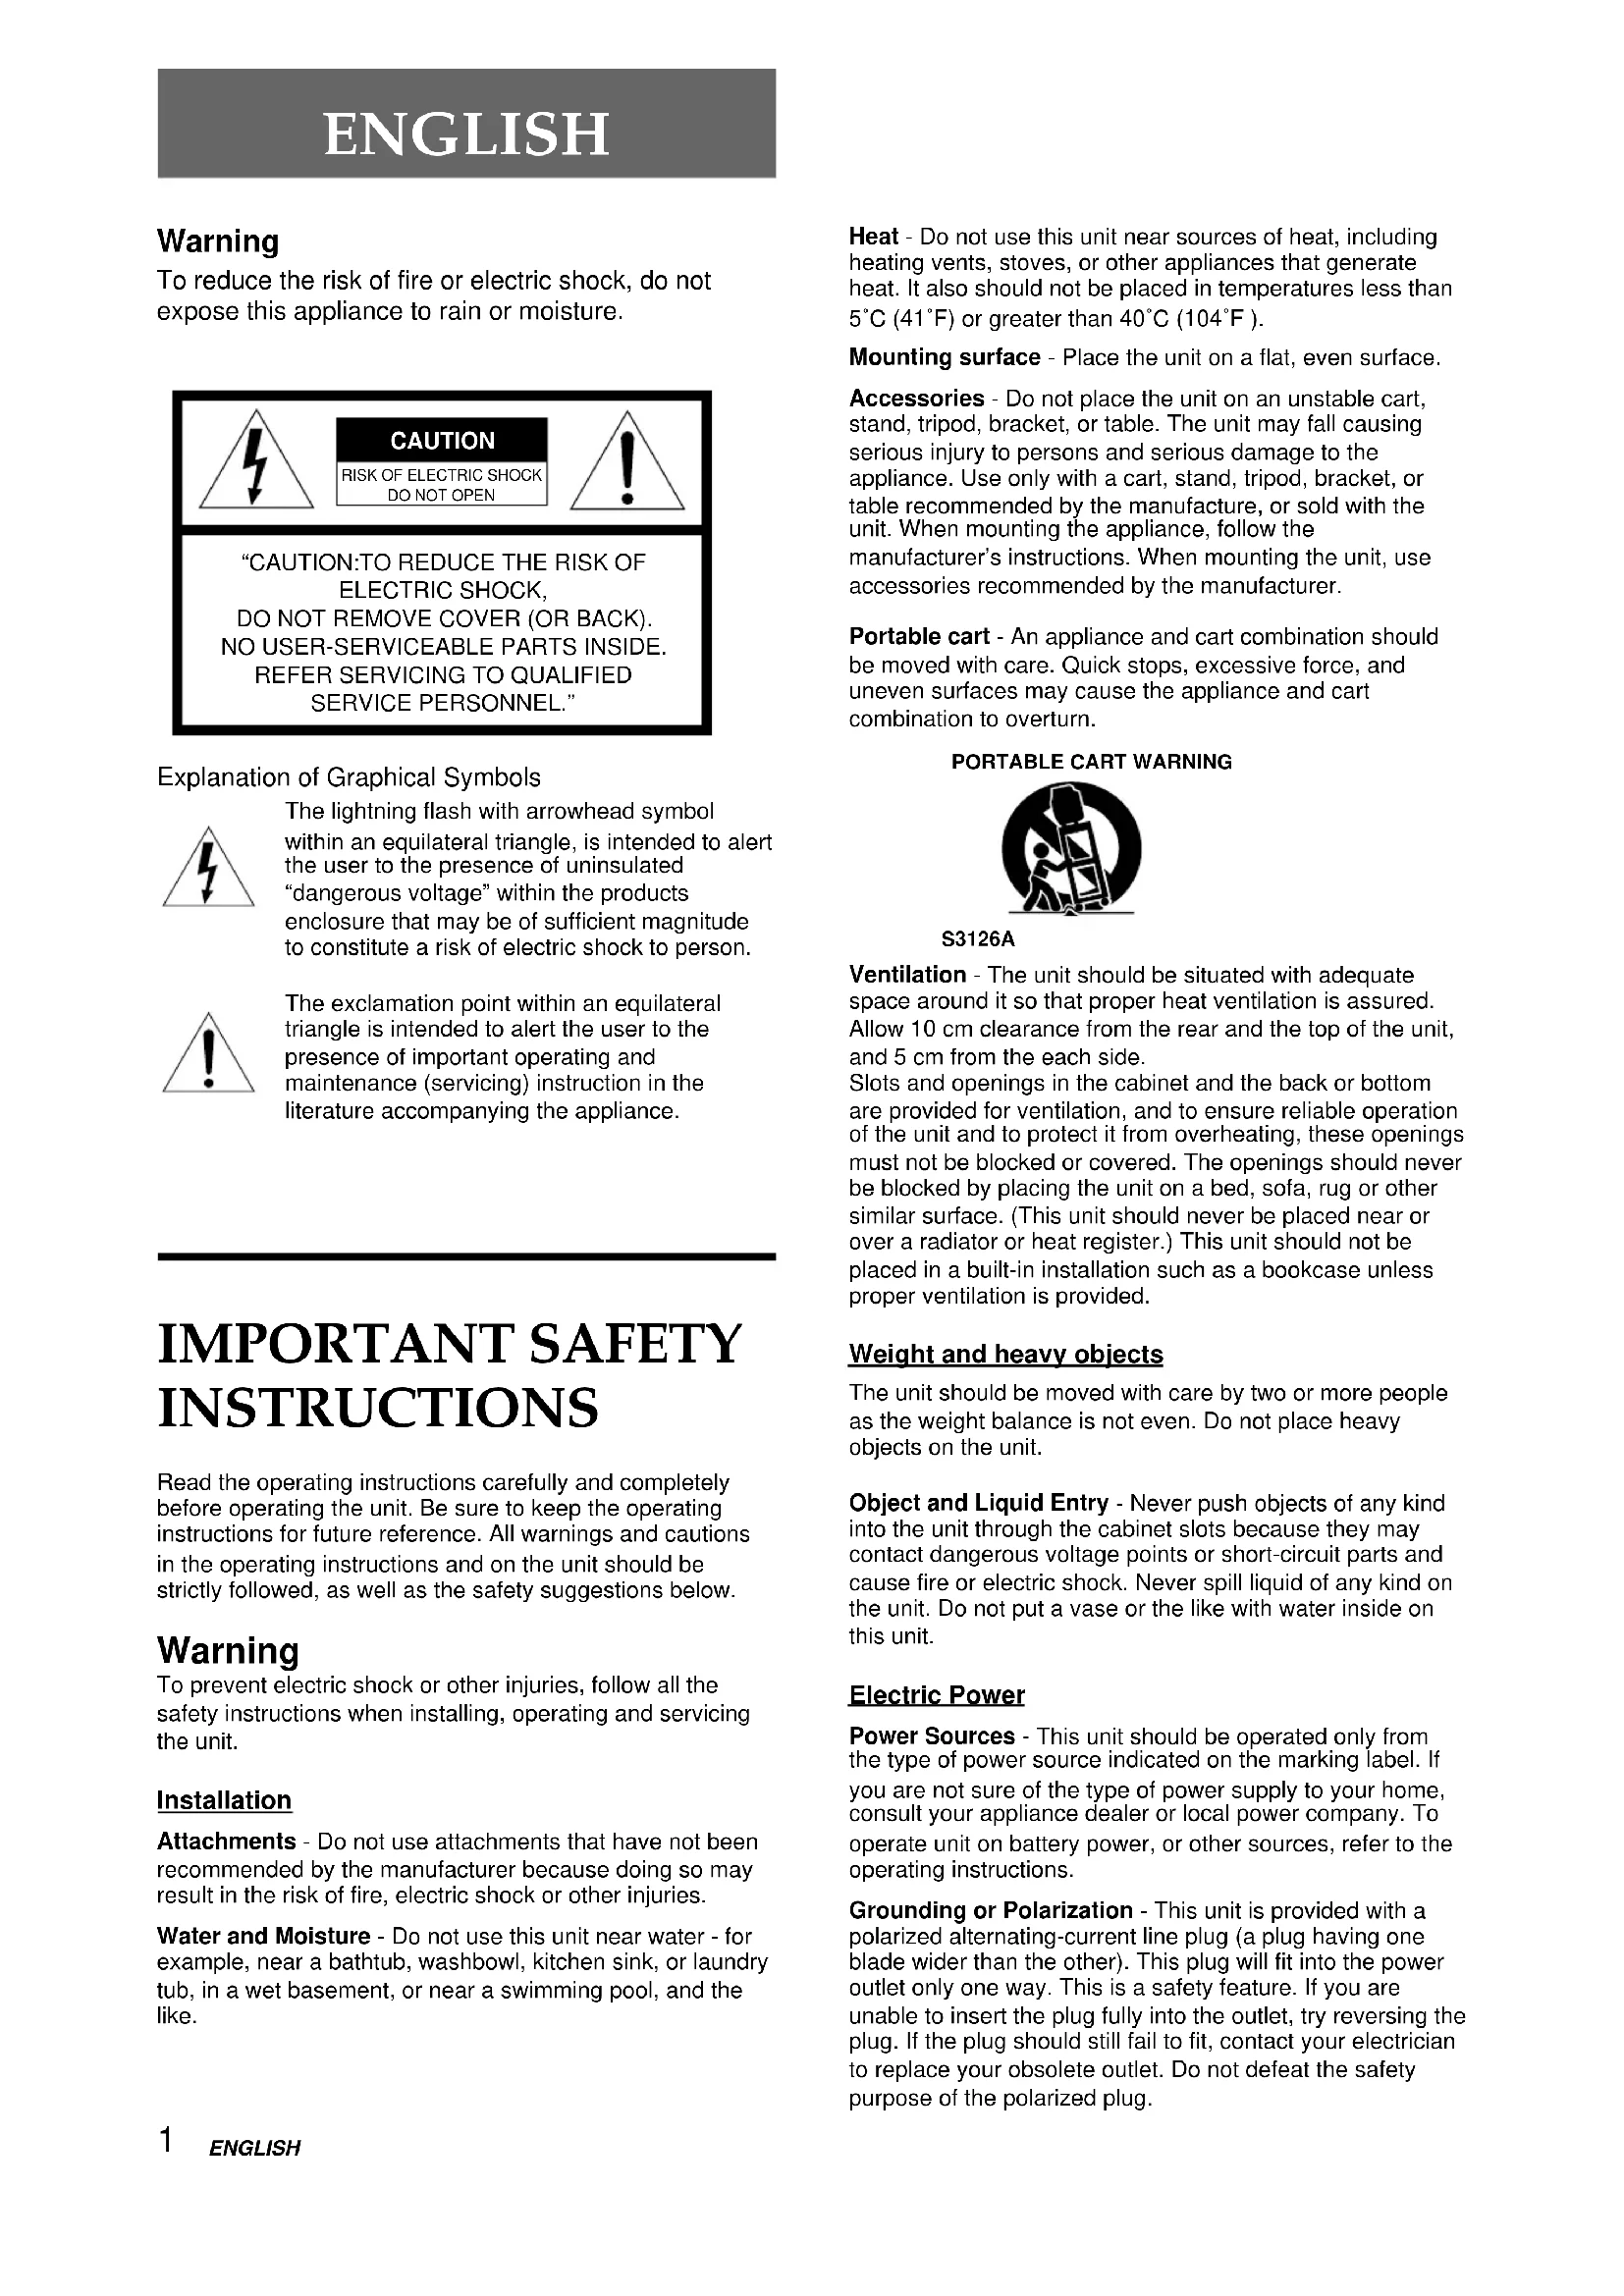
Warning To reduce the risk of fire or electric shock, do not expose this appliance to rain or moisture. Explanation of Graphical Symbols The lightning flash with arrowhead symbolwithin an equilateral triangle, is intended to alertthe user to the presence of uninsulated“dangerous voltage” within the productsenclosure that may be of sufficient magnitudeto constitute a risk of electric shock to person.The exclamation point within an equilateraltriangle is intended to alert the user to thepresence of important operating andmaintenance (servicing) instruction in theliterature accompanying the appliance. IMPORTANT SAFETY INSTRUCTIONS Read the operating instructions carefully and completelybefore operating the unit. Be sure to keep the operatinginstructions for future reference. All warnings and cautionsin the operating instructions and on the unit should bestrictly followed, as well as the safety suggestions below. Warning To prevent electric shock or other injuries, follow all thesafety instructions when installing, operating and servicingthe unit. Installation Attachments - Do not use attachments that have not beenrecommended by the manufacturer because doing so mayresult in the risk of fire, electric shock or other injuries.Water and Moisture - Do not use this unit near water - forexample, near a bathtub, washbowl, kitchen sink, or laundrytub, in a wet basement, or near a swimming pool, and thelike.“CAUTION:TO REDUCE THE RISK OFELECTRIC SHOCK,DO NOT REMOVE COVER (OR BACK).NO USER-SERVICEABLE PARTS INSIDE.REFER SERVICING TO QUALIFIEDSERVICE PERSONNEL.”CAUTIONRISK OF ELECTRIC SHOCKDO NOT OPENPORTABLE CART WARNINGS3126AHeat - Do not use this unit near sources of heat, includingheating vents, stoves, or other appliances that generateheat. It also should not be placed in temperatures less than 5˚C (41˚F) or greater than 40˚C (104˚F ). Mounting surface - Place the unit on a flat, even surface.Accessories - Do not place the unit on an unstable cart,stand, tripod, bracket, or table. The unit may fall causingserious injury to persons and serious damage to theappliance. Use only with a cart, stand, tripod, bracket, ortable recommended by the manufacture, or sold with theunit. When mounting the appliance, follow themanufacturer’s instructions. When mounting the unit, useaccessories recommended by the manufacturer.Portable cart - An appliance and cart combination shouldbe moved with care. Quick stops, excessive force, anduneven surfaces may cause the appliance and cartcombination to overturn.Ventilation - The unit should be situated with adequatespace around it so that proper heat ventilation is assured.Allow 10 cm clearance from the rear and the top of the unit,and 5 cm from the each side.Slots and openings in the cabinet and the back or bottomare provided for ventilation, and to ensure reliable operationof the unit and to protect it from overheating, these openingsmust not be blocked or covered. The openings should neverbe blocked by placing the unit on a bed, sofa, rug or othersimilar surface. (This unit should never be placed near orover a radiator or heat register.) This unit should not beplaced in a built-in installation such as a bookcase unlessproper ventilation is provided. Weight and heavy objects The unit should be moved with care by two or more peopleas the weight balance is not even. Do not place heavyobjects on the unit.Object and Liquid Entry - Never push objects of any kindinto the unit through the cabinet slots because they maycontact dangerous voltage points or short-circuit parts andcause fire or electric shock. Never spill liquid of any kind onthe unit. Do not put a vase or the like with water inside onthis unit. Electric Power Power Sources - This unit should be operated only fromthe type of power source indicated on the marking label. Ifyou are not sure of the type of power supply to your home,consult your appliance dealer or local power company. Tooperate unit on battery power, or other sources, refer to theoperating instructions.Grounding or Polarization - This unit is provided with apolarized alternating-current line plug (a plug having oneblade wider than the other). This plug will fit into the poweroutlet only one way. This is a safety feature. If you areunable to insert the plug fully into the outlet, try reversing theplug. If the plug should still fail to fit, contact your electricianto replace your obsolete outlet. Do not defeat the safetypurpose of the polarized plug. ENGLISHENGLISH
For your convenience, record the model number and serial number (you will find them on the rear of your set) in the space provided below. Please refer to them when you contact your AIWA dealer in case of difficulty. Model No. Serial No.
UNIT (NEC SECTION 810-20)GROUNDING CONDUCTORS(NEC SECTION 810-21)GROUND CLAMPSPOWER SERVICE GROUNDINGELECTRODE SYSTEM(NEC ART 250 PART H)
ELECTRICSERVICEEQUIPMENTGROUND CLAMP Antenna Grounding According to the National Electrical Cord Power-cord Protection - The unit is provided with an attachment plug with overload protection. This is a safety feature. See operating instructions for replacement or resetting of protective device. If replacement of the plug is required, be sure the service technician has used a replacement plug specified by the manufacturer that has the same overload protection as the original plug. Overloading - Do not allow anything to rest on the power cord. Do not overload wall outlets and extension cords because this can result in fire or electric shock. Do not place the unit in an area where people will walk on the cord. Outdoor Antenna Power lines - An outside antenna system should not be located in the vicinity of overhead power lines or other electric light or power circuits, or where it can fall onto such power lines or circuits. When installing an outside antenna system, extreme care should be taken to avoid touching power lines or circuits because contact with them may be fatal. Outdoor Antenna Grounding - If an outside antenna or cable system is connected to the unit, be sure the antenna or cable system is grounded so as to provide some protection against voltage surges and built-up static charges. Section 810 of the National Electrical Code, ANSI/ NFPA No.70, provides information with regard to proper grounding of the mast and supporting structure, grounding of the lead-in wire to an antenna discharge unit, size of grounding conductors, location of antenna-discharge unit, connection to grounding electrodes, and requirements for the grounding electrode. See the figure. Lightning For added protection during a lightning storm, or when left unattended and unused for long periods of time, unplug the unit from the wall outlet and disconnect the antenna or cable system. This will prevent damage to the unit due to lightning and powerline surges. Maintenance Cleaning - Unplug the unit from the wall outlet before cleaning. Do not use liquid cleaners or aerosol cleaners. Use a damp cloth for cleaning. Damage Requiring Service Unplug the unit from the wall outlet and refer servicing to qualified service personnel under the following conditions:
1) When the power cord or plug is damaged or frayed.
2) If liquid has been spilled into the unit.
3) If the unit has been exposed to rain or water.
4) If the unit does not operate normally when following
the operating instructions. Adjust only those controls that are covered by the operating instructions because improper adjustment of other controls may result in damage to the unit and will often require extensive work by a qualified technician to restore the unit to normal operation.
5) If the unit has been dropped or the cabinet has been
6) When the unit exhibits a distinct change in
performance - this indicates a need for service. Do not attempt to service the unit yourself because opening or removing covers may expose you to high voltage or other hazards. Refer all servicing to qualified service personnel. Replacement Parts - When replacement parts are required, be sure the service technician has used replacement parts specified by the manufacturer or having the same characteristics as the original part. Unauthorized substitutions may result in fire, electric shock or other hazards. Safety Check - After completion of any service or repairs to the unit, ask the service technician to perform a safety check to ensure that the unit is in proper operating condition. Note to CATV system installer: This reminder is provided to call the CATV system installer’s attention to Article 820-40 of the NEC that provides guidelines for proper grounding and, in particular, specifies that the cable ground should be connected to the grounding system of the building, as close to the point of cable entry as practical.ENGLISH Welcome Thank you for purchasing this AIWA product. To optimize the performance of this unit, please read through this operating instructions carefully. Main features of this
- V-chip An age limitation can be set to prevent children from viewing or listening to violent scenes or programs with adult content. This unit corresponds to “TV-RATING” and “MPAA RATING.” Video Enhancer This unit provides 4 modes as the multi video enhancer: NORMAL, CINEMA, GAME, and DIMMER. Sound Enhancer This unit provides 3 modes as the sound enhancer: SUPER BASS, Q SURROUND and BBE. MTS (Multichannel TV Sound) broadcast You can receive the stereo and bilingual TV programs which are broadcasted in the United States. Closed Caption The subtitles can be displayed on the screen when a broadcast corresponding to closed caption is received. Preparation Connecting the antenna p. 4
- Preparing the remote control p. 8
- Setting the language p. 8
- Setting the channels p. 9
- Basic operations Watching a TV program p. 10
- Selecting the MTS mode p. 11
- Selecting the closed captions mode p. 11
- Selecting the AV mode p. 12
- Adjusting the picture p. 13
- Adjusting the sound p. 14
- Other functions Setting the V-chip p. 15
- Registering a broadcasting station name p. 17
- On-screen display p. 18
- Watching a video or other equipment p. 19
- Additional information Troubleshooting p. 19
- Care and maintenance p. 20
- Specifications p. 20
- Parts and controls Table of contents p. 21
This equipment has been tested and found to comply with the limits for a Class B digital device, pursuant to Part 15 of the FCC Rules. These limits are designed to provide reasonable protection against harmful interference in a residential installation. This equipment generates, uses, and can radiate radio frequency energy and, if not installed and used in accordance with the instructions, may cause harmful interference to radio communications. However, there is no guarantee that interference will not occur in a particular installation. If this equipment does cause harmful interference to radio or television reception, which can be determined by turning the equipment off and on, the user is encouraged to try to correct the interference by one or more of the following measures: - Reorient or relocate the receiving antenna. - Increase the separation between the equipment and receiver. - Connect the equipment into an outlet on a circuit different from that to which the receiver is connected. - Consult the dealer or an experienced radio/TV technical for help. Note Modifications or adjustment to this product, which are not expressly approved by the manufacturer, may void the user’s right authority to operate this product.ENGLISHConnect the antenna cable to the ANTENNA connector on the TV.If the cable is a round-type 75-ohm coaxial cable, connect it directly to the ANTENNA connector. If the cable is a flat-type 300-ohm twin-lead cable, connect it to the antenna adaptor (supplied), and connect the adaptor to the ANTENNA connector.Connect the AC cord to the AC wall outlet.When you are using TV-F2000, connect the AC cord after passing it through the AC cord hook on the rear. Connecting the antenna Basic connections PREPARATION
2 To AC outlet To prevent the unit from falling during earthquakes, etc., Fix the unit even to a wall or pillar with the security hook located on the rear using the strong twine or wire.Security hookCONTINUEStrong twineor wire(not supplied)AC cord hook(TV-F2000 only)To ANTENNA connectorTV-F2000TV-F2000Security hookTV-F2400Strong twineor wire(not supplied)ENGLISH CATV connections To connect a CATV system without using a CATV converter
Connect the cable from the CATV system to the ANTENNA connector on the TV. Connect the AC cord to the AC wall outlet. When you are using TV-F2000, connect the AC cord after passing it through the AC cord hook on the rear. Connect the cable from the CATV system to the input connector on the CATV converter. Connect the output connector on the converter to the ANTENNA connector on the TV. Connect the AC cord to the AC wall outlet. When you are using TV-F2000, connect the AC cord after passing it through the AC cord hook on the rear.
Connecting the antenna (continued) AC cord hook(TV-F2000 only)AC cord hook(TV-F2000 only)To ANTENNA connectorTo ANTENNAconnectorTV-F2000TV-F2000ENGLISH Connecting a VCR or other equipment
Remove the antenna cable from the TV and connect it to the antenna input connector on the VCR. Connect the optional antenna cable to the antenna output connector on the VCR and to the ANTENNA connector on the TV. You can connect the TV and the VCR with the optional audio/video cable. To watch video Refer to “Watching a video or other equipment” on page 19. Tips
- If the VCR is a monaural type, connect one of the audio plugs only to the AUDIO L (MONO) jack.
- If the VCR has a S-video output jack, you can connect the optional S-video cable to the S-video output jack on the VCR and to the VIDEO 1 INPUT S-VIDEO jack on the TV. In this case, you do not need to connect the cable to the VIDEO jack. Note For details on how to connect the VCR to the TV, consult the individual owner’s manual for the VCR.
To antenna inputconnector 75-ohm coaxialcable(not supplied) To antenna outputconnectorTo audio/videooutput jacksAudio/videocable(not supplied)To VIDEO 1 INPUTVIDEO jackTo VIDEO 1 INPUTAUDIO L (MONO)/R jacks Red YellowWhite TV-F2000To ANTENNAconectorCONTINUEENGLISH
To connect to a stereo system This connection improves the sound quality. Connect the OUTPUT AUDIO L / R jacks on the TV to the audio input jacks on the stereo system with the optional audio cable. To watch a video camera or game machine Refer to “Watching a video or other equipment” on page 19. Tip If the other equipment has a S-video output jack, you can connect the optional S-video cable to the S-video output jack on the VCR and to the VIDEO 2 INPUT S-VIDEO jack on the TV. In this case, you do not need to connect the cable to the VIDEO jack. Connecting the antenna (continued) To connect a video camera or a game machine It is convenient to use VIDEO 2 IN AUDIO L (MONO)/R/ VIDEO jacks on the front. To VIDEO 2 INVIDEO jackTo VIDEO 2 IN AUDIOL (MONO)/R jacksTo audio/videooutput jacksVideo camera (Player)Audio/video cable(not supplied)Game machineStereo systemTo audio input jacksAudio cable(not supplied)To OUTPUTAUDIO L / R jacks YellowWhite Red White RedENGLISH
Preparing the remote control Inserting the batteries Caution To prevent damage from leakage or explosion, followthe descriptions below.• Insert the two supplied R6 (size AA) batteries with the0 and 9 marks correctly as illustrated.• Do not mix old batteries with new ones or differenttypes of batteries.• Do not throw the batteries into a fire, apply heat tothem or take them apart.• Do not carry the batteries with keys or other metallicobjects. Note Remove the batteries when they have no more power, or whenyou do not use the remote control for a long period of time. Using the remote control Point the remote control toward the remote sensor. Notes
The remote control may not operate when there is anyobstruction between the remote control and the remote sensor.• Strong ambient light sources such as a fluorescent lamp ordirect sunlight may cause unreliable operation.• Using a TV with the same type of infrared remote controlfacing the same direction may cause incorrect operation.• The maximum distance for effective control between theremote control and the remote sensor is 7 meters. Although you can use the remote control within an angle of upto 30 degrees in any direction from directly in front of the remotesensor, we recommend a narrower angle for stable operation. Setting the language The on-screen menu can display three languages:English, Spanish and French.POWER MENU ENTERVOLUME
/–POWERRemote sensorTV/VIDEO/ENTER6 STANDBYindicatorCHANNELN/M Press POWER on the TV. The STANDBY indicator on the TV lights in red. Press POWER on the remote control to turn on the TV. The 6 STANDBY indicator turns off. You can also turn on the TV with CHANNEL N or M on the TV. Press MENU. Press CHANNEL N or M to select SET UP, then press ENTER. The selected item is displayed in red.You can also use TV/VIDEO/ENTER on the TV insteadof ENTER on the remote control. Press VOLUME
or – to display the desired language. Each time you press the button, the on-screen displaylanguage changes. Press MENU to return to the normal screen.
P CTURESOUNDV CH I P
Setting the channels Before Auto Search, this unit can receive all channels in your area by pressing CHANNEL N/M repeatedly. After Auto Search, you can skip the channels which are notpreset with CHANNEL N/M. Adding or erasing the channels manually If the Auto Search does not set the channels correctly, addthem manually for watching TV programs. Also, you canerase the unnecessary channels. Select the channel number to be erased or added using the number buttons. Press the buttons as follows:ExampleTo select the channel 7, press 0 then 7.To select the channel 77, press 7 then 7.To select the channel 107, press +100, 0 then 7. Press MENU. Press CHANNEL N or M to select SET UP, then press ENTER. Press CHANNEL N or M to select ADD/ ERASE, then press ENTER. Press VOLUME
or – to erase or add a selected channel.
- When the selected channel is already set, ADDappears. When it is not set, ERASE appears.• When you add or erase channels, the picture does notchange until you change the channel on the normalscreen. If you want to erase or add another channel, press CHANNEL N or M to select CABLE (or TV,) then press VOLUME
or – to select the channel number to be erased or added. And press CHANNEL N or M to select ADD/ ERASE, then press VOLUME
Tip To interrupt the Auto Search, press MENU. Note Once you conduct the Auto Search, the previous settings willbe canceled.NumberbuttonsBefore startingMake sure the TV is in TV mode. Press MENU. Press CHANNEL N or M to select SET UP, then press ENTER. The selected item is displayed in red. Press CHANNEL N or M to select ANTENNA, then press VOLUME
or – to select CABLE or TV. CABLE : the CATV according to the connections to theANTENNA connectorTV : the program from VHF/UHF antenna Press CHANNEL N or M to select AUTO SEARCH, then press ENTER. All available channels in your area are scanned andstored in the memory of the TV.After scanning, the first located channel appears on thescreen.
P CTURESOUNDV CH I P
Setting the sleep timer Press SLEEP repeatedly to select the number ofminutes after which to turn off.The minutes change up to 120 minutes as follows.After the set amount of time has elapsed, the TV turns to thestandby mode. To check the remaining sleep time Press SLEEP once. The remaining time appears on thescreen. To cancel the sleep timer Press SLEEP repeatedly until “SLEEP OFF” appears. Note The remaining time appears automatically 5 minutes and 1minute before the TV turns off.For example, 5 minutes before turning off, “SLEEP 5” appears. POWER +100 CHANNEL N/M SLEEP Number buttons MUTE VOLUME
CHANNEL N/M OFF 15 30 60 90 120Press POWER on the remote control to turn onthe TV.If POWER on the TV is not pressed, you cannot operatethe TV even by pressing POWER on the remote control.Press CHANNEL N or M repeatedly or thenumber buttons to select the channel number.When you use the number buttons, press the button asfollows:ExampleTo select the channel 7, press 0 then 7.To select the channel 77, press 7 then 7.To select the channel 107, press +100, 0 then 7.Press VOLUME or – to adjust the volume. To turn off the TV Press POWER on the remote control.The 6 STANDBY indicator on the TV lights.You can turn the TV on or set the TV to the standby modeby pressing POWER on the remote control.Press POWER on the TV to turn the main power off. To mute the volume Press MUTE. “MUTE” appears for a few seconds. To restore the volume, press MUTE or VOLUME or –. To recall a previous channel Press PREV. CH to switch back and forth between thecurrent channel and the previous one. Tip To listen through the headphones, insert the headphones (notsupplied) with a stereo mini plug into the PHONES \ jack onthe front. The sound from the TV speaker is muted.Notes• The TV automatically turns to the standby modeapproximately 15 minutes after a television station hasstopped broadcasting.• In standby mode, CHANNEL N or M on the TV also canturn on the power.
PREV.CHENGLISH Selecting the MTS mode This unit is equipped with the MTS (Multi-channel TV Sound) system which will greatly enhance TV viewing by bringing you programs with high fidelity stereo sound. MTS also provides for an extra channel called SAP (Second Audio Program) which broadcasters can use to transmit a second language for bilingual transmissions or some other sound track. When the channel is changed, one of the following message is displayed at the top of the right side of the screen according to the type of broadcast. Stereo broadcast: STEREO is displayed in yellow. Stereo/SAP broadcast: STEREO/SAP is displayed in yellow and red. SAP broadcast: SAP is displayed in red. Monaural broadcast: Nothing is displayed. Press MTS repeatedly to selct the MTS mode. The display changes as follows: Selecting the closed captions mode This unit can decode and display closed captioned television programs.
CAPTION OFFCAPTION 1TEXT 1 CAPTION 2TEXT 2
MONO/SAP CAPTION 1 MTS CAPTION Note When MTS is pressed, selectable items are displayed in green and not selectable ones are displayed in red according to the type of broadcast.
MONO STEREO SAP MONO/SAP
Press CAPTION repeatedly to select the caption mode. The display changes as follows: Captions: This closed caption mode displays text on the screen in English or another language. Generally, closed captions in English are transmitted on CAPTION 1 and closed captions in other languages are transmitted on CAPTION 2. Full Screen Text: The text closed caption mode TEXT 1, TEXT2 will usually fill the screen with a programming schedule or other information. 11ENGLISH Notes
- After selecting a closed caption mode, it will stay in effectuntil it is changed, even if the channel is changed.• If the captions signal is lost due to a commercial or a breakin the signal, the captions will reappear when the signal isreceived again.• When selecting closed captions, the captioning might bedelayed momentarily.• If the channels are changed, the captions might be delayedmomentarily.• If using an indoor antenna or if TV reception is very poor, theclosed caption decoder text may not appear. In this case,adjust the antenna for better reception or use an outdoorantenna.• When activating the closed captioned decoder, there will bea short delay before the closed captioned text appears onthe screen.• The captions will appear in places on the screen where theywill least interfere with the picture, usually on the bottom ofthe screen. News programs will usually show three-lineclosed captions which scroll onto the screen. Most othershows provide two or three lined captions placed near thecharacter who is speaking so the viewer can follow thedialogue.• If no caption signal is received, no captions will appear, butthe television will remain in the caption mode.• Misspellings or unusual characters may occasionally appearduring closed captioning. This is normal with closedcaptioning, entered live. These transmissions do not allowtime for editing.• Some cable systems and copy protection systems mayinterfere with the closed captioned signal.• Words in italics or underlined describe titles, words in foreignlanguages or words requiring emphasis. Words that are sungusually appear enclosed by musical notes.• For television programs broadcasting with closed captions,look in your TV guide for the closed captions symbol (CC). Selecting the AV mode This unit provides 4 modes as the multi video enhancer. NORMAL: Normal setting CINEMA: Setting for watching films GAME: Setting where it causes less eyestrain DIMMER: Setting where the surrounding is darker
NORMAL CINEMA GAME DIMMER
AV MODE NORMAL Press AV MODE repeatedly to select the AV mode. The display changes as follows: Note Even if you change the AV mode, the sound quality does notchange. 12ENGLISH Press VOLUME
or – to adjust the setting. After 2 seconds from releasing the button, the display returns to step 4. To adjust the other item, complete steps 3 through 5. Press MENU to return to the normal screen. Tip To reset all the items of the selected AV mode to its initial setting, select RESET in step 4, then press ENTER. CHANGE :
Item BRIGHT CONTRAST SHARP COLOR Increasing the bars makes the picture brighter enhances the contrast makes the picture clearer enhances the intensity and brilliance of the color Decreasing the bars makes the picture darker lowers the contrast makes the picture softer lowers the intensity and brilliance of the color ENTER Adjusting the picture You can adjust the picture settings for each AV mode. Press MENU. Press CHANNEL N or M to select PICTURE, then press ENTER. Press CHANNEL N or M to select the top line, then press VOLUME + or – to select the AV mode to adjust. Press CHANNEL N or M to select the item to adjust. Item TINT Movement to the left makes lighter colors redder Movement to the right makes lighter colors greener
Press MENU. Press CHANNEL N or M to select SOUND, then press ENTER. Press CHANNEL N or M to select the item to adjust. Adjusting the sound You can adjust the settings for treble sound, bass sound and the balance (Left/Right) of the sound.
Press VOLUME + or – to adjust the setting. After a few seconds from releasing the button, the display returns to step 3. To adjust the other item, complete steps 3 and 4. Press MENU to return to the normal screen. Tip To reset all the items to its initial setting, select RESET in step3, then press ENTER. Note Due to the combination among TREBLE, BASS, SUPER BASSor BBE, the sound may be distorted. In this case, turn down thelevels of sound adjustment functions above.
Item TREBLE BASS Item BALANCE Increasing the bars makes the treble sound stronger makes the bass sound stronger Decreasing the bars makes the treble sound weaker makes the bass sound weaker Movement to L makes the output level of right speaker lower Movement to R makes the output level of left speaker lower CONTINUE MENU P CTURE SOUND V CH I P
Adjusting the sound (continued) BASS
MENU CHANNEL N/MENTERNumberbuttonsVOLUME +/– Setting the V-chip An age limitation can be set to prevent children from viewing or listening to violent scenes or programs with adult content. This unit corresponds to “TV-RATING” and “MPAA RATING.” To use the V-chip function, register a password at first. Registering the password Important You cannot set the V-chip if you forget the password. We recommend you write down the password and keep it in a safe place in case you forget it. Press MENU. Press CHANNEL N or M to select V CHIP, then press ENTER. Enter the password (4 digits) using the number buttons (0-9).
” appears instead of the number. Enter the same password again for the safety. The V chip menu appears. MENU P CTURE SOUND V CH I P
Enjoying special sound effect Your TV provides 3 modes of sound enhancer : SUPER BASS, Q SURROUND, and BBE. SUPER BASS enhances the bass sound. Q SURROUND uses only two speakers at the left and right to create an atmosphere that sounds as if you are surrounded by two front speakers and two rear speakers. BBE system enhances the clarity of high-frequency sound. To operate with the single button To turn on SUPER BASS, Q SURROUND or BBE, press S- BASS, SURROUND or BBE. Each press changes on/off. To operate on the SOUND menu Press MENU. And press CHANNEL N or M to select SOUND, then press ENTER. And press CHANNEL N or M to select SUPER BASS, Q SURROUND or BBE, then press VOLUME + or – to display ON. Notes
- The Q SURROUND system does not work for monaural sources.
or – to display the desired setting.
- When the following programs are received, they are protected from display according to the selected setting. OFF: TV RATING is not set. TV-Y: Suitable for children of all ages TV-Y7: Suitable for children 7 and older TV-G: All audiences TV-PG: Parental guidance suggested TV-14: Inappropriate for under 14 TV-MA: Mature audiences
- TV RATING sub menu may appear according to the selected setting. If the sub menu appears, go to step 2. If not, go to step 3. Press CHANNEL N or M to select the sub menu item, then press VOLUME
- When TV-Y7 is selected, the items below appear.
- When TV-PG or TV-14 is selected, the items below appear.
- When TV-MA is selected, the items below appear.
Press CHANNEL N or M to select MPAA RATING, then press VOLUME
or – to display the desired setting. When the following movies are received, they are protected from display according to the selected setting. OFF: MPAA RATING is not set. G: No age limitation PG: Movies not proper for children PG-13: Movies not proper for children of 13 years old and younger R: Movies those can be seen by children under 17 years old with their parents NC-17: Movies forbidden children under 17 years old X: Movies for adults Press CHANNEL N or M to select V CHIP, then press VOLUME
or – to display ON. Press MENU to return to the normal screen. Note If no button is pressed for 15 seconds, the normal screen returns. To use the TV after the TV is protected When the program applied to the V-chip setting is received, “PROTECT BY V CHIP” is displayed. Enter the password. When the password is right, the protect will be canceled.
” appears instead of the number. Enter the same password again for the safety. Press MENU to return to the normal screen. Note If no button is pressed for 15 seconds, the normal screenreturns.
P CTURESOUNDV CH I P
Registering a broadcasting station name You can register a broadcasting station name for eachchannel. Press MENU. Press CHANNEL N or M to select SET UP, then press ENTER. Press CHANNEL N or M to select CH CAPTION, then press ENTER. Press VOLUME
or – to select the channel number you want to register a name.
Press CHANNEL M to select the bar display. Press VOLUME
to display the desired letter, then press CHANNEL M . Each press of VOLUME+ changes the display as follows: Press VOLUME – to change the display in reverse order. Repeat steps 5 and 6 to enter a broadcasting station name. You can enter up to 4 letters. To enter another broadcasting station name, press CHANNEL M to move the cursor (red area) to the channel number, then repeat steps 4 through 7. You can enter up to 30 stations. When 30 stations are already registered, “FULL” appears instead of “----.” Press MENU to return to the normal screen. Tip To cancel all letters in steps 6 and 7, press CHANNEL N orM to select RESET, then press ENTER.
- If no button is pressed for 8 seconds, the on-screen displayautomatically turns off.• The broadcasting station name appears only when thestation name is registered.• Audio input indicator does not appear when the TV is inVIDEO1 and VIDEO2 mode. CABLE125NBC STEREO/SAP DISPLAY Channel number/ VIDEO indicator Audio input Broadcasting station name CH CAPTIONCABLE125RESET– – – –EX T : MENUISELECT:CHANGE : – /+ /ENGLISH Watching a video or other equipment Press TV/VIDEO on the remote control or TV/ VIDEO/ENTER on the TV to display “VIDEO 1” or “VIDEO 2” for a few seconds. VIDEO 1: input from the VIDEO 1 INPUT AUDIO/VIDEOjacks on the rearVIDEO 2: input from the VIDEO 2 IN AUDIO/VIDEOjacks on the front Set the VCR or other equipment to playback. To return to the TV program Press TV/VIDEO on the remote control or TV/VIDEO/ENTERon the TV repeatedly until the TV program appears. Also,you can return to the TV program by selecting the channelnumber directly with the number buttons. To switch the GAME position directly Press GAME to select the AV mode to GAME. The TVinput mode changes to VIDEO 2 automatically. And thescreen becomes to the adquate size for games. When connecting to the AIWA VCR with the ONE-TOUCH PLAYBACK When ONE-TOUCH PLAYBACK or OTPB on the remotecontrol of VCR is pressed, this unit automatically turns onand is in the VIDEO 1 mode. However, this function doesnot operate in the following cases:• ONE-TOUCH PLAYBACK on the VCR is pressed.• The TV and VCR is not placed in the place where theycan receive the signal from the remote controlsimultaneously. Note For details on how to use the VCR, consult the individualowner’s manual for the VCR.TV/VIDEO/ENTERTV/VIDEONumber buttons GAME
Troubleshooting If the unit does not seem to operate properly, read theinstructions again, then check the following guide.There is no picture or sound.The unit is in VIDEO input mode.There is no sound.Increase the volume level.There is poor or no color.Adjust the color setting.The remote control does not operate.Replace both batteries with new ones.Clicking noise sounds.Unavoidable expansion or contraction of cabinet due totemperature changes. This is not a problem. ADDITIONAL INFORMATIONENGLISH Specifications Tuner System Frequency synthesized tuner TV System NTSC-M Channel Coverage VHF: 2 to 13 UHF: 14 to 69 CATV: 5A, A-1 to A-5, A to W, W+1 to W+84 Program Memory 181 Antenna Input 75 ohms, unbalanced Picture Tube TV-F2400: 24 in TV-F2000: 20 in Screen Size TV-F2400: 478 (W) × 359 (H) mm (18
in.) 598 mm (diagonal) (23
- Design and specifications are subject to change without notice for the purpose of performance improvement.
- The illustrations in this operating instructions are for the TV-F2000.
Care and maintenance To clean the cabinet Wipe with a soft dry cloth. If the surfaces are extremely dirty, use a soft cloth lightly moistened with mild detergent solution. Do not use strong solvents, such as alcohol, benzine or thinner as these could damage the finish of the unit. Do not stick a seal or an adhesive label Do not stick a seal or an adhesive label on the surface for a long time. The finish of the unit may be damaged or come off. When noises are heard from the radio or other audio/ video equipment Separate the equipment from this unit. Braun tube If the surface is dirty, wipe with a soft dry cloth. When you touch the Braun tube, sometimes you feel week electricity. This is the static electricity, and it does not damage you.ENGLISH Parts and controls Front panel Rear panel (TV-F2000) Rear panel (TV-F2400) PHONES \ jack MENU button