AV14F703 - Television JVC - Free user manual and instructions
Find the device manual for free AV14F703 JVC in PDF.
Frequently Asked Questions - AV14F703 JVC
User questions about AV14F703 JVC
0 question about this device. Answer the ones you know or ask your own.
Ask a new question about this device
Download the instructions for your Television in PDF format for free! Find your manual AV14F703 - JVC and take your electronic device back in hand. On this page are published all the documents necessary for the use of your device. AV14F703 by JVC.
USER MANUAL AV14F703 JVC
natural_image
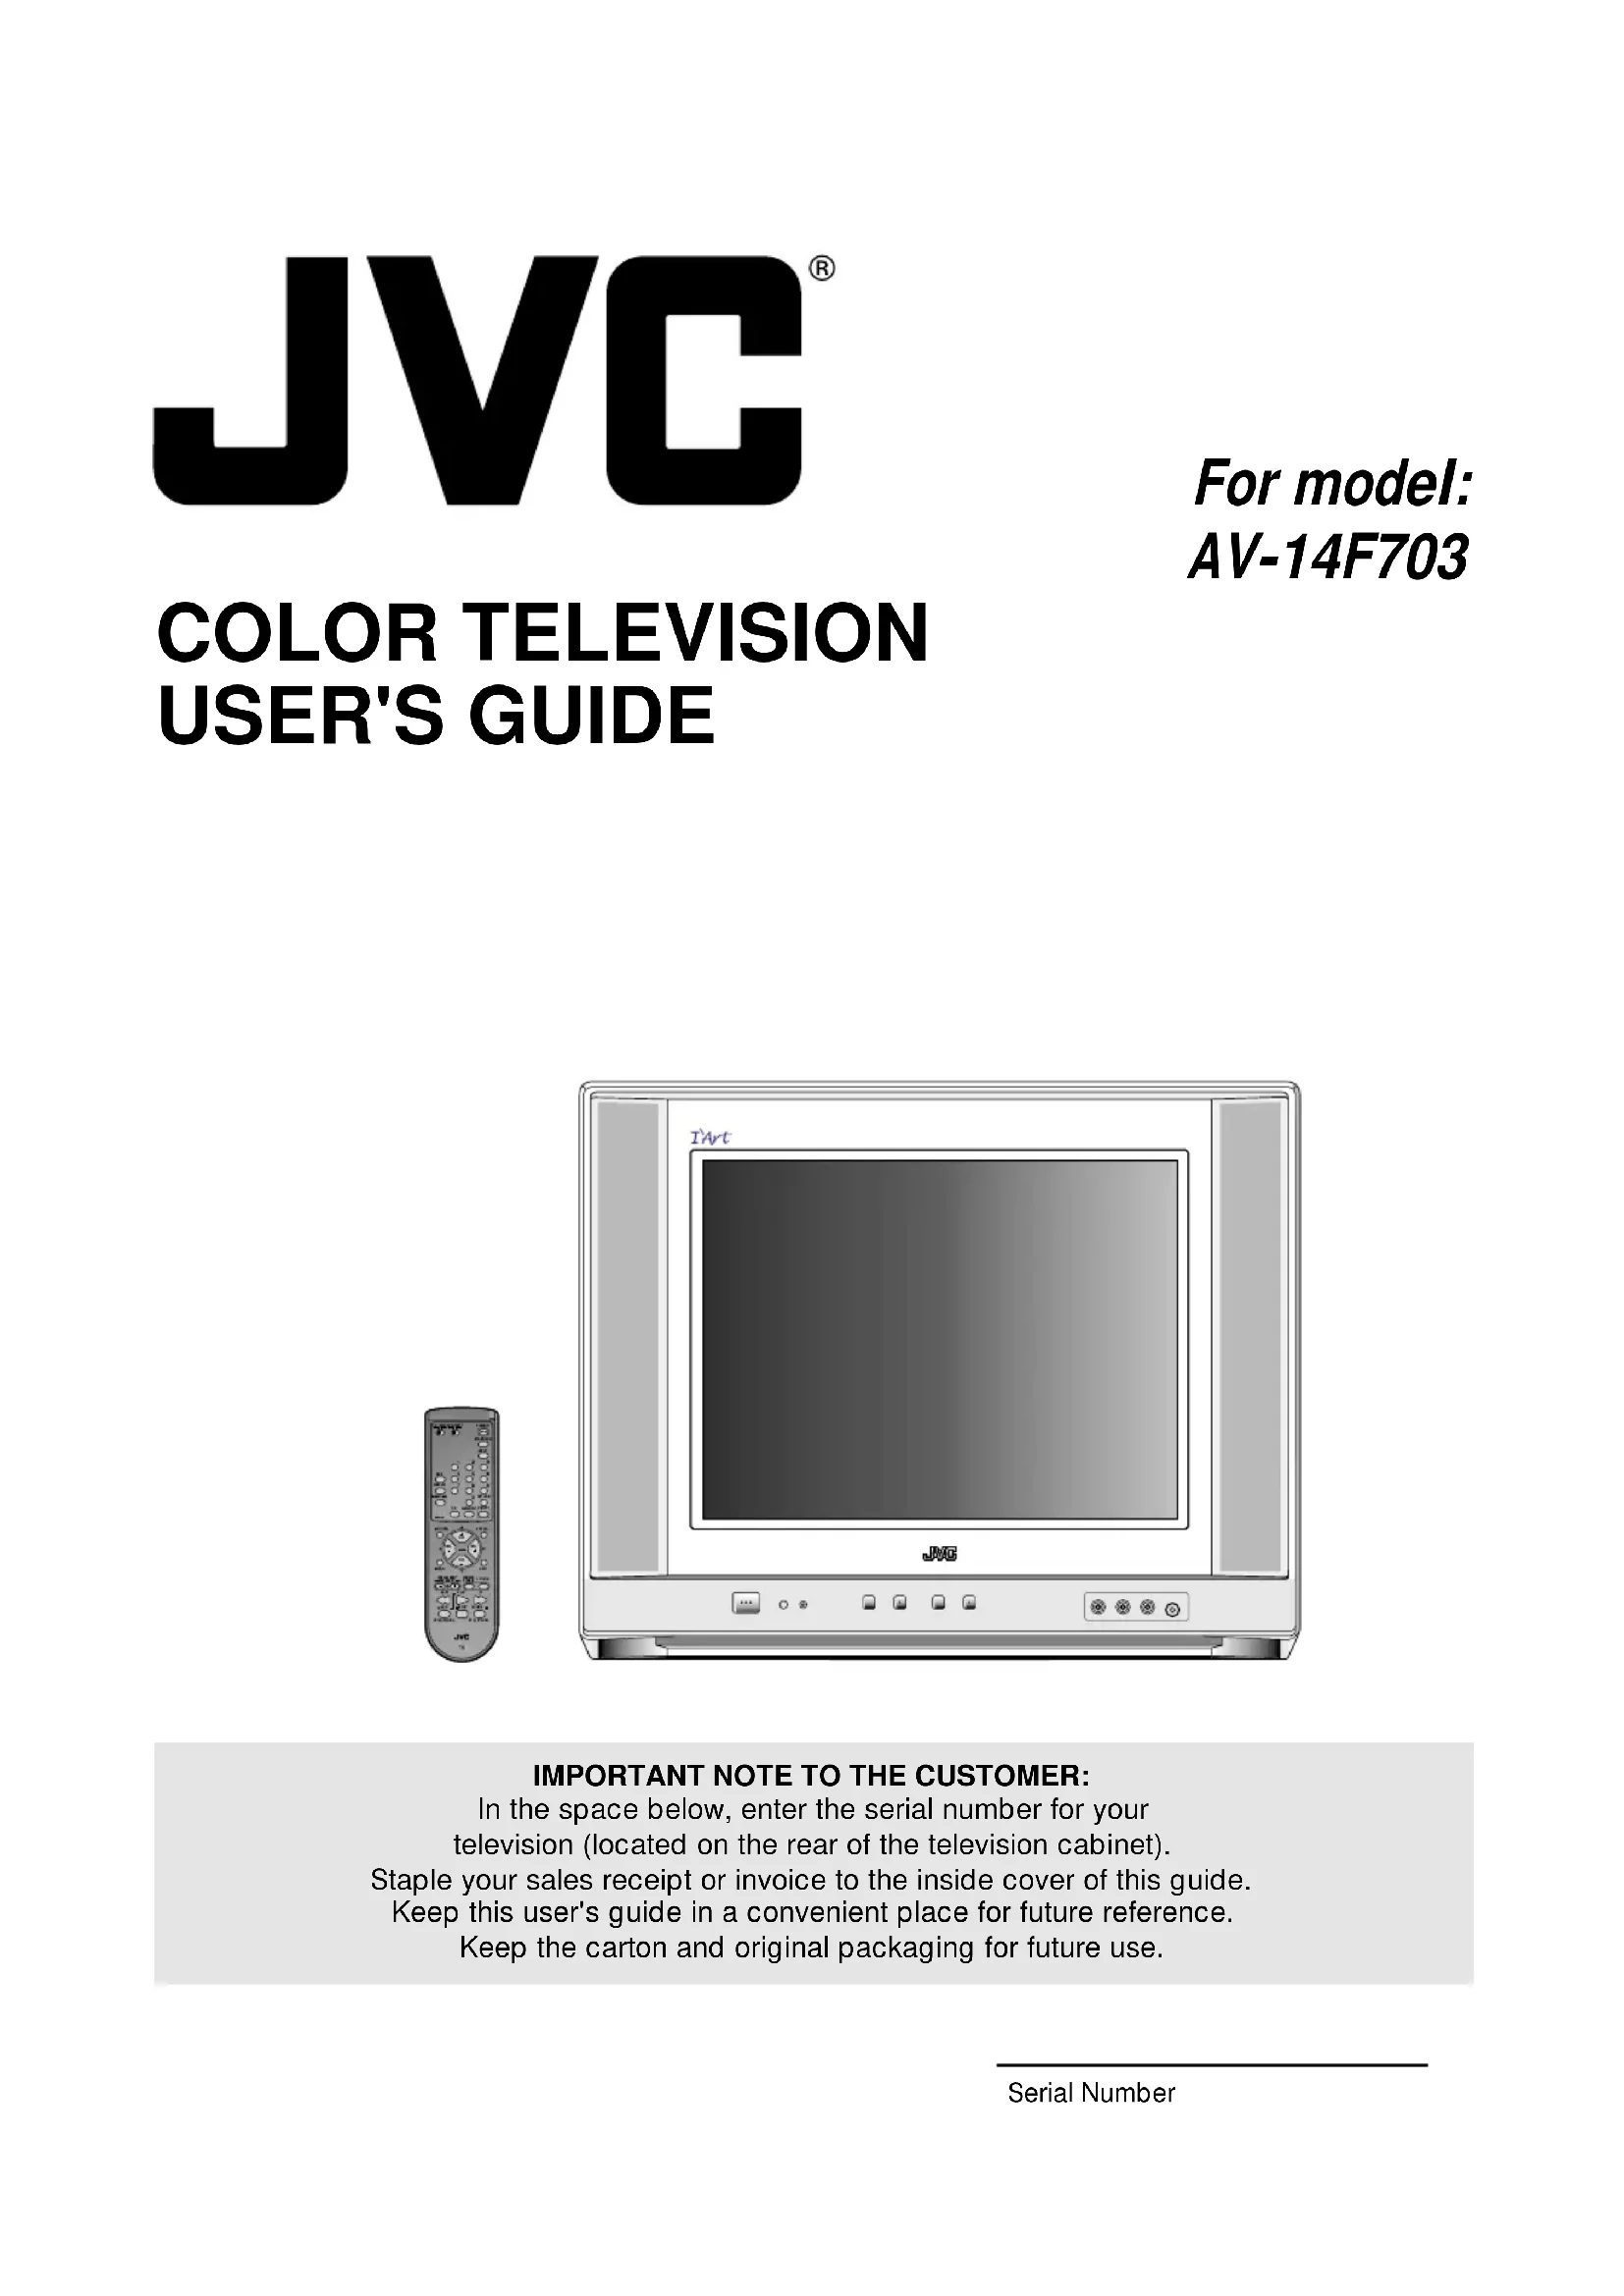
Illustration of a JMC TV set with a remote control unit beside it (no text or symbols on the device itself)IMPORTANT NOTE TO THE CUSTOMER:
In the space below, enter the serial number for your television (located on the rear of the television cabinet). Staple your sales receipt or invoice to the inside cover of this guide. Keep this user's guide in a convenient place for future reference. Keep the carton and original packaging for future use.
text_image
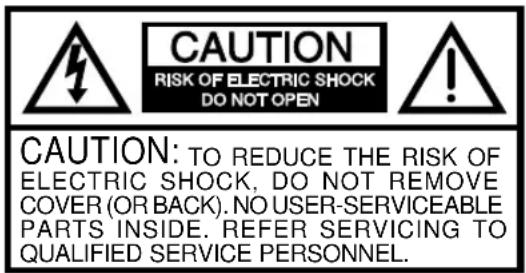
CAUTION RISK OF ELECTRIC SHOCK DO NOT OPEN CAUTION: TO REDUCE THE RISK OF ELECTRIC SHOCK, DO NOT REMOVE COVER (OR BACK). NO USER-SERVICEABLE PARTS INSIDE. REFER SERVICING TO QUALIFIED SERVICE PERSONNEL.
The lightning flash with arrowhead symbol, within an equilateral triangle is intended to alert the user to the presence of uninsulated dangerous voltage within the product's enclosure that may be of sufficient magnitude to constitute a risk of electric shock.

The exclamation point within an equilateral triangle is intended to alert the user to the presence of important operating and maintenance (servicing) instructions in the literature accompanying the appliance.
CAUTION: Changes or modifications not expressly approved by the party responsible for compliance with the FCC Rules could void the user's authority to operate this equipment.
WARNING: TO PREVENT FIRE OR SHOCK HAZARD, DO NOT EXPOSE THIS APPLIANCE TO RAIN OR MOISTURE. CAUTION: TO PREVENT ELECTRIC SHOCK DO NOT USE THIS POLARIZED PLUG WITH AN EXTENSION CORD, RECEPTACLE OR OTHER OUTLET UNLESS THE BLADES CAN BE FULLY INSERTED TO PREVENT BLADE EXPOSURE.
IMPORTANT SAFEGUARDS
1. READ INSTRUCTIONS
All the safety and operating instructions should be read before the unit is operated.
2. RETAIN INSTRUCTIONS
The safety and operating instructions should be retained for future reference.
3. HEED WARNINGS
All warnings on the unit and in the operating instructions should be adhered to.
4. FOLLOW INSTRUCTIONS
All operating and use instructions should be followed.
5. CLEANING
Unplug this unit from the wall outlet before cleaning. Do not use liquid cleaners or aerosol cleaners. Use a damp cloth for cleaning the exterior cabinet only.
6. ATTACHMENTS
The manufacturer of this unit does not make any recommendations for attachments, as they may cause hazards.
7. WATER AND MOISTURE
Do not use this unit near water. For example, near a bathtub, washbowl, kitchen sink, laundry tub, in a wet basement, or near a swimming pool. PORTABLE CART WARNING
8. ACCESSORIES
Do not place this unit on an unstable cart, stand, tripod, bracket, or table.
The unit may fall, causing serious injury, and serious damage to the unit.
8A. An appliance and cart combination should be moved with care. Quick stops, excessive force, and uneven surfaces may cause the appliance and cart combination to overturn.
9. VENTILATION
PORTABLE CART WARNING (symbol provided by RETAC)

Slots and openings in the cabinet back or bottom are provided for ventilation, and to ensure reliable operation of the unit, and to protect it from overheating. These openings must not be blocked or covered. The openings should never be blocked by placing the unit on a bed, sofa, rug, or other similar surface. This unit should never be placed near or over a radiator or heat source. This unit should not be placed in a built-in installations such as a bookcase or rack unless proper ventilation is provided or the manufacturer's instructions have been adhered to.
10. POWER SOURCE
This unit should be operated only from the type of power source indicated on the rating plate. If you are not sure of the type of power supply to your home, consult your appliance dealer or local power company. For units intended to operate from battery power, or other sources, refer to the operating instructions.
11. GROUNDING OR POLARIZATION
This unit is equipped with a polarized alternating-current line plug (a plug having one blade wider than the other). This plug will fit into the power outlet only one way. This is a safety feature. If you are unable to insert the plug fully into the outlet, try reversing the plug. If the plug should still fail to fit, contact your electrician to replace your obsolete outlet. Do not defeat the safety purpose of the polarized plug, if your unit is equipped with a 3-wire grounding-type plug, a plug having a third (grounding) pin. This plug will only fit into a grounding-type power outlet. This too, is a safety feature. If you are unable to insert the plug into the outlet, contacts your electrician to replace your obsolete outlet. Do not defeat the safety purpose of the grounding-type plug.
12. POWER-CORD PROTECTION
Power-supply cords should be routed so that they are not likely to be walked on or pinched by items placed upon or against them, paying particular attention to cords at plugs, convenience receptacles, and the point where they exit from the appliance.
13. LIGHTNING
To protect your unit during a lightning storm, or when it is left unattended and unused for long periods of time, unplug it from the wall outlet and disconnect the antenna or cable system. This will prevent damage to the unit due to lightning and power line surges.
14. POWER LINES
An outside antenna system should not be located in the vicinity of overhead power lines or other electric light or power circuits, or where it can fall into such power lines or circuits. When installing an outside antenna system, extreme care should be taken to keep from touching such power lines or circuits, as contact with them might be fatal.
15. OVERLOADING
Do not overload wall outlets and extension cords as this can result in a risk of fire or electric shock.
16. OBJECT AND LIQUID ENTRY
Do not push objects through any openings in this unit, as they may touch dangerous voltage points or short out parts that could result in fire or electric shock. Never spill or spray any type of liquid into the unit.
17. OUTDOOR ANTENNA GROUNDING
If an outside antenna or cable system is connected to the unit, be sure the antenna or cable system is grounded to provide some protection against voltage surges and built-up static charges, Section 810 of the National Electrical Code, ANSI/NFPA 70, provides information with respect to proper grounding of the mast and supporting structure, grounding of the lead-in wire to an antenna discharge unit, size of grounding conductors, location of antenna discharge unit, connection to grounding electrodes, and requirements for the grounding electrode.
18. SERVICING
Do not attempt to service this unit yourself as opening or removing covers may expose you to dangerous voltage or other hazards. Refer all servicing to qualified service personnel.
19. DAMAGE REQUIRING SERVICE
Unplug this unit from the wall outlet and refer servicing to qualified service personnel under the following conditions:
a. When the power-supply cord or plug is damaged.
b. If liquid has been spilled, or objects have fallen into the unit.
c. If the unit has been exposed to rain or water.
d. If the unit does not operate normally by following the operating instructions. Adjust only those controls that are covered by the operating instructions, as an improper adjustment of other controls may result in damage and will often require extensive work by a qualified technician to restore the unit to its normal operation.
e. If the unit has been dropped or the cabinet has been damaged.
f. When the unit exhibits a distinct change in performance, this indicates a need for service.
20. REPLACEMENT PARTS
When replacement parts are required, be sure the service technician uses replacement parts specified by the manufacturer or those that have the same characteristics as the original part.
Unauthorized substitutions may result in fire, electric shock or other hazards.
21. SAFETY CHECK
Upon completion of any service or repairs to this unit, ask the service technician to perform safety checks to determine that the unit is in proper operating condition.
22. HEAT
The product should be situated away from heat sources such as radiators, heat registers, stoves, or other products (including amplifiers) that produce heat.
23. NOTE TO CATV SYSTEM INSTALLER
This reminder is provided to call the CATV system installer's attention to Article 820-40 of the NEC that provides guidelines for proper grounding and, in particular, specifies that the cable ground shall be connected to the grounding system of the building, as close to the point of cable entry as practical.
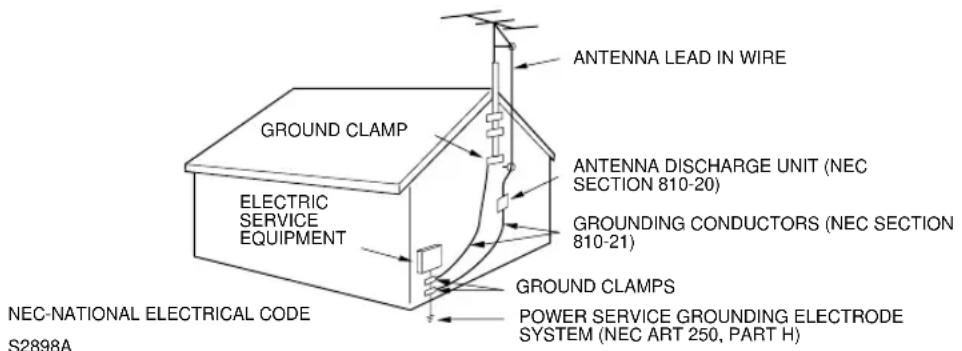
EXAMPLE OF ANTENNA GROUNDING AS PER THE NATIONAL ELECTRICAL CODE
text_image
ANTENNA LEAD IN WIRE GROUND CLAMP ELECTRIC SERVICE EQUIPMENT ANTENNA DISCHARGE UNIT (NEC SECTION 810-20) GROUNDING CONDUCTORS (NEC SECTION 810-21) GROUND CLAMPS POWER SERVICE GROUNDING ELECTRODE SYSTEM (NEC ART 250, PART H) NEC-NATIONAL ELECTRICAL CODE S2898AIMPORTANT RECYCLING INFORMATION
This product utilizes both a Cathode Ray Tube (CRT) and other components that contain lead. Disposal of these materials may be regulated in your community due to environmental considerations. For disposal or recycling information, please contact your local authorities, or the Electronic Industries Alliance: http://www.eiae.org
TABLE OF CONTENTS
| FEATURES | 4 |
| LOCATION OF CONTROLS | 5 |
| REMOTE CONTROL | 6 |
| ANTENNA/CATV CONNECTIONS | 11 |
| CONNECTION TO OTHER EQUIPMENT | 12 |
| SETTING LANGUAGE | 13 |
| SETTING CLOCK | 13 |
| TO MEMORIZE CHANNELS | 14 |
| SETTING V-CHIP | 15 |
| TV BASIC OPERATION | 17 |
| INPUT button | 18 |
| STEREO AND SEPARATE AUDIOPROGRAM (SAP) | 18 |
| DISPLAY button | 18 |
| PICTURE ADJUSTMENTS | 19 |
| SOUND ADJUSTMENTS | 19 |
| CLOSED CAPTION | 20 |
| ON/OFF TIMER | 21 |
| BBE | 22 |
| SLEEP TIMER button | 22 |
| VCR buttons | 22 |
| DVD buttons | 22 |
| TV/CATV swich | 22 |
| VCR/DVD swich | 22 |
| TROUBLESHOOTING GUIDE | 23 |
| SPECIFICATIONS | Back Cover |
FEATURES
- Flat Picture Tube - It reduces the influence of surrounding light resulting in outstanding image detail and clarity.
- 181 Channel Tuner - The tuning system is capable of receiving all 68 VHF/UHF standard broadcast channels that are available in your area. When operating on a cable system, it can tune to the standard VHF channel frequencies plus up to 113 cable channel frequencies. The actual number of channels received depends upon channel reception in your area or your cable system.
- On-Screen 3 Language Display - Consists of channel, sleep timer, volume level, muting, text/caption indicators and picture control adjustments. These can be displayed in English, Spanish or French.
- ON/OFF Timer - Allows you to automatically turn on or off your TV at a set time.
- Sleep Timer - Operable from the remote control, this TV can be programmed up to 120 minutes to turn off automatically.
- V-Chip - The V-Chip function can read the rating of a TV program or movie content if the program is encoded with this information. The V-Chip will allow you to set a restriction level.
- Picture Control Adjustments - The On-Screen display allows precise remote control adjustment of BRIGHTNESS, COLOR, CONTRAST, SHARPNESS, TINT and COMPONENT.
- Closed Captioned Decoder - Displays text captions or 1/2 of full screen text on the screen for hearing impaired viewers.
- Stereo/SAP Reception - This TV is designed to receive stereo and separate audio program (SAP) broadcasts where available.
- BBE- BBE gives you the vivid sound with so much presence.
- Video Input Jacks - This unit is equipped 3 types of video input jacks. The component video in jacks and S-video in jack enable you to watch the DVD player or the video devices with high quality picture.
- Remote Control - You can operate your VCR, Cable Box, Satellite Dish and DVD after you have registered the 3-digit codes for their brand name.
natural_image
Front view of a JMM television set with CRT monitors and control buttons (no visible text or symbols on screen)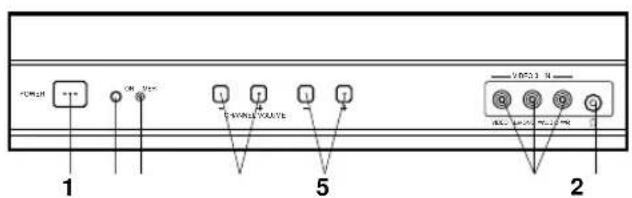
text_image
1 2 5 6 7 8 9 10 11 12 13 14 15 16 17 18 19 20 21 22 23 24 25 26 27 28 29 30 31 32 33 34 35 36 37 38 39 40 41 42 43 44 45 46 47 48 49 50 51 52 53 54 55 56 57 58 59 60 61 62 63 64 65 66 67 68 69 70 71 72 73 74 75 76 77 78 79 80- POWER Button - Press to turn the TV on or off.
- Remote Sensor - Signals from the Remote Control unit are received here.
- ON TIMER Indicator - This indicator lights up when the powered up. It also lights up when ON TIMER program is turned ON while power is OFF.
- CHANNEL +/- Buttons - Press to select a higher or lower numbered channel set into memory.
- VOLUME +/- Buttons - Press to raise or lower the volume of the sound.
- VIDEO 3 IN Jacks (Front) - Audio and video signal cables from an external source can be connected here.
- HEADPHONES JACK - Plug an earphone or headphones with an 1/8 miniplug into this jack for listening.
- VHF/UHF IN (ANT) Jack - Connect a VHF/UHF antenna or CATV cable to this jack.
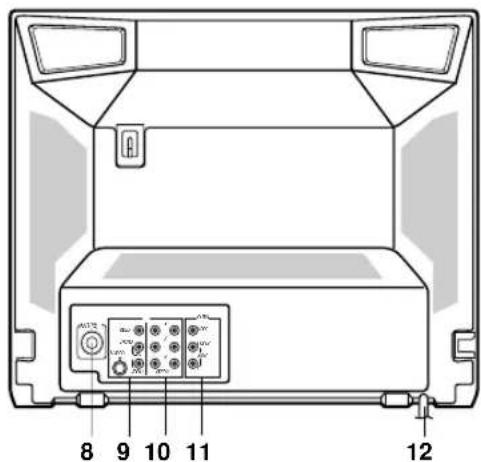
BACKFRONT
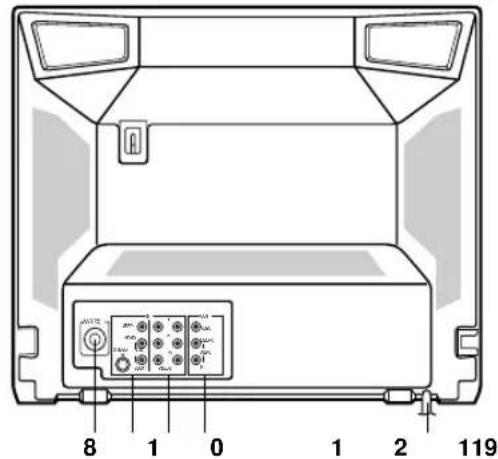
text_image
8 1 0 1 2 1194
6
7
3
-
VIDEO 1 IN Jacks (Rear) - Audio and video signal cables from an external source (ex. VCR) can be connected here. If your video device has S-video out jack, connect to S-video in jack.
-
VIDEO 2 IN Jacks - Audio and video signal cables from an external source (ex. DVD) can be connected here.
If you have a DVD with component video out jacks, connect to the component video in jacks. If you have a video device without the component video out, connect to video in jack.
- REAR AUDIO (L / R) /VIDEO OUT Jacks - Used to output audio and video signals to a TV, amplifier or VCR.
NOTE: This video out jack does not output the signal from component video in jacks.
- AC Power Cord - Connect to a 120V, 60Hz outlet.
text_image
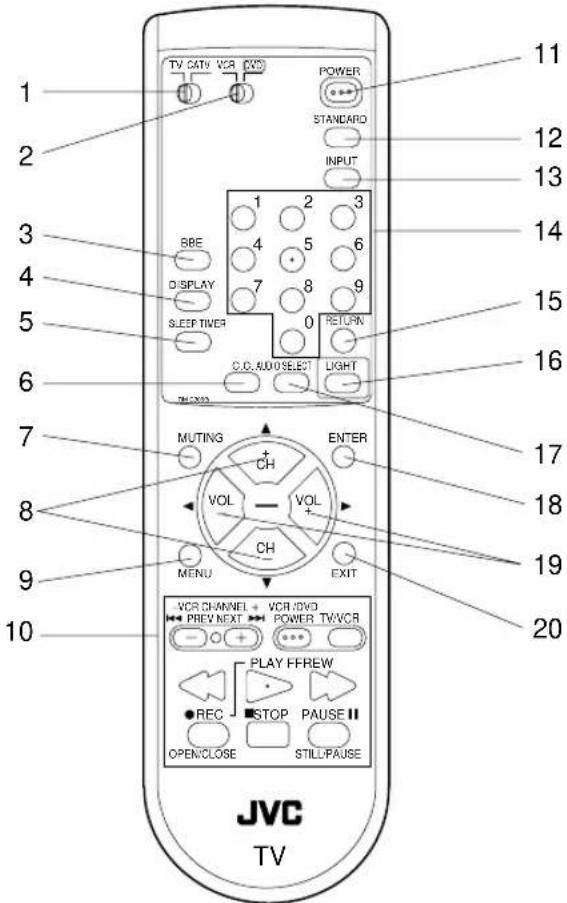
1 2 3 4 5 6 7 8 9 10 TV CATV VCR CVD POWER STANDARD INPUT BBE 1 2 3 DISPLAY 4 5 6 SLEEP TIVER 7 8 9 C.C. AUTO SELECT RETURN LIGHT MUTING ENTER CH VOL - VOL + CH MENU EXIT VCR CHANNEL + VCR/DVD POWER TV/VCR PREV NEXT PLAY FFREW REC STOP PAUSE II OPEN/CLOSE STILL/PAUSE JVC TVBATTERY INSTALLATION
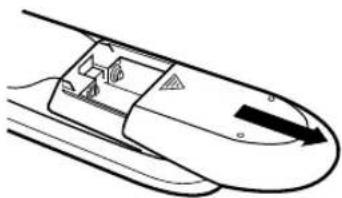
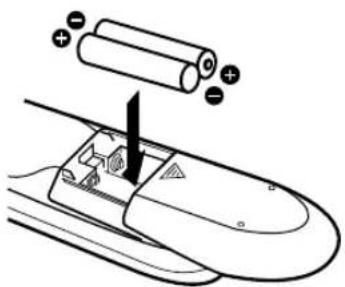
- Slide the battery compartment cover in the direction of the arrow.
natural_image
Line drawing of a high-speed train with tracks and a passenger inside (no text or symbols)- Install two "AA" (penlight size) batteries, paying attention to the polarity diagram in the battery compartment.
text_image
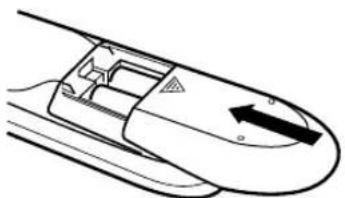
Diagram showing battery charging process with positive and negative charges on a device panel- Replace the compartment cover.
natural_image
Diagram of a car interior with directional arrow indicating movement (no text or symbols)- TV/CATV Switch - Used to select the TV or Cable Box to be operated. (You can operate your cable box after you have programmed the remote control.)
- VCR/DVD switch - Used to select the VCR or DVD to be operated. (You can operate your VCR or DVD after you have programmed the remote control.)
- BBE Button - Press to turn BBE On or Off.
- DISPLAY Button - Displays the current status time, channel (or Input), the present settings on the TV screen.
- SLEEP TIMER Button - Sets the TV to turn off automatically after up to 120 minutes.
- C.C. (Closed Caption) Button - Switches between Caption, Text and TV modes for Closed-Captioned programs.
- MUTING Button - Press to turn off the sound. Press again to turn the sound back on.
- CH +/- Buttons - Press the + button to change to a higher numbered channel set into memory. Press the – button to change to a lower numbered channel set into memory. Press to select the desired item during On-Screen operations.
- MENU Button - Press to display the On-Screen menu function.
10.VCR or DVD Operation Buttons - Press to operate your VCR or DVD.
11.POWER Button - Press to turn the TV on or off.
12.STANDARD Button - Press to reset the On-Screen picture adjustments or Audio adjustment to their factory preset positions. - INPUT Button - Switches between the TV and external input sources.
14.10-key pad - Allows direct access to any channel of the TV, VCR or Cable box. - RETURN Button - Switches between the present channel and the last channel selected.
- LIGHT Button - Press to turn the illumination on for CH +/- and VOL +/- buttons.
- AUDIO SELECT Button - Switches sound between mono and stereo, and SAP when receiving broadcasts in stereo or SAP.
- ENTER Button - Press to enter selected setup.
- VOL +/- Buttons - Press the + button to increase, or the - button to decrease the volume level. Press to select the desired setting or arrangement during On-Screen operations.
- EXIT Button - Press to exit the On-Screen menu function.
REMOTE CONTROL BASICS
- Before you can operate the remote control, you must first install the batteries (included). See “Changing the Batteries” on this page above for instructions. (For an illustration, please see page 6.)
- Press the POWER button to turn the television on or off.
- Make sure the TV/CATV switch is set to TV. Move the switch to CATV only if you need to operate a cable box.
- Slide the VCR/DVD selector switch to VCR to control a VCR, slide to DVD to control a DVD player. Please see pages 8 to 10 for instructions on programming your remote control to operate a Cable box, VCR or DVD player.
- Press the CH + and CH - buttons to scan through the channels. Tap the CH + or CH - button to move through the channels one channel at a time.
- Press VOL + or VOL – to raise or lower the volume. An indicator bar will appear onscreen to show you the television volume level.
- The CH +/- and VOL +/- buttons are also used to navigate JVC's onscreen menu system.
- You can directly access specific channels using the 10-key pad.
- This remote includes illuminated buttons for key features like CH +/- buttons, and VOL +/- buttons. Press the LIGHT button to turn the illumination on.
CHANGING THE BATTERIES
Push down on the remote's back cover and slide towards the bottom to remove it.
Insert two AA batteries (supplied), carefully noting the “+” and “−” markings on the batteries and on the remote control. To avoid a potential short circuit, insert the “−” end first.
Be sure to use only size AA batteries.
When batteries are installed, slide the cover back into place (until it clicks into position).
- If the remote control acts erratically, replace the batteries. Typical battery life is six months to one year. We recommend using alkaline batteries for longer battery life.
When you change the batteries, try to complete the task within three minutes. If you take longer than three minutes, the remote control codes for your VCR, DVD, and/or Cable Box may have to be reset (pages 8-10).
BATTERY PRECAUTIONS
The precautions below should be followed when using batteries in this device:
- Use only the size and type of batteries specified.
- Be sure to follow the correct polarity when installing the batteries as indicated in the battery compartment. Reversed batteries may cause damage to the device. To avoid a potential short circuit, insert the “—” end first.
- Do not mix different types of batteries together (e.g. Alkaline and Carbon-zinc) or old batteries with fresh ones.
- If the device is not to be used for a long period of time, remove the batteries to prevent damage or injury from possible battery leakage.
- Do not try to recharge batteries not intended to be recharged; they can overheat and rupture. (Follow battery manufacturer's directions.)
- When you change the batteries, try to complete the task within three minutes. If you take longer than three minutes, the remote control codes for your Cable Box may have to be reset (see page 8).
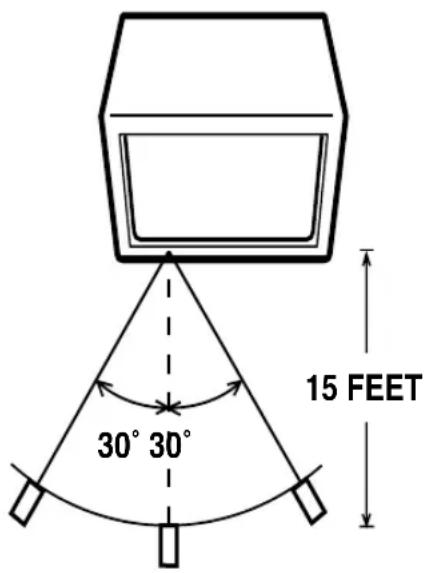
EFFECTIVE DISTANCE OF THE REMOTE CONTROL TRANSMITTER
text_image
30° 30° 15 FEETNOTES: • When there is an obstacle between the TV and the transmitter, the transmitter may not operate. • When direct sunlight, an incandescent lamp, fluorescent lamp or any other strong light shines on the Remote sensor of the TV, the remote operation may be unstable.
REMOTE PROGRAMMING
Setting the CATV, VCR and DVD Codes
You can program your remote to operate your cable box, satellite receiver, VCR or DVD player by using the instructions and codes listed below. If the equipment does not respond to any of the codes listed below or to the code search function, use the remote control supplied by the manufacturer.
Cable Box or Satellite setup
The remote control is programmed with CATV and/or Satellite codes for power on, power off, channel up, channel down, and 10 key operation.
1) Find the CATV/Satellite brand from the list of codes shown below.
2) Slide the 2-way selector switch to "CATV".
3) Press and hold down the DISPLAY button.
4) With the DISPLAY button held down, enter the first code number listed using the 10 key pad.
5) Release the DISPLAY button.
6) Confirm the operation of the Cable Box/Satellite receiver.
- If your CATV or Satellite box does not respond to the first code, try the others listed. If it does not respond to any code, try the Search Codes Function as shown below.
| Cable Box CODES Cable Box CODES | |||
| ABC | Pulsar024 | 051, 032 | |
| Archer | 032, 025 | Puser | 032 |
| Cableview | 051, 032 | RCA | 061, 070 |
| Citizen | 022, 051 | Realistic | 032 |
| Curtis | 058, 059 | Regal | 058, 064, 040, 041, 042, 045, 068 |
| Diamond | 024, 032, 025 | Regency | 034 |
| Eagle | 029 | Rembrandt | 037, 032, 051, 038 |
| Eastern | 034 | Samsung | 051 |
| GC Brand | 032, 051 | Scientific Atlanta | 057, 058, 059 |
| Gemini | 022, 043 | SLMark | 051, 047 |
| General Instrument | 065, 024, 025, 026, 027, 020, 021, 022, 057, 023 | Sprucer | 051, 056 |
| Hamlin | 040, 041, 042, 045, 058, 064 | Stargate | 032, 051 |
| Hitachi | 049, 024 | Telecaption | 067 |
| Jerrold | 065, 024, 025, 026, 027, 020,021, 022, 057, 023 | Teleview | 047, 051 |
| Macom | 049, 050, 051, 054 | Texscan | 044 |
| Magnavox | 033 | Tocom | 035, 036, 066 |
| Memorex | 030 | Toshiba | 050 |
| Movietime | 032, 051 | Unika | 032, 025 |
| Oak | 039, 037, 048 | Universal | 022, 032 |
| Panasonic | 055, 056, 060, 071 | Videoway | 052 |
| Paragon | 063 | Viewstar | 029, 030 |
| Philips | 028, 029, 030, 052, 053, 031, 069 | Zenith 063, 046 | |
| Pioneer | 047, 062 | Zenith/Drake Satellite | 046 |
| Digital Satellite Systems | CODES | Digital Satellite Systems | CODES |
| Echostar | 100, 113, 114 | Philips | 102, 103 |
| Express VU | 100, 113 | Primestar | 108 |
| G.E. | 106 | Proscan | 106, 109, 110 |
| G.I. | 108 | RCA | 106, 109, 110 |
| Gradiente | 112 | Sony | 107 |
| Hitachi | 104, 111 | Star Choice | 104, 108 |
| HNS (Hughes) | 104 | Toshiba | 101 |
| Pranasonic | 105 | Uniden | 102, 103 |
Cable/Satellite Search Codes Function:
1) Slide the 2-Way Mode Selector switch to CATV.
2) Press the TV POWER and RETURN buttons. Hold for at least three seconds and release.
3) Press TV POWER, see if the CATV or Satellite box responds.
4) If there was a response, press RETURN. The operating codes are now set. If there was no response, repeat Step 3. If you repeat Step 3 a total of 52 times without a response, use the remote control which came with the equipment.
5) Press RETURN to exit.
VCR setup
The remote control is programmed with VCR codes for power on, power off, play, stop, fast-forward, rewind, pause, record, channel up, and channel down operation.
1) Find the VCR brand from the list of codes shown below.
2) Slide the first 2-way selector switch to "TV" and the other 2-way selector switch to "VCR".
3) Press and hold down the DISPLAY button.
4) With the DISPLAY button held down, enter the first code number listed with the 10 key pad.
5) Release the DISPLAY button.
6) Confirm the operation of the VCR.
- If your VCR does not respond to the first code, try the others listed. If it does not respond to any code, try the Search Codes Function as shown below.
- Some manufacturer's VCR's may not respond to the TV/VCR button, even if other buttons work properly.
- To record, hold down the REC button on the remote and press PLAY.
| VCRs CODES | VCRs CODES | ||
| Admiral | 035 | Optimus | 028, 021, 035, 064 |
| Aiwa | 027, 032, 095 | Orion | 026, 020 |
| Akai | 029, 072, 073, 074 | Panasonic | 023, 024, 021, 022 |
| Audio Dynamic | 003, 005 | Penney | 024, 058, 045, 063, 003, 004, 005, 093 |
| Bell & Howell | 063, 071 | Pentax | 058, 005, 045, 093 |
| Broksonic | 020, 026, 094 | Philco | 031, 024, 027, 023, 026, 020, 043 |
| Canon | 023, 025 | Philips | 031, 023, 024, 086 |
| CCE | 043 | Pioneer | 023 |
| Citizen | 064 | Proscan | 045, 058, 023, 024, 031, 046, 059, 060, 033, 087, 093 |
| Craig | 063, 029, 064 | Quasar | 021, 022, 023, 024 |
| Curtis Mathes | 045, 024, 027, 093 | Radio Shack | 033, 024, 063, 036, 067, 040, 027 |
| Daewoo | 043, 059, 024, 092 | RCA | 033, 045, 058, 023, 024, 031, 046, 059, 060, 083, 084, 085, 087, 093 |
| DBX | 003, 004, 005 | Realistic 024, 063, 036, 067, 040, 027 | |
| Dimensia | 045, 093 | Samsung | 037, 060, 062, 033, 089 |
| Emerson | 043, 026, 077, 061, 025, 042, 020, 076 | Samtron | 089 |
| Fisher | 063, 066, 067, 065, 071, 091 | Sansui | 003, 026, 020, 052 |
| Funai | 027, 026, 020, 000 | Sanyo | 063, 067, 091, 071 |
| G.E. | 033, 045, 024 | Scott | 059, 060, 062, 067, 038, 040, 047, 048, 026, 020 |
| Go Video | 037, 051, 049, 050, 089 | Sears | 063, 064, 065, 066, 058, 000, 001 |
| Goldstar | 064 | Shintom | 075 |
| Gradiente | 083, 084, 081, 000, 001 | Sharp | 035, 036, 080, 088 |
| Hitachi | 023, 045, 058, 027, 081, 093 | Signature 2000 | 027, 035 |
| Instant Replay | 024, 023 | Singer | 075 |
| Jensen | 003 | Sony | 028, 029, 030, 053, 054, 055 |
| JVC | 000, 001, 002, 003, 004, 005 | SV 2000 | 027 |
| Kenwood | 003, 004, 064, 005 | Sylvania | 031, 023, 024, 027 |
| LXI 027, 064, 058, 065, 066, 063, 067 | Symphonic | 027, 081 | |
| Magnavox | 031, 023, 024, 086 | Tashiro | 064 |
| Marantz | 003, 004, 005 | Tatung | 003, 004, 005 |
| Marta | 064 | Teac | 003, 004, 027, 005 |
| Memorex | 024, 067 | Technics | 021, 022, 023, 024 |
| MGA | 038, 040, 047, 048, 041, 042 | Teknika | 024, 027, 070 |
| Minolta | 058, 045, 093 | Toshiba | 059, 046, 079 |
| Mitsubishi | 038, 040, 047, 048, 041, 042, 078, 090 | Vector Research | 005 |
| Multitech | 047, 027, 062 | Wards | 035, 036, 067, 044, 064 |
| NEC | 003, 004, 005, 000 | Yamaha | 063, 003, 004, 005 |
| Olympic | 024, 023 | Zenith 044, 082, 064, 094 | |
VCR Search Codes Function:
1) Slide the first 2-way selector switch to "TV" and the other 2-way selector switch to "VCR".
2) Press the VCR POWER and RETURN buttons. Hold for at least three seconds and release.
3) Press VCR POWER, see if the VCR responds.
4) If there was a response, press RETURN. The operating codes are now set. If there was no response, repeat Step 3. If you repeat Step 3 a total of 80 times without a response, use the manufacturers remote control which came with the VCR.
5) Press RETURN to exit.
DVD setup
The remote control is programmed with DVD codes for power on, power off, play, stop, fast-forward, rewind, previous chapter, next chapter, tray open/close, and still/pause operation.
1) Find the DVD player brand from the list of codes shown below.
2) Slide the first 2-way selector switch to "TV" and the other 2-way selector switch to "DVD".
3) Press and hold down the DISPLAY button.
4) With the DISPLAY button held down, enter the first code number listed with the 10 key pad.
5) Release the DISPLAY button.
6) Confirm the operation of the DVD player.
- If your DVD player does not respond to the first code, try the others listed. If it does not respond to any code, try the Search Codes Function as shown below.
- After you program your remote, some DVD buttons may not work properly. If some buttons do not work properly, use the remote control which came with your DVD player.
| DVD Player CODES | DVD Player CODES | ||
| Aiwa | 043 | Raite | 033 |
| Apex | 040 | RCA | 021, 026 |
| Denon | 020, 037 | Sampo | 034 |
| Hitachi | 030, 031 | Samsung | 030 |
| JVC | 000 | Sharp | 028 |
| Kenwood | 035 | Silvania | 038 |
| Konka | 039 | Sony | 024, 045, 046, 047 |
| Mitsubishi | 025 | Technics | 020 |
| Onkyo | 041 | Toshiba | 023 |
| Oritron | 044 | Wave | 042 |
| Panasonic | 020 | Yamaha | 020 |
| Philips | 023, 036 | Zenith | 027, 032 |
| Pioneer | 022 | ||
DVD Player Search Codes Function:
1) Slide the first 2-way selector switch to "TV" and the other 2-way selector switch to "DVD".
2) Press the DVD POWER and RETURN buttons. Hold for at least three seconds and release.
3) Press DVD POWER, see if the DVD player responds.
4) If there was a response, press RETURN. The operating codes are now set. If there was no response, repeat Step 3. If you repeat Step 3 a total of 30 times without a response, use the manufacturers remote control which came with the DVD player.
5) Press RETURN to exit.
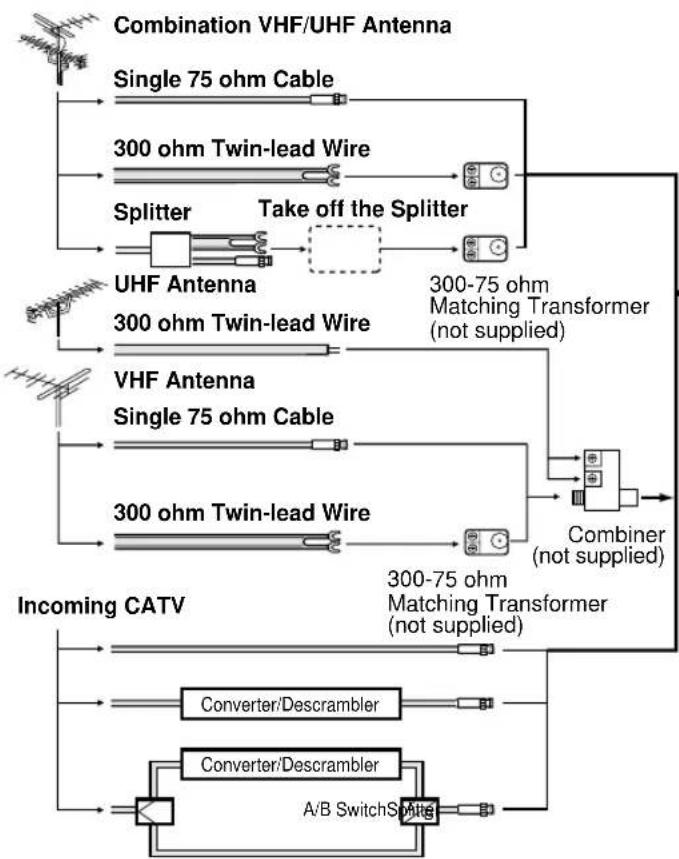
flowchart
graph TD
    A["Combination VHF/UHF Antenna"] --> B["Single 75 ohm Cable"]
    A --> C["300 ohm Twin-lead Wire"]
    A --> D["Splitter"]
    D --> E["Take off the Splitter"]
    F["UHF Antenna"] --> G["300 ohm Twin-lead Wire"]
    F --> H["VHF Antenna"]
    H --> I["300 ohm Twin-lead Wire"]
    J["Incoming CATV"] --> K["Converter/Descrambler"]
    J --> L["Converter/Descrambler"]
    J --> M["A/B SwitchSpit"]
    N["300-75 ohm Matching Transformer (not supplied)"] --> O["Combiner (not supplied)"]
    P["300-75 ohm Matching Transformer (not supplied)"] --> Q["300-75 ohm Matching Transformer (not supplied)"]
Combination VHF/UHF Antenna (Single 75 ohm Cable or 300 ohm Twin-lead Wire)
Connect the 75 ohm cable from a combination VHF/UHF antenna to the Antenna Jack. If your combination antenna has a 300 ohm Twin-lead Wire, use the 300-75 ohm Matching Transformer (not supplied).
Combination VHF/UHF Antenna (Separate VHF and UHF 300 ohm Twin-leads)
Connect the UHF Twin-lead Wire to a Combiner (not supplied). Connect the VHF Twin-lead to the 300-75 ohm Matching Transformer (not supplied). Attach the Transformer to the Combiner. Attach the Combiner to the Antenna Jack.

natural_image
Front view of a white electronic device casing with control panel and indicator lights (no visible text or symbols)This television has an extended tuning range and can tune most cable channels without using a cable company supplied converter box. Some cable companies offer "premium pay channels" in which the signal is scrambled. Descrambling these signals for normal viewing requires the use of a descrambler device which is generally provided by the cable company.
Separate VHF/UHF Antennas
Connect the 75 ohm Cable from the VHF antenna and the UHF antenna Twin-lead to a combiner (not supplied). Attach the Combiner to the Antenna Jack.
NOTE: If your VHF antenna has a Twin-lead Wire, use the 300-75 ohm Matching Transformer (not supplied), then connect the Transformer to the Combiner.
For Subscribers to Basic Cable TV Service
For basic cable service not requiring a Converter/Descrambler box, connect the CATV 75 ohm Coaxial Cable directly to the Antenna Jack on the back of the television.
For Subscribers to Scrambled Cable TV Service
If you subscribe to a cable service which requires the use of a Converter/Descrambler box, connect the incoming cable to the Converter/Descrambler box and connect the output of the box to the Antenna Jack on the back of the television. Follow the connections shown left. Set the television to the output of the Converter/Descrambler box (usually channel 3 or 4) and use the Converter/Descrambler box to select channels.
For Subscribers to Unscrambled Basic Cable with Scrambled Premium Channels
If you subscribe to a cable service in which basic cable channels are unscrambled and premium channels require the use of a Converter/Descrambler box, you may wish to use a two-set signal splitter (sometimes called a "two-set coupler") and an A/B Switch box from the cable installer or an electronics supply store. Follow the connections shown left. With the switch in the "B" position, you can directly tune any nonscrambled channels on your TV. With the switch in the "A" position, tune your TV to the output of the Converter/Descrambler box (usually channel 3 or 4) and use the box to tune scrambled channels.
The exact arrangement you use to interconnect various video and audio components to the TV is dependent on the model and features of each component. Check the User's Guide provided with each component for the location of video and audio inputs and outputs.
The connection diagrams in the following are offered as suggestions. You may need to modify them to accommodate your particular assortment of components. The diagrams are intended to show component video and audio interconnections only.
Press the INPUT button to select the AV mode to use the TV as a monitor.
Operate your VCR as usual.
TV/AV SELECTION
If you connect the TV to VCR, camcorder, TV game or DVD you can select by pressing the INPUT button.
Press the INPUT button repeatedly to select the desired mode.
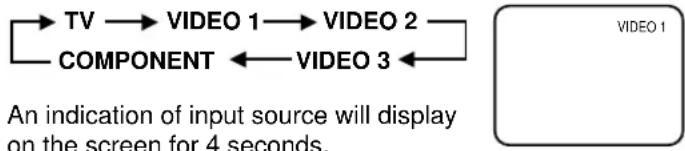
flowchart
graph LR
    TV --> VIDEO 1 --> VIDEO 2 --> COMPONENT <-- VIDEO 3
An indication of input source will display on the screen for 4 seconds.
1. To connect the TV to a VCR
(ex. Use VIDEO 1 IN jacks to connect it.)
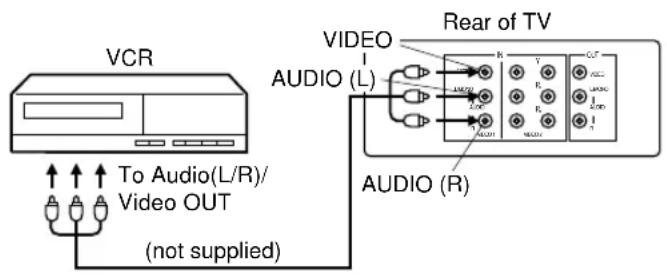
text_image
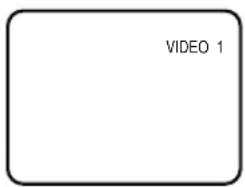
VCR To Audio(L/R)/ Video OUT (not supplied) VIDEO AUDIO (L) Rear of TV AUDIO (R)- Select "VIDEO 1" by pressing the INPUT button to display the VCR picture.
2. To connect the TV to a VCR with an S-VIDEO jack
If you connect a VCR with an S-video jack to the S-VIDEO jack on the rear of TV, you must also connect the audio cables to the AUDIO IN (VIDEO 1) jacks on the rear of the TV. The S-video cable only carries the video signal. Audio signal is separate.
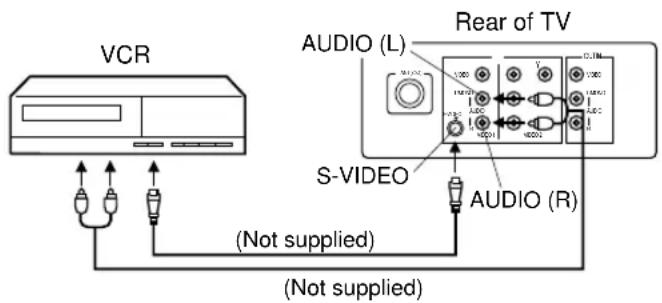
text_image
VCR AUDIO (L) Rear of TV S-VIDEO (Not supplied) (Not supplied) AUDIO (R)NOTE: When the S-video cable and the video cable are connected to each jack at the same time, the S-video cable takes precedence over the video cable.
3. To connect the TV to a camcorder
To playback from the camcorder, connect the camcorder to the TV as shown.
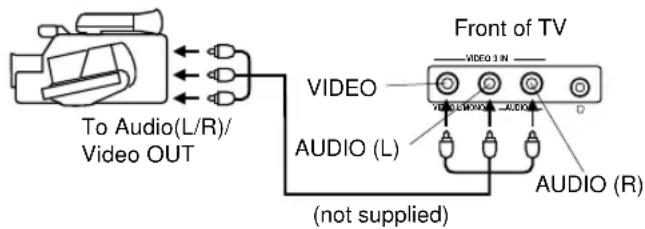
text_image
To Audio(L/R)/ Video OUT Front of TV VIDEO AUDIO (L) AUDIO (R) (not supplied)- Select "VIDEO 3" by pressing the INPUT button to display the camcorder picture.
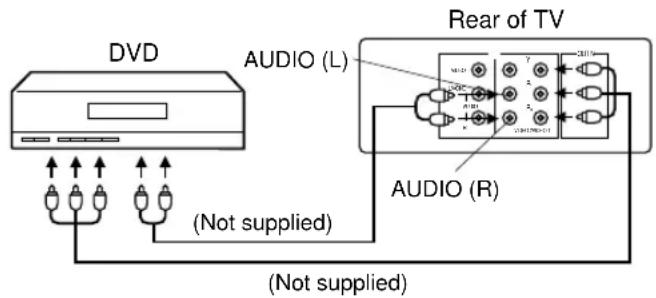
4. To connect the TV to a DVD with COMPONENT VIDEO OUT Jacks.
If you connect a DVD with the COMPONENT VIDEO OUT jacks to the COMPONENT VIDEO IN (Y, PB, PR) jacks on the rear of TV, you must also connect the audio cables to the AUDIO IN (VIDEO 2 IN) jacks on the rear of the TV.
text_image
DVD AUDIO (L) Rear of TV AUDIO (R) (Not supplied) (Not supplied)- Select "COMPONENT" by pressing the INPUT button to display the DVD picture.
- If you have a DVD without COMPONENT VIDEO OUT jacks, connect the video cable to VIDEO IN (VIDEO 2 IN) jack. In this case, select "VIDEO 2" by pressing the INPUT button to display the DVD picture.
This TV can display the channel number, on-screen displays and picture adjustments on the screen in English, Spanish or French.
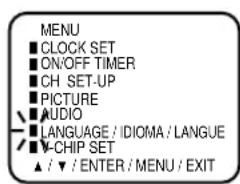
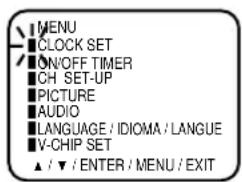
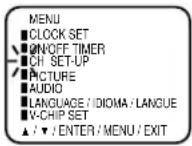
On-screen language selection (step 3) will automatically appear on the screen when you press the MENU button initially. Select the language you prefer first, then proceed with the other menu options.
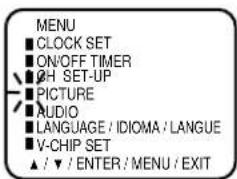
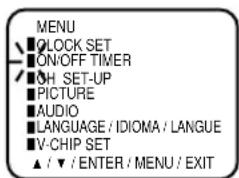
1 Press the MENU button.
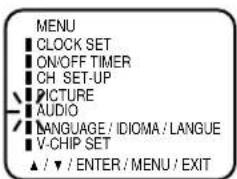
2 Press the CH + (▲) or - (▼) button to select the LANGUAGE mode, then press the ENTER button.
text_image
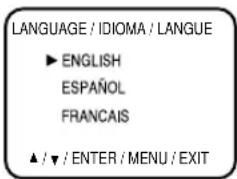
MENU ■ CLOCK SET ■ ON/OFF TIMER ■ CH SET-UP ■ PICTURE ■ AUDIO ■ LANGUAGE / IDIOMA / LANGUE ■ V-CHIP SET ▲ / ▼ / ENTER / MENU / EXIT3 Press the CH + (▲) or - (▼) button until the "▶" indicator points to the desired language: English (ENGLISH), Spanish (ESPAÑOL) or French (FRANCAIS), then press the ENTER button.
text_image
LANGUAGE / IDIOMA / LANGUE ► ENGLISH ESPAÑOL FRANCAIS ▲ / ▼ / ENTER / MENU / EXIT4 Press the EXIT button.
NOTE:
If Spanish or French is chosen, the Closed Caption indicators will be in the selected language, but the Closed Caption text will not be affected by the language selection.
SETTING CLOCK
You must set the time manually for DISPLAY and ON/OFF TIMER.
1 Press the MENU button.
2 Press the CH + (▲) or CH - (▼) button until the indicator next to "CLOCK SET" begins to flash, then Press the ENTER button.
3 Press the CH + (▲) or CH - (▼) button to set the hour, then press the VOL + (▶) button.
text_image
MENU CLOCK SET ON/OFF TIMER CH SET-UP PICTURE AUDIO LANGUAGE / IDIOMA / LANGUE V-CHIP SET ▲ / ▼ / ENTER / MENU / EXIT4 Press the CH + (▲) or CH - (▼) button to set the minute.
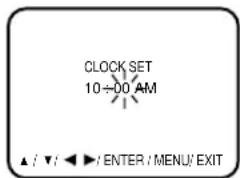
text_image
CLOCK SET 10÷00 AM ▲ / ▼ / ◀ ▶ : ENTER / MENU/ EXIT5 Press the EXIT button.
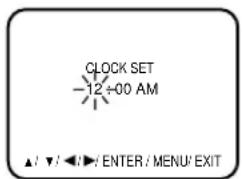
text_image
CLOCK SET -12 +00 AM ▲ / ▼ / ◀ / ENTER / MENU/ EXITNOTES:
• After a power failure or disconnection of the power plug, the time display will be lost. In this case, set present time again.
- When you set the minute, you can change in 10-minutes by holding down the CH + (▲) or CH - (▼) button.
This TV is equipped with a channel memory feature which allows channels to skip up or down to the next channel set into memory, skipping over unwanted channels. Before selecting channels, they must be programmed into the TV's memory. In addition to normal VHF and UHF channels, this TV can receive up to 113 Cable TV channels. To use this TV with an antenna, set the TV/CATV menu option to the TV setting. When shipped from the factory, this menu option is in the CATV setting.
TV/CATV SELECTION
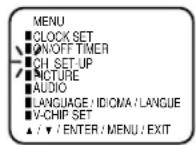
1 Press the MENU button.
2 Press the CH + (▲) or - (▼) button until the indicator next to "CH SET-UP" begins to flash, then press the ENTER button.
3 Press the CH + (▲) or - (▼) button until the indicator next to "TV/CATV" begins to flash.
4 Press the VOL + (▶) or - (◀) button to select the TV or CATV mode. The arrow indicates the selected mode.
5 Press the EXIT button.
NOTE: Contact your cable company to determine the type of cable system used in your area.

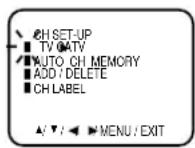
AUTOMATIC CHANNEL MEMORY
1 Press the MENU button.
2 Press the CH + (▲) or - (▼) button until the indicator next to "CH SET-UP" begins to flash, then press the ENTER button.
3 Press the CH + (▲) or - (▼) button until the indicator next to "AUTO CH MEMORY" begins to flash, then press the ENTER button. The TV will begin memorizing all the channels available in your area.
4 Press the EXIT button.
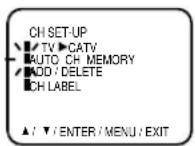
TO ADD/DELETE CHANNELS
1 Press the MENU button.
2 Press the CH + (▲) or - (▼) button until the indicator next to "CH SET-UP" begins to flash, then press the ENTER button.
3 Press the CH + (▲) or - (▼) button until the indicator next to "ADD/DELETE" begins to flash, then press the ENTER button.
4 Select the desired channels to be added or deleted using the 10-key pad (0-9) or the CH + or - button.
5 Press the VOL + (▶) or - (◀) button to select ADD or DELETE.
If an unmemorized channel was selected (step 4), the channel indication will be red. Press the VOL + (▶) or - (◀) button if you wish to ADD the unmemorized channel. The channel indicator will change from red to green when a channel is added and the channel will be memorized. If a memorized channel was selected (step 4), the channel indication will be green.
Press the VOL + (▶) or - (◀) button if you wish to DELETE the channel from memory. The channel indicator will change from green to red when a channel is deleted.
Repeat Steps 4 and 5 for each channel to be added or deleted.
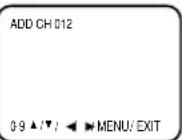
6 Press the EXIT button after adding or deleting all of the desired channels, to return to normal TV viewing.
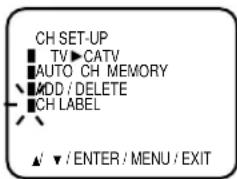
CH LABEL
You can labal every channel up to 4 characters.
Channel labels will appear over the channel number display each time you select a channel.
1 Select a channel you want to label by pressing the 10-key pad or CH + or - button.
2 Press the MENU button.
3 Press the CH + (▲) or - (▼) button until the indicator
next to "CH SET-UP" begins to flash, then press the ENTER button.

text_image
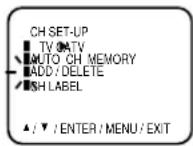
MENU ■CLOCK SET ▼ON/OFF TIMER ■CH SET-UP ■PICTURE ■AUDIO ■LANGUAGE / IDIOMA / LANGUE ■V-CHIP SET ▲ / ▼ / ENTER / MENU / EXIT4 Press the CH + (▲) or - (▼) button until the indicator
next to "CH LABEL" begins to flash, then press the ENTER button.
text_image
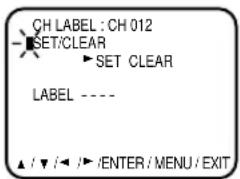
CH SET-UP TV ▶ CATV AUTO CH MEMORY ADD / DELETE CH LABEL ▲/▼ / ENTER / MENU / EXIT5 Press the VOL + (▶ or - () button to select "SET"
or "CLEAR". Select "SET" in case you have a channel to label or change. Select "CLEAR" in case you have a channel to delete. Then press the ENTER button.
text_image
CH LABEL : CH 012 SET/CLEAR SET CLEAR LABEL ---- ▲ / ▼ / ◀ / ▶ /ENTER / MENU / EXIT6 Go to step 7 when you select the "SET". Go to step 9 when you select the "CLEAR".
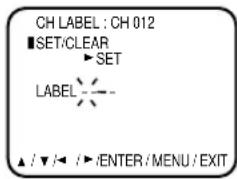
7 Now the bar for the first space is flashing. Press the
VOL + (▶) or - (◀) button to enter a character in the first space. Press the button repeatedly until the character you want appears on the screen. Then press the ENTER button.
text_image
CH LABEL : CH 012 ■SET/CLEAR ►SET LABEL ▲ /▼/◄ /►/ENTER/MENU/EXITNOTE:
The character will change as below.

text_image
- ←→ 0 ←→ ⋯ ←→ 9 ←→ A ←→ ⋯ ←→ Z SPAGE → ←→ + ←→ -8 Repeat step 7 to enter the rest of the characters from second to fourth.
9 Press the ENTER button to register.
10 Press the EXIT button.
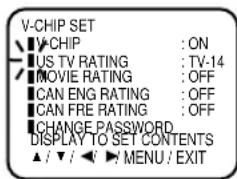
SETTING V-CHIP
This TV is fitted with a V-CHIP controller which provides you with channel viewing access controls and restrictions. This function is to prevent your children from watching violence or sexual scenes that may be harmful.
1 Press the MENU button and press the CH + (▲) or - (▼) button to select the V-CHIP SET option, then press the ENTER button.
text_image
MENU ■ CLOCK SET ■ ON/OFF TIMER ■ CH_SET-UP ■ PICTURE ■ AUDIO ■ LANGUAGE / IDIOMA / LANGUE ■ V-CHIP SET ▲: ▼ / ENTER / MENU / EXIT4 Press the CH + (▲) or - (▼) button to select the V-CHIP option. Press the VOL + (▶or - ()◀ button to select the ON.
text_image
V-CHIP SET ■ V-CHIP : OFF ■ NS TV RATING : OFF ■ MOVIE RATING : OFF ■ CAN ENG RATING : OFF ■ CAN FRE RATING : OFF ■ CHANGE PASSWORD ▲/▼/◄/►/MENU/EXIT2 Enter your password (4 digits) using the 10-key pad (0-9). In the event of entering incorrect password press the VOL – (→) button. Then press the ENTER button.
text_image
V-CHIP SET NEW PASSWORD : ***** 0-9' ← / ENTER / MENU / EXITFor U.S. Press the CH + (▲) or - (▼) button to select the US TV RATING or MOVIE RATING option. For Canadian Press the CH + (▲) or - (▼) button to select the CAN ENG RATING RATING option.
text_image
V-CHIP SET ■ V CHIP : ON ■ US TV RATING : OFF ■ MOVIE RATING : OFF ■ CAN ENG RATING : OFF ■ CAN FRE RATING : OFF ■ CHANGE PASSWORD ▲ / ▼ / ◀ / ▶ / MENU / EXIT3 Enter the same password for confirmation, then press the ENTER button.

text_image
V-CHIP SET CONFIRM PASSWORD : 0-9/ ← / ENTER / MENU / EXIT6 Press the VOL + (▶ or - () ◀ button to select the desired rating for the applicable video or TV channel.
text_image
V-CHIP SET ■ V-CHIP : ON ■ US TV RATING : TV-14 ■ MOVIE RATING : OFF ■ CAN ENG RATING : OFF ■ CAN FRE RATING : OFF ■ CHANGE PASSWORD DISPLAY TO SET CONTENTS ▲ / ▼ / ◀ ▶ MENU / EXIT7 Press the EXIT button.
for U.S. TV RATING

flowchart
graph LR
    A["OFF"] --> B["TV-Y"]
    B --> C["TV-PG"]
    C --> D["Y7"]
    D --> E["TV-G"]
    E --> F["TV-14"]
    F --> G["↔"]
    G --> H["↔"]
    H --> I["TV-MA"]
    J["VOL - ()"] --> K["← ()→"]
    K --> L["▶"]
    L --> M["↔"]
    M --> N["↔"]
    N --> O["↔"]
TV-Y : all children TV-PG : parental guidance
TV-Y7 : 7 years old and above TV-14 : 14 years old and above
TV-G : childrens program TV-MA : 17 years old and above
When you select TV-Y7, TV-PG, TV-14 or TV-MA, press the DISPLAY button to explain the rating.
Press the CH + (▲) or - (▼) button to select the desired rating you want. Press the VOL + (▶) or - ( ) ◀ button to select the setting ON or OFF. If you want to back to V-CHIP SET menu, press the MENU button.
MOVIE RATING

flowchart
graph LR
    A["OFF"] --> B["PG"]
    B --> C["PG-13"]
    C --> D["R NC-17-XG"]
    D --> E["XG"]
    E --> F["Output"]
    style A fill:#f9f,stroke:#333
    style B fill:#ccf,stroke:#333
    style C fill:#cfc,stroke:#333
    style D fill:#fcc,stroke:#333
    style E fill:#cff,stroke:#333
    style F fill:#ffc,stroke:#333
G : all ages R : under 17 years old
PG : parental guidance parental guidance PG-13 : parental guidance suggested
less than 13 years old NC-17: 17 years old and above X : adult only
for Canadian CAN ENG RATING

flowchart
graph LR
    A["VOL - (−)VOL ← (−)"] --> B["OFF C/G+EPG-18+"]
    B --> C["↔"]
    C --> D["G"]
    D --> E["↔"]
    E --> F["↔"]
    F --> G["14+"]
E : Exempt
C : Programming Intended for Children
C8+ : Programming Intended for Children 8 and Over
G : General Audience
PG : Parental Guidance
14+ : 14 Years and Older
18+ : Adult
CAN FRE RATING

flowchart
graph LR
    A["VOL + (◀)"] <--> B["VOL - (▶)"]
    C["OFF"] <--> D["E ↔ G ↔ 8ans+ ↔ 13ans+ ↔ 16ans+ ↔ 18ans+"]
    D --> E["↑"]
- If you want to change password, follow steps 1 and 2 and select "CHANGE PASSWORD" option then enter your new password.
- The V-Chip function is activated only on programs and tapes that have the rating signal.
- Once you block a program using the V-Chip function, the blocked program cannot be watched based on the content of the show. When the program starts, the "IF YOU CANCEL PROTECT, INPUT PASSWORD" will appear on the screen. When you want to release the V-Chip temporarily, enter the password.
If you change the channel or turn off and on the TV while releasing the V-Chip temporarily, the V-Chip setting will be resumed.
- When you watch the TV from the cable box or the VCR with the RF Modulator, then you release the V-Chip temporarily, the V-Chip setting will not be resumed until you turn off the TV. The TV channel is not used in this case.
- When changing the channel with the cable box or the VCR, approximately 10 seconds will pass until the program appears.
- When you dislocated or lost the password, you can cancel the existing password by the following procedure: - Press VOLUME – button of main unit.
- Keep pressing VOLUME – button of main unit and press "0" key of remote control simultaneously for a few seconds.
Before operate your TV select TV position of the TV/CATV switch on the remote to control the TV with the remote.
1 To turn on the TV, press the POWER button.
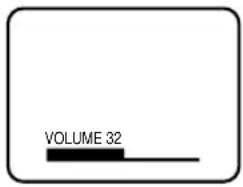
② The VOLUME can be adjusted to a desired level by pressing the VOL (VOLUME) + or - button.
Adjust the volume level by pressing the VOLUME + or - button. The volume level will be indicated on the screen by green bar. As the volume level increases, so do the number of bar. If the volume decreases, the number of green bar also de
text_image
VOLUME 32The sound level will be indicated on the TV screen by green bars and a number. As the sound level increases, so do the number of bars and the number on the screen. The same is true for decreasing the level.
3 Set the TV/CATV menu option to the appropriate position. When shipped from the factory, this menu option is in the CATV setting. See "TO MEMORIZE CHANNELS".
TV - VHF/UHF channels CATV - CABLE TV channels
4 CH (CHANNEL) + and - buttons
Press and release the CH (CHANNEL) + or - button. The channel automatically stops at the next channel set into memory.
CH 012
For proper operation, before selecting channels, they should be set into the TV's memory. See "TO MEMORIZE CHANNELS".
RETURN button
Returns to the channel viewed just before the channel currently onscreen.
flowchart
graph LR
    A[" "] <--> B[" "]
    B[" "]
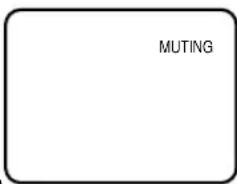
MUTING button
The MUTING button instantly turns the volume down completely when you press it.
Press MUTING button and the volume level will instantly go to zero. To restore
the volume to its previous level, press MUTING button again.
text_image
MUTING10-key pad (0-9)
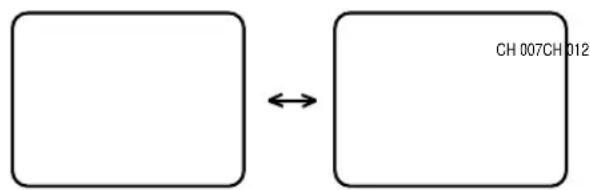
Press these buttons to select a channel. The channel number will appear on the upper right corner of the TV screen. If an invalid channel number is selected, the display will revert to the original channel.
TV Mode Direct Channel Selection
When the TV/CATV menu option is in the TV position, all channels can be instantly selected by using two buttons. (For example, to select channel 2, press "0", then "2". If you press only "2", channel selection will be delayed for a few seconds). For channels 10 and above, press the 2 digits in order.
CATV Mode Direct Channel Selection
When the TV/CATV menu option is in the CATV position, channels can be selected as follows:
CH. 1-9 Press "0" twice, then 1-9 as needed. Example, to select channel 2, press "002".
CH. 10-12 Press "0", then remaining 2 digits. Example, to select channel 12, press "012".
CH. 13-99 Press the 2 digits in order. Example, to select channel 36, press "36".
CH. 100-125 Press the 3 digits in order. Example, to select channel 120, press "120".
NOTE: If the station being viewed stops broadcasting, the TV will automatically shut off after 15 minutes.
Selects the signal input source for the television or Video1,2,3 or Component for video devices like VCR's, DVD players, or camcorders.
text_image
VIDEO 1The input source changes as below.

flowchart
graph LR
    TV --> VIDEO1 --> VIDEO2 --> VIDEO3
    VIDEO1 --> VIDEO2 --> VIDEO3
    VIDEO2 --> VIDEO3
    VIDEO3 --> COMPONENT
STEREO AND SEPARATE AUDIO PROGRAM (SAP)
The TV is equipped with a feature known as Multi-channel TV Sound or MTS. MTS broadcasts greatly enhance TV viewing by bringing you programs with high fidelity stereo sound. MTS also provides an extra channel called the Separate Audio Program or SAP which broadcasters can use to transmit a second language for bilingual transmission or for other purposes.
LISTENING TO STEREO SOUND
When the TV is turned on or a channel selection is made, make certain the STEREO appears on the screen. This means that "Stereo" broadcasting is available. You can enjoy stereo sound from the left and right speakers.
- When "Mono" broadcasting is received, no indication is displayed.
- If the broadcast signal is not strong enough or clear stereo sound is not available, press the AUDIO SELECT button to change to mono sound. The noise should be eliminated. Press it again to return to the stereo sound.
LISTENING TO SAP (SEPARATE AUDIO PROGRAM)
When the TV is turned on or a channel selection is made, make certain the SAP appears on the screen. This means that the "Separate Audio Program" broadcasting is available.
TO SELECT DESIRED SOUND
Press the AUDIO SELECT button to select the desired sound.
MONO+SAP BROADCASTING

flowchart
graph TD
    A["MAIN SOUND (MONO)"] --> B["SAP SOUND"]
    B --> C["MAIN + SAP SOUND (MONO)"]
    C --> A
STEREO+SAP BROADCASTING
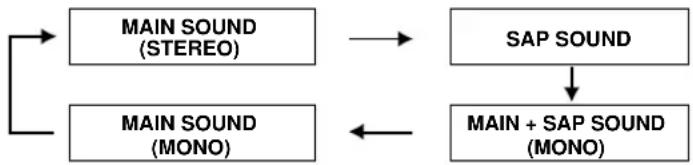
flowchart
graph TD
    A["MAIN SOUND (STEREO)"] --> C["SAP SOUND"]
    B["MAIN SOUND (MONO)"] --> C["SAP SOUND"]
    C --> D["MAIN + SAP SOUND (MONO)"]
    D --> E["Output"]
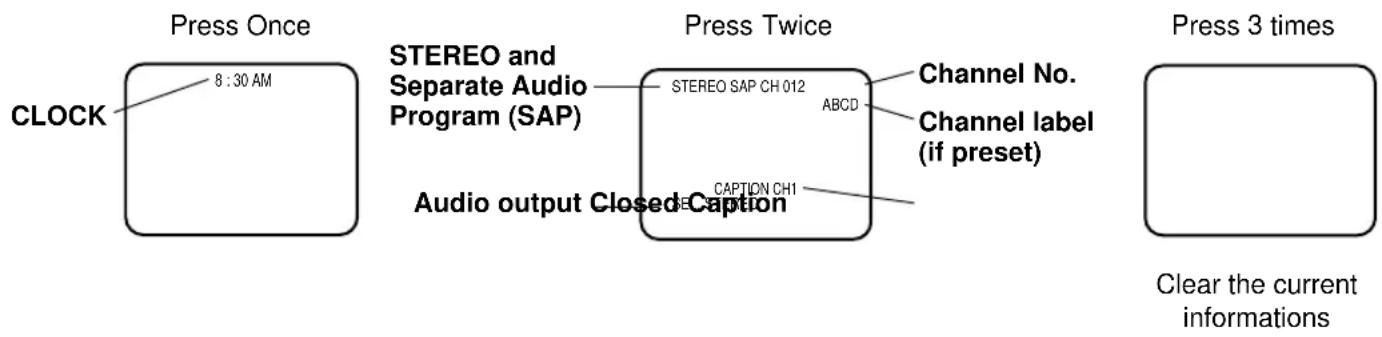
DISPLAY button
Press the DISPLAY button to display the current informations on the screen.
text_image
Press Once CLOCK 8:30 AM STEREO and Separate Audio Program (SAP) Audio output Closed Caption Press Twice STEREO SAP CH 012 ABCD CAPTION CH1 Channel No. Channel label (if preset) Press 3 times Clear the current informationsPICTURE ADJUSTMENTS
You can adjust the settings for color, sharpness, contrast, brightness, tint and component.
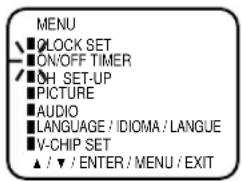
1 Press the MENU button.
2 Press the CH + (▲) or - (▼) button until the indicator next to "PICTURE" begins to flash, then press the ENTER button.
text_image
MENU ■ CLOCK SET ■ ON/OFF TIMER ■ OH SET-UP ■ PICTURE ■ AUDIO ■ LANGUAGE / IDIOMA / LANGUE ■ V-CHIP SET ▲ / ▼ / ENTER / MENU / EXIT3 Press the CH + (▲) or - (▼) button repeatedly to select the item you want to adjust.
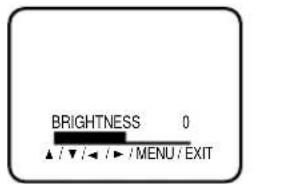
text_image
BRIGHTNESS 0 ▲ / ▼ / ◀ / ▶ / MENU / EXIT
text_image
CONTRAST COLORBRIGHTNESS COMPONENT ↔ ↔ TINTSHARPNESS4 Press the VOL + (▶ or - () ◀ button to adjust the setting.
| + | - | |
| BRIGHTNESS | increase brightness | decrease brightness |
| CONTRAST | increase contrast | decrease contrast |
| COLOR | brilliant color | pale color |
| TINT | greenish color | reddish color |
| SHARPNESS | makes picture clearer | makes picture softer |
| COMPONET | be best picture for DVD | indicate video device except DVD |
TO RETURN TO INITIAL SETTING
Press the STANDARD button while the picture adjusting mode appears on the screen (except the adjusting component).
NOTE: The on-screen display will disappear 6 seconds after finishing an adjustment. The settings can only be adjusted when they are displayed on the TV screen.
SOUND ADJUSTMENTS
You can adjust the setting for bass, treble, balance and stable sound.
1 Press the MENU button.
2 Press the CH + (▲) or - (▼) button until the indicator next to "AUDIO" begins to flash, then press the ENTER button.
text_image
MENU CLOCK SET ON/OFF TIMER CH SET-UP PICTURE AUDIO LANGUAGE / IDIOMA / LANGUE V-CHIP SET ▲ / ▼ / ENTER / MENU / EXIT3 Press the CH + (▲) or - (▼) button repeatedly to select the item you want to adjust.
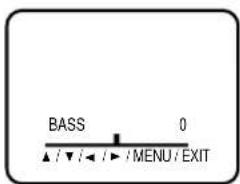
text_image
BASS 0 ▲ / ▼ / ◀ / ▶ / MENU / EXIT4 Press the VOL + (▶or - () ◁button to adjust the setting.
| + - | ||
| BASS | makes the bass sound stronger | makes the bass sound weaker |
| TREBLE | makes the treble sound stronger | makes the treble sound weaker |
| BALANCE | makes the output level of right speaker stronger | makes the output level of left speaker stronger |
| STABLE SOUND | STABLE SOUND “ON” | STABLE SOUND “OFF” |
TO RETURN TO INITIAL SETTING
Press the STANDARD button while the sound adjusting mode appears on the screen.
STABLE SOUND FEATURE
When the loud sound is made, the stable sound feature automatically lower the sound.

text_image
STABLE SOUNDTREBLE BALANCEBASS NOTE: The cNOTE: The on-screen display will disappear 6 seconds after finishing an adjustment. The settings can only be adjusted when they are displayed on the TV screen.
WHAT IS CLOSED CAPTIONING?
This television has the capability to decode and display Closed Captioned television programs. Closed Captioning will display text on the screen for hearing impaired viewers or it will translate and display text in another language.
TO VIEW CLOSED CAPTIONS
Press the C.C. button on the remote control to switch between normal TV and the two Closed Caption Modes (Captions and 1/2 of Full Screen Text).
Captions: This Closed Caption Mode will display text on the screen in English or another language. Generally, Closed Captions in English are transmitted on Captions Channel 1 and Closed Captions in other languages are transmitted on Captions Channel 2.
The Captions will appear in places on the screen where they will least interfere with the picture, usually on the bottom of the screen. News programs will usually show three-line Closed Captions which scroll onto the screen. Most other shows provide two or three lined Captions placed near the character who is speaking so the viewer can follow the dialogue. Words in italics or underlined describe titles, words in foreign languages or words requiring emphasis. Words that are sung usually appear enclosed by musical notes.
Text: The Text Closed Caption Mode will usually fill 1/2 of full screen with a programming schedule or other information. After selecting a Closed Caption Mode, it will stay in effect until it is changed, even if the channel is changed. If the Captions signal is lost due to a commercial or a break in the signal, the Captions will reappear when the signal is received again. If the channels are changed, the Captions will be delayed approximately 10 seconds.
For television programs broadcasting with Closed Captions, look in your TV guide for the Closed Captions symbol (CC).
- When activating the Closed Captioned Decoder, there will be a short delay before the Closed Captioned text appears on the screen.
- Closed Captioned text is only displayed in locations where it is available.
- If no caption signal is received, no captions will appear, but the television will remain in the Caption Mode.
- Misspellings or unusual characters may occasionally appear during Closed Captioning. This is normal with Closed Captioning, especially with live programs. This is because during live programs, captions are also entered live. These transmissions do not allow time for editing.
- When Captions are being displayed, on-screen displays, such as volume and MUTING may not be seen or may interfere with Closed Captions.
- Some cable systems and copy protection systems may interfere with the Closed Captioned signal.
- If using an indoor antenna or if TV reception is very poor, the Closed Caption Decoder may not appear or may appear with strange characters or misspelled words. In this case, adjust the antenna for better reception or use an outdoor antenna.
ON TIMER SETTING
This feature allows you to have the TV automatically turn "ON" at predetermined time.
If you program the "ON" timer once the timer will turn "ON" the TV daily at the same time and to the same channel.
If the power has been turned on at programmed time, the channel is changed to a programmed one.
1 Press the MENU button.
2 Press the CH + (▲) or CH - (▼) button until the indicator next to "ON/OFF TIMER" begins to flash, then press the ENTER button.
3 Press the CH + (▲) or CH - (▼) button until the indicator next to "ON TIMER" begins to flash, then press the ENTER button.
4 Press the CH + (▲) or CH - (▼) button to set the hour, then press the VOL + (▶) button.
text_image
MENU ■LOCK SET ■ON/OFF TIMER ■OH SET-UP ■PICTURE ■AUDIO ■LANGUAGE / IDIOMA / LANGUE ■V-CHIP SET ▲ / ▼ / ENTER / MENU / EXIT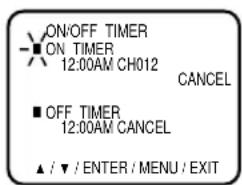
text_image
ON/OFF TIMER ■ ON TIMER 12:00AM CH012 CANCEL ■ OFF TIMER 12:00AM CANCEL ▲ / ▼ / ENTER / MENU / EXIT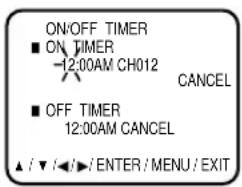
text_image
ON/OFF TIMER ■ ON TIMER -12:00AM CH012 CANCEL ■ OFF TIMER 12:00AM CANCEL ▲ / ▼ / ←/► / ENTER / MENU / EXIT5 Press the CH + (▲) or CH - (▼) button to set the minute, then press the VOL + (▶) button.
- You can change in 10-minutes step by holding down the CH + (▲) or CH - (▼) button.
text_image
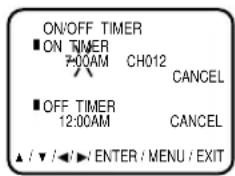
ON/OFF TIMER ■ ON TIMER 7:00AM CH012 CANCEL ■ OFF TIMER 12:00AM CANCEL ▲ / ▼ / ◀/ ▶ ENTER / MENU / EXIT6 Press the CH+ (▲) or CH- (▼) button to set the channel, then press the VOL+ (▶) button.
- You can set the channel which is added in the CH SET-UP option.
text_image
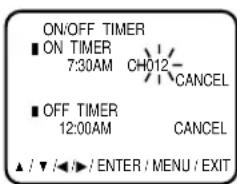
ON/OFF TIMER ■ ON TIMER 7:30AM CH012- CANCEL ■ OFF TIMER 12:00AM CANCEL ▲ / ▼ / ◀ / ▶ / ENTER / MENU / EXIT7 Press the CH + (▲) or CH - (▼) button to select the SET mode.
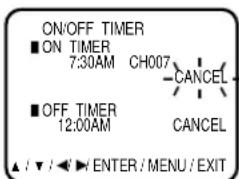
text_image
ON/OFF TIMER ■ ON TIMER 7:30AM CH007 CANCEL ■ OFF TIMER 12:00AM CANCEL ▲ / ▼ / ◀ ▶ ENTER / MENU / EXIT8 Press the EXIT button.
NOTES:
- You cannot set the ON/OFF TIMER when the clock is not set.
- This TV will automatically turn off approximately 1 hour later after the ON TIMER turns on the TV unless any buttons are pressed.
- To cancel the ON TIMER function: To cancel ON TIMER in step 7 above press the CH + (▲) or CH - (▼) button to select the CANCEL mode.
OFF TIMER SETTING
This feature allows you to have the TV turn "OFF" automatically at a predetermined time.
If you program the OFF TIMER once, The TV will be automatically turned off at the same time daily.
1 Press the MENU button.
2 Press the CH + (▲) or CH - (▼) button until the indicator next to "ON/OFF TIMER" begins to flash, then press the ENTER button.
3 Press the CH + (▲) or CH - (▼) button until the indicator next to "OFF TIMER" begins to flash, then press the ENTER button.
text_image
MENU ■LOCK SET ■ON/OFF TIMER ■OH SET-UP ■PICTURE ■AUDIO ■LANGUAGE / IDIOMA / LANGUE ■V-CHIP SET ▲ / ▼ / ENTER / MENU / EXIT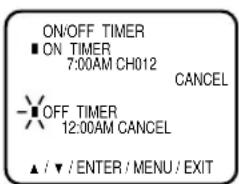
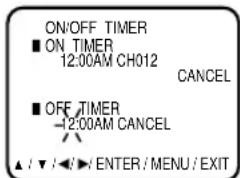
text_image
ON/OFF TIMER ■ ON TIMER 7:00AM CH012 CANCEL ■ OFF TIMER 12:00AM CANCEL ▲ / ▼ / ENTER / MENU / EXIT4 Press the CH + (▲) or CH - (▼) button to set the hour, then press the VOL + (▶) button.
text_image
ON/OFF TIMER ■ ON TIMER 12:00AM CH012 CANCEL ■ OFF TIMER -12:00AM CANCEL ▲ / ▼ / ◀/ ▶ ENTER / MENU / EXIT5 Press the CH + (▲) or CH - (▼) button to set the minute then press the VOL + (▶) button. • You can change in 10-minutes step by holding down the CH + (▲) or CH (▼) button.
text_image
ON/OFF TIMER ■ ON TIMER 12:00AM CH012 CANCEL ■ OFF TIMER 11:00PM CANCEL ▲ / ▼ / ◀ / ENTER / MENU / EXIT6 Press the CH + (▲) or CH - (▼) button to select the SET mode. 7 Press the EXIT button.
text_image
ON/OFF TIMER ■ ON TIMER 12:00AM CH012 CANCEL ■ OFF TIMER 11:30PM CANCEL ▲ / ▼ / ◀/ ENTER / MENU / EXITNOTES:
- If station being viewed stops broadcasting, the TV will automatically shut itself off after 15 minutes.
- To cancel the OFF TIMER function:
To cancel OFF TIMER, in step 7 above press the CH + (▲) or CH - (▼) button to select the CANCEL mode.
BBE
By correcting the phase delay and distortion naturally generated by speaker systems, BBE ensures that the sound that reaches your ears is as natural as the original SONUD. Human voices are clearer and music is natural and well-defined.
TO SET BBE
Press the BBE button to select ON or OFF.
text_image
BBE AUDIO ON OFF- BBE is a registered trademark of BBE Sound, Inc. For U.S., licensed from BBE Sound, Inc. under USP 4638258, 4482866 and 5510572. For Canada, licensed from BBE Sound, Inc. BBE is a registered trademark of BBE Sound, Inc.
SLEEP TIMER button
The Sleep Timer can turn the TV off for you after you fall asleep. Program it to work in intervals of 10 minutes, for a total time of up to 120 minutes.

text_image
SLEEP 120- To change the sleep timer setting: Press the SLEEP TIMER button repeatedly until the display turns to desired time.
- To cancel the sleep time: Press the SLEEP TIMER button repeatedly until the display turns to 0.
VCR buttons
You can use this remote control to operate the basic functions of your VCR. These functions include: play, record, rewind, fast-forward, stop, pause, channel scan, TV /VCR, power on, and power off.
DVD buttons
You can also use this remote control to operate the basic functions of your DVD player. These functions include play, rewind, fast-forward, stop, still/pause, previous/next, tray open/close, power on, and power off.
TV/CATV switch
Use either the television's own tuner or a cable box to select channels. Set this switch to TV to operate the television's built-in tuner.
VCR/DVD switch
You can control a VCR or DVD player with the buttons on the lower part of the remote control.
Move the selector switch to VCR to operate.
- The remote is preset with the code 000 to control JVC-brand VCR's. For any other manufacturer's brand VCR, please see the code chart and instructions on page 9.
Move the selector switch to DVD to operate.
- The remote is preset with the code 000 to control JVC-brand DVD players. For any other manufacturer's brand DVD player, please see the code chart and instructions on page 10.
Move the switch to CATV to operate a cable box.
- See page 8 for information on programming your remote for cable box operation.
Use the VCR/DVD selector switch to choose either VCR or DVD operation.
• See pages 9 and 10 for information on programming your remote with VCR and DVD operating codes.
Before requesting service, please refer to the following chart for the symptom and possible solution.
| SYMPTOMS POSSIBLE SOLUTIONS | |
| TV does not operate | Make sure the power cord is plugged in.Try another AC outlet.Power is off, check fuse or circuit breaker.Unplug unit for an hour, then plug it back in.Set the 2 way selector switch on the remote control correctly (See page 6). |
| Poor sound or No sound | Station or CATV experiencing problems, tune to another station.Check sound adjustments (Volume and Muting).Check for sources of possible interference. |
| Poor picture or No picture | Station or CATV experiencing problems, tune to another station.Make sure channels are set into memory.Check antenna or CATV connections, reorient antenna.Check for sources of possible interference.Check picture control adjustments. |
| Poor reception on some channels | Station or CATV experiencing problems, tune to another station.Make sure channels are set into memory.Station signal is weak, reorient antenna to receive desired station.Check for sources of possible interference. |
| Poor color or no color | Station or CATV experiencing problems, tune to another station.Make sure channels are set into memory.Check picture control adjustments.Check antenna or CATV connections, reorient antenna.Check for sources of possible interference. |
| Picture wobbles or drifts | Station or CATV experiencing problems, tune to another station.Make sure channels are set into memory.CATV company is scrambling signal.Check antenna orientation. |
| No CATV reception | Check all CATV connections.Set TV/CATV menu option to the CATV mode.Station or CATV system problems, try another station. |
| Horizontal or diagonal bars on screen | Check antenna connections, reorient antenna.Check for sources of possible interference. |
| No reception above channel 13 | Make sure TV/CATV menu option is in the appropriate mode.If using antenna, check UHF antenna connections. |
| No Remote operation | Batteries are weak, dead or inserted incorrectly.Remote is out of range, move closer to TV within (15 feet).Make sure Remote is aimed at sensor.Confirm there are no obstructions between the Remote and the TV.Make sure the power cord is plugged in.Set the 2 way selector switch on the remote control correctly (See page 6). |
| TV shuts off | No broadcast on station tuned.Sleep Timer is set.ON/OFF TIMER is set.Power interrupted.Approximately 1 hour has passed after the ON TIMER turns on and no button was pressed (See page 21). |
| Closed - Caption is not activated. | TV station experiencing problems or program tuned is not closed captioned.Try another channel.Check CATV connection or VHF/UHF antenna, reposition or rotate antenna.Press C.C. button to turn on the closed caption decoder. |
| Display is not shown in your language. | Select proper language in the menu options. |
| The remote control does not operate other product. | Set the 2 way selector switch on the remote control correctly (See page 6).Program remote with a different code.The remote control may not be compatible with your product.Install new batteries. |
| The remote control does not operate some features of other product. | Program remote with a different code.The remote control may not be able to operate all features of your product. |
SPECIFICATIONS
| AC Power Input: | 120 V, 60 Hz |
| AC Power Consumption: | 80W |
| Picture Tube: | 14" (measured diagonally) |
| Audio Power Output Rating: | 2.5 W + 2.5 W |
| Speaker: | 1-5/8" (4 cm) x 2-13/16" (7 cm), 8 ohm x 2 |
| Audio/Video Input: | COMPONENT Input:Y-Input: 1.0Vp-p, 75 ohmPB, PR-input: 0.7Vp-p, 75 ohmS-Video InputY-Input: 1.0Vp-p, 75 ohmC-Input: 0.3Vp-p, 75 ohmVideo Input: 1.0Vp-p, 75 ohmAudio Input: -8dB, 47k ohm |
| Tuner Type: | 181 Channel, Quartz PLL Frequency Synthesized |
| Receiving Channels: | |
| VHF | 2-13 |
| UHF | 14-69 |
| CATV | 01-97 (5A)-(A-3)98-99 (A-2)-(A-1)14-22 (A)-(I)23-36 (J)-(W)37-65 (AA)-(FFF)66-125 (GGG)-(125) |
| Antenna Input Impedance: | 75 ohm (VHF/UHF/CATV) Coaxial Input |
| Dimensions: | 17-1/8" (432 mm) (W) x 15-1/2" (393.5 mm) (D) x 13-5/8" (344.5mm) (H) |
| Weight: | 26.4 lbs (12.0 kg) |
ACCESSORIES:
Remote Control
Batteries (2 x AA)
Specifications are subject to change without notice.
JVC®
JVC COMPANY OF AMERICA
Division of U.S. JVC CORP.
1700 Valley Road
Wayne, New Jersey 07470
JVC CANADA, INC.
21 Finchdene Square
Scarborough, Ontario
Canada M1X 1A7
JVC®
Pour le modèle:
AV-14F703
MANUEL D'INSTRUCTIONS TÉLÉCOULEUR
natural_image
Illustration of a JMC TV set with a remote control unit beside it (no text or symbols on the device itself)REMARQUE:
natural_image
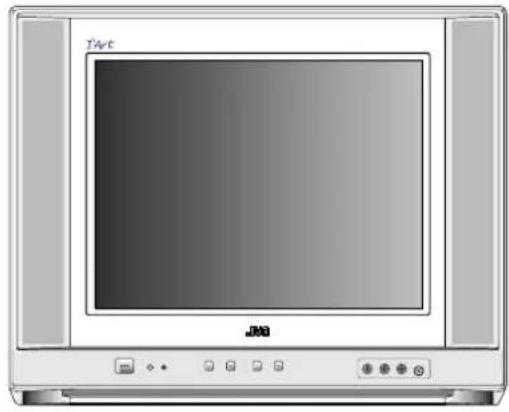
Illustration of a flat-screen TV with control buttons and a 'iArt' label (no other text or symbols)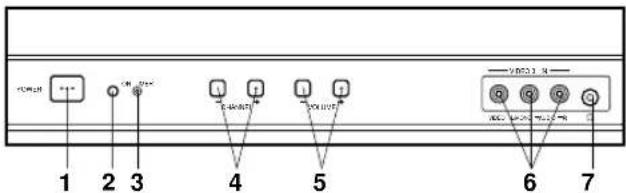
flowchart
graph TD
    A["1"] --> B["2"]
    B --> C["3"]
    C --> D["4"]
    D --> E["5"]
    E --> F["6"]
    F --> G["7"]
    H["输入模块"] --> I["输入模块1"]
    H --> J["输入模块2"]
    H --> K["输入模块3"]
    L["输出模块"] --> M["输出模块1"]
    L --> N["输出模块2"]
    L --> O["输出模块3"]
VUE ARRIERE
text_image
8 9 10 11 12natural_image
Line drawing of a car inside a vehicle, showing steering wheel and dashboard (no text or symbols)text_image
Diagram showing a mechanical assembly with labeled components and directional arrows indicating movement or forcenatural_image
Pure diagram of a mechanical component with no text, numbers, or symbolsnatural_image
Front view of a portable electronic device with control panel and buttons (no visible text or symbols)C : Programming Intended for Children
C8+ : Programming Intended for Children 8 and Over
G : General Audience
PG : Parental Guidance
14+ : 14 Years and Older
18+ : Adult
REMARQUES:
text_image
VOLUME 32Division of U.S. JVC CORP.
1700 Valley Road
Wayne, New Jersey 07470
JVC CANADA, INC.
21 Finchdene Square
Scarborough, Ontario
Canada M1X 1A7