
STM7500S - Blender AEG - Free user manual and instructions
Find the device manual for free STM7500S AEG in PDF.
| Product type | Immersion blender |
| Brand | AEG |
| Model | STM7500S |
| Graduated beaker capacity | 800 ml |
| Maximum filling capacity (beaker) | 600 ml (2/3 of volume) |
| Maximum mini-chopper capacity | 300 g |
| Speeds | 2: Normal and Turbo |
| Blending foot material | Metal (vertical and horizontal double-action blade) |
| Included accessories | Blending foot, traditional whisk, chopper bowl with lid, knife, graduated beaker |
| Safety | Unplug before assembly, disassembly or cleaning; do not immerse motor block; sharp blades |
| Maximum continuous use | 30 seconds for heavy use, 60 seconds for normal use |
| Care of blending foot | Wash under running water without abrasive detergent; dry vertically |
| Care of beaker and whisks | Dishwasher safe (whisks detached from plastic support) |
| Care of motor block | Wipe with a damp cloth; never immerse |
| Repairability | Spare parts available from the manufacturer or its approved repairers |
Frequently Asked Questions - STM7500S AEG
User questions about STM7500S AEG
0 question about this device. Answer the ones you know or ask your own.
Ask a new question about this device
Download the instructions for your Blender in PDF format for free! Find your manual STM7500S - AEG and take your electronic device back in hand. On this page are published all the documents necessary for the use of your device. STM7500S by AEG.
USER MANUAL STM7500S AEG
GB Instruction book.....17-22 Before using the appliance for the first time, please read the safety advice on page 18.


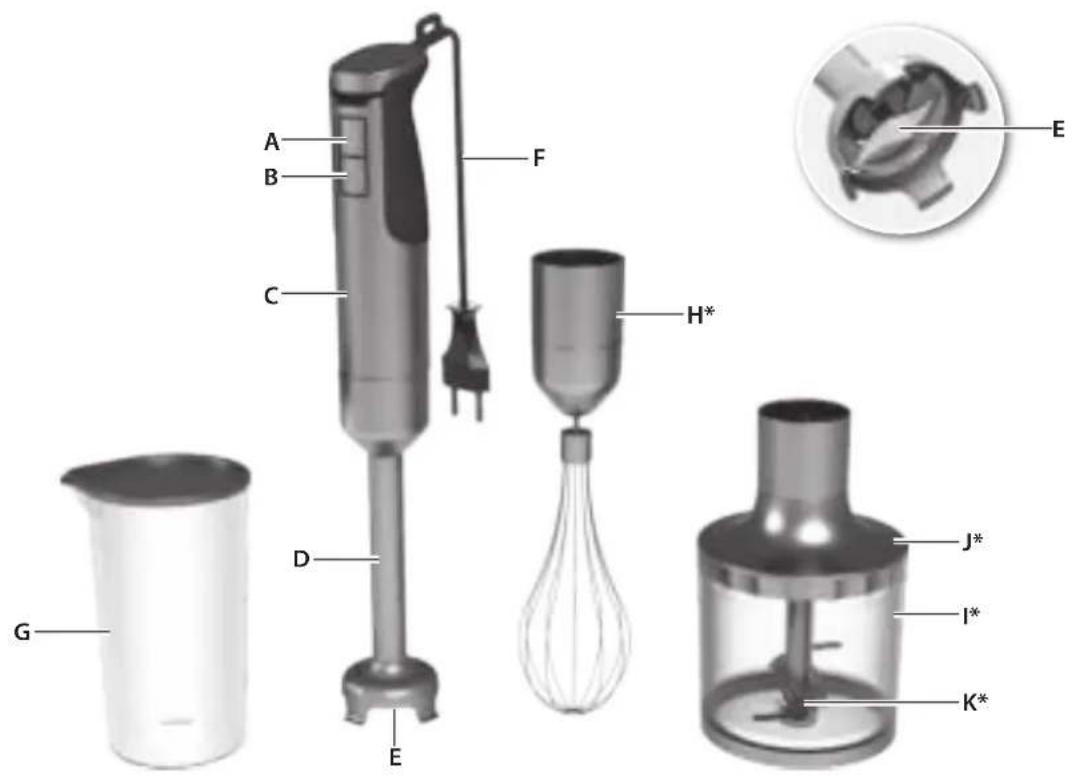


D
Teile
A. Normal speed button
B. Turbo button
C. Handheld part
D. Metal mixing foot
E. Knife
F. Power cord
G. Beaker
H. Traditional whisk
I. Chopper bowl
J. Chopper bowl lid
K. Chopper bowl knife
*depending on model

Read the following instruction carefully before using machine for the first time.
- Appliances can be used by persons with reduced physical, sensory or mental capabilities or lack of experience and knowledge if they have been given supervision or instruction concerning use of the appliance in a safe way and if they understand the hazards involved.
Children shall not play with the appliance. - This appliance shall not be used by children. Keep the appliance and its cord out of reach of children.
- The appliance may only be connected to a power supply whose voltage and frequency comply with the specifications on the rating plate!
- Never use or pick up the appliance if
- the supply cord is damaged,
- the housing is damaged.
- If the appliance or the supply cord is damaged, it must be replaced by the manufacturer, its service agent or similarly qualified person, in order to avoid hazard.
- Always disconnect the appliance from the supply if it is left unattended and before assembling, disassembling or cleaning.
- Never touch the blades or inserts with your hand or any tools while the appliance is plugged in.
- The blades and inserts are very sharp! Danger of injury! Caution when assembling, disassembling after use or when cleaning! Ensure that the appliance is disconnected from the mains supply.
- The appliance cannot be used for chopping ice or blending hard and dry substance, such as nut, candy; except with specific accessories provided with the appliance. Otherwise the blade could be blunt.
- Do not immerse the appliance in water or any other liquid.
- When processing heavy load, do not use the appliance continuously for more than 30 seconds. In normal use, do not use appliance continuously for more than 60 seconds. Allow to cool down before restarting.
- Do not use this appliance to stir paint. Danger, could result in an explosion!
- Do not exceed the maximum filling volume as indicated on the appliances.
- Never operate all-purpose bowl without lid.
- This appliance is intended for domestic use only. The manufacturer cannot accept any liability for possible damage caused by improper or incorrect use.
- If relevant add time and volume limitations for accessories.
- DO NOT OPEN UNTIL BLADES STOP. SHARP BLADES - HANDLE CARFULLY. UNPLUG BEFORE INSERTING OR REMOVING PARTS. DO NOT PUT MOTOR END TO WATER.
Getting started

GB
- Before first use, clean the mixing foot under running water. Before inserting or removing mixing foot, remove plug from power outlet.
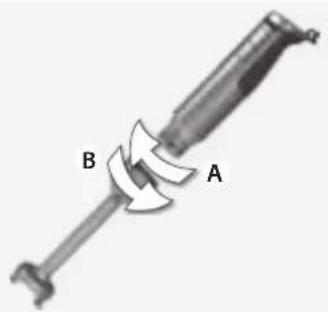
- Insert the mixing foot to handheld part, turn clockwise (A) and lock into position. To remove, turn mixing foot counter clockwise (B).
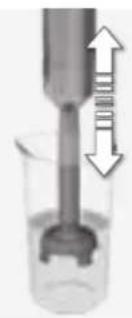
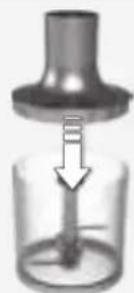
- Insert the stick mixer deep into the beaker, begin mixing by starting at normal speed. Make sure the beaker is no more than 2/3 (600 ml) full. If you do not use the beaker, do not immerse the mixing foot more than 2/3 of its length. Move stick mixer lightly up and down to ensure best processing of content. Release switch to stop.
- Using the mini chopper*, Place chopper bowl on a clean, level surface. Put stainless steel blade into place.
- Place food into the chopper bowl*. Amount of food to be chopped cannot exceed 300g (Indicated max level). Close the lid.

- Insert handheld part into the chopper lid, turn clockwise (A) and lock into position. Plug into power outlet and press switch to start. Release to stop. Remove handheld part by turning counter clockwise (B).
Working with the traditional whisk*
*depending on model
GB
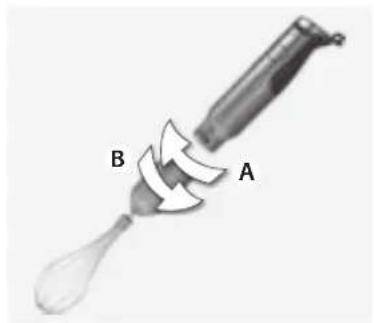
- Working with the traditional whisk*. To assemble whisk with handheld part, turn handheld part clockwise until tightened. To disassemble, turn counter clockwise.
Cleaning and care

- Before cleaning, always unplug the appliance. Do not immerse mixing foot in water, just wash under running water (no abrasive cleaner or detergents). Place upright to let dry.
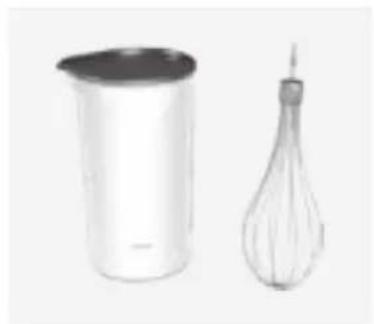
- Beaker and whisks detached from the plastic holder can be washed in the dishwasher.

- Disassemble the handheld part. Wipe with a damp cloth and dry thoroughly. Never immerse in water due to risk of electric shock.
Processing times and quantities
| Processing times and quantities for blending and chopping | ||||
| Recipe | Ingredients | Quantity | Time | Speed |
| Pureeing raw vegetables | Carrots | 80 g | 20~30 sec | Max |
| Potatos | 80 g | |||
| Onions | 80 g | |||
| Water | 160 ml | |||
| Strawberries margaritas (Cocktail) | Tequila | 120 ml | ≤ 60 sec | Max |
| Triple sec | 30 ml | |||
| Frozen strawberries | 110 g | |||
| Frozen Lemeade concentrate | 70 g | |||
| Ice cubes | 75 g | |||
| Vitamine | Apple | 40 g | 20~30 sec | Medium |
| Banana | 50 g | |||
| Papaya | 100 g | |||
| Milk | 150 ml | |||
| Potato leek soup | Potatoes | 150 g | 50~60 sec | Max |
| Leek | 150 g | |||
| Water | 300 ml | |||
| Accessory Mini Chopper | ||||||||
| Ingredients | Quantity | Quality | Time | Quality | Time | Quality | Time | Speed |
| Bread crumbs | 50 g | Coarse | 10 sec | Medium | 20 sec | Fine | 30 sec | Turbo |
| 100 g | 10 sec | 20 sec | 30 sec | Turbo | ||||
| Almonds | 100-200 g | - | 10 sec | 20 sec | Turbo | |||
| 200-400 g | 10 sec | 20 sec | 30 sec | Turbo | ||||
| Meat (Beef) | 200 g | 10 sec | 20 sec | 30 sec | Turbo | |||
| Accessory Traditional whisk | |||
| Ingredients Qua | tity Time Speed | ||
| Cream 500 g 50 | 70 sec Turbo | ||
| Egg whites 4 un | ts 60 sec Turbo | ||
| Note: it is possible to use the Professional Double Whisk for whipping cream in the Beaker, as long as the temperature of the cream is between 4 and 8 Degree Celcius. For whisking eggs, please use a 1,5 Litre bowl. | |||
Troubleshooting
| Problem Possible cause Solution | ||
| The mini chopper* does not work. The chopper lid is not correctly fastened. Make sure the lid and the chopper bowl are properly assembled. | chopper bowl are properly assembled. | |
| The mixing foot/traditional whisk* does not work. The mixing foot/traditional whisk* is not correctly assembled. | Make sure to lock mixing foot/traditional whisk* into position. | |
| * depending on model |
Disposal
GB
Recycle the materials with the symbol

Put the packaging in applicable containers to recycle it.
Help protect the environment and human health and to recycle waste of electrical and electronic appliances.
Do not dispose appliances marked with

the symbol with the household waste. Return the product to your local recycling facility or contact your municipal office.

This page is left blank intentionally


www.aeg-home.com
With Electrolux, the choice of professionals.

