
LDU75V900S - TV HAIER - Free user manual and instructions
Find the device manual for free LDU75V900S HAIER in PDF.
Frequently Asked Questions - LDU75V900S HAIER
User questions about LDU75V900S HAIER
0 question about this device. Answer the ones you know or ask your own.
Ask a new question about this device
Download the instructions for your TV in PDF format for free! Find your manual LDU75V900S - HAIER and take your electronic device back in hand. On this page are published all the documents necessary for the use of your device. LDU75V900S by HAIER.
USER MANUAL LDU75V900S HAIER
oppervlakken.
On ventilating passengers to work him - meet u
Product as market component for prosthetic orthopedics on
Ais net battenjcompartment hiet veing asiult, mag
PC-invoernormaleweergavemodi
| AV en HDMI- signale compatibilitéit | |||
| Bron Ondersteunde signalen Beschikkaar | |||
| ZIJde AV | PAL O | ||
| SECAM O | |||
| NTSC4.43 | O | ||
| NTSC3.58 | O | ||
| YPbPr | 480i, 480p | 60Hz | O |
| 576i, 576p | 50Hz | O | |
| 720p | 50Hz,60Hz | O | |
| 1080i | 50Hz,60Hz | O | |
| HDMI | 480i | 60Hz | O |
| 480p | 60Hz | O | |
| 576i, 576p | 50Hz | O | |
| 720p | 50Hz,60Hz | O | |
| 1080i | 50Hz,60Hz | O | |
| 1080p | 24Hz,25Hz,30Hz,50Hz,60Hz | O | |
| 3840x2160p | 24Hz,25Hz,30Hz,50Hz,60Hz | O | |
| 4096x2160p | 24Hz,25Hz,30Hz,50Hz,60Hz | O | |
Follow Me TV (Evapot (indian beer) beer).
DereopoeVon de FelloM T/finetio is standard.
Mortalinga: auditee underwriting an orgertailing contract.
| Caution | |
| Risk of electric shock | Dangerous voltage risk |
| Maintenance | Important maintenance component |
| Markings on the Product |
Safety Information
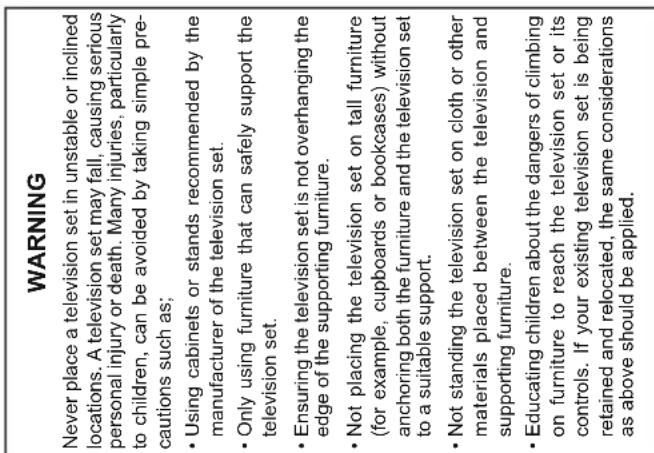
- Do not expose the TV to direct sunlight or do not place open flames such as lit candles on the top of or near the TV.
Contents
Do not place any heat sources such as electric heating or radiation. Apply the T/F rule.
- Heaters, Radiators, etc. Near the TV set.
- Do not place the TV on the floor and inclined surfaces.
surfaces. - To avoid danger of suffocation, keep plastic bags out of the reach of the babies, children and domestic animals.
- Carefully attach the stand to the TV. If the stand is provided with screws, tighten the screws firmly to prevent the TV from tilting. Do not over-tighten the
- Do not dispose of the batteries in fire or with
- Not exposed to the batteries in more or less hazardous or flammable materials.
- Warning: Batteries must not be exposed to excessive
heat such as sunshine, fire or the like. Caution Serious injury or death risk
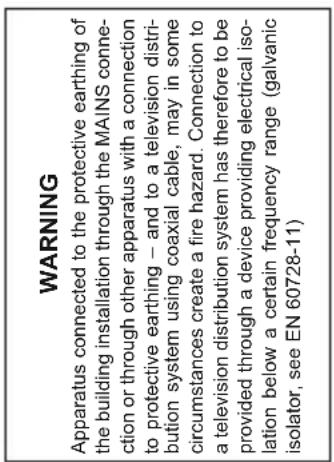
The following symbols are used on the product as a marker for restrictions and precautions and safety instructions. Each explanation shall be considered where the product bears related marking only. Note
such information for security reasons. Class II Equipment: This appliance is
designed in such a way that it does not require a safety connection to electrical earth.
Class II Equipment With Functional Earthing: This appliance is designed in such
- Earthing: The appliances are designed to work a way that it does not require a safety connection to electrical earth, the earth connection is used for functional purposes.
Protective Earth Connection: The marked terminal is intended for connection of the
protective earthing conductor associated with the supply wiring.
Hazardous Live Terminal: The marked terminal(s) is/are hazardous live under normal
operating conditions. Caution, See Operating Instructions: The
1 marked area(s) contain(s) user replaceable coin or button cell batteries.
Class 1 Laser Product: This product contains Class
CLASS 1 LASER PRODUCT 1 laser source that is safe under reasonably foreseeable conditions of operation.
In extreme weather (storms, lightning) and long inactivity periods (going on holiday) disconnect the TV set from the mains.
The mains plug is used to disconnect TV set from the mains and therefore it must remain readily operable. If the TV set is not disconnected electrically from the mains, the device will
still draw power for all situations even if the TV is in standby mode or switched off. Note: Follow the on screen instructions for operating the related features.
IMPORTANT - Please read these instructions fully before installing or operating
WARNING: Never let people (including children) with reduced physical, sensory or
children) with reduced physical, sensory or mental capabilities or lack of experience and / or knowledge use electrical devices unsupervised. Use this TV set at an altitude of less than 2000
meters above the sea level, in dry locations and in regions with moderate or tropical climates. The TV set is intended for household and similar
- The TV set is intended for household and similar general use but may also be used in public places.
- For ventilation purposes, leave at least 5cm of free space around the TV.
- The ventilation should not be impeded by covering or blocking the ventilation openings with items, such as newspapers, table-cloths, curtains, etc.
- The power cord plug should be easily accessible. Do not place the TV, furniture, etc. on the power cord. A damaged power cord/plug can cause fire or give
you an electric shock. Handle the power cord by the plug, do not unplug the TV by pulling the power cord. Never touch the power cord/plug with wet hands.
Never touch the power cord/rod with wet hands as this could cause a short circuit or electric shock. Never make a knot in the power cord or tie it with
Never made a knot in the power cord or its it with other cords. When damaged it must be replaced, this should only be done by qualified personnel.
- Do not expose the TV to dripping or splashing of liquids and do not place objects filled with liquids, such as uneven, uneven, or uneven the TV (or
such as vases, cups, etc. on or over the TV (e.g., on shelves above the unit).
Do not express the TV to direct sunlight or do not
Safety Information 96
Markings on the Product. 96
Environmental Information. 97
Features. 98
Accessories Included. 98
Standby Notifications.. .98 TV Control Switch & Operation. .98 Inserting the Batteries into the Remote 99
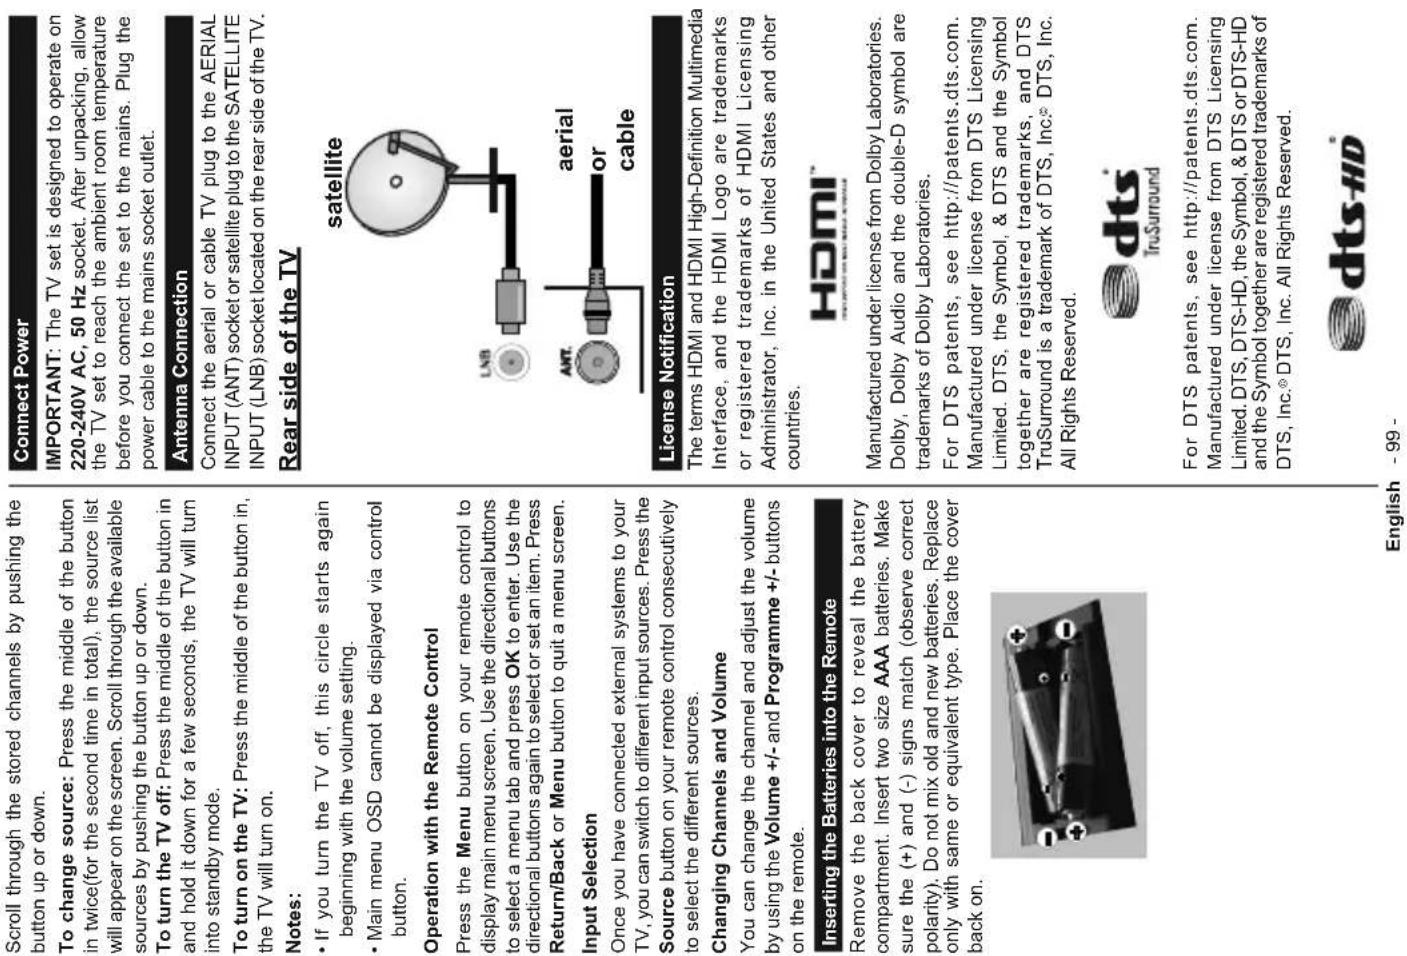
Connect Power .99
Antenna Connection 99
License Notification 99
Remote Control 102
Connections. 103
Switching On/Off .104
First Time Installation .104
First Time Installation 104
Media Playback via USB Input 105
Media Browser Menu. 105
FollowMe TV (if available) 105
CEC and CEC RC Passthrough 106
E-Manual (if available) 106
TV Menu Contents. 107
General TV Operation 111
Using the Channel List 111
Configuring Parental Settings 111
Electronic Programme Guide (EPG) 111
Teletext Services 112
Software Upgrade. 112
Troubleshooting & Tips 112
PC Input Typical Display Modes 113
AV and HDMI Signal Compatibility 113
Supported Video File Formats for USB Mode 114
Supported Picture File Formats for USB Mode .. 114
Supported Audio File Formats for USB Mode .... 115
Supported Subtitle File Formats for USB Mode .... 116
Supported DVI Resolutions 117
Connectivity. 118
Internet Portal 121
Internet Browser 121
IPDTV System 130
HBBTV System 122
Smart Center 123
and over DVB-S broadcasts. Set the related HDMI source input as Enhanced from the Sources option in the Settings menu in order to watch HDR/HLG images, if the HDR/HLG content is received through an HDMI input. The source device should also be at least HDMI 2.0a compatible in this case.
Accessories Included
Remote Control
- Batteries: 2 x AAA
Instruction Book Quick Start Guide
Standby Notificat
If the TV does not receive any input signal (e.g. from an aerial or HDMI source) for 3 minutes, it will go into standby. When you next switch-on, the following message will be displayed: "TV switched to stand-by mode automatically because there was no signal for a long time." Press OK to continue.
The Auto TVOFF option (in the System>Settings>More menu) may be set to a value between 1 and 8 hours by default. If this setting is not set as Off and the TV has been left on and not been operated during the set time, it will switch into standby mode after the set time has expired. When you next switch-on the TV, the following message will be displayed. "TV switched to
stand-by mode automatically because no operation was made for a long time." Press OK to continue.
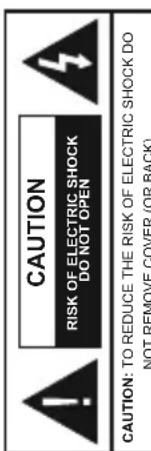
TV Control Switch & Operation
1.Up direction
-
Down direction
-
Volume / Info / Sources List selection and Standby-On switch
The Control button allows you to control the Volume / Programme / Source and Standby-On functions of the TV.
To change volume: Increase the volume by pushing the button up. Decrease the volume by pushing the button down.
To change channel: Press the middle of the button in, the information banner will appear on the screen.
English - 98 -
Note: Screen Off option is not available if the Mode is set to Game. When the TV is not in use, please switch off or disconnect the TV from the mains plug. This will also reduce energy consumption.
Features
TV supports Ultra HD (Ultra High Definition - also known as 4K) which provides resolution of 3840 × 2160 (4K:2K). It equals 4 times the resolution of Full HD TV by doubling the pixel count of the Full HD TV both horizontally and vertically. Ultra HD contents are supported from HDMI, USB inputs and over DVB-T2 and DVB-S2 broadcasts.
- Remote controlled colour TV
- Fully integrated digital terrestrial/cable/satellite TV (DVB-T2/C/S2)
-
HDMI inputs to connect other devices with HDMI sockets
-
USB input
- OSD menu system
- Stereo sound system
Stereo sound system
- Teletext
-
Usephone connection
-
Headphone connection
-
Automatic programming system
-
Manual tuning
Automatic power down after up to eight hours.
- Sleep timer
Child lock
Automatic sound mute when no transmission.
- NTSC playback
AVL (Automatic Volume Limiting)
- PLL (Frequency Search)
PC input
Game Mode (Option)
-
Picture offunction
-
Ethernet (LAN) for Internet connectivity and service
- 802.11 a/b/g/n built in WIFI Support
Audio Video Sharing
Audio Video Sharing
HbbTV
tem>Picture menu. Note that some picture settings
will be unavailable to be changed.
If pressed Right button while Auto option is selected or
Left button while Custom option is selected, "Screen
will be off in 15 seconds." message will be displayed
on the screen. Select Proceed and press OK to turn on the screen off immediately. If you don't press any
the screen on immediately. If you don't press any button, the screen will be off in 15 seconds. Press any button on the remote or on the TV to turn the screen on again.
-
on the selected Mode in the System>Picture menu.
The Energy Saving settings can be found in the Sys-
tem>Picture menu. Note that some picture settings
will be unavailable to be changed.
If pressed Right button while Auto option is selected or
Left button while Custom option is selected, "Screen
will be off in 15 seconds." message will be displayed
on the screen. Select Proceed and press OK to turn on the screen off immediately. If you don't press any
the screen on immediately. If you don't press anybutton, the screen will be off in 15 seconds. Press
button , the screen will be off in 15 seconds . Pressany button on the remote or on the TV to turn the
any button on the remote or on the PC to turn off the screen on again.

| Specification | |
| TV Broadcasting | PAL BG/I/DK/LL' SECAM BG/DK |
| Receiving Channels | VHF (BAND I/III) - UHF (BAND U) - HYPERBAND |
| Digital Reception | Fully integrated digital terrestrial-cable-satellite TV(DVB-T-C-S) (DVB-T2, DVB-S2 compliant) |
| Number of Preset Channels | 10.000 |
| Channel Indicator On Screen Display | |
| RF Aerial Input 75 Ohm (unbalanced) | |
| Operating Voltage 220-240V AC, 50Hz. | |
| Audio DTS TruSurround HD | |
| Audio Output Power (WRMS.) (10% THD) | 2 x 12 |
| Power Consumption (W) | 260 |
| Networked Standby (W) < 3 | |
| TV Dimensions DxLxH (with foot) (mm) | 370 x 1684 x 1026 |
| TV Dimensions DxLxH (without foot) (mm) | 73 x 1684 x 967 |
| Display 75" | |
| Operation temperature and operation humidity | 0°C up to 40°C, 85% humidity max |
This product contains technology subject to certain intellectual property rights of Microsoft. Use or distribution of this technology outside of this product is prohibited without the appropriate license(s) from Microsoft.
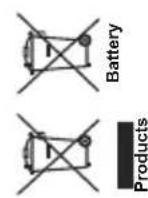
Content owners use Microsoft PlayReady™ content access technology to protect their intellectual property, including copyrighted content. This device uses PlayReady technology to access PlayReady-protected content and/or WMDRM-protected content. If the device fails to properly enforce restrictions on content usage, content owners may require Microsoft to revoke the device's ability to consume PlayReady-protected content. Revocation should not affect unprotected content or content protected by other content access technologies. Content owners may require you to upgrade PlayReady to access their content. If you decline an upgrade, you will not be able to access content that requires the upgrade. Information for Users on Disposal of Old Equipment and Batteries
[European Union only]
Equipment bearing these symbols should not be disposed as general household waste.
You should look for appropriate recycling facilities and systems for the disposal of these products. Notice: The sign Pb below the symbol for batteries indicates that this battery contains lead.
| Frequency Ranges | Max Output Power |
| 2400 - 2483,5 MHz (CH1-CH13) < 100 | mW |
| 5150 - 5250 MHz (CH36 - CH48) < 200 | mW |
| 5250 - 5350 MHz (CH52 - CH64) < 200 | mW |
| 5470 - 5725 MHz (CH100 - CH140) < 200 mW |
Country Restrictions
This device is intended for home and office use in all offices (except offices of the firm)
all EU countries (and other countries following the relevant EU directive) without any limitation except for the countries mentioned below.
| Country Restriction | |
| Bulgaria | General authorization required for outdoor use and public service |
| France In-door | use only for 2454-2483.5 MHz |
| Italy | If used outside of own premises, general authorization is required |
| Greece | In-door use only for 5470 MHz to 5725 MHz band |
| Luxembourg | General authorization required for network and service supply(not for spectrum) |
| Norway | Radio transmission is prohibited for the geographical area within a radius of 20 km from the centre of Ny-Álesund |
| Russian Fed- eration | In-door use only |
The requirements for any country may change at any time. It's recommended that user checks with local authorities for the current status of their national regulations for both 2.4 GHz and 5 GHz wireless LAN's.
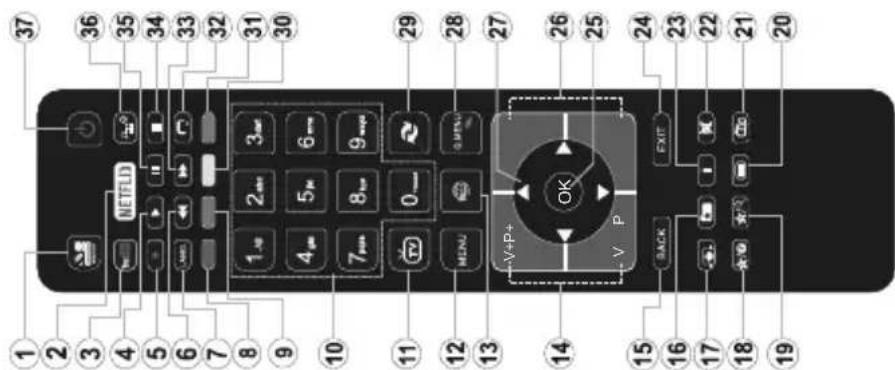
(*) MY BUTTON 1 & MY BUTTON 2:
These buttons may have default functions depending on
the model . However you can set a special function to these buttons by pressing on : them , for , fun , seconds , with
bats by pressing on " them " for " five seconds " withdesired source or channel . A confirmation message will be
displayed on the screen. Now the selected MY BUTTON is associated with the selected function.
Note that if you perform First-Time Installation, MY BUTTON
Note that if you perform First Time Installation, MY BUTTON 1&2 will return to their default function.
Direct, Single Satellite Cable or DiSEqC switch by using " 一 or " 一 buttons.
Direct: If you have a single receiver and a direct satellite dish, select this antenna type. Press OK to continue. Select an available satellite on the next
continue. Select an available satellite on the next screen and press OK to scan for services.
Single Satellite Cable: If you have multiple receivers and a single satellite cable system, select this antenna type. Press OK to continue. Configure
settings by following instructions on the next screen. Press OK to scan for services.
DiSEqC switch: If you have multiple satellite dishes and a DiSEqC switch, select this antenna type. Then set the DiSEqC version and press OK
to continue. You can set up to four satellites (if available) for version v1.0 and sixteen satellites for
version V1.1 on the next screen. Press OK button to scan the first satellite in the list. Analogue: If Analogue broadcast search option is
Analogous broadcast search is turned on, the TV will search for analogue broadcasts after other initial settings are completed.
Additionally you can set a broadcast type as your favourite one. Priority will be given to the selected
rocast type during the search process and thechannels of it will be listed on the top of the Channel list. When finished, press OK to continue.
List: When finished, press OK to continue.
You can activate Store Mode option at this point. This option will configure your TV's settings for store.
environment and depending on the TV model being used, the supported features of it may be displayed
on the top of the screen as an info banner. This optionis intended only for store use. It is recommended toselect Home Mode for home use. This option will be
available in System>Settings>More menu and can
be turned off/on later.
depending on the model of your TV and the country
selection. Privacy Settings may vary depending on
Selection Privacy Settings menu may appear at this point. Using this menu you can set your privacy privileges. Highlight a feature and use Left and Right
directional buttons to enable or disable. Read the related explanations displayed on the screen for each highlighted feature before making any changes.
each highlighted feature before making any changes .You can use Programme +/- buttons to scroll upand down to read the entire text . You will be able to
h to read the entire text . You will be able tochange your preferences at any time later from theSettings>Privacy Settings menu . If the Internet
Settings: Privacy Settings Manager in the Internet Connection option is disabled Network/Internet Settings screen will be skipped and not displayed.
press OK button on the remote control to continueand the Network/Internet Settings menu will be
isplayed, if you confirm the previously displayed
message asking whether you want to do the network settings. Please refer to Connectivity section to
configure a wired or a wireless connection. After the settings are completed press OK button to continue.
To skip to the next step without doing anything select
104 -
Switching On/Off
To Switch the TV On
Connect the power cord to a power source such as a wall socket (220-240V AC, 50 Hz).
To switch on the TV from standby mode either:
-
Press the Standby button, Programme +/- or a numeric button on the remote control.
-
Press the middle of the side function switch on the
TV in. To Switch the TV Off
Press the Standby button on the remote control or press the middle of the side function switch on the TV in and hold it down for a few seconds, the TV will switch into standby mode.
To power down the TV completely, unplug the power cord from the mains socket.
Vote. When the TV is switched into standby mode, the standby LED can blink to indicate that features such as Standby Search, Over Air Download or Timer is active. The LED can also blink when you switch on the TV from standby
First Time Installation
When turned on for the first time, the language selection screen is displayed. Select the desired
language and press OK. On the next person, set your preferences using the
On the next screen, set your preferences using the directional buttons.
Note: Depending on the Country selection you may be asked to set and confirm a PIN at this point. The selected PIN cannot be 0000. You have to enter it if you are asked to enter a PIN for any menu operation later.
About Selecting Broadcast Type
Digital Aerial: If Digital Aerial broad
Digital Aerial: In Digital Aerial broadcast search option is turned on, the TV will search for digital terrestrial broadcasts after other initial settings are completed.
Digital Cable: If Digital Cable broadcast search option is turned on, the TV will search for digital cable
broadcasts after other initial settings are completed. According to your other preferences a confirmation message may be displayed before starting to search.
Select YES and press OK to proceed. To cancel operation, select NO and press OK. You can select Network or set values such as Frequency, Network
ID and Search Step. When finished, press OK button. Note: Searching duration will change depending on the selected Search Step.
Satellite: If Satell turned on the TV
turned on , the TV will search for digital satteblote broadcasts after other initial settings are completed. Before satellite search is performed some settingsshould be made . Antenna Type menu will beshowed first . You can select Antenna T
To skip English - 104 -
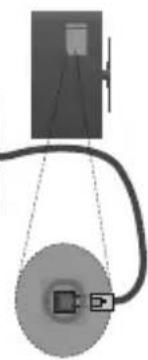
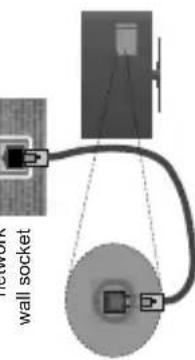
Connections
NOTE: When connecting a device via the YPbPr or Back
AV inputs, you must use the connection cables to enable
connection. See the illustrations on the left side. | You can use YPbPr to VGA cable to enable
YPbPr signal via VGA input. | You cannot use VGA and YPbPr at the same time. | To enable PC/
YPbPr audio, you will need to use the back audio inputs with a VLPB-PCO condenser for recording
- EPB/PC audio cable for audioconnection . | When using the
wall mounting kit (available from third party in the market, if not
supplied), we recommend that you plug all your cables into the
back of the TV before mountingon the wall . | Insert or removethe C' model is only when the TV
the CI module only when the TV is SWITCHED OFF. You should refer to the module instruction
manual for details of the settings. The/Each USB input of your TV
supports devices up to 500mA. Connecting devices that have
current value above 500mA may damage your TV . By connectingon HDMI cable to your TV ,
an HDMI cable to your TV, you have to use only a shielded (high grade) HDMI cable to guarantee a sufficient immunity against
parasitic frequency radiation. And make sure to use a High-Speed HDM with the same parameters
HDMI cable that can transmit high definition signals, such 4K contents, for trouble-free
transmission.
| Connector Type Cables Device | |||
| VGA Connection (back) | |||
| AUDIO IN | PC/YPbPr Audio Connection (back) | YPbPr/PC Audio Cable | |
| HDMI Connection (slide&back) | |||
| SPDIF | SPDIF (Optical Out) Connection (back) | ||
| BACK AV | Back AV (Audio/Video) Connection (back) | Audio Video Cable | |
| HEADPHONE | Headphone Connection (side) | ||
| YPBPR | YPbPr Video Connection (back) | PC to YPbPr Connection Cable | |
| USB Connection (side) | |||
| CI Connection (side) | |||
| LAN | Ethernet Connection (bottom) | LAN / Ethernet Cable | |
| Subwoofer Connection (back)(*) | |||
(*) For external subwoofer connection
If you want to connect a device to the TV, make sure that both the TV and the device are turned off before making any connection. After the connection is done, you can turn on the units and use them.
| Media Browser Menu | |
| You can play photo, music and movie files stored on a USB disk by connecting it to your TV. Connect a USB disk to one of the USB inputs located on the side of the TV. Pressing the Menu button while in the Media Browser mode will access the Picture, Sound and Settings menu options. Pressing the Menu button again will exit from this screen. You can set your Media Browser preferences by using the Settings menu. | |
| Loop/Shuffle Mode Operation | |
| Start playback with the Play button and activate | All files in the list will be continuously played in original order |
| Start playback with the OK button and activate | The same file will be played continuously (repeat) |
| Start playback with the Play button and activate | All files in the list will be played once in random order |
| Start playback with the Play button and activate | All files in the list will be continuously played in the same random order. |
| Custom Boot Up Logo | |
| You can personalize your TV and see your favorite image or photo on the screen each time your TV boots up. To do this, copy your favorite image files into a USB disk and open them from the Media Browser menu. When you have chosen the desired image, highlight it and press OK to view it in full screen. Press OK again to choose the image as custom logo. A confirmation message will be displayed. Select Yes and press OK again. If the image is suitable(*) you will see it on the screen during the TV's next boot up. | |
| Note: If you perform a First Time Installation the TV will return to using the default logo, if any. (*) Images must have an aspect ratio between 4:3 to 16:9 and they must be in .jpeg, .jpg or .jpe file formats. The image cannot be set as boot logo, which's resolution doesn't appear on the info banner. | |
| FollowMe TV (if available) | |
| With your mobile device you can stream the current broadcast from your smart TV using the FollowMe TV feature. Install the appropriate Smart Center application to your mobile device. Start the application. For further information on using this feature refer to the instructions of the application you use. Note: This application may not be compatible with all mobile devices. Both of the devices must be connected to the same network. | |
TV Menu Contents
System - Picture Menu Contents
| Equalizer | Selects the equalizer mode. Custom settings can be made only when in User mode. |
| Balance | Adjusts whether the sound comes from the left or right speaker. |
| Headphone | Sets headphone volume.Pleasesureensure before using headphones that the headphone volume is set to a low level, to prevent damage to your hearing. |
| Sound Mode | You can select a sound mode (If the viewed channel supports). |
| Audio Link | Press OK to open the Audio Link menu screen. Using this screen you can discover and connect the sound devices to your TV wirelessly. |
| AVL (Automatic Volume Limiting) | Sets the sound to obtain fixed output level between programmes. |
| Headphone/Lineout | When you connect an external amplifier to your TV using the headphone jack, you can select this option as Lineout. If you have connected headphones to the TV, set this option as Headphone.Please ensure before using headphones that this menu item is set to Headphone.If it is set to Lineout, the output from the headphone socket will be set to maximum which could damage your hearing. |
| Dynamic Bass | Enables or disables the Dynamic Bass. |
| DTS TruSurround HD | Enables or disables the DTS TruSurround HD. |
| Digital Out | Sets digital out audio type. |
| Bass Gain | Controls the bass gain level. Use Left or Right button to set. |
Position
| Power Up Mode | This setting configures the power up mode preference. Last State and Standby options are available. |
| Virtual Remote | Enable or disable the virtual remote feature. |
| CEC | With this setting you can enable and disable CEC functionality completely. Press Left or Right button to enable or disable the feature. |
| CEC Auto Power On | This function allows the connected HDMI-CEC compatible device to turn on the TV and switch to its input source automatically. Press Left or Right button to enable or disable the feature. |
| Speakers | To hear the TV audio from the connected compatible audio device set as Amplifier. You can use the remote control of the TV to control the volume of the audio device. |
| Smart Remote | Press OK to open the Smart Remote menu screen. Using this screen you can discover and connect the remote controller devices to your TV wirelessly. |
| OSS | Displays Open Source Software license information. |
| Installation Menu Contents | |
| Automatic channel scan (Retune) | Displays automatic tuning options. Digital Aerial: Searches and stores aerial DVB stations. Digital Cable: Searches and stores cable DVB stations. Analogue: Searches and stores analogue stations. Satellite: Searches and stores satellite stations. |
| Manual channel scan | This feature can be used for direct broadcast entry. |
| Network channel scan | Searches for the linked channels in the broadcast system. Digital Aerial: Searches for aerial network channels. Digital Cable: Searches for cable network channels. |
| Analogue fine tune | You can use this setting for fine tuning analogue channels. This feature is not available if no analogue channels are stored. |
| Satellite Settings | Displays satellite settings. Satellite list: Displays available satellites. You can Add, Delete satellites or Edit satellite settings on the list. Antenna installation: You can change satellite antenna settings and/or start a satellite scan. |
| Installation Settings | Displays installation settings menu. Standby Search (Optional): Your TV will search for new or missing channels while in standby. Any new found broadcasts will be shown. |
| Clear Service List | Use this setting to clear channels stored. This setting is visible only when the Country option is set to Denmark, Sweden, Norway or Finland. |
| Select Active Network | This setting allows you to select only the broadcasts within the selected network to be listed in the channel list. This feature is available only for the country option of Norway. |
| First time installation | Deletes all stored channels and settings, resets TV to factory settings. |
English - 109 -
| System - Settings Menu Contents | |
| Conditional Access | Controls conditional access modules when available. |
| Language | You may set a different language depending on the broadcaster and the country. |
| Parental | Enter correct password to change parental settings. You can easily adjust Menu Lock, Maturity Lock, Child Lock or Guidance in this menu. You can also set a new PIN or change the Default CICAM PIN using the related options.Note: Some menu options may not be available depending on the country selection in the First Time Installation. Default PIN can be set to 0000 or 1234. If you have defined the PIN (is requested depending on the country selection) during the First Time Installation use the PIN that you have defined. |
| Timers | Sets sleep timer to turn off the TV after a certain time. Sets timers for selected programmes. |
| Date/Time | Sets date and time. |
| Sources | Enables or disables selected source options. There are Regular, Enhanced and Disabled options available for HDMI sources. Regular and Enhanced options are affecting the colour settings of the selected HDMI source. To be able to watch 4K or HDR/ HLG images from an HDMI source related source setting should be set as Enhanced if the connected device is compatible with HDMI 2.0 and subsequent versions. Set as Regular if the connected device is HDMI 1.4 compatible. Set accordingly or disable the related HDMI source by setting as Disabled. |
| Network/Internet Settings | Displays network/internet settings. |
| Accessibility | Displays accessibility options of the TV. |
| Hard of Hearing | Enables any special feature sent from the broadcaster. |
| Audio Description | A narration track will be played for the blind or visually impaired audience. Press OK to see all available Audio Description menu options. This feature is available only if the broadcaster supports it. |
| Netflix | If this feature is supported by your TV, you can view your ESN(*) number and deactivate Netflix. (*) ESN number is an unique ID number for Netflix, created especially to identify your TV. |
| More | Displays other setting options of the TV. |
| Menu Timeout | Changes timeout duration for menu screens. |
| Standby LED | If set as Off, the standby LED will not light up when the TV is in standby mode. |
| HBBTV | You can enable or disable this feature by setting it as On or Off. |
| Software Upgrade | Ensures that your TV has the latest firmware. Press OK to see the menu options. |
| Application Version | Displays current software version. |
| Subtitle Mode | This option is used to select which subtitle mode will be on the screen (DVB subtitle / Teletext subtitle) if both is available. Default value is DVB subtitle. This feature is available only for the country option of Norway. |
| Auto TV OFF | Sets the desired time for the TV to automatically go into standby mode when not being operated. |
| Biss Key | Biss is a satellite signal scrambling system that is used for some broadcasts. If you need to enter Biss key on a broadcast, you can use this setting. Highlight Biss Key and press OK to enter keys on the desired broadcast. |
| Store Mode | Select this mode for store display purposes. Whilst Store Mode is enabled, some items in the TV menu may not be available. |
| Audio Video Sharing | Audio Video Sharing feature allows you to share files stored on your smartphone or tablet pc. If you have a compatible smartphone or tablet pc and the appropriate software is installed, you can share/play photos on your TV. See instructions of your sharing software for more information. Audio Video Sharing mode will not be available with internet portal feature. |
| General TV Operation Using the Channel List The TV sorts all stored stations in the Channel List. You can edit this channel list, set favourites or set active stations to be listed by using the Channel List options. Press the OK button to open the Channel List. You can filter the listed channels by pressing the Blue button or open the Edit Channel List menu by pressing the Green button in order to make advanced changes in the current list. Managing the Favourite Lists You can create four different lists of your favourite channels. Enter the Channel List in the main menu or press the Green button while the Channel List is displayed on the screen in order to open the Edit Channel List menu. Select the desired channel on the list. You can make multiple choices by pressing the Yellow button. Then press the OK button to open the Channel Edit Options menu and select Add/Remove Favourites option. Press the OK button again. Set the desired list option to On. The selected channel/s will be added to the list. In order to remove a channel or channels from a favourite list follow the same steps and set the desired list option to Off. You can use the Filter function in the Edit Channel List menu to filter the channels in the Channel List permanently according to your preferences. Using this Filter option, you can set one of your four favourite lists to be displayed every time the Channel list is opened. The filtering function in the Channel List menu will only filter the currently displayed Channel list in order to find a channel and tune in it. These changes will not remain the next time the Channel list is opened if you don't save them. To save the changes on the list press the Red button after filtering while the Channel list is displayed on the screen. Configuring Parental Settings The Parental Settings menu options can be used to prohibit users from viewing of certain programmes, channels and using of menus. These settings are located in the System>Settings>Parental menu. To display parental lock options, a PIN number should be entered. After coding the correct PIN number, Parental Settings menu will be displayed. Menu Lock: This setting enables or disables access to all menus or installation menus of the TV. Maturity Lock: If this option is set, TV gets the maturity information from the broadcast and if this maturity level is disabled, disables access to the broadcast. Note: If the country option in the First Time Installation is set as France, Italy or Austria, Maturity Lock's value will be set to 18 as default. | Child Lock: If this option is set to ON, the TV can only be controlled by the remote control. In this case the control buttons on the TV will not work. Internet Lock: If this option is set to ON, the open browser application in the portal will be disabled. Set to OFF to release the application again. Set PIN: Define a new PIN number. Default CICAM PIN: This option will appear as greyed out of the CI module is inserted into the CI slot of the TV. You can change the default PIN of the CI CAM using this option. Note: Default PIN can be set to 0000 or 1234. If you have defined the PIN(s requested depending on the country selection) during the First Time Installation use the PIN that you have defined. Some options may not be available depending on the model and/or on the country selection in the First Time Installation. Electronic Programme Guide (EPG) Some channels send information about their broadcast schedules. Press the Epg button to view the Programme Guide menu. There are 3 different types of schedule layouts available, Timeline Schedule, List Schedule and Now/Next Schedule. To switch between them follow the instructions on the bottom of the screen. Timeline Schedule Zoom (Yellow button): Press the Yellow button to see events in a wider time interval. Filter (Blue button): Views filtering options. Highlight Genre (Subtiles button): Displays Highlight Genre menu. Using this feature, you can search the programme guide database in accordance with the genre. Info available in the programme guide will be searched and results matching your criteria will be highlighted. Options (OK button): Displays event options. Event Details (Info button): Displays detailed information about selected programmes. Next/Prev Day (Programme +/- buttons): Displays the programmes of previous or next day. Search (Text button): Displays Guide Search menu. Now (Source button): Displays current event of the highlighted channel. List Schedule(*) |
| The Parental Settings menu options can be used to prohibit users from viewing of certain programmes, channels and using of menus. These settings are located in the System>Settings>Parental menu. To display parental lock options, a PIN number should be entered. After coding the correct PIN number, Parental Settings menu will be displayed. Menu Lock: This setting enables or disables access to all menus or installation menus of the TV. Maturity Lock: If this option is set, TV gets the maturity information from the broadcast and if this maturity level is disabled, disables access to the broadcast. Note: If the country option in the First Time Installation is set as France, Italy or Austria, M maturity Lock's value will be set to 18 as default. | () In this layout option, only the events of the highlighted channel will be listed. Prev. Time Slice (Red button): Displays the programmes of previous time slice. Next/Prev Day (Programme +/- buttons): Displays the programmes of previous or next day. Event Details (Info button): Displays detailed information about selected programmes. Filter (Text button): Views filtering options. Next Time Slice (Green button): Displays the programmes of next time slice. |
PC Input Typical Display Modes
The following table is an illustration of some of the typical video display modes. Your TV may not support all resolutions.
| Source Supported Signals Available | |||
| Side AV | PAL O | ||
| SECAM O | |||
| NTSC4.43 O | |||
| NTSC3.58 O | |||
| YPbPr | 480i, 480p | 60Hz | O |
| 576i, 576p | 50Hz | O | |
| 720p | 50Hz,60Hz | O | |
| 1080i | 50Hz,60Hz | O | |
| HDMI | 480i | 60Hz | O |
| 480p | 60Hz | O | |
| 576i, 576p | 50Hz | O | |
| 720p | 50Hz,60Hz | O | |
| 1080i | 50Hz,60Hz | O | |
| 1080p | 24Hz,25Hz,30Hz,50Hz,60Hz | O | |
| 3840x2160p | 24Hz,25Hz,30Hz,50Hz,60Hz | O | |
| 4096x2160p | 24Hz,25Hz,30Hz,50Hz,60Hz | O | |
(X: Not Available, O: Available)
In some cases a signal on the TV may not be displayed
properly. The problem may be an inconsistency with
standards from the source equipment (DVD, Set-lopbox etc . ) If you do experience such problem please
box, etc.). If you do contact your dealer source equipment.
Supported Video File Formats for USB Mode
| Video Codec | Resolution | Bit Rate | Container |
| MPEG1/2 | 1080Px2@30fps, 1080P@60fps | 40Mbps | MPEG program stream (.DAT, .VOB, .MPG, .MPEG), MPEG transport stream (ts, trp, .tp), MP4 (.mp4, .mov), 3GPP (.3gpp, .3gp), AVI (.avi), MKV (.mkv), ASF (.asf) |
| MPEG4 | MPEG program stream (.MPG, .MPEG), MP4 (.mp4, .mov), 3GPP (.3gpp, .3gp), AVI (.avi), MKV (.mkv), ASF (.asf) | ||
| XviD | MP4 (.mp4, .mov), AVI (.avi), MKV (.mkv), ASF (.asf) | ||
| Sorenson H.263 | FLV (.flv), AVI (.avi), SWF(.swf) | ||
| H.263 | MP4 (.mp4, .mov), 3GPP (.3gpp, .3gp), AVI (.avi), MKV (.mkv) | ||
| H.264 | 3840x2160@30fps, 1080P@60fps | 135Mbps | FLV (.flv), MP4 (.mp4, .mov), 3GPP (.3gpp, .3gp), MPEG transport stream (.ts, trp, .tp), ASF (.asf), AVI (.avi), MKV (.mkv) |
| Motion JPEG 720P | @30fps 10Mbps | 10Mbps | AVI (.avi), 3GPP (.3gpp, .3gp), MP4 (.mp4, .mov), MKV (.mkv), ASF (.asf) |
| VP8 | 1080P@30fps 20Mbps | MKV (.mkv), WebM (.webm) | |
| HEVC/H.265 | 4K2K@60fps | 100Mbps | MP4 (.mp4, .mov), MKV (.mkv), MPEG transport stream (.ts, .trp, .tp) |
| 1080P@60fps 50Mbps | MP4 (.mp4, .mov), MKV (.mkv), MPEG transport stream (.ts, .trp, .tp), 3GPP (.3gpp, .3gp) | ||
| VP9 | 4K2K@30fps | 100Mbps | MKV (.mkv), WebM (.webm) |
Supported Picture File Formats for USB Mode
| Image | Photo | Resolution (width x height) | Remark |
| JPEG | Base-line | 15360x8640 | The limit for max resolution depends on DRAM size |
| Progressive | 1024x768 | ||
| PNG | non-interlace | 9600x6400 | |
| interlace | 1200x800 | ||
| BMP | 9600x6400 |
Supported Subtitle File Formats for USB Mode
Supported Audio File Formats for USB Mode
| Internal Subtitles | ||
| Extension Container Subtitle Code | ||
| dat, mpg, mpeg, hob MPG, MPEG DVD Subtitle | ||
| ts, trp, tp | TS | DVB Subtitle |
| mp4 | MP4 | DVD Subtitle UTF-8 Plain Text |
| mkv | MKV | ASS SSA UTF-8 Plain Text VobSub DVD Subtitle |
| avi | AVI (1.0, 2.0), DMF0,1, 2 | XSUB XSUB+ |
| External Subtitles | ||
| Extension | Subtitle Parser | Remark |
| .srt | Subrip | |
| .ssa/.ass | SubStation Alpha | |
| .smi | SAMI | |
| .sub | Subscriber MicroDVD DVDssubtitleSystem SubIdx (VobSub) | Subscriber 1.0 & 2.0 Only |
| .txt | TMPlayer | |
| Audio Codec | Sample rate | Bit Rate | Container | |
| MPEG1/2 Layer1 | 16KHz ~ 48KHz | 32Kbps ~ 448Kbps | MP3 (.mp3), AVI (.avi), ASF (.asf), Matroska (.mkv, .mka), MPEG transport stream (.ts, .trp, .tp), MPEG program stream (.DAT, .VOB, .MPG, .MPEG), WAV (.wav) | |
| MPEG1/2 Layer2 | 16KHz ~ 48KHz | 8Kbps ~ 384Kbps | MP3 (.mp3), AVI (.avi), ASF (.asf), Matroska (.mkv, .mka), MPEG transport stream (.ts, .trp, .tp), MPEG program stream (.DAT, .VOB, .MPG, .MPEG), WAV (.wav) | |
| MPEG1/2 Layer3 | 16KHz ~ 48KHz | 8Kbps ~ 320Kbps | MP3 (.mp3), AVI (.avi), ASF (.asf), Matroska (.mkv, .mka), 3GPP (.3gpp, .3gp), MP4 (.mp4, .mov, m4a), MPEG transport stream (.ts, .trp, .tp), MPEG program stream (.DAT, .VOB, .MPG, .MPEG), FLV (.flv), WAV (.wav), SWF (.swf) | |
| AC3 | 32KHz, 44.1KHz, 48KHz | 32Kbps ~ 640Kbps | AC3 (.ac3), AVI (.avi), Matroska (.mkv, .mka), 3GPP (.3gpp, .3gp), MP4 (.mp4, .mov, m4a), MPEG transport stream (.ts, .trp, .tp), MPEG program stream (.DAT, .VOB, .MPG, .MPEG) | |
| EAC3 | 32KHz, 44.1KHz, 48KHz | 32Kbps ~ 6 Mbps | EAC3 (.ec3), 3GPP (.3gpp, .3gp), MP4 (.mp4, .mov, m4a), MPEG transport stream (.ts, .trp, .tp), MPEG program stream (.DAT, .VOB, .MPG, .MPEG) | |
| AAC, HEAAC 8KHz ~ 48KHz | AAC (.aac), AVI (.avi), Matroska (.mkv, .mka), 3GPP (.3gpp, .3gp), MP4 (.mp4, .mov, m4a), MPEG transport stream (.ts, .trp, .tp), MPEG program stream (.DAT, .VOB, .MPG, .MPEG), FLV (.flv), RM (.ra) | |||
| WMA 8KHz ~ 48KHz | 128bps ~ 320Kbps | ASF (.wma, .asf), AVI (.avi), Matroska (.mkv, .mka) | ||
| WMA 10 Pro M0 48KHz < 192kbps | ||||
| WMA 10 Pro M1 48KHz < 384kbps | ||||
| WMA 10 Pro M2 96KHz < 768kbps | ||||
| G711 A/mu-law | 8KHz | 64Kbps ~ 128Kbps | WAV (.wav), AVI (.avi), Matroska (.mkv, .mka), 3GPP (.3gpp, .3gp), MP4 (.mp4, .mov, m4a) | |
| LBR (cook) | 8KHz, 11.025KHz, 22.05KHz, 44.1KHz | 6Kbps ~ 128Kbps | RM (.ra) | |
| FLAC 8KHz~96KHz < 1.6Mbps Matroska (.mkv, | ||||
Supported DVI Resolutions
When connecting devices to your TV's connectors by using DVI converter cable(DVI to HDMI cable - not supplied), you can refer to the following resolution information.
| 56Hz 60Hz 66Hz 70Hz 72Hz 75Hz | |||||
| 640x480 | |||||
| 800x600 | |||||
| 1024x768 | |||||
| 1280x768 | |||||
| 1280x960 | |||||
| 1360x768 | |||||
| 1366x768 | |||||
| 1280x1024 | |||||
| 1400x1050 | |||||
| 1600x900 | |||||
| 1920x1080 | |||||
Connectivity
Wired Connectivity
Brodard USP connection
To Connect to a Wireless Network
The TV cannot connect to the networks with a hidden SSID. To make your modem's SSID visible, you should change your SSID settings via the modem's software.
- To configure your wireless settings please refer to the Network/Internet Settings section in the System>Settings Menu.
Broadband
JSP
LAN input on the rear side of the TV
Configuring Wired Device Settings
Network Type
Internet Speed Test
Advanced Settings
Highlight Advanced Settings and press the OK button. On the next screen you can change the IP and DNS settings of the TV. Highlight the desired one and press Left or Right button to change the setting
from Automatic to Manual. Now you can enter the Manual IP and / or Manual DNS values. Select the related item in the drop down menu and enter the new values using the numeric buttons of the remote. Press the OK button to save settings when complete.
Wireless Connectivity
To Connect to a Wireless Network
The TV cannot connect to the networks with a hidden SSID. To make your modem's SSID visible, you should change your SSID settings via the modem's software.
LAN input on the rear side of the TV
The frequency and channel information depending on the area. The transmission speed differs depending on the distance and number of observations between the
distance and number of obstructions between the transmission products, the configuration of these products, the radio wave conditions, the line traffic
and the products that you use. The transmission may also be cut off or may get disconnected depending on the radio wave conditions, DECT phones or any other WiFi 11b appliances. The standard values of the transmission speed are the theoretical maximum values for the wireless standards. They are not the actual speeds of data transmission.
The location where the transmission is most effective differs depending on the usage environment.
To Connect to a Wired Network
- You must have a modem/router connected to an active broadband connection.
- Connect your TV to your modem/rodter via an ethernet cable. There is a LAN port at the rear (back) of your TV.
To Connect to a wire the following steps:
The Network Type can be selected as Wired Device, Wireless Device or Disabled, in accordance with the active connection to the TV set. Select this as Wired Device if you are connecting via an ethernet cable.
Highlight Internet Speed Test and press the OK button. TV will check the internet connection bandwidth and display the result when complete.
To Connect to a wire the following steps:
To configure wired settings please refer to the Network/Internet Settings section in the System>Settings Menu.
- You might be able to connect your TV to your LAN depending on your network's configuration. In such a case, use an ethernet cable to connect your TV directly to the network wall outlet.
1 + u1 - 1 = ( 1 + u) u1 < 1 = u
network
| · The Wireless feature of the TV supports 802.11 a,b,g & n type modules. It is highly recommended that you should use the IEEE 802.11n communication protocol in order to avoid any possible problems while watching videos. · You must change your modem's SSID when there are any other modems around with the same SSID. You can encounter connection problems otherwise. Use a wired connection if you experience problems with wireless connection. Configuring Wireless Device Settings Open the Network/Internet Settings menu and select Network Type as Wireless Device to start connection process. The TV will scan the wireless networks automatically. A list of available networks will be displayed. Please select your desired network from the list. Note: If the modem supports N mode, you shou mode settings. If the selected network is protected with a password, please enter the correct key by using the virtual keyboard. You can use this keyboard via the directional buttons and the OK button on the remote control. Wait until the IP address is shown on the screen. This means that the connection is now established. To disconnect from a wireless network, highlight Network Type and press Left or Right buttons to set as Disabled. Highlight Internet Speed Test and press the OK button to check your internet connection speed. Highlight Advanced Settings and press the OK button to open the advanced setting menu. Use directional and numeric buttons to set. Press the OK button to save settings when complete. Other Information The status of the connection will be displayed as Connected or Not Connected and the current IP address, if a connection is established. Connecting to your mobile device via WiFi · If your mobile device has WiFi feature, you can connect it to your TV via a router, in order to access the content in your device. For this, your mobile device must have an appropriate sharing software. · Connect to your router following the steps stated above in the Wireless Connectivity section. · Afterwards, engage your mobile device with the router and then activate the sharing software on your mobile device. Then, select files that you want to share your TV. · If the connection is established correctly, you will be able to access the shared files from your mobile device via the Media Browser of your TV. | · Enter the Media Browser menu and the playback device selection OSD will be displayed. Select your mobile device and press the OK button to continue. · If available, you can download a virtual remote controller application from the server of your mobile device application provider. · Note: This feature may not be supported on all mobile devices. · Wake ON Wake-on-LAN (WoL) and Wake-on-Wireless LAN (WoWLAN) are standards that allow a device to be turned on or woken up by a network message. The message is sent to the device by a program executed on a remote device connected to the same local area network, such as a smartphone. Your TV is WoL and WoWLAN compatible. To enable this feature set the Wake On option in the Network/ Internet Settings menu as On. It is necessary that both the device and the connection be set to the TV, and the TV are connected to the same network. Wake On feature is only supported for Android OS devices and can only be used via YouTube and Netflix applications. In order to use this feature the TV and the remote device should be connected at least once while the TV is on. If the TV is powered off, the connection should be reestablished, the next time it is switched on. Otherwise this feature will be unavailable. This does not apply, when the TV is switched into the standby mode. · Wireless Display Wireless Display is a standard for streaming video and sound content by Wi-Fi Alliance. This feature provides the ability to use your TV as wireless display device. Using with mobile devices There are different standards which enable sharing of screens including graphical, video and audio content between your mobile device and TV. Plug the wireless USB dongle to TV first, if the TV doesn't have internal WiFi feature. Then press the Source button on the remote and switch to Wireless Display source. A screen appears stating that the TV is ready for connection. Open the sharing application on your mobile device. These applications are named differently for each brand, please refer to the instruction manual of your wireless device for detailed information. Scan for devices. After you select your TV and connect, the screen of your device will be displayed on your TV. Note: This feature can be used only if the mobile device supports this feature. Scanning and connecting processes |
| · Ensure that any firewalls of your network allow the TV wireless connection. · Try searching for wireless networks again, using the Network/Internet Settings menu screen. If the wireless network does not function properly, try using the wired network in your home. Refer to the Wired Connectivity section for more information on the process. If the TV does not function using the wired connection, check the modern (router). If the router does not have a problem, check the internet connection of your modem. Connection is Slow See the instruction book of your wireless modem to get information on the internal service area, connection speed, signal quality and other settings. You need to have a high speed connection for your modem. | · Audio Video Sharing feature uses a standard that eases the viewing process of digital electronics and makes them more convenient to use on a home network. This standard allows you to view and play photos, music and videos stored in the media server connected to your home network. · 1. Server Software Installation · The Audio Video Sharing feature cannot be used if the server programme is not installed onto your PC or if the required media server software is not installed onto the companion device. Please prepare your PC with a proper server programme. · 2. Connect to a Wired or Wireless Network See the Wired/Wireless Connectivity chapters for detailed configuration information. |
| 3. Play Shared Files via Media Browser Select Media Browser by using the directional buttons from the main menu and press OK. The media browser will then be displayed. Audio Video Sharing Select the desired media type on the main media browser menu and press OK. If sharing configurations are set properly, Device Selection screen will be displayed after selecting the desired media type. If available networks are found, they will be listed on this screen. Select media server or network that you want to connect to using the Up or Down buttons and press OK. If you want to refresh the device list, press the Green button. You can press Menu to exit. If you select the media type as Videos and choose a device from the selection menu. Then select the folder with video files in it on the next screen and all the available video files will be listed. To play other media types from this screen, you can go back to main Media Browser screen and select the media type as desired and then perform the network selection again. Or press the Blue button to switch to next media type quickly without changing the network. Refer to the Media Browser menu section for further information on file playback. If a problem occurs with the network, please switch your television off at the wall socket and back on again. Trick mode and jump are not supported with the Audio Video Sharing feature. PC/HDD/Video Player or any other devices that are compatible should be used with a wired connection for higher playback quality. Use a LAN connection for quicker file sharing between other devices like computers. Note: There may be some PC's which may not be able to utilize the Audio Video Sharing feature due to administrator and security settings (such as business PC's). Internet Portal HINT: A broadband internet connection is required for high quality viewing. You must set the country option accordingly in the First Time Installation for proper operation of the internet portal. Portal feature adds your TV a feature that allows you to connect a server on the Internet and view the content provided by this server over your Internet connection. Portal feature allows you to view the music, video, clip or web content with defined short-cuts. Whether you can view this content without interruption depends on the connection speed provided by your internet service provider. Press the Internet button on your remote control to open internet portal page. You will see icons of the available applications and services on the portal screen. Use the directional buttons on your remote control to open the dial-up or down menu. Press the dial-up or down menu icon to select the dial-up or down menu icon. You can also use the Opera menu options to manage the browser. Highlight the Opera button and press |
| rewind keys on the remote control to interact with the AV content. Note: You can enable or disable this feature from the More menu in System>Settings menu. |
| Smart Center Smart Center is a mobile application running on iOS and Android platforms. With your tablet or phone, you can easily stream your favorite live shows and programmes from your smart TV. Also, you can launch your portal applications, use your tablet as a remote control for your TV and share media files. Note: Being able to use all functions of this application depends on the features of your TV. Setting Started To use Smart Center features, connections have to be done properly. To get connected to your network wirelessly, plug in the Wi-Fi dongle to one of the USB ports if your TV doesn't have internal wifi feature. To be able to use internet based features, your modem/rod must be connected to the internet. IMPORTANT: Make sure the TV and mobile device are connected to the same network. For media sharing feature Audio Video Sharing option should be enabled(if available). Press the Menu button on the remote, select System>Settings>More menu and press OK. Highlight Audio Video Sharing and change as Enabled. Your TV is ready to connect to your mobile device now. Install the Smart Center application onto your mobile device. Start the smart center application. If all connections are configured properly, you will see your TV's name on your mobile device. If your TV's name doesn't appear on the list, wait a while and tap on the Refresh widget. Select your TV from the list. Mobile Device screen On the main screen you can find tabs to various features. The application retrieves actual channel list from TV first when it starts. MY CHANNELS: The programmes of first four channels from the channel list retrieved from the TV are shown. You can change the listed channels. Press on the channel thumbnail and hold. A list of channels will be displayed and you can choose your desired channel to be replaced. TV: You can watch content through the TV tab. In this mode you can navigate through the channel list retrieved from your TV and click on the thumbnails to view the detail pages. RECORDINGS: You can view your active recordings(if available) and reminders through this tab. To delete any item, simply press on the delete icon found on each row. |
| EPE: You can view the broadcast schedules of selected channel lists through this tab. You can also navigate through channels by pressing on the selected channel on the EPG grid. Please note that updating / refreshing the EPG information may take a while depending on your network and web service quality. Note: Internet connection is required for WEB based EPG informations. PORTAL: This tab displays the Portal applications in scrollable view. Unless FollowMeTV (if available) is active, the selected application will be displayed on your TV screen. Note: Internet connection is required. This tab is enabled if a portal page is in use. SETTINGS: Configure the application to your liking. You can change: Auto-lock (Only in IOS): The screen of the device automatically turns off after a certain amount of time. Default is off, which means the screen will always stay on. Auto-enable FollowMeTV: FollowMeTV function (if available) will start automatically when this setting is enabled. Default is disabled. Auto-connection to TV: When enabled, your mobile device will automatically connect to last connected TV and skips the TV search screen. Change TV (Only in IOS): Shows the currently connected TV. You can press on this setting to go to the "TV search" screen and change to a different TV. Edit custom channel list: You can edit your custom channel list using this setting. Choose channel list source: You can choose the channel list source to be used in the application. The options are "TV List" and "Custom List". Additionally you can activate "Remember my choice" option to set the selected channel list source as a constant choice. In this case if the selected source is available it will be used in the application. Version No: Displays the current version of the application. Detail Page To open detail page tap on a programme. On the detail page screen you can get detailed information of the programmes you select. There are "Details", "Cast&Crew" and "Videos" tab to find on this page. DETAILS: This tab provides summary and information about the selected programme. Also there are links to facebook and twitter pages of the programme selected. CAST&CREW: Shows all the people contributed to the current programme. VIDEOS: Provides videos on Youtube related to the selected programme. |
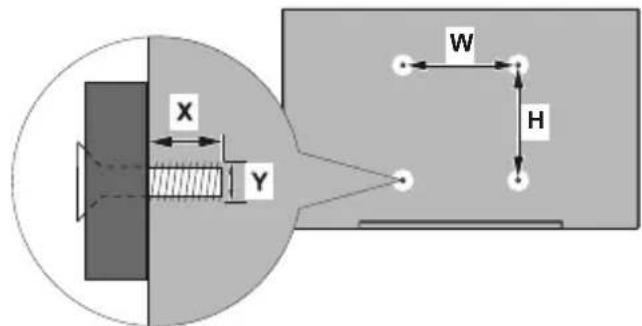
| A | VESA WALL MOUNT MEASUREMENTS | ||
| B | Hole Pattern Sizes (mm) | W | H |
| 600 | 400 | ||
| C | Screw Sizes | ||
| D | Length (X) | min. (mm) | 15 |
| max. (mm) | 20 | ||
| E | Thread (Y) | M8 | |
| A | Product Fiche | ||
| B | Commercial Brand:HAIER | ||
| C | Product No. | 10116045 | |
| D | Model No. | LDU75V900S | |
| E | Energy efficiency class | A+ | |
| F | Visible screen size (diagonal,approx.) (inch/cm) | 75 inches | 190 cm |
| G | On mode average power consumption (Watt) | 160 | |
| H | Annual energy consumption (kWh/annum) | 233 | |
| I | Standby power consumption (Watt) | 0,5 | |
| J | Off mode power consumption (Watt) | 0 | |
| K | Display resolution (px) | 3840x2160 | |
| A | B | C | D | E | Visible screen size(diagonal, approx.) (inch/cm) | ||||||||
| English | Product Fiche Commercial Brand Product No | Model No. Energy efficiency class | |||||||||||
| Deutsch | Produkt-Datenblatt | Markenzeichen | Produkt-Nr. | Model-Nr. | Energieeffizienzklasse | Sichtbare Bildschimgroße(diagonal, ca.) (Zoll/cm) | |||||||
| Белларский | Справочen пост Стейнескtie Дадни | Тьровская марka | Проб yourself | Мердл. № | Дуллары | Саллары | (,) (,) (,) (,) (,) (,) (,) (,) (,) (,) (,) (,) (,) (,) (,) (,) (,) (,) (,) (,) (,) (,) (,) (,) (,) (,) (,) (,) (,) (,) (,) (,) (,) (,) (,) (,) (,) (,) (,) (,) (,) (,) (,) (,) (,) (,) (,) (,) (,) (,) (,) | ||||||
| Белларский | Справочен пост Cтейнескtie Дадни | Тьровская марka | Проб yourself | Мердл. № | Клас на[eheprinha[efeektibnost] | Виdimе рамер на ekрANA(Dиагоган, пост.) (Инга/cm) | |||||||
| Čeština | Produktovy list | Značka výrobce | Сisable produkt | Model ... | Energetická třida | Viditeileva velkost obrazovky(úhlopíčka, pril). (palu/cm) | |||||||
| Dansk | Produktoplysningsskema | Varemaerkle | Produktnr. | Model nr. | Energieeffektivitetsklasse | Synig skærmstørrelse(diagonal,ca.) (HK/cm) | |||||||
| Suomi | Tuote fiche | Kaupallinen merkki | Tuote nro. | Malli nro. | Virran tehokkuusluokka | Nakyvan kuvaruudun koko(diagonal,n.), (tuumaa/cm) | |||||||
| Français | Fiche du produit | Marque commerciale | Produit N° | Modèle N° | Classe d'efficacité énergétique | Taille d'écran visible (diagonal,approx., (pouces)/cm) | |||||||
| Hrvatski | SAŽETAK PROIZVODA | Trgovačka marka | Br. proizvoda | Br. modela | Klasa energetske učinkovitosti | Vidžjiva večicina ekrana(diagonal,prilibno) (inca/cm) | |||||||
| Nederlands | Productfiche | Commercieel merk. | Productnr. | Modelnr. | Energie efficientre kasse | Zichtoare schemgrotte(diagonal,ca.) (inches/cm) | |||||||
| Espanol | Ficha del Producto | Marca Comercial | N° de Producto | N° de Modelo | Clasificación Energética | Tamano de pantalla visible(diagonal,aprox.), (pulgadas/cm) | |||||||
| Svenska | Produktspecifikation | Varumärke | Produktnr. | Modelinnr. | Energiklass | Synig skamstortek(diagonal, ungefargir) (tum/cm) | |||||||
| Italiano | Scheda prodotto | Marchio commerciale | Numero prodotto | Numero modello | Classe di efficienza energetica | Dimensioni visibili dello schermo(diagonal,circa) (pollici/cm) | |||||||
| Polski | KARTA PRODUKTU | Marka produktu | Nr produktu Nr | modelu | Klasa efektwinošci energetycznej | Widoczny obraz ekrana(przekatna,okolo)(cali/cm) | |||||||
| Magyar | Termékismertető adatlap | Kereskedelmi marka | Termékszám | Modellszám | Energiahalékonysúsagi osztály | Latható képlartomány (diagonal,kb.) (inches/cm) | |||||||
| Norsk | Produktinformation | Kommersiell merkevare | Produkt nr. | Model nr. | Energieeffektivitet klasse | Synig skjermstørrelse (diagonal,ca.) (tommer/cm) | |||||||
| Portugues | Ficha do produits | Marca Comercial | Produito N° | Modelo N° | Classificação eficiência enerética | Tamanno ecra visiter (diagonal,approx.) (polegadas/cm) | |||||||
| Română | Fișă produs | Marcă commerciale | Nr. Produs | Nr. Model | Clasa de eficientă energetica | Dimensiunea ecranulii vizibili(diagonal,approx.) (inch/cm) | |||||||
| Pyccskiy | Справочny litstok Теки checkx Ддпьх ИддьяяяяяяяяяяяяяяяяяяяяяяяяяяяяяяяяяяяяяяяяяяяяяяяяяяяяяяяяяяяяяяяяяяяяяяяяяяяяяяяяяяяяяяяяяяяяяяяяяяяяЯяяяяяяяяяяяяяяяяяяяяяяяяяяяяяяяяяяяяяяяяяяяяяяяяяяяяяяяяяяяяяяяяяяяяяяяяяяяяяяяяяяяяяяяяяяяяяяяяяяя� | Latható kěptarlomány (diagonal,kb.) (inches/cm) | |||||||||||
| Белар Caucasian | Справочny litstok Теки checkx Ддпьх Иддьяяяяяяяяяяяяяяяяяяяяяяяяяяяяяяяяяяяяяяяяяяяяяяяяяяяяяяяяяяяяяяяяяяяяяяяяяяя饯 | Торвая марka | Homep nolement | Homep nolement | Knacc 3hepronotpe6neuher | В Viдимь рамер ekрANA (no daquona), prindniembo (dokono) (duimmoVB/cm) | |||||||
| мakedoncki | Тechнижни podatoцhi | Коршцилална марka | Пробselfб.р. | Мoder emb.р. | Knaca na eheprctcka ephikaackost | Големпima на видений ekран(Dиагогана, okony) (invy/m) | |||||||
| ураійський | ТechнишиDani | Коршцилална марka | Артукун | Мodelь | Knac eheprocnoxibanhy | В Viдимь розмир ekрANA (diagonal,bpriibno) (duojibm/b) | |||||||
| Srpski | Tehnicke odlike | Komercjialna marka | Proizvod br. | Modelbr. | Klasa energetske efikasnosti | Veilčina vidljvog ekrana (diagonal, tokom) (inca/cm) | |||||||
| Slovenčina | Produktovy list | Značka výrobcu | Сisable produktu | Model ... | Energetická trieda | Viditeileva velkost obrazovky(ukropiečka, zhruba) (palcov/cm) | |||||||
| Slovenščina | Opis izdelka | Komercjialna znamka | St. Izdelka | St. Modela | Razred energetske učinkovitosti | Vidna velkost zaslona (diagonal, pril.) (palvev/cm) | |||||||
| Ельник | Демлно пожуго | Ельникov smja | Ap. Пожуго | Ap. Можелуо | Katnyoripia уретуккс оtmobул | Оразу щétб�овпс (diayuvioc, trp.) (ivotc/cm) | |||||||
| Bosanski | Тechиicki podaci | Komercjialna marka | Produktbr. | Modelbr. | Klasa energetske efikasnosti | Vidjiva veletchina ekrana (diagonal, prilibno) (inca/cm) | |||||||
| Тусянese | Тусяноу Тусяно Тусяно Тусяно Тусяно Тусяно Тусяно Тусяно Тусяно Тусяно Тусяно Тусяно Тусяно Тусяно Тусяно Тусяно Тусяно Тусяно Туquia | Тусян Тусян Тусян Тусян Туquia | Тусян Туquia | Тусян Туquia | Тусян Тусян Туquia | (Tусян)(davon) (davon) (davon) (davon) (davon) (davon) (davon) (davon) (davon) (davon) (davon) (davon) (davon) (davon) (davon) (davon) (davon) (davon) (davon) (davon) (davon) (Tučný) (davon) (davon) (davon) (davon) (davon) (davon) (davon) (davon) (davon) (davon) (davon) (davon) (davon) (davon) (davon) (davon) (davon) (davon) (davon) (dav on) (davon) (davon) (davon) (davon) (davon) (davon) (davon) (davon) (davon) (davon) (davon) (davon) (davon) (davon) (davon) (davon) (davon) (davon) (davon) (dav-on) (davon) (davon) (davon) (davon) (davon) (davon) (davon) (davon) (davon) (davon) (davon) (davon) (davon) (davon) (davon) (davon) (davon) (davon) (davon) (davond) (davon) (davon) (davon) (davon) (davon) (davon) (davon) (davon) (davon) (davon) (davon) (davon) (davon) (davon) (davon) (davon) (davon) (davon) (davon) (davod) (davon) (davon) (davon) (davon) (davon) (davon) (davon) (davon) (davon) (davon) (davon) (davon) (davon) (davon) (davon) (davon) (davon) (davon) (davon) (davom) (davon) (davon) (davon) (davon) (davon) (davon) (davon) (davon) (davon) (davon) (davon) (davon) (davon) (davon) (davon) (davon) (davon) (davon) (davon) (davons) (davon) (davon) (davon) (davon) (davon) (davon) (davon) (davon) (davon) (davon) (davon) (davon) (davon) (davon) (davon) (davon) (davon) (davon) (davon) (davson) (davon) (davon) (davon) (davon) (davon) (davon) (davon) (davon) (davon) (davon) (davon) (davon) (davon) (davon) (davon) (davon) (davon) (davon) (davon) (davdon) (davon) (davon) (davon) (davon) (davon) (davon) (davon) (davon) (davon) (davon) (davon) (davon) (davon) (davon) (davon) (davon) (davon) (davon) (davon) (davgon) (davon) (davon) (davon) (davon) (davon) (davon) (davon) (davon) (davon) (davon) (davon) (davon) (davon) (davon) (davon) (davon) (davon) (davon) (davon) (davcon) (davcon) (davcon) (davcon) (davcon) (davcon) (davcon) (davcon) (davcon) (davcon) (davcon) (davcon) (davcon) (davcon) (davcon) (davcon) (davcon) (davcon) (davcon) (davcon) (davon) (davcon) (davcon) (davcon) (davcon) (davcon) (davcon) (davcon) (davcon) (davcon) (davcon) (davcon) (davcon) (davcon) (davcon) (davcon) (davcon) (davcon) (davcon) (davon) (davon) (davcon) (davcon) (davcon) (davcon) (davcon) (davcon) (davcon) (davcon) (davcon) (davcon) (davcon) (davcon) (davcon) (davcon) (davcon) (davcon) (davcon) (davon) (davcon) (davon) (davcon) (davcon) (davcon) (davcon) (davcon) (davcon) (davcon) (davcon) (davcon) (davcon) (davcon) (davcon) (davcon) (davcon) (davcon) (davcon) (davcon) (davon) (davon) (davon) (davcon) (davcon) (davcon) (davcon) (davcon) (davcon) (davcon) (davcon) (davcon) (davcon) (davcon) (davcon) (davcon) (davcon) (davcon) (davcon) (davon) (davcon) (davcon) (davon) (davcon) (davcon) (davcon) (davcon) (davcon) (davcon) (davcon) (davcon) (davcon) (davcon) (davcon) (davcon) (davcon) (davcon) (davcon) (davcon) (davon) (davcon) (davon) (davon) (davcon) (davcon) (davcon) (davcon) (davcon) (davcon) (davcon) (davcon) (davcon) (davcon) (davcon) (davcon) (davcon) (davcon) (davcon) (davcon) (davon) (davon) (davcon) (davon) (davcon) (davcon) (davcon) (davcon) (davcon) (davcon) (davcon) (davcon) (davcon) (davcon) (davcon) (davcon) (davcon) (davcon) (davcon) (davcon) (davon) (davon) (davon) (davon) (davcon) (davcon) (davcon) (davcon) (davcon) (davcon) (davcon) (davcon) (davcon) (davcon) (davcon) (davcon) (davcon) (davcon) (davcon) (davon) (davcon) (davcon) (davcon) (davon) (davcon) (davcon) (davcon) (davcon) (davcon) (davcon) (davcon) (davcon) (davcon) (davcon) (davcon) (davcon) (davcon) (davcon) (davcon) (davon) (davcon) (davcon) (davon) (davon) (davcon) (davcon) (davcon) (davcon) (davcon) (davcon) (davcon) (davcon) (davcon) (davcon) (davcon) (davcon) (davcon) (davcon) (davcon) (davon) (davcon) (davon) (davcon) (davon) (davcon) (davcon) (davcon) (davcon) (davcon) (davcon) (davcon) (davcon) (davcon) (davcon) (davcon) (davcon) (davcon) (davcon) (davcon) (davon) (davcon) (davon) (davon) (davon) (davcon) (davcon) (davcon) (davcon) (davcon) (davcon) (davcon) (davcon) (davcon) (davcon) (davcon) (davcon) (davcon) (davcon) (davcon) (davon) (davon) (davcon) (davcon) (davon) (davcon) (davcon) (davcon) (davcon) (davcon) (davcon) (davcon) (davcon) (davcon) (davcon) (davcon) (davcon) (davcon) (davcon) (davcon) (davon) (davon) (davcon) (davon) (davon) (davcon) (davcon) (davcon) (davcon) (davcon) (davcon) (davcon) (davcon) (davcon) (davcon) (davcon) (davcon) (davcon) (davcon) (davcon) (davon) (davon) (davon) (davcon) (davon) (davcon) (davcon) (davcon) (davcon) (davcon) (davcon) (davcon) (davcon) (davcon) (davcon) (davcon) (davcon) (davcon) (davcon) (davcon) (davon) (davon) (davon) (davon) (davon) (davcon) (davcon) (davcon) (davcon) (davcon) (davcon) (davcon) (davcon) (davcon) (davcon) (davcon) (davcon) (davcon) (davcon) (davon) (davcon) (davcon) (davcon) (davcon) (davon) (davcon) (davcon) (davcon) (davcon) (davcon) (davcon) (davcon) (davcon) (davcon) (davcon) (davcon) (davcon) (davcon) (davcon) (davon) (davcon) (davcon) (davcon) (davon) (davon) (davcon) (davcon) (davcon) (davcon) (davcon) (davcon) (davcon) (davcon) (davcon) (davcon) (davcon) (davcon) (davcon) (davcon) (davon) (davcon) (davcon) (davon) (davcon) (davon) (davcon) (davcon) (davcon) (davcon) (davcon) (davcon) (davcon) (davcon) (davcon) (davcon) (davcon) (davcon) (davcon) (davcon) (davon) (davcon) (davcon) (davon) (davon) (davon) (davcon) (davcon) (davcon) (davcon) (davcon) (davcon) (davcon) (davcon) (davcon) (davcon) (davcon) (davcon) (davcon) (davcon) (davon) (davcon) (davon) (davcon) (davcon) (davon) (davcon) (davcon) (davcon) (davcon) (davcon) (davcon) (davcon) (davcon) (davcon) (davcon) (davcon) (davcon) (davcon) (davcon) (davon) (davcon) (davon) (davcon) (davon) (davon) (davcon) (davcon) (davcon) (davcon) (davcon) (davcon) (davcon) (davcon) (davcon) (davcon) (davcon) (davcon) (davcon) (davcon) (davon) (davcon) (davon) (davon) (davcon) (davon) (davcon) (davcon) (davcon) (davcon) (davcon) (davcon) (davcon) (davcon) (davcon) (davcon) (davcon) (davcon) (davcon) (davcon) (davon) (davcon) (davon) (davon) (davon) (davon) (davcon) (davcon) (davcon) (davcon) (davcon) (davcon) (davcon) (davcon) (davcon) (davcon) (davcon) (davcon) (davcon) (davcon) (davon) (davon) (davcon) (davcon) (davcon) (davon) (davcon) (davcon) (davcon) (davcon) (davcon) (davcon) (davcon) (davcon) (davcon) (davcon) (davcon) (davcon) (davcon) (davcon) (davon) (davon) (davcon) (davcon) (davon) (davon) (davcon) (davcon) (davcon) (davcon) (davcon) (davcon) (davcon) (davcon) (davcon) (davcon) (davcon) (davcon) (davcon) (davcon) (davon) (davon) (davcon) (davon) (davcon) (davon) (davcon) (davcon) (davcon) (davcon) (davcon) (davcon) (davcon) (davcon) (davcon) (davcon) (davcon) (davcon) (davcon) (davcon) (davon) (davon) (davcon) (davon) (davon) (davon) (davcon) (davcon) (davcon) (davcon) (davcon) (davcon) (davcon) (davcon) (davcon) (davcon) (davcon) (davcon) (davcon) (davcon) (davon) (davon) (davon) (davcon) (davcon) (davon) (davcon) (davcon) (davcon) (davcon) (davcon) (davcon) (davcon) (davcon) (davcon) (davcon) (davcon) (davcon) (davcon) (davcon) (davon) (davon) (davon) (davcon) (davon) (davon) (davcon) (davcon) (davcon) (davcon) (davcon) (davcon) (davcon) (davcon) (davcon) (davcon) (davcon) (davcon) (davcon) (davcon) (davon) (davon) (davon) (davon) (davcon) (davon) (davcon) (davcon) (davcon) (davcon) (davcon) (davcon) (davcon) (davcon) (davcon) (davcon) (davcon) (davcon) (davcon) (davcon) (davon) (davon) (davon) (davon) (davon) (davon) (davon) (davon) (davon) (davon) (davon) (davon) (davon) (davon) (davon) (davon) (davon) (davon) (davon) (davion) Тусян Тусян Тусян Тусян Тусян Тусян Тусян Тусян Тусян Тусян Тусян Тусян Тусян Тусян Тусян Тусян Тусян Тусян Тусян Тусян Тусян Тусян Тусян Тусян Тусян Тусян Тусян Тусян Тусян Тусян Тусян Тусян Тусян Тусян Тусян Тусян Тусян Тусян Тусян Тусян Тусян Тусян Тусян Тусян Тусян Тусян Тусян Тусян Тусян Тусян Тусян Тусян Тусян Тусян Тусян Тусян Тусян Тусян Тусян Тусян Тусян Тусян Тусян Тусян Тусян Тусян Тусян Тусян Тусян Тусян Тусян Тусян Тусян Тусян Тусян Тусян Тусян Тусян Тусян Тусян Тусян Тусян Тусян Тусян Тусян Тусян Тусян Тусян Тусян Тусян Тусян Тусян Тусян Тусян Тусян Тусян Тусян Тусян Тусян Тусян Тусян Тусян Тусян Тусян Тусян Тусян Тусян Тусян Тусян Тусян Тусян Тусян Тусян Тусян Тусян Тусян Тусян Тусян Тусян Тусян Тусян Тусян Тусян Тусян Тусян Тусян Тусян Тусян Тусян Тусян Тусян Тусян Тусян Тусян Тусян Тусян Тусян Тусян Тусян Тусян Тусян Тусян Тусян Тусян Тусян Тусян Тусян Тусян Тусян Тусян Тусян Тусян Тусян Тусян Тусян Тусян Тусян Тусян Тусян Тусян Тусян Тусян Тусян Тусян Тусян Тусян Тусян Тусян Тусян Тусян Тусян Тусян Тусян Тусян Тусян Тусян Тусян Тусян Тусян Тусян Тусян Тусян Тусян Тусян Тусян Тусян Тусян Тусян Тусян Тусян Тусян Тусян Тусян Тусян Тусян Тусян Тусян Тусян Тусян Тусян Тусян Тусян Тусян Тусян Тусян Тусян Тусян Тусян Тусян Тусян Тусян Тусян Тусян Тусян Тусян Тусян Тусян Тусян Тусян Тусян Тусян Тусян Тусян Тусян Тусян Тусян Тусян Тусян Тусян Тусян Тусян Тусян Тусян Тусян Тусян Тусян Тусян Тусян Тусян Тусян Тусян Тусян Тусян Тусян Тусян Тусян Тусян Тусян Тусян Тусян Тусян Тусян Тусян Тусян Тусян Тусян Тусян Тусян Тусян Тусян Тусян Тусян Тусян Тусян Тусян Тусян Тусян Тусян Тусян Тусян Тусян Тусян Тусян Тусян Тусян Тусян Тусян Тусян Тусян Тусян Тусян Тусян Тусян Тусян Тусян Тусян Тусян Тусян Тусян Тусян Тусян Тусян Тусян Тусян Тусян Тусян Тусян Тусян Тусян Тусян Тусян Тусян Тусян Тусян Тусян Тусян Тусян Тусян Тусян Тусян Тусян Тусян Тусян Тусян Тусян Тусян Тусян Тусян Тусян Тусян Тусян Тусян Тусян Тусян Тусян Тусян Тусян Тусян Тусян Тусян Тусян Тусян Тусян Тусян Тусян Тусян Тусян Тусян Тусян Тусян Тусян Тусян Тусян Тусян Ту尼亚 Ту尼亚 Ту尼亚 Ту尼亚 Ту尼亚 Ту尼亚 Ту尼亚 Ту尼亚 Ту尼亚 Ту尼亚 Ту尼亚 Ту尼亚 Ту尼亚 Ту尼亚 Ту尼亚 Ту尼亚 Ту尼亚 Ту尼亚 Ту尼亚 Ту尼亚 Ту尼亚 Ту尼亚 Ту尼亚 Ту尼亚 Ту尼亚 Туinia Ту尼亚 Ту尼亚 Ту尼亚 Ту尼亚 Ту尼亚 Ту尼亚 Ту尼亚 Ту尼亚 Ту尼亚 Ту尼亚 Ту尼亚 Ту尼亚 Ту尼亚 Ту尼亚 Ту尼亚 Ту尼亚 Ту尼亚 Ту尼亚 Ту尼亚 Ту尼亚 Ту尼亚 Ту尼亚 Ту尼亚 Ту尼亚 Туeria Ту尼亚 Ту尼亚 Ту尼亚 Ту尼亚 Ту尼亚 Ту尼亚 Ту尼亚 Ту尼亚 Ту尼亚 Ту尼亚 Ту尼亚 Ту尼亚 Ту尼亚 Ту尼亚 Ту尼亚 Ту尼亚 Ту尼亚 Ту尼亚 Ту尼亚 Ту尼亚 Ту尼亚 Ту尼亚 Ту尼亚 Ту尼亚 Туiously Туiously Туiously Туiously Туiously Туiously Туiously Туiously Туiously Туiously Туiously Туiously Туiously Туiously Туiously Туiously Туiously Туiously Туiously Туiously Туiously Туiously Туiously Туiously Туiously Туroids Туroids Туroids Туroids Туroids Туroids Туroids Туroids Туroids Туroids Туroids Туroids Туroids Туroids Туroids Туroids Туroids Туroids Туroids Туroids Туroids Туroids Туroids Туroids Туroids Туroides Туroides Туroides Туroides Туroides Туroides Туroides Туroides Туroides Туroides Туroides Туroides Туroides Туroides Туroides Туroides Туroides Туroides Туroides Туroides Туroid. Туroid. Туroid. Туroid. Туroid. Туroid. Туroid. Туroid. Туroid. Туroid. Туroid. Туroid. Туroid. Туroid. Туroid. Туroid. Туroid. Туroid. Туroid. Туroid. Туroid. Туroid. Туroid. Туroid. Туroid. Туroid Туroid Туroid Туroid Туroid Туroid Туroid Туroid Туroid Туroid Туroid Туroid Туroid Туroid Туroid Туroid Туroid Туroid Туroid Туroid Туroid Туroid Туroid Туroid Туroid Туroid | Tyrk | Tyrk | Tyrk | Tyrk | Tyrk | Tyrk | Tyrk |
| Tyrk | Tyrk | Tyrk | Tyrk | Tyrk | Tyrk | Tyrk | Tyrk | ||||||
| Tyrk | Tyrk | Tyrk | Tyrk | Tyrk | Tyrk | Tyrk | Tyrk | ||||||
| Tyrk | Tyrk | Tyrk | Tyrk | Tyrk | Tyrk | Tyrk | Tyrk | ||||||
| Tp | Tp | Tp | Tp | Tp | Tp | Tp | Tp | ||||||
| Tp | Tp | Tp | Tp | Tp | Tp | Tp | Tp | ||||||
| Tp | Tp | Tp | Tp | Tp | Tp | Tp | Tp | ||||||
| Tp | Tp | Tp | Tp | Tp | Tp | Tp | Tp | ||||||
| Tp | Tp | Tp | Tp | Tp | Tp | Tp | Tp | ||||||
| Tp | Tp | Tp | Tp | Tp | Tp | Tp | Tp | ||||||
| Tp | Tp | Tp | tp | tp | tp | tp | tp | ||||||
| Tp | Tp | tp | tp | tp | tp | tp | tp | ||||||
| Tp | Tp | tp | tp | tp | tp | tp | tp | ||||||
| Tp | Tp | tp | tp | tp | tp | tp | tp | ||||||
| Tp | Tp | tp | tp | tp | tp | tp | tp | ||||||
| Tp | Tp | tp | tp | tp | tp | tp | tp | ||||||
| Tp | Tp | tp | tp | tp | tp | tp | TP | ||||||
| G | H | I | J | K | |
| English | On mode average power consumption (Watt) | Annual energy consumption (kWh/annum) | Standby power consumption (Watt) | Off mode power consumption (Watt) | Display resolution (px) |
| Deutsch | Durchschnittlicher Stromverbrauch im eingeschalttem Zustand (Watt) | Jährlicher Energieverbrauch (kWh/Jahr) Standby-Stromverbrauch | (Watt) | Stromverbrauch im ausgeschiedem Zustand (Watt) Display-Auflösung (px) | |
| Былгарский | С replenishment у садуху в пос�има на的同时е вдддддддддддддддддддддддддддддддддддддддддддддддддддддддддддддддддддддддддддддддддддддддддддддддддддд徳 | (Taft) | (Volat) | (Volat) | (,) |
| С replenishment у садуху в пос�има на的同时е вддддддддддддддддддддддддддддддддддддддддддддддддддддддддддддддддддддддддддддддд徳 | (Taft) | (Volat) | (Volat) | (,) (,) | |
| С replenishment у садуху в пос�има на的同时е вддддддддддддддддддддддддд徳 | (Taft) | (Volat) | (Volat) | (,) (,) | |
| Естina | Prußmäß spõteba elektrique energie v zapnutém režimu (Watt) | Ročni spõteba energia (kWh/Ročni) | Spreťeba elektrique energie v pohtovostním režimu (Watt) | Spreťeba elektrique energie v yvvnutém režimu (Watt) Rozlěsi disp. | Rozlucija zaslona (piksela) |
| Dansk | Gennensnitzigt stromforbrug i taendt tilstand (Watt) | Arligt energforbrug (kWh/Arligt) | Stromforbrug (standby)(Watt) | Strømforbrug i sklket tilstand (Watt) | Skaermoplánsing (px) |
| Suomi | Päälli-tilan keskimaäräinen virankulutus (Wattia) | Vuosittainen sähkönkulutu (kWh/Vuosittainen) | Vakovirran kalutus (Wattia) | Pois-tilan virankulutus (Wattia) | Näytön erotteluky (pikselia) |
| Français | Consumption énergétique moyenne en mode "marche" (Watt) | Consumption énergétique annuelle (kWh/annuel) | Consummation d'énergie en veille (Watt) | Consummation d'énergie en mode "arret" (Watt) | Résolution de l'écran (px) |
| Hrvatski | Prosječna potrošnja el. energia kada je proizvod ukljucić (Watta) | Godsja potrošnja el. Energije (kWh/Godsjnja) | Potrošnja el. energia u modu pripravnosi (Watta) | Potrošnja el. energia kada je proizvod iskóljen (Watta) | Rezolucija zaslona (piksela) |
| Nederlands | Aan-modus gemiddeld stroomverbruk (Watt) | Jaarijs energverbruk (kWh/Jaarijks) | Stand-by stroombruk (Watt) | Uit-modus stroomverbruk (Watt) | Schemresolutie (px) |
| Espanoi | Consumo electrico medio, en configuracioni (Vatio) | Consumo electrico anual (kWh/annual) Consumo en modulo en aspera (Vatio) | Videmodus stromforbruk (Watt) | Consumo electrico medio apagado (Vatio) | Resoluccion de pantalla (px) |
| Svenska | Strömkonsumption i PÅ-läge (Watt) | Enerikconsumption per ar (kWh/Arlig) | Strömkonsumption i village (Watt) | Strömkonsumption i AV-lage (Watt) | Skärnuplapsing (pixdar) |
| Italiano | Consumo di corrente medio da accesa (Watt) | Consumo annuale di energia (kWh/annuo) | Consumo di corrente in modalità standby (Watt) | Consumo di corrente da spenta (Watt) | Risoluccion del display (px) |
| Polski | Średnie zuzycie energii w trybie wączonym (Wataw) | Rocznze zuzycie energii (kWh/Rocznze) | Średnie zuzycie energii w trybie oczekiwania (Wataw) | Zuzycie energii w trybie wączyonym (Wataw) | Rozdzielcość obrazu (pikseil) |
| Magyar | Eneriagofyaşzlás bekapcsolva hagyott üzemmodban (Watt) Éves energiafogasyzlás (Watt) | (KWh/Eves) | Eneriagofyaşzlás standby üzemmodban (Watt) | Eneriagofyaşzlás kikapsolt üzemmodban (Watt) | Képernyőfelbontás (px) |
| Norsk | Pamodus gjennonsnittig stromforbruk (Watt) | Arlig stremforbruk (kWh/Arlig) | Hvlemodus stromforbruk (Watt) | Av-modus stremforbruk (Watt) | Skiermoppliesing (pixel) |
| Portugues | Consumo energia em modo medio (Watt) | Consumo annual energia (kWh/annual) Consumo energia em standing-by (Watt) | Stand-by (Watt) | Consumo energia em modo alimentação (Watt) | Resoluccion do visor (pixel) |
| Româna | Consum electric mediu in modul pornit (Watt) | Consum annual de energia (kWh/annual) | Consum electric in stare de repaus (Watt) | Consum electric in modul oprit (Watt) | Rezoluța ecranului (pixel) |
| Pуssкь | Crdeni pracxod thrempin b pekmime pabotb (B7) | Ekeodnien pracxod thrempin b pekmime (kBrur/Tog) | Pacxod thrempin b pekmime okuzdaniya (B7) | Pacxod thrempin b okuzdaniya okuzdaniya (B7) | Pazreшени Okpana (ninkceilen) |
| 6enapczayka | Crdeni pracxod thrempin b pekmime BAVKONENIA (BATT) | Ekeodnien pracxod thrempin b pekmime (kWh/Rocznne) | Pacxod thrempin b pekmime okuzdaniya (BATT) | Pacxod thrempin b pekmime okuzdaniya okuzdaniya (BATT) | Pazreшени Okpana (ninkceilen) |
| Makdońskii | Priscunhau notpośuzybawska kora e klyučen | Todmuna noptośuzybawska na hepejriu (kWh/Todmua) | Todmuna noptośuzybawska bo mrypuhaene (B7) | Todmuna noptośuzybawska bo mrypuhaene (B7) | Peózonyunieta na ekpan (ninkceilen) |
| ukraičnýkub | Cerdecnau okonjiwana hotykhicty b pochobomuy pekmimi (B7) | Cerdecny bioprupa ncozhihana hotykhicty b pekmimi onkivahana (B7) | Czopniwana hotykhicty b pekmimi onkivahana (B7) | Czopniwana hotykhicty b onkivahana onkivahana (B7) | Pozdnilna zdatnichty ekpana (ninkceilen) |
| Srpski | Prosečna potrošnja kada je uključeni (Wati) | Godsraj potrošnja energia (kWh/Godsnej) | Potrošnja tokom mirovanja (Wati) | Potrošnja kada je iskóljcni (Vati) | Rezolucija displeja (pix.) |
| Slovencina | Priemerná potrošba elektrique energie v zapnutom režime (Wattov) | Ročna potrošba energia (kWh/Ročná) | Potrošba elektrique energie v pohtovostnom režime (Wattov) | Potrošba elektrique energie vo vypnutom režime (Wattov) | Rozliseenie displeja (pix.) |
| Slovenscina | Poraba elektrène energia v povrpecnem načiniu (Wattov) | Letna poraba energija (kWh/Letna) | Poraba energija vStanju pripravlenosti (Wattov) | Poraba energija načiniu izklopa (Wattov) | Resoluncia zastona (pix.) |
| EALnyuk | Méton katováluon peúpátoč klastoupírc (Watt) | Étroho katováluon evépyeio (kWh/Etrogo) | Katalváluon peúpátoč otá ovapoví (Watt) | Katalváluon peúpátoč oté otévepyo'toíno (Watt) | Avdáluon obóvůn (nifel) |
| Bosanski | Prosječna potrošnja kada je uključeni (Watt) | Godsraj potrošnja energia (kWh/Godsnej) | Potrošnja tokom mirovanja (Watt) | Potrošnja kada je iskóljcni (Watt) | Rezolucija ekrana (pix.) |
| nau | (nau) | (nau) | (nau) | (nau) | (nau) |
| Türkce | Açk moddaki ortalama Güç tükeleti (Wati) | Yilik enerji tükelimi (kWh/ylik) | Bekleme durumda enerji tükelimi (Wati) | Kapali moddaki Güç tükelimi (Wati) | Ekran çüzünülcı (pix.) |
| Shqip | Konsumi mesatar i energijë s i ndezur (Watt) | Konsumi vjetor i energijë (kWh/vejtor) | Konsumi i energijë s i ned gatismérë (Wati) | Konsumi i energijë s i fikur (Wati) | Rezolucioni i ekrant (pix.) |
| Lietuvij | Vidutinës energijos sanaudos jungus (Vatai) | Meltinës energijos sanaudos (kWh/Meltinës) | Energios sanaudos budëjmo režimu (Vatai) | Energios sanaudos ijsjungus (Vatai) | Ekranolo skiriamoji geba (pikseil) |
| Latvišu | Eneriagjus patēniş aktivā režimā (Vati) | Gada energijus patērišs gaidišanas režimā (Vati) | Eneriagjus patērišs gaidišanas režimā (Vati) | Eneriagjus patērišs ijsjulgă stavokli (Vati) | Displeja rezolucija (pikseil) |
| Eesti | Keskmine energiakulu toöreziimil (Vati) | Aastane energiakulu (kWh/aosteil) | Eneriakulu ootereziimil (Vati) | Eneriakulu väilajullitud atolekus (Vati) | Ekraani resolutsoon (pikseil) |
| jek | jaskanai sianu sianu sianu sianu sianu sianu sianu sianu sianu sianu sianu sianu sianu sianu sianu sianu sianu sianu sianu sianu sianu sianu sianu sianu sianu sianu sianu sianu sianu sianu sianu sianu sianu sianu S | jaskanai sianu sianu sianu sianu sianu sianu sianu sianu sianu sianu sianu sianu sianu sianu sianu sianu sianu sianu sianu sianu sianu sianu sianu sianu sianu sianu sianu sianu sianu sianu sianu sienu sienu sienu sienu sienu sienu sienu sienu sienu sienu sienu sienu sienu sienu sienu sienu sienu sienu sienu sienu sienu sienu sienu sienu sienu sienu sienu sienu sienu sienu sienu sienu sienu sienuu sienu sienu sienu sienu sienu sienu sienu sienu sienu sienu sienu sienu sienu sienu sienu sienu sienu sienu sienu sienu sienu sienu sienu sienu sienu sienu sienu sienu sienu sienu sienu sienu sienu S | jaskanai sianu sianu sianu sianu sianu sianu sianu sianu sianu sianu sianu sianu sianu sianu sianu sianu sianu sianu sianu sianu sianu sianu sianu sianu sianu sianu sianu sianu sianu sianu sianuu sienu sienu sienu sienu sienu sienu sienu sienu sienu sienu sienu sienu sienu sienu sienu sienu sienu sienu sienu sienu sienu sienu sienu sienu sienu sienu sienu sienu sienu sienu sienu sienu sienuu S | jaskanai sianu sianu sianu sianu sianu sianu sianu sianu sianu sianu sianu sianu sianu sianu sianu sianu sianu sianu sianu sianu sianu sianu sianu sianu sianu sianu sianu sianu sianu sianu sianu S |
TR: Isbu belgede; VESTEL Elektronik Sanayi ve Ticaret A.S., telsiz ekipmani tipi TFT IDTV 'nin 2014/53/AB sayili direktife uygun olduğunu beman eder. AB uygünlik beyanin tam metni internet adresinde mevcuttur doc.vosshub.com
EN: Hereby, VESTEL Elektronik Sanayi ve Ticaret A.S., declares that the radio equipment type TFT IDTV is in compliance with Directive 2014/53/EU. The full text of the EU declaration of conformity is available at the following internet address: doc.vosshub.com
BG: C H A C T O R I T O V E S T E L Elektronik Sanayi ve Ticaret A.Ş., De Knapupa, Ye To3n TIN paDIOscOpbXeHne TFT IDTV e B CbotBETCTBne C DnpEKTINBa 2014/53/EC. LAnocTHNtT TekCT Ha EC DeKnapaUNrTa 3a CbotBETCTBne MoKe Da ce Hamepn Ha CneDNH INTEpHET aDPEC: doc.vosshub.com
CZ: Timto VESTEL Elektronik Sanayi ve Ticaret A.S. prohlasej, ze typ radioveho zafrzeni TFT IDTV je v souladu se smernici 2014/53/EU. Uplne zneni E prohlaseni o shode je k disposzici na teto intern adrese: doc.vosshub.com
DA: Hermed erklærer VESTEL Elektronik Sanayi ve Ticaret A.Ş., at radioudystyrtypen TFT IDTV er i overensstemmelse med direktiv 2014/53/EU. EU-overensstemmelseserklaeringens fulde tekst kan findes på følgende internetadresse: doc.vosshub.com
DE: Hiermit erklart VESTEL Elektronik Sanayi ve Ticaret A.S., dass der Funkanlage typ TFT IDTV der Richtlinie 2014/53/EU entspricht. Der vollständige Text der EU-Konformitätserklärung ist unter der folgenden Internetadresse verfügbar: doc.vosshub.com
EL: Me tvapouo a/NESTEL Elektronik Sanayi ve Ticaret A.S., 8nawvio oTIO paioeOIAOc TFT IDTV nI npoi tv odnyia 2014/53/EE. To anpoc KIEVEo Tg dn gn oumuoppwong EE biatthetaa otnv akolouon ioToeAid aTo diaiktu: doc.voshub.com
ES: Por la presente, VESTEL Elektronik Sanayi ve Ticaret A.Ş., declara que el tipo de equipo radioeléctrico TFT IDTV es conforme con la Directiva 2014/53/UE. El texto Completeo de la交代ación UE de conformidad está disponible en la direction Internet asigniente: doc.vosshub.com
ET: Käesolevaga deklareerib VESTEL Elektronik Sanayi ve Ticaret A.Ş., et käesolev raadioseadme tuüp TFT IDTV vastab direktivi 2014/53/EL nöutele. ELi vastavusdeklaratsiooni täielik tekst on kattesaadav jargmisel internetaaddressil: doc.voshub.com
FI: VESTEL Elektronik Sanayi ve Ticaret A.Ş., vakuuttaa,että radiolaitetyppi TFT IDTV on direktivin 2014/53/EU mukainen. EU-vaatimustenmukaisuusvakuutuksen tāysimittainen teksti on saatavilla seuraavassa internetosoitteessa: doc.vosshub.com
FR: Le soussigné, VESTEL Elektronik Sanayi ve Ticaret A.Ş., déclare que l'équipement radioélectrique du type TFT IDTV est conforme à la directive 2014/53/UE. Le texte complet de la déclaration UE de conformité est disponible à l'adresse internet suivante: doc.vosshub.com
HR: VESTEL Elektronik Sanayi ve Ticaret A.Ş., ovime izjavluje da je radija ska oprema tipa TFT IDTV u skladu s Direktivom 2014/53/EU. Cjeloviti tekst EU izjave o sukladnosti dostupan je na sljedećoj internetskoj adresi: doc.vosshub.com
HU: VESTEL Elektronik Sanayi ve Ticaret A.S., igazolja, hogy a TFT IDTV tipusu radioberendezes megfelel a 2014/53/EU irányelvnek. Az EU-megfelelo ségi nyilatkozat teljes szövege elerheto a kovetkezo internetes cimen: doc.vosshub.com
IT: Il fabbricante, VESTEL Elektronik Sanayi ve Ticaret A.S., dichiara che il tipo di apparecchiatura radio TFT IDTV è conforme alla direttiva 2014/53/UE. Il testo completo della dichiarazione di conformità UE è disponibile al seguente indirizzo Internet: doc.vosshub.com
LT: As, VESTEL Elektronik Sanayi ve Ticaret A.Ş., patvirtinu, kad radijo irenginiu tipas TFT IDTV atitinka Direktyvag 2014/53/ES. Visas ES atitikties deklaracijos tekstas prieinamas siuo interneto adresu: doc.vosshub.com
LV: Ar so VESTEL Elektronik Sanayi ve Ticaret A.Ş., deklare, ka radioiekarta TFT IDTV atbilst Direktivai 2014/53/ES. Pilns ES atbilstibas deklaracijas teksts ir pieejams šadā interneta vietne: doc.vosshub.com
MT: B'dan, VESTEL Elektronik Sanayi ve Ticaret A.S., niddikjara li dan it-tip ta' taghmir tar-radju TFT IDTV huwa konformi mad-Direttva 2014/53/UE. It-test kollu tad-dikjarazzjoni ta' konformita tal-UE huwa disponibbli f'dan I-indirizz tal-Internet li gej: doc.vosshub.com
NL: Hierbij verklaar ik, VESTEL Elektronik Sanayi ve Ticaret A.Ş., dat het type radioapparatuur TFT IDTV conform is met Richtlijn 2014/53/EU. De volledige tekst van de EU-conformiteitsverklaring kan worden geraadpleegd op het volgende internetadres: doc.vosshub.com
PL: VESTEL Elektronik Sanayi ve Ticaret A.S., niniejszym oswiadzca, ze typ urzadzenia radiowego TFT IDTV jest zgodny z dyrektywa 2014/53/UE. Pelny tekst deklarazioni zgodnosci UE jest dostepny pod nastepujacym adresem internetowym: doc.vosshub.com
PT: O(a) abaixo assinado(a) VESTEL Elektronik Sanayi ve Ticaret A.Ş., declara que o presente tipo de equipamento de rádio TFT IDTV está em conformidade com Diretiva 2014/53/UE. O texto integral da declaração de conformidade está disponivel no segunte endereço de Internet: doc.vosshub.com
RO: Prin prezenta, VESTEL Elektronik Sanayi ve Ticaret A.S., declară că tipul de echipamente radio TFT IDTV este in conformitate cu Direcita 2014/53/UE. Textul integral al declaratiei UE de conformitate este disponibil la urmatoarea adresă internet: doc.vosshub.com
SK: VESTEL Elektronik Sanayi ve Ticaret A.S., tymto vyhlasuje, ze radiové zariadenie typu TFT IDTV je v sulade so smernicou 2014/53/EU. Üplné EU vyhlasenie o zhode je k dispozicii na tejto internetovej adrese: doc.vosshub.com
SL: VESTEL Elektronik Sanayi ve Ticaret A.S., potruje, da je tip radijske opreme TFT IDTV skladen z Direktivo 2014/53/EU. Celotno besedilo izjave EU o skladnosti je na voljo na naslednjem spletnem naslovu: doc.vosshub.com
SV: Harmed forsakrar VESTEL Elektronik Sanayi ve Ticaret A.S., attenna typ av radioutrustning TFT IDTV overensstammer med direktiv 2014/53/EU. Den fullstandiga texten till EU-forsakran om overensstammelse finns pa foljande webbadress: doc.vosshub.com

- Safety Information
- Contents
- Accessories Included
- TV Control Switch & Operation
- Features
- Country Restrictions
- (*) MY BUTTON 1 & MY BUTTON 2:
- Switching On/Off
- To Switch the TV On
- TV in. To Switch the TV Off
- First Time Installation
- About Selecting Broadcast Type
- Connections
- PC Input Typical Display Modes
- Supported DVI Resolutions
- Connectivity
- Wired Connectivity
- Brodard USP connection
- To Connect to a Wireless Network
- Broadband
- JSP
- Configuring Wired Device Settings
- Network Type
- Internet Speed Test
- Advanced Settings
- Wireless Connectivity
Brand : HAIER
Model : LDU75V900S
Category : TV