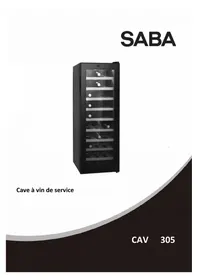
USER MANUAL CAV1196BK SABA
Specifications techniques. 4
Description 6
Specifications techniques
Thank you for choosing SABA quality. This product has been developed by our team of professional and according to European regulations. In order to get the most out of your new appliance, we recommend that you read this instruction manual carefully and keep it for future reference.
TABLE OF CONTENTS
Safety information 22
Technical information 24
Overview 26
Reverse door 27
Daily use. 33
Disposal of old electrical appliances 39
IMPORTANT PRECAUTIONS READ CAREFULLY AND KEEP FOR FUTURE REFERENCE
- This appliance is designed to be used for domestic and similar purposes, such as:
- kitchens used by employees in shops, offices and other working environments;
-farms;
- use by guests of hotels, motels and other residential environments;
- other bed and breakfast-type accommodation;
- This appliance is not designed to be used in the following applications:
- catering and other similar applications including retail.
- CAUTION: Keep vent openings clear both within the appliance and in the cabinet that houses it.
- CAUTION: Do not use mechanical devices or other means to accelerate the defrosting process, other than those recommended by the manufacturer.
- CAUTION: Do not damage the refrigeration circuit.
-
CAUTION: Do not use electrical appliances inside the wine storage compartment, unless these are of a type recommended by the manufacturer.
-
This appliance can be used by children aged from 8 years and above and persons with reduced physical, sensory or mental capabilities or lack of experience and knowledge on the condition that they have been given supervision or instructions concerning use of the appliance in a safe way and understand the hazards involved. Children must not play with the appliance. Cleaning and user maintenance must not be carried out by children unless they are supervised.
- If the power cable is damaged, it must be replaced by the manufacturer, its after-sales service or a similarly qualified person to avoid any hazards.
- CAUTION: To avoid any risk due to the instability of the appliance, this must be fitted according to the instructions.
- Do not store explosive substances such as aerosols containing flammable propellants in this appliance.
- For information concerning the installation, handling, maintenance and disposal of the appliance, please refer to the following paragraph in the manual.
- For information on how to replace the light bulbs, please refer to the following paragraph of the notice:
REFRIGERANT GAS
risk of fire
- The refrigerant contained in the circuit of this appliance is isobutane (R600a), an environmentally friendly but flammable gas.
WARNING
- The appliance must be installed on the ground, on a flat, horizontal surface making sure the vents are not obstructed.
- Never attempt to replace or repair any appliance part or component yourself. Request help from a professional, qualified person if needed.
- This appliance is designed for storing wine only.
Technical information
| Model SABA CAV1196BK | |
| Category of household refriger-ating appliance | Category 2 |
| Energy class E | |
| Annual energy consumption (1) | 347 kWh/annum |
| Storage volume 221L | |
| Storage capacity 100 bottles (bordeaux-type) | |
| Climate class + Ambient range N | (+16°C to +32°C) |
| Noise 41 dB (A) re 1 pW | |
| Rated voltage and frequency/Input power | 220V-240V/50Hz~ 120W0,8A |
| Lamp LED 230V/50Hz 1W max | |
| Refrigerant/Amount R600a/20g | |
| Product dimension (W x D x H) 500x590x1420 (mm) |
| Net weight | 42kg |
| Type of installation | Free Standing |
This appliance is designed for storing wine only.
(1) Calculation on the basis of results for 24 hours under standard test conditions. The actual energy consumption will depend on use and the location of the device.
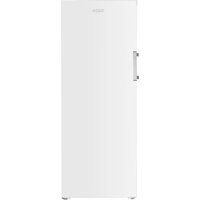
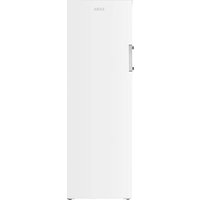
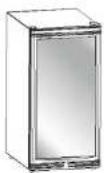
Overview
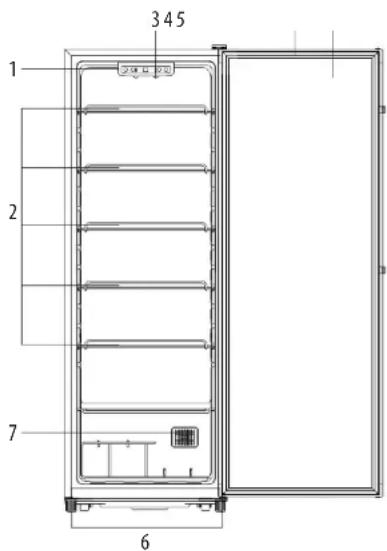
- Display Panel
- Wooden Shelves
- Interior Lamp
- Gasket
- Glass Door
- Levelling Feet
- Tempreture sensor
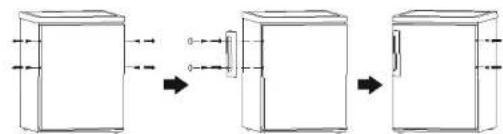
Reverse door
Tools required: Philips style screwdriver/Flat bladed screwdriver/ Hexagonal spanner

- Ensure the unit is unplugged and empty.
- To take the door off it is necessary to tilt the unit backwards. You should rest the unit on something solid, e.g. a chair just below the top panel.
- All parts removed must be saved to do the reinstallation of the door.
- Do not lay the unit flat as this may damage the coolant system.
- We recommend that 2 people handle the unit during assembly.
- If you want to have the door swing reversed, we recommend that you contact a qualified technician. You should only try to reverse the door yourself if you believe that you are qualified to do so.
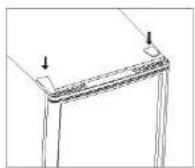
1). Remove the top right hinge cover.
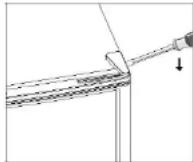
2). Undo the screws. Then remove the hinge bracket.
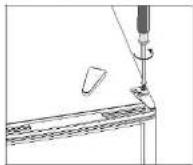
3). Remove the top left screw cover.
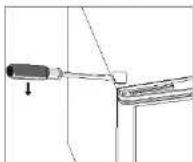
4). Move the core cover from left side to right side. And then lift the door and place it on a padded surface to prevent it from scratching.
5). Remove the screws and bottom hinge. Then remove the levelling feet from both sides.

6). Unscrew and remove the bottom hinge pin, turn the bracket over and replace it.
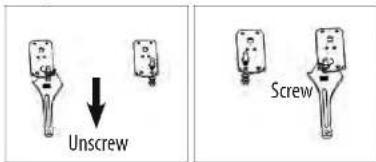
7). Re-fit the bracket, fitting the bottom hinge pin. Replace both levelling feet.
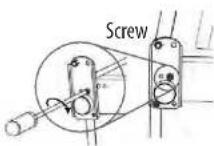
8). Place the door back on. Ensure the door is aligned horizontally and vertically so that the seals are closed on all sides before finally tightening the top hinge.
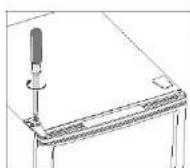
9). Insert the hinge bracket and screw it to the top of the unit.
10). Put the hinge cover and the screw cover back.
11). Re-adjust the levelling feet as needed.
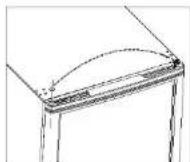
Install door handle
Space Requirement
- Keep enough space of door open.
- Keep at least 50mm gap at two sides.

Levelling the unit
To do this adjust the two levelling feet at front of the unit. If the unit is not level, the doors and magnetic seal alignments will not be covered properly.
Positioning
Install this appliance at a location where the ambient temperature corresponds to the climate class indicated on the rating plate of the appliance:
| Climate class Ambient temperature |
| SN +10 °C to +32 °C |
| N +16 °C to +32 °C |
| ST +16 °C to +38 °C |
| T +16 °C to +43 °C |
Location
The appliance should be installed well away from sources of heat such as radiators, boilers, direct sunlight etc. Ensure that air can circulate freely around the back of the cabinet. To ensure best performance, if the appliance is positioned below an overhanging wall unit, the minimum distance between the top of the cabinet and the wall unit must be at least 100mm . ideally, however, the appliance should not be positioned below overhanging wall units. Accurate leveling is ensured by one or more adjustable feet at the base of the cabinet.

Warning! It must be possible to disconnect the appliance from the mains power supply; the plug must therefore be easily accessible after installation.
Electrical connection
Before plugging in, ensure that the voltage and frequency shown on the rating plate correspond to your domestic power supply. The appliance must be earthed. The power supply cable plug is provided with a contact for this purpose. If the domestic power supply socket is not earthed, connect the appliance to a separate earth in compliance with current regulations, consulting a qualified electrician.
The manufacturer declines all responsibility if the above safety precautions are not observed. This appliance complies with the E.E.C. Directives.
Daily use
It is recommended you install the wine cooler in a place where the ambient temperature is between 22-25 degree Celsius. If the ambient temperature in above of below the recommended temperature, conditions may cause interior temperature to fluctuate. If the interior light is left on, the temperature inside the wine cooler will be higher.
Recommended Temperature for chilling Wine
| Red wines : 16-18°C | |
| Dry/White Wines 10-12°C |
| Sparkling, Rose Wines 7-9°C |
The above temperatures may fluctuate depending on whether or not the interior bulb is on or off or whether the bottles are located on the lower/middle or lower section.

You can set the temperature as you desire by pushing the button or when you push the two buttons for the first time, the LED readout will show the original temperature set at previous time (the temperature preset at the factory is 50^ ). The temperature that you desire to set will increase 1^ or 1^ if you push
the once, on the contrary the temperature will decrease 1^ or 1^ if you push the once.
When you store mostly red wines, the temperature which you control by pushing the above two buttons need to be set between 16 to 18^ and the LED lamp beside "RED" will be lit red.
When you store mostly white wines, the temperature need to be set at between 10 to 12^ and the LED lamp beside "WHITE" will be lit green.
When you store mostly sparkling wines, the temperature need to be set at between 7 to 9^ and the LED lamp beside "SPARKLING" will be lit green.
You can select temperature display setting from Fahrenheit to Celsius degree by pushing the button marked F/C. Fahrenheit degree indicator will appear in red color in the display marked ^ F and the Celsius degrees indicator will appear in yellow color in the display marked ^ C .
You can turn the interior light on or off by pushing the button marked ON/OFF symbol
CHANGING THE LIGHT BULB
This LED lamp is not standard design lamp, but has a long life time. Once it is broken, it is mandatory to call aftersales center to get a new one.
And ask technician to change it or change it under supervision of a qualified engineer. A replacement made by unqualified people without supervision from electrical engineer would result in
electrical shock and injury.
Stacking the Wine Bottles
Please follow the loading method for storing 100 bottles of wine.
- Upper shelf: 11 bottles
Second shelf: 18 bottles
Third shelf: 18 bottles
Fourth shelf: 18 bottles
- Fifth shelf: 18 bottles
- Sixth shelf: 11 bottles
- Bottom shelf: 6 bottles
- Total bottle loading = 11 + 4X18 + 11 + 6 = 100 bottles
Adjusting the Temperature
When filling your wine cooler the greater the amount of cans and bottles placed inside the wine cooler from room temperature, the longer it will take to cool them to the desired temperature.
You may wish to temporarily turn the Thermostat Control Dial to a higher setting to speed up the cooling process. If you do this remember to return it to the previous setting once the drinks have reached the required temperature in order to conserve energy.
Keep the Door Closed
To prevent cold air escaping, limit the number of times you open the door.
Noises Inside the Wine Cooler
You may notice that your wine cooler makes some unusual noises. These noises are perfectly normal, and are caused by the
circulation of the refrigerant liquid in the cooling system. They have become more pronounced since the introduction of CFC free gases. This is not a fault and will not affect the performance of your wine cooler.
This is the compressor motor working, as it pumps the refrigerant around the system.
Cleaning the Inside of the Wine Cooler
There is usually no need to defrost the wine cooler as any ice that is deposited on the back wall will defrost automatically.
- Before cleaning the wine cooler always switch off and disconnect the mains supply.
- Remove all the shelves and detachable accessories and wash in warm soapy water, rinse and dry thoroughly.
- If any ice has been deposited on the rear wall, leave the door open and wait until it begins to thaw. As the solid frost loosens, pry it away with a plastic scraper and remove. Never use metal or sharp instruments to remove the ice deposit.
- You should clean the interior of the wine cooler with warm water and a weak solution of bicarbonate soda.
- Check that the drain outlet at the rear wall of the wine cooler compartment is clear of debris as this will affect the automatic defrosting.
-
Rinse the wine cooler with warm water using a clean sponge or cloth. Wash the shelves and accessories with mild detergent solution. Then, wipe everything dry before replacing the shelves and accessories.
-
It may be necessary to periodically wipe the bottom part of the storage area.
- Never clean the appliance parts with flammable fluids. The fumes can create a fire hazard or explosion.
- Do not store or use gasoline or any other flammable vapours and liquids in the vicinity of this appliance. The fumes can create a fire or explosion.
Cleaning the Outside of the Wine cooler
Use a damp cloth to clean the wine cooler exterior and a glass cleaner to clean the door. Make sure that the door is closed, to prevent cleaners from getting on the magnetic door seal.
Care When Handling
Ensure the unit is empty and all loose items are secured before moving it. Hold the wine cooler around its sides or base when moving it.
Servicing
This wine cooler should be serviced by a qualified technician and only genuine spare parts should be used. Under no circumstances should you attempt to repair the wine cooler yourself. Repairs carried out by inexperienced persons may cause injury or serious malfunctioning.
Switching Off for Long Periods of Time
When the wine cooler is not in use for a long period of time, disconnect it from the mains supply, empty all wine and clean the wine cooler. Leave the door ajar to prevent unpleasant smells.
Condensation
Condensation may appear on the outside of the unit. This may be due to a change in room temperature. Wipe off any moisture residue. If the problem continues, please contact a qualified technician for assistance.
Disposal
Old units still have some residual value. An environmentally friendly method of disposal will ensure that valuable raw materials can be recovered and used again. The refrigerant and insulation materials used in the unit require special disposal procedures. Ensure that none of the pipes on the back of the unit are damaged prior to disposal.
Up to date information concerning options of disposing of your old unit and packaging from the new one can be obtained from your local council office.
When disposing of an old unit break off any old locks or latches and remove the door as a safeguard.
The refrigerating gas contained in the circuit of this appliance is isobutane (R600a); it causes a low level of pollution but is inflammable. Please contact your local disposal department for advice on the correct method of disposal.
Disposal of old electrical appliances

The European directive 2012/19/EU on Waste Electrical and Electronic Equipment (WEEE), requires that old household electrical appliances must not be disposed of in the normal or unsorted municipal waste stream. Old appliances must be selected separately in order to optimize the recovery and recycling of the materials they contain, and reduce the impact on human health and the environment.
The crossed out "wheeled bin" symbol on the product reminds you of your obligation, that when you dispose of the appliance, it must be separately collected.
Consumers should contact their local authority or retailer for information concerning the correct disposal of their old appliance.