ULG 350 B1 - Laminating machine UNITED OFFICE - Free user manual and instructions
Find the device manual for free ULG 350 B1 UNITED OFFICE in PDF.
Frequently Asked Questions - ULG 350 B1 UNITED OFFICE
User questions about ULG 350 B1 UNITED OFFICE
0 question about this device. Answer the ones you know or ask your own.
Ask a new question about this device
Download the instructions for your Laminating machine in PDF format for free! Find your manual ULG 350 B1 - UNITED OFFICE and take your electronic device back in hand. On this page are published all the documents necessary for the use of your device. ULG 350 B1 by UNITED OFFICE.
USER MANUAL ULG 350 B1 UNITED OFFICE
text_image
PDF ONLINE www.lidl-service.com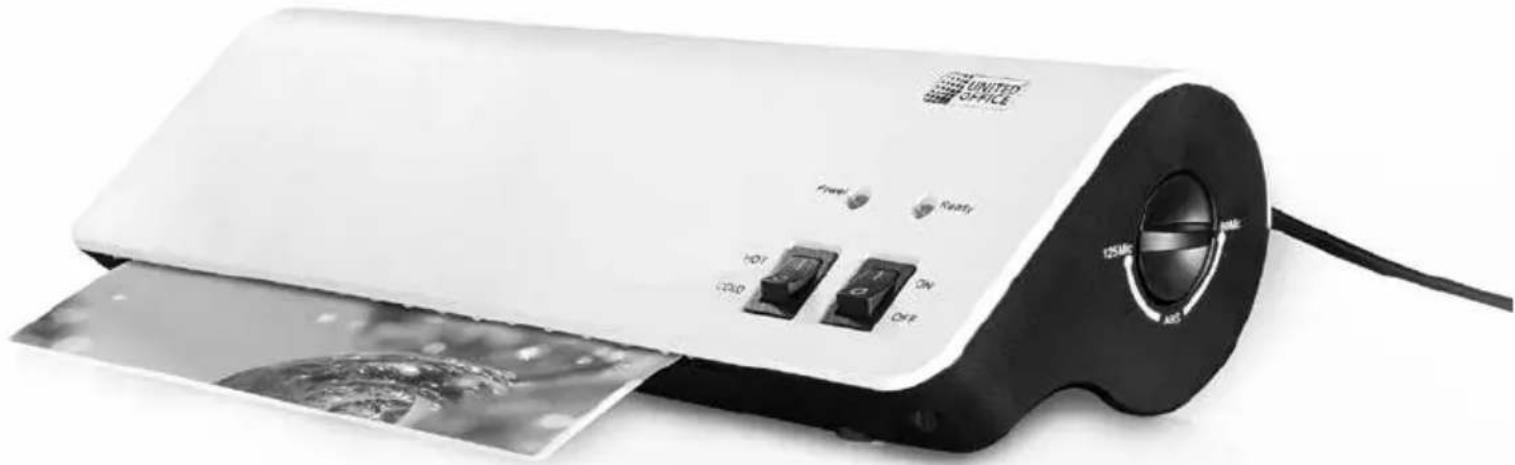
natural_image
White portable paper towel with control buttons and a water splash film, no visible text or symbols on the device itself.LAMINIERGERÄT / LAMINATOR PLASTIFIEUSE ULG 350 B1
DE AT CH
LAMINIERGERÄT
Operating instructions and safety instructions
NL BE
LAMINEERAPPARAAT
Before reading, unfold the page containing the illustrations and familiarise yourself with all functions of the device.
GB / IE Operating instructions and safety instructions Page 15
text_image
Two document checkmarks: one checked with a checkmark and the other checked with an 'X' symbol.Abb. 1
natural_image
Three-step diagram showing a hand holding a sheet with an arrow indicating rotation, followed by a document and then a separate paper sheet with arrows (no text or symbols)Abb. 2
KOMPERNASS HANDELS GMBH
BURGSTRASSE 21
44867 BOCHUM
DEUTSCHLAND
www.kompernass.com
Index
Introduction....16
Information for these operating instructions.... 16
Copyright....16
Limited liability....16
Intended use 16
Warning symbols used 17
Safety....18
Basic Safety Instructions....18
Setting up and connecting to the power supply 19
Items supplied and transport inspection....19
Unpacking....19
Disposal of the packaging....20
Requirements on the installation site 20
Electrical connection 20
Appliance description....21
Handling and operation....21
Suitable laminating pouches 21
Switching levels 21
Preparing for hot lamination 22
Preparing for cold lamination 23
Lamination process 23
Anti-blocking function....24
Cleaning....24
Storage 25
Disposal....25
Appendix....26
Technical data 26
Notes on the EU Declaration of Conformity 26
Kompernass Handels GmbH warranty 27
Service....28
Importer 28
Introduction
Information for these operating instructions
Congratulations on the purchase of your new appliance.
You have clearly decided in favour of a quality product. These operating instructions are a component of the Laminator ULG 350 B1 (henceforth designated as the appliance) and they supply you with important information on the intended use, safety, installation and connection as well as operation of the appliance.
These operating instructions must be constantly kept available close to the appliance. They are to be read and applied by everyone occupied with operating the appliance and eliminating any malfunctions it may have.
Retain these operating instructions and pass them on, with the appliance, to any future owners.
Copyright
This documentation is copyright protected.
All reproductions or duplications, also as extracts, as well as representations of the illustrations, even in an altered state, are only permitted with the written approval of the manufacturer.
Limited liability
All technical information, data and instructions for installation, connection and operation contained in this operating manual correspond to the latest available at the time of printing and, to the best of our knowledge, take into account our previous experience and know-how.
No claims can be derived from the details, illustrations and descriptions in these instructions.
The manufacturer assumes no responsibility for damage caused by failure to observe these instructions, improper use, incompetent repairs, making unauthorised modifications or for using unapproved replacement parts.
Intended use
This laminator is intended exclusively for use in domestic households, for the hot and cold lamination of documents made from paper or cardboard. This appliance is not intended for commercial or industrial use.
This appliance is not intended for any other use or for uses beyond those mentioned. Claims of any kind for damage resulting from unintended use will not be accepted. The user alone bears liability.
Warning symbols used
In these operating instructions the following warnings are used:

DANGER
A warning at this risk level indicates a threateningly dangerous situation.
If the dangerous situation is not avoided, it could result in death or serious injury.
▶ Follow the instructions given in this warning to avoid the risk of death or severe personal injury.

WARNING
A warning at this risk level indicates a possible dangerous situation.
If the dangerous situation is not avoided it could lead to injuries.
▶ Follow the instructions given in this warning to avoid the risk of personal injuries.
IMPORTANT
A warning at this risk level indicates possible property damage.
If the situation is not avoided it could lead to property damage.
▶ Follow the instructions in this warning to avoid property damage.
NOTICE
▶ A notice indicates additional information that may assist you in the handling of the appliance.
Safety
In this chapter you receive important safety information regarding the handling of the appliance. This appliance complies with the statutory safety regulations. Incorrect usage can lead to personal injury and property damage.
Basic Safety Instructions
For safe handling of the appliance observe the following safety information:
■ Before use check the appliance for visible external damage. Do not put into operation an appliance that is damaged. There will be a risk of a fatal electrical shock.
■ Repairs should only be carried out by authorised specialist companies or by the Customer Services department. Incorrect repairs can result in significant risks for the user. In addition, warranty claims become void.
■ To avoid risks, arrange for a defective power cable to be replaced by qualified technicians or by our Customer Service Department.
■ NEVER use the appliance with a defective power cable. There will be a risk of a fatal electrical shock.
■ Do not use extension cables or power socket strips that do not meet the required safety standards.
■ The mains power socket must be easily accessible, so that the power cable can be easily and quickly disconnected in the event of an emergency.
■ Do not use an external timing switch or a separate remote control system to operate the appliance.
This appliance may be used by children aged 8 over and by persons with reduced physical, sensory or mental capabilities or lack of experience and knowledge, provided that they are under supervision or have been told how to use of the appliance safely and are aware of the potential risks. Children must not play with the appliance. Cleaning and user maintenance tasks must not be carried out by children unless they are supervised.
■ Never perform hot lamination on flammable, heat-sensitive and/or meltable materials and do not laminate drawings on temperature-sensitive paper or material that will undergo changes in colour or quality when subjected to heat.
■ Never laminate valuable or unique documents. Although the appliance complies with all current safety norms/standards, malfunctions can never be completely ruled out. Malfunctions with the laminator can result in damage to the document being laminated.
Setting up and connecting to the power supply Items supplied and transport inspection
The appliance is delivered with the following components as standard:
• Laminator ULG 350 B1
- 10 x Laminating pouches DIN A4 for hot laminating (80 micron)
- 10 x Laminating pouches DIN A5 for hot laminating (80 micron)
- 10 x Laminating pouches for hot lamination of business cards (80 micron)
• This operating manual
NOTICE
▶ Check the contents to make sure everything is present and for signs of visible damage.
If the contents are not complete or are damaged due to defective packaging or through transportation, contact the Service Hotline (see chapter Service).
Unpacking
◆ Remove the appliance, the laminating pouches and the operating instructions from the box.
◆ Remove all packing material.
DANGER
▶ Packaging material should not be used as a play thing by children. There is a risk of suffocation!
Disposal of the packaging

The packaging materials have been selected for their environmental friendliness and ease of disposal and are therefore recyclable.
Dispose of packaging materials that are no longer needed in accordance with applicable local regulations.
Dispose of the packaging in an environmentally friendly manner.
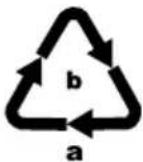
Note the labelling on the packaging and separate the packaging material components for disposal if necessary. The packaging material is labelled with abbreviations (a) and numbers (b) with the following meanings:
1-7: Plastics,
20-22: Paper and cardboard,
80-98: Composites
Requirements on the installation site
For safe and flawless operation of the appliance, the installation site must comply with the following requirements:
■ When setting it up, place the appliance on a firm, flat and horizontal surface.
■ Set up the appliance so that there is at least 30 cm of free space in front of the laminator. Otherwise, the pouch will not be ejected completely from the laminator after lamination.
- Do not operate the appliance in a hot, wet or very humid environment or close to combustible material.
The mains power socket must be easily accessible, so that the power cable can be easily disconnected in the event of an emergency.
Electrical connection
IMPORTANT
▶ Before you connect the appliance, compare the connection data (voltage and frequency) on the data plate with that of your mains power network. This data must match in order to avoid any damage to the appliance.
▶ Ensure that the power cable is undamaged and is not routed over hot surfaces and/or sharp edges.
▶ Ensure that the power cable is not taut or kinked.
▶ Do not let the power cable hang over edges (trip wire effect).
◆ Insert the plug into a mains power socket.
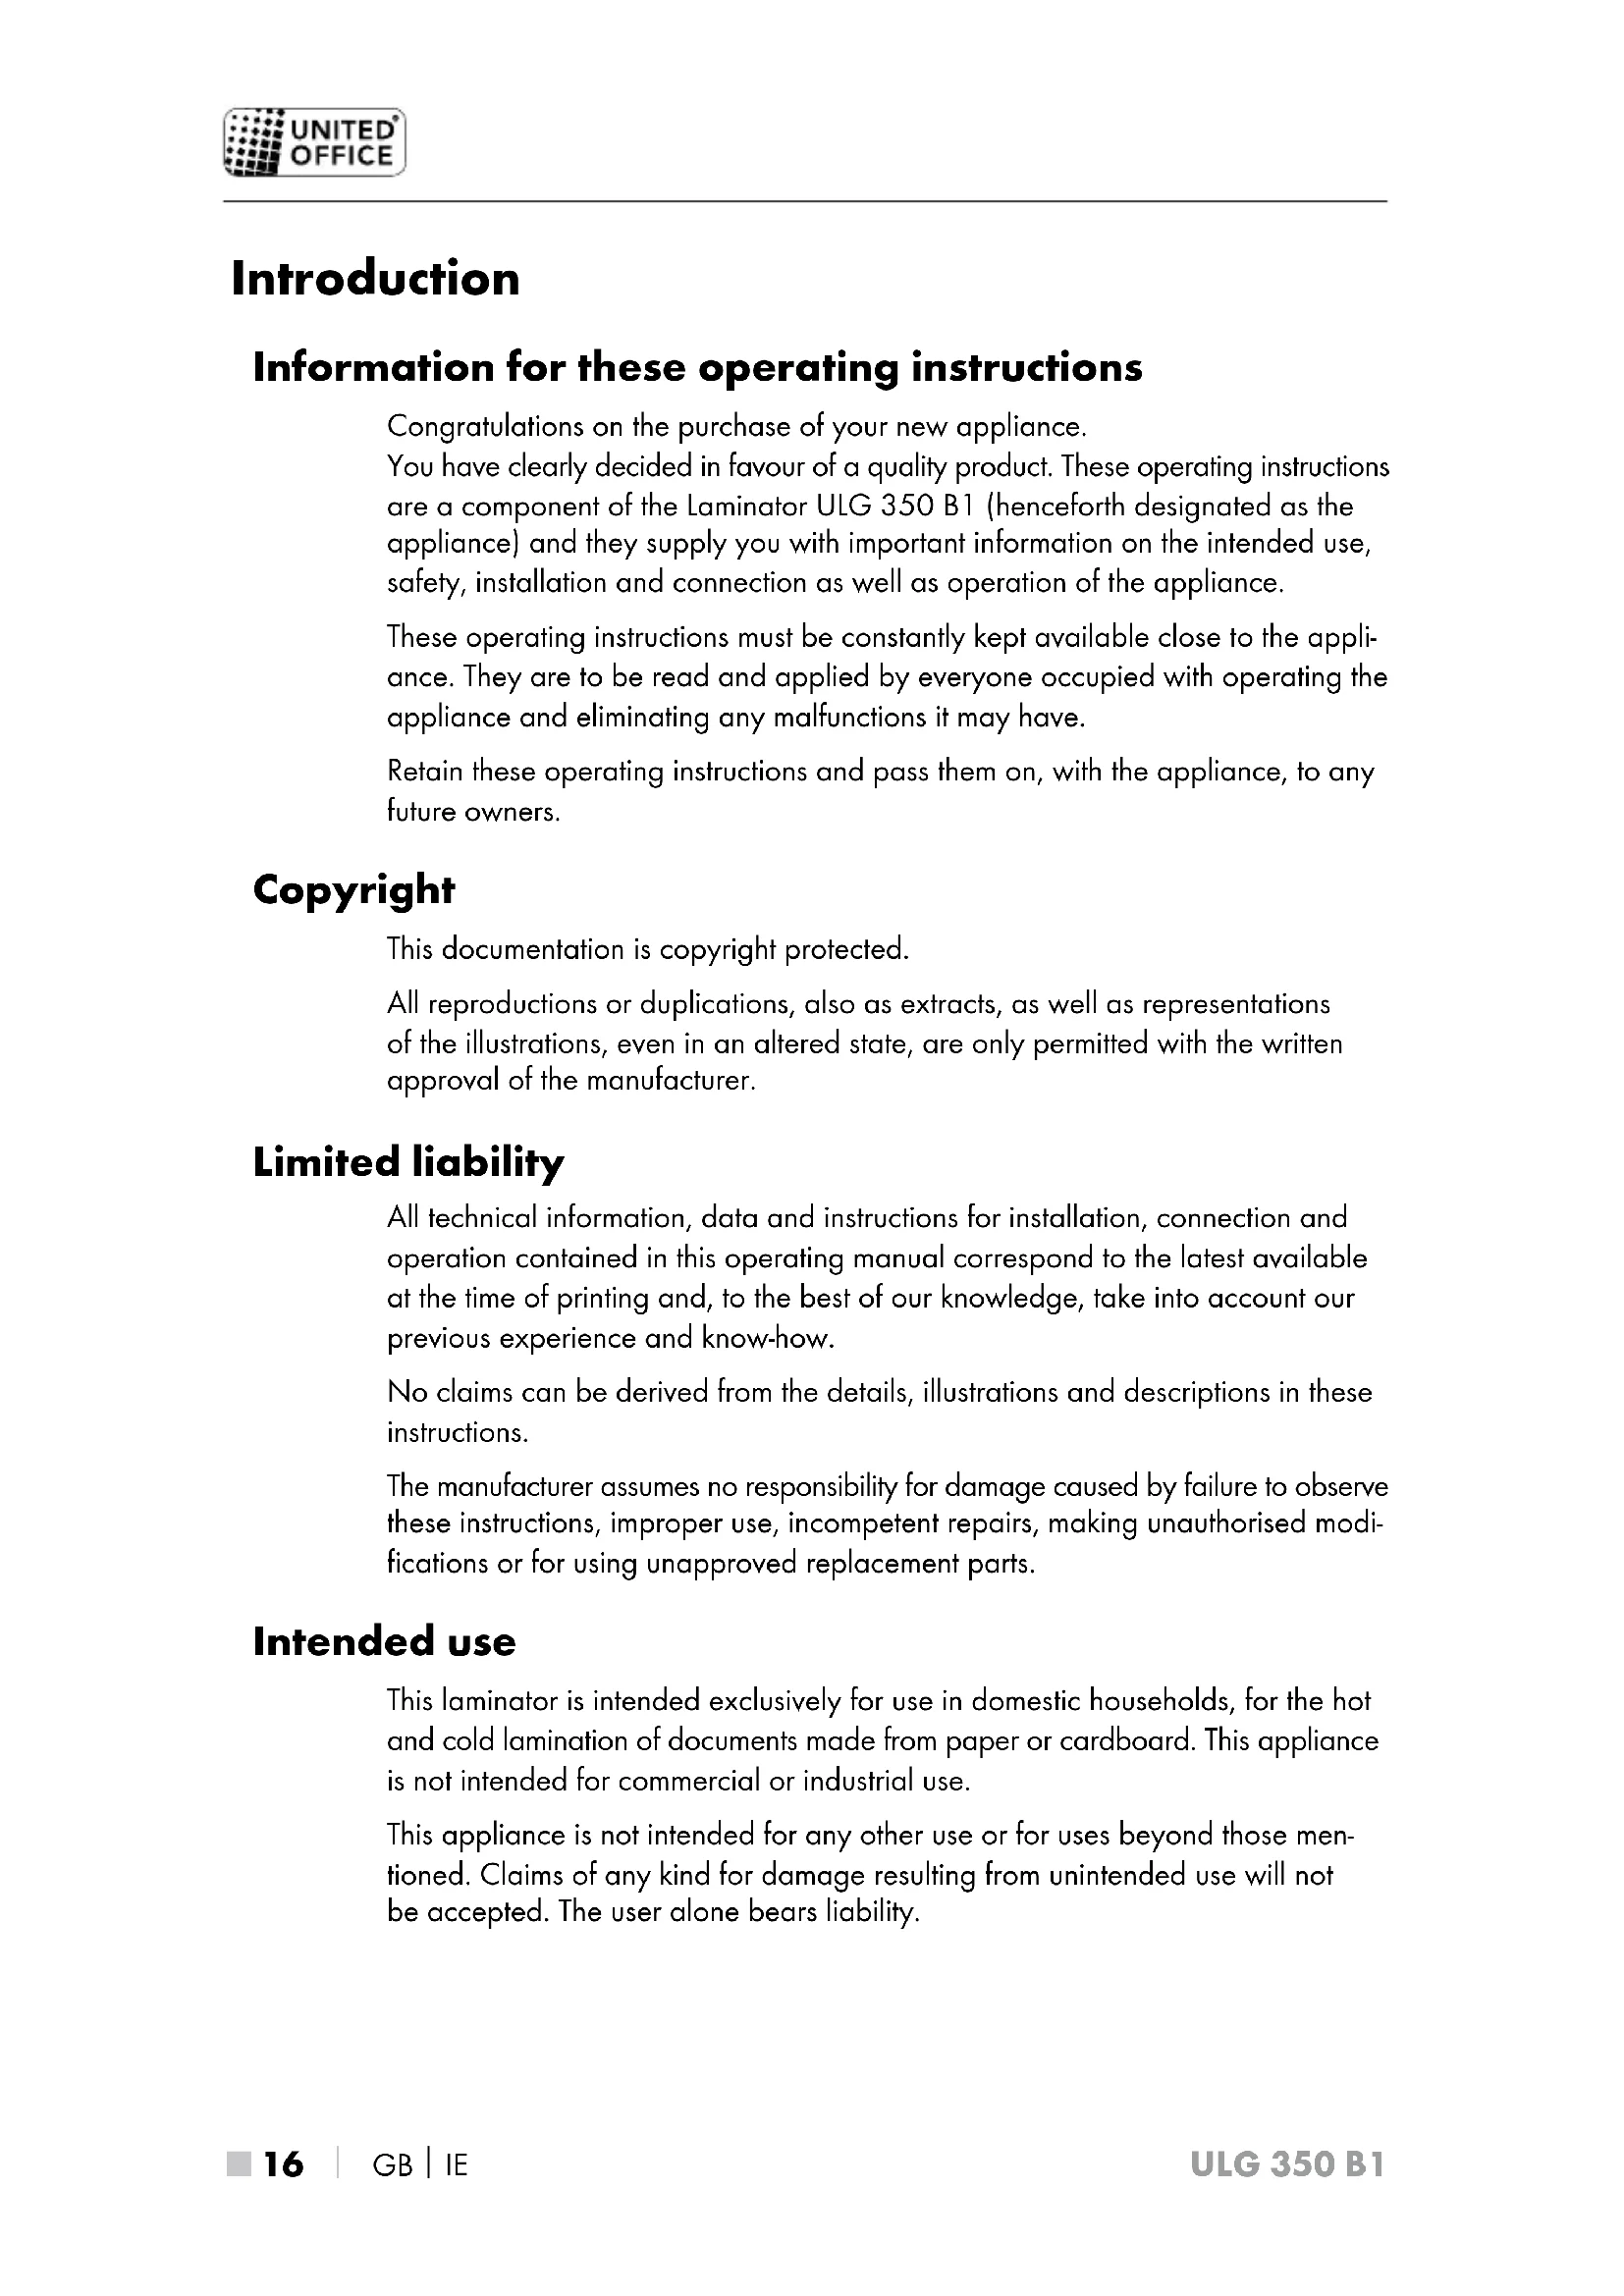
Appliance description
① Pouch slot for manual pouch insertion
② Power indicator light (appliance switched on)
③ Ready indicator light (ready for use)
4 Anti-blocking switch and pouch thickness switch
5 On/Off switch (ON/OFF)
6 Selector switch for hot and cold lamination (HOT/COLD)
⑦ Pouch ejector slot
Handling and operation
In this chapter you will receive important information about the handling and operation of the appliance.
Suitable laminating pouches
For hot lamination you can use pouches with a width of up to 230 mm and a maximum thickness of 125 micron. For cold lamination you can use pouches with a maximum thickness of 200 microns. Please note that each laminating pouch may only be used once.
NOTICE
For hot lamination, use only laminating pouches that are expressly intended for hot lamination.
For cold lamination, use only laminating pouches that are expressly intended for cold lamination.
▶ Take note that the laminating pouches supplied with the laminator are intended exclusively for hot lamination.
Switching levels
| Selector switch 6 position | Pouch thickness switch 4 position | Laminating pouch thickness |
| Hot 80 >60 - 80 | ||
| Hot 125 85 - 125 | ||
| Cold 125 to 200 |
NOTICE
For high-gloss photos, you should select the switch position "125" as well as the appropriate pouch thickness.
Preparing for hot lamination
◆ Insert the plug of the laminator into a mains power socket.
Switch the appliance on by pushing the On/Off switch⑤ to the "ON" position. The red Power indicator light ② lights up.
- Set the selector switch for hot and cold lamination ^6 to "HOT".
Place the pouch thickness switch ^4 at the corresponding pouch thickness (see also chapter Switching levels).
NOTICE
The attainment of the operating temperature is indicated by the glowing of the green indicator light Ready 3. For a more uniform laminating result we recommend, especially for thinner foils (below 125 Micron), and after adjustment to a different foil thickness, to first wait an additional 2-3 minutes before beginning with lamination.
Place the document to be laminated into a laminating pouch of the appropriate size.
NOTICE
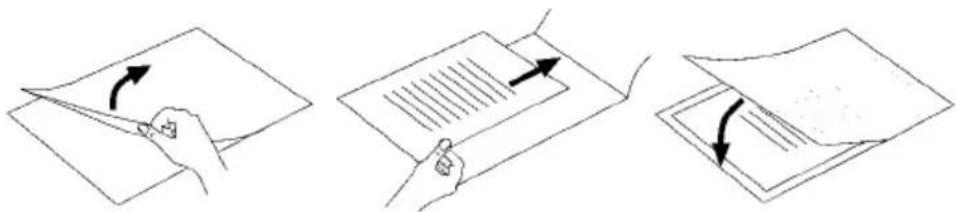
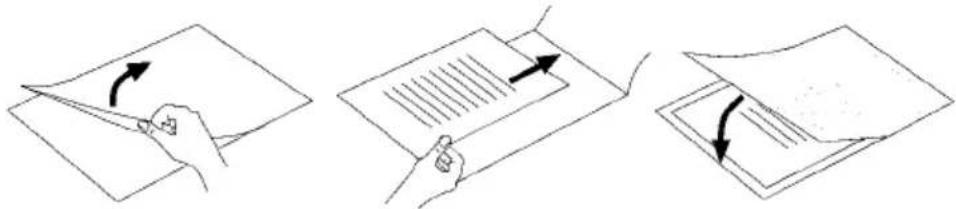
▶ Ensure that all edges of the document have at least two millimetres of space to the edges of the laminating pouch, as shown in Fig. 1.
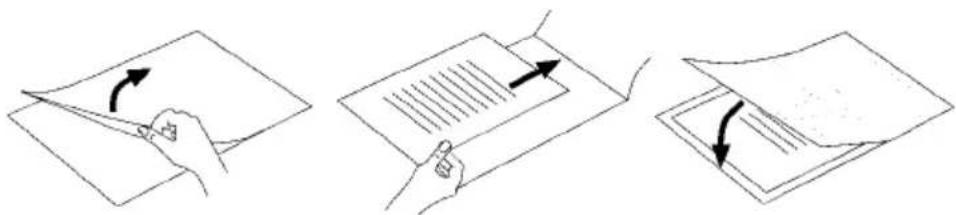
▶ Make certain that you use only one pouch for laminating. First flip it up, as shown in Fig. 2.
For further information about the lamination process, please read the section Lamination process.

text_image
Image showing a single black checkmark on a document page, likely indicating approval or completion.
text_image
XFig. 1

text_image
Three-step diagram illustrating document editing: page folding, sheet writing with arrows, and page rotation.Fig. 2
Preparing for cold lamination
IMPORTANT
▶ After hot laminating, allow the laminator to cool down completely before beginning with cold lamination. Bear in mind, the rollers inside the laminator will still be hot. This could damage the laminating pouch and the document to be laminated!
◆ Insert the plug of the laminator into a mains power socket.
Switch the appliance on by pushing the On/Off switch⑤ to the "ON" position. The red Power indicator light ② lights up.
- Set the selector switch for hot and cold lamination ^6 to "COLD". The green Ready indicator light ^3 lights up.
Place the pouch thickness switch ^4 at the corresponding pouch thickness (see also chapter Switching levels).
◆ Place the document to be laminated into a laminating pouch of the appropriate size.
NOTICE
▶ Ensure that all edges of the document have at least two millimetres of space to the edges of the laminating pouch, as shown in Fig. 1.
▶ Make certain that you use only one pouch for laminating. First flip it up, as shown in Fig. 2.
For further information about the lamination process, please read the section Lamination process.
Lamination process
Place the pouch centrally on the small supporting surface at the pouch slot ①. If the size permits, the pouch should be placed with the closed side towards the pouch slot ①.
◆ Slide the pouch slowly and straightly into the pouch slo1.
When you have slid the pouch several centimetres into the slc ^1 it will then be pulled in automatically. Release the laminating pouch as soon as you notice it being pulled in automatically.
IMPORTANT
▶ Ensure there is at least 30 cm of open space in front of the laminator. Otherwise, the pouch will not be ejected completely from the laminator after lamination. This could damage the pouch.
◆ The finished and laminated pouch is ejected from the pouch ejector slot of the laminator.
NOTICE
▶ Only after hot lamination: When the finished laminated pouch is ejected from the pouch ejector slot ⑦ of the laminator, it is hot and can easily change its shape. For this reason, let the laminated pouch cool for one minute before touching it.
▶ To improve the lamination result, you can weigh a still hot laminated pouch down with a book, a file folder or any other heavy, flat object. This will give it a smooth and flawless surface.
If you do not wish to start another laminating procedure, move the On/Off switch ⑤ to "OFF" and rotate the pouch thickness switch ④ to the ABS position.
◆ Disconnect the plug from the mains power socket.
Anti-blocking function
At the start of the lamination process, the pouch may be pulled in at an angle or jam itself inside the appliance.
- Turn the anti-blocking switch ^4 to the position ABS. The pouch will no longer be drawn in.
◆ Remove the pouch and turn the anti-blocking switch④ back to the desired pouch thickness.
◆ Re-start the lamination process.
Cleaning

DANGER
Risk of potentially fatal electrical shock!
▶ Remove the plug from the mains power socket before beginning to clean the appliance.
▶ Ensure that moisture cannot permeate into the appliance during cleaning.
IMPORTANT
Possible damage to the appliance
▶ Do not use aggressive or abrasive cleaners as they may damage the surface of the housing.
- Clean the housing of the appliance only with a lightly moistened cloth and a mild detergent.
Cleaning the inside of the appliance:
With every lamination, contaminants are deposited on the rollers inside the laminator. Over time, this reduces the performance of the laminator.
You should therefore clean the rollers inside the laminator after use.
Prepare the appliance for use, as described in the chapter Preparing for hot lamination, until the green indicator light Ready ③ glows.
- Then guide a sheet of folded in the middle A4 paper (maximum thickness 1.0 mm), without a pouch and with the fold forward, slowly into the manual pouch insertion slot ①.
Release the sheet as soon as you notice that it is being pulled in automatically.
The contaminants on the rollers inside the laminator now firmly attach themselves to the sheet of paper. The paper will be ejected from the pouch ejector slot ⑦ of the laminator.
◆ Repeat this cleaning process several times. Use a fresh clean sheet of paper each time.
When you no longer see any contaminants on the paper, the rollers inside the laminator are clean.
Storage
◆ Store the appliance in a clean, dry place away from direct sunlight.
Disposal
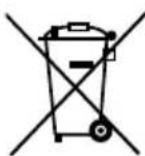
The adjacent symbol of a crossed-out dustbin means that this device is subject to Directive 2012/19/EU. This directive states that this device may not be disposed of in the normal household waste at the end of its useful life, but must be handed over to specially set-up collection locations, recycling depots or disposal companies.
This disposal is free of charge for the user. Protect the environment and dispose of this device properly.

Your local community or municipal authorities can provide information on how to dispose of the worn-out product.

The product is recyclable, subject to extended producer responsibility and is collected separately.
Appendix
Technical data
| Operational voltage | 220-240 V ~ (alternating current), 50 Hz |
| Current consumption 1.6 A | |
| Power consumption 350 W | |
| Protection class | II / ☐ (double insulation) |
| Pouch width max. 230 mm | |
| Pouch thickness for hot lamination max. 125 Micron | |
| Pouch thickness for cold lamination max. 200 Micron |
| Lamination times | ||
| Sheet size | Pouch thickness switch position: 80 Micron | Pouch thickness switch position: 125 Micron |
| DIN A4 approx. 40 s approx. 51 s | ||
| DIN A5 approx. 29 s approx. 36 s | ||
Overheating protection
This appliance is fitted with an overheating protector. If the motor overheats due to overloading, the appliance switches itself off automatically. In this case, disconnect the power cable and wait until the appliance has cooled down to room temperature. You can then reconnect the power cable with a mains power socket and take the appliance back into operation. We recommend that you let the appliance cool down for about 30 minutes after 2 hours of operation.
Notes on the EU Declaration of Conformity
This appliance complies, in regards to conformance with the basic requirements and other relevant regulations, with the EMC Directive 2014/30/EU, as well as the Directive for Low Voltage Devices 2014/35/EU.
The complete EU Declaration of Conformity can be obtained from the importer.
CE
This appliance has a 3-year warranty valid from the date of purchase. If this product has any faults, you, the buyer, have certain statutory rights. Your statutory rights are not restricted in any way by the warranty described below.
Warranty conditions
The warranty period starts on the date of purchase. Please keep your receipt in a safe place. This will be required as proof of purchase.
If any material or manufacturing fault occurs within three years of the date of purchase of the product, we will either repair or replace the product for you or refund the purchase price (at our discretion). This warranty service requires that you present the defective appliance and the proof of purchase (receipt) within the three-year warranty period, along with a brief written description of the fault and of when it occurred.
If the defect is covered by the warranty, your product will either be repaired or replaced by us. The repair or replacement of a product does not signify the beginning of a new warranty period.
Warranty period and statutory claims for defects
The warranty period is not prolonged by repairs effected under the warranty. This also applies to replaced and repaired components. Any damage and defects present at the time of purchase must be reported immediately after unpacking. Repairs carried out after expiry of the warranty period shall be subject to a fee.
Scope of the warranty
This appliance has been manufactured in accordance with strict quality guidelines and inspected meticulously prior to delivery.
The warranty covers material faults or production faults. The warranty does not extend to product parts subject to normal wear and tear or to fragile parts which could be considered as consumable parts such as switches, batteries or parts made of glass.
The warranty does not apply if the product has been damaged, improperly used or improperly maintained. The directions in the operating instructions for the product regarding proper use of the product are to be strictly followed. Uses and actions that are discouraged in the operating instructions or which are warned against must be avoided.
This product is intended solely for private use and not for commercial purposes. The warranty shall be deemed void in cases of misuse or improper handling, use of force and modifications / repairs which have not been carried out by one of our authorised Service centres.
Warranty claim procedure
To ensure quick processing of your case, please observe the following instructions:
■ Please have the till receipt and the item number (e.g. IAN 123456) available as proof of purchase.
■ You will find the item number on the type plate on the product, an engraving on the product, on the front page of the operating instructions (below left) or on the sticker on the rear or bottom of the product.
If functional or other defects occur, please contact the service department listed either by telephone or by e-mail.
■ You can return a defective product to us free of charge to the service address that will be provided to you. Ensure that you enclose the proof of purchase (till receipt) and information about what the defect is and when it occurred.

You can download these instructions along with many other manuals, product videos and installation software at www.lidl-service.com.
This QR code will take you directly to the Lidl service page (www.lidl-service.com) where you can open your operating instructions by entering the item number (IAN) 123456.
Service
GB Service Great Britain
Tel.: 0800 404 7657
E-Mail: kompernass@lidl.co.uk
IE ServiceIreland
Tel.: 1890 930 034
(0,08 EUR/Min., (peak))
(0,06 EUR/Min., (off peak))
E-Mail: kompernass@lidl.ie
IAN 338321_2001
Importer
Please note that the following address is not the service address. Please use the service address provided in the operating instructions.
KOMPERNASS HANDELS GMBH
BURGSTRASSE 21
44867 BOCHUM
GERMANY
www.kompernass.com
Sommaire
Introduction....30
Installation et raccordement ....33
Installation et raccordement
text_image
Document with a black checkmark symbol, likely indicating completion or approval status.
text_image
XFig. 1
text_image
Three-step diagram illustrating document editing: page rotation, sheet layout, and tab layout with arrows indicating rotation.Fig. 2
KOMPERNASS HANDELS GMBH
BURGSTRASSE 21
44867 BOCHUM
ALLEMAGNE
www.kompernass.com
Inhoud
Inleiding....48
text_image
Two document icons: one with a checkmark and the other with an 'X' symbol, likely indicating cancellation or rejection.Afb. 1

text_image
Three-step diagram illustrating document editing: page folding, sheet writing with arrows, and sheet alignment.Afb. 2
KOMPERNASS HANDELS GMBH
BURGSTRASSE 21
44867 BOCHUM
DUITSLAND
www.kompernass.com
Spis treści
Wprowadzenie....62
text_image
Two document icons: one with a checkmark and the other with an 'X' symbol, likely indicating cancellation or rejection.Rys. 1
text_image
Three-step diagram illustrating document editing: page rotation, tab writing with lines, and sheeting with arrows.Rys. 2
KOMPERNASS HANDELS GMBH
BURGSTRASSE 21
44867 BOCHUM
NIEMCY
www.kompernass.com
Obsah
Úvod. 76
text_image
Two document icons: one with a checkmark and the other with an 'X' symbol, likely indicating cancellation or rejection.Obr. 1

text_image
Three-step diagram illustrating document editing: page folding, sheet writing with arrows, and sheet transition.Obr. 2
KOMPERNASS HANDELS GMBH
BURGSTRASSE 21
44867 BOCHUM
NĚMECKO
www.kompernass.com
Obsah
Úvod....90
text_image
Two document check icons: one with a checkmark and the other with an 'X' symbol.Obr. 1

text_image
Three-step diagram illustrating document editing: page folding, sheet writing with arrows, and sheet rotation.Obr. 2
KOMPERNASS HANDELS GMBH
BURGSTRASSE 21
44867 BOCHUM
NEMECKO
www.kompernass.com

KOMPERNASS HANDELS GMBH
BURGSTRASSE 21
44867 BOCHUM
GERMANY
www.kompernass.com
Stand der Informationen · Last Information Update · Version des informations