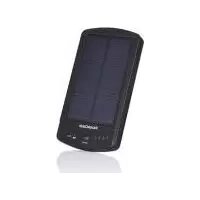
SPBS 5000 A1 - Battery charger SILVERCREST - Free user manual and instructions
Find the device manual for free SPBS 5000 A1 SILVERCREST in PDF.



| Product type | Solar battery charger / Power bank |
| Brand | SilverCrest |
| Model | SPBS 5000 A1 |
| Internal battery capacity | 5000 mAh (Lithium-polymer 3.7 V) |
| Input voltage (micro-USB) | 5 V, max. 2100 mA |
| Output voltage (USB-A) | 5 V, max. 2100 mA |
| Minimum charge current for devices | 80 mA |
| Charging time (solar panel) | Approximately 22 to 30 hours |
| Charging time (USB cable with 5 V / 2.1 A adapter) | Approximately 3 to 4 hours |
| Dimensions (without accessories) | Approximately 14.6 x 7.5 x 2.2 cm |
| Weight (without accessories) | Approximately 180 g |
| Operating temperature | +5 °C to +35 °C |
| Permissible humidity (non-condensing) | 10 % to 70 % |
| Main functions | Solar charging, USB charging, USB output for external devices, LED charge level indicator, automatic shut-off |
| Package contents | Power bank, USB cable (micro-USB), 2 suction cup holders, 4 suction cups, user manual |
| Maintenance and cleaning | Clean with a soft, dry cloth; do not use abrasive or solvent-based cleaners |
| Safety | Do not open the casing, avoid heat sources, do not expose to water, keep out of reach of children |
| Warranty | 3 years (under conditions described in the manual) |
| Compliance | CE, EMC 2014/30/EU, RoHS 2011/65/EU |
Frequently Asked Questions - SPBS 5000 A1 SILVERCREST
1. Solar panel: Expose the solar panel to direct sunlight. The orange solar LED indicates charging; when it turns green, the battery is full.
2. USB cable: Connect the provided micro-USB cable to a USB wall charger (5 V/2.1 A minimum). The charge status LEDs indicate the level.
With the solar panel: approximately 22 to 30 hours (depending on sunlight).
With a USB cable and a 5 V/2.1 A wall charger: approximately 3 to 4 hours.
- Make sure you briefly pressed the ON/OFF button to start charging.
- Check that the charger's battery is not empty.
- Check the USB cable connection.
- Your device requires a current between 80 mA and 2.1 A; if not, the charger turns off automatically.
User questions about SPBS 5000 A1 SILVERCREST
0 question about this device. Answer the ones you know or ask your own.
Ask a new question about this device
Download the instructions for your Battery charger in PDF format for free! Find your manual SPBS 5000 A1 - SILVERCREST and take your electronic device back in hand. On this page are published all the documents necessary for the use of your device. SPBS 5000 A1 by SILVERCREST.
USER MANUAL SPBS 5000 A1 SILVERCREST
Operating instructions
NL BE
POWERBANK MET ZONNEPANEL
Gebruiksaanwijzing
FR BE
BATTERIE POWERBANK AVEC FONCTION DE RECHARGE SOLAIRE
Mode d'emploi
DE AT CH
POWERBANK MIT SOLARLADEFUNKTION
Bedienungsanleitung
IAN 282263
GB IE
N
GB IE NI
Before reading, unfold the page containing the illustrations and familiarise yourself with all functions of the device.
FR BE
GB/IE/NI Operating instructions Page 1
Information concerning these operating instructions 2
Copyright 2
Notes on trademarks 2
Intended use 3
Warnings used 3
Safety 4
Basic safety guidelines 4
Description of components 7
Operation 7
Unpacking 7
Check the package contents 8
Disposal of packaging materials 8
Attaching the suction cups 9
Charging with the solar panel 1
Charging with the USB cable 12
Handling and operation 13
Switch the device on/off 13
Display charge level 13
Compatible devices 14
Charging external devices 14
Troubleshooting 15
Cleaning. 16
Storage when not in use 16
Disposal 17
Appendix 18
Technical data 18
Notes on the EU Declaration of Conformity 19
Kompernass Handels GmbH warranty 19
Service 22
Importer 22
Introduction
Information concerning these operating instructions
Congratulations on the purchase of your new device.
You have selected a high-quality product. The operating instructions are part of this product. They contain important information about safety, usage and disposal. Before using the product, familiarise yourself with all operating and safety instructions. Use the product only as described and for the specified areas of application.
Keep these operating instructions as a reference and store them near the product. Please also pass on these operating instructions to any future owner.
Copyright
This documentation is protected by copyright.
Any copying or reproduction, including in the form of extracts, or any reproduction of images (even in a modified state), is permitted only with the written authorisation of the manufacturer.
Notes on trademarks
■ USBis a registered trademark of USB Implementers Forum, Inc.
The SilverCrest trademark and the retail name are the property of their respective owner.
All other names and products may be trademarks or registered trademarks of their respective owners.
Intended use
This information technology device is designed solely for the charging of batteries in mobile phones, MP3 players, digital cameras or other battery-powered devices that feature a USB connection as standard. To do this, the device converts sunlight into electrical energy and stores it in its internal battery. The device is not intended for any other purpose, nor for use beyond the scope described. The device is not intended for use in commercial or industrial environments. The manufacturer accepts no responsibility for damage caused by failure to observe these instructions, improper use or repairs, unauthorised modifications or the use of unapproved replacement parts. The risk shall be borne solely by the user.
Warnings used
The following warning notice types are used in these operating instructions:

DANGER
A warning notice at this hazard level indicates a potentially hazardous situation.
Failure to avoid this hazardous situation could result in severe injuries or even death.
Follow the instructions in this warning notice to avoid the risk of serious injuries or death.

CAUTION
A warning notice at this hazard level indicates a potential for property damage.
Failure to avoid this situation could result in property damage.
Follow the instructions in this warning notice to prevent property damage.
NOTE
A note provides additional information that will assist you in using the device.
Safety
This section contains important safety instructions for using the product. This product complies with statutory safety regulations. Improper use may result in personal injury and property damage.
Basic safety guidelines
To ensure safe operation of the product, follow the safety guidelines set out below:
This device may be used by children aged 8 years and above and by persons with limited physical, sensory or mental capabilities, or lack of experience and knowledge, provided that they are under supervision or have been told how to use the device safely and are aware of the potential risks. Children must not use the device as a plaything. Cleaning and user maintenance tasks may not be carried out by children unless they are supervised.
ADANGER! Do not allow children to play with the packaging material! Keep all packaging materials away from children. Risk of suffocation!
-
Check the device for visible external damage before use. Do not operate a device that has been damaged or dropped.
-
Do not expose the device to water spray or dripping water, and do not place liquid-filled objects such as vases or open drink containers on or near the device.
DANGER! Be sure to provide sufficient air circulation to avoid a heat build-up. Never cover the device! Risk of fire!
ADANGER! Never operate the device in the vicinity of naked flames (e.g. candles), and do not place burning candles on or next to the device. This will help to prevent fires.
-
Do not operate the device near heat sources such as radiators or other heat-generating devices.
-
Never expose the device to extreme heat. This particularly applies to storage in a car. Extreme temperatures can occur in car interiors and glove compartments during long periods of immobilisation. Remove electrical and electronic devices from the vehicle.
DANGER! Never open the housing of the device. There are no user-serviceable or replaceable components inside the device.
- Do not make any unauthorised modifications or alterations to the device.
All repairs must be carried out by authorised specialist companies or by the Customer Service department. Improper repairs may put the user at risk. It will also invalidate any warranty claims.
Repairs to the device during the warranty period may only be carried out by a customer service department authorised by the manufacturer. Otherwise, no warranty claims will be held for any subsequent damages.
- Switch the device off immediately and disconnect any connected charging cables from the device if you smell fumes or notice any smoke. Have the device checked by a qualified specialist before using it again.
If you are using a USB power supply, the mains socket used must always be easily accessible so that the USB power supply can be quickly disconnected from the socket in a hazardous situation. You should also observe the operating instructions for the USB power supply.
DANGER! Mishandling the batteries can cause fires, explosions, leakages or other hazards! Do not throw the device into a fire, since the integrated battery may explode.
Comply with all conditions for and prohibitions on use for battery-powered devices in locations with specific hazard risks, such as petrol stations, aeroplanes, hospitals, etc.
Description of components
(See fold-out page for illustrations)
Solar panel
Solar LED
3 D (5 V USB active output)
ON/OFF button
Charge level LEDs
USB port (output: 5 V = 2100 mA)
Micro-USB port (input: 5 V -2100 mA)
8 Brackets for suction cups
Suction cups
USB cable (USB to micro-USB)
10 Operating instructions (Symbol image)
Operation
Unpacking
Remove all parts and the operating instructions from the packaging.
Remove all packaging material.
Check the package contents
(See fold-out page for illustrations)
The product includes the following components:
Power Bank with Solar Charger SPBS 5000 A1
USB cable
-
2 × brackets for suction cups
-
4 x suction cups
These operating instructions
NOTE
- Check the package for completeness and for signs of visible damage.
If the delivery is incomplete or damage has occurred as a result of defective packaging or during transport, contact the Service hotline (see section Service).
Disposal of packaging materials
The packaging protects the device from damage during transport. The packaging materials have been selected for their environmental friendliness and ease of disposal, and are therefore recyclable.

Returning the packaging into the material cycle conserves raw materials and reduces the amount of waste generated. Dispose of packaging materials that are no longer needed in accordance with applicable local regulations.
Attaching the suction cups
NOTE
To make sure that the suction cup hold firmly, the surface must be completely free of dust, oil and grease.
Variant A
Variant A is suitable for attaching the device to a flat, level surface.
Attach all four suction cups to the underside of the device, as shown in "Figure A".
Push the suction cup into the large holes.
Now fasten the suction cup by sliding them into the narrow openings.
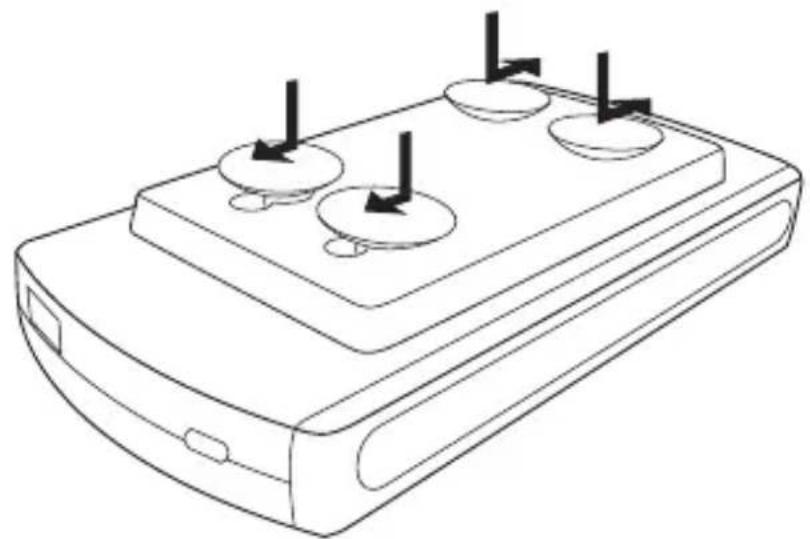
Figure A
You can now attach the device on a flat, level using the suction cups 9.
Variant B
Variant B is suitable for attaching the device to a pane of glass.
Attach the four suction cup to the two brackets 8, as shown in "Figure B".
Push the suction cup into the large holes.
Now fasten the suction cup by sliding them into the narrow openings.
Now mount the bracket on the underside of the device by pushing the retaining lugs into the corresponding slots on the rear of the device and locking them in place.
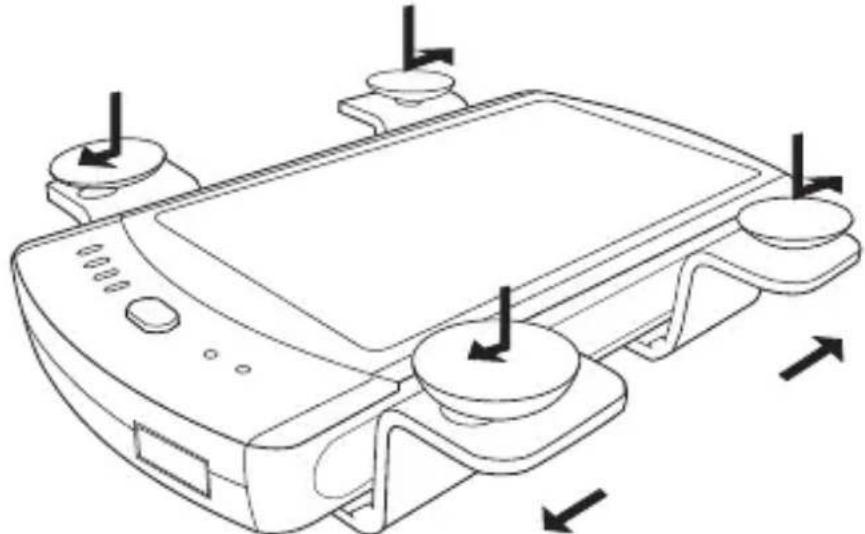
Figure B
You can now attach the device to a pane of glass using the suction cups
Charging with the solar panel

CAUTION
- Ensure that the ambient temperature does not exceed 45^ C . This is particularly important when using the device inside a motor vehicle.
You can charge the battery of the device with the solar panel 1. Ensure that the solar panel 1 is receiving sufficient sunlight. As soon as there is sufficient sunlight, the solar LED 2 lights up orange to show that the battery is being charged. If the solar LED 2 does not light up, there is not enough sunlight available. In this case, change the location of the device or place the device in direct sunlight. Once the solar LED 2 lights up green, the battery is fully charged.
Charging with the USB cable
If there is no sunlight available, you can charge the battery of the device with the USB cable 10.

CAUTION
Due to the high battery capacity and bearing in mind the charging time, we recommend charging the power bank using a USB mains adaptor (not supplied).
Use only a USB mains adapter with an output voltage of 5 V and an output current of at least 2.1 A to charge the power bank
To do this, connect the micro-USB plug of the charging cable to the device's micro-USB port ⑦.
Connect the USB plug of the USB cable to the USB connection of a USB mains adapter.
A rough estimate of the charge level is shown during charging by means of the charge level LEDs 5.
| Charge level LEDs ⑤ | Charge level |
| One LED is flashing < 25% | |
| One LED is on, the second LED is flashing 25–49% | |
| Two LEDs are on, the third LED is flashing 50–74% | |
| Three LEDs are on, the fourth LED is flashing 75–99% | |
| All LEDs are on 100% |
Handling and operation
Switch the device on/off
Switching on
Press the ON/OFF button4 briefly to switch on the device.
The charge level LEDs light up for about 10 seconds.
The LED lights up blue as long as a connected device is being charged.
Automatic switch-off
If no device is connected for charging within 10 seconds, the charger switches off automatically to conserve its battery.
Switching off
Press and hold the ON/OFF button for at least 3 seconds to switch off the device and stop the charging process.
The LED does out.
Display charge level
Press the ON/OFF button4 briefly to show the charge level of the non-loaded battery for a few seconds. The charge level LEDs 5 provide you with information about the approximate charge level.
| Charge level LEDs ⑤ | Charge level |
| All LEDs are on 75 -100 % | |
| Three LEDs are on 50 - 74 % | |
| Two LEDs are on 25 - 49 % | |
| One LED is on 5 - 24 % | |
| One LED is flashing < 5 % | |
| All LEDs off 0 % |
Compatible devices
You can use the solar charger to charge end devices that require a charging current of at least 80mA and a maximum of 2,1 A.
If the connected end device requires a current of less than 80mA or more than 2,1 A, the solar charger will switch itself off immediately after being switched on with the ON/OFF button. In this case, check the charger's suitability for your end device on the basis of the technical data of your end device.
NOTE
If the device switches off automatically, it can only be switched back on if it has been charged for a short time beforehand with a USB mains adapter.
Charging external devices
Connect the charging cable of your end device to the USB port 6 on the solar charger and to your end device.
If charging does not start automatically, press the ON/OFF button 4 briefly to start the charging process.
The LED lights up for as long as the connected device is being charged. Once your device is fully charged, the solar charger switches off. To interrupt the charging process, you can disconnect the end device. If your end device is not fully charged and the LED does out during charging, this means the solar charger's battery is discharged. The solar charger's battery must be recharged again before you can charge end devices.
Simultaneous charging of the integrated battery and a connected end device is possible in solar operation and via the micro USB port 7.
Troubleshooting
A connected device is not charging.
Press the ON/OFF button to briefly to start the charging process.
The solar charger's battery is empty. Charge the battery.
No connection to the device. Check the connection.
The solar charger can be used for end devices that require a charging current of no more than 2,1 A. If the connected end device requires a current of more than 2,1 A, the solar charger will switch itself off immediately after being switched on with the ON/OFF button. In this case, check the charger's suitability for your end device on the basis of the technical data of your end device.
The device will not switch on.
The device has switched itself off automatically. You need to charge the device for a short while with a USB mains adapter before you can switch the device back on.
The solar charger's battery is not charging via the solar panel.
Check that the solar panel is receiving sufficient sunlight.
NOTE
If the above-mentioned solutions do not resolve the problem, please contact Customer Service (see chapter Service).
Cleaning

CAUTION
Damage to the device!
- To avoid irreparable damage to the device, ensure that no moisture can penetrate the device during cleaning.
- Do not use caustic, abrasive or solvent-based cleaning materials. These can damage the surfaces of the device.
NOTE
A contaminated device will not perform as well.
Clean the surfaces of the device with a soft, dry cloth. For stubborn dirt, use a slightly damp cloth with a mild detergent.
Storage when not in use
If you do not intend to use the device for a long time, store it in a clean, dry place away from direct sunlight.
If the solar charger is not going to be used for some time, the battery should be recharged at regular intervals. This helps to preserve battery performance.
Disposal
The adjacent symbol of a crossed-out wheelie bin means that this device is subject to Directive 2012/19/EU. This directive states that this device may not be disposed of in the normal household
waste at the end of its useful life, but must be handed over to specially set-up collection locations, recycling depots or disposal companies.
This disposal is free of charge for the user. Protect the environment and dispose of this device properly.
You can obtain further information from your local disposal company or the city or local authority.
Appendix
Technical data
| Integrated battery | 3.7 V/5000 mAh (lithium polymer) |
| Input voltage/current 5 V | =, max. 2100 mA |
| Output voltage, current 5 V | =, max. 2100 mA |
| Minimum discharge current 80 mA | |
| Charging time, battery - Solar panel - USB cable | approx. 22-30 hours* approx. 3-4 hours** |
| Operating temperature +5°C to +35°C | |
| Storage temperature 0°C to +40°C | |
| Relative humidity (no condensation) | 10%-70% |
| Dimensions (without accessories) | approx. 14.6 x 7.5 x 2.2 cm |
| Weight (without accessories) approx. 180 g |
- The charging time is highly dependent on the level of sun exposure (intensity). This can be influenced by the season, cloud cover or location. Any of these factors can lead to longer charging times.
** When using the supplied USB cable and a USB mains adapter supplying 5 V/2100 mA.
Notes on the EU Declaration of Conformity
This device complies with the basic requirements and other relevant provisions of the EMC Directive 2014/30/EU and the RoHS Directive 2011/65/EU.
The complete EU Declaration of Conformity is available from the importer and may be requested if required (see section "Importer").
This appliance has a 3-year warranty valid from the date of purchase. If this product has any faults, you, the buyer, have certain statutory rights. Your statutory rights are not restricted in any way by the warranty described below.
Warranty conditions
The validity period of the warranty starts from the date of purchase. Please keep your original receipt in a safe place. This document will be required as proof of purchase.
If any material or production fault occurs within three years of the date of purchase of the product, we will either repair or replace the product for you at our discretion. This warranty service is dependent on you presenting the defective appliance and the proof of purchase (receipt) and a short written description of the fault and its time of occurrence.
If the defect is covered by the warranty, your product will either be repaired or replaced by us. The repair or replacement of a product does not signify the beginning of a new warranty period.
Warranty period and statutory claims for defects
The warranty period is not prolonged by repairs effected under the warranty. This also applies to replaced and repaired components. Any damage and defects present at the time of purchase must be reported immediately after unpacking. Repairs carried out after expiry of the warranty period shall be subject to a fee.
Scope of the warranty
This appliance has been manufactured in accordance with strict quality guidelines and inspected meticulously prior to delivery.
The warranty covers material faults or production faults. The warranty does not extend to product parts subject to normal wear and tear or fragile parts such as switches, batteries, baking moulds or parts made of glass.
The warranty does not apply if the product has been damaged, improperly used or improperly maintained. The directions in the operating instructions for the product regarding proper use of the product are to be strictly followed. Uses and actions that are discouraged in the operating instructions or which are warned against must be avoided.
This product is intended solely for private use and not for commercial purposes. The warranty shall be deemed void in cases of misuse or improper handling, use of force and modifications / repairs which have not been carried out by one of our authorised Service centres.
Warranty claim procedure
To ensure quick processing of your case, please observe the following instructions:
Please have the till receipt and the item number (e.g. IAN 12345) available as proof of purchase.
- You will find the item number on the type plate, an engraving on the front page of the instructions (bottom left), or as a sticker on the rear or bottom of the appliance.
If functional or other defects occur, please contact the service department listed either by telephone or by e-mail.
You can return a defective product to us free of charge to the service address that will be provided to you. Ensure that you enclose the proof of purchase (till receipt) and information about what the defect is and when it occurred.
You can download these instructions along with many other manuals, product videos and software on www.lidl-service.com.
Service

Service Great Britain
Tel.: 0871 5000 720 (£ 0.10/Min.)
E-Mail: kompernass@lidl.co.uk

Service Ireland
Tel.: 1890 930 034
(0,08 EUR/Min., (peak))
(0,06 EUR/Min., (off peak))
E-Mail: kompernass@lidl.ie
IAN 282263
Importer
Please note that the following address is not the service address. Please use the service address provided in the operating instructions.
KOMPERNASS HANDELS GMBH
BURGSTRASSE 21
DE-44867 BOCHUM
GERMANY
www.kompernass.com
Table des matieres
Introduction 24
Chere cliente, cher client,
KOMPERNASS HANDELS GMBH
BURGSTRASSE 21
DE-44867 BOCHUM
ALLEMAGNE
www.kompernass.com
Inhoud
Inleiding 46
KOMPERNASS HANDELS GMBH
BURGSTRASSE 21
DE-44867 BOCHUM
DUITSLAND
www.kompernass.com
Inhaltsverzeichnis
Einführung 68
KOMPERNASS HANDELS GMBH
BURGSTRASSE 21
DE-44867 BOCHUM
DEUTSCHLAND
www.kompernass.com
KOMPERNASS HANDELS GMBH
BURGSTRASSE 21
DE-44867 BOCHUM
GERMANY
www.kompernass.com
Last Information Update · Version des informations
Stand van de informatie · Stand der Informationen:
12/2016.Ident.-No.:SPBS5000A1-112016-2


- GB IE NI
- FR BE
- Safety 4
- Description of components 7
- Operation 7
- Handling and operation 13
- Troubleshooting 15
- Cleaning. 16
- Storage when not in use 16
- Disposal 17
- Appendix 18
- Introduction
- Information concerning these operating instructions
- Copyright
- Notes on trademarks
- Intended use
- Warnings used
- DANGER
- A warning notice at this hazard level indicates a potentially hazardous situation.
- CAUTION
- A warning notice at this hazard level indicates a potential for property damage.
- NOTE
- Safety
- Basic safety guidelines
- Description of components
- Operation
- Unpacking
- Check the package contents
- Disposal of packaging materials
- Attaching the suction cups
- Variant A
- Variant B
- Charging with the solar panel
- Charging with the USB cable
- Handling and operation
- Switch the device on/off
- Switching on
- Automatic switch-off
- Switching off
- Display charge level
- Compatible devices
- Charging external devices
- Troubleshooting
- A connected device is not charging.
- The device will not switch on.
- The solar charger's battery is not charging via the solar panel.
- Cleaning
- Damage to the device!
- Storage when not in use
- Disposal
- Appendix
- Technical data
- Notes on the EU Declaration of Conformity
- Warranty conditions
- Warranty period and statutory claims for defects
- Scope of the warranty
- Warranty claim procedure
- Service
- Service Great Britain
- Service Ireland
- Importer
- Table des matieres
- Introduction 24
- Inhoud
- Inleiding 46
- Inhaltsverzeichnis
- Einführung 68
- KOMPERNASS HANDELS GMBH
Brand : SILVERCREST
Model : SPBS 5000 A1
Category : Battery charger