
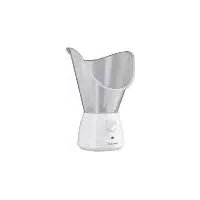
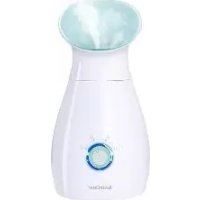
SGS 80 A2 - Facial sauna SILVERCREST - Free user manual and instructions
Find the device manual for free SGS 80 A2 SILVERCREST in PDF.
| Product Type | Facial Steam Sauna |
| Brand | SilverCrest |
| Model | SGS 80 A2 |
| Rated voltage | 220-240 V ~ 50 Hz |
| Power consumption | 75-95 W |
| Protection class | II |
| Maximum water capacity | About 15 minutes of steam (Hi level) |
| Maximum runtime | 30 minutes (automatic shut-off) |
| Steam levels | 2 (Lo and Hi) |
| Included masks | Face mask and nose mask |
| Accessories supplied | Face mask, nose mask, steam regulator, heating unit, measuring cup, instruction manual |
| Aroma reservoir | Yes, for essential oils and herbs |
| Intended use | Facial beauty care with steam, private use |
| Cleaning | Removable, washable with soapy water |
| Descaling | Descaler suitable for aluminium |
| Warranty | 3 years |
| After-sales service France | Tel. 0800 919270, email kompernass@lidl.fr |
| After-sales service Switzerland | Tel. 0842 665566, email kompernass@lidl.ch |
| Weight (approx.) | Approximately 0.8 kg (not specified, reasonable estimate) |
| Dimensions (approx.) | Approx. 20 x 15 x 15 cm (not specified, estimate) |
Frequently Asked Questions - SGS 80 A2 SILVERCREST
User questions about SGS 80 A2 SILVERCREST
0 question about this device. Answer the ones you know or ask your own.
Ask a new question about this device
Download the instructions for your Facial sauna in PDF format for free! Find your manual SGS 80 A2 - SILVERCREST and take your electronic device back in hand. On this page are published all the documents necessary for the use of your device. SGS 80 A2 by SILVERCREST.
USER MANUAL SGS 80 A2 SILVERCREST
natural_image
White portable blender with clear glass body and 'SolveCress' branding, no visible text or symbols on device surface
GESICHTSSAUNA SGS 80 A2
DE AT CH
GESICHTSSAUNA
Bedienungsanleitung
IT CH
SAUNAFACCIALE
Operating instructions
IAN 100149
DE AT CH
Before reading, unfold the page containing the illustrations and familiarise yourself with all functions of the device.
natural_image
Line drawing of a person's head in profile view showing facial features and hair (no text or symbols)natural_image
Line drawing of a person's profile showing head, ear, and shoulder (no text or symbols)KOMPERNASS HANDELS GMBH
BURGSTRASSE 21
44867 BOCHUM
GERMANY
www.kompernass.com
Sommaire
Introduction 10
Usage conforme 10
Accessoires fournis 10
natural_image
Line drawing of a person's head in profile view showing facial features and hair (no text or symbols)natural_image
Line drawing of a person's profile showing head, neck, and shoulder (no text or symbols)KOMPERNASS HANDELS GMBH
BURGSTRASSE 21
44867 BOCHUM
GERMANY
www.kompernass.com
Indice Pagina
Introduzione 18
Uso conforme 18
Fornitura 18
natural_image
Line drawing of a person's head in profile view showing facial features and hair (no text or symbols)natural_image
Line drawing of a person's head in profile view, showing detailed facial features and body contours (no text or symbols)KOMPERNASS HANDELS GMBH
BURGSTRASSE 21
44867 BOCHUM
GERMANY
www.kompernass.com
Content Page
Introduction 26
Intended Use 26
Items supplied 26
Description of the appliance 26
Technical data 26
Safety instructions 27
Preparing the facial sauna for use 28
...with the face mask ....28
...with the nose mask 28
Utilisation 28
Operation 29
Using aroma and herb containers 30
Cleaning and care 30
Storage 31
Disposal 31
Warranty & Service 31
Importer 32
Introduction
Congratulations on the purchase of your new appliance.
You have clearly decided in favour of a quality product. These operating instructions are a part of this product. They contain important information in regard to safety, use and disposal. Before using the product, familiarise yourself with all of these operating and safety instructions. Use the product only as described and only for the specified areas of application. In addition, pass these documents on, together with the product, to any future owner.
Intended Use
This facial sauna is intended for facial cosmetic care using steam.
This appliance is intended for domestic use only, it has not been designed for commercial applications!
Items supplied
Face mask
Nose mask
Steam controller
Heating unit
Measuring beaker
Operating instructions
Description of the appliance
Figure A:
① Face mask
② Lid of aroma and herb container (fits the aroma and herb container of the face mask and the nose mask)
③ Aroma and herb container
4 Steam regulator
⑤ Handle of the steam re#gulator
⑥ Water bowl
⑦ Control lamp
8 Lo/Hi/Off button
⑨ Heating unit
⑩ Cable winder
⑪ Bottom part of nose mask
⑫ Aroma and herb container
⑬ Top part of nose mask
Figure B:
14 Measuring cup
Technical data
Rated voltage: 220 - 240 V \~ / 50 Hz
Power consumption: 75 - 95 W
Protection class: II /
⚠️ Risk of personal injury!
- Place the appliance only on firm and level surfaces. There is a risk of scalding should hot liquids be spilled during use!
- This appliance may be used by children of the age of 8 years or more and by persons with reduced physical, sensory or mental capabilities or lack of experience and/or knowledge if they are being supervised or have been instructed with regard to the safe use of the appliance and have understood the potential risks.
• Children must not play with the appliance.
- Cleaning and user maintenance tasks shall not be carried out by children unless they are supervised.
- Do not operate the appliance adjacent to water, for example, in the bathtub or next to washbasins.
- Connect the appliance only to wall power sockets supplying the type of electrical current detailed on the model plate.
- NEVER submerse the appliance in water or other liquids! The appliance could become irreparably damaged!
- NEVER heat the appliance up without liquids!
- Do NOT fill the appliance with solvents or other inflammable fluids!
- Always disconnect the power cable by pulling on the plug itself. Do NOT pull on the power cable itself!
- Arrange for defective power plugs and/or cables to be replaced at once by qualified technicians or our Customer Service Department.
- Do NOT reach into the interior of the appliance when it is in use. There is a risk of being burnt/scalded!
- Clean the appliance after every use so as to avoid the accumulation of fats and other residues.

Risk of electric shock!
Do not use this appliance in the close vicinity of baths, washbowls or other receptacles containing water.
Preparing the facial sauna for use
- Unwind the cable from the cable winder 10 and guide it through the recess on the underside of the heating unit 9.
- Place the heating unit ⑨ on a level, non-slip and water resistant surface.
- Using the measuring cup 14 fill the water bowl 6 with water. Orientate yourself with the scale on the measuring cup 14 for how long you wish to use the appliance (approx. 5, approx. 10 or approx. 15 minutes). Use the scale that is appropriate to the respective steam setting (Hi or Lo).
Warning!
NEVER fill the water bowl ⑥ with a water volume that exceeds the "Hi 15 min." marking (in the measuring cup ⑭). Otherwise, the water could overflow and then permeate into the interior of the appliance. This could damage the appliance irreparably!
...with the face mask
If you wish to use the appliance with the face mask ①, proceed as follows:
- Place the steam regulator ④ on the water bowl ⑥ so that the handle ⑤ points to the front.
- Place the face mask ① on the heating unit ⑨: The lugs on the heating unit ⑨ must grip in the recesses on the underside of the face mask ①. Then turn the face mask ① clockwise so that it sits firmly on the heating unit ⑨.
- Insert the plug into a power socket.
The Facial Sauna is now ready for use.
...with the nose mask
If you wish to use the appliance with the nose mask, proceed as follows:
(i) Note:
The steam regulator ④ is not needed when using the nose mask.
- Place the lid of the aroma and herb container ② onto the aroma and herb container ⑫ in the lower part of the nose mask ⑪ in such a way that it is secure.
- Fit the upper 13 and lower parts of the nose mask 11 together so that they are securely connected.
- Place the assembled nose mask onto the heating unit 9:
The lugs on the heating unit ⑨ must engage in the recesses on the underside of the nose mask. Then rotate the nose mask clockwise so that it is sitting securely on the heating unit ⑨.
- Insert the power plug into a power socket.
The Facial Sauna is now ready for use.
Utilisation
Attention!
This facial sauna may not be used if you suffer from one of the following ailments:
• with acarodermatitis
- with erythrodermia
• with swellings in the facial area
• with heart illnesses
- with diabetes
- wounds in the facial area
- with eczema
- with psoriasis
Should you be pregnant or have other health issues, consult your doctor before using the appliance.
Utilisation of the facial sauna prepares your skin admirably for further treatments, for example deep cleansing, moisture provision, face masks etc. The steam invigorates the skin, opens the pores and impurities can be better removed.
Operation
Prepare the facial sauna as described under "Preparing the facial sauna for use".
- Press once on the Lo/Hi/Off button ⑧. The control lamp ⑦ glows green (low steam level "Lo"). The water in the water bowl ⑥ is heated just sufficiently to produce a small amount of steam. For more steam, press on the Lo/Hi/Off button ⑧ once more. The control lamp ⑦ glows red (high steam level "Hi"). The water is heated more strongly and so produces more steam.

Attention!
- If you feel uncomfortable or perceive the steam as unpleasant, either hold your face a little further away from the face mask ① / nose mask or reduce the volume of steam. Should the feeling of discomfort continue, stop using the appliance.


Attention! Hot steam!
- Since the human nasal mucous membrane is extremely sensitive, never use the appliance with steam level "Hi" when using the nose mask.
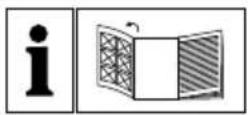
- Hold your face over the face mask ①. Close your eyes and relax:
natural_image
Line drawing of a human head with hair and facial features, no text or symbols present- You can also regulate the steam volume as follows: Slide the handle of the steam regulator 5 to the right (in the MAX direction) to increase the steam volume.
Slide the handle of the steam regulator 5 to the left (in the MIN direction) to decrease the steam volume.
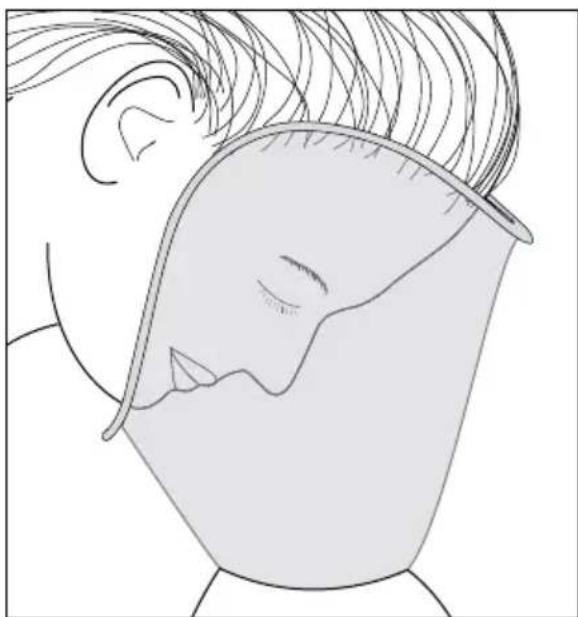
- Hold your nose over the nose mask. Close your eyes and relax:
natural_image
Line drawing of a person's profile showing head, neck, and shoulder (no text or symbols)- When the water in the water bowl ⑥ has evaporated, the appliance switches itself off automatically. If you wish to switch the appliance off prematurely, press the Lo/Hi/Off button ⑧ repeatedly until the control lamp ⑦ extinguishes.
(i) Note:
After 30 minutes the appliance switches itself off automatically, even if there is still water in the water bowl ⓘ.
Using aroma and herb containers
You can enrich the steam with various herbs and aromas. This can contribute to both relaxation and the treatment of the skin.
(i) Note:
Only those types of herbs and aromas can be employed that are intended and suitable for use in a facial sauna.
(i) Note:
The lid of the aroma and herb container ② fits the aroma and herb containers of the face mask ③ and the nose mask ⑫.
Before connecting the face mask ①/nose mask with the heating unit ⑨:
- Press the two catches of the lid of the aroma and herb container ② together and lift it from the respective aroma and herb container ③/⑫.
Face mask ① only:
Press the two pins on the underside of the aroma and herb container ③ through the opening in the base of the face mask ① so that the pins engage and the aroma and herb container ③ is securely attached.
- Put herbs or a cotton wool ball sprinkled with aroma essence into the aroma and herb container ③/⑫.
- Press the two catches of the lid of the aroma and herb container ② together and place it onto the aroma and herb container ③/12.
Release the catches so that the lid ② is securely attached. - Now assemble the face mask ①/nose mask onto the heating unit ⑨ as described under "Preparing the facial sauna for use".
The rising steam will now be directed through the aroma and herb container ③/⑫ and thus takes on the fragrance.
Cleaning and care
Danger!
Before cleaning the appliance, remove the power plug and allow it to cool down! Risk of injury!
The facial sauna should be thoroughly cleaned after every usage. If you do not, microbes could quickly develop in the warm moisture which, with further utilisation of the appliance, could lead to negative effects on ones health.
Warning!
Do not use abrasive, aggressive or chemical cleaning agents! These damage the surfaces of the appliance and cause irreparable damage.
- Dismantle the appliance.
Removing the face mask:
- Remove the face mask ① from the heating unit ⑨: Turn the face mask ⑪ anti-clockwise until it can be lifted off.
- Lift the steam regulator ④ from the heating unit ⑨.
- Remove the lid from the aroma and herb container 2:
For this, press the two locking devices together until the lid ② allows itself to be removed.
- Pull out the aroma and herb container ③:
Press the pins that are protruding from the underside of the face mask ① together and pull on the aroma and herb container ③ at the same time.
Removing the nose mask:
- Remove the nose mask from the heating unit ⑨: Turn the nose mask anti-clockwise until it can be lifted off.
- Pull the lower ⑪ and upper parts ⑬ of the nose mask apart.
- Remove the lid ② (if fitted) from the aroma and herb container ⑫:
To do this, press the two catches together until the lid ② can be removed.
Clean the face mask ①, the two parts of the nose mask ⑪/⑬, the lid of the aroma and herb container ②, the steam regulator ④, the aroma and herb container ③ and the measuring cup ⑭ in a mild soapy solution. Rinse everything off with fresh water and then dry off.
Clean the heating unit ⑨ and the water bowl ⑥ with a lightly moistened cloth. For stubborn soiling use a mild detergent on the cloth.
As soon as scale deposits form in the water bowl ⑥, clean the water bowl ⑥ with a commercially available descaling agent that is suitable for aluminium. Pay heed to the usage instructions for the descaling agent.
Reassemble the facial sauna after cleaning.
Storage
Allow the appliance to cool down and clean it (see section "Cleaning and care").
Store the facial sauna at a clean, dry location.
Wind the power cable around the cable storage 10 on the underside of the appliance.
Disposal

Do not dispose of the appliance in your normal domestic waste. This product is subject to the European guideline 2012/19/EU.
Dispose of the appliance through an approved disposal centre or at your community waste facility.
Observe the currently applicable regulations.
In case of doubt, please contact your waste disposal centre.

Dispose of all packaging materials in an environmentally friendly manner.
Warranty & Service
The warranty for this appliance is for 3 years from the date of purchase. The appliance has been manufactured with care and meticulously examined before delivery.
Please retain your receipt as proof of purchase. In the event of a warranty claim, please make contact by telephone with our Service Department. Only in this way can a post-free despatch for your goods be assured.
The warranty covers only claims for material and manufacturing defects, but not for transport damage, for wearing parts or for damage to fragile components, e.g. buttons or batteries. This product is for private use only and is not intended for commercial use.
The warranty is void in the case of abusive and improper handling, use of force and internal tampering not carried out by our authorized service branch.
Your statutory rights are not restricted in any way by this warranty.
The warranty period will not be extended by repairs made under warranty. This applies also to replaced and repaired parts. Any damage and defects extant on purchase must be reported immediately after unpacking the appliance, at the latest, two days after the purchase date. Repairs made after the expiration of the warranty period are subject to payment.
GB
Service Great Britain
Tel.: 0871 5000 720 (£ 0.10/Min.)
E-Mail: kompernass@lidl.co.uk
IAN 100149
Hotline availability:
Monday to Friday 08:00 - 20:00 (CET)
Importer
KOMPERNASS HANDELS GMBH
BURGSTRASSE 21
44867 BOCHUM
GERMANY
www.kompernass.com
KOMPERNASS HANDELS GMBH
BURGSTRASSE 21
44867 BOCHUM
DEUTSCHLAND / GERMANY
www.kompernass.com

- GESICHTSSAUNA SGS 80 A2
- DE AT CH
- Sommaire
- Indice Pagina
- Content Page
- Introduction
- Intended Use
- Items supplied
- Description of the appliance
- Figure A:
- Figure B:
- Technical data
- ⚠️ Risk of personal injury!
- Risk of electric shock!
- Preparing the facial sauna for use
- Warning!
- ...with the face mask
- ...with the nose mask
- Note:
- Utilisation
- Attention!
- Operation
- Attention! Hot steam!
- Using aroma and herb containers
- Cleaning and care
- Danger!
- Removing the face mask:
- Removing the nose mask:
- Storage
- Disposal
- Warranty & Service
- Service Great Britain
- Hotline availability:
- Importer
Brand : SILVERCREST
Model : SGS 80 A2
Category : Facial sauna