Eco - Vacuum Cleaner ROTEL - Free user manual and instructions
Find the device manual for free Eco ROTEL in PDF.
| Product type | Canister vacuum cleaner |
| Brand | Rotel |
| Model | Eco |
| Intended use | Household, for vacuuming dry dirt and dust from floors, carpets and fabrics |
| Power supply | Mains 220-240 V, 50/60 Hz |
| Suction power adjustment | 5 levels (from fabrics to very dirty floors) via + and - buttons |
| Floor brush | Carpet / hard floor switch |
| Included accessories | Furniture brush, crevice tool |
| Dust bag capacity | Standard (size compatible with Rotel) |
| Motor filter | Dry washable, replace every 6 months or with each new pack of bags |
| Air outlet filter (HEPA) | Not washable, replace every 6 months to 1 year |
| Overheat protection | Automatic shut-off, cool down 45 minutes |
| Power cord length | Approximately 6 m (yellow mark at 5 m, red at 6 m) |
| Cord rewinder | Yes, with rewind button |
| Telescopic tube | Adjustable length |
| Weight | Approximately 4.5 kg (estimated) |
| Dimensions (L x W x H) | Approximately 40 x 28 x 30 cm (estimated) |
| Maintenance | Clean exterior surfaces with a soft, damp cloth |
| Storage | Vertical or horizontal position, cool and dry place |
| Warranty | Free repair for material or manufacturing defects |
Frequently Asked Questions - Eco ROTEL
Important: Turn off the vacuum cleaner before replacing the bag.
- The dust bag (full or clogged)
- The nozzle, tube or hose (blocked)
- The power setting adapted to the surface
- The carpet/hard floor switch
- The filters (dirty)
Clean or replace the affected parts.
- F: fabrics, curtains (low)
- G: cushions, upholstered furniture
- H: delicate carpets, rugs
- I: slightly dirty hard floors
- J: very dirty floors (maximum)
User questions about Eco ROTEL
0 question about this device. Answer the ones you know or ask your own.
Ask a new question about this device
Download the instructions for your Vacuum Cleaner in PDF format for free! Find your manual Eco - ROTEL and take your electronic device back in hand. On this page are published all the documents necessary for the use of your device. Eco by ROTEL.
USER MANUAL Eco ROTEL
- Safety instructions 42
Before first use 44
Unpacking. 44
Assembly 44
Using the vacuum cleaner 45
Vacuum cleaning 45
Setting the suction power 46
Accessories 46
After use 47
Transport and storage 47
Maintenance 48
Changing the dust bag 48
Filters 49
Changing the motor protection filter 49
Changing the exhaust filter (HEPA) 50
Cleaning the housing 50
Troubleshooting 50
Disposal 51
D/F/I/E 52
Garantie/Garantie/Garanzia/Warranty 52
Deutsch
SICHERHEITSHINWEISE
- SAFETY INSTRUCTIONS
Please read all instructions before using the device.
- This appliance may be used by persons with limited physical, sensory or mental abilities or lack of experience and/or knowledge, if they are supervised by persons responsible for their security or if they have been instructed about the safe use of the appliance and therefore fully understand the hazards involved.
The appliance must not be used by children. The appliance and its power cord must be kept away from children.
- Before plugging into a socket, it shall be ensured that the mains voltage matches the voltage specified on the rating plate of the appliance.
The appliance shall always be disconnected from the mains when not in use or when left unattended, and before assembling, disassembling or cleaning.
- The appliance shall not be operated with a damaged cord, hose or plug, or after the appliance malfunctions, if it has been left outdoors, dropped into water, or has been damaged in any manner. It shall be
returned to the nearest authorized service facility for examination, repair or adjustment.
-
The power cord shall not be run over with the brush, pulled to unplug or pulled around sharp edges or corners. Contact to hot surfaces shall be avoided at all times.
-
The appliance or its plug must not be handled with wet hands.
-
The appliance shall be switched off after use, before removing the plug from the wall outlet.
-
This appliance is only intended for domestic use, to remove dry dirt and dust from household carpets, floorings and fabrics.
The appliance shall never be used outdoors, on any wet surface or to vacuum up water, flammable or combustible liquids, such as gasoline or damp dirt, or to vacuum anything that is burning or smoking, such as cigarettes, matches, or hot ashes.
The vacuum cleaner shall never be operated without its filters and dust bag.
The openings of the appliance must be kept free of dust, lint, hair and anything that may reduce the air flow.
BEFORE FIRST USE
Unpacking
- Unpack the appliance and all its accessories and check for damage.
- Remove any labels, stickers and packaging from the vacuum cleaner.
ATTENTION:
This product has been packaged to protect it against transportation damage. Keep the original manual, packaging carton and materials in a safe place. It will be useful if the product needs to be transported in the future or handed to others.
In the event it is to be disposed of, please recycle all packaging materials where possible.
NOTE:
Do not use the appliance if any part is damaged, but immediately contact your after-sales service.
Assembly
- Ensure the vacuum cleaner is switched off and disconnected from the mains supply before assembling.
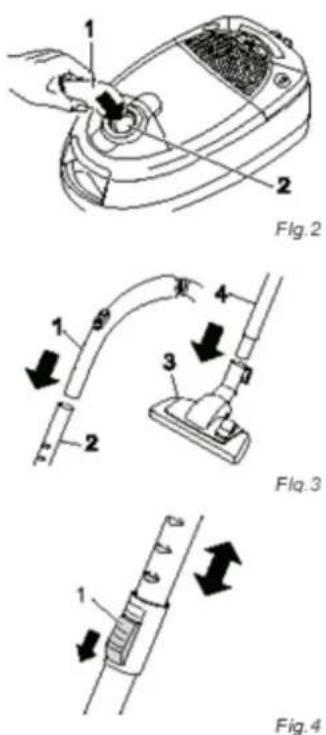
Insert the end of the suction hose (Fig. 2/1) into the intake opening of the vacuum cleaner (Fig. 2/2), until it clicks into position.
Insert the hose handle (Fig. 3/1) into the upper end of the telescopic tube (Fig. 3/2). - Attach the floor nozzle (Fig. 3/3) to the bottom end of the telescopic tube (Fig. 3/4).
o Adjust the telescopic tube by holding the lock (Fig. 4/1). Pull the handle of the telescopic tube (Fig. 3/1) to extend it to the desired length. Release the lock while pulling until it clicks into place.
- USING THE VACUUM CLEANER
Vacuum cleaning
- Open the dust compartment cover and check that the dust bag is in place.
O Attach the desired nozzle to the telescopic tube and make sure it clicks into position.
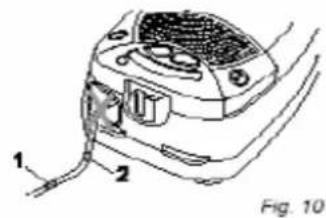
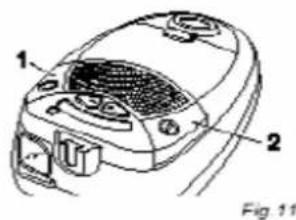
Pull out the power cord by grasping its plug, until the yellow marking is visible (Fig. 10/1) and plug into an earthed socket.
Switch on the vacuum cleaner (Fig. 11/1).
WARNING:
If the red marking shows (Fig. 10/2), retract the cord by pressing the retract button (Fig. 11/2) up to the yellow mark again. The cord must not be pulled further than its maximum length, otherwise there is a danger of overheating and damage.
-
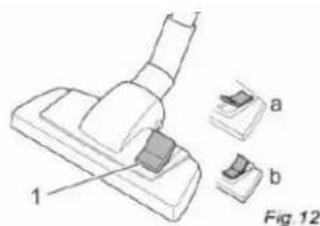
Set the floor nozzle switch (Fig. 12/1) to "carpet" or "hard floor" to suit the surface to be cleaned.
-
Hard floor (Fig. 12/a): laminate, tiles, PVC, etc.
- Carpet (Fig. 12/b): short- and deep-pile carpets, rugs, runners, etc.
ATTENTION:
Only use the vacuum cleaner with all filters, for dry substances.
- Never vacuum sharp-edged objects.
o Make sure that the openings of the vacuum cleaner are not obstructed.
o Keep hair, fingers, clothing and the like away from the nozzle while the vacuum cleaner is connected to the mains.
WARNING:
Danger of injury! Especially when vacuum-cleaning stairs, make sure that you always stand on a higher level than the appliance.
NOTE:
Your vacuum cleaner is equipped with a safety switch to prevent overheating. It will stop automatically if overheated (e.g. due to clogged suction channels). If this occurs, switch off the vacuum cleaner and disconnect it from the mains. Eliminate the cause of the overheating and switch the vacuum cleaner again after it has cooled off for about 45 minutes.
Setting the suction power
- You can adjust the suction power to suit the type of surface to be cleaned, as the following symbols on the display will show:
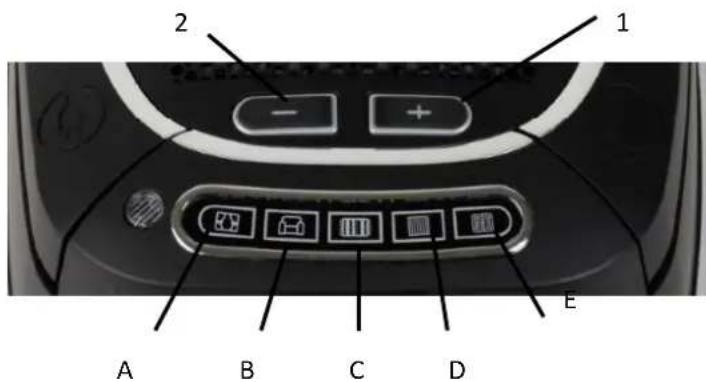
5 Increase suction power
6 Reduce suction power
K. For curtains, textiles (lowest setting)
L. For upholstery, cushions
M. For high-class carpets, rugs and runners
N. For slightly soiled carpets and hard floors
O. For heavily soiled carpets and hard floors with coarse dirt (highest setting)
To adjust the desired power setting, press the + button or the - button several times until the desired setting lights up on the suction power display.
NOTE:
The bypass vent (Fig. 13/1) on the handle allows to quickly reduce the suction power, to release objects accidentally sucked in.
Accessories
The floor nozzle serves solely to vacuum regular flooring, nonsensitive carpets, runners, doormats, and the like. For furniture or material with a delicate texture, you may use the other accessories: the combi-brush and the crevice nozzle. They can be stored in the accessory compartment when not in use (Fig. 5).
- Combi-brush (Fig. 6/1): use this nozzle to remove dust from objects with delicate surfaces (e.g. cupboards and tables) or to vacuum upholstery.
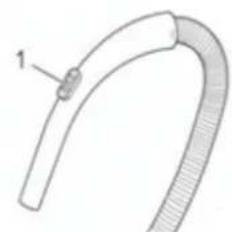
Fig.13
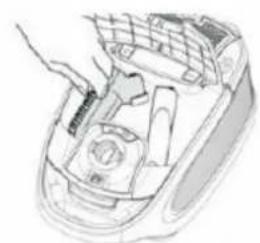
Fig5
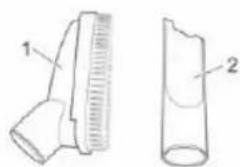
Fig6
○ Crevice nozzle (Fig. 6/2): use when vacuuming narrow spaces such as corners and grooves.
WARNING:
Only attach nozzles (on the hose handle or the telescopic tube) when the vacuum cleaner is not connected to the mains. The appliance could be switched on by accident.
- Switch off the vacuum cleaner and pull the plug from the mains socket.
Pull the attached nozzle from the telescopic tube.
○ Attach the required nozzle to the bottom end of the telescopic tube or if necessary directly to the handle
If possible, store the small nozzles no longer in use on their accessory bracket.
ATTENTION:
Using the vacuum cleaner without a nozzle increases the danger of accidentally sucking in objects.
- AFTER USE
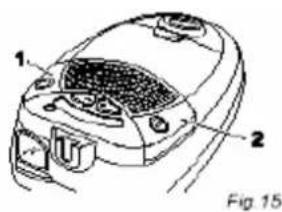
- Switch off the vacuum cleaner (Fig. 15/1) and pull the plug from the mains.
Hold the plug in your hand.
To retract the power cord, push the cord retracting button (Fig. 15/2).
WARNING:
During uncontrolled retraction, the power cord can whip around, become an obstacle or overthrow objects. Therefore, keep the plug in your hand and guide it during the retraction of the power cord.
- TRANSPORT AND STORAGE
- Switch off the vacuum cleaner, remove the plug from the wall outlet and retract the power cord before moving or storing the appliance.
To transport the vacuum cleaner, carry it by the handle.
To store it or when interrupting your work, hook the park/storage hook on the floor nozzle (Fig. 16/1) into the parking bracket (Fig. 16/2).
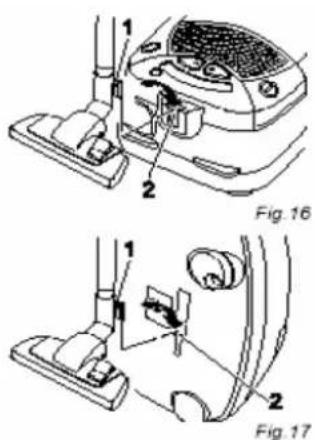
To store the vacuum cleaner in an upright position, hook the park/storage hook on the floor nozzle (Fig. 17/1) into the storage bracket (Fig. 17/2) on the bottom of the appliance.
To store the appliance for a long period, remove the dust bag, dispose of it properly and clean the filters.
Always store the appliance in a cool, dry place.
ATTENTION:
Never store the appliance next to heat sources (e.g. stoves or radiators). Avoid exposing it to direct sunlight. The heat might damage the appliance.
MAINTENANCE
Changing the dust bag
Change the dust bag at the latest when the dust bag change indicator light turns red or if the suction power has decreased significantly.
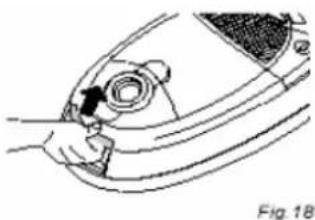
- Open the dust compartment cover (Fig. 18).
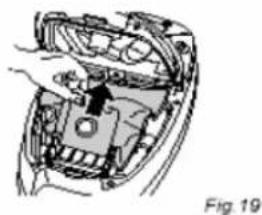
o Pull up the cardboard to release the dust bag out of the dust bag holder (Fig. 19). Pull carefully so that dust cannot escape from the bag. Dispose it.
Clean any dust that may have collected in the dust compartment
Slide a new dust bag in the dust bag holder. - Close the dust compartment cover until it clicks into position.
ATTENTION:
Switch off the appliance before changing the dust bag. In this way, you will prevent dust from soiling and damaging the appliance.
NOTE:
You can dispose of the dust bag with your regular domestic trash if it contains no prohibited waste materials.
The dust compartment cover will only close with a dust bag in place.
Filters
Your vacuum cleaner is equipped with the following filters:
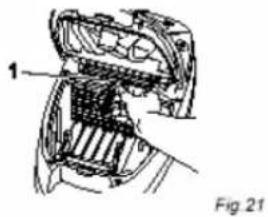
- Motor protection filter (Fig. 20/1) prevents larger particles from damaging the motor in case the dust bag is defective.
Hygienic exhaust filter (HEPA) (Fig. 20/2) removes microscopic particles from the exhaust air stream.
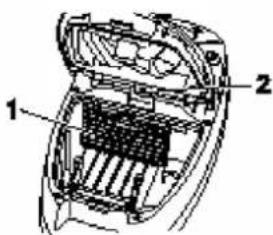
Fig.20
ATTENTION:
These filters are not washable. The exhaust filter is not reusable. Heavily soiled filters reduce the performance of the vacuum cleaner. Therefore, it is important to adhere to the changing intervals. Damaged filters must be removed immediately.
Changing the motor protection filter
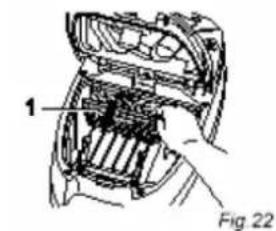
- Switch off the vacuum cleaner and remove the dust bag.
○ Remove the filter holder with motor protection filter (Fig. 22/1): flip the filter holder forwards and then pull the filter up and out.
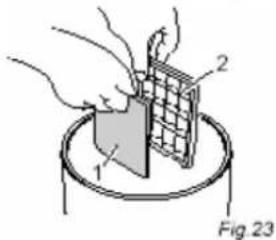
○ Remove the filter fleece (Fig. 23/1) from the filter holder (Fig. 23/2) over a waste bin.
Clean the filter holder.
If necessary, cut the new motor protection filter to size it to the holder.
Replace the filter holder and push it down until it audibly locks into place.
Replace the dust bag and properly close the dust compartment cover.
NOTE:
If the motor protection filter is only slightly dirty, shake or beat out the dust over a waste bin. Replace every time you open a new box of dust bags, as it always contains a new motor protection filter, or at least every six months.
Changing the exhaust filter (HEPA)
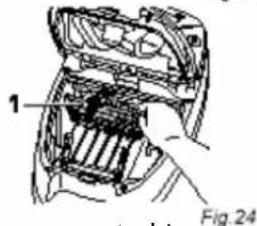
Switch off the vacuum cleaner and remove the dust bag.
Unlatch the lock and slightly lift the filter. Now you can pull out the filter towards the front (Fig. 21/1).
Insert a new exhaust filter and push it down slightly until it locks into the holder.
Replace the dust filter bag and properly close the dust compartment cover.
NOTE:
Make sure that the exhaust filter is always properly locked into position, otherwise the exhaust air will not be filtered.
Change it every six months to one year or a reduction of power may occur. Filter may be cleaned by hand but not with water.
Cleaning the housing
- Wipe the body of the appliance clean with a damp cloth and mild detergent, then wipe dry.
WARNING:
Always switch off the appliance and disconnect it from the mains before cleaning.
ATTENTION:
Do not use solvents or detergents which may damage the surface of the vacuum cleaner.
TROUBLESHOOTING
| Problem | Possible cause | Solution |
| The appliance will not start | The plug is not connected to the mains or the appliance is not switched on | Insert the plug into a mains socket and switch on the appliance |
| The wall socket does not carry current | Test the vacuum cleaner on an-other socket that is surely functional or test the socket with an-other device | |
| The power cord is damaged | Have the cord replaced by a qualified technician | |
| The cleaning re-sult is unsatisfac-tory | The filter bag is full or clogged | Replace the dust bag |
| Nozzle, telescopic tube or suction hose are clogged | Remove any obstructions | |
| The power setting does not fit the flooring | Set the power to the setting sug-gested for the flooring | |
| The «carpet/hard floor» switch is not suitable to the surface to be cleaned | Set the «carpet/hard floor» switch to the adequate position | |
| The used nozzle does not suit the flooring | Change nozzle | |
| The filter is dirty | Change/clean the respective filter | |
| The motor cre-ates unusual noise | Check if the tube, hose or other ac-cessories are blocked | If so, remove the cause accordingly |
WARNING:
Never use a defective appliance. Always switch off the appliance and disconnect it from the mains before starting troubleshooting.
DISPOSAL
For proper disposal, please return device to a retailer, a service agent or Rotel AG.
European Directive 2012/19/EC concerning Waste Electrical and Electronic Equipment (WEEE) states that household appliances should not be disposed of using the normal solid urban waste cycle. Exhausted appliances should be collected separately to optimise the cost of re-using and recycling materials comprising the machine, while preventing potential damage to public health and the environment. The crossed-out wheeled bin symbol appears on all products to remind owners of the obligations regarding separate waste collection. Owners should contact their local authorities or appliance dealers for further information concerning the correct disposal of household appliances.
This appliance conforms to the following EU directives:

2014/35/EU (Low Voltage Directive)
2014/30/EU (Electromagnetic Compatibility Directive)
D/F/I/E
- GARANTIE / GARANTIE / GARANZIA / WARRANTY
2 JAHRE GARANTIE
2 ANS DE GARANTIE
2 ANNI DI GARANZIA
2 YEARS WARRANTY
We commit ourselves to repair this device free of charge, should a failure occur within the period of warranty despite proper handling. We repair all defects caused by material or manufacturing faults. The guarantee will be fulfilled either by repairing the device or replacing the defective parts, according to our judgement. A warranty does not cover damages due to wearing parts, damages and defects caused by improper handling or maintenance (such as limescale and commercial use). It will only be granted if either the warranty card stating date of purchase, dealer's stamp and signature, or the purchase receipt is sent with the device to the relevant after-sales service (see address below). Devices shall be returned in their original packaging. Transport costs are to be borne by the purchaser. Remember to specify your address to your sending, as well as a short declaration about the failure, shall the defect not be obvious.
Servicestation:
Service après-vente: Rotel AG