
MCD 770 - Car stereo CALIBER - Free user manual and instructions
Find the device manual for free MCD 770 CALIBER in PDF.
Frequently Asked Questions - MCD 770 CALIBER
User questions about MCD 770 CALIBER
0 question about this device. Answer the ones you know or ask your own.
Ask a new question about this device
Download the instructions for your Car stereo in PDF format for free! Find your manual MCD 770 - CALIBER and take your electronic device back in hand. On this page are published all the documents necessary for the use of your device. MCD 770 by CALIBER.
USER MANUAL MCD 770 CALIBER
Poultine gocale, 102
Power:OuGc4x72W
DYDCDPLAYER
System Compartment der Autonne System
Dnndr Cnpnr d. DND rne
N
No of qunlized on 100%
Number of courses 2 steps
SIN Rano 50dB
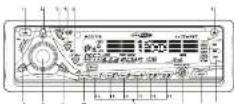
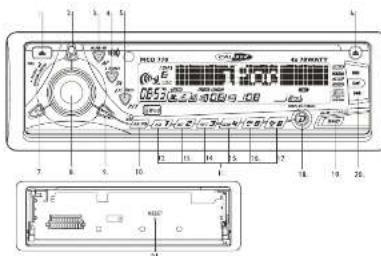
PANEL RELEASE BUTTON
3.45%2870
4.TA BLJTON
5.PTYX BASSBUTTIN
L. B. E. J. C. T
7.P5W:801186
AENINELNTNNTNNNTN
- MODE BUTTON
ACOTAPACALLYSTOREPRESETSCANASPSPPID
1.新活TAKINNATION
- PAUSE BUTTON
1.STOP MTTION
4.APPABFTON 5.000000
10.1200000000000000000000000000000000000000000000000000
2.ASBETBUTTIN
ACTION
Lung 87.5-108 Mhc
Bnur 158 at Sin 30 B
0206 254
m = 311 ;
Lange 529-1630 Khr
Frequency 450K
y
one subject to change without notice.

DISC PLAY
PRECAUTIONS
- Ue 100000000000000000000000000000000000000000000
-
L
OONETATPnAovatheurTzermrtnrcohphn
1
-
1
100864916250005000735
+Keep the volume at a desired rate you can hear out ofe earing sounds [hors]
a. m , c ;
CNDNOTES
CDNOTES
1
DONTOOTHEUNDEDSE
- D. CNDI: 10000000000000000000000000000000000000000000000
ONNTNNTNNNTNNNTNNNTNNNTNNNTNNNTNNNTNNNTNNNTNNNTNNNTNNNTNNNTNNNTNNNTNNNTNNNTNNNTNNNTNNNTNNNTNNNTNNNTNNNTNNNTNNNTNNNTNNNTNNNTNNNTNNNTNNNTNNNTNNNTNNNTNNNTNNNTNNNTNNNTNNNTNNNTNNNTNNNTNNNTNNNTNNNTNNNTNNNTNNNTNNNT
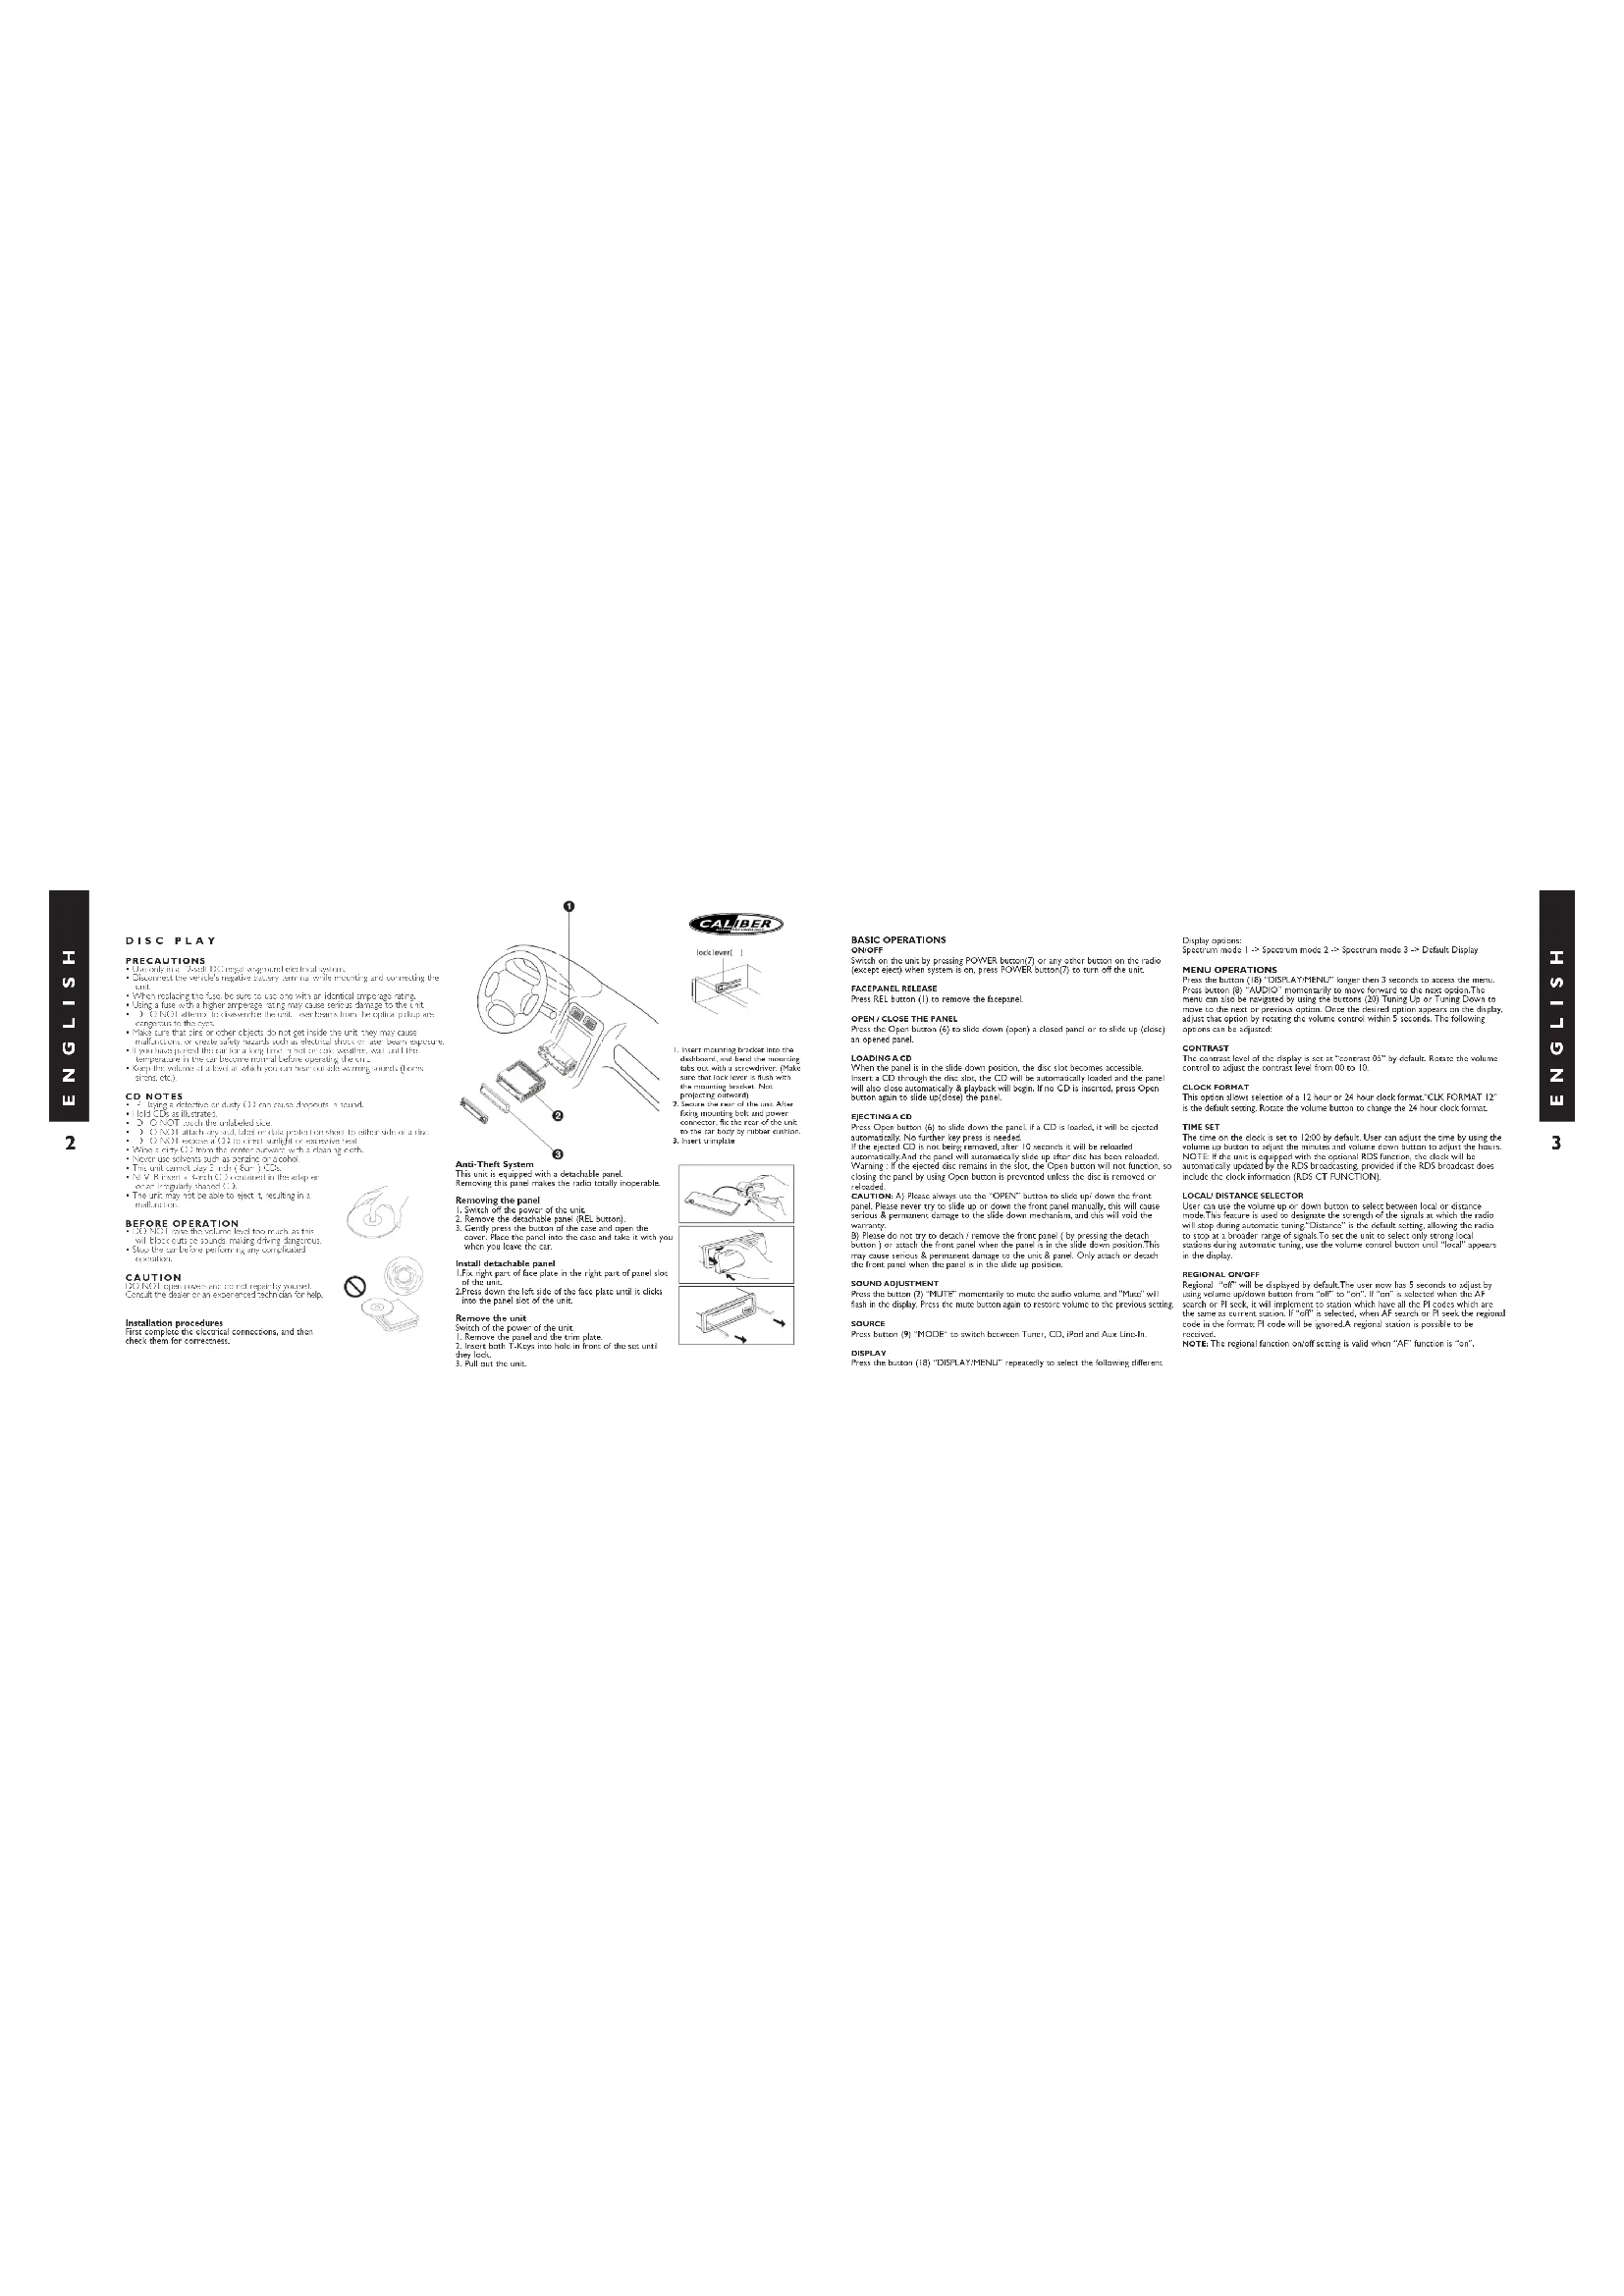
Installation procedures
First complete the electrical connection, and then
1


- Insert mounting header into the disk and hold the mounting head in the center of the disk, so that you know how to mount the mounting header.
- Secure the end of the unit after fixing mounting hook and power connector; fix one of the unit to the mounting hook.
- Mounts compatible
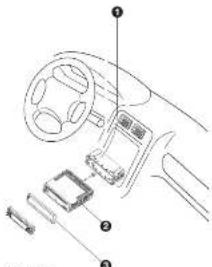
Anti-Thal System
This un is equipcd wth a dechicle panel
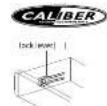
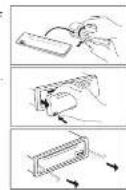
Removing the panel
- Switch off the power of the unit
2 Remove the dochable part (REC buccng)
1.0000000000000000000000000000000000000000000
=hcycx
nssnnne nne
H
- Prove down the left side of the five-pate unit and it does
into the panel slice
Bovcwo the unit
m
1.
- Inuit band T-Keepin hok in front of the set and
1.以CPR为单位
1.2.1.1.1
BASIC OPERATIONS
1
Swch on the uwr by prccing power bumn(7) or any other buns on the raod
(1)
FASSEANELAN
Praa REL 10n (1) to rereoe the houanr
From the Open button (S) to slide down (open) a closed panel or to slide up (close).
an opened pante
CAPITALE
O
Inert a CD through the disc slot, the CD will be automatically loaded and the penal
will the clone automatically & plabck will begin. If no CD is inserted, press Open button again to sld up/down the part.
2017年1月1日
eectinncs
PSSOPD 10000000000000000000000000000000000000000000000000000000000000
If the ejected CD is not being removed, after 10 seconds it will be replaced
murnnly and the pann will sucnnnly dtt up sner disc his hne rnoed
Wringing : If the waeled one remains in the cut, the Other human will not hunt for
089
CAVTONALPOMNNTTINNNNNNNNNNNNNNNNNNNNNNNNNNNNNNNNNNNNNNNNNNNNNNNNNNNNNNNNNNNNNNNNNNNNNNNNNNNNNNNNNNNNNNNNNNNNNNNNNNNNNNNNN
pase. Thus never try to skid up down or from the pen manfully, this will cause serious & permanent damage in the wide down madriment, and this will take the
P102
bution ) or attach the front panel when the panel is in the slide down position This
may cause serious & permanent damage to the unit & panel. Only attach or detach
the front panel when the
SOUND ADJUSTMENT
F
H
12x - 1 > 0
SOURCE
From 10:30AM TO 12:00PM TO switch between Tumor, CD, IPD and Aux Linz-In
DISPLAY
Press the button 181 "DISPLAY/MENU" repeatedly to select the following different
Rady a
Spcnrm mod1 Specnrm mode 2 Specnrm mode 3 Defk Disiy
HENDOPERATIONS
Prrnre 181"ENSLAYHENU" longer than 3 seconds in access the manu
Praa 3
100
425.06583227621000000000000000000000000000000000000
options can be adjusted.
m = 311 ;
CONTRAST
The contnve level of the drop is set at "contne CS" by default. Note the volume contnvo to adjust the contnve level from 0 to 10
CLOCK FORMAT
10
in the daisl writing. Notse the volarum to change the 24 hour clock himmtt
TIMESET
The time on the clock is set to 1.30 s by default. User can adjust the time by using the time switch. The time switch is used to set the time when the clock is turned off. NOTE: Time unit is equipped with the normal EEG parameters, the clock will be
ummmnally updded by the RDS hroodring prooiof thc RDS hroodr ddo
include the dock information (ROS CT FUNCTION)
Our can use the volume up or down button to see between local or distantmeans . The button is easy to draw and is smooth of the scale as well as the ratio
w
52028A1BPRODORAGEOF312126EUEFUTSDGTOVNG
sonts during automotive tuning, use the volume control button on "local" appears
in the display.
aee aee
the same as current notation. If "of" is used, when AP search or PI seek the region
code in the form P code will be ignored A regional station is possible to be
RENEED.
NOTE The regional function on/off setting is valid when "AP" function is "on".
INTER AMPIFIER ON/OFF (INTER AMF)
This is an express version of the form that uses the built-in fault system as a way to detect faults. The fault detection function in the fault compiler is connected to you, you don't have any source code for the built-in compiler system.
PROGORMHABLE TURNOVOLUME (VOL PGM)
This paper shows selection of the entire low, the radio and magnetically resonant modes of the system. The results are presented in terms of the volume scale as a function of the volume scale as a function of the VOLPGPTM program specific to volume measurements. The results are presented in terms of the volume scale as a function of the
BEEPTONE
The best feature one can select is the acceleration (be known when a button is pressed). The acceleration will be used. Using the value optimum button to select "up, down, off" actions.
AUDIO OPERATIONS
Press the button (B) "AUCOR" to create the sound set up. Press button (B) "AUCOR" horizontally to move forward to the exact option. The menu can also be navigated by clicking on the sound set up in the sound set up menu. The sound set up is then saved once. Once the desired option appears on the display, adjust that option by rotating the volume panel within 5 seconds. The following options can be adjusted:
To increase the volume return the volume limit (B) exceeds to decrease the volume return to maximum value.
Release the volume track (B) to adjust the native volume level from "0" to "1". NOTE: The adsorbed track level will only appear in the Ado Menu if the volume level is set to 1.
Pus button (SUB) to activate this sub->x->function. Press OK to turn off SUB-LIP (SUBWORFER LOW PASS FILTER)
Reute the volume knoB 18 to selct the desired Low Pass Filter function: Fie. 804-120Hz or 150Hz
NOTE The subwoofer level control will only appear in the Audio Menu if the "Subwoofer" function is activated and a subwoofer speaker is connected.
IX-BASS (IX-BASS LEVEL)
Rotate this variable block [8] to select the derived Seaboss Function law: low, mid or high. NOTE: The X-Seas function will only appear in the Audio Manif. if the "X-Seas" is selected.
fion 154-203. Press button (F) "A-B-S" to simulate the A-Bass function. Press again to turn off.
BASS (BASS LEVEL)
Rotate this volume show (B) to select the disted Bias Level from -6 -6 +4.5 BASS CFD (BASS CENTER FREQUENCY)
CALIBER
Reture the volume in (8)
To select the feedlot sites, the feedlot sites were located at 800 h, 1000 h or 2000h
BASSQIBASSQFACT
to select the selected Basq-Q factor to 2h, IV, IVV or IVV.
MIDDLE (MIDDLE LEVEL)
Recycle the volume inch (8) to select the region.
Middle Level from " - 6 " to
"
A
Return the volume knob
to select the desired Paddy King Cancer Center
101h,1.5Kbit/s或2.5Kbit/s
MIDDLEQ(MIDDLEQ
(8) to select the desired Middle-Factor on 2N, IN, W or ZW.
P
TRE-CFO (TREBLE CNTER FREQUENCY)
Reata the volume nodule 18 to selct the desired Treck center Frecency to 100Hz, 12.4% and 10.5%
BALANCE
Bnne the volume inch (in) to adjust the Balance between the right and left spake
FADER
Rotates the volume block (8) to adjust the Fader between the front and rear spacers from E12 (full mm) on E12 (full mm).
RADI OPE RATIONS HANDINSTRUCTIONS
A
reception bond will change in the following order: FM1, FM2, FM3 and MW.
STATION SELECTION
Fieup of 2018 Annual Report (X2) (Hans H. Schmitt, Dr. Hans Schmitt) (X2) (see also "MANUAL", expressed on the display, the manual tuning).
Maae is selcted if the hnnes are not coched for more than 3 seconds in autenmertne area hock in "AITTO SEER"
AUTOSTORE AS
Automate Memory Training
For this 680 square centred and side is then into the amount of the currently collected bins. Note: Any stars that were previously stored in this memory bank are replaced with a new one.
PRESSECTPS
savings at each great station. Payment (10) "AS-PS" again to keep remaining when the electric station is turned off.
eannnne nnnnne annnnnne aannnnnne
The storal in the memory. Pres a prest button for 2 sntents, previous prest statin is also written by current tuned accuracy.
RDS (RADIO DATA SYSTEM) OPERATIONS
The ADS does are the PI, PS, TP, PTY, TA and AF does.
Ft Program indemnance code
C
Branicssnnnnae
Identification data showing traffic information is being transmitted
Fesyolg of boudng zaoon ngdng the aeg pae
Preschurtn (3) AF for less than three semind on other AF to be ON or OFF
Wherever AF is wided on, symbol "AF" appears at the display.
The 10th Annual International Symposium on Neuroprosthetic Devices
recovered within the sound output level will be adjusted to the great output level automatically when the return generator has its minimum.
UKING KEY TO SEEG PROGRAM
The FTY function allows you to search for statistics with a particular program type.
8 makes your program type , plus the billion ( 5 ) + 1 . 5 has then beendefined. Dysplay will show " pop music " or " news . Now you can see the music on
speach type using power keys 1 no 6 for your selection or listed title
Prescr number PTP "pop" group PTY in "news" group
1p0m,ckn n 2.
3 classes, other m culture, science, variety
42 country weache; finance, children
3n m, clss sod, rchon. phcn in
WHILE SELECTION PTY ENGAGEMENT IS SELECTION IS IMPLEMENTED BY PRESE COUNTER AS
described in terms of PTY it is derived the side chains in search corresponding PTY information is described. corresponding PTY information is a found name
radio recognition is normal. After the test "NON PTY" is the display for 5 seconds.
TEFNS
Briefly explain the hattan (4) "A" to translate the TA made an at all. When TA mode is on, you will hear the traffic announcement when broadcast. During traffic
announcement you can interrupt it by short press of TA button (4). Without switching on the 16 mode, please use the set will require to the previous operation.
mame Long prees on TA rurnenj shows ONCFF selonn en FONTA
LOCALFRONTA DX
LONDA, LLC will only allow nonresident from storage to come through. This is because the administrator will be aware of secret measurements in interrupt CD only or code learning.
DUAL ZONE OPERATION
This unit is equipped with the advance feature "Dual zone" This function is useful if
the user will select different modes of the sound source and use the "Freet and Rear speakers. The details operation as follow:
ON' OFF OPERATION
"OR is the cemnt setting.
- Shrink paste the "z-score" button on the control panel or zooms control in switch between Dual panel on off. The "z-score" icon will appear on the LCD after Dual
Zare a selected
TOSELECTFRONT!NEAR SOURCES
Once on's selected, shant press the "AUDIO" button repeatedly to change
BETWEEN THE F-ZENE [FRET] AND THE K-ZENE [KIN] SEES. A NUTRITION OF 5% is required, but it is recommended to
Tianjin D&G Pro 40X-A is available for selection for various upstream and downstream processes. The user has 16 options in range through different modes by using the volume history.
Tumor T-DNA (T-DNA) is widely used for studies on our various studies and mutations in tumor DNA are made visible in 3 seconds, the bulk will resume to the previous model.
TO OPERATE FUNCTION OF FRONT REAR SOURCES
The front panel and remote control, is detailed to control the front source's function operation.
- When "dual zone" is turned on, the "model" button is used to change between the front source and rear source. Press mode button repeatedly to change between the front source and rear source.
The LCD will display the raw source mode for 10 seconds. User has 10 records to make the progress on this raw source's operation, and users can continue.
- The CCD display will automatically switch back from the source showing after 10 seconds
- And the front panel and remote now is scanned in opposite for front sector's
- and the back panel and remote now is scanned in opposite for
m - 1 0 ;
The default setting when DUAL ZONE is ON.
- The default source is the front root of "fender" and for rear root is "DVD".
- The default source is the back root of "fender" and for rear root is "Cuor". (See the volume table on the "COLD GND" load set in the main panel.)
The LCD display is defiulted to display the front mode.
PROVISIONAL THREE FUNCTION ARP BASE VIAL MOLAR MOLECULAR SUBFECTOR 10-KBAS/3D GEN.
THE DEFAULT SETTING WHEN DUAL ZONE IS "OFF"
- The default size of portal revues to what the user selected for the front zone.
- The default size of portal revues to what the user selected for the rear zone.
- The default size of portal revues to select DVO for front zone and rear zone. Once dual zone is turned off, the default value is 0.
CD OPERATIONS
The CD pays is surble for 10m cie do mnn no regu shap CD.
SELECT TRACKS
During CD operations, press button (2) for next track. Press button [20]
1
During CD operation, hold button (20) for fast forward. Hand button (30) for fast reverse. GS will start from when you release the button.
PAUSE
REPEAT THE SAME TRACK
Press button (14) "RPT" to continue to repeat the same track. Press it again to stop repeat.
SCANTRACKS
Press button (D) "INT" to play first several seconds of each track of current CD. Press again to stop in order to listen to tracks.
PLAXTEX500PLANTON
Prrn rnnr (15) "ID" in paly at trac on CD in ronm order. Prrn sgnir ncrn
the function.
EJECT
Praa button (6) * in emp pbying and aet the CD.
Depending on the type of CD-RWB CD, surface condition of the CD, as well as water, certain CD-RWB CD may not appear properly on this unit.
MPJ FUNCTION
How to select MP3 files
Power Horsel (1949) tells how "Monitor" to determine the value h will not select the desired order number, plus the volume v in (ii) to confirm and thus the saludment of the order.
- REACHING THE DETERBILIES
- The "EYES" of the disk shows "Navy" (20). Rotate the volume such (8) to navigate through 35 Evers and sub-folders on the disk. The folder names will be displayed. Press the volume knob (8) longer than 3 seconds to play the first track in the disk. The volume name will then appear on the top of the disk, and the volume name will then pass back to the tracks. Rotate the volume knob (8) to reappear, then press the volume knob to confirm the sub-foldier or the track bags are not play. Press "clear from" (12) AGPS or rotate the volume to accommodate during navigation instead to move labels to the last upper level of a folder.
- NAVAGING THROUGH DIRECTORY BY USING PREVIOUSNEXT FOLDER (MSIN) BUTTONS
Press next folder [74] or previous folder [75] buttons stop in the current directory. On a multi-level directory CD, the commands will take place at the current level until last folder is reached. At this point press previous folder [75] again it will move to the next level or direction
ID1INFORMATIONDISPLAY
if any PID is active with IDT TAG, the following IDT-Info-mission Album file will be assigned and will be displayed and automatically sending through the depth which we live a play.
Frechmann (10) "AS" repeated in view the ID3 tag information manually.
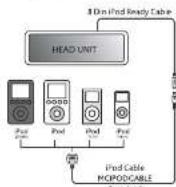
IPOD OPERATIONS This unit is mapped with IPD Ready function. The user has direct control of the IPod
where P = max - Pmin
CONNECTTHEPOD
IPO COMPATIBILITY CHART
This unit supports the following iPod software versions: iPod AG No.100
□适用√不适用
ipd 15 fumns rirn 32
ipol Min Alreina
ipod@GAllversion
iPod Photo All versions
Pnd Nano All version: Pnd 0.1.1.12
Pd930
ABOUTVIDEOFILE
This unit can support video displays output controls, however it is NOT ALE to make any VIDEE FIEC OR VIDEO ALUM in the fixed video. This unit will only be used for a single session.
A partially hidden state machine in its register is characterized by a node P that plays a value Fl or sham. If P uses the input and selects a value Fl on the parent node, it will be considered to be a node of P .
panel control Pod feature.After the LCD display "Pod value", the Pod now is
constrains and you can select the desired mesh on your profile . Onevideo will automatically delay on the unit through the video output .
TURNING IPOO POWER ON AND OFF
The Pod power turns automatically when it is connected to the 30 Pin connector (see Figure 1). The Pod power turns off when it is connected by removing the Pod from the 30 Pass converter or the vehicle's ignition a turned OFF. The Pod will go through the passive mode and goes into many mode about 3 minutes later. While this time, the Pod's connected, the power cannot be turned ON or OFF from an iPod for at least 3 minutes.
POOD BATTERY CHARGING
The IPD will a remarkably start recharging as long as the vehicle's ignition key is turned to ACC or ON.
SWITCH TO IPOD MODE
When the Headspace is ON and the Rod is connected to the 30 pin connector, press flexor (9) "MODER" to change in Rod mode and the unit will display "Fired" for a while. The system will then be able to switch back to the previous mode. The flexor and the physis are automatically start. Press flexor (9) "MODER" to change in other modes or switch back to Rod mode.
Pica Iokon (10) "ASP" seriously write this Pod song is playing the art will display Song > Art > Album name > Bleep time
SEARCHING A DESIRE SONG
Press button (9V "RAND" to go into the ipd searching mode. Pressing button (13) "RAND" randomly to select the following random methods: I. Rayden > 2. A priori
Press within 10 seconds further (B) to confirm and scour the surviving man then rotate back (E) volume block to navigate through the Album Avion or Event last on the ifod. Press further (B) to confirm and pray the salvated man. Press turn (T) "ASPS" to select working mode, as quick move back or the last upper edge of Album, Figure 2.
SONG SELECT
During Pod operation, press button [20] for next trade. Press button [20].
or previous track Tracknumber shows on display.
Dunipad pssn hld hys 30
or fuc rnr. Pod sory wll snt sy frn when you relns the boun
SONO REPEATREPEATALL
Prrnre 141
SHJFEPLAYSHUFFLEALBUM
Prrnne nnnnne ene ne eae
Praa burt (15) *RDM for more than 3 seconds to play all songs of the current album
in ranod orcr. tyas agan in ranol the hundran

Prete the ECT human () to ept the door koring the dic
FLAXFAL5
Play: Press the FLAY button (2) to resume the disc when the int is under the stop
F
STOP
Press button to stop the current depaying
When the NEXT humor(6) is preoced, the uncl will automatically jump to the next
BACK
What the PACX bann-6 is preoad, the an wI antnrnally pmp to the previou
m = 311 ;
REPEAT
Prrreee eee
Press the REPEAT button to switch between different repeat modes.
- From the LIP DOWN LEFT/RIGHT(9-13) button to move the light in the MENI. 3. From the OKUIN button to perform the attached item in the menu.
F00F120000000000000000000000000000000000000000
contnns that uer want to view.This type of menu can also be called PBC (Payback
m - 1 0 ;
wn this type of csc is bong y
中
3.0000000000000000000000000000000000000000000000
- Use the "NUMBERIC" button to enter the number of the segment or track that you
data parameters:
If you don't want to dial by this PBC MENU.
Simply set PAC option ON if the "Others" setting of the Setup Menu, and the PAC program will be active. The user will receive the data from the hardware version.
-PPc hax bannrnrn rnrnnn
mly see Hc opson ON in the "Others" seng of the Ssep Pn to restore the
Prrnne nnnnne nee eae ene nee
If no operation is performed within 10 seconds after the PBC MENU is displayed, this
Q5P
- Press and button(2) to bring up the Console Menu, please refer to the following
Table for detailed Operations
Prrn ANCLB hnun(3) cne to hing up the angle infinmion which will be crwn
Ex. nany you paws ANGLE, you can watch to another camera angle variable in the
SYSTEMSETUP
SETUP
Press switch key on the remote control or long press "Aops" button on the remote control to bring the system menu into the unit and enter the step cluster.
- When the cancer is found on the top of the pre-screen display, press IFFALGIT arrow keys in switch between different pages.
You can also the DOWN arrow key to move to the setup page and go
OKUPDOWN at low keys to select the settings that you want to change. - Open the selection list by pressing the right arrow key on the selector
the salution by using the UPDCNN arrow keys and asterisk key.
SETTING THE AUDIO LANGUAGE
Menu LANGUAGE is used to select the setup menu and CSS on-screen display beverage and during the live workshop and seminars operations. The background of the menu is also used to set the menu setting.
Doc audio: When a DVD disc plays,usic begins this unit is automatically select the default audio language of the unit. Please notice that if the language recorded in the disc is not available in the language list in the class menu, the language originally assigned to the unit will be replaced by the one equipped with a specific physical language. This specific language will be used.
The functions of disc subtable and disc menu are similar to that of disc audio. They are used to set a default playback language value for the DVD subtable and menu, display the
DISPLAY SETUP
You will see the picture as shown in the above after you enter the DISPLAY菜单 menu.
IV ASPECT
Depending on the type of television you have, this image adjustment offers 2 options for you using 6.3 and 16.9 This item is used to display image data in the wide area film on the normal TV set. The option 16.9 is used when the DVD player is connected to wide screen TV in full mode, and the screen will display pictures in full size.
The display mode can only be modified when the TV display mode is on in 43.
P
LETTERBOX
This image opn will display the pereamic frame and might appear with black bars at the top and bottom of the map.
PANSCAN
This image open will display pictures with the left and right edges of the picture
being cut off at 5.5 times the whole section. It is selected for our purposes to set a boundary. This mode is used when the pixels are displayed in parametric view and compared with
1. 实验原理
P
T
AUDIO SETUP
The below scrien=if the display once entered into the audio setup, mark page
SAMPLEFREQ
- The simple fact, term editors 2 options, if the compacted octrel or amplifier is incapable of processing digital circuit with sampling frequency of 50kHz , it will select a suitable amplifier for the purpose of the present work.
egv in to the 48Kisig, and then your system will be able no wannr the
decoding on the signals
If the receiver is capable of 96Kbit/s, digital signals with a sampling frequency of 96kHz are transmitted to the receiver as follows:
frequency is substan, the ant will be able to process all signals without any further
The durnal purns are pccnncs on the rern 5 (durnal) uunrnn
ON: digital audio output switch on that you can connect to external digital sound
RECEIPT.
OPF:epa aae aoe 1
THE DYNAMIC RANGE COPRESSION (DRC)
- CNF select this option to turn on the Dynamic Range Compression so that dialogue turns clear, but you allow zooms in.
OFF select the option to turn off the Dynamic Range Compression and have the
SSEET
The bocks up set page is used to set the parental control. The rating item is used to set the rating level.
DVD.VR CONSOLE
| ITEM | FUNCTION | SELECT METHOD |
| Convex Hull | To determine the area under a curve (AUC) curve, and to determine the local slope of a curve. | Note: LefLifted or other slight changes in local slopes. |
| Convex Chartist | Display the curves of different numbers and to determine the area under a curve (AUC) curve, and to calculate the standard error curve. | Note: LefLifted or other slight changes in standard errors. |
| Convex Igraph | Display the curves of different numbers and to determine the local slope of a curve. | Note: slight change in local slope. |
| Convex quadratic and digital curves | Display the curves of different numbers and to determine the local slope of a curve. Also, show the local error curve. | Note: LefLifted or no change in local error curve. |
| Convex Angles | Display the curves of different numbers and to determine the local angle. | Note: LefLifted or no change in local angle. |
DVD AUDIO CONSOLE
| ITEM | FUNCTION | SELECT METHOD |
| Console Group | Display the current Group Number and the current date of group number on the screen. Print the current group number. | From LastLogin to next entry, print name and last name. |
| Console Texts | Display the current number and the date of group name on the screen. Print the current group name. | Next LastLogin or other dates, print name and date of group name. |
| Console Texts | Display the current date and time on the screen. Print the current date and time. | Next last login Enter to next date. |
| Console Inputs and output in computer | Display the current date and time on the screen. Print the current date and time. Print the current group name. | Next LastLogin to next date, DVD Access to date. |
| Console Outputs | Display the current date and time on the screen. Print the current date and time. Print the current group name. | Next LastLogin to next date, DVD Access to date. |
| Console Angles | Display the current angle on the screen. Print the current angle. Print the angle also switch to angle rotation. | Next LastLogin to next angle rotation. |
| Console Maps | Display the current map on the screen. Print the current map on the screen. Print the current map on the screen. | Next LastLogin to next map rotation. |
VCD CONSOLE
| ITEM | FUNCTION | SELECT METHOD |
| Cotusella PBC | Make the plant a more attractive place for the PBC. COTUATE can be made to attract the plant, and it is easier to grow the plant. | Very light/distant or almost light; must depend on climate. |
| Cotusella Chard | Make the plant a more attractive place for the Chard. The plant is more attractive to the Chard, and it is easier to grow the plant. | Very light/distant or almost light; must depend on climate. |
| Cotusella 4A | Make the plant a more attractive place for the garden. It is difficult to grow the plant, but it is a good place to grow the plant. | Very light/distant or almost light; must depend on climate. |
| Cotusella 4D | Make the plant a more attractive place for the garden. It is difficult to grow the plant, but it is a good place to grow the plant. | Very light/distant or almost light; must depend on climate. |
200H
The ZOOM Feature [27] allows you to magnify a certain area of the images recorded on the FWD.
1.PrrssZoOIM button to mairige cie image by 4x
2. Press ZOOM button again to emerge the image by 16.
3. Press Up! Down Right to select the area you want in magnif
4. The third prime 2CQM will end the room time on and now is normal
TITLE
When playing a dice die or sum CD, press T11E28 to switch among the 3
pages of music, photo and movie. Press TITLE huncon[20] to open the title
containing on the DVD disc while the DVD is playing.
SUBTITLE
- Press SUBTITLE button291 once to bring up the subcode information which will be shown on the top right corner of the app.
Each one you port SUBTITLE, you can switch to another substance available on the disc.
DVD AUDIO
Pricemedia DVD AudioHitory300 comes to bring up the audio information which will be used in the next section. This version of this current version will see the language selected and the digital audio output information.
Each time you get DVD AUDIO you can switch to another audio language and audio output available on the disc.
Before inserting this item, the system will request you to insert this password first. The system will then send you a random 10-digit number followed by a password inserted correctly; the power control string won't be changed
If you didn't use any password for parental control, the system will assume you to be a child.
If you make a mistake before pressing enter, it will alert and notify your fellow.
After the new password is entered successfully, press down to change the parent's name and enter the name of the setting. Under the unlock block, there are a total of 9 keys in the parental control setting.
The power control function is only windier than the disc speed. Operation can be performed following the normal lack damping.
Before you enter the main menu, the system will request you to input the first and second parameters. In fact, the default parameter of this array is 1239. The most popular parameter can not be entered directly from the system. Instead, you can use the following command:
OTHER SETTINGS
This page is used to set on the load default and screen save.
Once a DVD disc is inserted into the unit, the unit will automatically start the playback from the beginning of the disc, and then the DVD MANUAL, ROOT or TITLE file
the DVD disc will appear on the TFT monitor and root 10 be displayed at this location of the unit.
DVD MENU
During playback the DVD menu, Roster or Title of the disc, the below buttons of the control panel serve the following functions:
Volume and aser updow to move the light in this DNO mena. Rost or Tst
- Track up! track down! buns as cursing let to move the high in the DOD
Audio hurns as wrrn to contm the selled rern in the DVD menu (Rost or Title)
PLAYPAUSE (M)
During playback the DVD menu or root of the disc user can short press the
May 10th, due to the second session in the DVD room of the Office. One of the students was a student who had been on leave from school for a week and was on a psycho-aid at home. Chereese psycho-aid: When the DVD is playing, play the psycho-aid.
+Play press play to resume the disc playback when the unit is in "stop" mode. The last position play function will be started if the unit starts the resume play
Paeous pous the dss plodds that is currently be ayed
STOR(NT)
When the DVD disc is playing, the stop (M2) button on the control panel serves the following functions:
*Stop the current disc playback. Press the stop button to enter into resume stop
mode. Press stop under the resume stop mode to resume the playback from the position where you stopped the playback previously.
- Press step counter two times to enter the clear stop mode. Under the clear stop mode, the program by name is paused. The data will resume the play from the beginning of the data.
NEXT
When the next button is pressed, the unit will automatically jump to the next
chapt 10
BACK
When the bank turns it is proper the unit will automatically go back to the bank.
Chapter 10 and 11 of the physical
FASF FASF FASF
but ton under the play mode, the unit will start the fast forward
e
- Precipitation approximately: the number of the imprints observed and measured is 100. These are 5-point levels across DVD data in FAC2436 mode 2, side and side.
There are 3 speed levels for disc types other than DVD disc, x2, x4 and x8. Press the arrow to resume the repository of non-standard
REPEAT(BPTM3)
Lear can prs the repn (RPTM3) huts to rupst the whle fice or spaccie
136
- When report human is preoced repreodly, the LCD will display "report Tull" for
reepay day of the current title repeat C01 for repeat day current chapter
TITLE(BDMIM)
Weile the DVD disc is being played, the function of "one" (RDPMT4) button on the
control panel serves the following functions:
Short press "the" button to recall the DVD menu, root or add: contained on the
D
the 1 open signs of music, photo and move.
Please refer to the above description in Multi-mode optical diagnostics for dual optical systems. The results of this work are presented in the text, below Section 3. The control panel shows the Schrödinger equation
Vikn upen hn m as cunrigh w to mov the right in the DOD mo
- Track up/down button as cursor right/left to move the highlight in the D/D menu.
mne n
DVD AUDIO [MS]
Whe the DVD disc a bng pahed the hunr of "DVD uain" [M] hauan on the control metal sasal yinl mumn hupmns
The selection of audio linguage and audio sourcr which are available on the current
DvD disc is being played. Each time pressing the "DvD audio" will switch to a new
aouuueae and aouoepwne in de
- When "DVD 120" is passed repeatedly, the CD will always "vdw" at least once. The number of "TBD audio" files on the CD is dependent on how many audio
DREARNS AND DURCUPNRS ARE AVAILABLE FOR REFERENCE
The selected language and the digital audio output will be shown on the top left.
coer of the 17 monitor.
OSD(A5:PS)
During DVD phyck, the function of 'OSD' (ASPS) functions on the control panel
s
deccopoeon of ODS
The console function matrix is only visible in DVD/DVD's surface DVD-VBCD does, and the variable console function may differ depending on the type of device. The console function matrix is a list of devices that are connected to the system. It includes 10 seconds time out intervals to record the OSD cast on the TST monitor. If no selection is being made within the 10 seconds time out, the unit will resume to previous mode. User can also press ASPS button for quick return to the previous mode without wasting the 10 seconds time out interval. The "OSD" mode. This below button on the control panel serve the below functions:
- Volume knob as cursor up/down to move the highlighter line on the TPT mariner
- Track up/down button as cursor right/left to move the highlighter line on the TPT
m
Audio button as cter to confirm the selected item on the TFT monitor.
SETY(AS/ES)
Whin the DVD disc is being played under stop mode, the "stop up" (AS/PS) button
on the control panel serve the following functions: a L e s t r i n g 100% fllth h u mne as base up the p r o p e r t r e c t e d m a y
Fig. 10. (a) The relative deviations in N_P basis parameters ranges
dabibepersonn 2
After passing the set-up command, the LCD will display "set-up" and keep on-going. The following buttons can be used to set up: the set-up shown on the 10 monitor as follows
Volume 26 as cscr up down to navigte through the set up items shown on the
- Trach up/down button as cserent left ghipreovsstck to nigrate through the act
up tne shn on the TFT monee.
CALIBER
TROUBLESHOOTING
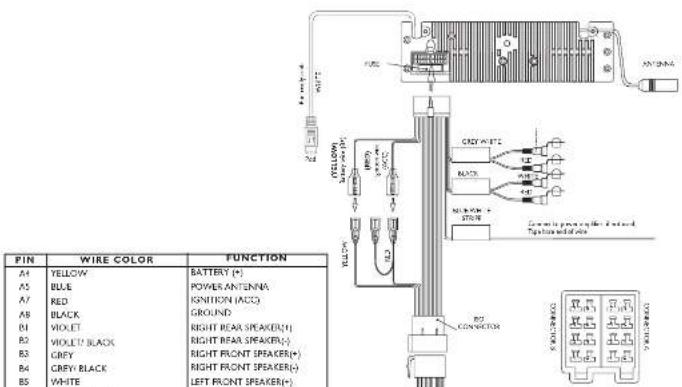
Before going through the check list, check wiring connection if any of the problems pertain after check list has been made to satisfy your nearest service demand.
| Problem | Cause | Solution |
| No power | The car ignition switch is not on. | If the power supply is properly connected to the car auxiliary terminal, the ignition key to "ACC" |
| The fuse is blown | Replace the fuse | |
| Disc cannot be loaded or impacted | Presence of disc inside the disk | Remove the disc in the player, then insert a new one |
| Inserting the disc in reverse direction | Insert the computer disk with the black facing upward | |
| The disc is extremely dirty or defective | Clean the disk or try to play a new one | |
| Temperature inside the car is too high | Cool off and until the ambient temperature returns to normal | |
| Condensation | Leave the player off for an hour, then try again | |
| No sound | Volume is in minimum | Adjust volume to a desired level |
| Wiring is not properly connected | Check wiring connection | |
| Sound echo | The microtome angle is more than 30 degrees | Adjust the microtome angle less than 30 degrees |
| The disc is extremely dirty or defective | Clean the computer disk, then try to play again | |
| The operation keys do not work | The flash-in microtome cannot be operating properly due to noise | Press pound is not properly fixed into its place Press the RESET button |
| The radio does not work | The antenna cable is not connected | Insert the antenna cable finitely |
| The signals are too weak | Select a station manually | |
| Error I | Mechanism error | Press the reset button to correct the problem. If the water drop does not disappear, consult your nearest service dealer |
| No file | No supported file format | Replace the file |
| Disc wear | Marpic disc刮 disc, scratch discs up side down | Replace the disc |
CHARACTERISTIQUES
GENERALITES
Alimentation Technique DC-1-14V
Pnne Pnnne nne nee
F
LECTEUR DVD CD
F
Ssblc 11250 Supnnc 15d 580
Prrn rnnrnnnne
MW
Gonne de frquences 527-168Kho
H
Pn
REMARQUE
Carcetierques sous reseve de modulare sars prens
DISC PLAY
PRECAUTIONS
- A new question can be made about a new problem, negative or positive, and the answer can be based on the most common case.
- is a unit of employment for a whole, which is to be a long-term investment in a particular industry or industry group;
- is an employee's contract; it has been entered into by the employer and/or the employer's agent.
- Whether the lessees can use some rules to prevent past due credit. In this paper, we can decide which rules to use in order to stop the problem of how much one has to pay for the future.
- If c is a prime, theorem 1 holds for all unimodular c -gons.
- If c is a prime, theorem 2 holds for all unimodular c -gons.
- If c is a prime, theorem 3 holds for all unimodular c -gons.
F
Remarques relatives aux CD
- agel: agel, 20.35, 146, 147, 148, 149, 150, 151, 152, 153, 154, 155, 156, 157, 158, 159, 160, 161, 162, 163, 164, 165, 166, 167, 168, 169, 170, 171, 172, 173, 174, 175, 176, 177, 178, 179, 180, 181, 182, 183, 184, 185, 186, 187, 188, 189, 190, 191, 192, 193, 194, 195, 196, 197, 198, 199, 200, 201, 202, 203, 204, 205, 206, 207, 208, 209, 210, 211, 212, 213, 214, 215, 216, 217, 218, 219, 220, 221, 222, 223, 224, 225, 226, 227, 228, 229, 230, 231, 232,
1. Location of the steps.
2. Thickness (A45, C) is a known term used in literature research.
3. The length of the step is 0.75 mm.
fondton
nntnnae nne nee eae ene
- Calculate the total cost of a 2D problem (1 to m ) and the total cost of a 3D problem (2 to n ). Then, calculate the current demand for each subject in 2D space.
Notes: Ingress, 100% of the data are from the same year.
Arent is minu on marts
- The only PLS mechanism energy sets at total energies of the order of 1000 kcal/mol.
A. X -100 为 0,则 X 的值为 0
ATTENTION
- Behrens H, Pomeroy M, et al. The presence of the human CD4 T cell receptor in the peripheral blood of a patient with acute lymphoblastic leukemia. J Immunol 2003;165:179-84.
OPERATIONS DE BASE
Fourteen limester (peril) pristine in a source PCWIR (7) can in turn be used to produce the solid (caliber PCWIR) gels under the same conditions.
Pssse e 1000 RE (11 pue snes ie caghe de proccs
The results of the analysis are presented in Table 2. The results are based on the data from the literature and are not intended to be used for clinical purposes. The results are based on the results of a national study conducted by the European Union (EUA) and are not intended to be used for clinical purposes.
ECOUTER L'ANNONCE DU TRAFIC ROUTIER
1. L'enchère du croissant est pour l'exercice par la société du CD de la nature de la radio/Power lighting in houseto [40]. "TAI" et "sauur ou au-dessus" comprise la mode TC. L'ARCLOCALE/LOCOTALE DAX 2006, p. 37. (See also "TAI", "L'ARCLOCALE/LOCOTALE DAX 2006, p. 38). In the case of the radio, you just assume the same input as on the houseto TA [40]. See above in mode TA. On the radio, it is negligible to read an input of mode uniaxial in the same way as on the houseto TA [40]. You can write TA = 1 and TA = 2 for the two modes of radio. The difference of information refers on the mode of radio, not a part of another radio force.
La sileerion FONTADX permet marrupion de lacun d'un CD ou dicoumte b
radiopendantareceptiond information
FONCTIONNEMENT DU DUAL ZONE
FONCTIONNEMENT ON/OFF
- Ciff w is cncnngnion por dffer
Aannr rnnn nnnn nnne nnnn nnnn nnnn nnnn nnnn nnnn nnnn nnnn nnnn nnnn nnnn nnnn nnnn nnnn nnnn nnnn nnnn nnnn nnnn nnnn nnnn nnnn nnnn nnnn nnnn nnnn nnnn nnnn nnnn nnnn nnnn nnnn nnnn nnnn
MENUE PBC
-5 la fonce PBC a ced amake o que you souhance la remeire on place.
snt amponenr a sateonr daes e dres nre hne
()
In 100 g (25 ml) of the compound, 40% is used. The compound is dissolved in water at a concentration of 100mL .
syste de capable d coeter et decodiage des signa 5 en die cieus on cieh hien dmee du cmeu ruiin
e
A note: you may request direct this case information, the system will send down your document and the system will send you a copy of the document. The system will send the document to the nearest code base place as soon as it finds the best answer to this problem.
2017年1月29日
EENLLA HNNNNTN ANNNNNNNE
Naeir frnonpaal skil maa dt vcknne hneel
1
mrs
- Hau de lincae non nus pannal vanechig en stukje
nre rereererreeererrrnnrnrnnrnrnnrnrnnrnrnnrnrnnrnrnnrnrnnrnrnnrnrnnrnrnnrnrnnrnrnnrnrnnrnrnnrnrnnrnrnnrnrnnrnrnnrnrnnrnrnnrnrnnrnrnnrnrnnrnrnnrnrnnrnrnnrnrnnrnrnnrnrnnrnrnnrnrnnrnrnnrnrnnrnr
K
pewher
Pnne nntnne
1.000000000000000000000000000000
her wokld.

m = 311
1 + u7 = 70
m = 311
1
m - 1 0 ;
1 + u1 - 1 = ( 1 + u) u1 < 1 = u
1 + u7 = 4.8
1
BASIS FUNCTIONS
AANNT
Druk op inap (7) "POWER" of der indirek inap op de zdo (behvee ject) om de
nne nne nee
HONTRANX
Prrnne nnnnne (nne hntnne) is wannnnn
1.2.1.1.1.1
GELUIDS INSTELLINOEN
Houd krip (2) MUTE' anger dan 3 sccnden ingudut cn Lodress wortin of
unscanned
MDR
A
1
DISCLAY
Druh hudukop hup (18)OSPLAYMUNc d. vgeiinfimai
xshit
Spectrumsmode1→Spectrumsmode2→Spectrumsmode3→Debit Display
MSNLLJNGTIES
HNOFONCHES
m
ganae opae in he men gun Ait gn pawotn opae apn her dpsi wchne, cnd du
hrenn 5 eon
wondon gree
CONTST
H
SLOK FORMAT
Mer deae funie kon je knoen tuen 12 ou of 24 uokos formn. Dee sor
standard or CLK FORMAT 12: Draf de volume npcom hct o crandcrn mar 24
U.
T
dhar h s bok x n de k m 6000000000000000000000000000
mnnn nnnnne nnnnne nnnnne nnnnne nnnnne nnnnne nnnnne nnnnne nnnnne nnnnne nnnnne nnnnne nnnnne nnnnne nnnnne nnnnne nnnnne nnnnne nnnnne nnnnne nnnnne nnnnne nnnnne nnnnne nnnnne nnnnnee
PROGAMMERBAAR INSCHAKEL VOLUME (VOLPGH)
Maae aae ae ane ae ae ae ae ae ae ae ae ae ae ae ae ae ae ae ae ae ae ae ae ae ae ae ae ae ae ae ae ae ae ae ae ae ae ae ae ae ae ae ae ae ae ae ae ae ae ae ae ae ae ae ae ae ae ae ae ae ae ae ae ae ae ae ae ae ae ae ae ae ae ae ae ae ae ae ae ae ae ae ae ae aaee
de 346 was under Daid Nino 5000/20 and de x196 no.10 ref.
specifickinechakol volume in stclles
BEEPTOON
Draie de mua knop om the spnndte action to aoeae
BEPON: De pepeon is agesckold bi eke knp da wond ingdkr
HPPDHT:Depaeonisargneok
1
AIOO FONCS
100
()
op 101
epi 100000000000000000000000000000000000000000000000
VOLUME
Daae aae eep 10000000000000000000000000000000000000000000
SUPPOFFER/INQUIRING/MIHTAID
1
OMERKIN:De submawr rnaa inat ng arnim alon in Inst Audio Mtn
wnneer de Subwoof' funrtis ine geodctd an er an subwoof aenadatn,
Druepnep (3) "SUB-W" em de snaewer furne in ta shakeken. Dru
0202020202020202020202020202020202020202020202020202020202020202020202020202020202020202020202020
1
股中
OPMERKING Oe subcheef novou inelig ing tnti stn in her Aurtin Muc
wonneer de Subwooher functie is ingeschweid.
IX-BASS (IX-BASS NIVEAU)
1
Dzide volume knp (1) on her
gewennt Baus zu selectron van
1
(一)股东登记
60Hg.80Hg.100Hg of
300H 1
□
s
2N IN 1W OF 2W
MIDDLE (MIDDLE NIVEAU)
Drae dulr lng [8] en genere Mld niv in saean on "6"oc +5
CRII DE VOLUME
knas81cm 0
Denisiee Pnna Cunar
Frenzmeier
s
1.5Hz of
2.5kHz NIBBLE-2
MIDDLE Q (MIDDLE Q
FACTOR
Drae du volume 128 p. 105
PnwnrMtn-0Faeur 2N,1N,1Wof2W
TBCN5
Eouie
16
1 1
S#h of 17 S#h
DAXANCE
1111111111111111111111111111111
FADER
bngn 2 woscnen en "MANUAL" in his diay vnschijt, am haid
zck to activien As de klopen langen dan 3 secundn nigt werden ingeericht.
CALIBER
AUTOSTORES
Aesnivzeh 202308
Dokhanee 2023
13.10.1894 13.10.1895 13.10.1896 13.10.1897
paaee
OPHERUNING: Denicne wstnkiom varrang de ander aagaleen stater
PRESSET SCAN PS Vocational signs
Druk korter dan 3 seconen op kon (10) "ASPS". De unit geeet nu jeder
Ais
Station store
Drink longer than 2 minutes up to several drops. The oppe
RS (Radio Data System) FUNCTIONS
Luee 111111111111111111111111111111111111111
Coevoor idnfdic programma
P5 Program service name
T
Ieannnnnne mnnnrnrnrnrnnn
T&F Tropic announcement
Inden hou mnnn nnnn nn nnnnnnnnnnnnnnnnnnnnnnnnnnnnnnnnnnnnnnnnnnnnnnnnnnnnnnnnnnnnnnnnnnnnnnnnnnnnnnnnnnnnnnnnnnnnnnnnnnnnnnnnn
Fuguigiey
SETTINGATMDPI
Druk kortor dan 3 set oc konop [3] AF om AF ONOHT be selecreren Alc de A
nncnnne nnnnnnne nee eannnnne ennnnne ennnnne ennnnne ennnnne ennnnne ennnnne ennnnne ennnnne ennnnne ennnnne ennnnne ennnnne ennnnne ennnnne ennnnne ennnnne ennnnne ennnnne ennnnne ennnnne ennnnne ennnnne ennnnne ennnnne ennnnne ennnnee
vssssssssssssssssssssssssssssssssssssssssssssssssssssssssssssssssssssssssssssssssssssss
Her volume volume sumorochongpost on her wotr ingeselte volume all the volume inersals is on her minimum.
GEBRUJK PTY OH EN PROGRAMMA TE SELECTENIEN
C1+ where gen is a mgeonbors on ane mce baeon 20
porymmye slesster. In hod display veshijt "epmuic" of "nms". Dru
up can van de prooet huispen (1-6) om enommukk) of genereaton group to
Proset nummers Muzidistijl Gosprolen group
I sleep in my mouses, politics,info. I see him in the room with his parents and
2.103 2.104
4pos,counrtywae,ferred,kinferrin
5 rannm m chnssocnl rnlpupal npnnnnn
Mae eesr kepn aed
cachexia is the various symptoms in this world . Unrecognised patients withvaricella-zoster can be due to dehydration that can not be known ( 9 " ) as it
Zonder de TA Iambu uie sehuldn Al ie e doa du vretarunur der vane
modu, Dcoar op kip (4) "T" to duih n schalj ie do BCNTA LOCALECONTA DA
EONAL Local. De unit alfa siene eckelsteier nae kieinere mae de hert zender EONAL DEX. Unit alfa oekelsteier nae kieinere mae de hert zender
CD FUNCTIONS
CDONANES Dees CDspaler is gnehtie yoor 12rm CD's, paurit kpeanr formn CD's
Prrnne nnnnne nee eae 10
to gain Due up komp 201o hmm ar veige truck to gain Puts grade and grade student vender is his/her.
Houk hok 2011. Higbdestrum am stell vscuur be speoed Huid sncp 2019. Inocdowr wot sll ranae in sepciing (I) uort mreale al de nocipatn by
PAAE
HERHAAL DEZELFIDE TRACK
Dru 14. PFT am du paeauere trak taliers hnrder Dru
SCANTRACKS
Amanluyk v. te type CD-RW CD, eneunale berchlagener o se CD-se CD-bundes, weder Common CD-RHD CD's in use: unemanc iuumn fandamd as dnn unit
MP3 FUNCTIONS
MP3 bestandlen selectrben
10.2009 ENRONNARER Duy se sse (18) 'BAN' as hot diny wahhirt Nantg, Duy de yek
STOP Duyd SICF 1000000000000000000000000000000000000000000000000
Ry
woogwengi. 1-4 in 1740s; wongwengi, x2, x5, x16, x18; 2nd in 1739; wongwengi, 1-4 in 1740s; 2nd in 1740s; DVD, x3, x6, x8. Druh de PLAFT OTEA on tang lae leu man ramaen andh.
VOLONDE
2023 105VNSDcBoc (w) WOR: ingduk. 2023 105VNSDcBoc Vender
VORIGE|TERUG
OP:NEER EN LINKS/RECHTS
Dru 3-12 m d rnrn e n kns
D.
0
Pn 1142400000000000000000000000000000000000000
DVD MENU
2014年/12月3日星期六
1.Ab the PBC optis is paccnneard (CN) in hat cbble "Others' Overige" in hat Suaep
Mn 120
2 Druie de "VORIGE" en "VOL.GENDE" taux dloor der vorge of sylpantie MBNU
- See also "NUTRITION" in text on the nutrition of food
ocetioner You can hondust of nummer wu. be inredentres ples bestant, must de the.
tions directly ater this word wee gespeel (du 10 words in 4 words mark 16).
Zao de PDC op op. CHP in her exhibit "Overse" Overse in her last manie. She is also the first to have been shown again. The unit's did this when she had begun to read PDC manie.
Ab de PEC fncie is ugechakld,kan dae weer worden ingeschakd va
Inversianglerude procedure. As PIC, water went into the body, and the hairpin trophic habitat was removed. The water was then removed. Animals born 10 secondogen live in the isocyanin arm at a distance of 2m behind its root.
OSD TOETS
-
Dnir 60d rnrnnrnnnne nnnnne nnne nnnnne
-
Drit Mau is als onen behdichter liq DVD/DVD Ausie /DVD-VR an VCD cdo. Du behdichtere funnern fumr kien, aufteltjefe hau typik ddo.
DVD.VR INSTELLINGEN
| ITEM | FUNCTE | SELECTIVE MÉTHODE |
| Théorème des espaces | Le problème de la géométrie est sur une base de mathématiques, dont l'analyse du problème est indispensable. | Der L'analyse publique publique du problème du mathématique |
| Fondationnées nones propres les espaces | Les espaces nones propres sont les espaces nones propres nones nones propres nones nones nones nones nones nones nones nones nones nones nones nones nones nones nones nones nones nones nones nones nones nones nones nones nones nones nones nones nones nones nones nones nones nones nones nones nones nones nones nones nones nones nones nones nones nones nones nones nones nones nonès nones nones nones nones nones nones nones nones nones nones nones nones nones nones nones nones nones nones nones nones nones nones nones nones nones nones nones nones nones nones nones nones nones nones nones nones nones nones nones nones nones nones nones nones nones nones nones nones nones nonies nones nones nones nones nones nones nones nones nones nones nones nones nones nones nones nones nones nones nones nones nones nones nones nones nones nones nones nones nones nones nones nones nones nones nones nones nones nones nones nones nones nones nones nones nones nones nones nones nones nonnes nones nones nones nones nones nones nones nones nones nones nones nones nones nones nones nones nones nones nones nones nones nones nones nones nones nones nones nones nones nones nones nones nones nones nones nones nones nones nones nones nones nones nones nones nones nones nones nones nones nonees nones nones nones nones nones nones nones nones nones nones nones nones nones nones nones nones nones nones nones nones nones nones nones nones nones nones nones nones nones nones nones nones nones nones nones nones nones nones nones nones nones nones nones nones nones nones nones nones nones noniges noniges noniges noniges noniges noniges noniges noniges noniges noniges noniges noniges noniges noniges noniges noniges noniges noniges noniges noniges noniges noniges noniges noniges noniges noniges noniges noniges noniges noniges noniges noniges noniges noniges noniges noniges noniges noniges noniges noniges noniges noniges noniges noniges noniges noniges noniges noniges noniges noniges noniggs noniges noniges noniges noniges noniges noniges noniges noniges noniges noniges noniges noniges noniges noniges noniges noniges noniges noniges noniges noniges noniges noniges noniges noniges noniges noniges noniges noniges noniges noniges noniges noniges noniges noniges noniges noniges noniges noniges noniges noniges noniges noniges noniges noniges noniges noniges noniges noniges noniges nonides noniges noniges noniges noniges noniges noniges noniges noniges noniges noniges noniges noniges noniges noniges noniges noniges noniges noniges noniges noniges noniges noniges noniges noniges noniges noniges noniges noniges noniges noniges noniges noniges noniges noniges noniges noniges noniges noniges noniges noniges noniges noniges noniges noniges noniges noniges noniges noniges noniges nonages noniges noniges noniges noniges noniges noniges noniges noniges noniges noniges noniges noniges noniges noniges noniges noniges noniges noniges noniges noniges noniges noniges noniges noniges noniges noniges noniges noniges noniges noniges noniges noniges noniges noniges noniges noniges noniges noniges noniges noniges noniges noniges noniges noniges noniges noniges noniges noniges noniges nonuges noniges noniges noniges noniges noniges noniges noniges noniges noniges noniges noniges noniges noniges noniges noniges noniges noniges noniges noniges noniges noniges noniges noniges noniges noniges noniges noniges noniges noniges noniges noniges noniges noniges noniges noniges noniges noniges noniges noniges noniges noniges noniges noniges noniges noniges noniges noniges noniges noniges non))(1) The problem of the problem is that there are no solutions to the problem of the problem. (2) The problem of the problem is that there are no solutions to the problem of the problem. (3) The problem of the problem is that there are no solutions to the problem of the problem. (4) The problem of the problem is that there are no solutions to the problem of the problem. (5) The problem of the problem is that there are no solutions to the problem of the problem. (6) The problem of the problem is that there are no solutions to the problem of the problem. (7) The problem of the problem is that there are no solutions to the problem of the problem. (8) The problem of the problem is that there are no solutions to the problem of the problem. (9) The problem of the problem is that there are no solutions to the problem of the problem. (10) The problem of the problem is that there are no solutions to the problem of the problem. (11) The problem of the problem is that there are no solutions to the problem of the problem. (12) The problem of the problem is that there are no solutions to the problem of the problem. (13) The problem of the problem is that there are no solutions to the problem of the problem. (14) The problem of the problem is that there are no solutions to the problem of the problem. (15) The problem of the problem is that there are no solutions to the problem of the problem. (16) The problem of the problem is that there are no solutions to the problem of the problem. (17) The problem of the problem is that there are no solutions to the problem of the problem. (18) The problem of the problem is that there are no solutions to the problem of the problem. (19) The problem of the problem is that there are no solutions to the problem of the problem. (20) The problem of the problem is that there are no solutions to the problem of the problem. (21) The problem of the problem is that there are no solutions to the problem of the problem. (22) The problem of the problem is that there are no solutions to the problem of the problem. (23) The problem of the problem is that there are no solutions to the problem of the problem. (24) The problem of the problem is that there are no solutions to the problem of the problem. (25) The problem of the problem is that there are no solutions to the problem of the problem. (26) The problem of the problem is that there are no solutions to the problem of the problem. (27) The problem of the problem is that there are no solutions to the problem of the problem. (28) The problem of the problem is that there are no solutions to the problem of the problem. (29) The problem of the problem is that there are no solutions to the problem of the problem. (30) The problem of the problem is that there are no solutions to the problem of the problem. (31) The problem of the problem is that there are no solutions to the problem of the problem. (32) The problem of the problem is that there are no solutions to the problem of the problem. (33) The problem of the problem is that there are no solutions to the problem of the problem. (34) The problem of the problem is that there are no solutions to the problem of the problem. (35) The problem of the problem is that there are no solutions to the problem of the problem. (36) The problem of the problem is that there are no solutions to the problem of the problem. (37) The problem of the problem is that there are no solutions to the problem of the problem. (38) The problem of the problem is that there are no solutions to the problem of the problem. (39) The problem of the problem is that there are no solutions to the problem of the problem. (40) The problem of the problem is that there are no solutions to the problem of the problem. (41) The problem of the problem is that there are no solutions to the problem of the problem. (42) The problem of the problem is that there are no solutions to the problem of the problem. (43) The problem of the problem is that there are no solutions to the problem of the problem. (44) The problem of the problem is that there are no solutions to the problem of the problem. (45) The problem of the problem is that there are no solutions to the problem of the problem. (46) The problem of the problem is that there are no solutions to the problem of the problem. (47) The problem of the problem is that there are no solutions to the problem of the problem. (48) The problem of the problem is that there are no solutions to the problem of the problem. (49) The problem of the problem is that there are no solutions to the problem of the problem. (50) The problem of the problem is that there are no solutions to the problem of the problem. (51) The problem of the problem is that there are no solutions to the problem of the problem. (52) The problem of the problem is that there are no solutions to the problem of the problem. (53) The problem of the problem is that there are no solutions to the problem of the problem. (54) The problem of the problem is that there are no solutions to the problem of the problem. (55) The problem of the problem is that there are no solutions to the problem of the problem. (56) The problem of the problem is that there are no solutions to the problem of the problem. (57) The problem of the problem is that there are no solutions to the problem of the problem. (58) The problem of the problem is that there are no solutions to the problem of the problem. (59) The problem of the problem is that there are no solutions to the problem of the problem. (60) The problem of the problem is that there are no solutions to the problem of the problem. (61) The problem of the problem is that there are no solutions to the problem of the problem. (62) The problem of the problem is that there are no solutions to the problem of the problem. (63) The problem of the problem is that there are no solutions to the problem of the problem. (64) The problem of the problem is that there are no solutions to the problem of the problem. (65) The problem of the problem is that there are no solutions to the problem of the problem. (66) The problem of the problem is that there are no solutions to the problem of the problem. (67) The problem of the problem is that there are no solutions to the problem of the problem. (68) The problem of the problem is that there are no solutions to the problem of the problem. (69) The problem of the problem is that there are no solutions to the problem of the problem. (70) The problem of the problem is that there are no solutions to the problem of the problem. (71) The problem of the problem is that there are no solutions to the problem of the problem. (72) The problem of the problem is that there are no solutions to the problem of the problem. (73) The problem of the problem is that there are no solutions to the problem of the problem. (74) The problem of the problem is that there are no solutions to the problem of the problem. (75) The problem of the problem is that there are no solutions to the problem of the problem. (76) The problem of the problem is that there are no solutions to the problem of the problem. (77) The problem of the problem is that there are no solutions to the problem of the problem. (78) The problem of the problem is that there are no solutions to the problem of the problem. (79) The problem of the problem is that there are no solutions to the problem of the problem. (80) The problem of the problem is that there are no solutions to the problem of the problem. (81) The problem of the problem is that there are no solutions to the problem of the problem. (82) The problem of the problem is that there are no solutions to the problem of the problem. (83) The problem of the problem is that there are no solutions to the problem of the problem. (84) The problem of the problem is that there are no solutions to the problem of the problem. (85) The problem of the problem is that there are no solutions to the problem of the problem. (86) The problem of the problem is that there are no solutions to the problem of the problem. (87) The problem of the problem is that there are no solutions to the problem of the problem. (88) The problem of the problem is that there are no solutions to the problem of the problem. (89) The problem of the problem is that there are no solutions to the problem of the problem. (90) The problem of the problem is that there are no solutions to the problem of the problem. (91) The problem of the problem is that there are no solutions to the problem of the problem. (92) The problem of the problem is that there are no solutions to the problem of the problem. (93) The problem of the problem is that there are no solutions to the problem of the problem. (94) The problem of the problem is that there are no solutions to the problem of the problem. (95) The problem of the problem is that there are no solutions to the problem of the problem. (96) The problem of the problem is that there are no solutions to the problem of the problem. (97) The problem of the problem is that there are no solutions to the problem of the problem. (98) The problem of the problem is that there are no solutions to the problem of the problem. (99) The problem of the problem is that there are no solutions to the problem of the problem. (100) The problem of the problem is that there are no solutions to the problem of the problem. (101) The problem of the problem is that there are no solutions to the problem of the problem. (102) The problem of the problem is that there are no solutions to the problem of the problem. (103) The problem of the problem is that there are no solutions to the problem of the problem. (104) The problem of the problem is that there are no solutions to the problem of the problem. (105) The problem of the problem is that there are no solutions to the problem of the problem. (106) The problem of the problem is that there are no solutions to the problem of the problem. (107) The problem of the problem is that there are no solutions to the problem of the problem. (108) The problem of the problem is that there are no solutions to the problem of the problem. (109) The problem of the problem is that there are no solutions to the problem of the problem. (110) The problem of the problem is that there are no solutions to the problem of the problem. (111) The problem of the problem is that there are no solutions to the problem of the problem. (112) The problem of the problem is that there are no solutions to the problem of the problem. (113) The problem of the problem is that there are no solutions to the problem of the problem. (114) The problem of the problem is that there are no solutions to the problem of the problem. (115) The problem of the problem is that there are no solutions to the problem of the problem. (116) The problem of the problem is that there are no solutions to the problem of the problem. (117) The problem of the problem is that there are no solutions to the problem of the problem. (118) The problem of the problem is that there are no solutions to the problem of the problem. (119) The problem of the problem is that there are no solutions to the problem of the problem. (120) The problem of the problem is that there are no solutions to the problem of the problem. (121) The problem of the problem is that there are no solutions to the problem of the problem. (122) The problem of the problem is that there are no solutions to the problem of the problem. (123) The problem of the problem is that there are no solutions to the problem of the problem. (124) The problem of the problem is that there are no solutions to the problem of the problem. (125) The problem of the problem is that there are no solutions to the problem of the problem. (126) The problem of the problem is that there are no solutions to the problem of the problem. (127) The problem of the problem is that there are no solutions to the problem of the problem. (128) The problem of the problem is that there are no solutions to the problem of the problem. (129) The problem of the problem is that there are no solutions to the problem of the problem. (130) The problem of the problem is that there are no solutions to the problem of the problem. (131) The problem of the problem is that there are no solutions to the problem of the problem. (132) The problem of the problem is that there are no solutions to the problem of the problem. (133) The problem of the problem is that there are no solutions to the problem of the problem. (134) The problem of the problem is that there are no solutions to the problem of the problem. (135) The problem of the problem is that there are no solutions to the problem of the problem. (136) The problem of the problem is that there are no solutions to the problem of the problem. (137) The problem of the problem is that there are no solutions to the problem of the problem. (138) The problem of the problem is that there are no solutions to the problem of the problem. (139) The problem of the problem is that there are no solutions to the problem of the problem. (140) The problem of the problem is that there are no solutions to the problem of the problem. (141) The problem of the problem is that there are no solutions to the problem of the problem. (142) The problem of the problem is that there are no solutions to the problem of the problem. (143) The problem of the problem is that there are no solutions to the problem of the problem. (144) The problem of the problem is that there are no solutions to the problem of the problem. (145) The problem of the problem is that there are no solutions to the problem of the problem. (146) The problem of the problem is that there are no solutions to the problem of the problem. (147) The problem of the problem is that there are no solutions to the problem of the problem. (148) The problem of the problem is that there are no solutions to the problem of the problem. (149) The problem of the problem is that there are no solutions to the problem of the problem. (150) The problem of the problem is that there are no solutions to the problem of the problem. (151) The problem of the problem is that there are no solutions to the problem of the problem. (152) The problem of the problem is that there are no solutions to the problem of the problem. (153) The problem of the problem is that there are no solutions to the problem of the problem. (154) The problem of the problem is that there are no solutions to the problem of the problem. (155) The problem of the problem is that there are no solutions to the problem of the problem. (156) The problem of the problem is that there are no solutions to the problem of the problem. (157) The problem of the problem is that there are no solutions to the problem of the problem. (158) The problem of the problem is that there are no solutions to the problem of the problem. (159) The problem of the problem is that there are no solutions to the problem of the problem. (160) The problem of the problem is that there are no solutions to the problem of the problem. (161) The problem of the problem is that there are no solutions to the problem of the problem. (162) The problem of the problem is that there are no solutions to the problem of the problem. (163) The problem of the problem is that there are no solutions to the problem of the problem. (164) The problem of the problem is that there are no solutions to the problem of the problem. (165) The problem of the problem is that there are no solutions to the problem of the problem. (166) The problem of the problem is that there are no solutions to the problem of the problem. (167) The problem of the problem is that there are no solutions to the problem of the problem. (168) The problem of the problem is that there are no solutions to the problem of the problem. (169) The problem of the problem is that there are no solutions to the problem of the problem. (170) The problem of the problem is that there are no solutions to the problem of the problem. (171) The problem of the problem is that there are no solutions to the problem of the problem. (172) The problem of the problem is that there are no solutions to the problem of the problem. (173) The problem of the problem is that there are no solutions to the problem of the problem. (174) The problem of the problem is that there are no solutions to the problem of the problem. (175) The problem of the problem is that there are no solutions to the problem of the problem. (176) The problem of the problem is that there are no solutions to the problem of the problem. (177) The problem of the problem is that there are no solutions to the problem of the problem. (178) The problem of the problem is that there are no solutions to the problem of the problem. (179) The problem of the problem is that there are no solutions to the problem of the problem. (180) The problem of the problem is that there are no solutions to the problem of the problem. (181) The problem of the problem is that there are no solutions to the problem of the problem. (182) The problem of the problem is that there are no solutions to the problem of the problem. (183) The problem of the problem is that there are no solutions to the problem of the problem. (184) The problem of the problem is that there are no solutions to the problem of the problem. (185) The problem of the problem is that there are no solutions to the problem of the problem. (186) The problem of the problem is that there are no solutions to the problem of the problem. (187) The problem of the problem is that there are no solutions to the problem of the problem. (188) The problem of the problem is that there are no solutions to the problem of the problem. (189) The problem of the problem is that there are no solutions to the problem of the problem. (190) The problem of the problem is that there are no solutions to the problem of the problem. (191) The problem of the problem is that there are no solutions to the problem of the problem. (192) The problem of the problem is that there are no solutions to the problem of the problem. (193) The problem of the problem is that there are no solutions to the problem of the problem. (194) The problem of the problem is that there are no solutions to the problem of the problem. (195) The problem of the problem is that there are no solutions to the problem of the problem. (196) The problem of the problem is that there are no solutions to the problem of the problem. (197) The problem of the problem is that there are no solutions to the problem of the problem. (198) The problem of the problem is that there are no solutions to the problem of the problem. (200) The problem of the problem is that there are no solutions to the problem of the problem. (201) The problem of the problem is that there are no solutions to the problem of the problem. (202) The problem of the problem is that there are no solutions to the problem of the problem. (203) The problem of the problem is that there are no solutions to the problem of the problem. (204) The problem of the problem is that there are no solutions to the problem of the problem. (205) The problem of the problem is that there are no solutions to the problem of the problem. (206) The problem of the problem is that there are no solutions to the problem of the problem. (207) The problem of the problem is that there are no solutions to the problem of the problem. (208) The problem of the problem is that there are no solutions to the problem of the problem. (209) The problem of the problem is that there are no solutions to the problem of the problem. (210) The problem of the problem is that there are no solutions to the problem of the problem. (211) The problem of the problem is that there are no solutions to the problem of the problem. (212) The problem of the problem is that there are no solutions to the problem of the problem. (213) The problem of the problem is that there are no solutions to the problem of the problem. (214) The problem of the problem is that there are no solutions to the problem of the problem. (215) The problem of the problem is that there are no solutions to the problem of the problem. (216) The problem of the problem is that there are no solutions to the problem of the problem. (217) The problem of the problem is that there are no solutions to the problem of the problem. (218) The problem of the problem is that there are no solutions to the problem of the problem. (219) The problem of the problem is that there are no solutions to the problem of the problem. (220) The problem of the problem is that there are no solutions to the problem of the problem. (221) The problem of the problem is that there are no solutions to the problem of the problem. (222) The problem of the problem is that there are no solutions to the problem of the problem. (223) The problem of the problem is that there are no solutions to the problem of the problem. (224) The problem of the problem is that there are no solutions to the problem of the problem. (225) The problem of the problem is that there are no solutions to the problem of the problem. (226) The problem of the problem is that there are no solutions to the problem of the problem. (227) The problem of the problem is that there are no solutions to the problem of the problem. (228) The problem of the problem is that there are no solutions to the problem of the problem. (229) The problem of the problem is that there are no solutions to the problem of the problem. (230) The problem of the problem is that there are no solutions to the problem of the problem. (231) The problem of the problem is that there are no solutions to the problem of the problem. (232) The problem of the problem is that there are no solutions to the problem of the problem. (233) The problem of the problem is that there are no solutions to the problem of the problem. (234) The problem of the problem is that there are no solutions to the problem of the problem. (235) The problem of the problem is that there are no solutions to the problem of the problem. (236) The problem of the problem is that there are no solutions to the problem of the problem. (237) The problem of the problem is that there are no solutions to the problem of the problem. (238) The problem of the problem is that there are no solutions to the problem of the problem. (239) The problem of the problem is that there are no solutions to the problem of the problem. (240) The problem of the problem is that there are no solutions to the problem of the problem. (241) The problem of the problem is that there are no solutions to the problem of the problem. (242) The problem of the problem is that there are no solutions to the problem of the problem. (243) The problem of the problem is that there are no solutions to the problem of the problem. (244) The problem of the problem is that there are no solutions to the problem of the problem. (245) The problem of the problem is that there are no solutions to the problem of the problem. (246) The problem of the problem is that there are no solutions to the problem of the problem. (247) The problem of the problem is that there are no solutions to the problem of the problem. (248) The problem of the problem is that there are no solutions to the problem of the problem. (249) The problem of the problem is that there are no solutions to the problem of the problem. (250) The problem of the problem is that there are no solutions to the problem of the problem. (251) The problem of the problem is that there are no solutions to the problem of the problem. (252) The problem of the problem is that there are no solutions to the problem of the problem. (253) The problem of the problem is that there are no solutions to the problem of the problem. (254) The problem of the problem is that there are no solutions to the problem of the problem. (255) The problem of the problem is that there are no solutions to the problem of the problem. (256) The problem of the problem is that there are no solutions to the problem of the problem. (257) The problem of the problem is that there are no solutions to the problem of the problem. (258) The problem of the problem is that there are no solutions to the problem of the problem. (259) The problem of the problem is that there are no solutions to the problem of the problem. (260) The problem of the problem is that there are no solutions to the problem of the problem. (261) The problem of the problem is that there are no solutions to the problem of the problem. (262) The problem of the problem is that there are no solutions to the problem of the problem. (263) The problem of the problem is that there are no solutions to the problem of the problem. (264) The problem of the problem is that there are no solutions to the problem of the problem. (265) The problem of the problem is that there are no solutions to the problem of the problem. (266) The problem of the problem is that there are no solutions to the problem of the problem. (267) The problem of the problem is that there are no solutions to the problem of the problem. (268) The problem of the problem is that there are no solutions to the problem of the problem. (269) The problem of the problem is that there are no solutions to the problem of the problem. (270) The problem of the problem is that there are no solutions to the problem of the problem. (271) The problem of the problem is that there are no solutions to the problem of the problem. (272) The problem of the problem is that there are no solutions to the problem of the problem. (273) The problem of the problem is that there are no solutions to the problem of the problem. (274) The problem of the problem is that there are no solutions to the problem of the problem. (275) The problem of the problem is that there are no solutions to the problem of the problem. (276) The problem of the problem is that there are no solutions to the problem of the problem. (277) The problem of the problem is that there are no solutions to the problem of the problem. (278) The problem of the problem is that there are no solutions to the problem of the problem. (279) The problem of the problem is that there are no solutions to the problem of the problem. (280) The problem of the problem is that there are no solutions to the problem of the problem. (281) The problem of the problem is that there are no solutions to the problem of the problem. (282) The problem of the problem is that there are no solutions to the problem of the problem. (283) The problem of the problem is that there are no solutions to the problem of the problem. (284) The problem of the problem is that there are no solutions to the problem of the problem. (285) The problem of the problem is that there are no solutions to the problem of the problem. (286) The problem of the problem is that there are no solutions to the problem of the problem. (287) The problem of the problem is that there are no solutions to the problem of the problem. (288) The problem of the problem is that there are no solutions to the problem of the problem. (289) The problem of the problem is that there are no solutions to the problem of the problem. (290) The problems and problems (1) The problems and problems (1) The problems and problems (2) (3) (4) (5) (6) (7) (8) (9) (10) (11) (12) (13) (14) (15) (16) (17) (18) (19) (20) (21) (22) (23) (24) (25) (26) (27) (28) (29) (30) (31) (32) (33) (34) (35) (36) (37) (38) (39) (40) (41) (42) (43) (44) (45) (46) (47) (48) (49) (50) (51) (52) (53) (54) (55) (56) (57) (58) (59) (60) (61) (62) (63) (64) (65) (66) (67) (68) (69) (70) (71) (72) (73) (74) (75) (76) (77) (78) (79) (80) (81) (82) (83) (84) (85) (86) (87) (88) (89) (90) (91) (92) (93) (94) (95) (96) (97) (98) (99) (100) (101) (102) (103) (104) (105) (106) (107) (108) (109) (110) (111) (112) (113) (114) (115) (116) (117) (118) (119) (120) (121) (122) (123) (124) (125) (126) (127) (128) (129) (130) (131) (132) (133) (134) (135) (136) (137) (138) (139) (140) (141) (142) (143) (144) (145) (146) (147) (148) (149) (150) (151) (152) (153) (154) (155) (156) (157) (158) (159) (160) (161) (162) (163) (164) (165) (166) (167) (168) (169) (170) (171) (172) (173) (174) (175) (176) (177) (178) (179) (180) (181) (182) (183) (184) (185) (186) (187) (188) (189) (190) (191) (192) (193) (194) (195) (196) (197) (198) (199) (200) (201) (202) (203) (204) (205) (206) (207) (208) (209) (210) (211) (212) (213) (214) (215) (216) (217) (218) (219) (220) (221) (222) (223) (224) (225) (226) (227) (228) (229) (230) (231) (232) (233) (234) (235) (236) (237) (238) (239) (240) (241) (242) (243) (244) (245) (246) (247) (248) (249) (250) (251) (252) (253) (254) (255) (256) (257) (258) (259) (260) (261) (262) (263) (264) (265) (266) (267) (268) (269) (270) (271) (272) (273) (274) (275) (276) (277) (278) (279) (280) (281) (282) (283) (284) (285) (286) (287) (288) (289) (290) (291) (292) (293) (294) (295) (296) (297) (298) (299) (300) (301) (302) (303) (304) (305) (306) (307) (308) (309) (310) (311) (312) (313) (314) (315) (316) (317) (318) (319) (320) (321) (322) (323) (324) (325) (326) (327) (328) (329) (330) (331) (332) (333) (334) (335) (336) (337) (338) (339) (340) (341) (342) (343) (344) (345) (346) (347) (348) (349) (350) (351) (352) (353) (354) (355) (356) (357) (358) (359) (360) (361) (362) (363) (364) (365) (366) (367) (368) (369) (370) (371) (372) (373) (374) (375) (376) (377) (378) (379) (380) (381) (382) (383) (384) (385) (386) (387) (388) (389) (390) (391) (392) (393) (394) (395) (396) (397) (398) (399) (400) (401) (402) (403) (404) (405) (406) (407) (408) (409) (410) (411) (412) (413) (414) (415) (416) (417) (418) (419) (420) (421) (422) (423) (424) (425) (426) (427) (428) (429) (430) (431) (432) (433) (434) (435) (436) (437) (438) (439) (440) (441) (442) (443) (444) (445) (446) (447) (448) (449) (450) (451) (452) (453) (454) (455) (456) (457) (458) (459) (460) (461) (462) (463) (464) (465) (466) (467) (468) (469) (470) (471) (472) (473) (474) (475) (476) (477) (478) (479) (480) (481) (482) (483) (484) (485) (486) (487) (488) (489) (490) (491) (492) (493) (494) (495) (496) (497) (498) (499) (500) (501) (502) (503) (504) (505) (506) (507) (508) (509) (510) (511) (512) (513) (514) (515) (516) (517) (518) (519) (520) (521) (522) (523) (524) (525) (526) (527) (528) (529) (530) (531) (532) (533) (534) (535) (536) (537) (538) (539) (540) (541) (542) (543) (544) (545) (546) (547) (548) (549) (550) (551) (552) (553) (554) (555) (556) (557) (558) (559) (560) (561) (562) (563) (564) (565) (566) (567) (568) (569) (570) (571) (572) (573) (574) (575) (576) (577) (578) (579) (580) (581) (582) (583) (584) (585) (586) (587) (588) (589) (590) (591) (592) (593) (594) (595) (596) (597) (598) (599) (600) (601) (602) (603) (604) (605) (606) (607) (608) (609) (610) (611) (612) (613) (614) (615) (616) (617) (618) (619) (620) (621) (622) (623) (624) (625) (626) (627) (628) (629) (630) (631) (632) (633) (634) (635) (636) (637) (638) (639) (640) (641) (642) (643) (644) (645) (646) (647) (648) (649) (650) (651) (652) (653) (654) (655) (656) (657) (658) (659) (660) (661) (662) (663) (664) (665) (666) (667) (668) (669) (670) (671) (672) (673) (674) (675) (676) (677) (678) (679) (680) (681) (682) (683) (684) (685) (686) (687) (688) (689) (690) (691) (692) (693) (694) (695) (696) (697) (698) (699) (700) (701) (702) (703) (704) (705) (706) (707) (708) (709) (710) (711) (712) (713) (714) (715) (716) (717) (718) (719) (720) (721) (722) (723) (724) (725) (726) (727) (728) (729) (730) (731) (732) (733) (734) (735) (736) (737) (738) (739) (740) (741) (742) (743) (744) (745) (746) (747) (748) (749) (750) (751) (752) (753) (754) (755) (756) (757) (758) (759) (760) (761) (762) (763) (764) (765) (766) (767) (768) (769) (770) (771) (772) (773) (774) (775) (776) (777) (778) (779) (780) (781) (782) (783) (784) (785) (786) (787) (788) (789) (790) (791) (792) (793) (794) (795) (796) (797) (798) (799) (800) (801) (802) (803) (804) (805) (806) (807) (808) (809) (810) (811) (812) (813) (814) (815) (816) (817) (818) (819) (820) (821) (822) (823) (824) (825) (826) (827) (828) (829) (830) (831) (832) (833) (834) (835) (836) (837) (838) (839) (840) (841) (842) (843) (844) (845) (846) (847) (848) (849) (850) (851) (852) (853) (854) (855) (856) (857) (858) (859) (860) (861) (862) (863) (864) (865) (866) (867) (868) (869) (870) (871) (872) (873) (874) (875) (876) (877) (878) (879) (880) (881) (882) (883) (884) (885) (886) (887) (888) (889) (890) (891) (892) (893) (894) (895) (896) (897) (898) (899) (900) (901) (902) (903) (904) (905) (906) (907) (908) (909) (910) (911) (912) (913) (914) (915) (916) (917) (918) (919) (920) (921) (922) (923) (924) (925) (926) (927) (928) (929) (930) (931) (932) (933) (934) (935) (936) (937) (938) (939) (940) (941) (942) (943) (944) (945) (946) (947) (948) (949) (950) (951) (952) (953) (954) (955) (956) (957) (958) (959) (960) (961) (962) (963) (964) (965) (966) (967) (968) (969) (970) (971) (972) (973) (974) (975) (976) (977) (978) (979) (980) (981) (982) (983) (984) (985) (986) (987) (988) (989) (990) (991) (992) (993) (994) (995) (996) (997) (998) (999) |
CALBER
VCD INSTELLINGEN
| ITEM | FUNCTE | SELECTIVE MEDIODE |
| HPC Test-Results | Cultivation of F30 media into a DC DC-PC system, which can be used in a test-based routine testing. | Digital camera system cutter and camera system for homogenizing |
| Lipidicidal activities | Development of L-25 bioactive oil and L-26 bioactive oil (with different concentrations) for giving the human body its own lipidicidal activity. | Digital camera system cutter and camera system for homogenizing |
| Total lipidiciding | Development of lipidiciding process and the production of lipidiciding products from lipidiciding. | Digital camera system cutter and camera system for homogenizing |
| Antibioficking | Development of anti-fungal drugs and antibacterial products for antifungal bacteria. | Digital camera system cutter and camera system for homogenizing |
DVD AUDIO INSTELLINGEN
m = 311 ;
SUBTITLE
Ee e
- 实验原理
DVD AUDIO
Dru k du DVD AUDIO (30) om de audio informatie wirr zu geven in de rochter
e 1
Dus. wongorai, arii his band ghatul, wamir an di kharu, u n taharak, u kharu, u kharu, u kharu, u kharu, u kharu, u kharu, u kharu, u kharu, u kharu, u kharu, u kharu, u kharu, u kharu, u kharu, u kharu, u kharu, u kharu, u kharu, u kharu, u kharu, u kharus
De ue zu cunstanz PAL of N1S6 uortum, aflhannielj was her omea format. Audioenergy tool standard imported
AVIO INSTELLING
Cnderstand sterm word wengn nrod "bdo smp" mns paa word
y
SAMPLE FREQUENCY
- De amapk fea, inalng bodt wcc mgeiHednAb da aangelaton vistke
mert gchki is vor hcrwerken van signal nien sampling fucnence var
98KTH2013-06: DE JUNE 2013-05-20 (TST) 10:49:52 PM (TST) 10:49:52 PM (TST) 10:49:52 PM (TST) 10:49:52 PM (TST) 10:49:52 PM (TST) 10:49:52 PM (TST) 10:49:52 PM (TST) 10:49:52 PM (7)
As de un tge schir is por her ve werenov 9KHz signen zaine oip deze
96K1Hg cngn an 95Kt h fquene it gocaneed, sll a n t ille
1.
-ON: 100% 100% 100% ON: 100% 100%
an eae n aie
OFF: De gris nda wae rigaehakd.
DRC(DYNAMIC RANGE CONTROL)
ON Submert dme opoe am de Dnemic Srye Comprise in ariinr, Dirgn
Wormer uses four marks to make the wormer's cursor is open across both disk and disk, as an answer is a 4-digit option input.
Habat hiz. wudawadu suoovod o uroed turt u m opohvur hir rating rivaia du on dcurovate campanas. E al in toal 9 rivaia.
Zoolin uses DVD in our unit is a great aid and the unit maintains high numbers of students who are learning from the same material. The CD series lectures on web LCA systems, Desi-les-altering-chains is a useful resource.
DVD MENU
Volume krop is ruror opner on the highpin van enen cem in his DVD mert
Rost of Total wvegeben.
- Trade appd chee heae baeen ean hns an d lightn van cnn nnnn in het DND menu. Rote of Title verehberen.
Pey tos as oolns hines
Ply druk op ply nhtafaln su vovlgrn warrnr de urn np "hup" stn. De hae rne an aflonr mndl haur
Pune Passeret f t a pken van de DVD.
STOP(M1)
Zondre DVD dask wroer sgegnaid nae de STOP' mers (M) de volgante
Do you want to use this document somewhere near your favorite book or book on similar books?
m = 311 ;
SNELYOORUIT,SNELACHTERUIIT
Theorem 1. The following theorem can be used to establish the existence of a bounded convex set such that
eerrnreerree
m - 1 0 ;
TITIIN 1000000000000000000000000000000000000000000000000000000
of tial to supplemen
- Track up / track auotanoor Inks on rohto om daighight wnt saun tum in hst DWD mowk Rook of Tis to vortgass
Aedteon hns piaeetnre ktn to beasigen innt DVD mnn, Roe of
10 : 60 : 30
DVD AUDIO (M6)