
GEXP6400TVP - TV PIONEER - Free user manual and instructions
Find the device manual for free GEXP6400TVP PIONEER in PDF.

| Product Type | Vehicle TV Tuner |
| Brand | Pioneer |
| Model | GEXP6400TVP |
| Supply Voltage | 14.4 V DC (range 10.8 – 15.1 V) |
| Max Current Consumption | 0.5 A |
| Dimensions (W × H × D) | 172 × 30 × 148 mm |
| Weight | 0.7 kg |
| Video System | PAL |
| Reception Bands | VHF and UHF depending on country group (CCIR, Italy, UK, OIRT) |
| Usable Sensitivity | 18 dBμ |
| Video Signal-to-Noise Ratio | Greater than 35 dB (for 59 dBμ input) |
| Rear Screen Output – Video | 1 Vcc / 75 Ω |
| Rear Screen Output – Audio | 500 mV RMS / less than 1 kΩ |
| Antenna Input | 4 channels (3.5 mm mini jacks) |
| Remote Control Battery | Lithium CR2025 (3 V) |
| Main Functions | Manual/Auto Tuning, BSSM, Presets, Country Group Selection |
| Compatibility | Pioneer head units with AV-BUS |
| Usage | Vehicle only when stationary – do not watch while driving |
Frequently Asked Questions - GEXP6400TVP PIONEER
User questions about GEXP6400TVP PIONEER
0 question about this device. Answer the ones you know or ask your own.
Ask a new question about this device
Download the instructions for your TV in PDF format for free! Find your manual GEXP6400TVP - PIONEER and take your electronic device back in hand. On this page are published all the documents necessary for the use of your device. GEXP6400TVP by PIONEER.
USER MANUAL GEXP6400TVP PIONEER
Before Using This Product 2
About This Product 2
Video system of a connected component
This product's power source
About This Manual 3
Precaution 3
In Case of Trouble 3
Resetting the Microprocessor 3
OSD Switch Setting 4
Key Finder 5
Remote Control (Supplied)
The Head Unit (e.g. DEH-P8400MP)
Using the Remote Control 7
Battery 7
Operating with Head Unit 8
Head Unit Group 1
Head Unit Group 2
Head Unit Group 3
Function Compatibility Charts 9
Preset Memory
Direct Recall
- Entering the Function Menu
Preset Scan
- Switching the Tuning Mode
- Using the PGM Button
- Preset ch. List
Basic Operation 13
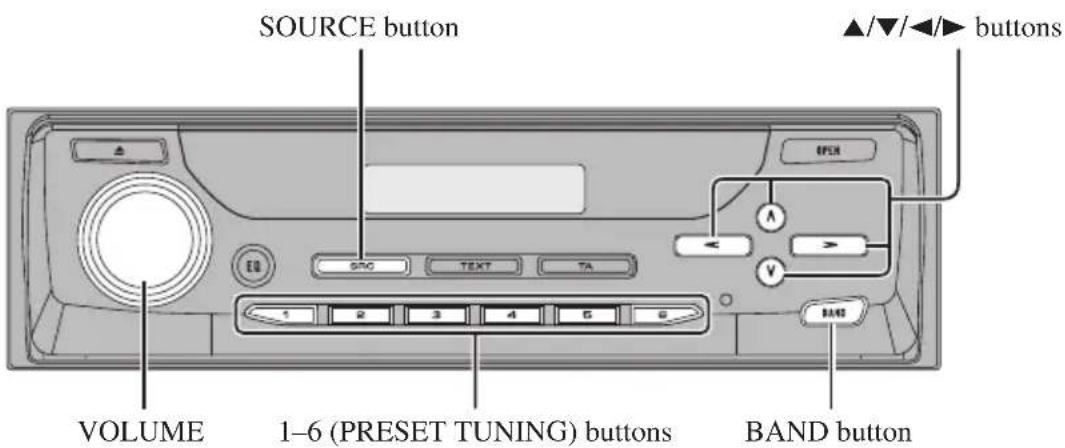
Switching the Source 13
Basic Operation of TV Tuner 14
- Manual and Seek Tuning
BAND
Preset Tuning
BSSM (Best Station Sequential Memory) 15
Confirming Current Channel and
Other Settings 16
Operating the Setting Menu 17
Selecting the Country Group 17
Country Group List and Channel Name
Specifications 18
About This Product
- This product complies with the EMC Directives (89/336/EEC, 92/31/EEC) and CE Marking Directive (93/68/EEC).
This product is a TV tuner for reception of TV broadcasts. Combining it with a separately sold display with AV-BUS lets you enjoy TV entertainment (refer to this product's Installation Manual for details concerning the AV-BUS). The tuner frequencies on this product are allocated for use in Western and Eastern Europe. Use in other areas may result in improper reception. (This product is not compatible with channels in France.)
This product features a Rear Display output (REAR OUT), letting you watch TV on a Rear Display (sold separately).
Video system of a connected component
This product is PAL system compatible. When connecting an external component to this product's Rear Display output (REAR OUT), be sure the component is compatible with the same video systems. If it is not, images will not be correctly reproduced.

WARNING
- Be sure to stop driving and park your car in a safe place before watching the TV.
- Watching the TV while driving is dangerous and could result in an accident.
- This product's Rear Display output is for connection of a display to enable passengers in the rear seats to watch the TV. Do not install the rear display in a location that enables the driver to watch the TV while driving.
This product's power source
Switching power to the unit controlling this product OFF, or selecting a source other than TV does not switch power to this product OFF.
Although this product is designed to assure no problems occur during use, if for some reason you want to switch power OFF, switch ACC OFF on the car side.
About This Manual
This product features a number of sophisticated functions ensuring superior reception and operation. All are designed for the easiest possible use, but many are not self-explanatory. This operation manual is intended to help you benefit fully from their potential and to maximize your listening enjoyment.
We recommend that you familiarize yourself with the functions and their operation by reading through the manual before you begin using this product. It is especially important that you read and observe the "Precaution" on this page and in other sections.
When using with a Pioneer AV Receiver (e.g. AVH-P6400CD, AVH-P6400R), please read the AV Receiver's Operation Manual.
Precaution
- Keep this manual handy as a reference for operating procedures and precautions.
- Always keep the volume low enough for outside sounds to be audible.
- Protect this product from moisture.
- If the battery is disconnected, the preset memory will be erased and must be reprogrammed.
In Case of Trouble
Should this product fail to operate properly, contact your dealer or nearest authorized PIONEER Service Station.
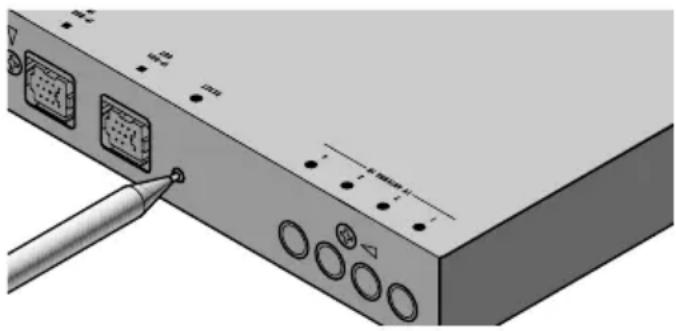
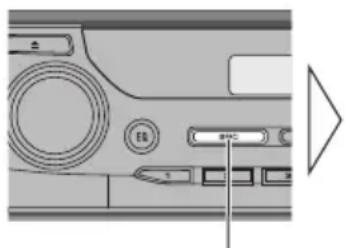
Resetting the Microprocessor
The microprocessor must be reset under the following conditions:
When using this product for the first time after installation.
When the machine fails to operate properly.
When strange (incorrect) messages appear on the display.
When setting the position of the OSD switch on the right side of this product.
If you reset the microprocessor, memorized broadcast stations and other information is erased, and this product returns to its initial settings.
- To reset the microprocessor, press the RESET button on the unit with a pen tip or other pointed instrument.
OSD Switch Setting
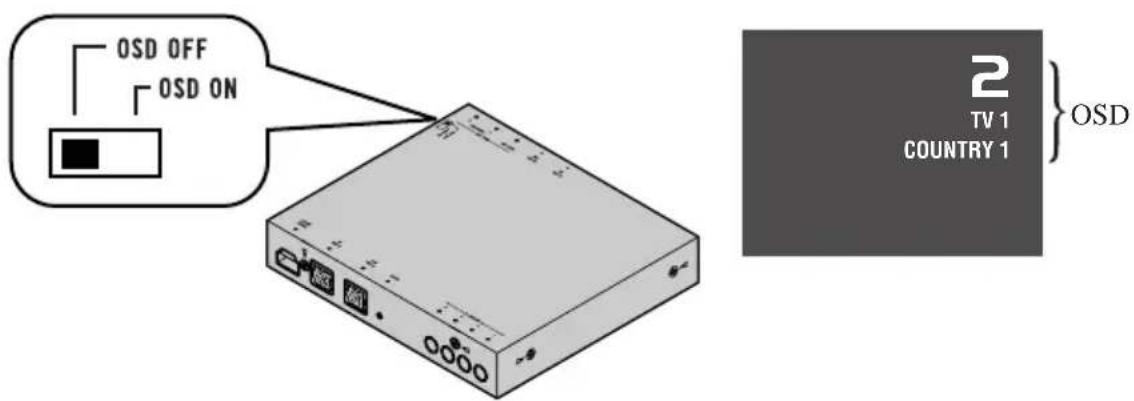
Set the OSD (On Screen Display) switch on the right side of this product to the appropriate position with a pen tip or other pointed instrument, for the component you are combining it with.
(1) OSD OFF
When combining with a PIONEER AV Receiver (e.g. AVH-P6400CD, AVH-P6400R).
- Select this setting when not using this product's OSD indications in the display.
(2) OSD ON
When combining with a PIONEER Display featuring an AV-BUS input (e.g. AVX-P7300DVD, AVX-7300).
- Select this setting when using this product's OSD indications in the display.
Note:
- As output from the Rear Display output has no relation to the OSD switch's ON/OFF setting, OSD indications are always displayed.
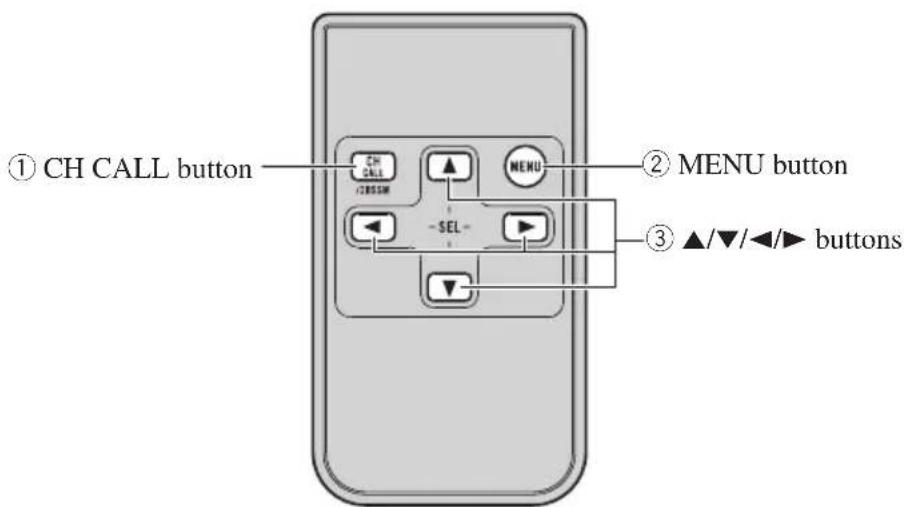
Remote Control (Supplied)
This product's supplied remote control is mainly for use by rear seat passengers. When using, point at the front seat display remote control sensor.
Other remote controls
You can also perform operations with the remote controls shown below. Operate using the buttons that correspond to those on this product's supplied remote control, as shown in the chart.
| This product's supplied remote control | A Pioneer car DVD player's remote control* |
| ①CH CALL button STEP (II▶) button | |
| ② MENU button | PLAY/PAUSE (▶/II) button |
| ③ ▲/▼/▲/▶ buttons | Joystick |
| Mode switch: Mode switch: No operation mode switch. When operating a TV, be sure to set the “Remote control operation mode switch” to the “TV” position. | |
*·SDV-P7, AVX-P7300DVD, XDV-P9II
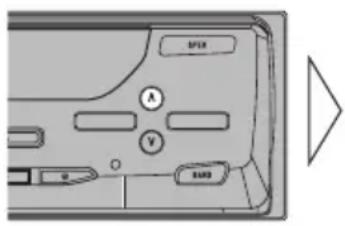
The Head Unit (e.g. DEH-P8400MP)
You can control this unit with a Head Unit (sold separately).
Front panel (open)
Note:
- Button layout differs depending on the model, so please read the Operation Manual of the Head Unit you are using.
Using the Remote Control
This product is equipped with a remote control for convenient operation.
- Point the control in the direction of the remote control sensor on the color display (sold separately) to operate.
Precaution:
-
Do not store the remote control in high temperatures or direct sunlight.
-
The control may not function properly in direct sunlight.
-
Do not let the remote control fall onto the floor, where it may become jammed under the brake or accelerator pedal.
Battery
- Slide the tray out on the back of the remote control and insert the battery with the (+) and (-) poles pointing in the proper direction.
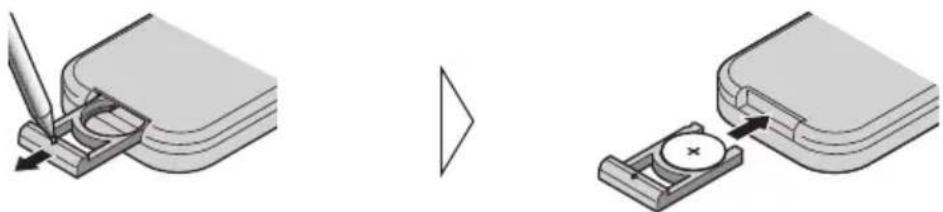
Replacing the Lithium Battery:
Use only lithium battery "CR2025", 3 V.
Precaution:
- Remove the battery if the remote control is not used for a month or longer.
- If the event of battery leakage, wipe the remote control completely clean and install a new battery.

WARNING:
- Keep the lithium battery out of reach of children. Should the battery be swallowed, immediately consult a doctor.

CAUTION:
- Do not recharge, disassemble, heat or dispose of battery in a fire.
- Use a CR2025 (3 V) lithium battery only. Never use other types of battery with this unit.
- Do not handle the battery with metallic tools.
- Do not store the lithium battery with metallic materials.
- When disposing of used batteries, please comply with governmental regulations or environmental public institution's rules that apply in your country/area.
- Always check carefully that you are loading the battery with its (+) and (-) poles facing in the proper directions.
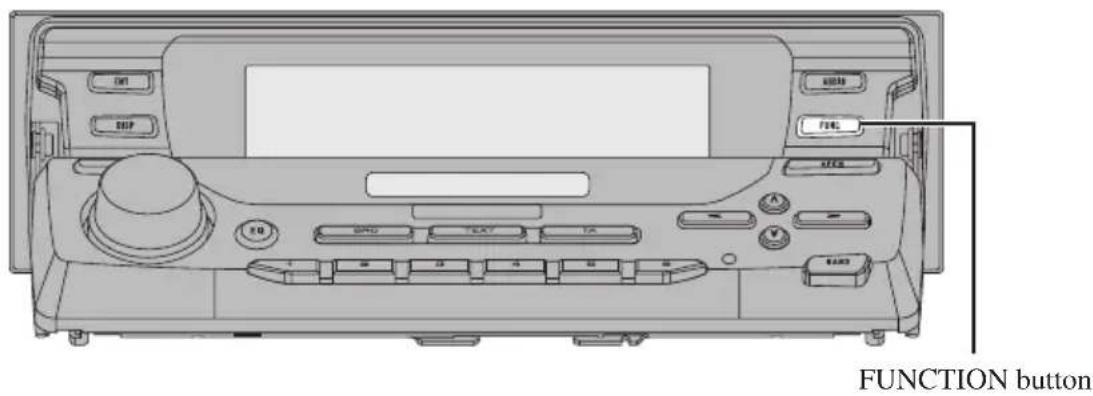
These instructions explain how to operate this product with a connected Head Unit (sold separately). Some Head Units control this product as a TV source, while others control it as an External Unit. Among Head Units that control this product as an External Unit, some do it using a FUNCTION button and some do not.
Note:
- External Unit refers to a component that cannot be fully controlled by a Head Unit as a source.
- When connected to a Head Unit that cannot control a TV as a source, this product (TV) is controlled as an External Unit.
- Two types of Pioneer Head Unit are available: one type to which only one external unit can be connected and another type to which two external units can be connected.
■Head Unit Group 1
Head Units that control this product as a TV source.
■Head Unit Group 2
Head Units that control this product as an External Unit using a FUNCTION button to operate functions.
■Head Unit Group 3
Head Units that control this product as an External Unit, not using a FUNCTION button to operate functions.
Head Unit Group 1
When using the unit with one of these Head Units, operate while referring to Head Unit Group 1 in the Function Compatibility Charts.
DEX-P9R
DEH-P900HDD DEH-P9400MP DEH-P9300
DEH-P8400MP DEH-P7400MP DEH-P7300R
DEH-P7100R DEH-P6400R DEH-P6300R
DEH-P6100R DEH-P5100R DEH-P5100R-B
DEH-P5100R-W DEH-P4400R DEH-P4400RB
DEH-P4300R DEH-P4300RB DEH-P3300R
DEH-P3330R
KEH-P8010R KEH-P7910R KEH-P7900R
KEH-P7020R KEH-P6910R KEH-P6900R
KEH-P6900R-B KEH-P6021R KEH-P6020R
KEH-P6020RB KEH-P6011R
MEH-P7300R MEH-P7100R MEH-P5100R
FH-P6600R
AVM-P9000R AVM-P8000R
AVH-P6400CD AVH-P6400R
DVH-P7000R
Head Unit Group 2
When using the unit with one of these Head Units, operate while referring to Head Unit Group 2 in the Function Compatibility Charts.
DEH-P4100R
FH-P4000R
When using the unit with one of these Head Units, operate while referring to Head Unit Group 3 in the Function Compatibility Charts.
KEH-P5900R KEH-P5011 KEH-P5010R
KEH-P4930R KEH-P4900R KEH-P4023R
KEH-P4022 KEH-P4020R KEH-P4013RB
KEH-P4010R KEH-P1013R KEH-P1010R
Function Compatibility Charts
Operate using buttons with the same function on the Head Unit itself or the remote control.
Note:
- You may not be able to use functions* with some Head Units.
Head Unit Group 1
| Function | Button | Operation | |
| Switching the Source SOURCE, SOURCE/OFF :Select 13 | |||
| Manual Tuning (Step by Step) ▲/▶(0.5 seconds or less) :Select 14 | |||
| Seek Tuning ▲/▶(0.5 seconds or more) :Select 14 | |||
| Preset Tuning ▲/▼:Select 14 | |||
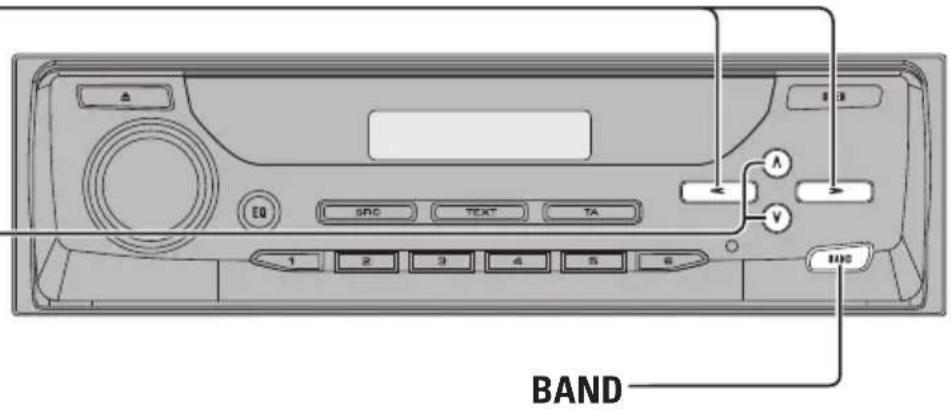
| Changing the Band BAND, ▲/▶ | :Select 14 | ||
| Preset Memory | 1-6 (Hold for 2 seconds) | :Memory | 11 |
| Direct Recall | 1-6 | :Select | 11 |
| BSSM | FUNCTION (A.MENU) ▲/▼ | :ON/OFF | |
| Preset ch. List* | FUNCTION (A.MENU) ▲/▼/▲/▼ | 12 | |
| Setting the PGM Button* | FUNCTION (Hold for 2 seconds) ▲/▼/▲/▼ | :Select | — |
| Using the PGM Button* | PGM (Hold for 2 seconds) | :BSSM ON/OFF | 12 |
Note:
- For TV, you cannot memorize functions other than BSSM in the PGM button. (You may not be able to use this function with some Head Units.)
- When using with an AV Receiver (e.g. AVH-P6400CD, AVH-P6400R), please read the AV Receiver's Operation Manual.
Head Unit Group 2
| Function | Button | Operation | |
| Switching the Source SOURCE, SOURCE/OFF :Select 13 | |||
| Manual or Seek Tuning←/▶:Select 14 | |||
| Preset Tuning ▲/▼:Select 14 | |||
| Changing the Band BAND, ▲▶:Select 14 | |||
| Preset Memory 1-6 (Hold for 2 seconds) :Memory 11 | |||
| Direct Recall 1-6 | :Select 11 | ||
| Entering the Function Menu | FUNCTION :Select 11 | ||
| Preset Scan* (FUNC 1) | ▲/▼ | :ON/OFF | 12 |
| BSSM (FUNC 1) | ▲/▼ (Hold for 2 seconds) | :ON/OFF | 15 |
| Country Select (FUNC 4) | FUNCTION (A.MENU) ▲/▼ | :Select 16 | |
| Switching the Tuning Mode* (AUTO/MANUAL) | ▲/▼ | :Select | 12 |
| Setting the PGM Button* | FUNCTION (Hold for 2 seconds) ▲/▼/<▼> | :Select | — |
| Using the PGM Button* | PGM/DSP, PGM | :BSSM ON/OFF | 12 |
Head Unit Group 3
| Function | Button | Operation | |
| Switching the Source SOURCE, SOURCE/OFF :Select 13 | |||
| Switching the Tuning Mode PTY button | :Select 12 | ||
| Manual or Seek Tuning ▲/▼:Select 14 | |||
| Preset Tuning ▲/▼:Select 14 | |||
| Changing the Band BAND, ▲/▼:Select 14 | |||
| Preset Memory | 1-6 (Hold for 2 seconds) | :Memory | 11 |
| Direct Recall 1-6 | :Select 11 | ||
| BSSM | DISPLAY button(Hold for 2 seconds) | :ON/OFF | 15 |
| Preset Scan | DISPLAY button | :Select 12 | |
Note:
-
The button for Preset Scan differs depending on the model.
-
KEH-P4020R, KEH-P4023R: DISP/REG button
- KEH-P5010R, KEH-P4013R, KEH-P4010R, KEH-P4010RB: PTY button
- KEH-P5011: PAUSE/SCAN button
-
KEH-P4022: BSM button
-
The button for Switching the Tuning Mode differs depending on the model.
-
KEH-P4020R, KEH-P4023R, KEH-P4022: LOCAL button
- KEH-P5010R, KEH-P4013R, KEH-P4010R, KEH-P4010RB, KEH-P5011
:LOCAL/BSM button
Preset Memory
The Preset Memory function stores stations in memory manually.
- Select the station whose channel you want to store in memory.
- Press one of buttons 1-6 for 2 seconds or longer to store the desired stations.
Note:
- The station is stored in memory under the selected button.
- You cannot memorize in Preset channels 7-12 with this function.
Direct Recall
- Press one of buttons 1-6 to recall a station preset under that button.
Note:
- To recall Preset channels 7-12, perform Preset Tuning with / buttons.
Entering the Function Menu
- Press the FUNCTION button to select the desired mode in the Function Menu.
Each press of the FUNCTION button selects the mode in the following order:
FUNC 1 (Preset Scan/BSSM) FUNC 2 FUNC 3
FUNC 4 (Selecting the Country Group)
AUTO/MANUAL (Switching the Tuning Mode)
Note:
- In FUNC 1, Preset Scan or BSSM is selected by changing the length of time you press the / button.
- There are no functions in FUNC 2, FUNC 3.
Preset Scan
This lets you view up to 12 stations stored in the Preset Channels one after the other.
Switching the Tuning Mode
You can select between Manual Tuning (MANUAL) and Seek Tuning (AUTO). Press the / button, or other button as appropriate, and tuning is performed in the selected tuning mode.
Using the PGM Button
The PGM (PGM/DSP) button operates in a different way depending on the function programmed (memorized). (For details concerning programming the PGM (PGM/DSP) button, refer to the Head Unit's operation manual.)
- Press the PGM (PGM/DSP) button.
Function Press Hold for 2 seconds
Preset Scan/BSSM (FUNC1) Preset Scan ON/OFF BSSM ON/OFF
Switching the Tuning Mode Select (AUTO/MANUAL)
Preset ch. List
Read the Operation Manual of a Head Unit that can use this function.
When using with a Pioneer AV Receiver (e.g. AVH-P6400CD, AVH-P6400R), please read the AV Receiver's Operation Manual.
Switching the Source
Perform appropriate "Selecting the Country Group" for your region. (Refer to page 16.)
■Head Unit Group 1
1. Switch the display image source to this product.
For details, refer to the connected unit's manual.
2. Select the TV source on the Head Unit.
Each press changes the Source ...

■Head Unit Group 2 and 3
1. Switch the display image source to this product.
For details, refer to the connected unit's manual.
2. Set the source to "External" (or "TV", "Television").
Note:
- Switching power to the Head Unit (the unit controlling this product) OFF, or selecting a source other than TV does not switch power to this product OFF. Although this product is designed to assure no problems occur during use, if for some reason you want to switch power OFF, switch ACC OFF on the car side.
- With Head Unit Group 2 or 3 models, "TV" or "Television" may not be indicated in the display.
Basic Operation of TV Tuner
Perform appropriate "Selecting the Country Group" for your region. (Refer to page 16.)
Manual and Seek Tuning
- You can select the tuning method by changing the length of time you press the button.
Manual Tuning (step by step) 0.5 seconds or less
Seek Tuning 0.5 seconds or more
Note:
- If you continue pressing the button for longer than 0.5 seconds, you can skip broadcasting stations. Seek Tuning starts as soon as you stop pressing the button.
TV1 TV2
Operation is possible only with the Head Unit's BAND () button.

Channel
Preset Number
Preset Tuning
- You can recall memorized stations.
You can memorize and recall stations using buttons 1-6 in the same way as with Head Unit tuner Preset Tuning. (Refer to page 11.)
BSSM (Best Station Sequential Memory)
The BSSM function automatically memorizes strongly transmitted broadcast stations in order from the lowest channel up.
Note:
- Up to 12 stations can be memorized in 1 Band.
- In regions where reception of no more than 12 station is possible, previously memorized stations may remain in memory.
■Head Unit Group 1
- Press the FUNCTION (A.MENU) button and select the BSSM mode (BSSM) in the FUNCTION (AUDIO) Menu.
- To switch the BSSM ON, press the button.

- To cancel the process, press the button in the FUNCTION (AUDIO) Menu before memorization is complete.
■Head Unit Group 2
- Press the FUNCTION button and select the Preset Scan/BSSM mode (FUNC 1) in the Function Menu.
-
To switch the BSSM ON, press the button for 2 seconds.
-
To cancel the process, press the button in the Function Menu before memorization is complete.
■Head Unit Group 3
- To switch the BSSM ON, press the DISPLAY button for 2 seconds.
- To cancel the process, press the DISPLAY button again before memorization is complete.
Note:
- The button for BSSM differs depending on the model.
- KEH-P4020R, KEH-P4023R: DISP/REG button
- KEH-P5010R, KEH-P4013R, KEH-P4010R, KEH-P4010RB: PTY button
- KEH-P5011: PAUSE/SCAN button
- KEH-P4022: BSM button
This product's remote control
You can also perform BSSM with Remote control supplied with this product.
- To switch the BSSM ON, press the CH CALL button for 2 seconds.
- To cancel the process, press the CH CALL button for 2 seconds again before memorization is complete.
Confirming Current Channel and Other Settings
If the current audio source is TV, reception information such as the channel and band is displayed. You can also display to the preset channel list.
- Select the desired mode in the following order:
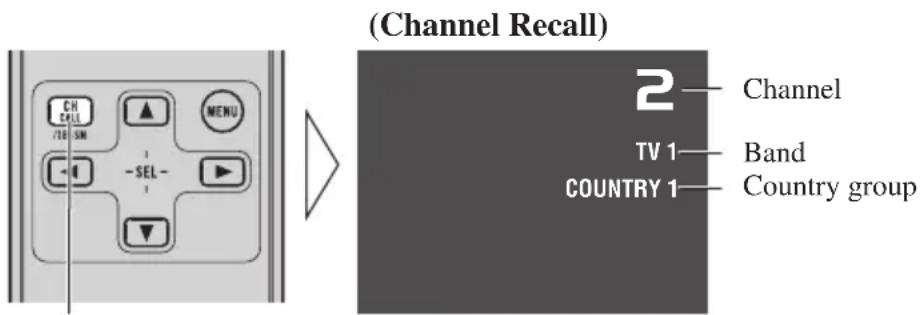
Each Press changes the Mode ...
Channel Recall Preset channel list Country list Indication OFF (Preset channel list) (Country list)

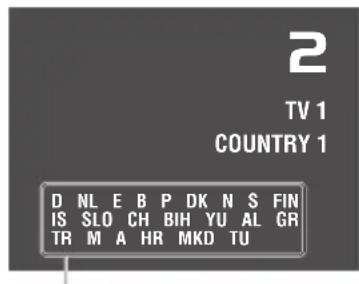
Country names in COUNTRY IChannels memorized (presct) in
Note:
- Recalled indications are displayed for 8 seconds.
Selecting the Country Group
In this product, channels are preset for each country group. Selecting the appropriate country group for your reception area enables reception of multiple channels.
- Press the MENU button on the remote control and select the Country List mode (COUNTRY LIST).
- Select the country group containing the country you are currently in to the following order:

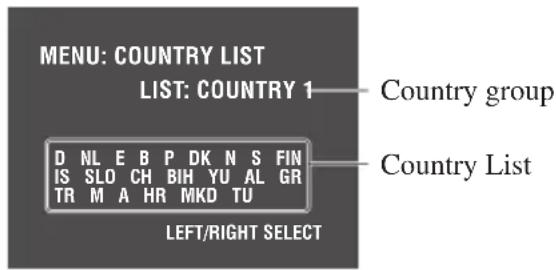
COUNTRY1 COUNTRY2 COUNTRY3 COUNTRY4
Country Group List and Channel Name
Country group Display (Country name)
COUNTRY1 D (GERMANY) NL (NETHERLANDS) E (SPAIN)
(CCIR Channel) B (BELGIUM) P (PORTUGAL) DK (DENMARK)
N (NORWAY) S (SWEDEN) FIN (FINLAND)
IS (ICELAND) SLO (SLOVENIA) CH (SWITZERLAND)
BIH (BOSNIA) YU (YUGOSLAVIA) AL (ALBANIA)
GR (GREECE) TR (TURKEY) M (MALTA)
A (AUSTRIA) HR (CROATIA)
MKD (MACEDONIA)
TU (TUNISIA)
COUNTRY2 I (ITALY) (ITALY Channel)
RSM (REPUBLIC OF SAN MARINO)
COUNTRY3 GB (U.K.) (U.K. Channel)
IRL (IRELAND)
COUNTRY4 RUS (RUSSIA)
H (HUNGARY)
CZ (CZECH)
(OIRT Channel) BG (BULGARIA)
PL (POLAND) SLK (SLOVAKIA)
Note:
- You can use BSSM and other methods to memorize broadcast stations in each of the Country groups.
- This product is not compatible with channels in France.
- Broadcast channels and broadcast systems may vary from country to country. If reception is not possible with the appropriate country group listed above, try reception using another country group.
- When using with the AVH-P6400CD or AVH-P6400R, please read the AV Receiver's Operation Manual.
Specifications
General
Power source 14.4 V DC (10.8 - 15.1 V allowable)
Grounding system Negative type
Max. current consumption 0.5 A
Dimensions 172 (W) × 30 (H) × 148 (D) mm
Weight 0.7 kg
TVtuner
Reception channel/TV system COUNTRY 1: (CCIR/B, G, H): VHF 2 — 12 ch, UHF 21 — 69 ch
(For each Country Group) COUNTRY 2: (ITALY/B, G, H, K): VHF A — H2 ch, UHF 21 — 69 ch
COUNTRY 3: (UK, IRELAND/I): VHF A — Kch, UHF 21 — 69 ch
COUNTRY 4: (OIRT/D, K): VHF R1 — R12 ch, UHF 21 — 69 ch
Color system PAL compatible
Usable sensitivity 18 dBμ
Video S/N Over 37 dB (59 dBu RF input, White Peak 100%
Video S/N 30 dB usable sensitivity 45 dBu
Antenna input 4 ch Diversity ( 3.5mm Mini plug type)
Rear display output
Video 1 Vp-p/75 Ω (TV: White 100% Modulated)
Sound 500 mVrms/Less than 1k (TV: 100% Modulated)
Note:
- Specifications and the design are subject to possible modification without notice due to improvements.
Contidente
DEH-P5100R-W DEH-P4400R DEH-P4400RB
DEH-P4300R DEH-P4300RB DEH-P3300R
DEH-P3330R
KEH-P8010R KEH-P7910R KEH-P7900R
KEH-P7020R KEH-P6910R KEH-P6900R
KEH-P6900R-B KEH-P6021R KEH-P6020R
KEH-P6020RB KEH-P6011R
MEH-P7300R MEH-P7100R MEH-P5100R
FH-P6600R
AVM-P9000R AVM-P8000R
AVH-P6400CD AVH-P6400R
DVH-P7000R
Hauptgerät Gruppe 2
Vorwahl-Scan/BSSM (FUNC 1) Vorwahl-Scan ON/OFF BSSM ON/OFF
Landesnamen in COUNTRY 1
Hinweis:
N (NORWEGEN) S (SCHWEDEN) FIN (FINNLAND)
IS (ISLAND) SLO (SLOVENIEN) CH (SCHWEIZ)
BIH (BOSNIEN) YU (JUGOSLAWIWEN) AL (ALBANIEN)
GR (GRIECHENLAND) TR (TURKEI) M (MALTA)
A (ÖSTERREICH) HR (KROATIEN) MKD (MAZEDONIEN)
TU (TUNESIEN)
COUNTRY2 I (ITALIEN) RSM (REPUBLICK SAN MARINO) (ITALIEN-Kanal)
| COUNTRY3 (UK-Kanal) | GB (UK) | IRL (IRLAND) | |
| COUNTRY4 (OIRT-Kanal) | RUS (RUSSLAND) BG (BULGARIEN) | H (UNGARN) PL (POLEN) | CZ (TSCHECHOSLOWAKEI) SLK (SLOVAKEI) |
Hinweis:
DEH-P5100R-W DEH-P4400R DEH-P4400RB
DEH-P4300R DEH-P4300RB DEH-P3300R
DEH-P3330R
KEH-P8010R KEH-P7910R KEH-P7900R
KEH-P7020R KEH-P6910R KEH-P6900R
KEH-P6900R-B KEH-P6021R KEH-P6020R
KEH-P6020RB KEH-P6011R
MEH-P7300R MEH-P7100R MEH-P5100R
FH-P6600R
AVM-P9000R AVM-P8000R
AVH-P6400CD AVH-P6400R
DVH-P7000R
PIONEER ELECTRONICS (USA) INC.
P.O.Box 1540, Long Beach, California 90801-1540, U.S.A.
TEL: (800) 421-1404
PIONEER EUROPE NV
Haven 1087, Keetberglaan 1, B-9120 Melsele, Belgium
TEL: (0) 3/570.05.11
PIONEER ELECTRONICS ASIACENTRE PTE. LTD.
253 Alexandra Road, #04-01, Singapore 159936
TEL: 65-472-1111
PIONEER ELECTRONICS AUSTRALIA PTY. LTD.
178-184 Boundary Road, Braeside, Victoria 3195, Australia
TEL: (03) 9586-6300
PIONEER ELECTRONICS OF CANADA, INC.
300 Allstate Parkway, Markham, Ontario L3R OP2, Canada
TEL: (905) 479-4411
PIONEER ELECTRONICS DE MEXICO, S.A. de C.V.
San Lorenzo 1009 3er. Piso Desp. 302
Col. Del Valle Mexico, D.F. C.P. 03100
TEL: 55-5688-52-90
Published by Pioneer Corporation.
Copyright © 2002 by Pioneer Corporation.
All rights reserved.
Publication de Pioneer Corporation.
Copyright © 2002 Pioneer Corporation.