
CristalProfi e401 - Aquarium filter JBL - Free user manual and instructions
Find the device manual for free CristalProfi e401 JBL in PDF.
| Product type | External filter for aquarium |
| Brand | JBL |
| Model | CristalProfi e401 greenline |
| Dimensions (L x W x H) | 180 x 210 x 284 mm |
| Tank volume | 4.6 L |
| Filter media volume | 2.3 L |
| Number of filter baskets | 1 |
| Filter basket volume | 1.2 L |
| Compartment basket volume | 1.1 L |
| Hose diameter | 12/16 mm |
| Max pump flow rate | 450 L/h (empty) |
| Real-world flow rate | 200-250 L/h (with media and 1.5 m hoses) |
| Recommended aquarium | 40 to 120 L |
| Power supply | 230 V / 50 Hz |
| Power consumption | 4 W |
| Approval | TÜV/GS |
| Warranty | 4 years |
| Included filter media | Pre-filter foam F1, MicroMec balls F2, foams F3/F4/F5 |
| Priming | Integrated quick priming device (START button) |
| Water shut-off | Connection block with ball valves |
| Noise level | Quiet thanks to a rotor on ceramic shaft |
| Use | Freshwater or saltwater |
Frequently Asked Questions - CristalProfi e401 JBL
User questions about CristalProfi e401 JBL
0 question about this device. Answer the ones you know or ask your own.
Ask a new question about this device
Download the instructions for your Aquarium filter in PDF format for free! Find your manual CristalProfi e401 - JBL and take your electronic device back in hand. On this page are published all the documents necessary for the use of your device. CristalProfi e401 by JBL.
USER MANUAL CristalProfi e401 JBL
Aquarium external filter
For clean and healthy water


natural_image
Exploded view of a robotic arm and mechanical components (no text or symbols visible)
natural_image
Close-up of a hand placing a small object into a dark, textured container (no visible text or symbols)2

natural_image
Close-up of a mechanical component with internal features and a magnified inset showing a small tool (no visible text or symbols)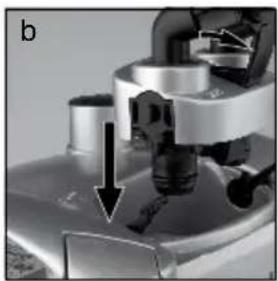
natural_image
Close-up of a mechanical device with a downward arrow indicating a process or operation (no visible text or symbols)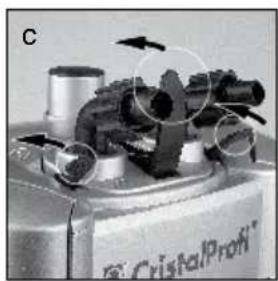
natural_image
Close-up of a mechanical component with arrows indicating motion or force, labeled 'CristalProfi' (no readable text beyond label)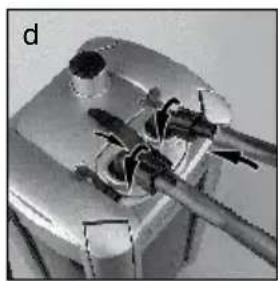
natural_image
Close-up of a metallic mechanical component with wires and a tool, no visible text or symbols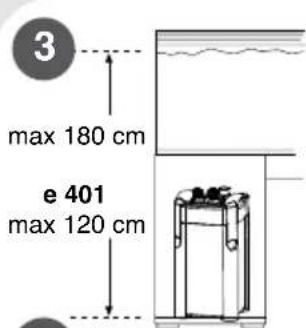
4
natural_image
Diagram of a mechanical device with a magnified inset showing a suspended component (no text or symbols)4

b
5
b
natural_image
Close-up of a gas stove burner with a cylindrical component and downward arrows indicating compression or cooling (no text or symbols visible)6
natural_image
Simple line drawing of a pipe with a curved pipe passing through water (no text or symbols)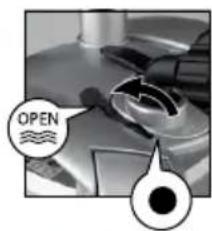
natural_image
Close-up of a kitchen utensil with two circular annotations showing 'OPEN' and a magnified view (no readable text or symbols)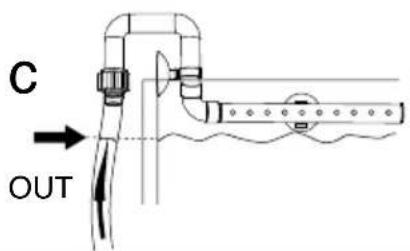
d
natural_image
Simple line drawing of an electrical outlet connected to a battery, with a power plug and cable (no text or symbols)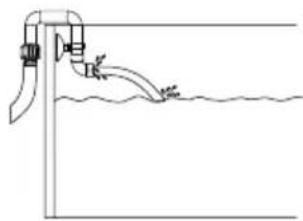
natural_image
Simple line drawing of a pipe outlet with water flowing through it (no text or symbols)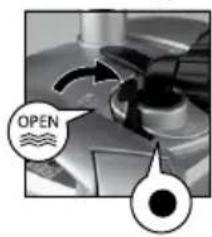
natural_image
Close-up of a kitchen utensil with a 'OPEN' label and magnified view showing water level (no text or symbols on the utensil itself)7
natural_image
Close-up of two mechanical components with circular features and directional arrows (no visible text or symbols)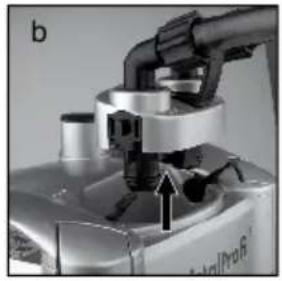
natural_image
Close-up of a robotic arm gripping a mechanical component, no visible text or symbols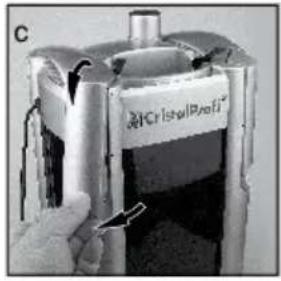
natural_image
Close-up of a stainless steel cylindrical container with a label showing 'CristallProff' and a hand holding a key (no readable text beyond label)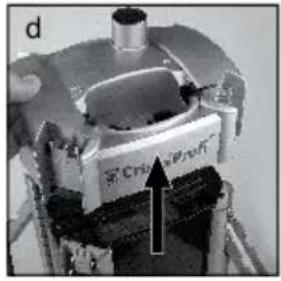
natural_image
3D rendered mechanical assembly with components and housing (no visible text or symbols)8
F1+F4+F5 = JBL CombiBloc
F3 = JBL UniBloc
F2= JBL MicroMec

10

natural_image
Close-up of a mechanical component with a magnified inset showing a circular feature (no visible text or symbols)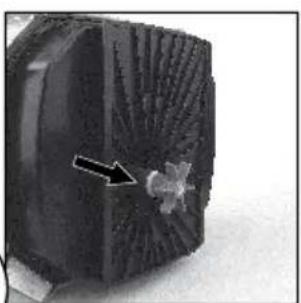
natural_image
Close-up of a dark, textured object with a small white mark and arrow pointing to its surface (no text or symbols visible)
natural_image
Close-up of a dark, textured object with a black arrow pointing to it, next to smaller mechanical components (no visible text or symbols)The purchase of this high-quality JBL CristalProfi external filter was a wise decision. Highly efficient filtering of your tank and the simplest possible operation are key factors in the design of this filter.
Safety Precautions
If a multi-socket extension cable is used, it must be positioned above the filter power connection.
These appliances can produce magnetic fields that may cause damage or disturbances to electrical equipment. This also applies to cardiac pacemakers. Please consult the manual of the medical appliance in question for recommended safe operating distances.
There is a danger of fingers being squashed by magnetic force when maintenance work is carried out.
Unforeseen chemical reactions may cause the feet of the appliance to leave permanent marks on varnished and waxed furniture or wooden floors. Appropriate protection should therefore be used if the appliance is placed on a wooden surface.
Please note: Basic safety precautions including the following should be observed to protect from injury and electric shock:
1. Read and follow all safety advice.
- Warning: As these external filters are in contact with water, particular care must be taken to avoid electric shock. Should one of the following situations arise, do not repair the appliance yourself. The appliance must be repaired by an authorised specialist or disposed of:
a) If the appliance falls into the water, do not try to retrieve it! Pull all power plugs first and then retrieve the appliance.
b) The aquarium and the appliance should be positioned next to a wall socket in such a way that no water can splash onto the socket or the plug. The power cable of the appliance should form a "drip loop" to prevent water running along the cable into the power socket.
c) Never touch the plug if the socket or plug is wet! First switch off the circuit to which the appliance is connected (safety switch) and then disconnect the plug. Check the power socket and plug for water.
- The appliance may be used by children over the age of 8 and by persons with a physical, sensory or mental impairment, as well as by inexperienced persons, if they are under supervision. They should have received an introduction to how to use the appliance for
this purpose and be aware of the risks of use. The appliance is not a toy. Children should not clean the appliance or do maintenance or repair work on it unless they are over the age of 8 and are being supervised.
- Always disconnect the appliance from the power supply when the appliance is not in use, before dismantling or installing parts and before cleaning the appliance. Never disconnect the plug by pulling on the cable. Always hold the plug when disconnecting.
- The appliance may not be used for any other purpose than is intended by the manufacturer. The use of accessories not recommended by the manufacturer may result in hazardous situations.
- Do not operate or store the appliance where there is a risk of frost.
- The power cord of this appliance cannot be replaced. If the cable is damaged, the appliance must be disposed of.
- Before using the appliance for the first time, make sure it has been installed correctly.
- Do not operate without water.
- The appliance is for indoor use only. The appliance may only be used for aquatic purposes.
- Disconnect all electrical appliances in the aquarium from the power supply before carrying out any work on the appliance or in the aquarium.
- Do not use this appliance to pump liquids with a temperature above 35^ C.
- Avoid electric shock by never immersing the appliance, mains plug or power cord in water or any other liquid.
- Save these instructions!
CE, TÜV/GS


DISPOSAL: Do not dispose of the pump head of this appliance with your general household waste. Comply with local disposal regulations for electric appliances.
Contents:
Description of functions Page 18
Special features Page 18
Parts and names Page 19
Technical data Page 20
Installation Page 20
Note on pumping capacity
Maintenance and care Page 23
What to do if.... Page 26
Filter media for solving problems
Page 23
Page 28
Description of functions
The JBL CristalProfi greenline Filter cleans the tank water in a closed circuit.
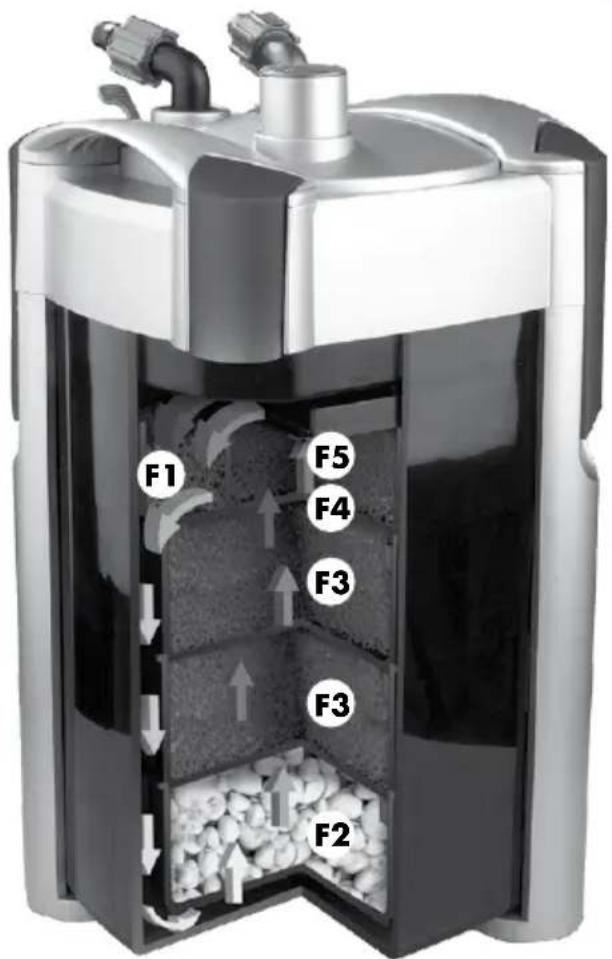
A maintenance-free pump built into the filter head ensures permanent water circulation. The water is fed from the aquarium into the filter media basket, where it flows through the filter media from the bottom to the top and is cleaned appropriately, before being pumped back into the aquarium. The filter is NOT self priming. The air initially contained in the system must be removed before starting the appliance. This can be done by selecting the built-in quick-start option by pushing the priming button.
Special features
• Energy efficient
The filters of the JBL CristalProfi greenline range consume up to 43 % (depending on model) less power than previous comparable models.
• High capacity, quiet
New motor technology delivers the same effective water circulation in your aquarium as previous models. Optimised pump impeller with ceramic bearings ensures very quiet running and long service life.
• Seldom needs cleaning
Immediately below the pump head, there is an innovative, patented [EP 1832164] combi filter basket containing pre-filter media on the right and left, which are very easily accessible. The remaining pre-filter media seldom need cleaning, providing the pre-filter media are replaced regularly.
• Complete with JBL MicroMec high-capacity biological filter balls
The round shape and varying diameter of the balls produces a self-cleaning effect. As a result, these filter media only need cleaning at very long intervals.
- The main filter media can be used for up to a year when used in conjunction with the easily cleaned pre-filter.
• Fully fitted and ready to install
A wide range of accessories guarantee easy connection to almost any freshwater or marine aquarium.
• Simple to start, safe to use
The built-in quick-start priming button makes starting the filter child's play, without the annoyance of manual priming.
All the parts of the filter are easy to fit and designed in such a way that incorrect assembly is impossible.
An innovative patented [EP 1869973] hose connection block prevents water leakage when the block is disconnected from the filter.
Tested to TÜV/GS
• Complete and ready to plug in
The filter is fully ready to plug in and equipped with filter media. The filter media have been selected to ensure efficient manual and biological water purification that leaves your aquarium water clear and healthy.
A wide range of accessories guarantee easy connection to almost any freshwater or marine aquarium.
Parts and names
1 Hose connection block with water-stop
1 a Middle lever
2 Pump head 2 a left stopcock lever 2 b right stopcock lever
3 Pump head seal
4 New distributor plate for incoming water
5 Combi filter basket
6 Filter basket
7 Filter canister 7 a Locking clips
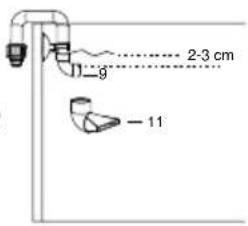
8 Water outlet pipe (to the aquarium) with a threaded hose coupling
9 Angle piece (2 x)
10 Extension piece (2 x)
11 Wide jet pipe
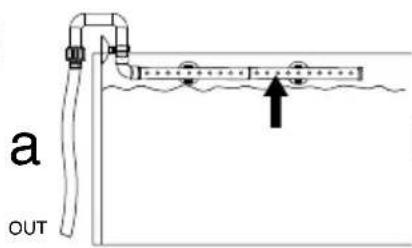
12 Spray bar (2 parts)
13 End cap for spray bar (pre-fitted!)
14 Suction cup (5 x)
15 Short hose clip for suction cup (5 x)
16 Long hose clip for suction cup (5 x)
17 Suction pipe (from the aquarium), telescopic, with a threaded hose coupling
18 Intake strainer
19 Hose ( 12/16 for CP e401, e701 and e901, 16/22 for CP e1501, 19/25 for CP e1901)
F1 Pre-filter media: T-profile foam, 10 ppi*
F2 Biological main filter media: JBL MicroMec high-performance biological filter balls
F3 Biological main filter media: Foam pad 20 ppi
F4 Biological main filter media: Foam pad 20 ppi
F5 Mechanical / biological fine filter media: Foam pad 30 ppi
*ppi: pores per inch; 1 inch = 2.54 cm
| Technical data | CP e401greenline | CP e701greenline | CP e901greenline | CP e1501greenline | CP e1901greenline |
| Max. flow rate [l/h] 450 700 900 1400 1900 | |||||
| Aquarium size [l] 40-120 60-200 90-300 160-600 200-800 | |||||
| L x W x H [mm]* | 180 x 210 x284 | 180 x 210 x350 | 180 x 210 x405 | 200 x 235 x460 | 200 x 235 x564 |
| Filter canister [l] 4,6 6,1 7,6 12 15 | |||||
| Filter baskets [l] /number | 1,2 / 1 1,2 / 2 1,2 / 3 1,9 / 3 1,9 / 4 | ||||
| Combi filter basket [l] 1,1 1,1 1,1 2,3 2,3 | |||||
| Filter media [l] | 2,3 3,5 4,7 | 8 | 10 | ||
| Hose size [mm] | 12/16 | 12/16 | 12/16 | 16/22 | 19/25 |
| Voltage [V] /Frequency [Hz] | 230 / 50 | 230 / 50(110 / 60) | 230 / 50(110 / 60) | 230 / 50(110 / 60) | 230 / 50 |
| Power input [W] | 4 | 9 (11) | 11 (15) | 20 (27) | 36 |
| Energy savings compared to the previous model | |||||
| W | 4 | 4 | 15 | ||
| KWh per year | 35 35 | 131,4 | |||
| € per year** | 7 | 7 | 26,28 | ||
| € during the guaranteeperiod** | 28 28 | 105,12 | |||
| *including the hose connection block** at € 0.20 / KWh | |||||
Installation
1 Unpacking and preparation
Carefully remove the filter and the separate accessories from the packaging and check that nothing is missing. In the event that anything is missing or damaged, please contact your specialist retailer.
Open all 4 locking clips on the filter container and remove the pump head. Serial Numbers 12-27-0001 and up of the CristalProfi greenline external filter range have a new water distribution plate (4) which seals against the upper combi filter basket with a U-profile. Take out all the filter baskets one at a time and thoroughly rinse all the filter media under lukewarm mains water. Place the filter baskets back in the filter canister in the original order.
Before you fit the pump head, biologically activate the filter media with JBL FilterStart cleansing bacteria (available at your specialist retailer) as follows:
Empty the complete contents of the required number of bottles of JBL FilterStart over both of the pre-filter media in the combi filter basket.
Number of bottles of JBL FilterStart:
CristalProfi e401: 1 bottle
CristalProfi e701: 1 bottle
CristalProfi e901: 2 bottles
CristalProfi e1501: 3 bottles
CristalProfi e1901: 4 bottles
Put the pump head back on the filter canister and close the locking clips.
Please note: The empty filter baskets are interchangeable (excepting e401). However, the combi filter basket is the only one that can be inserted last on top. The pump head can be turned 180^ in any direction.
Tip: Always open and close clips positioned opposite each other. This prevents unnecessary wear on the pump head seal and ensures an accurate fit when the filter canister is closed.
2 Attaching the hose connection block and hoses
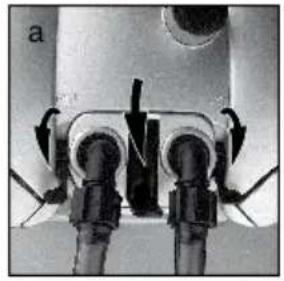
Turn the two small stopcock levers on the pump head to the (●) position opposite the "OPEN" mark, so that the groove in the base of the levers points vertically upwards.
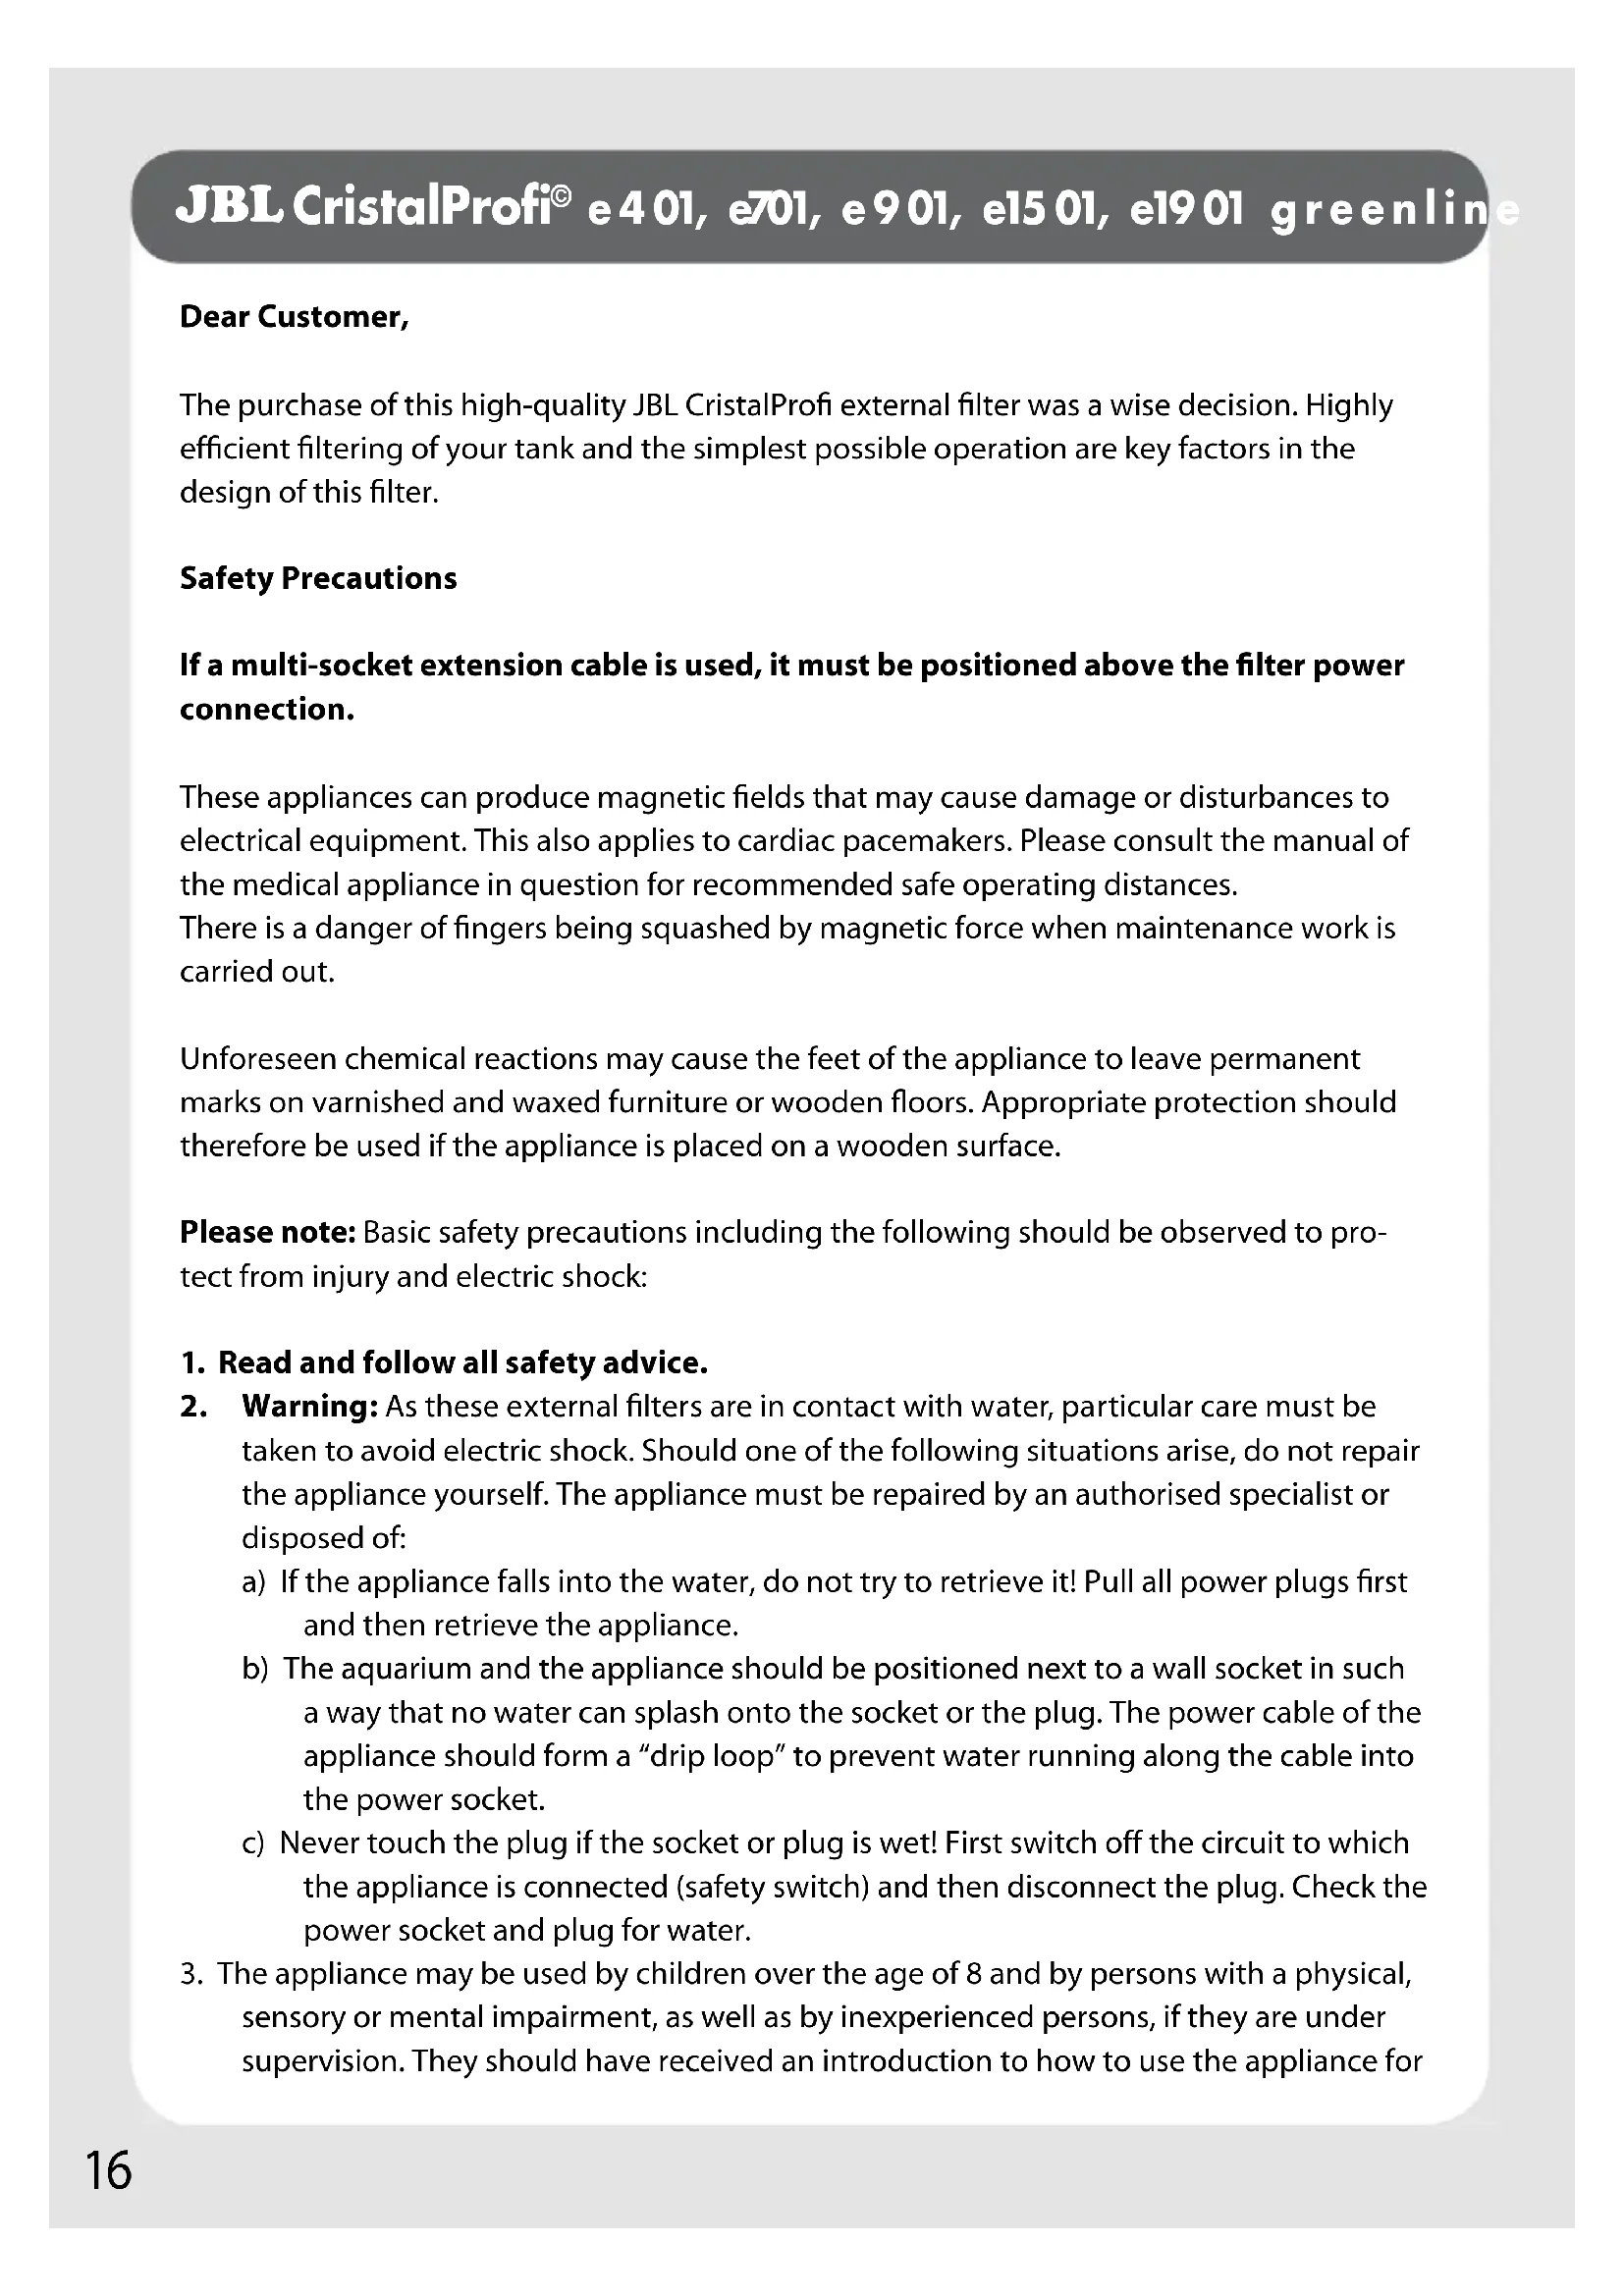
Place the hose connection block with the middle lever pointing upwards into the pump head and press it down firmly.
To fasten, press the middle lever down to secure and turn the two small stopcock levers to the "OPEN" position. Now the ball valves integrated in the hose connection block are open and the hose connection block cannot be removed, even if the middle lever is raised (safety lock). Push each hose onto a hose connection and turn the nut anti-clockwise until the hose fits firmly.
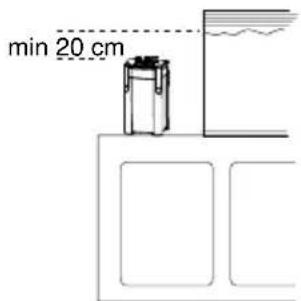
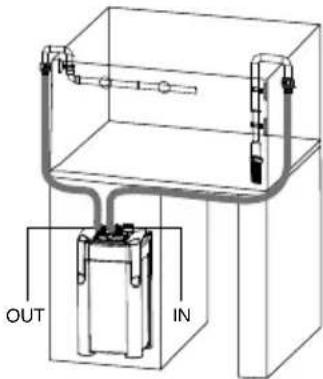
3 Positioning the filter
The filter can now be positioned in the intended place for use in the aquarium cabinet or similar. attention must be paid to the following: If the filter is to be housed in the cabinet, the distance in height between the surface of the water and the bottom of the filter may not exceed 180 cm max. (max. 120 cm for the e401 ). If the filter is located next to the aquarium, the distance between the surface of the water and the top of the filter must be at least 20 cm.
CAUTION: the filter should always be operated in an upright position!
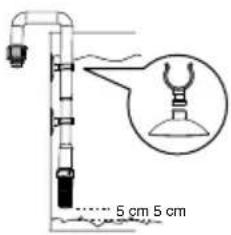
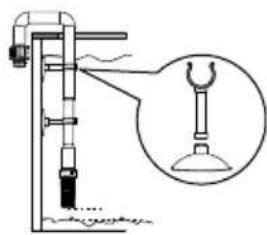
4 Attaching pipes and hoses
Place the intake strainer on the end of the suction pipe and attach it to the inside of the aquarium using the suction cups and pipe clips. Use long or short clips depending on the design of the aquarium edge. Pull out the telescopic pipe so that the intake strainer is about 5 cm above the base of the aquarium. The two parts of the telescopic pipe are sealed against one another by an O-ring so that no air is drawn into the telescopic pipe, even if the
water level is low (e.g. in a turtle tank).
Connect the water outlet pipe, angle piece and spray bar (if required) and secure them in the aquarium with suction cups. First, remove the end cap of the spray bar and only replace it when the filter is operating.
Tip: We advise against using the spray bar in aquariums containing plants, as too much of the vital plant nutrient, CO2, is expelled from the water. The best results are achieved by using the water outlet pipe with an angle piece or a wide jet pipe with the outlet just below the surface of the water to produce moderate surface agitation. The distance between the outlet and the surface of the water can be individually set by using the two extension pieces.
Connect the hose with the suction pipe from the "IN" position on the hose connection block (black elbow connection) and the hose with the water outlet pipe from the "OUT" position (grey elbow connection). Firmly attach the hoses by turning the nuts anticlockwise until they are tight.
Cut the hoses as short as possible to avoid kinking. This also makes priming easier.

Starting up
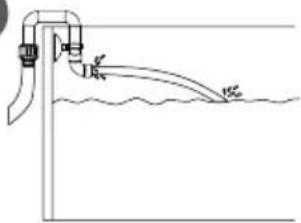
Make sure that the two small stopcock levers on the pump head are in the "OPEN" position. During the following start up procedure, the water outlet pipe with the spray bar, etc. must be positioned ABOVE the surface of the water for optimum ventilation of the appliance.
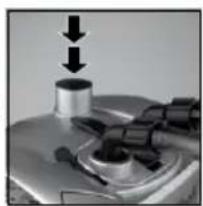
Press the "START" button on the pump head repeatedly with the palm of your hand until water begins to flow into the suction hose (hose on "IN"). Wait until the filter has completely filled with water and the water in the hose leading to the water outlet pipe (hose on "OUT") is at the same level as the surface of the water in the aquarium.
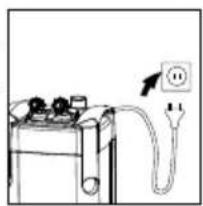
Connect the filter to the mains power supply. The water will now flow out of the water outlet pipe into the aquarium. At first, it may be mixed with air that is still trapped between the layers of the filter media. Gently shake the filter to dislodge the air which will escape with the stream of water.
Please note: If you replace an existing aquarium filter with a JBL CristalProfi external filter, we recommend running both the new filter and the old filter parallel in the same aquarium for the first 2 weeks, before dismantling the “old” filter. This ensures that the new filter has a sufficiently large colony of cleansing bacteria and avoids harmful nitrites occurring in the transitional phase.
Check that all parts are watertight.

Regulating water flow
The water flow can be regulated by the stopcock labelled OUT if required (grey elbow connection). The further the lever is turned away from the "OPEN" mark, the less water is pumped by the filter. Never use the lever opposite to regulate flow!
Important: Reducing capacity by more than half should be avoided for the following reasons: running noise may increase, the service life of the rotor may be shortened and the cooling required when the pump head is in operation is no longer reliably guaranteed.
Note on the pumping capacity
For optimum reliable performance, we strongly recommend the use of JBL original filter media only.
As usual technically, the data given on the type plates and the packaging refer to maximum IDLE RUNNING DATA of the pump, without hoses and filter media:
CP e401: 450 l/h
CP e701: 700 l/h
CP e901: 900 l/h
CP e1501: 1400 l/h
CP e1901: 1900 l/h
When operated in an aquarium, this data is reduced by varying degrees, depending on the length of hose and the filter media used. An accumulation of dirt in the hoses and filter media will further reduce performance.
The following approximate capacities refer to a hose length of 1.5 m and operation with the supplied filter media in a clean or new condition:
CP e401: 200 - 250 l/h
CP e701: 350 - 400 l/h
CP e901: 380 - 450 l/h
The filter media and hoses should be cleaned when these levels are reduced by about 50%.
Maintenance and care
All JBL CristalProfi greenline external filters are supplied with a standard filling of filter media to provide clean and healthy aquarium water for “normal” operation. The filters provide extremely good conditions for the development of colonies of cleansing bacteria which play an essential role in the breakdown of pollutants. Mechanical pre-filtering ensures that these bacteria can efficiently carry out their task undisturbed for as long as possible.
You can of course adapt to your special needs by selecting from the wide range of available JBL filter media. Depending on your choice of filter media, this may influence the pumping capacity of your filter and the length of time the filter media can be used.
Note: Regular maintenance and cleaning of the filter is vital to prevent a reduction in the pumping capacity.
7 Cleaning or replacing filter media
Make sure to always disconnect the mains plug before carrying out any work on the filter!
Turn the two small stopcock levers on the pump head to the stop position (●) opposite the "OPEN" mark. Lift the middle lever on the hose connection block as far up as possible and push to the stop position. This slightly lifts the hose connection block out of its seat. Pull upwards to lift the hose connection block out. The ball valves in the hose connection block are now closed and retain the water in the hoses. This prevents accidental opening e.g. by children and any associated unwanted leakage of water.
Open the 4 locking clips on the filter canister and remove the pump head.
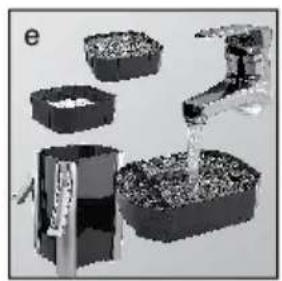
Remove the filter baskets with the filter media and rinse the filter media in lukewarm water (25°C). Never wash ALL the filter media at the same time, as too many beneficial cleansing bacteria would be washed away. The JBL CristalProfi filters of the e range are designed so that, as a rule, only the pre-filter material (F1) has to be cleaned whilst the remaining filter material must be cleaned at longer intervals.
Tip: Do not forget to clean all the hoses and pipes regularly with an appropriate brush (e.g. JBL Cleany), as bacterial deposits on the inside of the pump drastically reduce the pumping capacity of the filter.
8 Function and replacement intervals of the individual filter media
(F1) JBL Pre-filter media
Mechanical pre-filter media made of coarse foam cut into a T-profile to absorb as much coarse dirt as possible. These media should be changed every 2 months. They can be rinsed once or twice.
(F2) High capacity biological filter balls (JBL MicroMec):
JBL MicroMec is a highly porous biological filter medium made from sintered glass and with a special surface and pore structure, which provides excellent conditions for colonisation by beneficial cleansing bacteria. This allows an effective biological breakdown of pollutants. It
is therefore particularly well suited for intensive long-term filtration in freshwater and marine aquariums. The round shape and varying diameter of the balls produce a self-cleaning effect. As a result, this filter material only needs rinsing briefly every 6 – 12 months, depending on the amount of dirt. Change when the balls begin to disintegrate.
Filter media to solve particular problems can be found in Chapters 12 and 13.
(F3) Filter foam pad
Medium-pored foam pads for effective biological filtering with ideal conditions for colonisation by cleansing bacteria. The pads have a section which can be removed and replaced with filter material to treat specific problems. (section D). Careful cleaning is required approximately every 6 months. Replace after cleaning 2 to 3 times. Only one of the two pads should be cleaned or replaced at a time.
(F4+F5) Filter foam pad
Set of one coarse foam pad and one fine foam pad for the middle section of the combi filter basket. The coarse pad provides biological filtration through the colonisation of cleansing bacteria. The fine pad traps particles of dirt which could damage the pump, as well as providing biological filtration. The grooves on the top side of the fine pads are intended to hold special JBL Stixx for long-term fertilisation of aquatic plants. The coarse pad should be cleaned approximately every 6 months. The fine pad should be cleaned about every 4 months or as required (if pumping capacity deteriorates). Replace after cleaning three to four times.
$$ (F 1 + F 4 + F 5 = J B L \text { Combi Bloc }) $$
9 Cleaning the hoses
Bacteria settle in the hoses producing slime, which can significantly obstruct the flow of water. Algae growth only occurs in strong light. The hoses should therefore be cleaned regularly with a cleaning brush (e.g. JBL Cleany). Simply rinsing with tap water is not enough!
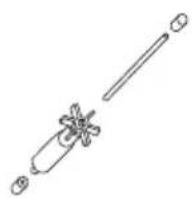
10 Cleaning the impeller and casing
Turn the cover of the impeller casing anti-clockwise towards "Open" and remove the cover by pulling gently.
Pull the impeller out of the casing. CAUTION: the impeller is held in the casing by magnetic force. Take appropriate care when removing the impeller, making sure to avoid injuring your fingers.
The ceramic shaft is held by two rubber bearings, which remain either on the shaft or on the bottom of the impeller casing, or in the middle of the casing cover, when the impeller is removed.
Clean the impeller casing, impeller and shaft with a suitable cleaning brush, then rinse in clean water. Limescale can be easily removed by soaking in JBL Clean A (available at your specialist retailer). Never dip the pump head in water or other liquid to clean it. Use a damp cloth (e.g. JBL WishWash) to clean the surface of the casing.
Place the ceramic shaft and impeller back in the casing. Check that both rubber bearings are present and correctly positioned for the ceramic shaft. Put the impeller cover back in and, pressing gently, turn the cover towards "CLOSE" until the stop point.
Please note: If the impeller has to be replaced due to wear and tear, the complete set comprising the impeller with the shaft and 2 rubber bearings must be replaced. Only this way can flawless operation and quiet running be guaranteed. When the impeller and shaft are removed, a rubber bearing often adheres to the base of the impeller casing where it is very difficult to remove. JBL has produced a special tool for this purpose which is available at specialist pet shops under the name “Extraction tool for impeller bearing”. A useful cleaning brush for the impeller casing comes with the tool.

Re-starting the filter
Place the hose connection block with the attached hoses back in position as described in (2). Then turn the right-hand stopcock lever towards "OPEN" until the stop point. Repeat with the left-hand lever a few seconds later.
If the water does not begin to run into the filter automatically, start the filter as described in (5). Connect the filter to the mains power supply.
What to do if...?
The pump head cannot be correctly fitted
| Cause Solution | |
| One or more filter baskets too full or not positioned correctly on top of one another | Do not overfill filter baskets, check the baskets are properly stacked on top of each other |
Filter on pump head leaks
| Cause Solution | |
| Fastening clips not closed or not properly closed | Close all fastening clips correctly |
| Profile seal washer dirty Clean sealing surfaces and | grease with Vaseline |
| Profile seal washer fitted incorrectly, twisted, damaged or missing. | Position seal washer correctly or replace |
Filter does not run or no water flows out
| Cause Solution | |
| No power supplied Plug into power supply | |
| No water in the filter | Filter does not have automatic suction! Press start button and fill filter with water (5) |
| Impeller and/or shaft fitted crooked, shaft broken, rubber bearings of shaft missing, bayonet lock on impeller casing not positioned correctly | Dismantle, check, replace faulty parts and re-assemble. Check shaft and bayonet lock correctly positioned. |
| Impeller missing or blocked by gravel, wormgear casing or impeller faulty | Clean impeller casing, fit intact impeller |
Filter capacity greatly reduced
| Cause Solution | |
| Stopcocks levers on pump head not in “OPEN” position | Check positions and correct them |
| Hose connection block dirty | Remove hoses and use suitable brushes to clean hose connection block whilst in position with stopcocks in “OPEN” position |
| Hoses kinked etc. Check hoses for kinks, constrictions etc. | |
| Intake strainer blocked Clean intake strainer | |
| Hoses blocked with sediment Clean hoses with cleaning brush | |
| Filter material heavily soiled | Clean filter material (particularly pre-filter material). |
| Filter material filled into net bag | Do not fill long-term biological filter material e.g. JBL MicroMec, JBL Sintomec etc. in finely meshed net bags. For special problem solutions, only use the original CristalProfi filter material with the appropriate foam edge. |
| Filter material not cleaned thoroughly | Remove filter material from filter basket and clean. |
| Incorrect filter material used | Fill fine filter material e.g. filterwool loosely into the filter baskets so that water flow is not obstructed. |
| Pump dirty | Clean pump chamber, impeller and cover with cleaning brush (10) |
| Water does not circulate correctly Repeat start procedure (5) | |
| Impeller and/or shaft fitted crooked, shaft broken, rubber bearings of shaft missing, bayonet lock on impeller casing not positioned correctly | Dismantle, check, replace faulty parts and re-assemble. Check shaft and bayonet lock correctly positioned. |
| Too many accessories attached to hose system | Accessories (e.g. UV-C clarifier etc.) reduce water flow. Remove accessories or operate with own separate water circulation. |
Air in filter
| Cause Solution | |
| Connection of telescopic suction pipe is above the surface of the water | When carrying out a partial change of water, siphon off water to approx. 5 cm above the connection only. Otherwise disconnect plug. |
| Filter is positioned too high | The top of the pump head should be at least 20 cm below the surface of the water, the further the better. |
| Hose installation leaks and draws in air Check all connections are airtight and fit correctly. | |
| Airstone too close to suction pipe | If air is additionally provided by a membrane pump, check that there is sufficient distance between the airstone and the suction pipe. |
| “IN” and “OUT” hoses mixed up Reconnect hoses correctly | |
| High flow resistance due to dirty filter material or filter material in net bag | Clean filter material and do not fill long-term filter material (JBL MicroMec, JBL SintoMec) in finely meshed net bags. For special problem solutions, only use the original CristalProfi filter material with the appropriate foam edge. |
Stopcock on pump head stiff
| Cause Solution | |
| Washers do not glide | Dismantle hose connection block (7) and spray the stopcocks with commercially available silicone oil. Reassemble hose connection block and move stopcock backwards and forwards a few times. |
Fish dead and/or water cloudy
| Cause Solution | |
| Nitrite poisoning due to too rapid change from “old” to “new”. Cleansing bacteria thrown away with old filter. | Run an old and new filter parallel for 2 weeks in the same aquarium or incorporate 1/3 of the old filter material in the new filter. Never carry out a “general clean up” of the aquarium at the same time! |
Filter material for problem cases (available at your specialist retailer)
12 Filter material with foam edge
The following filter material kits are constructed according to a new two-stage principle which is specially designed for the CristalProfi Filter "e" range. They are comprised of a core section and an edge section. The core is made up of a relatively fine special filter media requiring a finely meshed net bag. The edge consists of coarse foam. With this design, the water flows slowly through the special filter media providing optimum efficiency, whilst at the same time the overall water flow through the filter is obstructed as little as possible thanks to the coarse foam edge. The size and volume of each kit is measured specifically for the filter basket of the JBL CristalProfi e range.
JBL CarboMec Pad
Kit with high-capacity active carbon
Removes residue medication, water discolouration and high molecular pollution from fresh water and salt water. Virtually no increase in conductivity and phosphate levels in the water.
JBL PhosEx ultra Pad
Solves algae problems by reliably removing phosphate
Prevents and eliminates undesirable algae growth by removing the main nutrient, phosphate, from fresh water and salt water.
JBL NitratEx Pad
Kit with nitrate eliminator
Eliminates nitrate from fresh water. Prevents and eliminates the growth of undesirable algae by reliably removing the nutrient, nitrate, from fresh water. Exchange resin can be regenerated with cooking salt.
JBL ClearMec Pad
Pollutant remover for crystal-clear water without algae trouble
A mixture of clay pellets and special resins removes the pollutants, phosphate, nitrate and nitrite, from fresh water, thereby preventing undesirable algae growth. The clay pellets promote colonisation by cleansing bacteria and additionally support the biological breakdown of pollutants. The result is crystal-clear, healthy water.
13 Filter material without foam edge
The following filter media hardly slow down the flow of water in the filter and therefore do not require foam edge. The amount contained in the pack is specifically measured for filter baskets of the JBL CristalProfi e range of filters.
JBL MicroMec
High capacity biological filter pellets
JBL MicroMec is a highly porous biological filter medium made from sintered glass and with a special surface and pore structure, which provides excellent conditions for colonisation by beneficial cleansing bacteria. This allows an effective biological breakdown of pollutants. It is therefore particularly well suited for intensive long-term filtration in freshwater and marine aquariums.
JBL CerMec
Ceramic rings
A mechanical filter medium which, though, also acts biologically as a result of colonising by cleansing bacteria. The ring shape makes it especially well-suited for directing water flow in all directions, thereby ensuring optimal flow through the filter.
JBL TorMec
Active peat pellets for natural tropical water
JBL TorMec Pellets are pressed from two peat components with differing amounts of humic substances. This produces a rapid initial effect and an evenly dosed long-term effect. JBL TorMec reduces the carbonate hardness and the pH level due to the high level of humic substances. It also helps prevent algae by slightly discolouring the water and therefore filtering out certain sections of the light spectrum, as in natural tropical waters.
Warranty
We offer the end buyer of this JBL product an extended guarantee of 4 years from the date of purchase.
The guarantee covers defects in material and workmanship. Parts subject to wear and tear such as sealing rings, the impeller and shaft, as well as damage resulting from external influences and improper handling, are exempt from the guarantee. We reserve the right to replace or repair the defective parts under guarantee at our discretion.
No further guarantee claims will be accepted. In particular, to the extent permitted by law, no liability can be accepted for consequential damage caused by this appliance.
In the event of a claim under the guarantee, please contact your specialist pet shop or send the appliance to us with proof of purchase and postage paid.*
* In the event of a claim under the warranty please fill in and return to:
Space for purchase receipt:
Serial No ____ - ____ - ____ ____
Purchase date: ____ / ____ / ____
(please include purchase receipt, which will be returned with the appliance)
Reason for claim:
Date: Signature:
JBL NitratEx Pad - Kit anti-nitrate
Date: Signature.....
Geachte klant,


- Aquarium external filter
- Safety Precautions
- If a multi-socket extension cable is used, it must be positioned above the filter power connection.
- Read and follow all safety advice.
- Contents:
- Description of functions
- Special features
- • Energy efficient
- • High capacity, quiet
- • Seldom needs cleaning
- • Complete with JBL MicroMec high-capacity biological filter balls
- • Fully fitted and ready to install
- • Simple to start, safe to use
- • Complete and ready to plug in
- Parts and names
- Installation
- Unpacking and preparation
- Attaching the hose connection block and hoses
- Positioning the filter
- Attaching pipes and hoses
- Starting up
- Regulating water flow
- Note on the pumping capacity
- Maintenance and care
- Cleaning or replacing filter media
- Make sure to always disconnect the mains plug before carrying out any work on the filter!
- Function and replacement intervals of the individual filter media
- (F1) JBL Pre-filter media
- (F2) High capacity biological filter balls (JBL MicroMec):
- (F3) Filter foam pad
- (F4+F5) Filter foam pad
- Cleaning the hoses
- Cleaning the impeller and casing
- Re-starting the filter
- What to do if...?
- Filter material for problem cases (available at your specialist retailer)
- Filter material with foam edge
- JBL CarboMec Pad
- Kit with high-capacity active carbon
- JBL PhosEx ultra Pad
- Solves algae problems by reliably removing phosphate
- JBL NitratEx Pad
- Kit with nitrate eliminator
- JBL ClearMec Pad
- Pollutant remover for crystal-clear water without algae trouble
- Filter material without foam edge
- JBL MicroMec
- High capacity biological filter pellets
- JBL CerMec
- Ceramic rings
- JBL TorMec
- Active peat pellets for natural tropical water
- Warranty
- JBL NitratEx Pad - Kit anti-nitrate
- Geachte klant,
Brand : JBL
Model : CristalProfi e401
Category : Aquarium filter