
AM120 - Pedometer TANITA - Free user manual and instructions
Find the device manual for free AM120 TANITA in PDF.
| Product Type | Daily Activity Monitor / Pedometer |
| Brand | Tanita |
| Model | AM120 |
| Dimensions | D13 x W30 x H88 mm |
| Weight | Approx. 32 g (including batteries) |
| Power Supply | DC 3.0 V, two CR2032 batteries |
| Battery Life | Approx. 9 months (for 16 hours use per day) |
| Display | LCD |
| Sensor | Triaxial accelerometer |
| Settings Content | Time (24h), age (6-99 years), gender, height (90-220 cm), weight (20-150 kg), body fat percentage (5-75%), step length (20-150 cm) |
| Displays | Step count (1-99999), distance (0.01-149.99 km), walking time (1-1440 min), total energy expenditure (1-99999 kcal), BMR (1-9999 kcal), AEE (0.1-9999.9 kcal), METs (1.0-18.0), 24h activity graph (1-7 levels) |
| Memory | 7 days (energy expenditure, BMR, AEE, steps, distance, time, graph) |
| Step Count Accuracy | ±5% (on test bench) |
| Clock Accuracy | Approx. ±30 seconds per month |
| Operating Temperature | 0 to +40 °C |
| Materials | ABS body, PMMA lens |
| Country of Manufacture | China |
| Main Functions | Step measurement, distance, walking time, total calories, BMR, AEE, METs, 24h activity graph, 7-day memory |
| Maintenance and Cleaning | Wipe with a soft cloth. Do not use alcohol, thinner, benzene, or boiling water. |
| Safety | Keep out of reach of children. Do not burn batteries. Do not disassemble. Do not use in back pocket. Do not expose to moisture. |
| Included Accessories | Battery cover clip, safety strap, screwdriver, batteries (pre-installed), instruction manual |
Frequently Asked Questions - AM120 TANITA
User questions about AM120 TANITA
0 question about this device. Answer the ones you know or ask your own.
Ask a new question about this device
Download the instructions for your Pedometer in PDF format for free! Find your manual AM120 - TANITA and take your electronic device back in hand. On this page are published all the documents necessary for the use of your device. AM120 by TANITA.
USER MANUAL AM120 TANITA
Daily Activity Monitor AM-120E
Instruction Manual
Warranty Certificate Included

Instruction Manual
Read this Instruction Manual carefully and keep for future reference.

Bedienungsanleitung
Parts and Accessories....6
Names of Parts....7
Fitting/Replacing Batteries 8
Initial Settings/Changing Settings....11
Usage
Wearing the Daily Activity Monitor....18
Using the Clip Battery Cover 19
Using the Safety Strap....19
Measuring your Total Energy Expenditure (calories burned) 20
Using the Daily Activity Monitor Correctly....21
Viewing the Measurement Results 22
Viewing the Memory 26
Resetting the Values for the Day 28
Resetting the System....29
Troubleshooting
Specifications 30
Troubleshooting....32
Thank you for purchasing this Tanita Daily Activity Monitor.
Before use, please read through this instruction manual and store this manual in a safe place for future reference.
Safety Notes
This instruction manual contains information on how to use this device correctly.
 Warning Warning | Indicates contents “may cause death or serious injury”. |
 Caution Caution | Indicates contents “may cause injury or damage to property”. |
 Prohibited Prohibited | Indicates contents are “prohibited”. |
 Must Do Must Do | Indicates instructions that must be followed. |
| Request | Indicates contents you should follow to keep your device in the best possible condition. |
| Note | Supplementary information related to usage inspections of the device. |
Warning

Keep this device and batteries out of the reach of small children.
Small children may swallow small objects by mistake.
Do not burn batteries.
Doing so may cause the batteries to explode.

natural_image
Simple line drawing of a baby holding a phone to their ear (no text or symbols)Caution

If you are not accustomed to exercising on a regular basis, consult your physician or trainer.
It may be unhealthy to suddenly start exercising or to over-exercise.
If you are currently under medical care for an injury or illness, consult your physician or trainer.
It may be unhealthy to suddenly start exercising or to over-exercise.
Usage, Storage, and Maintenance
Handling the Device

Prohibited
Never attempt to disassemble the device.
Doing so will damage the device.
Do not subject the device to strong impacts or vibrations.
Doing so will damage the device.

Must Do
Never insert the device into a rear trouser pocket.
Doing so may damage the device and injure the wearer.
Do not use in humid places or places where the device may get wet.
Doing so will damage the device.
Do not swing the device around by the strap
The device may hit someone causing an injury.
Doing so will damage the device.
When using the strap to wear the device around your neck, make sure that the strap does not get pulled or caught on anything.
Pulling the strap in such a way may cause injury.
Storage

Must Do
Do not store the device in humid places, or places where the device may get wet.
Doing so will damage the device.
Maintenance

Must Do
Never use alcohol, boiling water, thinner or benzene on the device.
If the device becomes dirty, wipe it clean with a soft cloth.
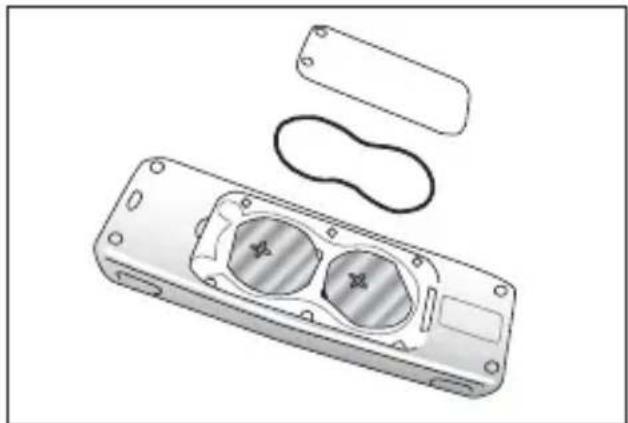
Parts and Accessories
1. Daily Activity Monitor
2. Clip battery cover
natural_image
Line drawing of a mechanical component with three circular holes and a rectangular housing (no text or symbols)3. Safety strap

natural_image
Line drawing of a mechanical tool with handle and grip (no text or symbols)- Instruction manual (This manual: Warranty certificate included)
5. Screwdriver

natural_image
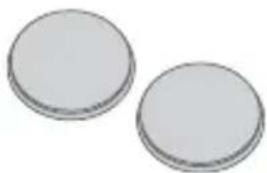
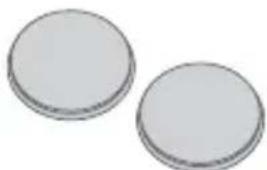
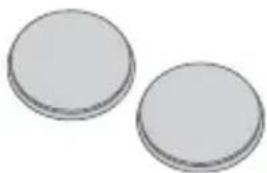
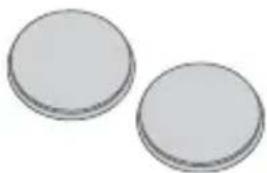
Simple line drawing of a screwdriver with no text or symbols6. Batteries (2xCR2032)
natural_image
Two plain circular objects with no text or symbols visibleNote: The batteries included are installed in the factory before shipment, and may last less than 9 months.
Names of Parts
Front
MEMORY Button/Down Button MODE Button/Up Button
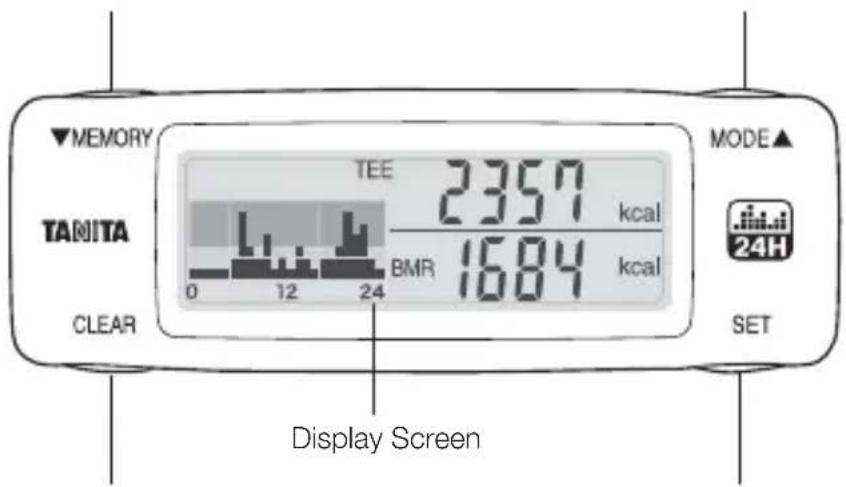
CLEAR Button SET Button
Back
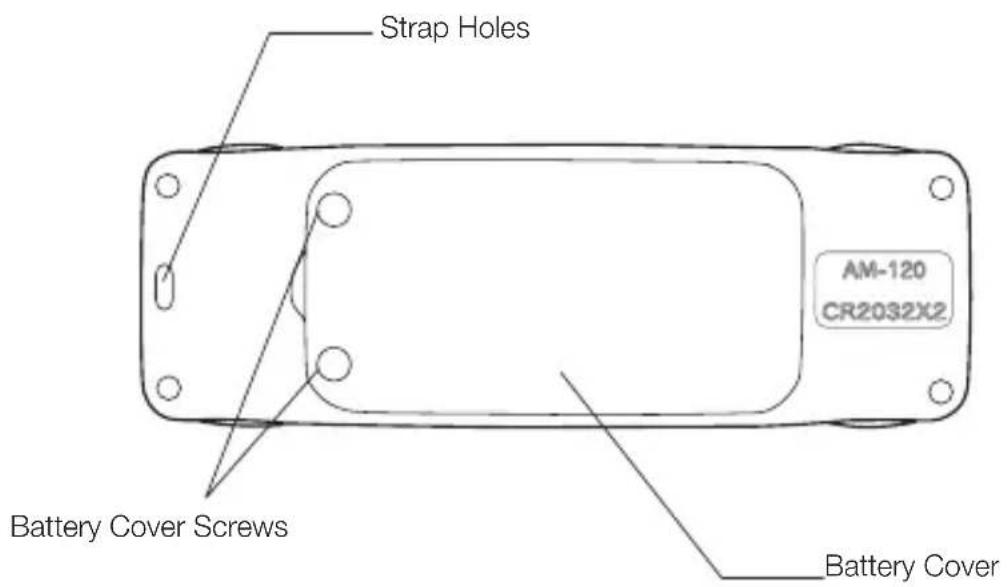
Fitting/Replacing Batteries
If you are setting your Daily Activity Monitor for the first time, the first step is to insert the batteries. If □ displayed on the display screen, promptly replace the batteries with brand-new CR2032 size batteries. Always replace both batteries at the same time.
Note:
- Correct values will not be displayed until the initial settings are made. Be sure to make the initial settings.
- Initial settings are performed in the following order: Time → Age → Sex → Height → Weight → Body fat percentage → Stride length. We recommend finding your weight, body fat percentage and stride length in advance.
- If you do not know your body fat percentage, use the calculated value shown in the display screen. If you want more accurate readings, use a Tanita Body Composition Monitor (sold separately) to measure your body fat percentage.
- The stride length is taken as the distance between the toes on one foot and the toes on the other foot. In order to accurately find your average stride length, walk for 10 steps and then divide the total walked distance by 10.
E.g. If you walked 6.5 meters in 10 steps, 6.5/10 (steps) = 0.65 meters = 65 cm

Battery Mark
 Flashing Flashing | The battery power is low. Replace the old batteries with 2 new CR2032 batteries. |
 Display Display | There is no battery power left. The device cannot take measurements. Replace the old batteries with 2 new CR2032 batteries. |
Request:

Must Do
- Do not replace the batteries immediately before or after 0:00 am midnight. If you do, the measurement from the day when the batteries were removed will be added to the measurement value of the day when the new batteries were inserted. (Data from the day the batteries were removed will be treated as data from the same day the new batteries were inserted.)
- Measurement values are recorded from 00 minutes of every hour. When the batteries are replaced, the measurement data from 00 minutes to the time the batteries are replaced is erased.
- When the batteries are removed, the time returns to [0:00]. Reset the time again → P. 11. However, all individual settings and measurements other than the time settings are not erased.
Note:
The batteries included are installed in the factory before shipment, and may therefore run down before 9 months.
natural_image
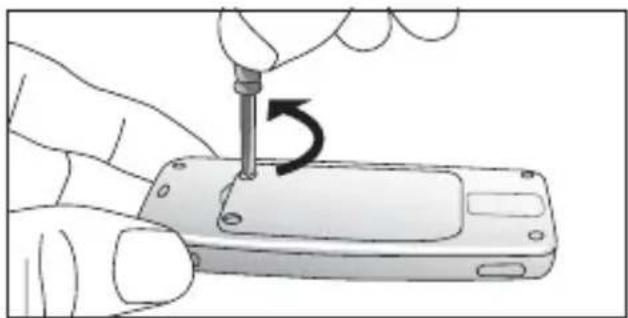
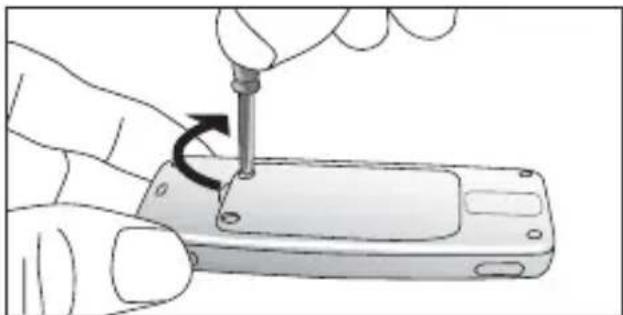
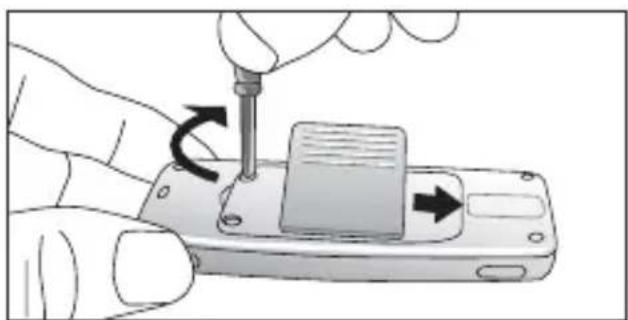
Illustration of a hand using a screwdriver to adjust or install a smartphone into a mobile phone (no text or symbols visible)1) Use the included screwdriver or a commercially available small screwdriver to loosen the 2 screws in the battery cover on the back of the device.
natural_image
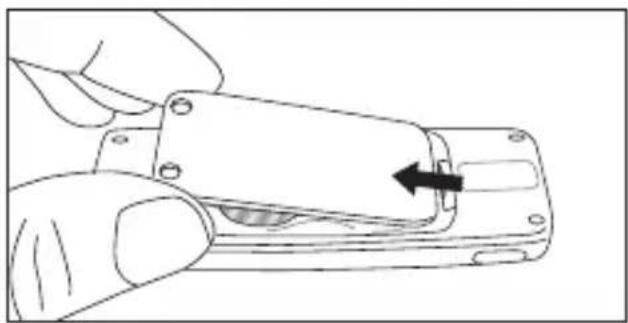
Technical illustration of a remote control casing with internal compartments and external housing (no text or symbols)2) Remove the battery cover.
When removing the battery cover, the inner ring may also come out of the groove in the device body. Make sure you do not lose this ring.
natural_image
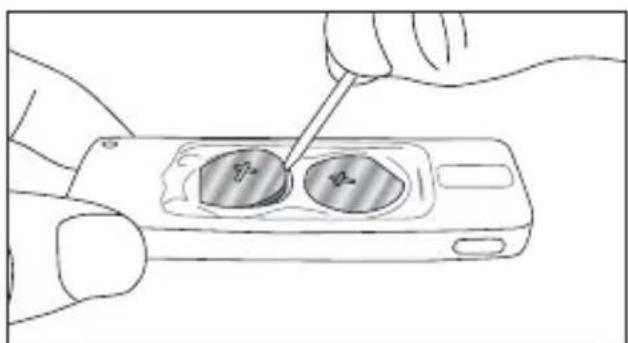
Illustration of a hand using a tool to apply a circular component on a smartphone (no text or symbols visible)3) Insert a strong, thin stick into the hole and remove the batteries
Note: Do not use metallic tweezers or a screwdriver etc.
Note: When replacing the batteries, always remove both batteries at the same time, and replace both with brand new batteries.
Continued on next page
Fitting/Replacing Batteries
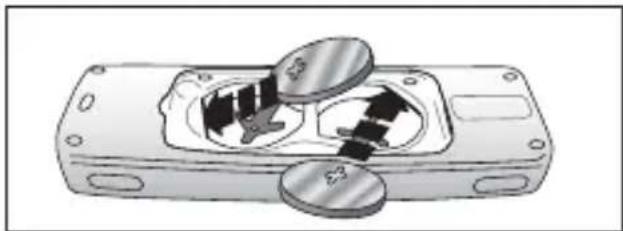
natural_image
Illustration of a mechanical component with two circular parts and internal arrows indicating motion (no text or symbols)4) Make sure the ⊕ (positive) electrode is facing upwards, and insert the edge of the batteries in the direction of the arrows shown.
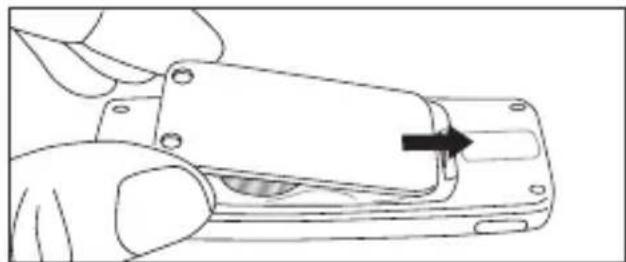
natural_image
Line drawing of a hand holding a device with a black arrow pointing to a component (no text or symbols)5) Insert the battery cover in the direction of the arrow.
Request:

Check to make sure that the inner ring is inserted correctly into the groove. If the inner ring does not sit properly in the groove, it may be inserted upside down. Make sure that the protruding section of the inner ring and groove of the body are lined up correctly both horizontally and vertically, and insert the inner ring.
natural_image
Illustration of a hand using a screwdriver to adjust or install a smartphone into a battery (no text or symbols visible)6) Tighten the battery cover screws firmly
The time display will flash [0:00]. Set the time display to the correct time. For details see "Setting the Time" on P. 11.
Initial Settings/Changing Settings

- If you do not input the initial settings, correct measurements cannot be displayed.
- To change the setting details, press and hold the [setting] button for about 2 seconds while today's measurement values are displayed in the display screen.
• From the second time onwards, the information that you set previously is displayed.
Setting the Time
E.g. Setting to 3pm. Note: The clock uses the 24-hour display.
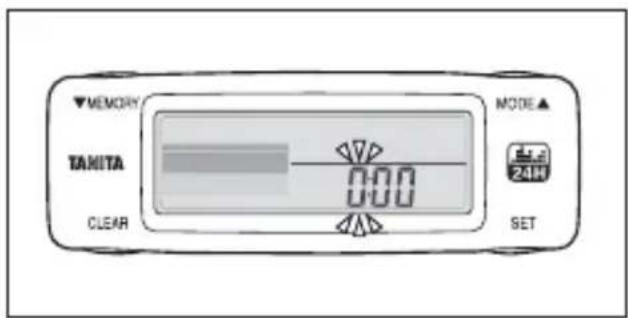
1) When batteries are inserted, the [hour] value flashes.
If you do not press any buttons within 1 minute, the display changes to [Today's measurements]. To continue with the settings, press and hold the SET button for about 2 seconds.
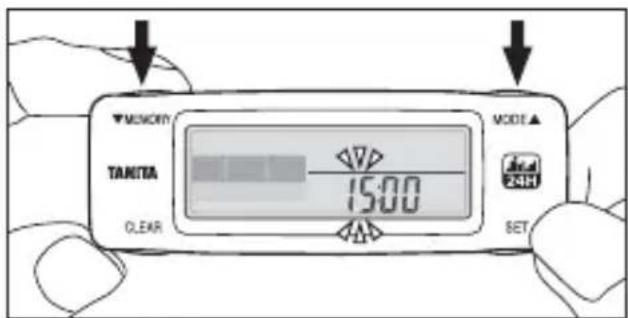
2) Press the ▼MEMORY button/ ▲ MODE button to set the clock.
Press and hold to advance the setting rapidly.
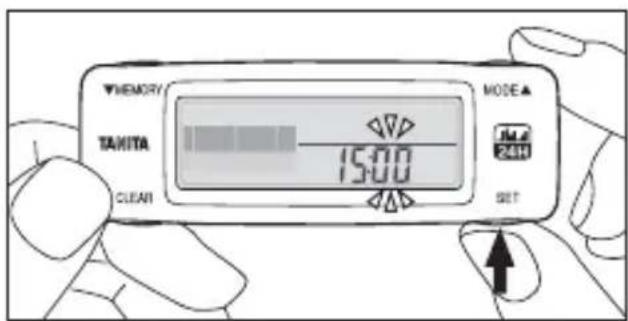
3) Press the SET button to finalize the setting.
Next, the [minute] digit flashes. Set the minutes in the same way as for the hour digit.
Note: To accurately set the time, when the minute digit is flashing press the SET button in time with the time signal.
Continued on next page
Setting Your Age
E.g. When setting the device to 45 years old, female, 158~cm height, 50~kg bodyweight, 25.5% body fat percentage, and 55~cm stride length.
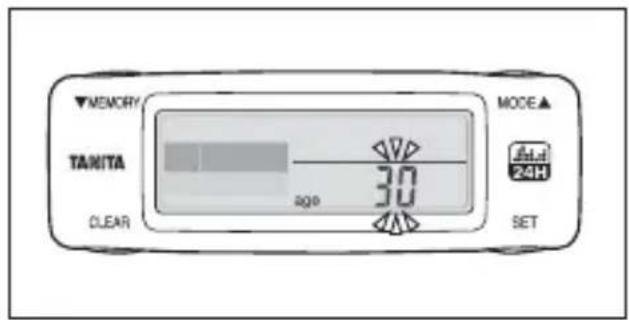
1) After setting the [Time], the [Age] display flashes.
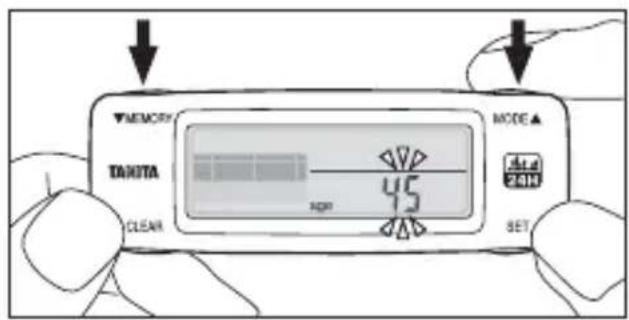
2) Press the ▼MEMORY button/ ▲ MODE button to set the [Age].
Press and hold to advance the settings rapidly.
(The age setting range is 6–99 years old.)

3) Press the SET button to finalize the setting.
Setting Male/Female
Eng
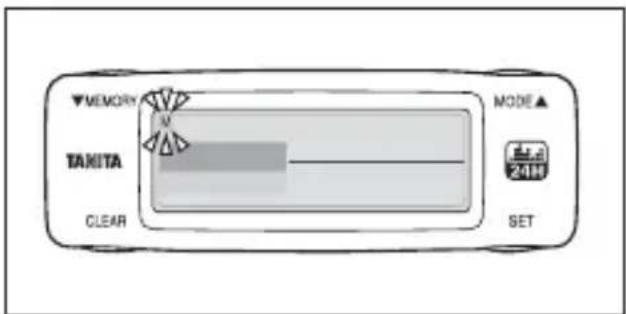
1) After setting the [Age], the [Sex] display flashes.
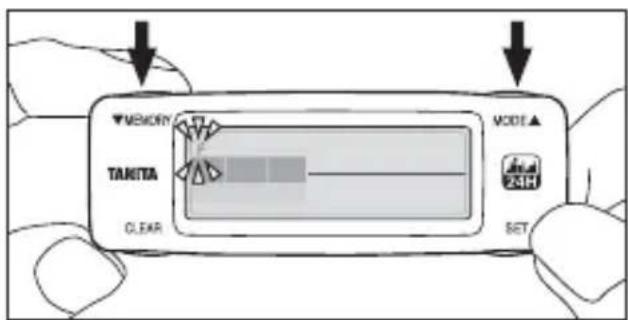
2) Press the ▼MEMORY button/ ▲ MODE button to select either Male (M) or Female (F).

3) Press the SET button to finalize the setting.
Note: cm only
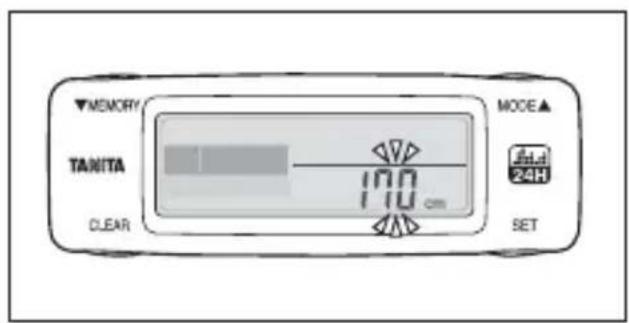
1) After setting Male/Female, the [Height] display flashes.
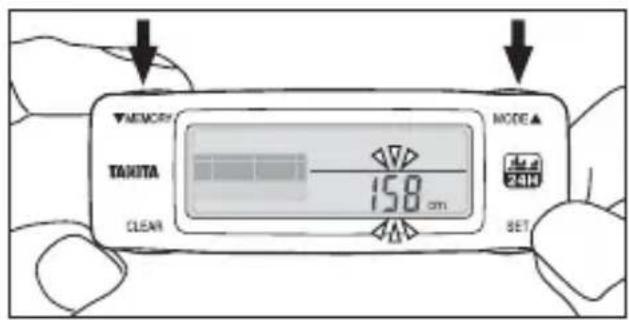
2) Press the ▼MEMORY button/ ▲ MODE button to set your [Height].
Press and hold to advance the settings rapidly.
(The setting range is 90 cm–220 cm).
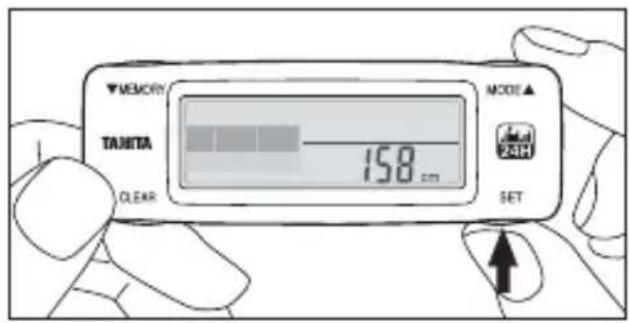
3) Press the SET button to finalize the setting.
Note: kg only

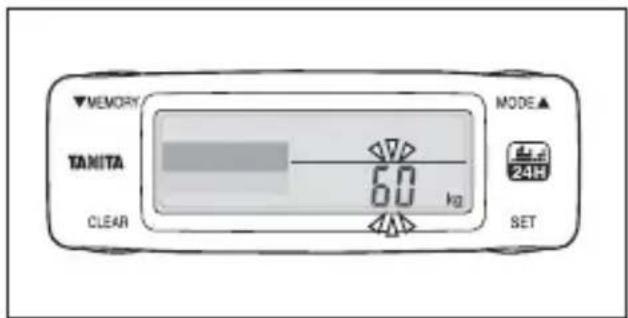
1) After setting the [Height], the [Weight] display flashes.
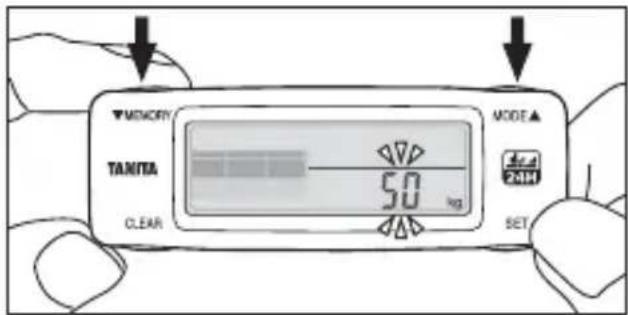
2) Press the ▼MEMORY button/ ▲ MODE button to set your [Weight].
Press and hold to advance the settings rapidly.
(The setting range is 20 kg–150kg)

3) Press the SET button to finalize the setting.
Setting Your Body Fat Percentage
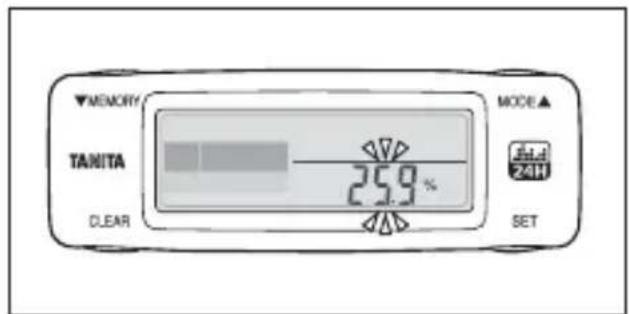
1) After setting the [Weight], the [Body fat percentage] display flashes.
Note: If you do not know your body fat percentage, just press the SET button. An estimation will be automatically input according to your height and weight (BMI).
Note: If you are performing this setting for the second or subsequent times, the previous setting value is displayed.
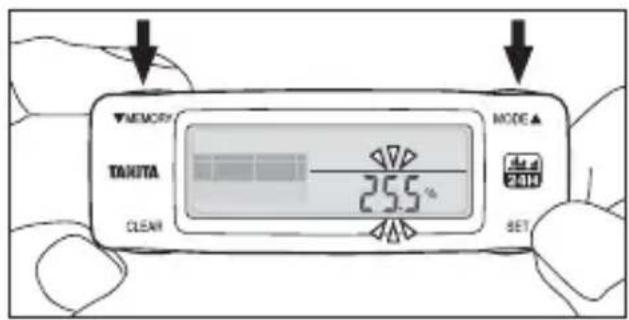
2) Press the ▼MEMORY button/ ▲ MODE button to set your [Body fat percentage].
Press and hold to advance the settings rapidly. (The setting range is 5%–75%.)
Recommendation: We recommend using a Tanita Body Composition Monitor to measure your body fat percentage accurately. Visit www.tanita.eu for more details.
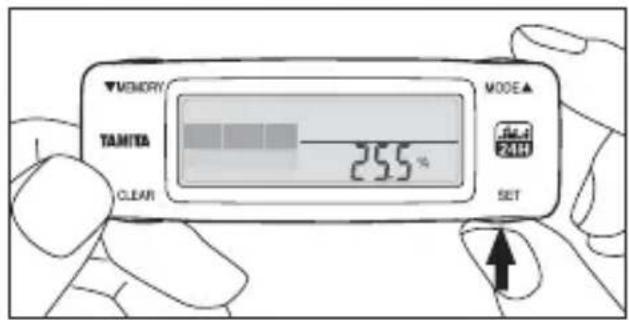
3) Press the SET button to finalize the setting.
If you do not know your body fat percentage, just press the SET button. BMR will be automatically estimated according to your height and weight.
Setting Your Stride Length

1) After setting your [Body Fat Percentage], the [Stride Length] display flashes.
Note: The stride length shown in the display is a value calculated from your height. If you are performing this setting for the second or subsequent times, the previous setting value is displayed.
Note: The stride length is taken as the distance between the toes on one foot and the toes on the other foot. In order to accurately find your average stride length, walk for 10 steps and then divide the total walked distance by 10.
E.g. If you walked 6.5 meters in 10 steps, 6.5/10 (steps) = 0.65 meters = 65 cm

2) Press the ▼MEMORY button/ ▲ MODE button to set your [stride length].
Press and hold to advance the setting rapidly. (Setting range is 20 cm–150 cm)
3) Press the SET button to finalize the setting.
After setting your [Stride Length], [Today's Measurement] is displayed. This completes the initial settings.
This completes the initial settings.
Wearing the Personal Activity Monitor

natural_image
Line drawing of a hand holding a small object over a glass (no text or symbols)In a pocket
We recommend using the safety strap and attaching the clip to the edge of the pocket.
Caution
Do not place the device into the back pocket of trousers. Doing so may damage the device and cause injury to the wearer.
natural_image
Line drawing of a person using a smartphone to interact (no text or symbols present)Wearing with the clip battery cover
We recommend using the safety strap and attaching the clip to the edge of your clothing.
Note:
natural_image
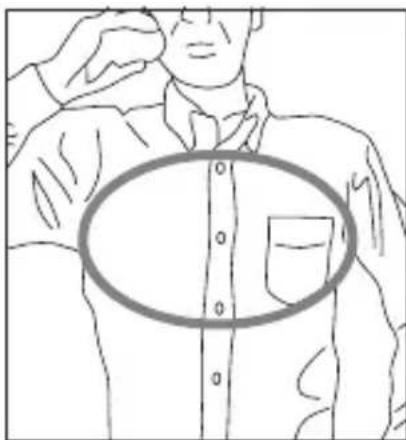
Line drawing of a person adjusting a button with a magnified inset showing the mouth area (no text or symbols)In order to accurately measure your physical activity based on upper body movement, we recommend wearing the device near your chest. For example, in a shirt-pocket etc.
Using the Clip Battery Cover

natural_image
Line drawing of a hand holding a mechanical component with an arrow indicating direction (no text or symbols)1) Remove the battery cover.
Loosen the 2 screws, and remove the battery cover. See P. 9.
natural_image
Illustration of a hand using a screwdriver to adjust or install a device on a smartphone (no text or symbols visible)2) Attach the battery cover with clip.
Insert in the direction shown by the arrow, and securely tighten the 2 screws.
Note: Make sure that the inner ring is installed securely in the groove.
Using the Safety Strap

natural_image
Line drawing of a mechanical component with a black arrow indicating a force or connection (no text or symbols present)Attaching the strap
Note: Do not pull the strap sharply. Doing so may cause the strap to stretch or break.
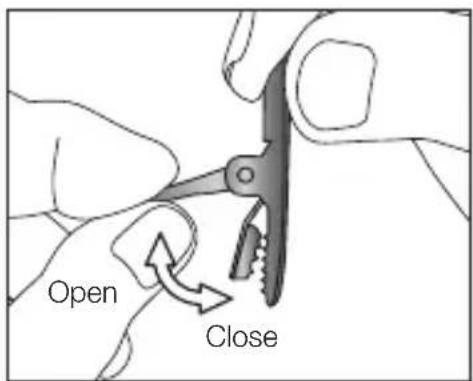
Opening/Closing the clip
Note: Do not pull the strap sharply when the clip is closed. Doing so may damage the fabric that the clip is attached to.
Measuring your Total Energy Expenditure (calories burned)
You are now ready to start using your Personal Activity Monitor!
You can measure your total energy expenditure for a full day simply by wearing this device. Unlike pedometers, the daily activity monitor measures the energy expenditure you consume during normal daily physical activity in addition to the number of steps.
Measuring the number of steps, walking distance, and walking time Tips on getting the most accurate readings
If you move consistently for more than 7 seconds, the device senses you have started walking, and displays the measurement value up to that point. If the movement stops once, and is not followed by more than 7 seconds of consistent Movement, the additional movement is not added.
Note: Information other than the number of steps, walking distance and walking time are continually measured.
Note: Even if this device does not detect movement, the total energy expenditure value increases. Even when resting without any physical exercise, the energy consumed by our bodies while resting has been incorporated into the device programming.
Note: This device is equipped with an energy saving mode. If it does not detect movement for approximately 5 minutes, the display will become blank. Information is displayed again when movement is detected, or when one of the buttons is pressed.
Using the Daily Activity Monitor Correctly
In the following cases, total energy expenditure may not be measured correctly. However, this will not interfere with the total energy expenditure it does not continue for a long time.
- When riding in a vehicle
- When riding in a car, bus, or on a motorbike
- When riding a bicycle
- Activities involving vertical movements
- Climbing up or down stairs
- Climbing up or down steep slopes
• Sports other than walking
- Jogging or jumping exercise, playing sports
• (A reference value for total energy expenditure can be measured)
- When this device is subjected to irregular movements
- If this device is shaken around inside a pocket etc.
- If the area where this device is worn moves irregularly
In the following situations, the number of steps, walking distance and walking time may not be measured correctly.
- When walking irregularly
- When sliding your feet to walk (on snowy/icy surfaces etc.)
- When walking in shoes such as sandals or slippers.
- When walking through crowded areas such as busy city centre streets
• Sports other than walking
- Jogging or jumping exercise, playing sports (Measurement can be made, but should be taken as a reference value)
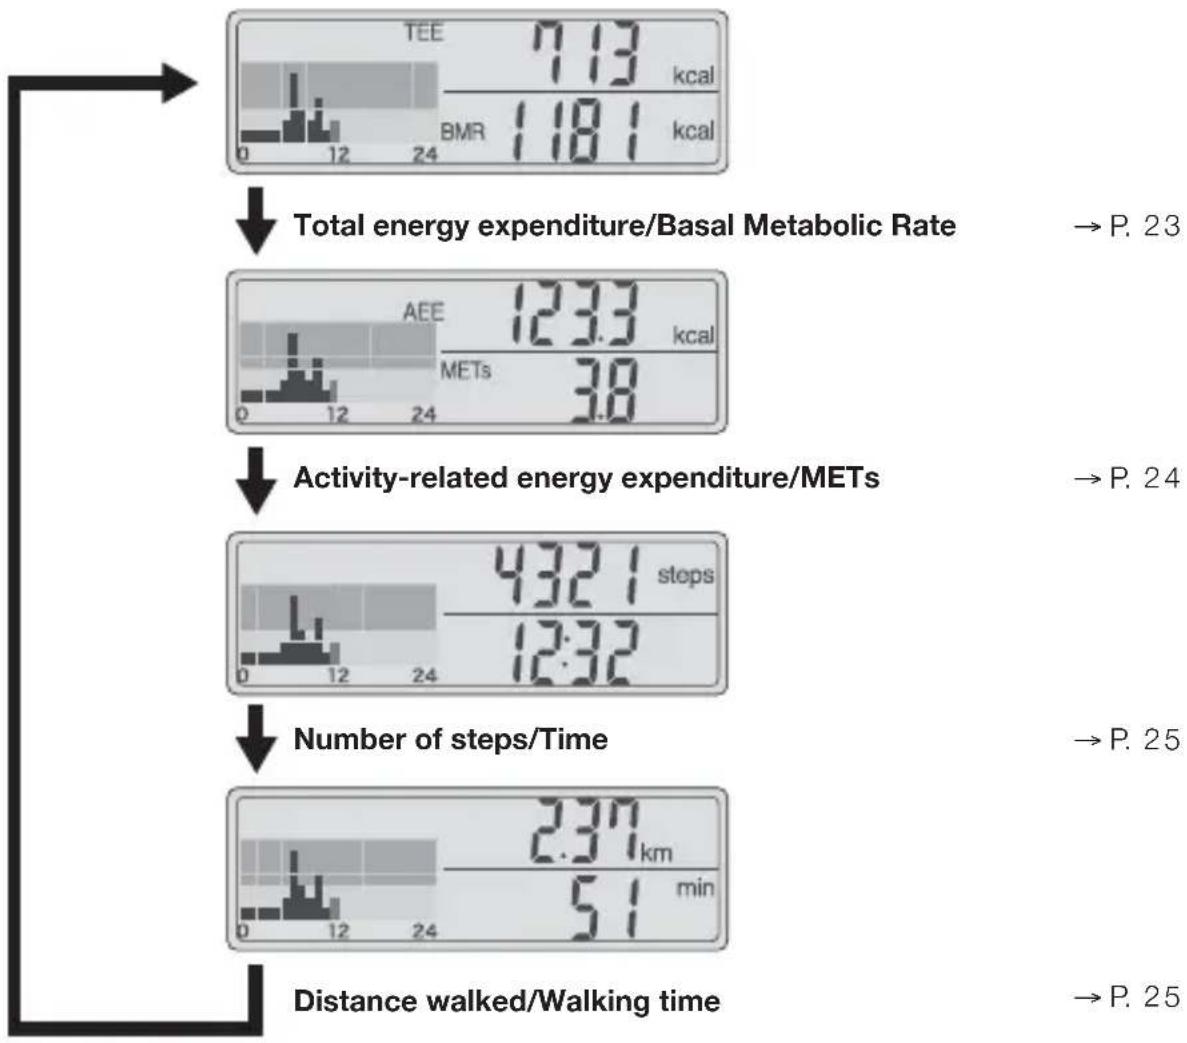
Viewing the Measurement Results
Pressing the MODE button changes the display to show different information.
other
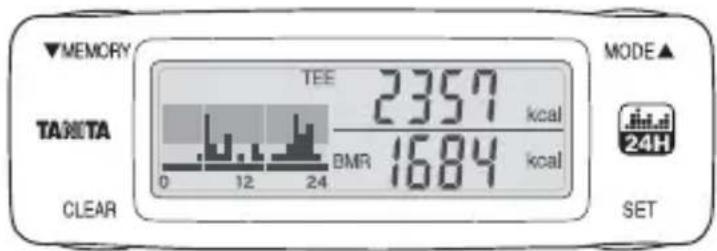
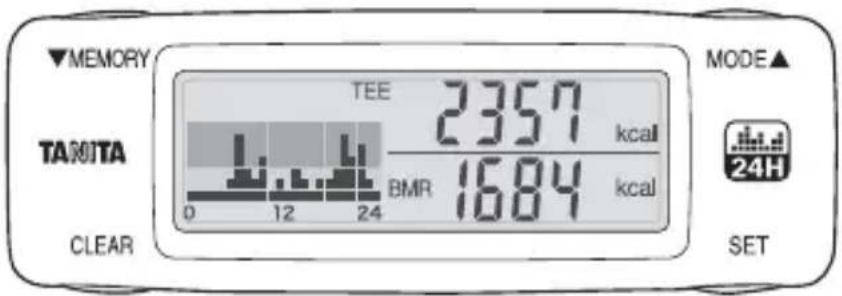
| Metric | Value | | --- | --- | | Total energy expenditure/Basal Metabolic Rate | P. 23 | | Activity-related energy expenditure/METs | P. 24 | | Number of steps/Time | P. 25 | | Distance walked/Walking time | P. 25 |Total Energy Expenditure/Basal Metabolic Rate


bar
| Metric | Value | | :--- | :--- | | TEE | 713 kcal | | BMR | 1181 kcal | | 0-12 | 12 | | 12-24 | 24 |2) Basal Metabolic Rate3) 24-Hour Activity Graph
1) Total Energy Expenditure (TEE)
Shows the accumulated total of burned calories for the day from midnight until the present time. (The maximum display for 1 day is 99999 calories. The display stops changing if this value is exceeded.)
2) Basal Metabolic Rate (BMR)
The minimum number of calories your body burns for vital bodily functions such as respiration and heart rate when at rest. This value is calculated based on the personal information you set. This value will not change unless you change the settings.
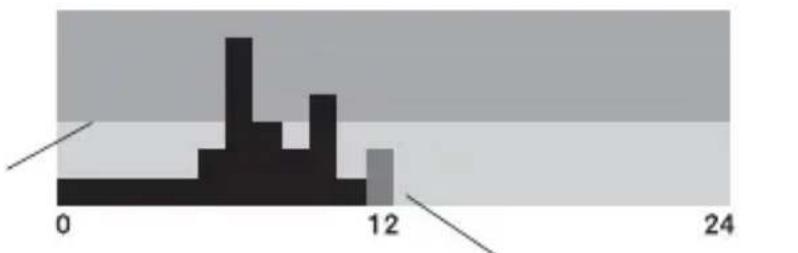
3) 24-Hour Activity Graph
Shows the amount of activity for the day from midnight until the present time as a graph. The amount of activity is shown in hour blocks for every hour on a scale of 7. Each scale is based on the Basal Metabolic Rate for one hour, and shows the amount of activity as a multiple of this base value.
7th scale mark ..... More than 3.5 times the resting energy expenditure
6th scale mark ..... More than 3.0 times, less than 3.5 times the resting energy expenditure 5th scale mark ..... More than 2.5 times, less than 3.0 times the resting energy expenditure 4th scale mark ..... More than 2.0 times, less than 2.5 times the resting energy expenditure 3rd scale mark ..... More than 1.5 times, less than 2.0 times the resting energy expenditure 2nd scale mark ..... More than 1.1 times, less than 1.5 times theresting energy expenditure 1st scale mark ..... Less than 1.1 times the resting energy expenditure (almost entirely resting)
Line indicating 2.0 times the resting energy expenditure
histogram
| Bin Range | Frequency | | --------- | --------- | | 0 - 5 | 1 | | 5 - 10 | 3 | | 10 - 15 | 2 | | 15 - 20 | 1 | | 20 - 25 | 0 | | 25 - 30 | 0 | | 30 - 35 | 0 | | 35 - 40 | 0 | | 40 - 45 | 0 | | 45 - 50 | 0 | | 50 - 55 | 0 | | 55 - 60 | 0 | | 60 - 65 | 0 | | 65 - 70 | 0 | | 70 - 75 | 0 | | 75 - 80 | 0 | | 80 - 85 | 0 | | 85 - 90 | 0 | | 90 - 95 | 0 | | 95 - 100 | 0 | | 100 - 105 | 0 | | 105 - 110 | 0 | | 110 - 115 | 0 | | 115 - 120 | 1 | | 120 - 125 | 0 | | 125 - 130 | 0 | | 130 - 135 | 0 | | 135 - 140 | 0 | | 140 - 145 | 0 | | 145 - 150 | 0 | | 150 - 155 | 0 | | 155 - 160 | 0 | | 160 - 165 | 0 | | 165 - 170 | 0 | | 170 - 175 | 0 | | 175 - 180 | 0 | | 180 - 185 | 0 | | 185 - 190 | 0 | | 190 - 195 | 0 | | 195 - 200 | 0 | | 200 - 205 | 0 | | 205 - 210 | 0 | | 210 - 215 | 0 | | 215 - 220 | 0 | | 220 - 225 | 0 | | 225 - 230 | 0 | | 230 - 235 | 0 | | 235 - 240 | 0 |The block for the current time flashes
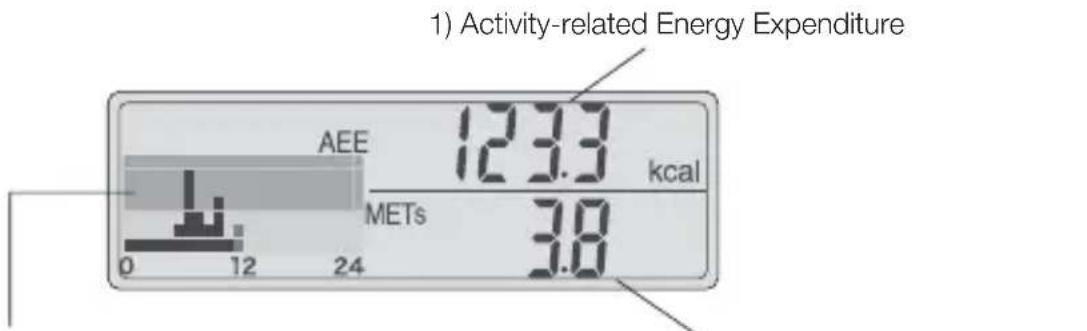
Activity-related Energy Expenditure/METs
other
1) Activity-related Energy Expenditure | Category | Value (kcal) | |---|---| | AEE | 123.3 | | METs | 3.8 |2) METs3) 24-Hour Activity Graph
1) Activity-related Energy Expenditure (AEE)
Shows the total number of calories burned through the physical activity for the day between midnight and the current time. Physical activity means all activities that burn more calories that when seated (when resting).
2) METs
This unit is used to show the intensity of physical activity. 1 MET is taken as the intensity of physical activity in the seated, relaxed state; other activities are measured as a multiple of this value. Regular walking is measured as approximately 3 METS. This means that walking is approximately 3 times more intense than sitting down.
* This value is calculated from the intensity of physical activity for the previous 1 minute.
3) 24-Hour Activity Graph
Shows the amount of activity for the day from midnight until the present time as a graph. (See P. 23 for details)
Number of Steps/Time

1) Number of Steps
Shows the number of steps walked. (The maximum display for 1 day is 99999 steps. The display stops changing if this value is exceeded.)
2) Time
Shows the present time. (24-hour clock display)
3) 24-Hour Activity Graph
Shows the number of steps for the day from midnight until the present time as a graph. (See P. 23 for details)
Walking Distance/Walking Time

1) Walking Distance
Shows the walking distance, which is calculated by multiplying the number of steps taken by your stride length. (The maximum display for 1 day is 149.99 km. The display stops changing if this value is exceeded.)
2) Walking Time
The walking time of each step taken is measured, and the walking time is calculated and shown.
3) 24-Hour Activity Graph
Shows the amount of activity for the day from midnight until the present time as a graph. (See P. 23 for details)
Viewing the Memory
Memory display switch operations

flowchart
graph TD
    A["Walking Distance/Walking Time"] --> B["Number of Steps/Time"]
    B --> C["Activity-related Energy Expenditure/METs"]
    C --> D["Total Energy Expenditure/Basal Metabolic Rate"]
    D --> E["MEA: 1233 kcal, METs: 38 kcal"]
    E --> F["TEE: 713 kcal, RMR: 1181 kcal"]
    F --> G["Today's Measurement Values"]

    H["MEA button"] --> I["MEMORY button"]
    H --> J["CLEAR button"]

    K["MEA button"] --> L["MEMORY button"]
    K --> M["CLEAR button"]

    N["MEA button"] --> O["MEMORY button"]
    N --> P["CLEAR button"]

    Q["MEA button"] --> R["MEMORY button"]
    Q --> S["CLEAR button"]
flowchart
graph TD
    A["Start"] --> B["1 day ago TEE 1954 kcal BMR 1181 kcal"]
    B --> C["MODE button"]
    C --> D["1 day ago AEE 2730 kcal"]
    D --> E["MODE button"]
    E --> F["1 day ago 1835 steps"]
    F --> G["MODE button"]
    G --> H["1 day ago 430 km min 94 min"]
    H --> I["End"]
    style A fill:#f9f,stroke:#333
    style I fill:#bbf,stroke:#333
Resetting the Values for the Day
At 0:00 am (midnight) every day, this device automatically saves the measurement values to the memory. You can reset the current day's measurement values to [0] any time before 0:00 am.
Note: If you reset current day's values, you cannot restore the values.
Note: You cannot reset the week's exercise.
Note: Measurement values already stored in the memory and initial settings are not deleted.
Note: The Basal Metabolic Rate is calculated from your personal settings, and is therefore not deleted.
1) Press and hold the CLEAR button for more than 5 seconds while current day's values are shown in the display.
2) Current day's values are reset.
Resetting the System

In the following situations, reset the system.
If you want all of personal settings and measurement values in the memory to be reset to [0].
Note: If you reset the system, you cannot restore any of the values or initial settings.
1) Press and hold the SET button for more than 2 seconds while today's values are shown in the display. The display switches to the setting display, and the [Hour] in the time display flashes.
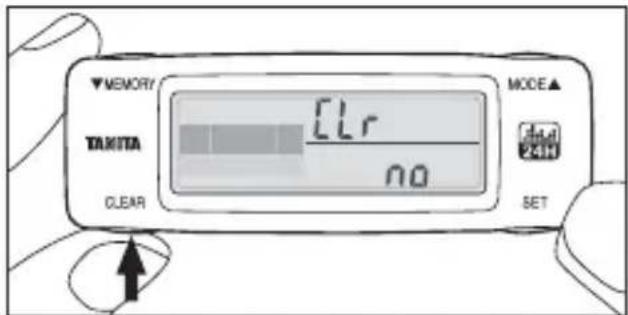
2) Press and hold the CLEAR button for more than 5 seconds, and [Clr] and [No] are displayed.
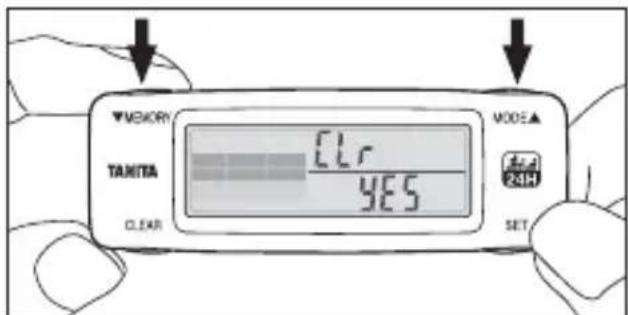
3) Press the ▼memory/ MODE button to change the display to [Yes].
4) Press the SET button to complete the system reset.
Note: The display screen switches to the setting screen after system reset. Refer to page 11, and reset the initial settings.
Note: If you do not wish to reset the system, select [No] and press the SET button. The display screen returns to the setting screen.
Specifications
| Detection Method Triaxial Acceleration Sensor | ||
| Display Method LCD Display | ||
| Setting Contents | Time 24-Hour | Display |
| Age 6–99 years old | ||
| Sex | Male/Female | |
| Height 90 cm– | 220 cm | |
| Weight 20 kg– | 150 kg | |
| Body Fat Percentage | 5.0%–75.0% | |
| Stride Width 20 cm–150 cm | ||
| Display Contents | Number of Steps Min: 1 step Max: 99999 steps | |
| Time 24-Hour | Display | |
| Distance Min: 0.01 km Max: 149.99 km | ||
| Walking Time Min: | 1 min Max: 1440 mins | |
| Total Energy Expenditure | Min: 1 kcal Max: 99999 kcal | |
| Basal Metabolic Rate Min: 1 kcal Max: 9999 kcal | ||
| Activity-related Energy Expenditure | Min: 0.1 kcal Max: 9999.9 kcal | |
| METs Min: 1.0 | Max: 18.0 METs | |
| 24-Hour Activity Graph | Min: 1 Scale mark Max: 7 Scale marks Shows the amount of activity for each hour | |
| 7-Day | Shows the total energy expenditure, resting energy expenditure, active energy, number of steps, distance, walking time and 24-hour Activity graph for the last 7 days | |
| Accuracy of Number of Steps | ±5% (depending on vibration testing machine) | |
| Clock accuracy | Within ±30 seconds of the average month | |
| Power Supply DC 3.0 V (two CR2032 batteries) | ||
| Battery Life | Approx. 9 months (when used for approximately 16 hours per day) | |
| Temperature Range 0 – +40 °C | ||
| Dimensions | D13 x W30 x H88 mm | |
| Weight Approx. 32 g (including batteries) | |
| Main Materials | Device body: ABSClear Lens: PMMA |
| Country of Manufacture China | |
Troubleshooting
| The mark is flashing | The battery power is low. Replace them promptly with new batteries (CR2032). Refer to P. 8. |
| is displayed | There is no battery power. Measurements cannot be taken. Replace with new batteries (CR2032). Refer to P. 8. |
| Batteries are fitted but nothing is displayed | Are the batteries positioned correctly?Check the ⊕ and ≡ sides of the batteries. Refer to P. 10. |
| The batteries have run down. Replace them promptly with new batteries (CR2032). Refer to P. 8. | |
| The measured value is too small/large | Is the device attached correctly? Refer to P. 18. |
| Are the settings correct? Check the contents of the settings. Refer to P. 11. | |
| Refer to “Using the Daily Activity Monitor Correctly” on P. 21 to ensure you are using the device correctly. | |
| mark is displayedErr02 | Re-insert the batteries. Refer to P. 8.If there are problems with the past memory after re-inserting the batteries, reset the system. Refer to P. 29. |
Notice:
These marks can be found out on contaminant-containing Batteries:
Pb Pb = Battery contains lead,
Cd Cd = Battery contains cadmium,
Hg Hg = Battery contains mercury.

Not allowed to mix batteries with consumer wastes!
As consumer you are legally bound to return used or discharged batteries. You can deposit your old batteries at the public collecting points in your town, or wherever the corresponding batteries are sold and specifically marked collecting boxes have been set up. In case of scrapping the apparatus, the batteries should be removed from it and deposited at the collecting points as well.


The device features radio interference suppression in compliance with EC regulation 2004/108/EC
Inhalt
Vor dem Gebrauch
natural_image
Simple line drawing of a baby holding a magnifying glass (no text or symbols)Vorsicht

natural_image
Line drawing of a vehicle front panel with ventilation slots and mounting holes (no text or symbols)natural_image
Line drawing of a mechanical tool or tool with no visible text, numbers, or symbolsnatural_image
Simple line drawing of a screwdriver with no text or symbols6. Batterien (2xCR2032)
natural_image
Two plain circular objects with no text or symbols visiblenatural_image
Illustration of a hand using a screwdriver to adjust or install a smartphone into a mobile phone (no text or symbols visible)natural_image
Technical illustration of a remote control casing with internal compartments and external housing (no text or symbols)natural_image
Illustration of a hand using a tool to apply a circular component to a device (no text or symbols visible)natural_image
Illustration of a mechanical component with two circular components and internal arrows indicating motion (no text or symbols)natural_image
Line drawing of a hand holding a device with a black arrow pointing to a component (no text or symbols)natural_image
Illustration of a hand using a screwdriver to adjust or install a smartphone into a portion of the screen (no text or symbols visible)natural_image
Line drawing of a hand holding a small object over a glass, no text or symbols presentIn einer Tasche
natural_image
Line drawing of a person using a smartphone to interact (no text or symbols present)natural_image
Line drawing of a person adjusting a shirt with a pocket, no text or symbols presentnatural_image
Line drawing of a hand holding a mechanical component with an arrow indicating direction (no text or symbols)natural_image
Illustration of a hand using a screwdriver to adjust or install a device on a smartphone (no text or symbols visible)natural_image
Line drawing of a mechanical component with a black arrow indicating force or movement (no text or symbols)natural_image
Simple line drawing of a baby holding a magnifying glass (no text or symbols)natural_image
Line drawing of a mechanical component with slots and mounting holes (no text or symbols)natural_image
Line drawing of a mechanical tool with handle and grip (no text or symbols)natural_image
Illustration of a screwdriver with a flat blade and threaded end (no text or symbols)6. Batteries (2 x CR2032)

natural_image
Two plain circular objects with no text or symbols visiblenatural_image
Illustration of a hand using a screwdriver to adjust or repair a mobile phone component (no text or symbols visible)natural_image
Illustration of a remote control casing with two internal compartments and two external casing (no text or symbols)natural_image
Illustration of a hand using a tool to apply a button to two circular objects on a smartphone (no text or symbols present)natural_image
Illustration of a mechanical component with two circular parts and internal arrows indicating motion (no text or symbols)natural_image
Line drawing of a hand holding a device with a black arrow pointing to a component (no text or symbols)natural_image
Illustration of a hand using a screwdriver to adjust or install a smartphone into a mobile phone (no text or symbols visible)natural_image
Line drawing of a hand holding a pen over a glass with liquid (no text or symbols)Dans une poche
natural_image
Line drawing of a person using a smartphone to interact (no text or symbols present)natural_image
Line drawing of a person adjusting a shirt with a pocket, no text or symbols presentnatural_image
Line drawing of a hand holding a mechanical device with an arrow indicating the process (no text or symbols present)natural_image
Illustration of a hand using a screwdriver to adjust or install a device on a smartphone (no text or symbols visible)natural_image
Line drawing of a mechanical component with a black arrow indicating force or movement (no text or symbols)Fixation de la sangle
natural_image
Simple line drawing of a baby holding a magnifying glass (no text or symbols)
Opgelet

natural_image
Line drawing of a mechanical component with three circular holes and a rectangular housing (no text or symbols)3. Veiligheidsriem

natural_image
Line drawing of a mechanical tool with handle and grip (no text or symbols)natural_image
Illustration of a screwdriver with a flat blade and threaded end (no text or symbols)6. Batterijen (2xCR2032)
natural_image
Two plain circular objects with textured surfaces, no text or symbols visiblenatural_image
Illustration of a hand using a screwdriver to adjust or install a smartphone into a mobile phone (no text or symbols visible)natural_image
Technical illustration of a remote control casing with internal compartments and external housing (no text or symbols)natural_image
Illustration of hands using a tool to apply a circular component on a smartphone (no text or symbols visible)natural_image
Illustration of a mechanical component with two circular parts and internal black arrows indicating movement or force (no text or symbols)natural_image
Line drawing of a hand holding a device with a black arrow pointing to a component (no text or symbols)natural_image
Illustration of a hand using a screwdriver to adjust or install a smartphone into a battery (no text or symbols visible)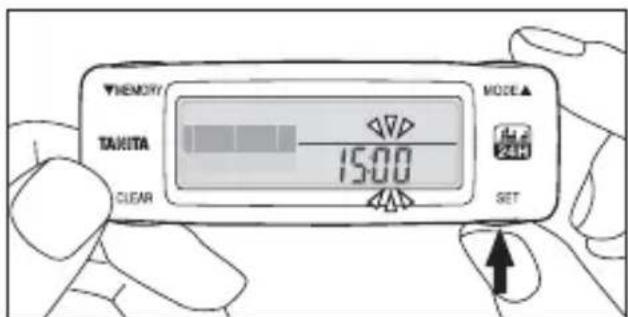
natural_image
Line drawing of a hand holding a pen over a glass, no text or symbols presentnatural_image
Line drawing of a person using a smartphone to interact (no text or symbols present)natural_image
Line drawing of a person adjusting a shirt with a circular badge highlighting the chest area (no text or symbols)natural_image
Line drawing of a hand holding a mechanical device with an arrow indicating the process (no text or symbols present)natural_image
Illustration of a hand using a screwdriver to adjust a device on a smartphone (no text or symbols visible)natural_image
Technical line drawing of a mechanical component with a black arrow indicating force or movement (no text or symbols)natural_image
Simple line drawing of a baby holding a magnifying glass (no text or symbols)
Avviso

natural_image
Line drawing of a mechanical component with slots and mounting holes (no text or symbols)natural_image
Line drawing of a mechanical tool or connector with no visible text or symbolsnatural_image
Illustration of a screwdriver with a flat blade and threaded tip (no text or symbols)6. Batterie (2 x CR2032)
natural_image
Two plain circular objects with no text or symbols visiblenatural_image
Illustration of a hand using a screwdriver to adjust or install a smartphone into a portion of the screen (no text or symbols visible)natural_image
Technical illustration of a remote control casing with internal compartments and external housing (no text or symbols)natural_image
Illustration of a hand using a tool to apply a circular component on a smartphone (no text or symbols visible)natural_image
Illustration of a mechanical component with two circular components and internal arrows indicating motion (no text or symbols)natural_image
Line drawing of a hand using a tool to adjust or install a component, with an arrow indicating the process (no text or symbols present)natural_image
Illustration of a hand using a screwdriver to adjust or install a smartphone into a battery (no text or symbols visible)natural_image
Line drawing of a hand holding a pen over a glass, no text or symbols presentIn tasca
natural_image
Line drawing of a person using a smartphone to interact (no text or symbols present)natural_image
Line drawing of a person adjusting a shirt with a circular badge highlighting the chest area (no text or symbols)natural_image
Line drawing of a hand holding a mechanical device with an arrow indicating the process (no text or symbols present)natural_image
Illustration of a hand using a screwdriver to adjust a device on a smartphone (no text or symbols visible)natural_image
Technical line drawing of a mechanical component with a black arrow indicating force or movement (no text or symbols)natural_image
Simple line drawing of a baby holding a magnifying glass (no text or symbols)Precaución

natural_image
Line drawing of a mechanical component with slots and mounting holes (no text or symbols)natural_image
Line drawing of a mechanical tool with handle and grip (no text or symbols)natural_image
Illustration of a screwdriver with a flat blade and threaded end (no text or symbols)6. Pilas (2 CR2032)

natural_image
Two plain circular objects with no text or symbols visiblenatural_image
Illustration of a hand using a screwdriver to adjust or install a smartphone into a portion of the screen (no text or symbols visible)natural_image
Technical illustration of a remote control casing with internal compartments and external housing (no text or symbols)natural_image
Illustration of hands using a tool to apply a circular component on a smartphone (no text or symbols visible)natural_image
Illustration of a mechanical component with two circular parts and internal arrows indicating movement or force (no text or symbols)natural_image
Line drawing of a hand holding a device with a black arrow pointing to a component (no text or symbols)Solicitud:

Debe
hacerlo
natural_image
Illustration of a hand using a screwdriver to adjust or install a smartphone into a mobile phone (no text or symbols visible)natural_image
Line drawing of a hand holding a pen over a glass, no text or symbols presentEn un bolsillo
natural_image
Line drawing of a person using a smartphone to interact (no text or symbols present)natural_image
Line drawing of a person adjusting a button with a magnified inset showing the mouth area (no text or symbols)natural_image
Line drawing of a hand holding a mechanical device with an arrow indicating the process (no text or symbols present)natural_image
Illustration of a hand using a screwdriver to press a device on a smartphone (no text or symbols visible)natural_image
Technical line drawing of a mechanical component with a black arrow indicating force or movement (no text or symbols)Fije la correa
natural_image
Simple line drawing of a baby holding a smartphone (no text or symbols)
Внимание

Необходимо
natural_image
Line drawing of a mechanical component with slots and mounting holes (no text or symbols)natural_image
Line drawing of a mechanical tool or clamp with no visible text or symbolsnatural_image
Illustration of a screwdriver with a flat blade and threaded end (no text or symbols)natural_image
Two plain circular objects with no text or symbols visiblenatural_image
Illustration of a hand using a screwdriver to adjust or install a mobile phone into a screen (no text or symbols visible)natural_image
Technical illustration of a remote control casing with internal compartments and external housing (no text or symbols)natural_image
Illustration of a hand using a tool to apply a circular component on a smartphone (no text or symbols visible)natural_image
Illustration of a mechanical component with two circular parts and internal arrows indicating motion (no text or symbols)natural_image
Line drawing of a hand holding a device with an arrow pointing to a component (no text or symbols)natural_image
Illustration of a hand using a screwdriver to adjust or install a smartphone into a battery (no text or symbols visible)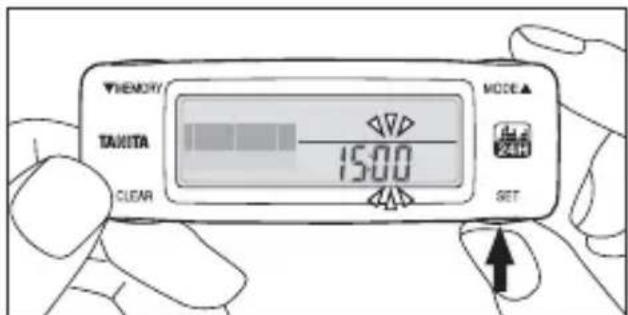
natural_image
Line drawing of a hand holding a pen over a glass, no text or symbols presentНошение в кармане
natural_image
Line drawing of a person using a smartphone to interact (no text or symbols present)natural_image
Line drawing of a person adjusting a shirt with a magnified inset showing the chest area (no text or symbols)natural_image
Line drawing of a hand holding a device with an arrow indicating left motion (no text or symbols)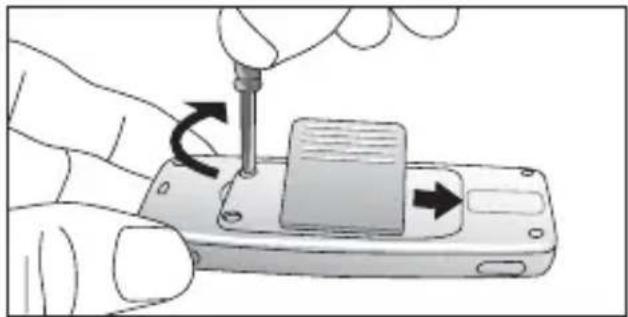
natural_image
Illustration of a hand using a screwdriver to press a device on a smartphone (no text or symbols visible)natural_image
Line drawing of a mechanical component with a black arrow indicating a force or connection (no text or symbols)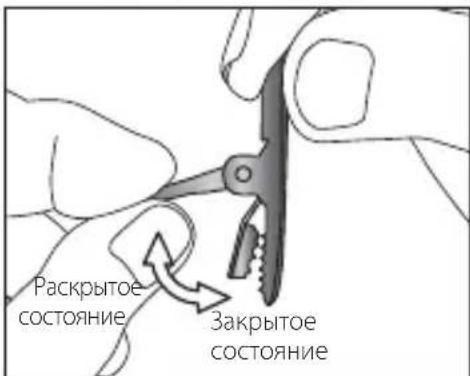
Business Location in UK
The Barn, Philpots Close, Yiewsley,
Middlesex, UB7 7RY,
United Kingdom
Tel: +44(0)1895-438577
Fax: +44(0)1895-438511
TANITA India Private Limited
Level 9, Platina, C-59, G Block,
Bandra Kurla Complex, Bandra East,
Mumbai 400051, INDIA
Tel: +91-22-3953-0507
Fax: +91-22-3953-0604
TANITA Corporation of America Inc.
2625 South Clearbrook Drive
Arlington Heights, IL 60005 USA.
Tel: +1-847-640-9241
Fax: +1-847-640-9261
www.tanita.com
TANITA Health Equipment H.K. Ltd.
Unit 301-303 3/F Wing On Plaza,
62 Mody Road, Tsimshatsui East,
Kowloon, Hong Kong
Tel: +852-2838-7111
Fax: +852-2838-8667
Manufacturer
TANITA Corporation
1-14-2, Maeno-Cho, Itabashi-ku,
Tokyo, Japan 174-8630
Tel: +81(0)-3-3968-2123
Fax: +81(0)-3-3967-3766
www.tanita.co.jp
ISO 9001 Certified

- Daily Activity Monitor AM-120E
- Instruction Manual
- Bedienungsanleitung
- Usage
- Troubleshooting
- Safety Notes
- Warning
- Caution
- Usage, Storage, and Maintenance
- Handling the Device
- Storage
- Maintenance
- Parts and Accessories
- Daily Activity Monitor
- Clip battery cover
- Safety strap
- Screwdriver
- Batteries (2xCR2032)
- Names of Parts
- Front
- Back
- Fitting/Replacing Batteries
- Note:
- Request:
- Must Do
- 2) Remove the battery cover.
- 3) Insert a strong, thin stick into the hole and remove the batteries
- Initial Settings/Changing Settings
- Setting the Time
- 1) When batteries are inserted, the [hour] value flashes.
- 2) Press the ▼MEMORY button/ ▲ MODE button to set the clock.
- 3) Press the SET button to finalize the setting.
- Setting Your Age
- Setting Male/Female
- Setting Your Body Fat Percentage
- Setting Your Stride Length
- Wearing the Personal Activity Monitor
- In a pocket
- Wearing with the clip battery cover
- Using the Clip Battery Cover
- 1) Remove the battery cover.
- 2) Attach the battery cover with clip.
- Using the Safety Strap
- Attaching the strap
- Opening/Closing the clip
- Measuring your Total Energy Expenditure (calories burned)
- You are now ready to start using your Personal Activity Monitor!
- Measuring the number of steps, walking distance, and walking time Tips on getting the most accurate readings
- Using the Daily Activity Monitor Correctly
- - When riding in a vehicle
- - Activities involving vertical movements
- • Sports other than walking
- - When this device is subjected to irregular movements
- - When walking irregularly
- Viewing the Measurement Results
- Total Energy Expenditure/Basal Metabolic Rate
- 1) Total Energy Expenditure (TEE)
- 2) Basal Metabolic Rate (BMR)
- 3) 24-Hour Activity Graph
- Activity-related Energy Expenditure/METs
- 1) Activity-related Energy Expenditure (AEE)
- 2) METs
- Number of Steps/Time
- 1) Number of Steps
- 2) Time
- Walking Distance/Walking Time
- 1) Walking Distance
- 2) Walking Time
- Viewing the Memory
- Resetting the Values for the Day
- Resetting the System
- Specifications
- Not allowed to mix batteries with consumer wastes!
- Inhalt
- Vor dem Gebrauch
- Vorsicht
- Batterien (2xCR2032)
- In einer Tasche
- Batteries (2 x CR2032)
- Dans une poche
- Fixation de la sangle
- Opgelet
- Veiligheidsriem
- Batterijen (2xCR2032)
- Avviso
- Batterie (2 x CR2032)
- In tasca
- Precaución
- Pilas (2 CR2032)
- Solicitud:
- En un bolsillo
- Fije la correa
- Внимание
- Ношение в кармане
- Business Location in UK
- TANITA India Private Limited
- TANITA Corporation of America Inc.
- TANITA Health Equipment H.K. Ltd.
- Manufacturer
- TANITA Corporation
Brand : TANITA
Model : AM120
Category : Pedometer