
SEH019500 - Barbecue Super-Ego - Free user manual and instructions
Find the device manual for free SEH019500 Super-Ego in PDF.

Frequently Asked Questions - SEH019500 Super-Ego
User questions about SEH019500 Super-Ego
0 question about this device. Answer the ones you know or ask your own.
Ask a new question about this device
Download the instructions for your Barbecue in PDF format for free! Find your manual SEH019500 - Super-Ego and take your electronic device back in hand. On this page are published all the documents necessary for the use of your device. SEH019500 by Super-Ego.
USER MANUAL SEH019500 Super-Ego
GB Portable gas Grill
P Barbecue portátil a gás
Please read retain these directions for use. Do not throw them away! The warranty does not cover damage caused by incorrect use of the equipment! Subject to technical modifications.
PORTUGUES Pagina 10
EC-DECLARATION OF CONFORMITY
We declare on our sole accountability that this product conforms to the standards and guidelines stated.
General safety information

DANGER
If you smell gas:
- Shut off gas to the appliance.
- Extinguish any open flame.
- Open lid.
- If odor continues, keep away from the appliance and immediately call your fire department.
Failure to follow these instructions could result in fire or explosion, which could cause property damage, personal injury or death.

DANGER
- Never operate this appliance unattended.
- Never operate this appliance within 3M of any structure, combustible material or other gas cylinder.
- Never operate this appliance within 7.5M of any flammable liquid.
- Do not fill cooking vessel beyond maximum fill line.
- Never allow oil or grease to get hotter than 200^ / 400^ . If the temperature exceeds 200^ / 400^ , or if oil begins to smoke, immediately turn the burner or gas supply OFF.
- Heated liquids remain at scalding temperatures long after the cooking process. Never touch cooking appliance until liquids have cooled to 45^ / 113^ or less.
- If a fire should occur, keep away from the appliance and immediately call your fire department. Do not attempt to extinguish an oil or grease fire with water.
Failure to follow these instructions could result in fire, explosion or burn hazard, which could cause property damage, personal injury or death.

DANGER
-
The use of alcohol, prescription or non-prescription drugs may impair the consumer's ability to properly assemble or safely operate the appliance.
-
When cooking with oil or grease, have a type BC or ABC fire extinguisher readily available. In the event of an oil or grease fire do not attempt to extinguish with water. Immediately call the fire department.
-
A Type BC or ABC fire extinguisher may, in some circumstances contain the fire.
- In the event of rain, snow, hail, sleet or other forms of precipitation while cooking with oil or grease, cover the cooking vessel immediately and turn off the appliance burners and gas supply.
- Do not attempt to move the appliance or cooking vessel.
- When cooking, the appliance fryer/boiler must be on a level, stable noncombustible surface in an area clear of combustible material. An asphalt surface (blacktop) may not be acceptable for this purpose.
- Do not leave the appliance unattended.
- Keep children and pets away from the appliance at all times.
- Do not place empty cooking vessel on the appliance while in operation. Use caution when placing anything in cooking vessel while the appliance is in operation.
- Do not move the appliance when in use. Allow the cooking vessel to cool to 45^ / 113^ or less before moving or storing.
- This appliance is not intended for and should never be used as a heater.
The following symbols shown below are used extensively throughout these instructions. Always heed these precautions, as they are essential when using any mechanical or propane fueled equipment.

DANGER
indicates an imminently hazardous situation which, if not avoided, will result
in death or serious injury.

WARNING
indicates a potentially hazardous situation which, if not avoided, could result in death
or serious injury.

CAUTION
indicates a potentially hazardous situation which, if not avoided, may result in minor
or moderate personal injury, or property damage.

WARNING
Gas containers shall be changed in a well ventilated location, preferably outside, away from any sources of ignition, such as naked flames, pilots, electric fires and away from other people.
- The appliance must be operated on a horizontal surface.
- For using ground type gas cylinder, after use, turn off first the gas container valve and then, after extinction of the flame, turn off the appliance tap. During locate the appliance, avoid twisting the flexible hose.
- Do not modify the appliance by user.
- Improper assembly may be dangerous. Please carefully follow the assembly instructions in this manual.
- Do not store a spare or disconnected propane cylinder under or near the Grill.
- Do not operate the Grill if there is a gas leak present.
- Do not use a flame to check for gas leaks.
- Combustible materials should never be within 24 inches (61 mm Ø) of the top, bottom, back or sides of your Grill.
- Do not use charcoal or lava rock in your Grill.
- The Grill should never be used by children.
- Accessible parts of the grill may be very hot.
- Keep children away while it is in use.
- You should exercise reasonable care when operating your Grill. It will be hot during cooking or cleaning and should never be left unattended, or moved while in operation.
- Should the burner go out while in operation, turn the gas valve off. Open the lid and wait 5 minutes before attempting to relight, using the lighting instructions.
- Never lean over an open grill or place hands or fingers on the front edge of the cooking box.
- Do not enlarge valve orifice or burner ports when cleaning the valve or burner.
- Should a grease fire occur, turn off the burner and leave lid closed until fire is out.
- The Grill should be thoroughly cleaned on a regular basis.
- After a period of storage, and/or nonuse, the Grill should be checked for gas leaks and burner obstructions before use. See instructions in this manual for correct procedures. Propane gas is not natural gas. The conversion or attempted use of natural gas in a propane unit or propane gas in a natural gas unit is dangerous and will void your warranty.
- Do not attempt to disconnect any gas fitting while the Grill is in operation.
- Use heat-resistant BBQ mitts or gloves when operating the Grill.
- Keep any electrical supply cord away from any heated surfaces.
Combustion byproducts produced when using this product contain chemicals known to
the state of California to cause cancer, birth defects, or other reproductive harm.
- Do not use the Grill unless all parts are in place. The unit must be properly assembled according to the instructions outlined in the "Cleaning and Maintenance" section of the Owner's Guide.
- Do not use the Grill in a vehicle trunk, station wagon, mini-van, sport utility vehicle (SUV), recreational vehicle (RV), or Boat.
- Do not attempt to disconnect the gas regulator or any gas fitting while the grill is in operation.
- This appliance is not intended for commercial use.

WARNING
Do not try to light this appliance without reading the "Lighting Instructions" section of this manual.

WARNING
Follow all leak-check procedures carefully in this manual prior to barbecue operation. Do this even if the Grill was dealer-assembled.
GRILL IS DESIGNED FOR OUTDOOR USE ONLY.

NOTICE
These instructions must be left with the owner and the owner should keep them for future use.
Technical data:
| Appliance category | vapour pressure-propane vapour pressure-butane vapour | pressure- butane-propane mixture |
| Gas type | propane butane | butane, propane or butane and propane mixtures |
| Heating input | 2,7 kW (193 g/h) | 2,9 kW (211 g/h) |
| Marking 0.83 on the injector indicates that the size of injector is 0.83 mm. | ||
Operating instructions. Getting Started
- Inspect all packing and remove all parts (Fig.1)
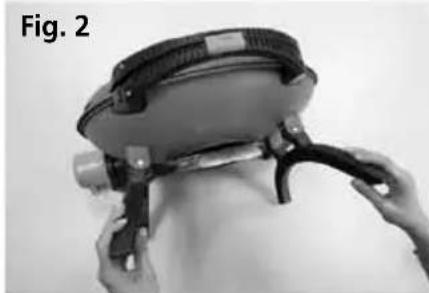
- Stretch out the folding legs (Fig.2)
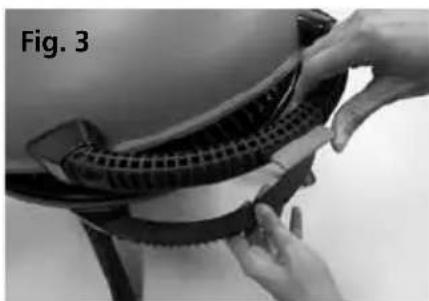
- Release the lock switch then open the lid (Fig.3)

Gas Instructions. Attach Fuel / Hose Connection.
The Grill has equipped with bultu-in regulator for your convenience. Please follow the below instructions for various applications:
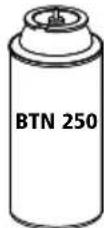
For Cartridge thread US 1" (Fig.5), and BTN 250 SUPER-EGO canister
(Fig.13)
Fig. 5
Propane Canister Cartridge 1" can easily adapt right into gas inlet of the grill. (Fig. 7)

BTN 250 SUPER-EGO Butane Canister need SEH019600 adaptor (optional Fig.12) to fit into grill gas inlet.
Fig. 12
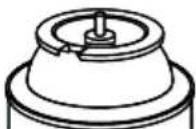
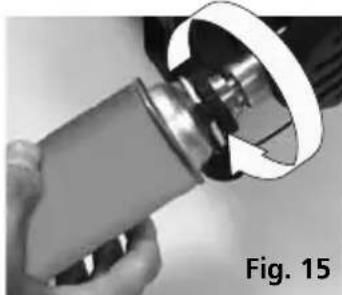
Apply SEH019600 adaptor (Fig.12) the Grill gas inlet by screw clockwise until it is tight (Fig. 14-15).

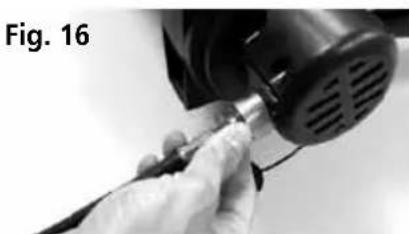
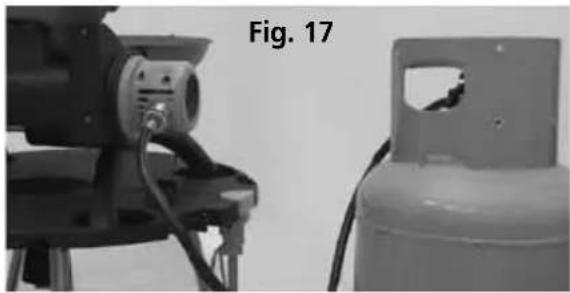
For floor type gas tank: Apply extension hose with connector into Grill gas inlet by screw clockwise until it is tight. (Fig. 16)
Ground cylinder connection

WARNING
Do not use a wrench to tighten the connection. Using a wrench could damage the regulator coupling and could cause a leak.
To light
- Open the lid.
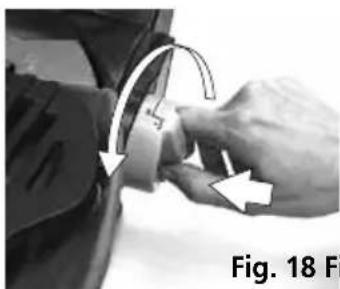
- Make sure the control knob is turned OFF. (Push control knob in and turn clockwise to ensure that it is in the OFF position.)
- Push burner control knob down and turn to HI / START (Fig. 18)
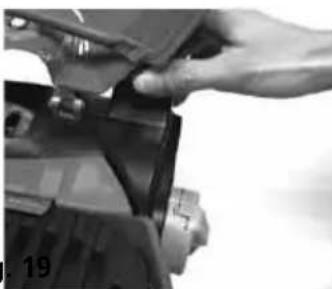
- Push the red ignition button several times, so it clicks each time (Fig.19)
- Check that the burner is lit by looking down through the cooking grid. You should see a flame.
- Turn OFF the gas supply at the gas container after use.

DANGER
Do not lean over the open grill. Keep your face and body at least one foot away from the grill when lighting the grill.

DANGER
If the burner does not light, turn the burner control knob to OFF and wait 5 minutes to let the gas clear before you try again.

DANGER
Failure to open the lid while igniting the grill's burner, or not waiting 5 minutes to allow the gas to clear if the grill does not light, may result in an explosive flame-up which can cause serious bodily injury or death.
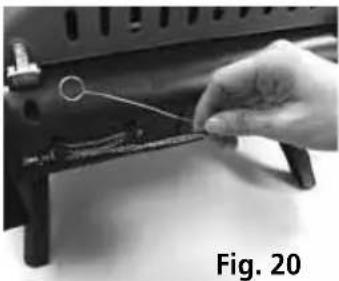
- The burner may be match lighted if there is no ignition.
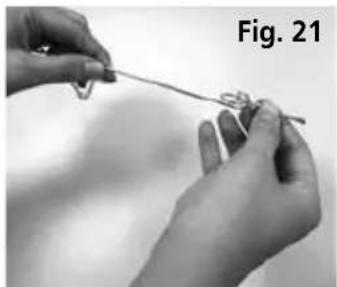
a. First, remove the match extension stick from the storage compartment (Fig.20)
b. Push the match into the clip of extension stick (Fig.21)
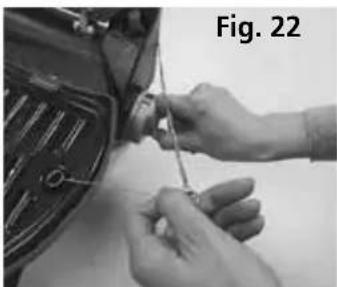
c. Hold extension stick close to Burner and turn control knob slowly (Fig.22)
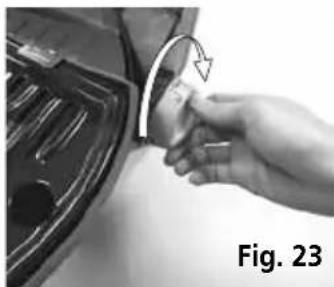
d. Adjust flame to desired heat level. (Fig.23)
To extinguish
Push in and turn burner control knob clockwise to the OFF position (Fig.23)
Leak check
Check:
1.1 Gas canister to adaptaor (SEH019600) SUPER-EGP (Fig.25).
1.2 Extension hose connector (for ground type gas cylinder) to Grill built-in regulator connection. This is optional to Grill (Fig.26).
1.3 Check that seals (between the appliance and the gas containers) are in place and in good condition before connecting to the gas container.
1.4 Do not use the appliance if it has damaged or worn seals. Do not use an appliance which is leaking, damaged or which does not operate properly.
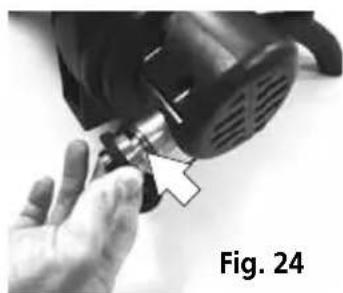

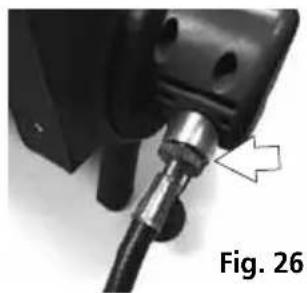
Fig. 26
DANGER If there is a leak at connection turn OFF the gas. DO NOT OPERATE THE GRILL. Contact the Customer Service Representative in your area. If there is a leak on your appliance (smell of gas), take it outside immediately into a well ventilated flame free location where the leak may be detected and stopped. If you wish to check for leaks on your appliance, do it outside. Do not try to detect leaks using a flame, use soapy water.
When leak checks are complete, turn gas supply OFF at the source and rinse connections with water.

DANGER
Do not use an open flame to check for gas leak. Be sure there are no sparks or open flames in the area while you check for leaks. Sparks or flames will result in a fire or explosion which can cause serious bodily injury or death, and damage to property.

PELIGRO
- Check for gas leaks periodically: After a period of nonuse you should perform the following maintenance procedures for your safety.
2.1 Inspect the burner for correct flame pattern. (Fig.15) Clean if necessary, following the procedures outlined in the "Maintenance" section of this manual.
2.2 Check all gas fittings for leaks.

DANGER
You should check for gas leaks every time you disconnect and reconnect a gas fitting. All factory-made connections have been thoroughly checked for gas leaks. The burners have been flame tested. As a safety precaution however, you should recheck all fittings for leaks before using your Grill. Shipping and handling may have loosened or damaged a gas fitting.

DANGER
Perform these leak checks even if your grill was dealer or store assembled.
You will need soap and water solution and a rag or brush to apply it. To perform leak checks make sure the Burner is in the off position and turn on gas supply.

DANGER
Do not ignite burner while leak checking. Check for leaks by wetting the connections with the soap and water solution and watching for bubbles. If bubbles form, or if a bubble grows, there is a leak.
NOTE: Since some leak test solutions, including soap and water, may be slightly corrosive, all connections should be rinsed with water after checking for leaks.
Cooking
Getting started:
Refer to "Operating Instructions" in this owner's manual.
To light the grill:
Refer to the "Lighting Instructions" in this owner's manual.
To Preheat the grill:
Light the Grill according the "Lighting Instructions" in this owner's manual. Close the lid and turn the Burner Control Knob to HI/START (4) position. Preheat the grill for 5-10 minutes (depending on conditions such as air temperature and wind). Once
the grill is preheated, set the Burner Control Knob to the low setting.
NOTE: Wind and weather may require adjustment of the Burner Control Knob to obtain the correct cooking temperature.
If the burner goes out during cooking, open the lid, turn off the burner, and wait 5 minutes before relighting.
Dripping and grease:
Excess drippings and grease will collect in the Catch Pan located on the underside of the grill. Disposable Grill drip pans are available that fit the Catch Pan.

DANGER
- Check the Catch Pan and the Base Pan of the grill for grease build-up before each use.
Remove excess grease to avoid a fire in the bottom of the grill.
Cleaning and maintenance

DANGER
Do not move the Grill when operating or while the grill is hot.
Cleaning
- Outside surfaces
Use a warm soapy water solution to clean, then rinse with water.

DANGER
Do not use oven cleaner, abrasive cleansers (kitchen cleansers) cleaners that contain citrus products, or abrasive cleaning pads on grill surfaces.
- Cooking grid
Clean with a suitable brass bristle brush. As needed, remove from grill and wash with warm soapy water, then rinse with water.
- Catch Pan
Disposable foil trays are available, or you can line the catch pan with aluminum foil. To clean the Catch Pan, wash with warm soapy water, then rinse.
- Inside base pan
Brush any debris off of burner tubes. DO NOT ENLARGE BURNER PORTS (OPENINGS). Wash inside of Base Pan with warm soapy water and a water rinse.
-Inside Lid
While lid is warm, wipe inside with paper towel to prevent grease build-up. Built-up grease resembles paint flakes.
Do not use cleaners that contain acid, mineral spirits or xylene. Rinse well after cleaning.
Mantenimiento

DANGER
- Do not touch or attempt any maintenance on Grill for at least one hour after use.
- Make sure all controls are off and propane tank has been turned OFF before doing maintenance.
To enjoy years of outstanding performance from your Grill, perform the following maintenance activities on a regular basis:
-
Keep exterior surfaces clean.
-
Use warm soapy water for cleaning. Never use flammable or abrasive cleaning agents.
Air Inlet (Fig.27) must be unobstructed. Keep controls, burner and circulating air passages clean. Signs of possible blockage include:
- The smell of gas in conjunction with burner flames appearing yellow and lazy.
- Grill does not reach temperature.
- Grill heats unevenly.
- Burner does not ignite.

DANGER
Failure to correct the above mentioned symptoms may result in a fire, which cause serious bodily injury or death, and cause damage to property.
- Spiders and insects can nest in burner venturi section (Fig.27). This condition can damage the Grill and render it unsafe for use. Clean burner holes by using a heavy-duty pipe cleaner. Compressed air may help clear away small particles.

-
Carbon deposits may create a fire hazard. Clean burner with warm soapy water if any carbon deposits develop.
-
If the Grill has been left uncovered and is wet from rain, snow, yard sprinklers, etc., allow to dry (at least 30 minutes prior to use).
NOTA: In a salt-air environment (such as near an ocean), corrosion occurs more quickly than normal. Frequently check for corroded areas and repair them promptly.
Burner flame pattern
The Grill burner has been factory set for the correct air and gas mixture. The correct flame pattern is shown. (Fig.28)
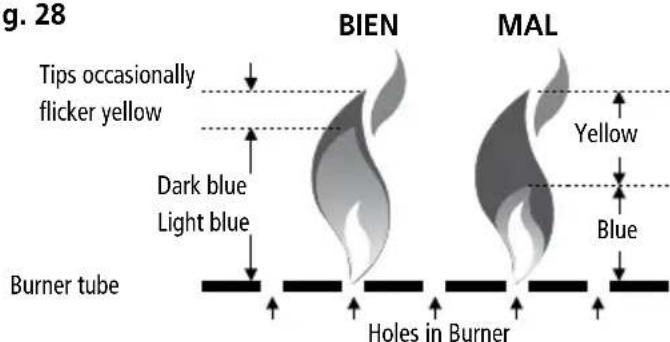
Fig. 28
If the flames do not appear to be uniform throughout the burner tube, follow the burner cleaning procedures.
Burner Tube Cleaning Procedures:
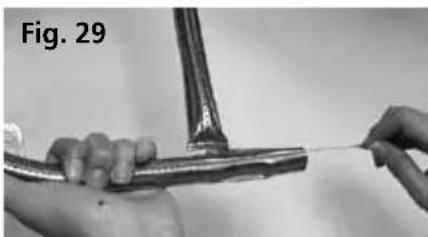
Turn off the gas supply. Remove the burner tube. (See Replacing Burner Tube) Look inside the burner with a flashlight. Clean the inside of burner with a wire (a straightened-out coat hanger will work).(Fig.29)
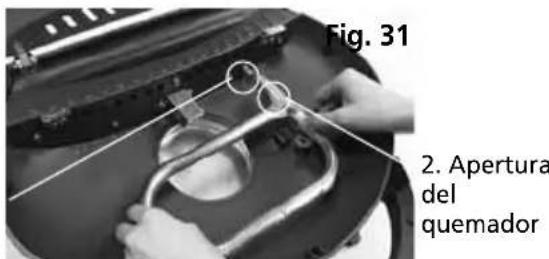
Check and clean the valve orifice (Fig.31) inside the rear end of Base Pan. Use a steel bristle brush to clean outside of burner. This is to make sure all the burner ports are fully open.

DANGER
Do not enlarge the burner ports when cleaning. Any modification of the appliance may be dangerous.
Replacingburner tube
- Your Grill must be OFF and cool.
- Unscrew and remove propane cylinder from the hose assembly.
- Open the lid.
- Remove cooking grid.
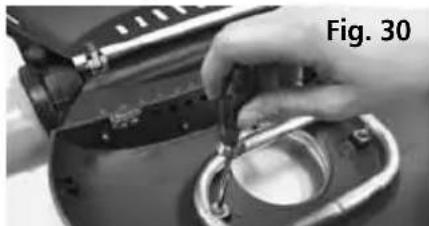
- Unscrew and remove the screws and stainless steel washers that hold the burner tube inside the Base Pan (Fig.30).
-
Carefully slide the burner tube out from the Base Pan.
-
Agujero de la valvula
CAUTION:
The burner opening 1 must be positioned properly over the valve orifice 2.(Fig.31)
- To reinstall the burner, reverse procedure 5 through 7.
Important:
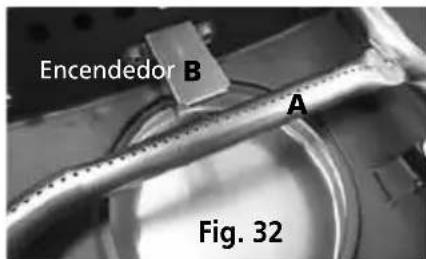
Make sure the Orifice 2 (Fig.31) is fitted into the Burner Opening 1 (Fig.31) and Igniter port hole A (Fig.32) lines up with the arrow tab on the igniter box B (Fig.32).

DANGER
Failure to follow the above mentioned procedures, may result in a fire, which cause serious bodily injury or death, and cause damage to property.
Ignition system operations
If the ignition system fails to ignite the burner, light the burner with a match. If the burner lights with a match, then check the ignition system.
- Check that both the white and black ignition wires are attached properly.
- Check that the ignition button pushes the igniter (button) down, and returns to the up position.
If the ignition system still fails to light, contact the Customer Service Representative in your area.
Storage
And/ Or Nonuse
- When the Grill is not in use, the cylinder must be DISCONNECTED and the cylinder stored outdoors in a well-ventilated space.
- Disconnect the gas canister by turning counterclockwise until the canister fully release form the gas inlet.
-
Check the seals before connecting a new gas container to the appliance.
-
Change the gas container outside and away from people.
Close the regulator inlet protection cap (Fig. 33 and 34) when your Grill is not in use.
- The Grill should be checked for gas leaks and any obstructions in the burner tubes before using. (See Sections: "Cleaning and Maintenance")
- The Burner venturi section should also be checked for any obstructions. (See Section: "Cleaning and Maintenance.")

| PROBLEMCHECKSOLUTION | ||
| Burners do not light, or flame is low in HIGH position. | Is LP cylinder fuel low or empty? Is Igniter wet? Does the burner light with a match? | Replace cylinder. If you can light the burner with a match, then check the ignition system. |
| Is there any air in the gas line? | Burner may take up to one minute to light after a cylinder has been connected. | |
| Burners burn with a yellow or orange flame, in conjunction with the smell of gas | Is there blockage in the burner tube or Venturi? | Clean Burner Tube. (See Section of "Maintenance") |
| Experiencing of flare-ups | Is the cooking grid heavily coated with burned-on-grease? | Clean thoroughly. (See section "Cleaning2) Clean catch Pan |
| Burner flame pattern is erratic. Flame is low when burner is on HIGH. Flame does no run the whole length of the burner tube | Is the burner clean? | Clean burner. (See section "Maintenance") |
| Is LP-cylinder Pressure low? Replace cylinder | ||
| Is outdoor temperature less than 40°F and LP cylinder less than 1/4 full? | Replace with a full cylinder | |
| Is fuel flow restricted? | Check burner and orifices for blockage. Adjust control knob to full ON position. | |
| Burner does not light when igniter button is pushed. | Is burner tube positioned is too far away from the igniter box? | Check that the burner tube is positioned correctly over the igniter box. (See section "Maintenance-Replacing the burner tube) |
| Burner flame does not ignite completely around the burner tube. | Are the burner ports clean and fully open? | Clean burner. (See section "Maintenance".) Use a small paper clip to unclog any dirty ports. |
| Burn won't stay lit. | Is dust and/or dirt built up around burner? | Clean dirt and/or dust from around burner ports. |