
F 410 RG L1 6N - Freezer GRAM - Free user manual and instructions
Find the device manual for free F 410 RG L1 6N GRAM in PDF.
| Product Type | Freezer |
| Brand | Gram |
| Model | F 410 RG L1 6N |
| Capacity | 410 liters (estimated based on model) |
| Dimensions (HxWxD) | Approx. 1850 x 600 x 700 mm (estimated for a 410L freezer) |
| Weight | Approx. 70 kg (estimated) |
| Power Supply | 220-240 V, 50 Hz |
| Climate Class | +16°C to +35°C |
| Door Type | Solid or glass depending on version |
| Display | Digital screen with +, -, P and on/off buttons |
| Interior Lighting | Yes (on models with glass door, switch under control panel) |
| Defrost | Automatic (4 times per day) and manual possible |
| Temperature Alarm | Yes, with display of high (AH), low (AL) values and door open alarm (id) |
| Keypad Lock | Yes, via button combination |
| Door Reversal | Possible (solid door by user, glass door by technician) |
| Refrigerant | Not specified, sealed circuit |
| Cleaning | Mild soapy solution, vacuum for condenser |
| Maintenance | Check power supply, contact Gram Commercial service |
Frequently Asked Questions - F 410 RG L1 6N GRAM
User questions about F 410 RG L1 6N GRAM
0 question about this device. Answer the ones you know or ask your own.
Ask a new question about this device
Download the instructions for your Freezer in PDF format for free! Find your manual F 410 RG L1 6N - GRAM and take your electronic device back in hand. On this page are published all the documents necessary for the use of your device. F 410 RG L1 6N by GRAM.
USER MANUAL F 410 RG L1 6N GRAM
natural_image
Exterior view of multiple stainless steel kitchen cabinets and refrigerators (no visible text or labels)Instructions for use GB 16
Connecting the cabinet 19
Starting up 19
Temperature setting....20
Temperature alarm 21
Error codes 22
Defrosting 22
Keylock 23
Illumination....23
Reversing the door 24
Cleaning....24
Service....25
Disposal 26
Dnhalt
natural_image
Pure geometric diagram with dashed and solid lines forming a rectangle, no text or symbols presentA
B
natural_image
Line drawing of a kitchen appliance with a cabinet and two wall-mounted sensors (no text or symbols)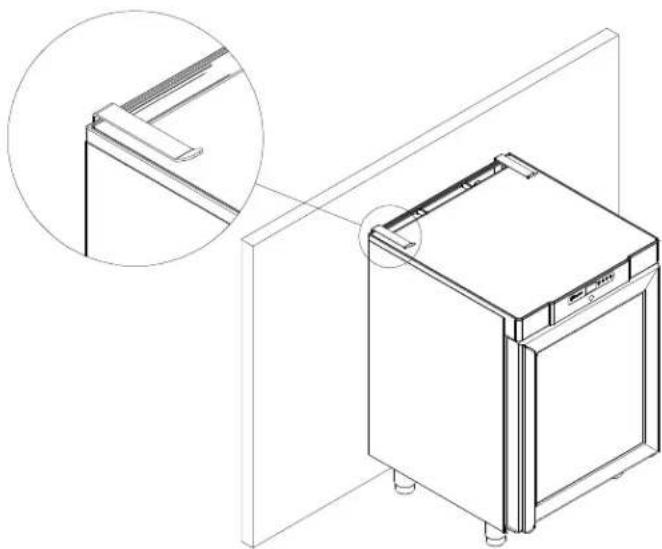
natural_image
Technical line drawing of a refrigerator with an inset close-up showing the exterior panel detail (no text or symbols)Tilslutning
Afrimning. Lyser under afrimning.

For at låse tastaturet:
Tryk på og samtidigt i 1 sekund, og displayet viser "Loc" som indikation af, at tastaturet er låst.
For at låse tastaturet op:
Tryk på og samtidigt i 1 sekund, og displayet viser "UnL" som indikation af, at tastaturet er låst op.
Belysning
natural_image
Line drawing of an open refrigerator with a black arrow pointing to the top panel (no text or symbols)Vending af dør
natural_image
Simple line drawing of a trash bin with no text or symbolsEnglish
Installation
To ensure reliable operation, make sure the following is observed:
The cabinet must be located in a dry and ventilated room.
The cabinet is designed to operate in ambient temperatures between +16°C and +35°C. Avoid location in direct sunlight or near any heat sources, i.e. an oven.
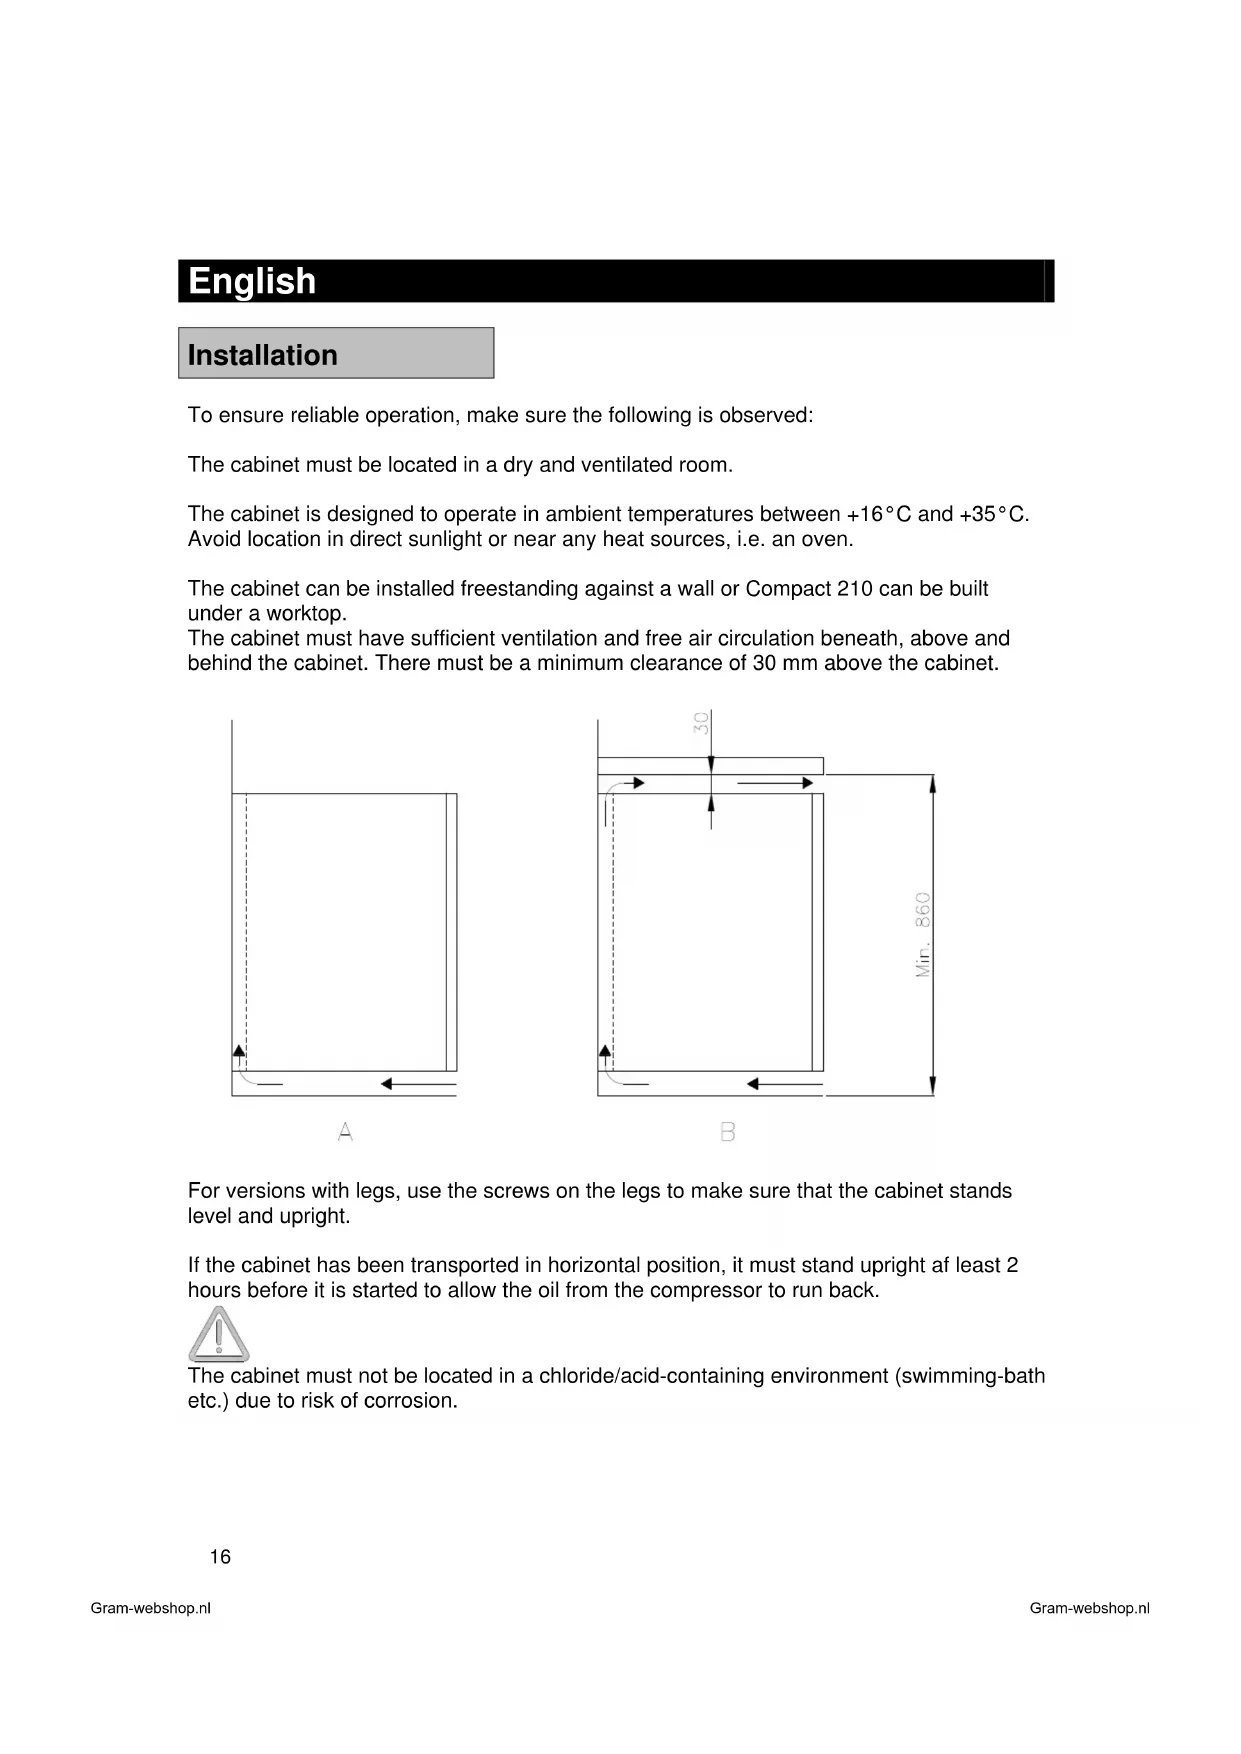
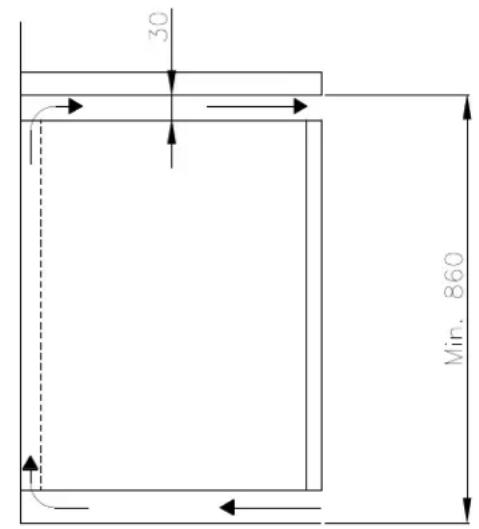
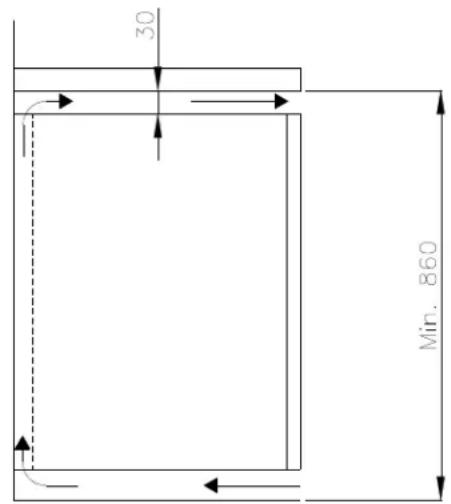
The cabinet can be installed freestanding against a wall or Compact 210 can be built under a worktop. The cabinet must have sufficient ventilation and free air circulation beneath, above and behind the cabinet. There must be a minimum clearance of 30 mm above the cabinet.
natural_image
Simple line drawing of a rectangular frame with dashed vertical line and corner arrows (no text or symbols)A
B
For versions with legs, use the screws on the legs to make sure that the cabinet stands level and upright.
If the cabinet has been transported in horizontal position, it must stand upright at least 2 hours before it is started to allow the oil from the compressor to run back.

The cabinet must not be located in a chloride/acid-containing environment (swimming-bath etc.) due to risk of corrosion.
Important!

Do not damage the refrigeration system.
Do not use electrical devices inside the cabinet.
To ensure correct and efficient air flow in the cabinet, the marked areas must be kept free of products.

All products to be stored, that are not wrapped or packed, must be covered in order to avoid unnecessary corrosion of the inner parts of the cabinet.

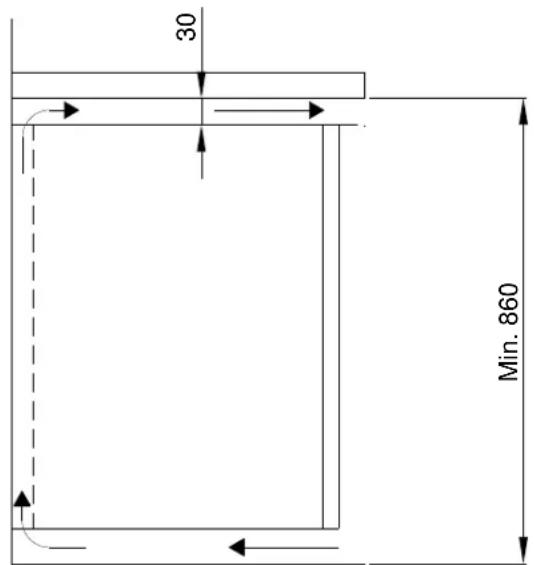
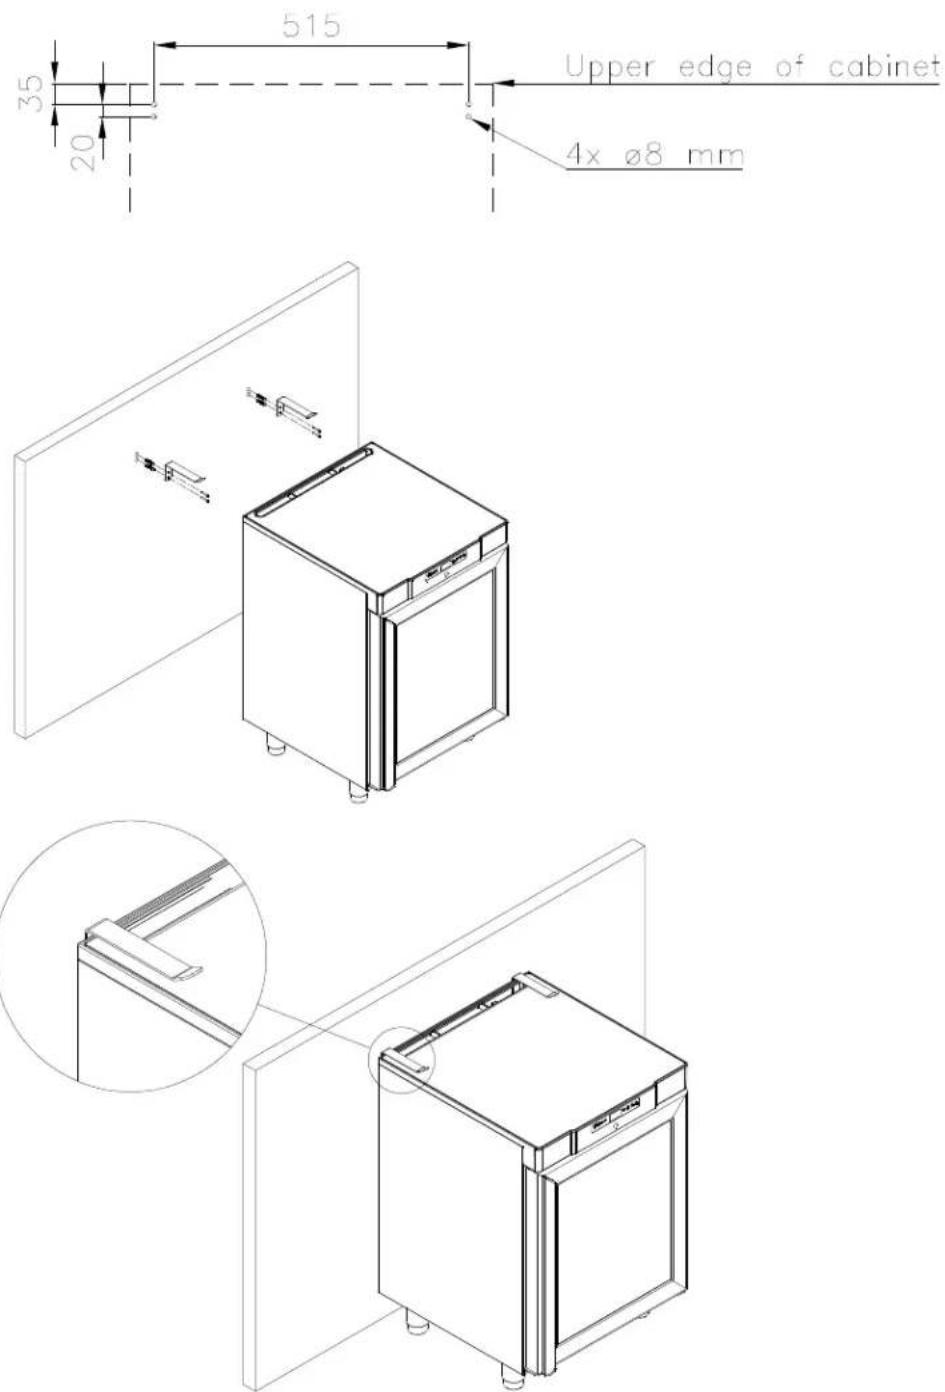
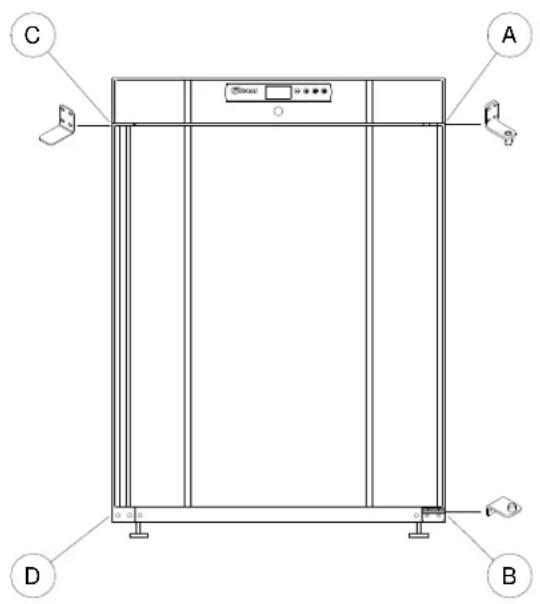
Important! Applies to cabinets with glass door:
Anti-topple brackets must be installed to avoid the cabinet toppling over when opening the door.
The brackets which are delivered with the cabinet must be fastened to the wall behind the cabinet, as shown in the drawings.
Connecting the cabinet
Read the text below thoroughly before electrical connection.
The cabinet is intended for connection to alternating current. The connection voltage (V) and frequency (Hz) are shown on the name plate in the cabinet.
Power connection is made by a three pin plug to a wall socket.
Do not use the cabinet before all shieldings have been mounted to prevent access to live or rotating machine parts.
Do not use the cabinet, if the wire has been damaged. In this case the cabinet must be examined by a service electrician from Gram Commercial or an authorised refrigeration company with knowledge of Gram's products.
The cabinet must not be used outdoor. All earthing requirements stipulated by the local electricity authorities must be observed. The cabinet plug and wall socket should then give correct earthing. If necessary, contact an electrician.
Starting up
Display:
Connect the cabinet to main power.
To turn on the cabinet, push 📋 for 2 seconds.
The display shows the actual cabinet temperature, and indicates that power is connected.
The cabinet is turned off likewise, by pushing for 2 seconds.

Servicing:
Make sure the appliance is switched off at the mains before service is performed on electrical parts.
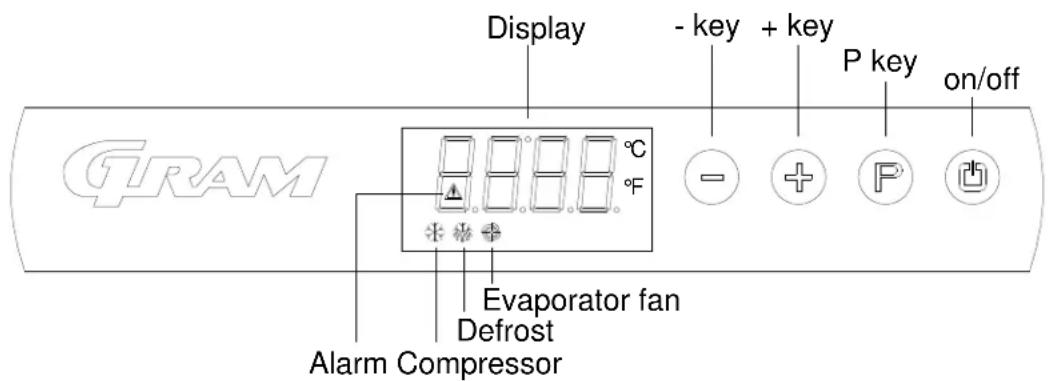
Control lights
The following control lights are located at the display:

Compressor. This LED is on while the compressor is running. Flashes during temperature setting.

Defrosting. This LED is turned on during defrosting cycle.

Evaporator fan. This LED is turned on while the evaporator fan is running.

Alarm. This LED is turned on if an alarm occurs. See chapter on temperature alarm and errors.
Temperature setting
The temperature is set as follows:
Push the button, the compressor lamp flashes.
Push or to set the temperature.
Push P again to save the set value. The compressor lamp is turned off, unless the compressor is running.
Alternatively, do not operate any buttons for 15 seconds, the controller switches back to temperature display, and the set value is saved automatically.
If there is a power failure, the controller will remember the settings. When the power returns, the cabinet will start up again.
Temperature alarm
The controller is equipped with a temperature alarm, which constantly monitors the cabinet temperature. The clamp lights, if an alarm has occurred.
The following alarms can be displayed:
AL low temperature alarm AH high temperature alarm Id open door alarm
Displaying alarm values:
Push the button, and keep pushed for 1 second. Push or until "LS" is
displayed. Now, push and one of the alarm codes above is displayed. Use the or button to select the wanted value. Push again, and the alarm values are displayed.
Example – alarm AH:
9.0 the temperature alarm value is 8.0^ C dur alarm duration
h01 the alarm lasted for 1 hour ....(continues)
n15 .... and 15 minutes
AH selected alarm value
Each value is displayed alternately for approx. 1 second.
To exit the alarm menu, push 📋 and the selected alarm is displayed (in this example "AH"). Push 📋 again, and the current cabinet temperature is displayed.
Deleting alarms:
Push, and keep pushed for 1 second. Push or until "rLS" is displayed. Now
push . Then push or + within 15 seconds and set "149". Push again, and
the display fashes "----" for 4 seconds. The alarms are now deleted, the AND is turned off, and the controller returns to temperature display.
Error codes
Pr1 If error Pr1 is displayed, it means that the temperature sensor is defect.
Request service assistance.
In the meantime, the cabinet will aim to maintain the set temperature.
Pr2 If error Pr2 is displayed, there are problems with the evaporator sensor. The sensor should be replaced as soon as possible. Request service assistance.
Defrosting
K/KG 210/410:
Defrosting is automatically performed 4 times every 24 hours, by circulating the air inside
the cabinet during compressor standstill periods. The defrost LED lights to indicate the defrosting cycle is running.
F/FG 210/410:
Defrosting is automatically performed 4 times every 24 hours, by a heating element mounted at the evaporator.
Manual defrosting:
If the cabinet is operating under severe load (frequent door opening and frequent replenishment), manual defrosting can become necessary.
Manual defrosting is performed as follows:
Push for 4 seconds, and defrosting is started. The defrost LED lights to indicate the defrosting cycle is running.

Do not use sharp or pointed objects to accelerate the defrosting process.
Keylock
The keys can be locked and in this way secured against unauthorized use of the appliance.
To lock the keys:
Press and at the same time for 1 second, "Loc" is shown to indicate the keys are locked.
To unlock the keys:
Press and at the same time for 1 second, "UnL" is shown to indicate the keys are unlocked.
Illumination
Applies only to models with glass door.
The light can be switched on or off by the switch underneath the control panel.
natural_image
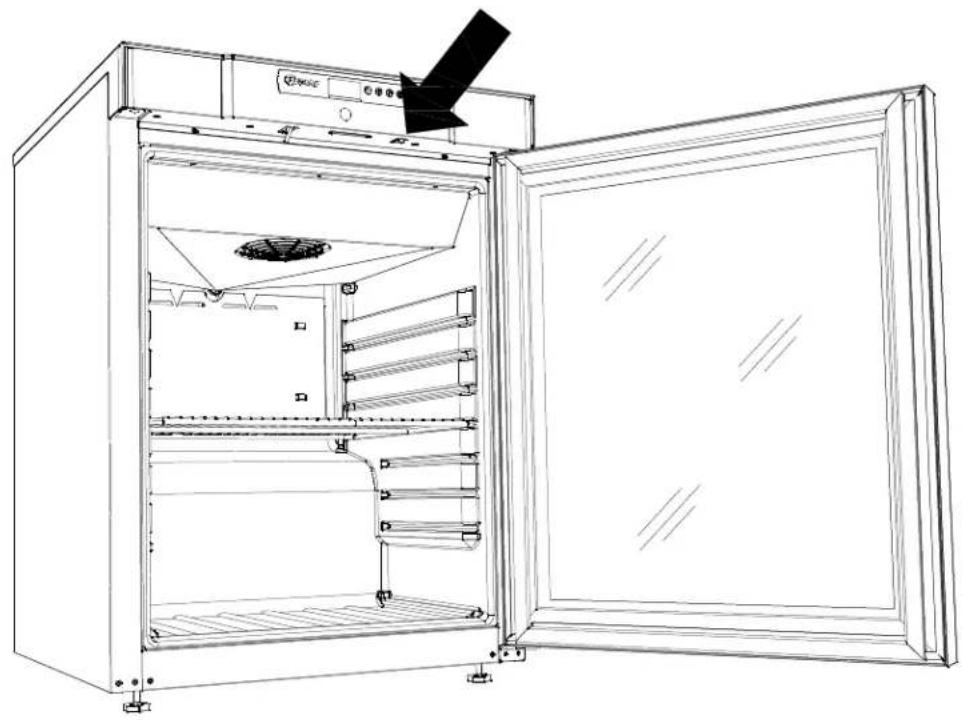
Line drawing of an open refrigerator with a black arrow pointing to the door (no text or symbols)Reversing the door
The door can be changed from righthand-hinged to lefthand-hinged, or vice versa.
To do so, proceed as follows:
Models with solid door:
Models with glass door:
- Switch off the power at the mains socket.
- Dismantle the two screws that hold the control panel at front and back, pull the panel a little forward, and then tilt it upwards.
- Dismantle the hinge at pos. A, and lift off the door.
- Dismantle the hinge at pos. B, and mount it at pos. D.
- Turn the door 180°, and fix it at the hinge pos. D.
- Mount the hinge from pos. A in pos. C, and move bracket from pos. C to pos. A.
- Fasten the control panel again. Apply power to the cabinet again.
The door should only be reversed by a service electrician from Gram Commercial or an authorised refrigeration company with knowledge of Gram's products.
Cleaning

Before cleaning, switch off the cabinet at the mains.
The cabinet should be kept clean using a mild soap solution. Do not use cleaning detergents that may cause scratches.
When regular cleaning is carried out, be sure to wipe clean the rubber door gasket to ensure any sticky substances are removed which would otherwise damage the gasket.
The condenser on the back of the cabinet must be regularly cleaned as well. This is best done with a vacuum cleaner and a brush.
The condenser fan air outlet above the compressor must be free of leaves, paper etc. to ensure normal operation of the cabinet.
Cleansing agents containing chlorine or compounds of chlorine as well as other corrosive means, must not be used, as they might cause corrosion to the stainless panels of the cabinet and the evaporator system.
Do not flush water directly on the cabinet or inside the cabinet as this may cause short-circuits in the electrical system.
Service
If refrigeration fails, first investigate whether the unit has been unintentionally disconnected or switched off at the socket, or whether a fuse has blown.
If it is not possible to find the cause of the refrigeration failure, please contact Gram technical department.
When contacting us please tell us the name and serial number (S/N) / (WWYY) of the cabinet. This information is stated on the name plate, see illustration below.

Disposal
The below only concerns the United Kingdom.
Disposal of an old cabinet is only available when we are delivering a new one at the same time. Cabinets must be fully defrosted and emptied prior to collection.
Gram recognises that our products for the catering market are considered as WEEE when they become obsolete. To ensure that Gram's responsibilities are handled correctly and environmentally friendly, we are signed up the largest Business to Business compliance scheme in the UK – B2B Compliance http://www.b2bcompliance.org.uk
B2B Compliance will on our behalf deal with all areas of our responsibilities when collecting and disposing of equipment which fall under the UK WEEE regulations. B2B Compliance can be contacted on telephone number 01691 676124.
natural_image
Simple line drawing of a trash bin with no text or symbolsDeutsch
Aufstellen/Einbau
natural_image
Pure geometric diagram showing a square with dashed lines and arrows, no text or symbols present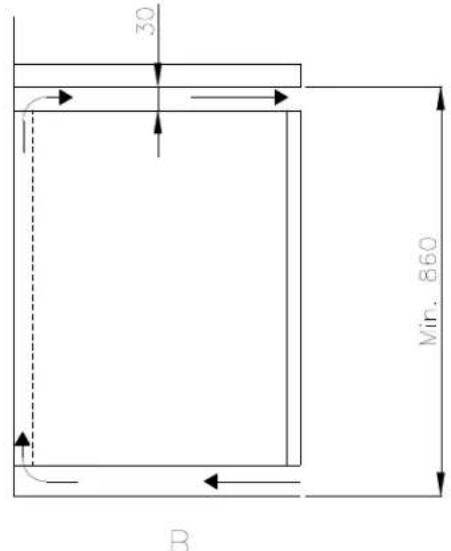
natural_image
Line drawing of an open refrigerator with a black lid and ventilation slots (no text or symbols)Umschlagen der Tür
natural_image
Simple line drawing of a trash bin with no text or symbolsFrancais
Installation
natural_image
Pure geometric diagram with dashed and solid lines forming a square frame, no text or symbols presentA
B
natural_image
Line drawing of an open refrigerator with a black triangular lid on top (no text or symbols)Mise au rebut
natural_image
Simple line drawing of a trash bin with no text or symbolsNederlands
Opstellen
natural_image
Simple line drawing of a rectangular frame with dashed vertical and horizontal lines, no text or symbols present.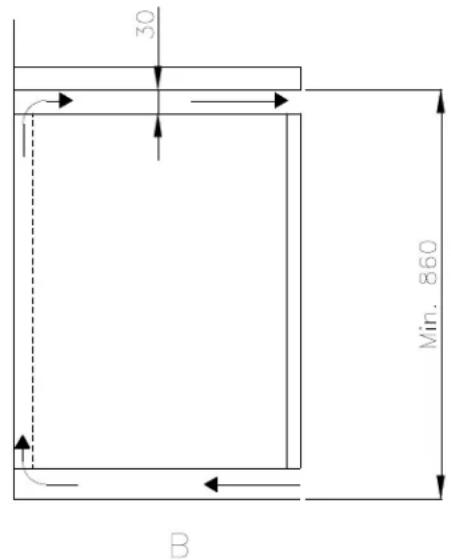
natural_image
Line drawing of an open refrigerator with a black lid on top (no text or symbols)Omkeren van de deur
Verwijderen
natural_image
Simple line drawing of a trash bin with no text or symbolsSvenska
Uppställning
natural_image
Pure geometric diagram showing a square with dashed vertical line and arrows indicating direction (no text or symbols)A

B
natural_image
Line drawing of a refrigerator with two wall-mounted sensors and a front-mounted unit (no text or symbols)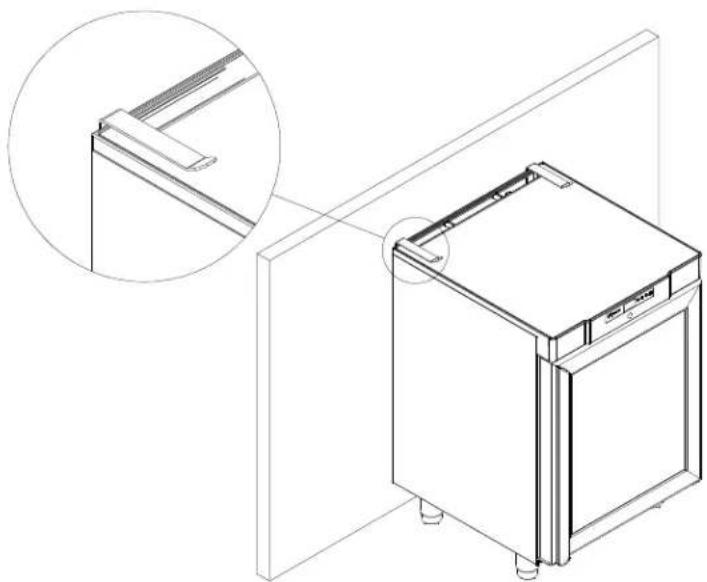
natural_image
Technical line drawing of a refrigerator with an inset close-up showing the exterior panel detail (no text or symbols)Anslutning
natural_image
Line drawing of an open refrigerator with a black lid on top (no text or symbols)Vändning av dörr
natural_image
Simple line drawing of a trash bin with no text or symbolsGram Commercial NUF
P.b. 44 Box 5157
1941 Bjørkelangen, Norway 217 24 Malmö, Sweden
Tel.: 22 88 17 50
Fax: 22 88 17 51
Gram Commercial
Tel.: 040-9878 48
Fax: 040-9878 49
2 The Technology Centre
London Road, Swanley
Kent BR8 7AG
Tel.: 01322 616900
Fax: 01322 616901
e-mail: info@gramuk.co.uk

Gram Commercial A/S
6500 Vojens - Denmark
Tlf.:+45 73 20 12 00