FHE 550 B2 - Hedge trimmers FLORABEST - Free user manual and instructions
Find the device manual for free FHE 550 B2 FLORABEST in PDF.

| Product type | Long-reach pruner (pole chainsaw) |
| Brand | Florabest |
| Model | FHE 550 B2 |
| Rated voltage | 230 V~, 50 Hz |
| Power consumption | 550 W |
| No-load speed | 6100 min⁻¹ |
| Cutting speed | 10.8 m/s |
| Weight (with bar and chain) | 4.4 kg |
| Weight (without accessories) | 3.9 kg |
| Oil tank capacity | 70 ml |
| Chain pitch | 3/8" (9.5 mm) |
| Chain thickness | 1.3 mm |
| Max cutting length | 260 mm |
| Protection class | II |
| Protection rating | IP20 |
| Guaranteed sound power level | 104 dB(A) |
| Sound pressure level | 102.2 dB(A) |
| Vibration at handle | 2.73 m/s² |
| Chain type | Oregon 3009 1400 |
| Lubrication | Automatic |
| Telescopic pole | Continuously adjustable |
| Included accessories | Shoulder strap, blade sheath, bio chain oil, hex key |
| Warranty | 3 years |
Frequently Asked Questions - FHE 550 B2 FLORABEST
User questions about FHE 550 B2 FLORABEST
0 question about this device. Answer the ones you know or ask your own.
Ask a new question about this device
Download the instructions for your Hedge trimmers in PDF format for free! Find your manual FHE 550 B2 - FLORABEST and take your electronic device back in hand. On this page are published all the documents necessary for the use of your device. FHE 550 B2 by FLORABEST.
USER MANUAL FHE 550 B2 FLORABEST
ELEKTRO-HOCHENTASTER FHE 550 B2
DE AT CH
ELEKTRO-HOCHENTASTER
Translation of original operation manual
DE AT CH
Before reading, unfold the page containing the illustrations and familiarise yourself with all functions of the device.
GB Translation of original operation manual Page 62


Einleitung

(L_pA) 88,0 dB(A); K_pA = 3,0 dB(A)
Elimination/Ecologie. 38
Pièces détachées 38
Lame 10" Oregon Double Guard
100SDEAO41 (518693)
Chaine . Oregon 91 P040X
(L_pA) 88,0 dB(A), K_pA = 3,0 dB(A)
Elimination/Ecologie
Congratulations on the purchase of your new device. With it, you have chosen a high quality product.
The operating instructions constitute part of this product. They contain important information on safety, use and disposal.
Before using the product, familiarise yourself with all of the operating and safety instructions. Use the product only as described and for the applications specified.
Keep this manual safely and in the event that the product is passed on, hand over all documents to the third party.
Contents
Introduction 62
Intended purpose. 63
General description 63
Enclosed parts. 63
Overview 63
Technical Data. 64
Notes on safety. 64
Symbols used in the instructions.....65
Symbols used on the device. 65
General Safety Directions for Power Tools 65
Chain saw safety warnings. 68
Causes and operator prevention of kickback. 69
Further safety directions. 70
Fitting 70
Assembling the Round Handle.....71
Attaching the Shoulder Strap.....71
Installing the Blade 71
Fitting the saw chain 71
Tensioning the saw chain. 71
Chain lubrication. 72
Operation startup 72
Before starting, check. 72
Switching On and Off. 73
Adjusting the Telescopic Handle ....73
Handle Adjustment 73
Working Safely. 73
Transport 73
Sawing techniques. 74
Sawing Off Small Branches 74
Sawing Off Larger Branches 74
Sawing Off Parts 74
Cleaning 75
Storage. 75
Resharpening of the saw chain..75
Waste disposal and environmental protection 75
Accessories Enclosed 75
Spare parts. 75
Maintenance Interval Table......76
Trouble shooting 77
Guarantee 78
Repair Service. 79
Service-Center.79
Service Branch 79
Translation of the original EC declaration of conformity.81
Exploded Drawing 83
Intended purpose
The electric pruner is intended for pruning work on tree branches. It is not designed for extensive sawing work, tree felling and cutting materials such as masonry, plastic or food. The device is designed for use by adults. Young people over 16 years old may use the electric pruner under supervision only. It is essential to ensure that you are standing in a safe position, in order to prevent accidents. The equipment is not intended for use by people of restricted physical, sensory or mental ability. This is also fundamentally applicable for children. The electric pruner is designed for employment in the do-it-yourself sector. National regulations may restrict the use of the equipment. The manufacturer is not liable for damages, which were caused through use in applications for which it was not designed, or incorrect operation.
General description
The illustration of the principal functioning parts can be found on the front and back foldout pages.
Enclosed parts
Carefully unpack the appliance and check that it is complete. Dispose of the packaging material correctly.
- Electric pruner
-Chain bar
-Saw chain - Sprocket chain wheel covering
- Blade cover
- Shoulder strap
- Round handle
- 60 ml Bio chain oil
-Allen Key - Instruction Manual
Overview
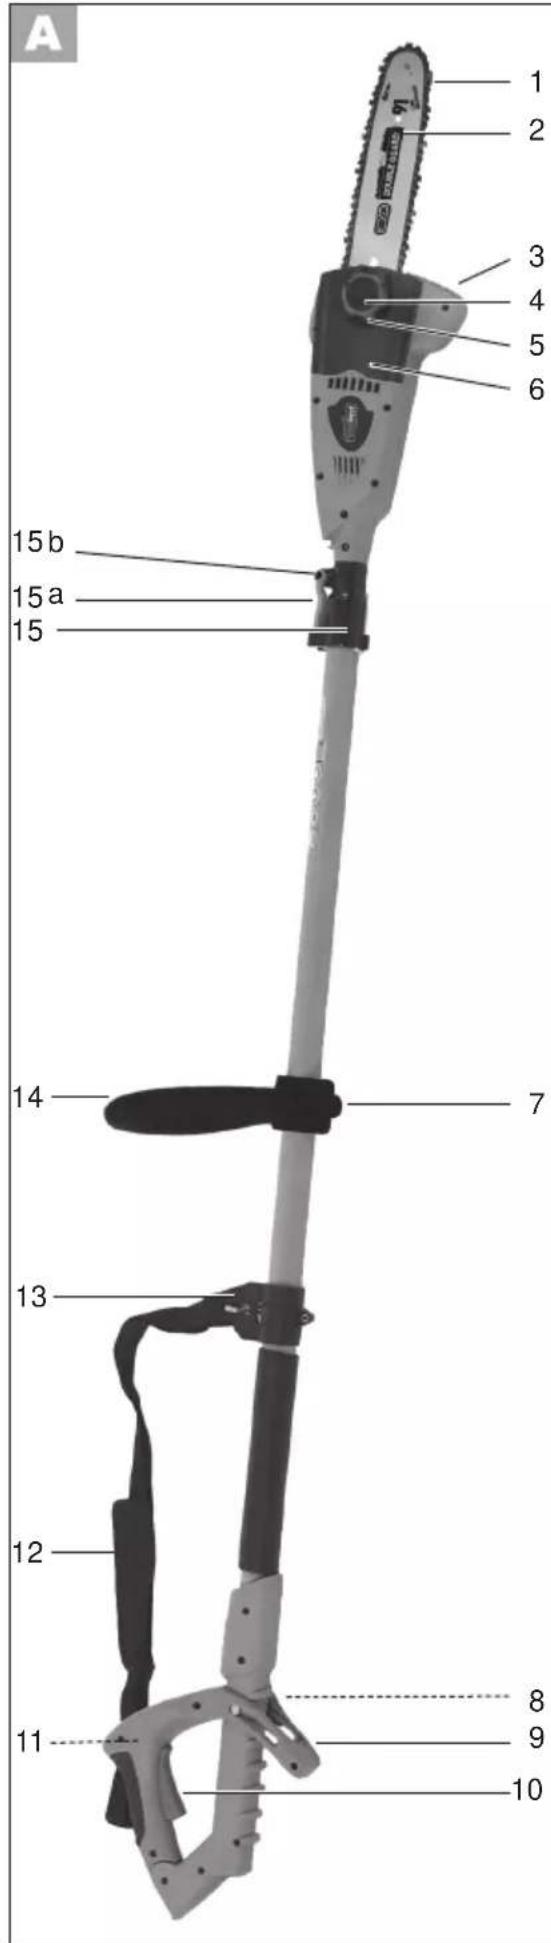
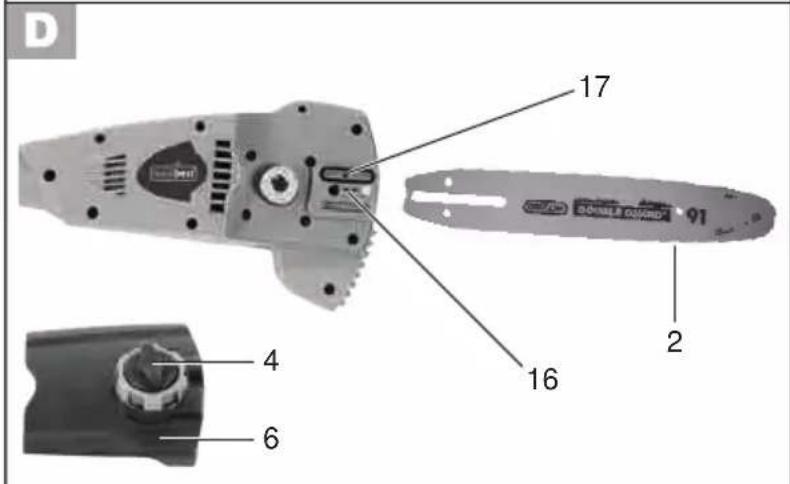
A 1 Saw chain 2 Chain bar
3 Bumber
4 Blade fixing screw
5 Chain adjustment ring
6 Sprocket chain wheel covering
7 Brake arm
8 Pivotal centre (not visible)
9 Adjustable handle
10 On/off switch
11 Safety lock (not visible)
12 Shoulder strap
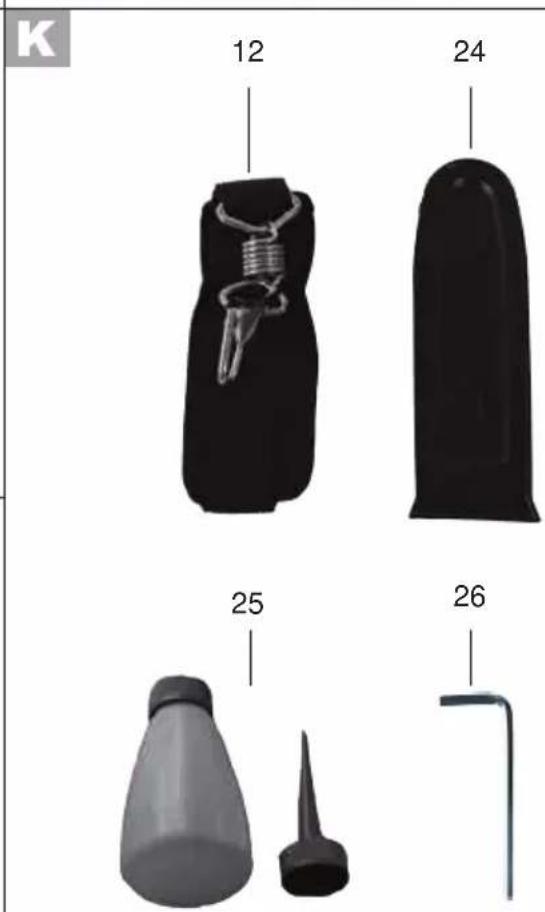
13 Eye (for shoulder strap)
14 Round handle
15 Quick release (for telescopic handle)
15a Lever
15b Allen screw
16 Blade guide 17 Oil outlet channel
18 Chain wheel 19 Thread
20 Hole in the chain bar
21 Chain tensioning pin
22 Oil level inspection window 23 Oil filler cap
24 Blade cover 25 60 ml Bio chain oil 26 Allen Key
Technical Data
Electric pruner..FHE 550 B2
Rated input voltage. 230V\~, 50 Hz
Input power. 550 W
Max. spindle rotation speed.....6100 min
Max. allowable rotation speed..8000 min-1
Safety class
Protection category IP20
Chain speed 10.8 m/s
Weight
without guide rail and
chain........................ approx. 3.9 kg
with guide rail and chain.. approx. 4.4 kg
Oiltank. 70 cm3
Chain bar.....10" Oregon Double Guard
100SDEAO41 (518693)
Chain............ Oregon 91 P040X
Chain pitch. 3/8" (9.5 mm)
Number of chain drive links. 40
Chain width 1.3 mm
Teeth of the sprocket chain wheel. 6
Sawing length (max.) 260 mm
Acoustic pressure level
(L_pA) 88 dB(A);KpA=3.0 dB(A)
Sound power level (L_WA)
guaranteed 104 dB(A)
measured ... 102.2 dB(A); Kw=2.0 dB(A)
Vibration (an) 2.73 m/s²; K=1.5 m/s²
Noise and vibration values were determined according to the standards and stipulations mentioned in the declaration of conformity.
Technical and optical changes can be carried out in the course of further development without notice. All dimensions, references and information of this instruction manual are therefore without guarantee. Legal claims, which are made on the basis of the instruction manual, cannot thus be considered as valid.
The stated vibration emission value was measured in accordance with a standard testing procedure and may be used to compare one power tool to another. The stated vibration emission value may also be used for a preliminary exposure assessment.

Warning: The vibration emission value may differ during actual use of the power tool from the stated value depending on the manner in which the power tool is used.
Safety precautions aimed at protecting the user should be based on estimated exposure under actual usage conditions (all parts of the operating cycle are to be considered, including, for example, times during which the power tool is turned off and times when the tool is turned on but is running idle).
Notes on safety
This section deals with the basic safety regulations while working with the electric pruner.

An electric pruner is a dangerous device, which can cause serious or even fatal injuries with incorrect or careless use. Thus, for your own safety and the safety of others, you should always take note of the instructions on safety and, in case of difficulties, consult a specialist for advice.
Symbols used in the instructions

Hazard symbols with information on prevention of personal injury and property damage.

Precaution symbol (explanation of precaution instead of exclamation mark) with information on prevention of harm / damage.

Notice symbol with information on how to handle the device properly.
Symbols used on the device

Make yourself familiar with all control elements before any work. Practice handling the saw and have explained the functions, operating methods and sawing techniques by a practiced user or specialist.

Read and take note of the operating manual belonging to the machine!

Do not expose the machine to the rain. Do not allow the equipment to become damp or operate it in a damp environment.

Danger due to materials blown out of machine!

Keep the equipment away from nearby people.

Caution! Remove the plug immediately from the plug socket in case of damage or cutting through of the mains cable.

Wear personal protective equipment. Basically, wear protective goggles or, even better, face protection, safety helmet and ear protection.

Wear cut-protection gloves.

Wear cut-protection safety boots with anti-slip soles.

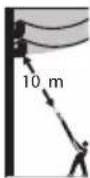
Danger of death by electrocution! Keep at least 10m away from power lines.
Information of the guaranteed acoustic power level L_WA in dB.

Safety class II

Machines do not belong with domestic waste.

A full tank will last for approx. 10 minutes of continuous operation.
General Safety Directions for Power Tools

Before you do any work with the electric pruner, make yourself familiar with all operating parts. Practise using the saw (sawing logs on a sawhorse) and get an experienced user or a specialist to explain to you the function of the saw, the way of working, the techniques of sawing and the personal protection equipment.

RESIDUAL RISKS
Even if properly operating and handling this electric tool, some residual risks will remain. Due to its construction and build, this electric tool may present the following hazards:
a) Cuts
b) Ear damage if working without ear protection.
c) Damage to your health caused by swinging your hands and arms when operating the appliance for longer periods of time or if the unit is not held or maintained properly.

WARNING! Read all safety directions and instructions. Omissions in the compliance with safety directions and instructions can cause electrical shock, fire and/or severe injuries.
Retain all safety directions and instructions for future use.
The term "power tool" in the warnings refers to your mains-operated (corded) power tool or battery-operated (cordless) power tool.
Work area safety
- Keep work area clean and well lit. Cluttered or dark areas invite accidents.
- Do not operate power tools in explosive atmospheres, such as in the presence of flammable liquids, gases or dust. Power tools create sparks which may ignite the dust or fumes.
- Keep children and bystanders away while operating a power tool. Distractions can cause you to lose control.
Electrical safety
- Power tool plugs must match the outlet. Never modify the plug in any way. Do not use any adapter plugs with earthed (grounded) power tools. Unmodified plugs and matching outlets will reduce risk of electric shock.
- Avoid body contact with earthed or grounded surfaces, such as pipes, radiators, ranges and refrigerators. There is an increased risk of electric shock if your body is earthed or grounded.
- Do not expose power tools to rain or wet conditions. Water entering a power tool will increase the risk of electric shock.
- Do not abuse the cord. Never use the cord for carrying, pulling or unplugging the power tool. Keep cord away from heat, oil, sharp edges or moving parts. Damaged or entangled cords increase the risk of electric shock.
- When operating a power tool outdoors, use an extension cord suitable for outdoor use. Use of a cord suitable for outdoor use reduces the risk of electric shock.
- If operating a power tool in a damp location is unavoidable, use a residual current device (RCD) protected supply. Use of an RCD reduces the risk of electric shock.
If the replacement of the supply cord is necessary, this has to be done by the manufacturer or his agent in order to avoid a safety hazard.
Personal safety
- Stay alert, watch what you are
doing and use common sense when operating a power tool. Do not use a power tool while you are tired or under the influence of drugs, alcohol or medication. A moment of inattention white operating power tools may result in serious personal injury.
- Use personal protective equipment. Always wear eye protection. Protective equipment such as dust mask, non-skid safety shoes, hard hat, or hearing protection used for appropriate conditions will reduce personal injuries.
- Prevent unintentional starting. Ensure the switch is in the off-position before connecting to power source and/or battery pack, picking up or carrying the tool. Carrying power tools with your finger on the switch or energising power tools that have the switch on invites accidents.
- Remove any adjusting key or wrench before turning the power tool on. A wrench or a key left attached to a rotating part of the power tool may result in personal injury.
- Do not overreach. Keep proper footing and balance at all times. This enables better control of the power tool in unexpected situations.
- Dress properly. Do not wear loose clothing or jewellery. Keep your hair, clothing and gloves away from moving parts. Loose clothes, jewellery or long hair can be caught in moving parts.
- If devices are provided for the connection of dust extraction and collection facilities, ensure these are connected and properly used. Use of dust collection can reduce dust-related hazards.
Power tool use and care
- Do not force the power tool. Use the correct power tool for your application. The correct power tool will do the job better and safer at the rate for which it was designed.
- Do not use the power tool if the switch does not turn it on and off. Any power tool that cannot be controlled with the switch is dangerous and must be repaired.
- Disconnect the plug from the power source and/or the battery pack from the power tool before making any adjust -ments, changing accessories, or storing power tools. Such preventive safety measures reduce the risk of starting the power tool accidentally.
- Store idle power tools out of the reach of children and do not allow persons unfamiliar with the power tool or these instructions to operate the power tool. Power tools are dangerous in the hands of untrained users.
- Maintain power tools. Check for misalignment or binding of moving parts, breakage of parts and any other condition that may affect the power tool's operation. If damaged, have the power tool repaired before use. Many accidents are caused by poorly maintained power tools.
- Keep cutting tools sharp and clean. Properly maintained cutting tools with sharp cutting edges are less likely to bind and are easier to control.
- Use the power tool, accessories and tool bits etc. in accordance with these instructions, taking into account the working
GB
conditions and the work to be performed. Use of the power tool for operations different from those intended could result in a hazardous situation.
- Carefully inspect the area to be cut and remove all wires or other foreign bodies.
Service
- Have your power tool serviced by a qualified repair person using only identical replacement parts. This will ensure that the safety of the power tool is maintained.
Chain saw safety warnings
- Keep all parts of the body away from the saw chain when the chain saw is operating. Before you start the chain saw, make sure the saw chain is not contacting anything. A moment of inattention white operating chain saws may cause entanglement of your clothing or body with the saw chain.
- Always hold the chain saw with your right hand on the rear handle and your left hand on the front handle. Holding the chain saw with a reversed hand configuration increases the risk of personal injury and should never be done.
- Wear safety glasses and ear protection. Other protective equipment for the head, hands, legs and feet is compulsory. Adequate protective clothing will reduce personal injury by flying debris or accidental contact with the saw chain.
-
Do not operate a chain saw in a tree. Operation of a chain saw white up in a tree may result in personal injury.
-
Always keep proper footing and operate the chain saw only when standing on fixed, secure and level surface. Slippery or unstable surfaces such as ladders may cause a loss of balance or control of the chain saw.
- When cutting a branch that is under tension be alert for spring back. When the tension in the wood fibres is released the spring loaded limb may strike the operator and/or throw the chain saw out of control.
- Use extreme caution when cutting brush and saplings. The slender material may catch the saw chain and be whipped toward you or pull you off balance.
- Carry the chain saw by the front handle with the chain saw switched off and away from your body. When transporting or storing the chain saw always fit the guide bar cover. Proper handling of the chain saw will reduce the likelihood of accidental contact with the moving saw chain.
- Follow instructions for lubricating, chain tensioning and changing accessories. Improperly tensioned or lubricated chain may either break or increase the chance for kickback.
- Keep handles dry, clean, and free from oil and grease. Greasy, oily handles are slippery causing loss of control.
- Cut wood only. Do not use chain saw for purposes not intended. For example: do not use chain saw for cutting plastic, masonry or non-wood building materials.
Use of the chain saw for operations
different than intended could result in a hazardous situation
- Hold the power tool only on the insulated handle surfaces, as the saw chain can come into contact with concealed power lines or the mains cable to the equipment. Contact between the saw chain and a live wire can make metal parts of the equipment live and cause an electric shock.
Causes and operator prevention of kickback

Beware of kickback! Be careful of kickback of the machine during work. There is danger of injury here. You can avoid kickbacks by exercising caution and using a correct sawing technique.
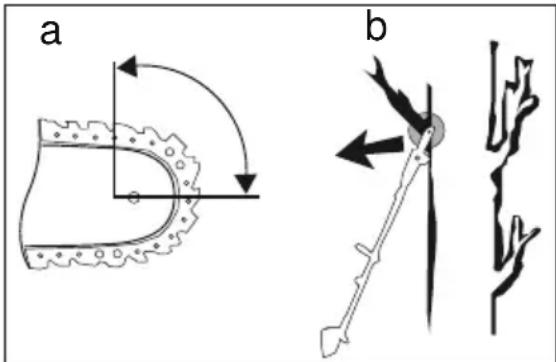
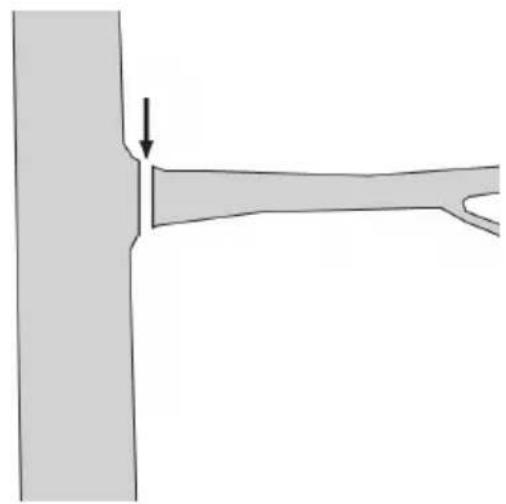
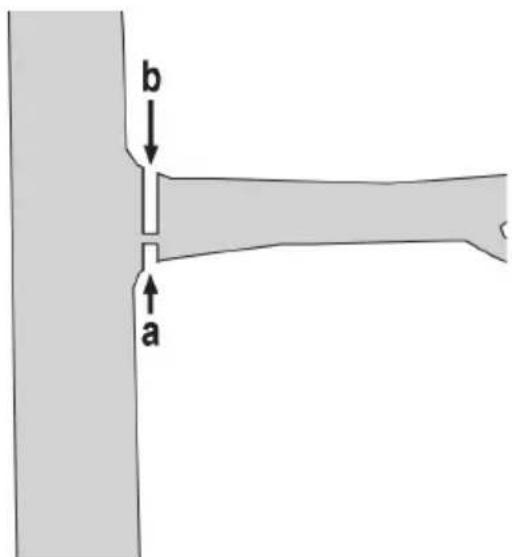
- Kickback may occur when the nose or tip of the guide bar touches an object, or when the wood closes in and pinches the saw chain in the cut (cf. fig. b).
- Tip contact in some cases may cause a sudden reverse reaction, kicking the guide bar up and back towards the operator (cf. fig. a).
-
Pinching the saw chain along the top of the guide bar may push the guide bar rapidly back towards the operator.
-
Either of these reactions may cause you to lose control of the saw which could result in serious personal injury. Do not rely exclusively upon the safety devices built into your saw. As a chain saw user, you should take several steps to keep your cutting jobs free from accident or injury.
Kickback is the result of tool misuse and/or incorrect operating procedures or conditions and can be avoided by taking proper precautions as given below:
- Maintain a firm grip, with thumbs and fingers encircling the chain saw handles, with both hands on the saw and position your body and arm to allow you to resist kickback forces. Kickback forces can be controlled by the operator, if proper precautions are taken. Do not let go of the chain saw.
- Do not overreach and do not cut above shoulder height. This helps prevent unintended tip contact and enables better control of the chain saw in unexpected situations.
- Only use replacement bars and chains specified by the manufacturer. Incorrect replacement bars and chains may cause chain breakage and/or kickback.
- Follow the manufacturer's sharpening and maintenance instructions for the saw chain. Decreasing the depth gauge height can lead to increased kickback.
- Do not saw with the point of the blade (cf. fig. b) or above shoulder height. Do not lean over too far during the sawing operation.
- Ensure that there are no objects lying around on the ground that you can trip over.
Further safety directions
- This appliance is not intended for use by persons (including children) with reduced physical, sensory or mental capabilities, or lack of experience and knowledge, unless they have been given supervision or instruction concerning use of the appliance by a person responsible for their safety.
Children should be supervised to ensure that they do not play with the appliance. - Damaged cables, coupling and plugs or connecting leads, not corresponding to the specifications, must be not be employed. Remove the plug immediately from the plug socket in case of damage or cutting through of the mains cable.
- Keep the equipment, cutting attachments and protective blade cover in good condition in order to prevent injury.
- Ensure during any location change that the saw chain is secured with the chain brake and the chainsaw is switched off and the finger does not contact the On/Off switch. Carry the electric pruner with the chain and chain bar pointing to the rear. Attach the chain guard for transporting the electric pruner. If dropped, check the equipment for significant damage or defects.
- Never start the electric pruner before the chain bar, saw chain and sprocket chain wheel covering are correctly assembled.
The electric pruner is designed for two-handed operation. Never work with one hand or above shoulder height. - Ensure you have a secure stance during sawing. Do not work on a ladder, in the tree or on unstable locations. Be very cautious carrying out work on a slope.
- Basically the mains cable is dragged
behind the operator. The cable must always lead away from the electric pruner towards the rear.
- Keep your working area tidy. Only start work if your working area is free from obstruction and you have planned a safe path of escape when felling timber.
- Place the claw stop securely with every cut and do not begin with the sawing before this.
- Be extremely careful during sawing small bushes and branches. The thin branch thicket can snag in the saw and whip in your direction or make you unbalanced.
- Do not cut wood that is lying on the ground.
- Pay attention to a possible spring-back during the sawing of a branch which is under stress, if the stress force of the wood is suddenly released. Danger of injury exists.
- Check the safety status of the electric pruner, in particular the chain bar, chain brake and the chain, before use.
- In the event that the cutting attachment becomes jammed or stuck in the branches, do not attempt to free the equipment with the use of force. Switch off the equipment immediately and restart it only after clearing the blockage. There is a risk of injury!
Fitting
Pull out the power plug before doing any work on the electric pruner itself injury hazard!
- Always wear cut-protection gloves
Undertake only work with which you are confident.
- In case of uncertainty, contact a specialist or contact our service directly.
Before using the electric pruner, you must:
- assembling the round handle
- attaching the shoulder strap
- fitting the blade
- fitting the saw chain
- tensioning the saw chain
- fill up with chain oil
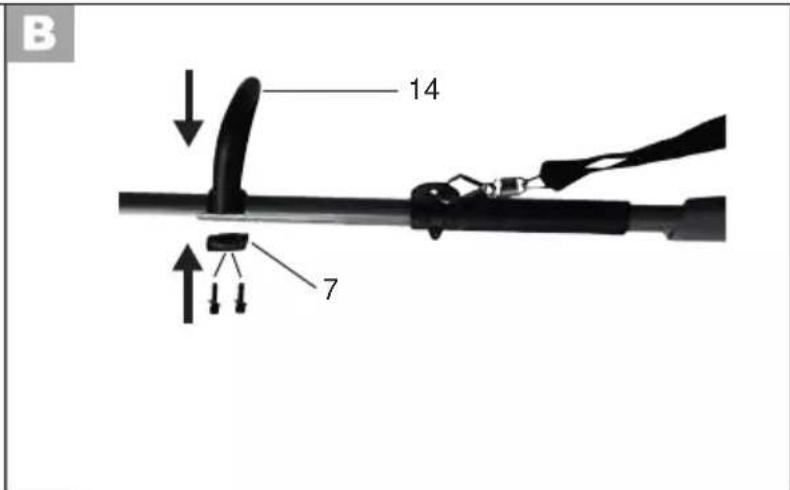
Assembling the Round Handle
The Allen key (26) can be found in its holder on the quick release (H 15).

-
Set round handle (14) to the desired position on the telescopic handle.
-
Place brake arm (7) on the telescopic handle.
- Screw together round handle (14) and brake arm (7).
- The height or holding angle of round handle (14) can be adjusted at any time by slightly loosening the screws, pushing/turning, and retightening the screws.
Attaching the Shoulder Strap

Fix the spring hook on shoulder strap (12) into lifting lug (13) on the telescopic handle of the equipment.
Installing the Blade

Insert blade (2) with the central longitudinal hole over central blade guide (16). Fit the saw chain.
Fitting the saw chain

-
Lay out saw chain (1) such that the bevelled cutting edges of the chain links point in a clockwise direction.
-
Place saw chain (1) in blade groove (2) and on chain wheel (18).
- To facilitate assembly, position the chain tensioning pin (21) by turning the chain tensioner (5) towards the blade fixing screw (4) until it stops, before fitting the chain wheel cover (6).
- Replace chain wheel cover (6) and screw on blade fixing (4).
- Blade fixing screw (4) is simply to be tightened lightly by hand. Hole (20) on the blade is the holder for chain tensioning pin (21). Thread (19) is the holder for blade fixing screw (4).

Ensure that chain tensioning pin (21) is positioned in hole (20) on the blade. The pin must be completely inserted into the hole.

Tensioning the saw chain
The tension of saw chain (1) is important both for your safety and for the function of the electric pruner. A correctly tensioned saw chain will increase the lifetime of your equipment.
- Saw chain (1) is correctly tensioned if it can be pulled around blade 2 by hand (wearing gloves) without sagging.
- When the saw chain is tensioned with 9N (approx. 1kg ), the gap between
the saw chain and the guide rail may not be more than 2mm
- Turn blade fixing screw (4) anticlockwise to slightly loosen blade (2).
- Set the tension of saw chain 1 using chain tensioning device (5).
- Turn this quick tensioning device clockwise to increase the tension.
- In the same way, the tension of saw chain (1) can be decreased by turning anticlockwise.
- Turn blade fixing screw (4) clockwise to retighten blade (2).
Where saw chain (1) has been newly tensioned, readjust the chain tension after a short period in operation.

Check the chain tension before each use of the electric pruner.
Chain lubrication

Always switch off the device and allow the motor to cool before filling with chain oil. There is a risk of fire if oil overflows.

Blade (2) and saw chain (1) must always be oiled. Non-observation of this will result in increased wear on the blade and saw chain.
The electric pruner is equipped with an oil automatic system. As soon as the motor is speeded up, the oil also flows faster to the chain bar (2).

A full tank will last for approx. 10 minutes of continuous operation. Check the oil level in good time.

Filling up with chain oil:
- Check the oil fill level in the Oil level inspection window (22) and regularly top up with oil. The oil tank holds 70ml oil.
- Use Grizzly bio-oil; this product contains additives that reduce wear and tear and does not damage the pump system. bio-oil is available from our Service-Center (see P. 79 for the address).
-
If you have no Grizzly bio-oil available, use chain lubrication oil with low adhesive additive content.
-
Unscrew the oil fill cap (23) and fill up with chain oil.
- Wipe off any spilled oil and close the cap again.
Note that the saw can re-oil.
Operation startup

Observe the country-specific and municipal regulations.
Do not work with the electric pruner during general ordinary or prescribed quiet periods.
Before starting, check
The tension of saw chain (1)
The oil level
All nuts and screws are sitting firmly
- Only remove blade cover (24) at the last minute
- Set the working length of the telescopic arm before switching on the equipment
- Ensure that you are wearing protective clothing
- Check that you are standing safely
- Check your working surroundings
Switching On and Off
- Put on the shoulder strap (12). Adjust the strap length such that the carrying ring (13) is at hip height.
- Connect the equipment to a power supply with the supply voltage specified on the rating plate.
- Hold the equipment firmly in a relaxed and safe manner.
- Operate starting lock (11) and switch on the pruning saw at on/off switch (10).
For safety reasons, a lockable continuous operation setting is not possible.
- The equipment will switch off again when you release on/off switch (10).
Adjusting the Telescopic Handle
The telescopic handle can be infinitely adjusted using quick release (15).

-
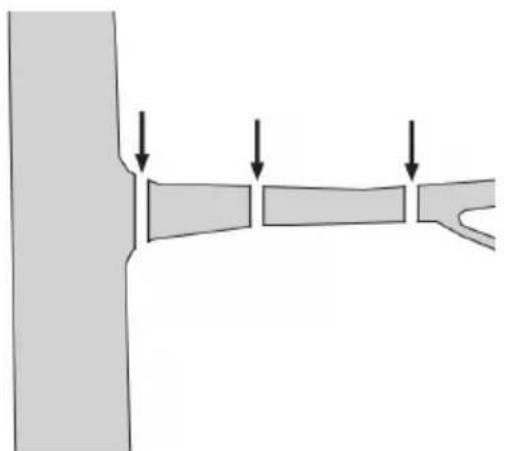
Push the lever (15a) forward as shown in the illustration then push and pull to adjust the handle length.
-
Pull back the lever (15a) and so fix the desired working length of the telescopic handle.
- If the lever (15a) comes loose, tighten the Allen screw (15b) using the Allen key (26).
Handle Adjustment

-
Loosen pivotal centre (8) and and fixing the adjustable handle (9) on position.
-
Replace the pivotal centre (8) to fixation.

Working Safely
- Keep the equipment, cutting attachments and protective blade cover in good condition in order to prevent injury.
- If dropped, check the equipment for significant damage or defects.
- Observe the specified working angle 60^ ± 10^ , in order to guarantee safe working.
- Do not use the electric pruner when standing on a ladder or in an unsafe position.
- Do not be tempted to make unconsidered cuts. Doing so may endanger both yourself and others.
Children must be supervised to ensure that they do not play with the equipment. - Change your working position regularly. Long use of the equipment can result in vibration-related circulatory disorders in the hands. However, the length of use can be extended by using suitable gloves or taking regular breaks. Note that a personal tendency for poor circulation, low outdoor temperatures, or high gripping forces during work will reduce the length of use.
Transport
Put on blade cover (24).
- Ensure that you do not switch on the equipment when carrying it.
Sawing techniques
Be thoroughly aware of the danger of rebounding branches.
Sawing Off Small Branches
Set your saw cut from top to bottom, as illustrated.
Be aware of early breaking of the branch if you have underestimated the size and weight.
Be completely aware of the falling cut material
Sawing Off Larger Branches
For controlled sawing of larger branches, first select a relief cut (s. ill. a).
This is made from below. Saw a notch in the lower third of the branch.
The actual length cut (s. ill. b) is again made from the top, as far as possible in line with the first cut so that the two cuts meet.
Sawing Off Parts
For large/long branches, sawing off in parts is recommended.
This is the only way to safely ensure the point of impact of the cut material.
Clear away from the area in which you are standing any parts that have already been cut and are lying on the ground.
Cleaning
- Do not use solvents or petrol to do this. A dry cloth or slightly soapy water are adequate.
- Saw chain (1) is to be wiped only with a dry cloth.
Storage
- Clean the equipment before putting it away.
Put on blade cover (24). - The storage location must be frost free and dry. Avoid direct sunlight.
- The storage location must be out of reach of children.
Resharpening of the saw chain
Leave the resharpening of a saw chain to an expert or proceed according to the instructions of your saw chain sharpener. Resharpening a saw chain takes some practice. If in doubt, replacing the saw chain is preferable.
Waste disposal and environmental protection
Do not dispose of used oil in the sewage system or drains. Dispose of used oil in an environmentally correct manner - bring it to a waste disposal center.
Be environmentally friendly. Return the tool, accessories and packaging to a recycling centre when you have finished with them.
Machines do not belong with domestic waste.
Empty the oil tank carefully and hand in your electric chainsaw at a disposal center. The plastic and metal parts employed can be separated out and thus recycled use can be implemented. Ask our Service-Center for details (see P. 79 for the address).
Accessories Enclosed
24 Blade cover 12 Shoulder strap
25 60 ml Bio chain oil
26 Allen Key
Spare parts
The following spares are available from Service-Center (see P. 79). Please indicate the machine type and the number of the spare part with your order.
Oregon saw chain 3009 1400
Oregon chain bar .3010 0100
Bio chain oil 1 liter. 3023 0001
Bio chain oil 5 liter.. 3023 0002
If further spare parts should be necessary, please find the part number on the exploded drawings.

The Oregon replacement saw chain is to be used only in conjunction with the associated Oregon blade and the electric chainsaw approved for this. There is a risk of injury.
Maintenance Interval Table
Regularly carry out the maintenance operations listed in the following table. The life of the saw is extended by regular maintenance of your chainsaw. Furthermore, you get optimum cutting performance and avoid accidents.
| Machine part Action | Before every use | After Each Use | |
| Complete Machine | Check the condition, replace damaged parts if required | ✓ | |
| Accessible screws and nuts | Retighten | ✓ | |
| Sprocket chain wheel (E 18) | Check, replace if required | ✓ | |
| Saw chain (A 1) | Check, regrind or replace if required | ✓ | |
| Saw chain (A 1) | Clean (also oil after a longer period out of use) | ✓ | |
| Guide bar (A 2) | Check | ✓ | |
| Guide bar (A 2) | Clean (also oil after a longer period out of use) | ✓ | |
| Oiltank Check, fill up chain oil if required | ✓ | ||
Trouble shooting
| Problem Possible cause Fault correction | |
| Device does not start | Mains voltage defectiveHouse protection fuse activated |
| Defective On/Off switch (A 10) | |
| Worn carbon brushes Repair by customer service | |
| Defective motor Repair by customer service | |
| Inferior cutting performance | Incorrectly mounted saw chain (A 1) |
| Saw chain (A 1) blunt | |
| Chain tension insufficient Check chain tension | |
| Saw runs with difficulty, chain (1 A) comes off | Chain tension insufficient Check chain tension |
| Chain (A 1) becomes hot, smoke development during sawing, discoloration of the rail | Too little chain oil |
| Telescopic handle cannot be locked | Allen screw (H 15b) loose on the quick release (H 15) |
Guarantee
Dear Customer,
This equipment is provided with a 3-year guarantee from the date of purchase. In case of defects, you have statutory rights against the seller of the product. These statutory rights are not restricted by our guarantee presented below.
Terms of Guarantee
The term of the guarantee begins on the date of purchase. Please retain the original receipt. This document is required as proof of purchase.
If a material or manufacturing defect occurs within three years of the date of purchase of this product, we will repair or replace - at our choice - the product for you free of charge. This guarantee requires the defective equipment and proof of purchase to be presented within the three-year period with a brief written description of what constitutes the defect and when it occurred.
If the defect is covered by our guarantee, you will receive either the repaired product or a new product. No new guarantee period begins on repair or replacement of the product.
Guarantee Period and Statutory Claims for Defects
The guarantee period is not extended by the guarantee service. This also applies for replaced or repaired parts. Any damages and defects already present at the time of purchase must be reported immediately after unpacking. Repairs arising after expiry of the guarantee period are chargeable.
Guarantee Cover
The equipment has been carefully pro
duced in accordance with strict quality guidelines and conscientiously checked prior to delivery.
The guarantee applies for all material and manufacturing defects. This guarantee does not extend to cover product parts that are subject to normal wear and may therefore be considered as wearing parts (e.g. Saw chain, chain bar, sprocket chain wheel and carbon brushes) or to cover damage to breakable parts (e.g. switches, batteries, or parts made of glass).
This guarantee shall be invalid if the product has been damaged, used incorrectly or not maintained. Precise adherence to all of the instructions specified in the operating manual is required for proper use of the product. Intended uses and actions against which the operating manual advises or warns must be categorically avoided.
The product is designed only for private and not commercial use. The guarantee will be invalidated in case of misuse or improper handling, use of force, or interventions not undertaken by our authorised service branch.
Processing in Case of Guarantee
To ensure quick handling of you issue, please follow the following directions:
-
Please have the receipt and item number (e.g. IAN 12345) ready as proof of purchase for all enquiries.
-
Please find the item number on the rating plate, an engraved plate on the front page of your manual (bottom left) or as a sticker on the back or bottom.
-
Should functional errors or other defects occur, please initially contact the service department specified below by telephone or by e-mail. You will then receive further information on the pro
cessing of your complaint.
- After consultation with our customer service, a product recorded as defective can be sent postage paid to the service address communicated to you, with the proof of purchase (receipt) and specification of what constitutes the defect and when it occurred. In order to avoid acceptance problems and additional costs, please be sure to use only the address communicated to you. Ensure that the consignment is not sent carriage forward or by bulky goods, express or other special freight. Please send the equipment inc. all accessories supplied at the time of purchase and ensure adequate, safe transport packaging.
Repair Service
For a charge, repairs not covered by the guarantee can be carried out by our service branch, which will be happy to issue a cost estimate for you.
We can handle only equipment that has been sent with adequate packaging and postage.
Attention: Please send your equipment to our service branch in clean condition and with an indication of the defect.
Equipment sent carriage forward or by bulky goods, express or other special freight will not be accepted.
We will dispose of your defective devices free of charge when you send them to us.

Service-Center
Service Great Britain
Tel.: 0871 5000 720
(£0.10/Min.)
E-Mail: grizzly@lidl.co.uk
IAN 79061

Service Branch
Please note that the following address is not a service address. Please initially contact the service centre specified above.
DES UK Ltd.
Unit B7
Oxford Street Industrial Park
Vulcan Road
Bilston, West Midlands WV14 7LF
| Original EG-Kon-formitätserklärung | Traduction de la dé- clération de conform- mité CE originale |
| Hiermit bestätigen wir, dass der Elektro-Hochentaster Baureihe FHE 550 B2 (Seriennummer 201212000001-201212029742) folgenden einschlädigen EU-Richtlinien in ihrer jeweils gültigen Fassung entspricht: | Nous certifion par la présente que l'élagueur à long manche série FHE 550 B2 (Numéro de série 201212000001-201212029742) est conforme aux directives UE actuellément en vigueur |
| 2006/42/EC • 2004/108/EC • 2000/14/EC • 2011/65/EU | |
| Um die Übereinstimmung zu gewährleisten, wurden folgende harmonisierte Normen sowie nationale Normen und Bestimmungen angewendet: | En vue de garantir la conformité les normes harmonisées ainsi que les normes et décisi- ons nationales suivantes ont été appliquées : |
| EN 62233:2008 • EN 60745-1:2009+A11:2010 • EN ISO 11680-1:2011 EN 55014-1/A1:2009 • EN 55014-2/A2:2008 EN 61000-3-2/A2:2009 • EN 61000-3-3:2008 | |
| Zusätzlich wird entsprechend der Ge- räuschemissionsrichtlinie 2000/14/EC bestätig: Schalleistungspegel: garantiert: 104,0 dB(A); gemessen: 102,2 dB(A) Angewendetes Konformitätsbewertungsver- fahren entsprechend Anh. V / 2000/14/EC Gemeldete Stelle: Intertek Deutschland GmbH, NB0905, Product Certification Baumusterbescheinigungs-Nr.: 12SHW0512-02 | De plus, conformémement à la directive sur les émissions de bruit 2000/14/EC, nous confirmons : Niveau de puissance acoustique garanti: 104,0 dB(A) mesure: 102,2 dB(A) Procédé utilisé pour l'évaluation de la conformité en fonction de l'annexe V / 2000/14/EC Bureau declares: Intertek Deutschland GmbH, NB0905, Product Certification Attestation de modèle type N° 12SHW0512-02 |
| Grizzly Gartengeräte GmbH & Co. KG Am Gewerbepark 2 64823 Groß-Umstadt 02.01.2013 | O.e.l.f Oliver Christ (Dokumentationsbevollmächtigter, Chargé de documentation) |
| ITCHTraduzione della di-chiarazione di conformità CE originale | GB Translation of the original EC declaration of conformity |
| Con la presente dichiariamo che tagliarami elettriciero series di costruzione FHE 550 B2 (Numero di series 201212000001-201212029742) corrisponde alle seguenti direttive UE in materia nella rispettova versione valida: | We hereby confirm that the FHE 550 B2 series Electric Pruner (serial number 201212000001-201212029742) conforms with the following applicable relevant version of the EU guidelines: |
| 2006/42/EC • 2004/108/EC • 2000/14/EC • 2011/65/EU | |
| Per garantire la conformità sono state applicate le seguenti norme armonizzate eanche le norme e disposizioni nazionali che seguono: | In order to guarantee consistency, the following harmonised standards as well as national standards and stipulations have been applied: |
| EN 62233:2008 • EN 60745-1:2009+A11:2010 • EN ISO 11680-1:2011 EN 55014-1/A1:2009 • EN 55014-2/A2:2008 EN 61000-3-2/A2:2009 • EN 61000-3-3:2008 | |
| Si dichiarare inoltre in conformità alla diretiva 2000/14/EC sull'emissione acustica ambientale: Livello di potenza sonora garantita: 104,0 db(A) misurata: 102,2 db(A) Procedure della valutazione della conformità applicata come da allegato V / 2000/14 EC Autorità registrata: Intertek Deutschland GmbH, NB 0905, Product Certification, Certificato di campione di costruzione n°: 12SHW0512-02 | We additionally confirm the following in accordance with the 2000/14/EC emissions guideline: Sound power level guaranteed: 104,0 dB(A) measured: 102,2 dB(A) Compliance evaluation process carried out in accordance with Appendix V, 2000/14/EC Registered Office: Intertek Deutschland GmbH, NB0905, Product Certification Design Type Certificate No.:12SHW0512-02 |
| Grizzly Gartengeräte GmbH & Co. KG Am Gewerbepark 2 64823 Groß-Umstadt 02.01.2013 | Oliver Christ (Responsabile documentazione tecnica, Documentation Representative) |