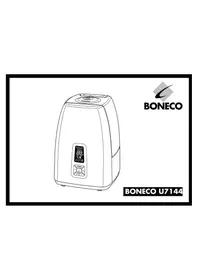
U7144 - Humidifier BONECO - Free user manual and instructions
Find the device manual for free U7144 BONECO in PDF.


| Product type | Ultrasonic humidifier |
| Brand | Boneco |
| Model | U7144 |
| Dimensions (L x W x H) | 254 x 290 x 347 mm |
| Weight (empty) | 4.0 kg |
| Power supply | 230 - 240 V / 50 Hz |
| Power consumption | 45 W (without preheating) / 130-140 W (with preheating) |
| Humidification output | 400 g/h (without preheating) / 550 g/h (with preheating) |
| Tank capacity | 5.5 liters |
| Recommended room size | Up to 60 m² / 150 m³ |
| Noise level | < 25 dB(A) |
| Humidity control | Built-in hygrostat, setpoint 40 to 60 % RH |
| Timer | 1 to 8 hours or continuous operation |
| Mist output levels | 3 levels: low (LO), medium (ME), high (HI) |
| Preheating function | Water heated to 80 °C, mist at 40 °C |
| Automatic modes | Auto mode (optimization according to temperature), Sleep mode (setpoint 60 %, 6h, heating activated) |
| Indicators | Low water level (symbol L), cleaning required (symbol CLEAN) |
| Water treatment | Ionic Silver Stick® (antibacterial silver ions) + anti-limescale cartridge |
| Maintenance and cleaning | Weekly cleaning of the tank and membrane; regular descaling; replacement of the anti-limescale cartridge every 2-3 months |
| Safety | Automatic shut-off when tank empty; overheat protection; detachable power cord |
| Spare parts and accessories | Anti-limescale cartridge, Ionic Silver Stick, cleaning brush, refill resin kit |
| General information | Warranty subject to presentation of invoice; proper disposal via specialist dealer |
Frequently Asked Questions - U7144 BONECO
User questions about U7144 BONECO
0 question about this device. Answer the ones you know or ask your own.
Ask a new question about this device
Download the instructions for your Humidifier in PDF format for free! Find your manual U7144 - BONECO and take your electronic device back in hand. On this page are published all the documents necessary for the use of your device. U7144 by BONECO.
USER MANUAL U7144 BONECO

BONECO U7144

| Gebrauchsanweisung (5 – 14) | de |
| Instructions for use (15 – 24) | en |
| Instructions d’utilisation (25 – 34) | fr |
| Istruzioni per l’uso (35 – 44) | it |
| Gebruiksaanwijzing (45 – 54) | nl |
| Instrucciones para el uso (55 – 64) | es |
| Használati útmutató (65 – 74) |
| Instrukcja obsługi (75 – 84) |
| Инструкция по эксплуатации (85 – 94) |
| Bruksanvisning (95 – 104) |
| Käyttöohje (105 – 114) |
| Brugsanvisning (115 – 124) |
| Bruksanvisning (125 – 134) |
| hu |
| pl |
| ru |
| sv |
| fi |
| da |
| no |
Gebrauchsanweisung
Vorwort
Auspacken

Wasserreinhaltung
A) Ein-/Ausschalten
Instructions for use
Foreword
Congratulations on choosing the Ultrasonic BONECO U7144!
en
Did you know that dry room air:
- Dries out the mucous membranes, and also causes chapped lips and stinging eyes?
- Encourages infections and illnesses of the respiratory system?
- Causes weariness, tiredness and poor concentration?
• Stresses household pets and house plants? - Encourages the formation of dust and the electrostatic charging of textiles made of synthetic fibers, as well as carpets and plastic flooring?
- Damages wooden furniture and especially parquet floors?
- Causes musical instruments to go out of tune?
General information
A comfortable indoor atmosphere is achieved at a relative humidity of between 40 and 60%. Your appliance automatically controls the humidity level according to your chosen setting. If the air is too dry, the unit will automatically switch on. As soon as the desired humidity level is reached, it will automatically switch off.
Safety instructions
- Read the operating instructions carefully before using the appliance and keep them in a safe place for later reference.
- Connect the unit only to an AC supply with a voltage that agrees with the rating label.
- Only use the appliance indoors and within the parameters stated in the technical specifications. Using the appliance for a purpose for which it is not intended could pose a serious hazard to health and life.
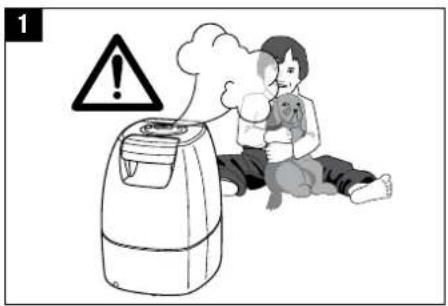
- Children cannot recognize the hazards associated with the usage of electrical appliances. For this reason, always supervise children when they are in the vicinity of the appliance (image 1).
- Persons who are unfamiliar with the operating instructions, as well as children and persons under the influence of medication, alcohol or drugs are not permitted to operate the appliance, or are only permitted to operate it under supervision.
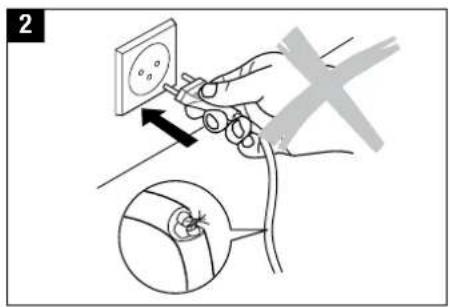
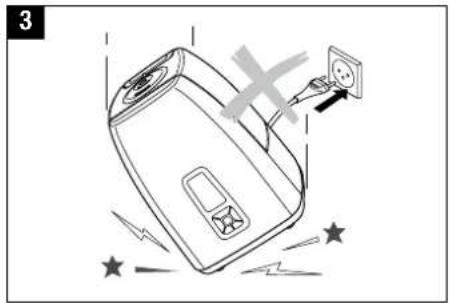
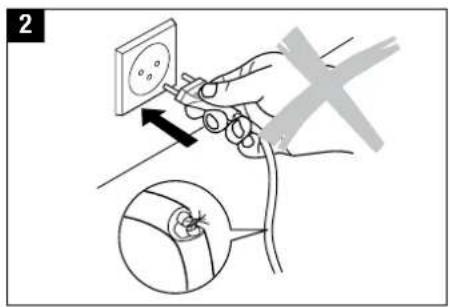
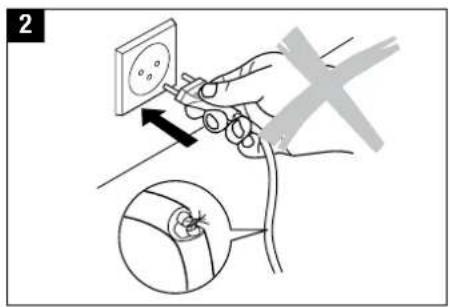
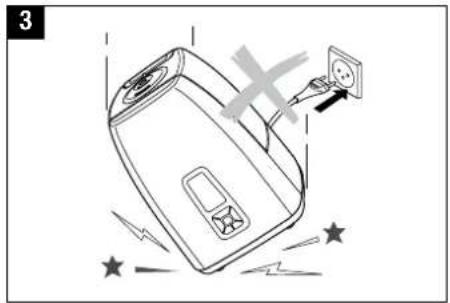
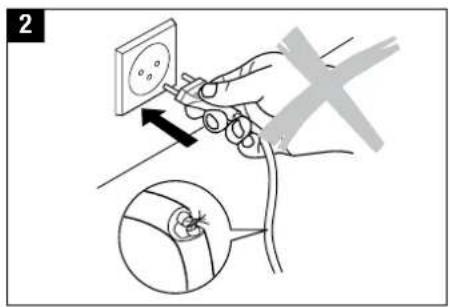
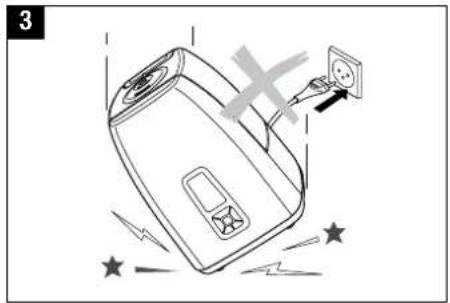
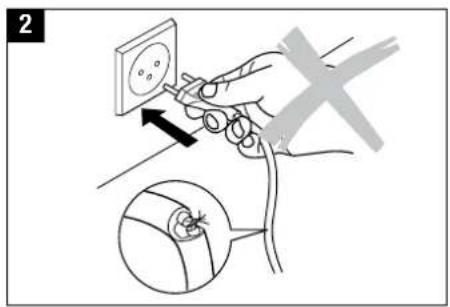
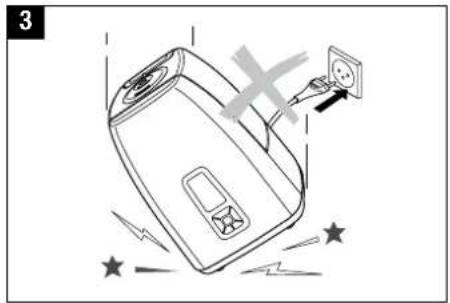
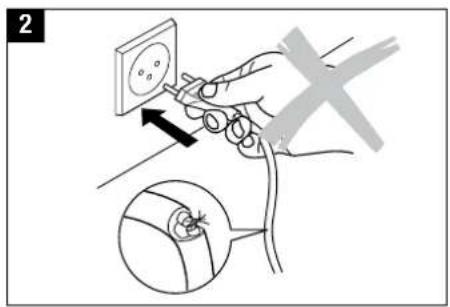
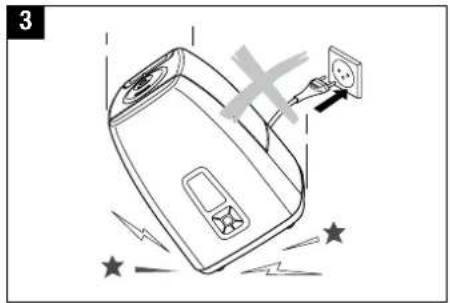
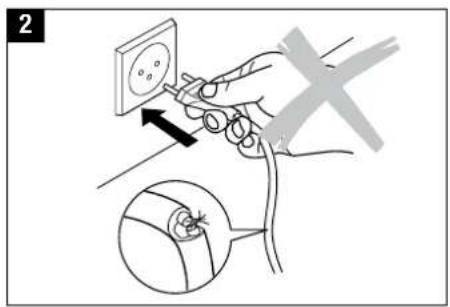
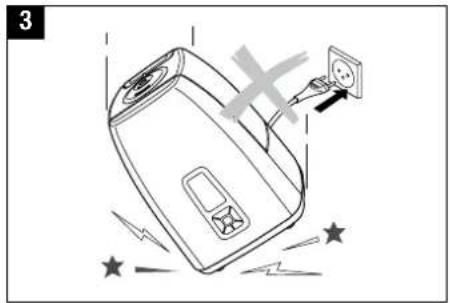
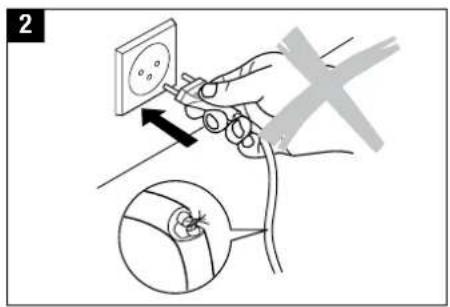
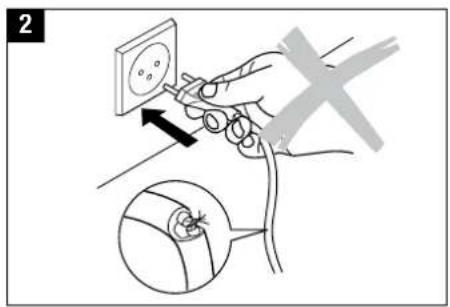
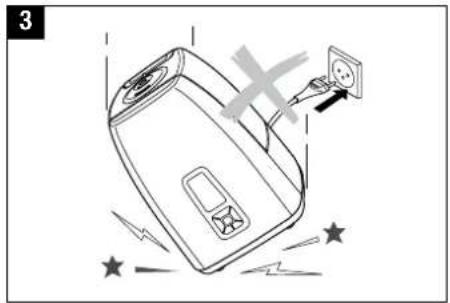
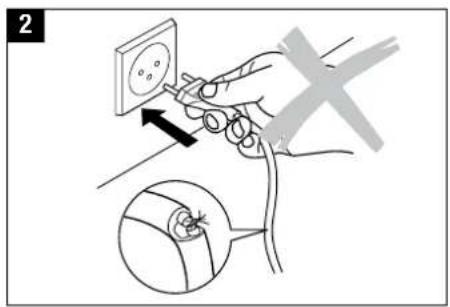
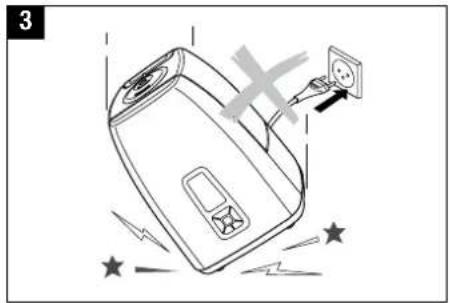
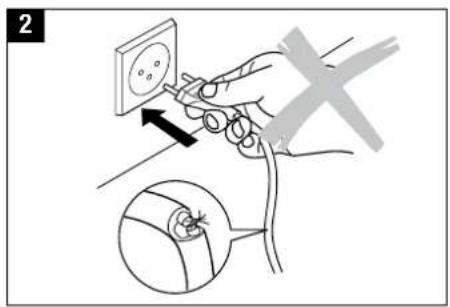
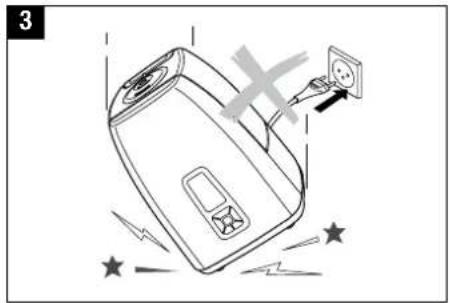
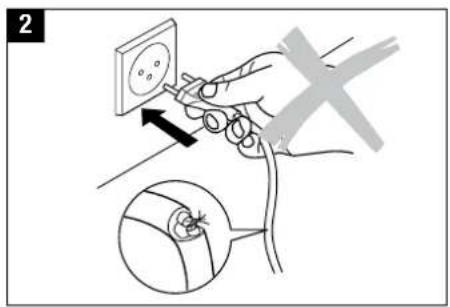
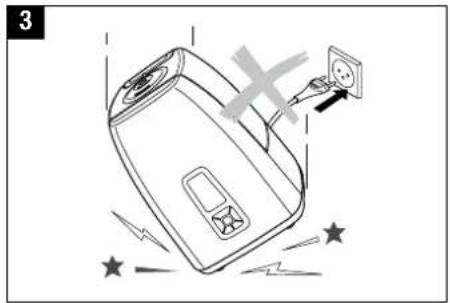
- Never use the appliance if there is any damage to the appliance or cable (2), after malfunction has occurred, after the appliance has been dropped (3) or damaged in any other way.
- Only operate the appliance when it is completely assembled.
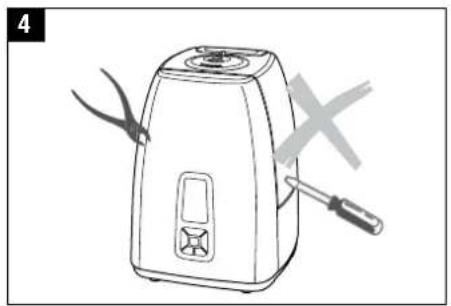
- Repairs to electrical appliances may only be carried out by qualified service engineers (4). Improper repair work can pose a considerable hazard to the user.
- Disconnect the appliance from the mains power before filling/emptying the water tank, before cleaning, before assembling/dismantling of individual parts and before moving the appliance.
- Do not reach inside the nebuliser space during operation. The high frequency oscillation causes the membrane to become hot.
-
Never pull the plug from the mains socket by the cable or with wet hands.
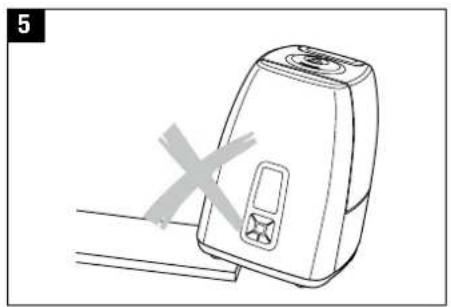
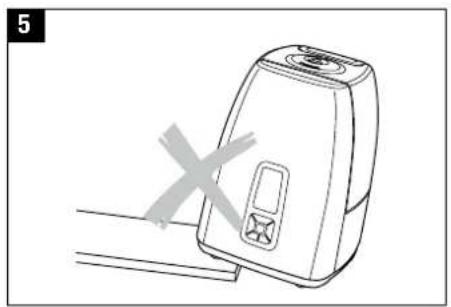
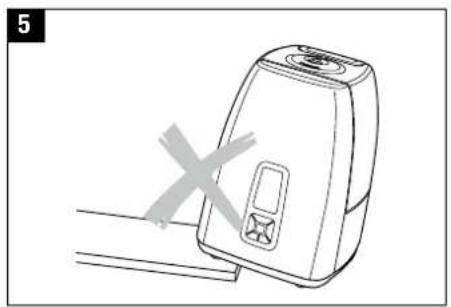
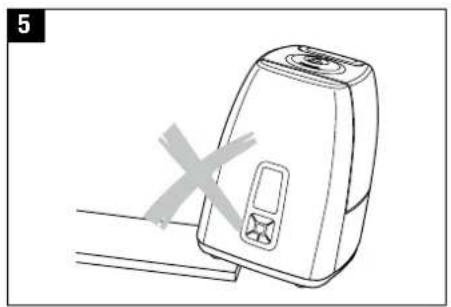
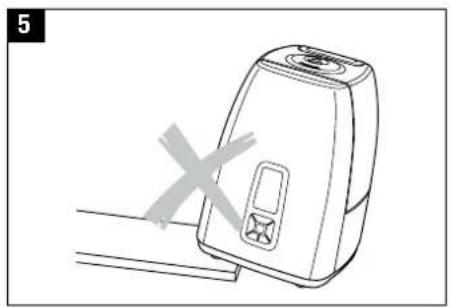
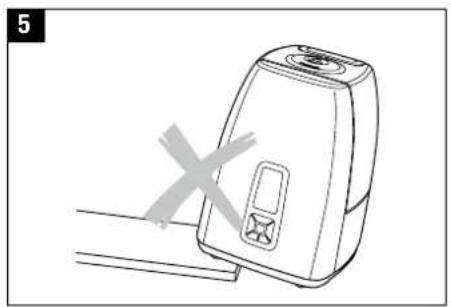
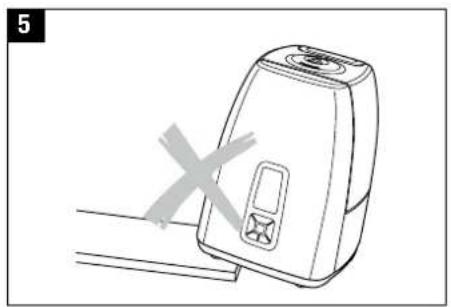
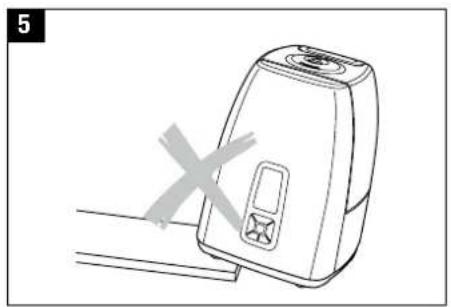
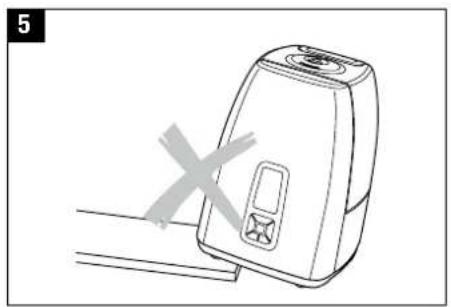
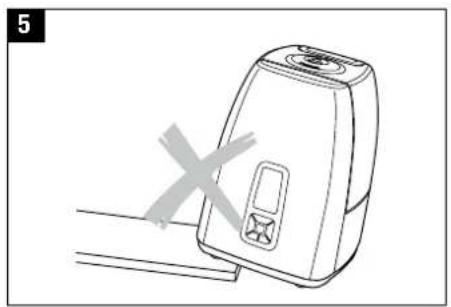
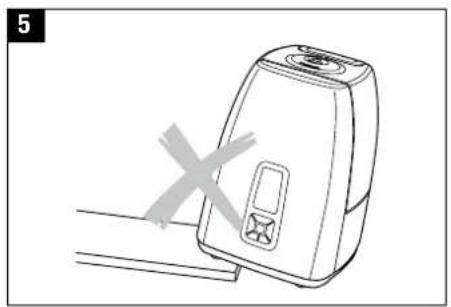
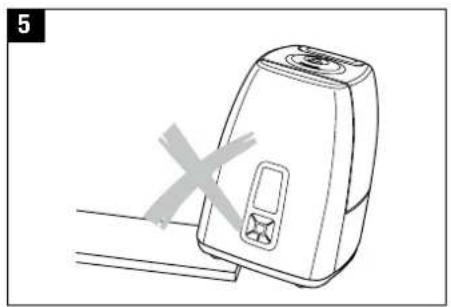
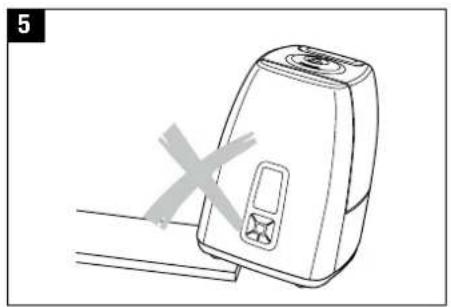
• Always place the appliance on a dry, level surface (5). -
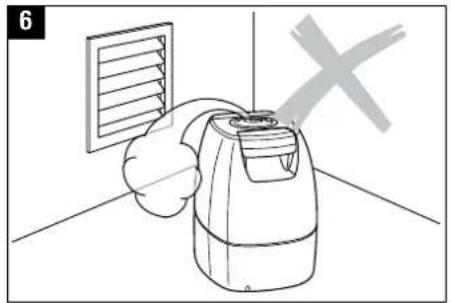
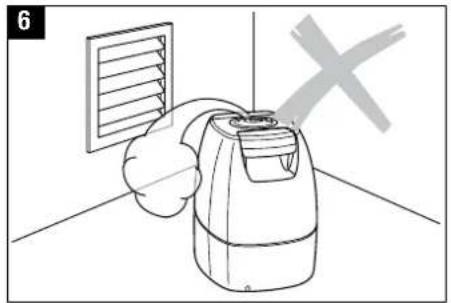
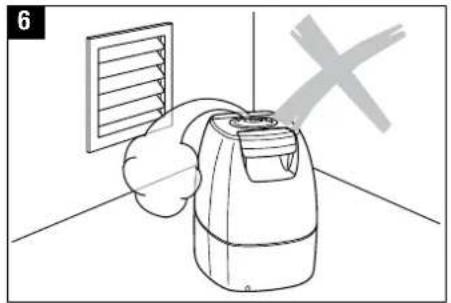
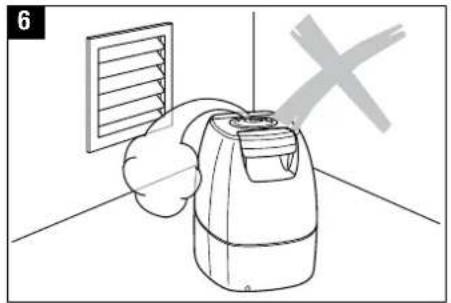
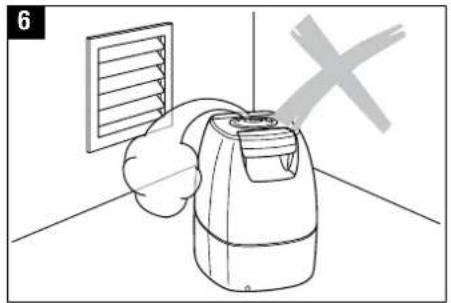
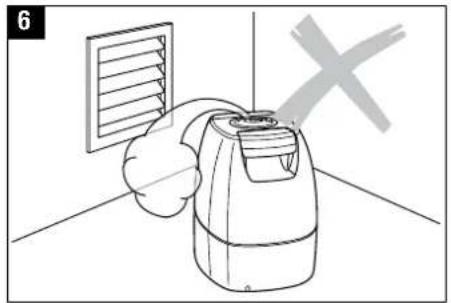
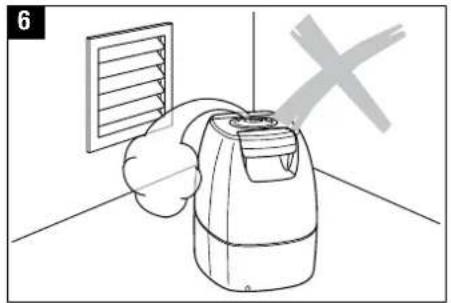
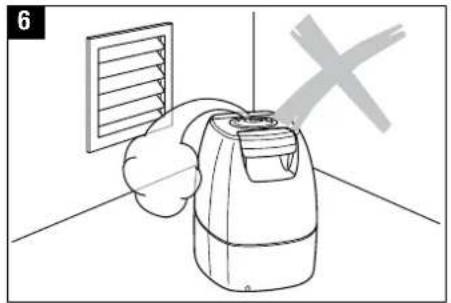
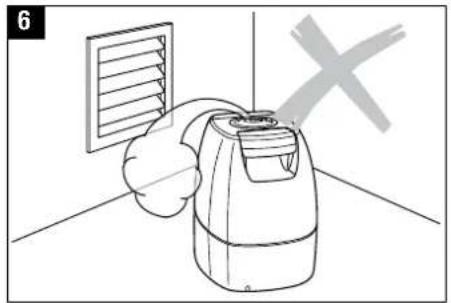
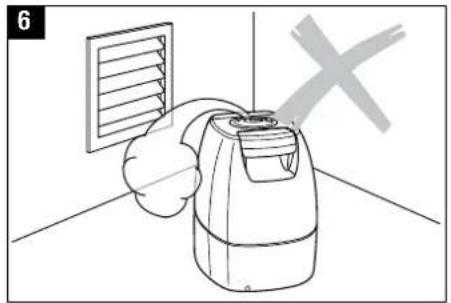
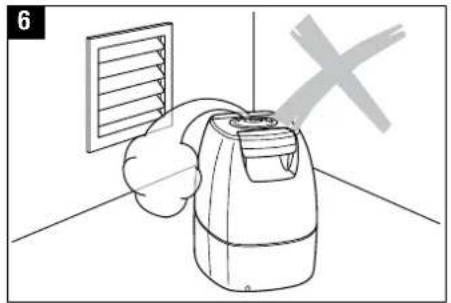
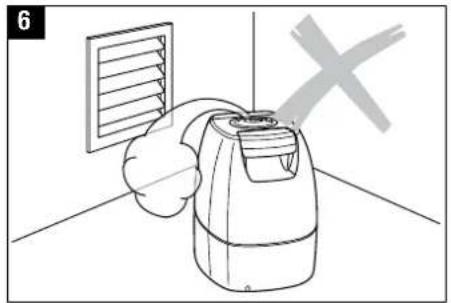
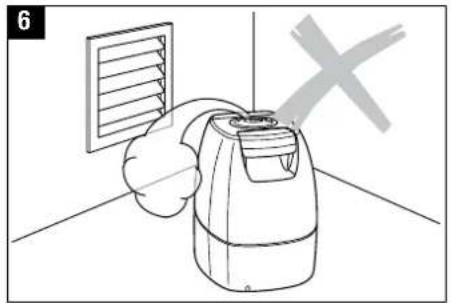
Do not place the appliance directly on the floor or next to heating. If the mist comes in contact with the floor before it has fully evaporated, the surface could be damaged (6). We do not accept any liability for damages due to the incorrect placement of the unit.
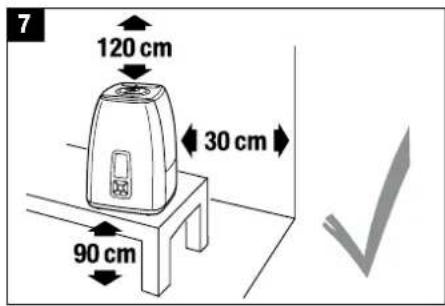
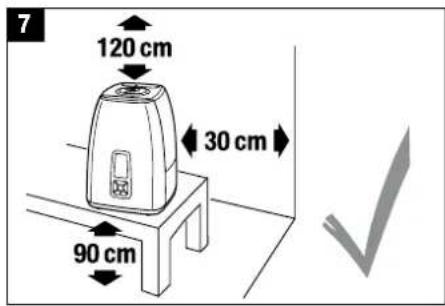
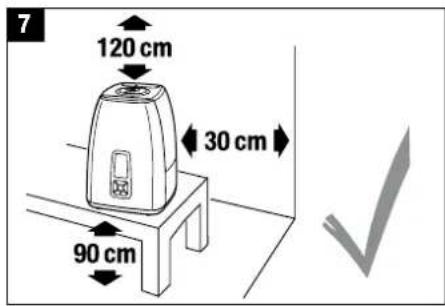
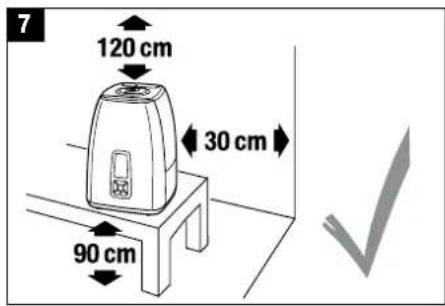
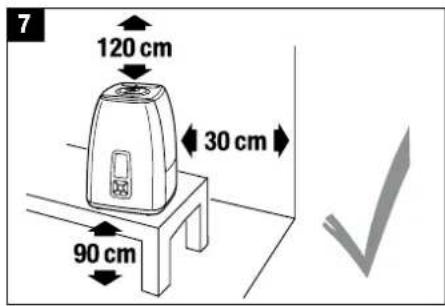
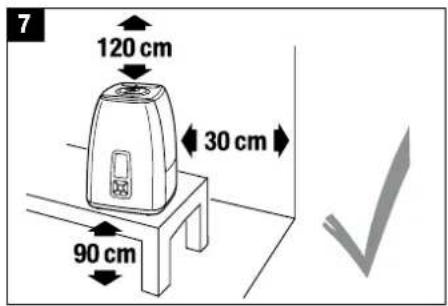
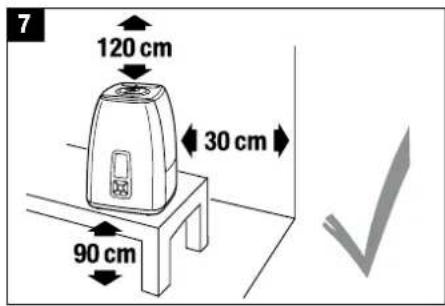
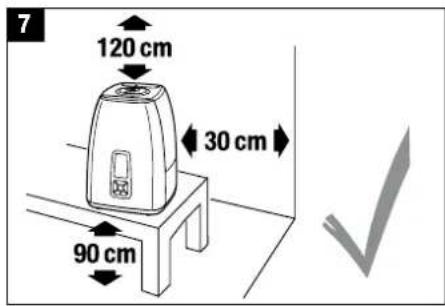
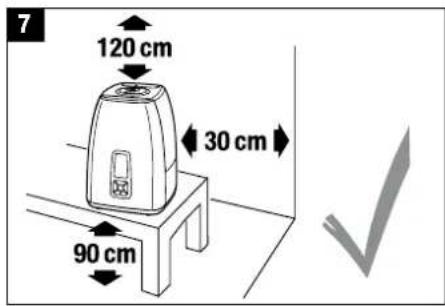
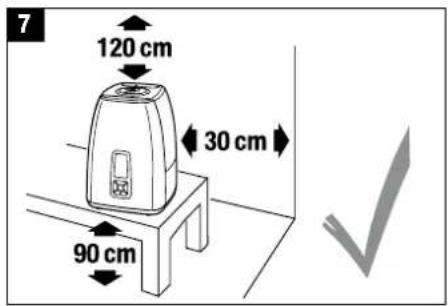
- The unit should be placed in an elevated position (7), e.g. on a table, chest, etc.
- Do not pour water into the mist outlet of the appliance.
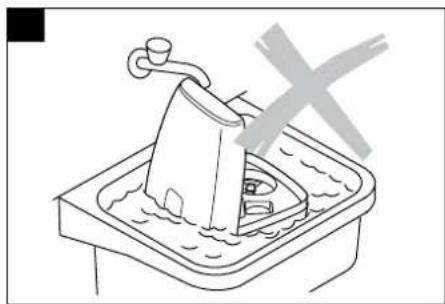
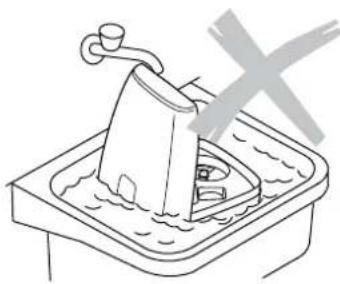
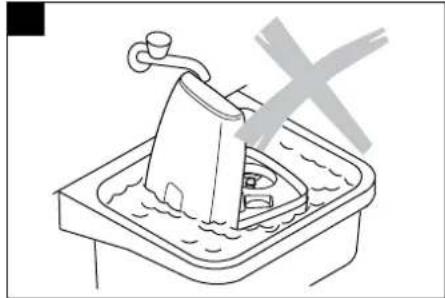
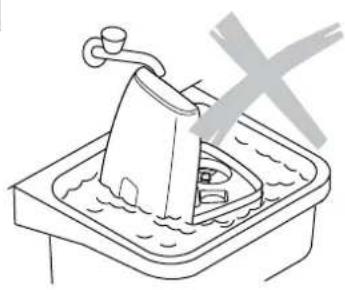
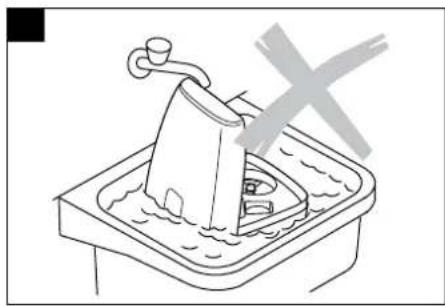
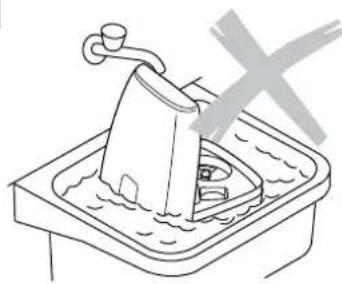
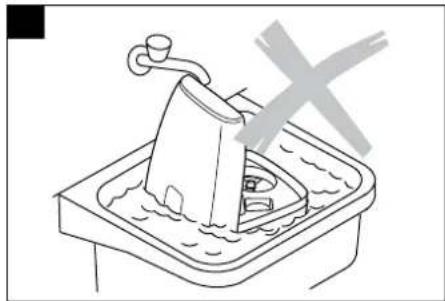
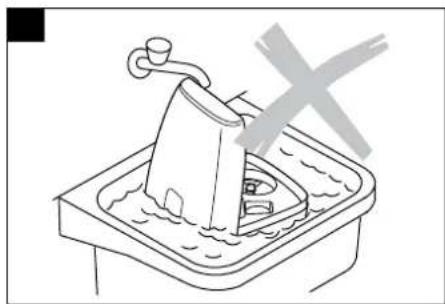
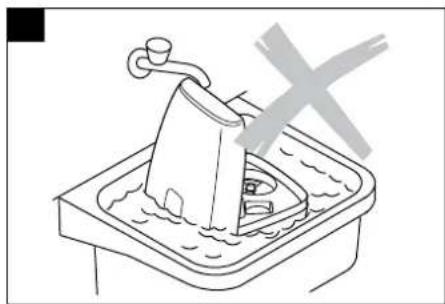
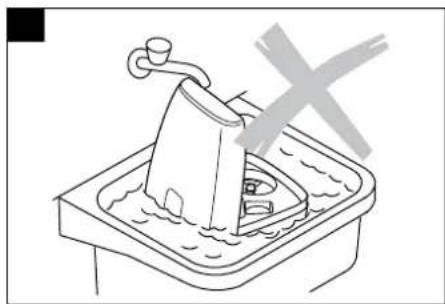
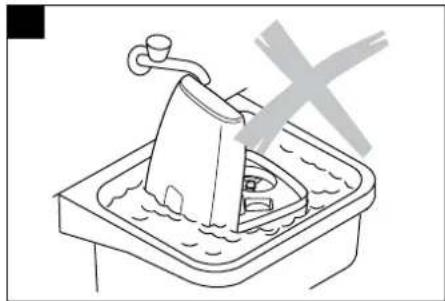
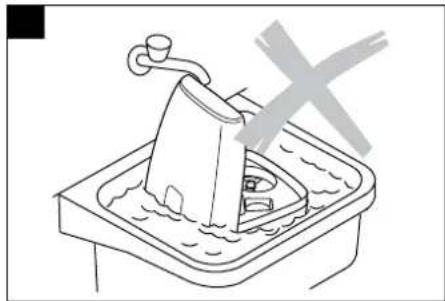
- Do not immerge the main body in water or other liquids.
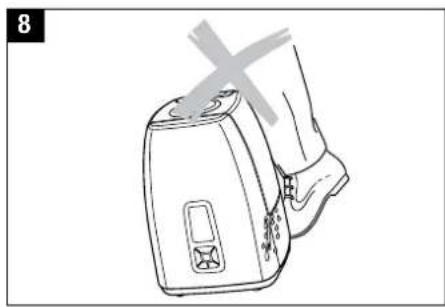
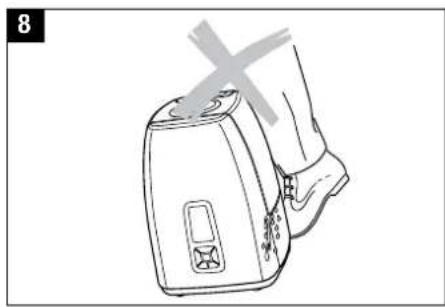
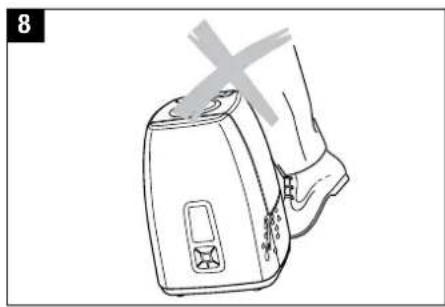
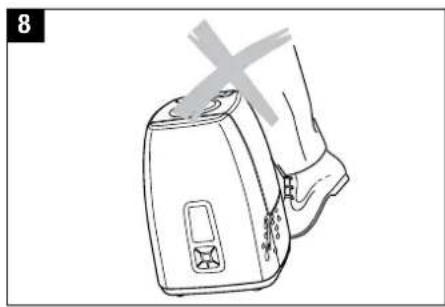
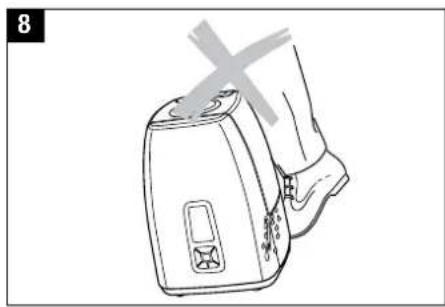
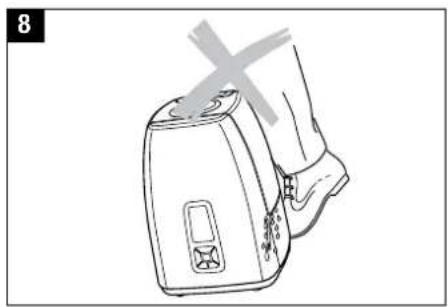
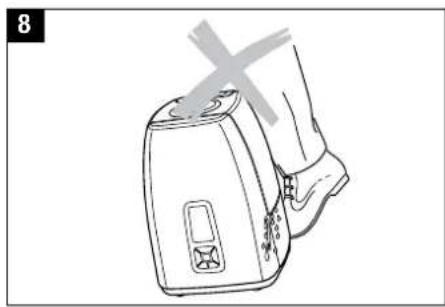
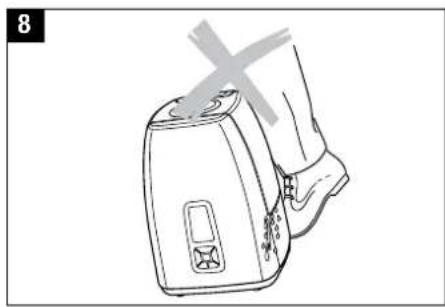
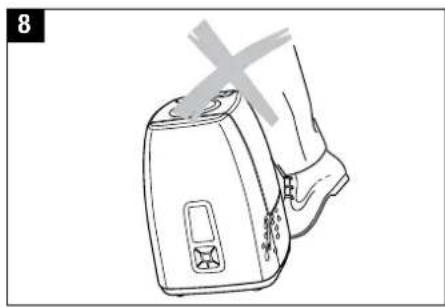
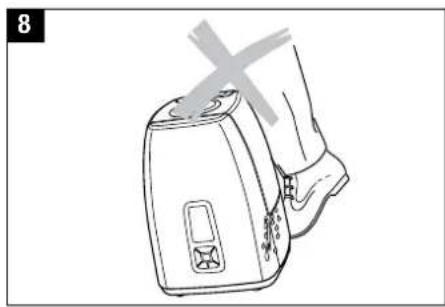
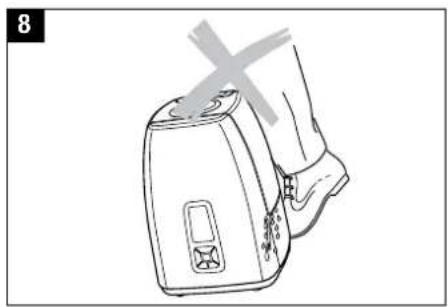
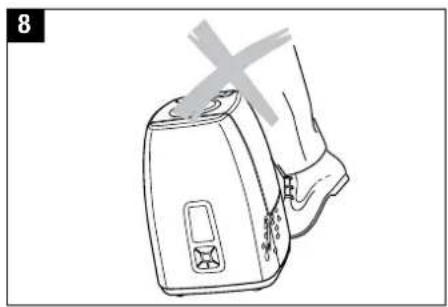
- Position the appliance where it cannot be easily knocked over (8).
- Always disconnect from the mains power when not in use.
- Do not run the power cord under a carpet or other objects. Position the appliance so that you will not trip over the cord.
- Do not use the appliance in areas where combustible materials, gases or vapours are present.
- Do not expose the appliance to rain, and do not use it in damp locations.
- Do not insert foreign objects in the device.
- Do not block the air intake or mist outlet.
- Do not sit, stand or place any heavy objects on the appliance.
- The use of fragrances, such as essential oils, water conditioners and aromas will damage your appliance! Appliances that are damaged by such additives will not be covered by the manufacturer's warranty.
- The high frequency vibrations cannot be heard by humans or animals, and are completely safe.


Unpacking
- Carefully remove the unit from its box.
- Remove the unit from the plastic bag.
- Warning: the mist outlet is packed in a red bag inside the box insert. Make sure that you remove the mist outlet from the packaging.
- Review the information given on the rating plate about the mains supply.
- Use the original packaging for storing the appliance if you do not use it all year round.
Putting into operation
Find the ideal location for your appliance:
- Do not place it directly next to a radiator or on a floor with underfloor heating. The moisture in the mist can damage the floor surface (6 and 7) (see Safety Instructions).
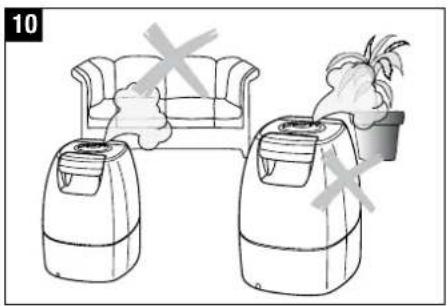
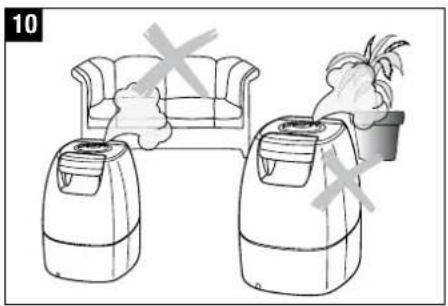
- The mist outlet must not be pointed directly at plants or other objects. Keep a distance of at least 50 cm) (10).
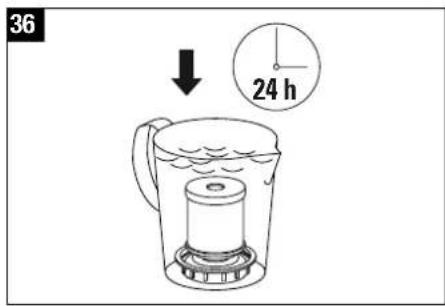
- Soak the demineralisation cartridge in a bowl of water for at least 24 hours before using it. The resin has to absorb water to achieve full performance.
- On average the demineralisation cartridge should be replaced every 2 – 3 months. This interval can be shorter or longer depending on the hardness of your water.
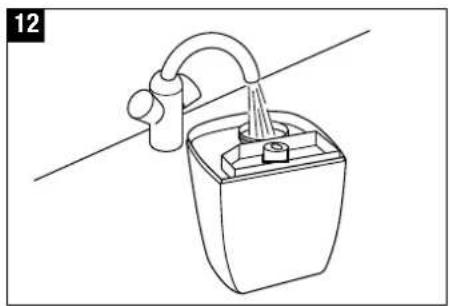
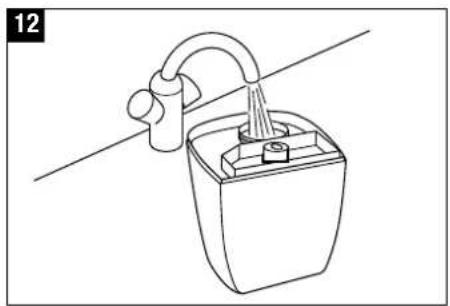
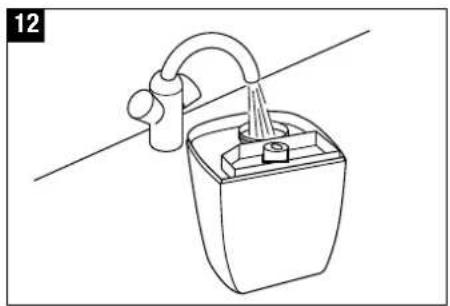
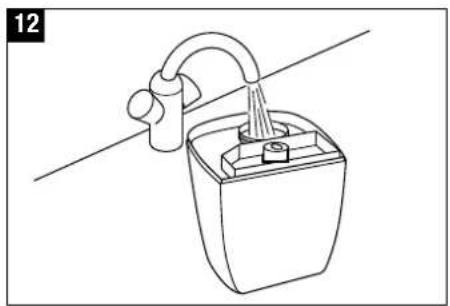
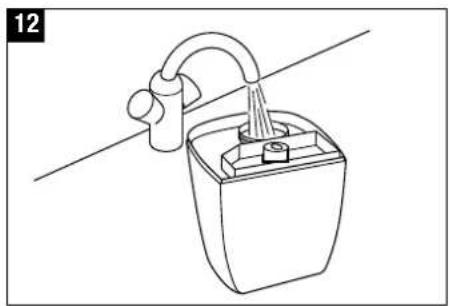
- Read the instructions under «Filling the Tank» for filling the water tank (12).
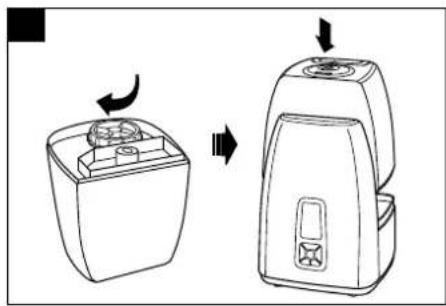
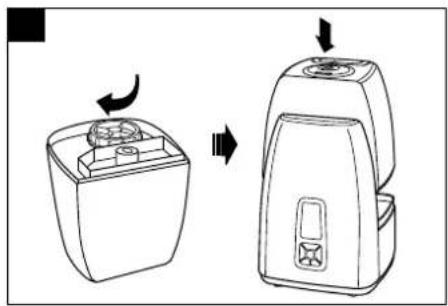
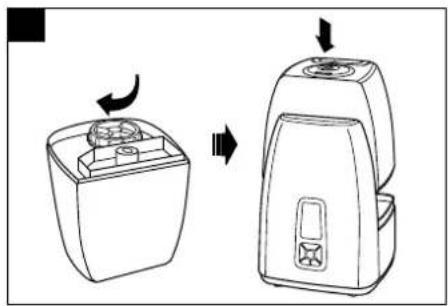
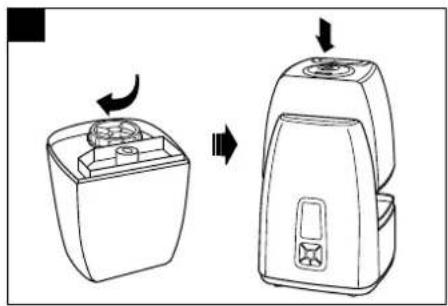
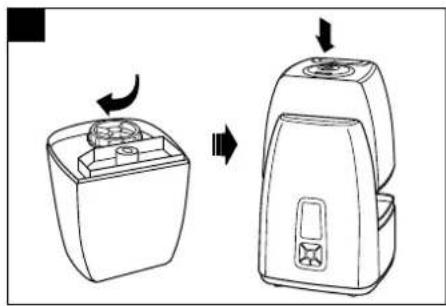
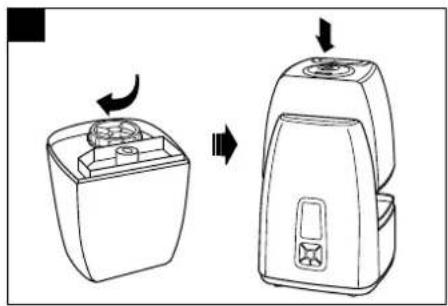
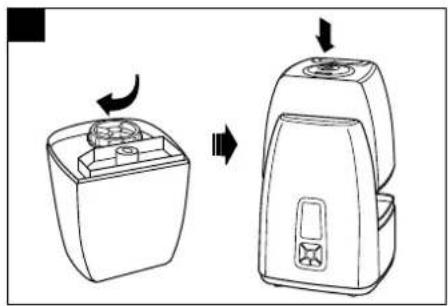
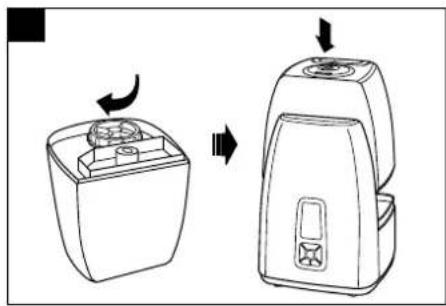
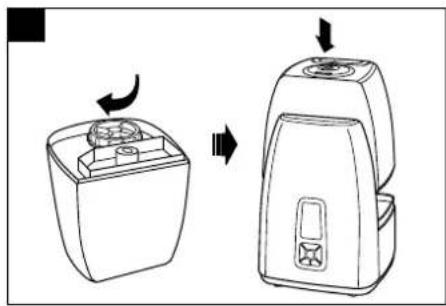
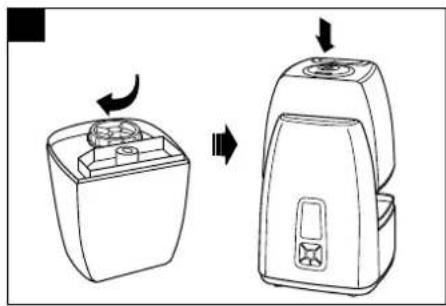
- Place the water tank onto the base and insert the mist outlet (13).
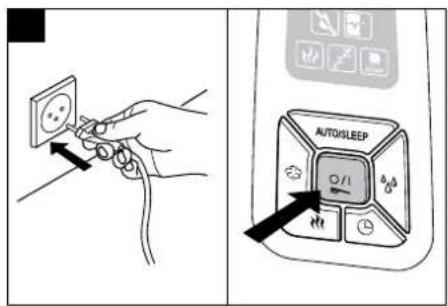
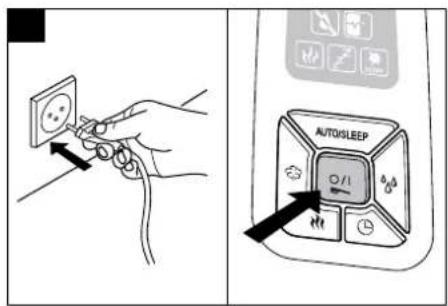
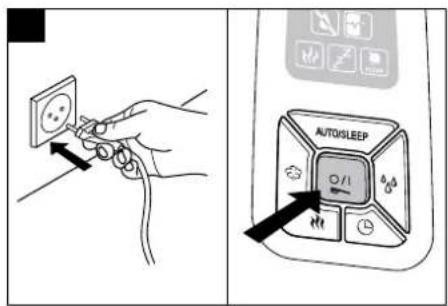
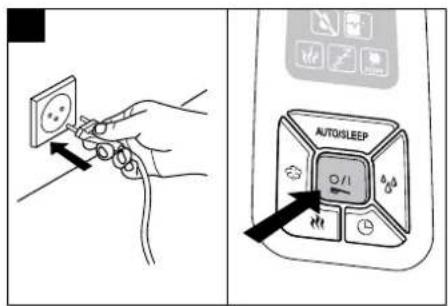
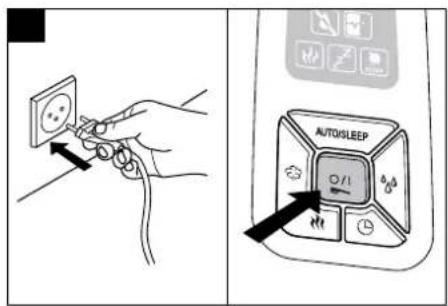
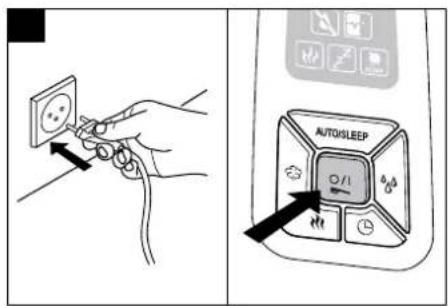
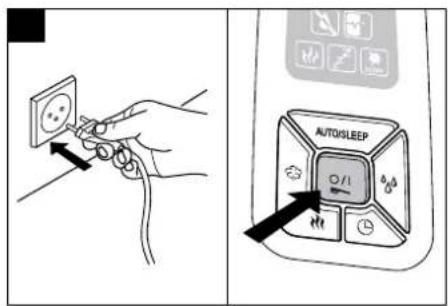
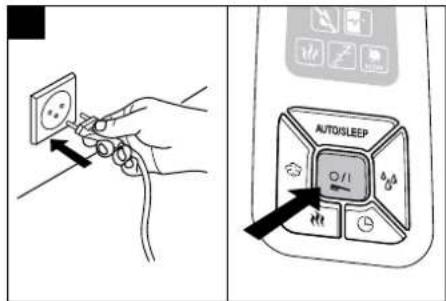
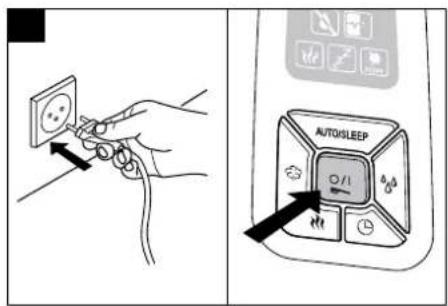
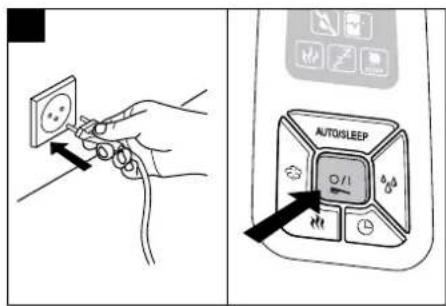
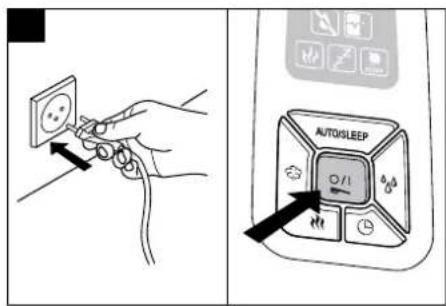
- Insert the plug into the mains socket and switch on the appliance using the on/off switch (15).
- The appliance will reach full capacity about 10 to 15 minutes after been switched on.
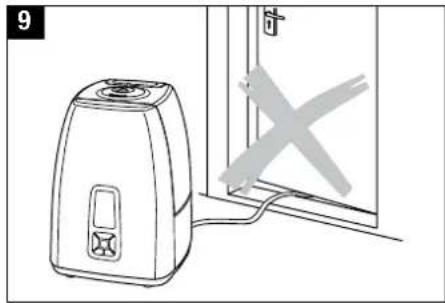
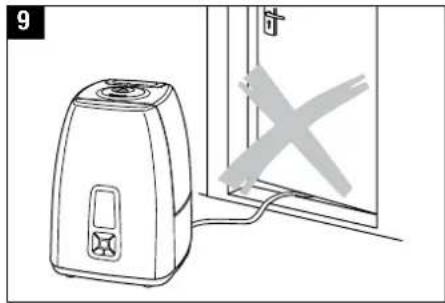
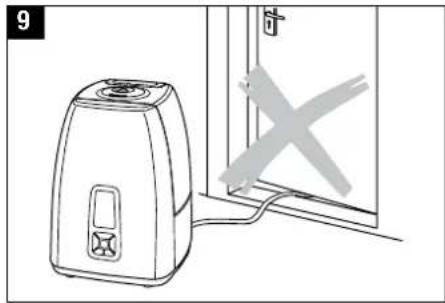
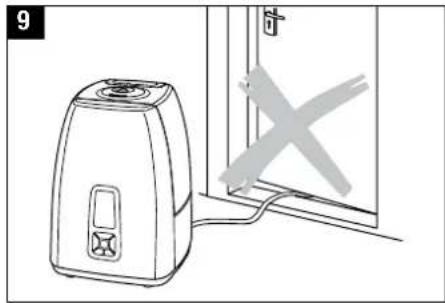
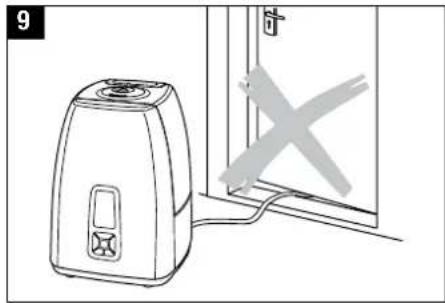
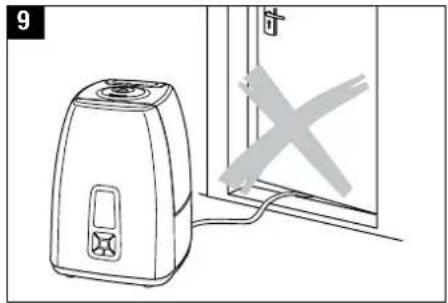
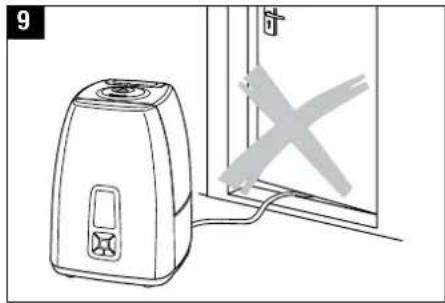
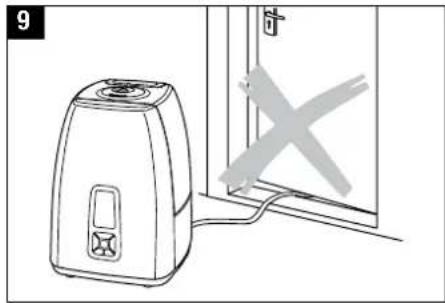
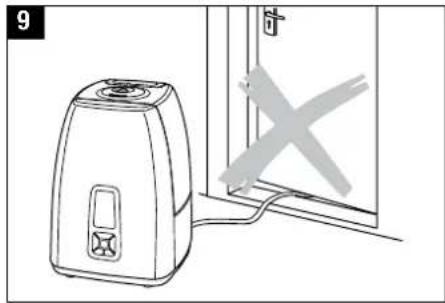
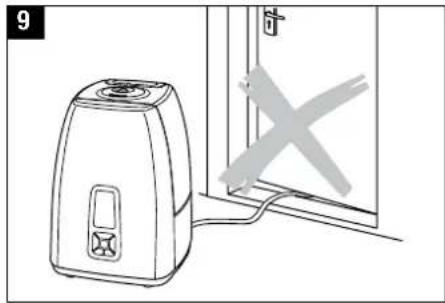
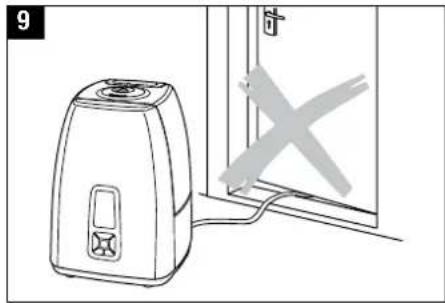
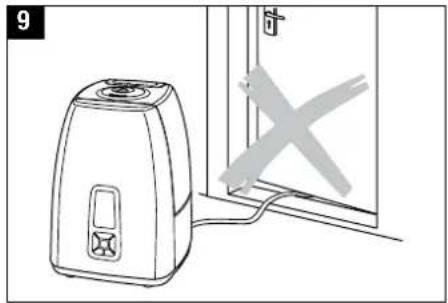
- Make sure that the power cord is not pinched anywhere (9). Do not operate the appliance if the cord is damaged (2).
Description of the appliance
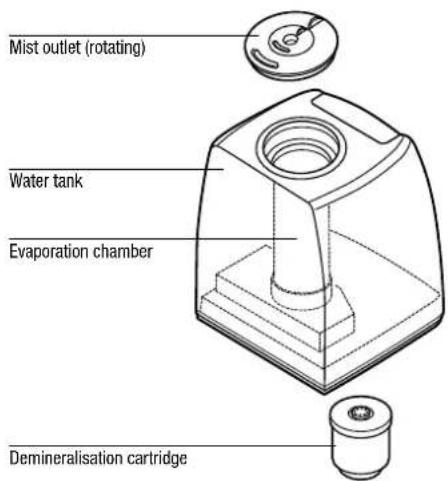
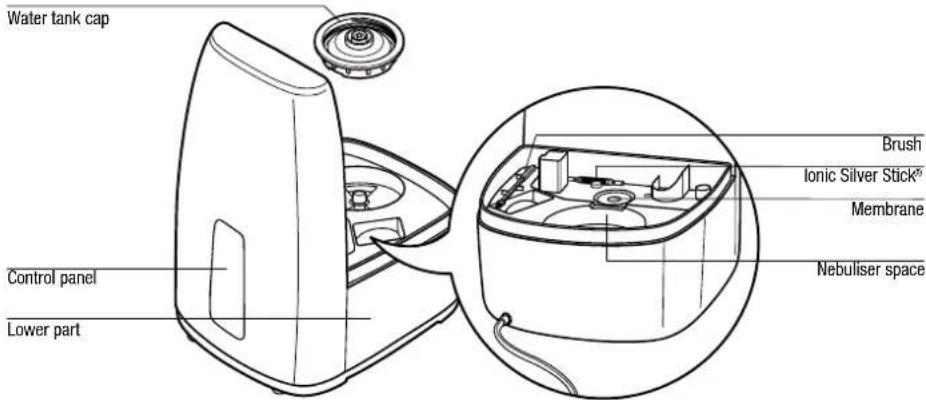
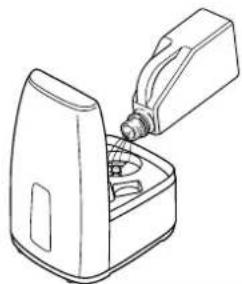
Filling the tank

Always switch off the appliance before removing the water tank. Do not reach inside the nebuliser space while the appliance is running!
Do not operate the appliance when the water tank is empty! When the water reaches the minimum level, the unit switches off automatically.
- Make sure that there are no foreign objects inside the water tank.
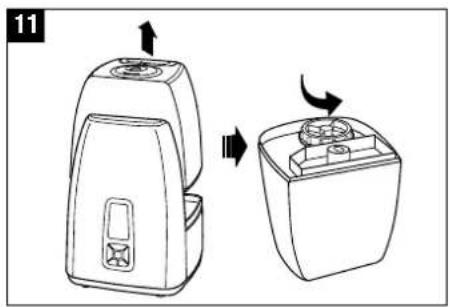
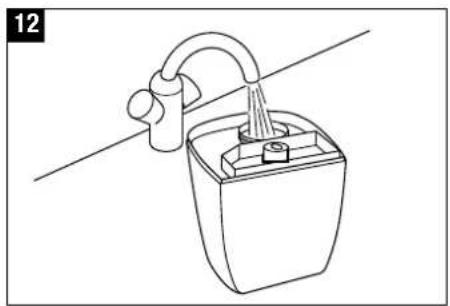
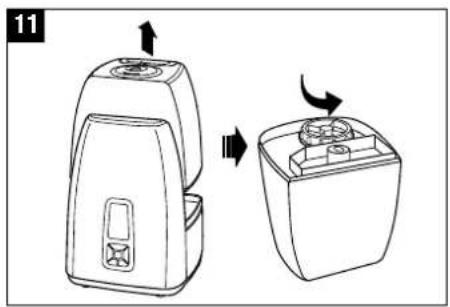
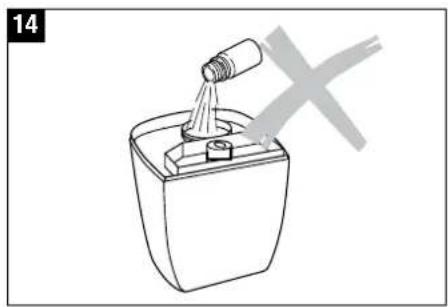
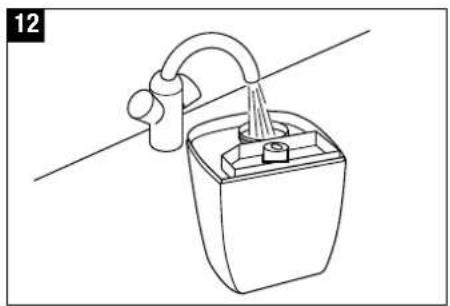
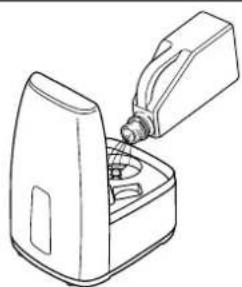
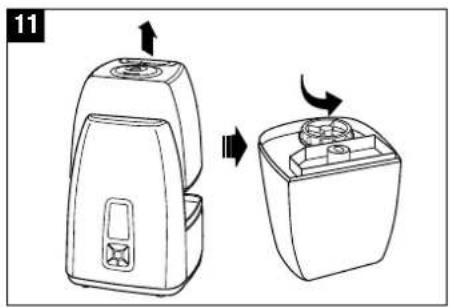
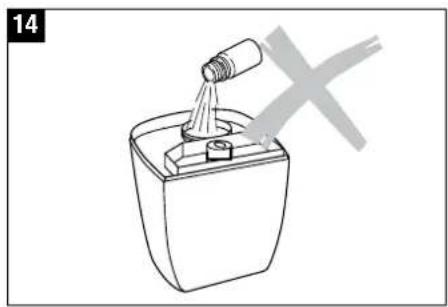
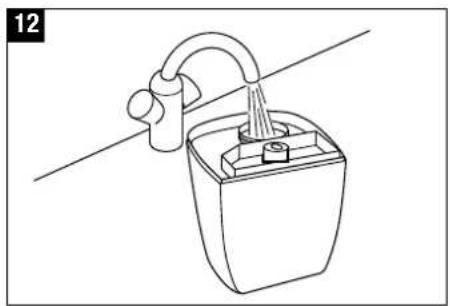
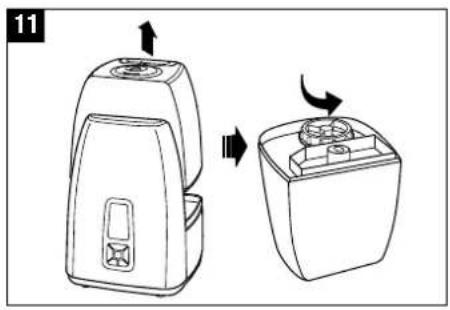
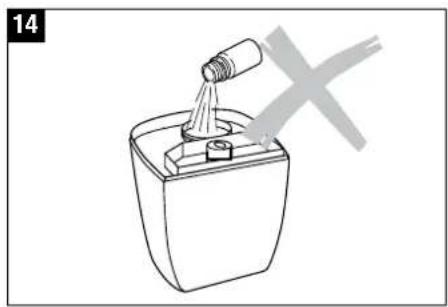
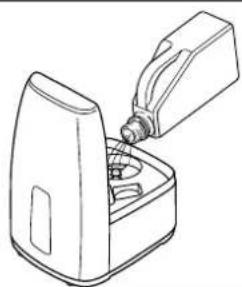
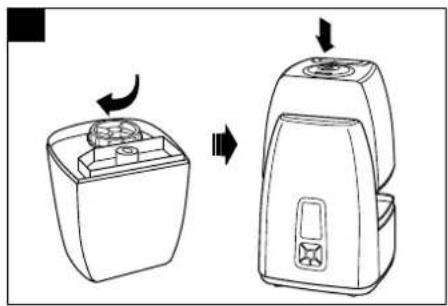
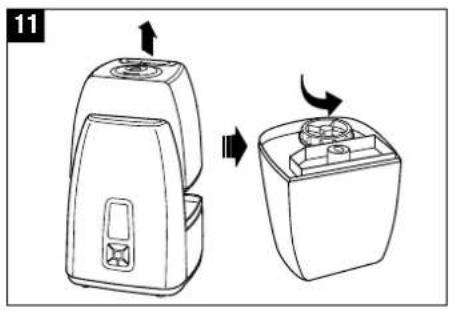
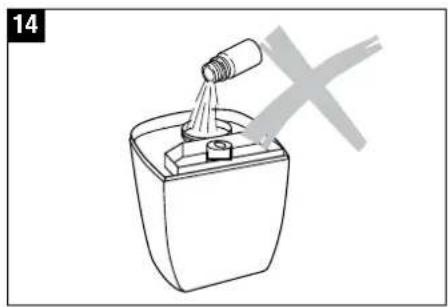
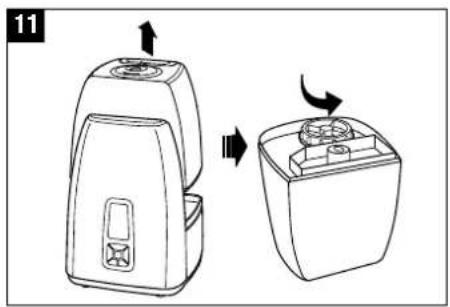
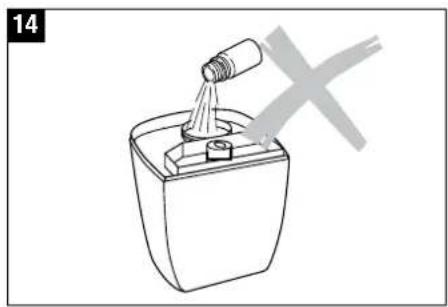
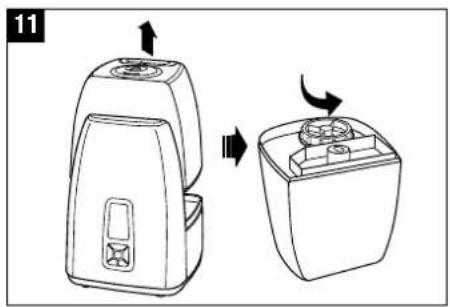
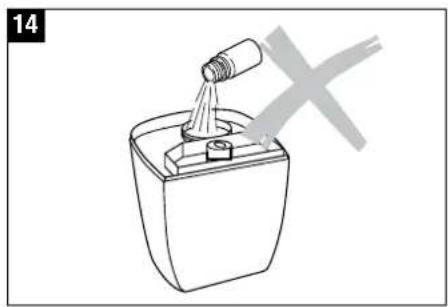
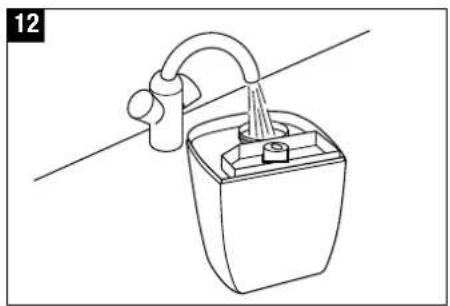
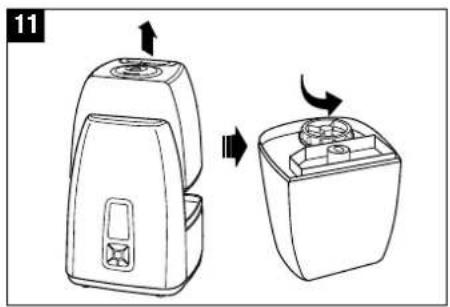
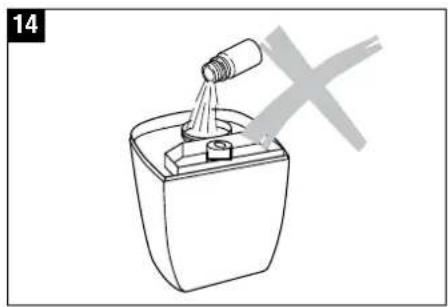
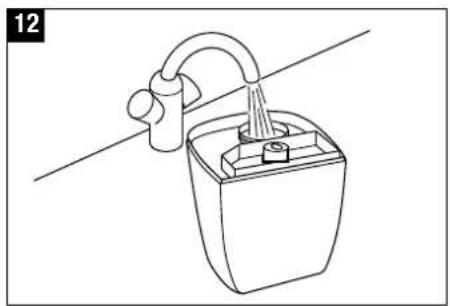
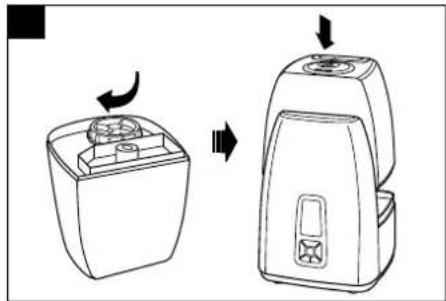
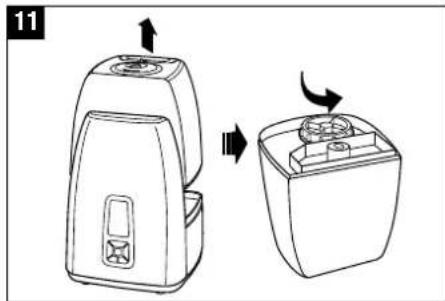
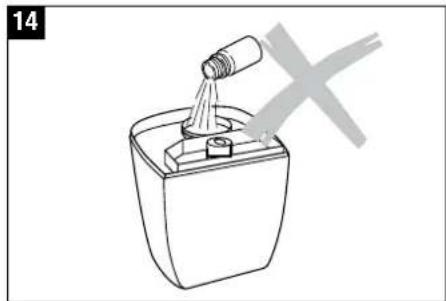
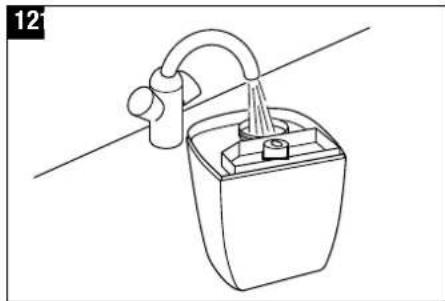
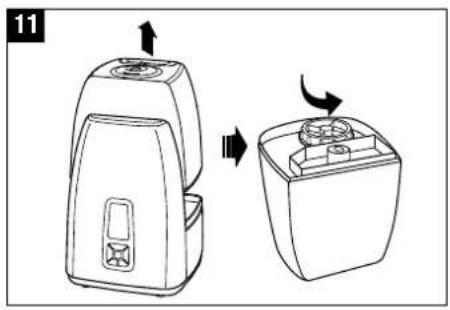
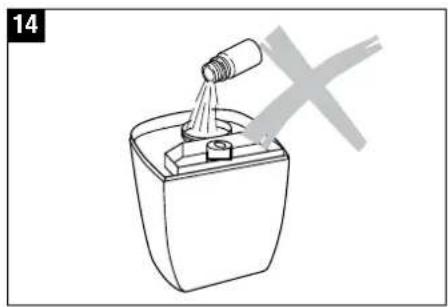
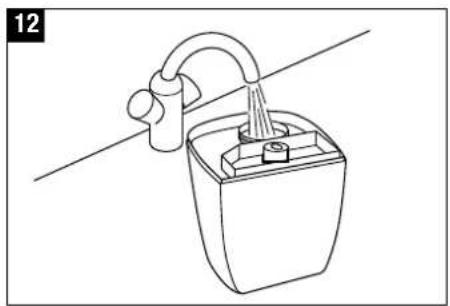
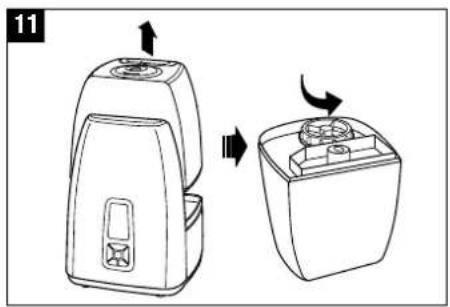
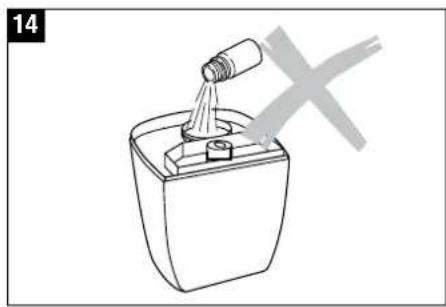
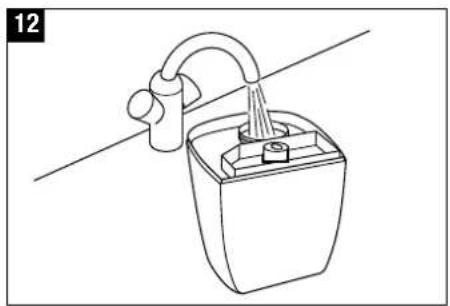
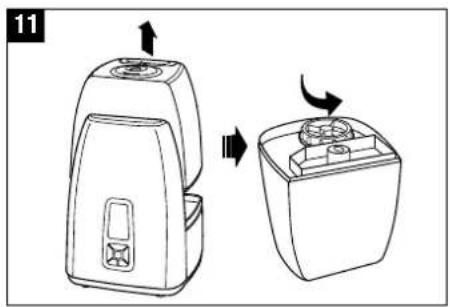
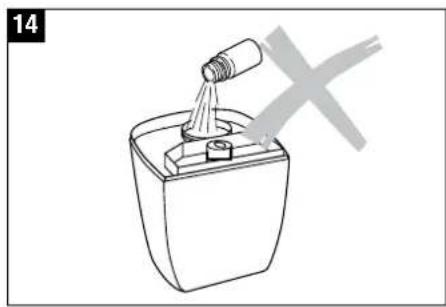
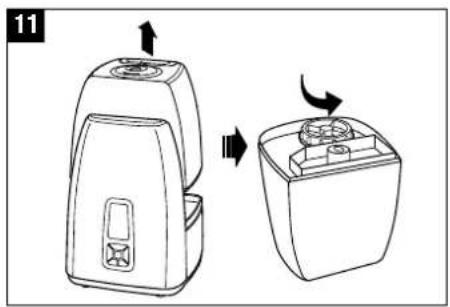
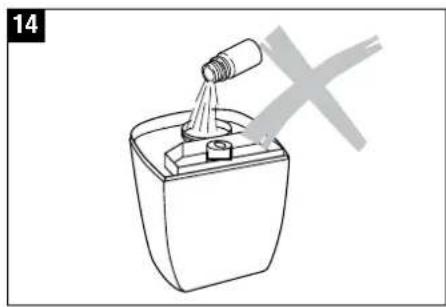
- Remove the water tank cap from the tank (11) (Warning: mist outlet is loosely inserted!). Fill the tank with clean, cold tap water (12). Close the cap of the water tank securely! Place the water tank onto the base and insert the mist outlet (13). Do not add any additives to the water (14)!
- Insert the plug into the power socket and switch on the appliance (15).
Water quality maintenance
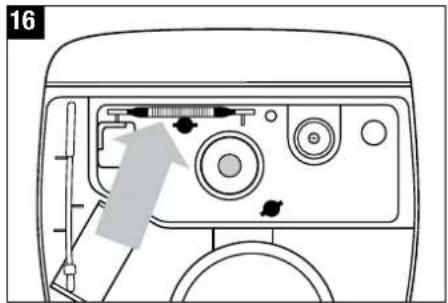
The innovative Ionic Silver Stick® (16) uses the proven antibacterial properties of silver to keep the water free from harmful bacteria and germs. The Ionic Silver Stick releases silver ions into the water over a period of more than one year. It is self-renewing and needs no maintenance. Look at picture 16 for the position of the ISS in the appliance. Do not reach inside the nebuliser space during operation. Switch off the unit first.
Use of fragrances
Water additives (e.g. essential oils, fragrances, water conditioners etc.) must NOT be used! Even a small amount can cause damage to the tank material. The material is not suitable for the use of such additives. One drop is enough to damage the tank and render the appliance unusable. Appliances that are damaged by such additives will not be covered by the manufacturer's warranty.
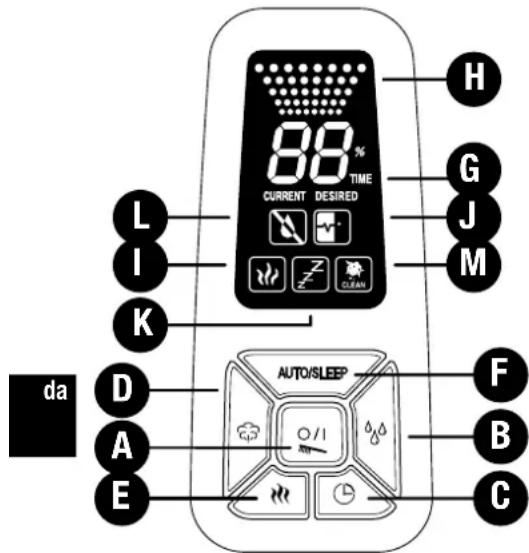
Operation U7144 tons are pressed, the unit will no longer for seconds or sleep
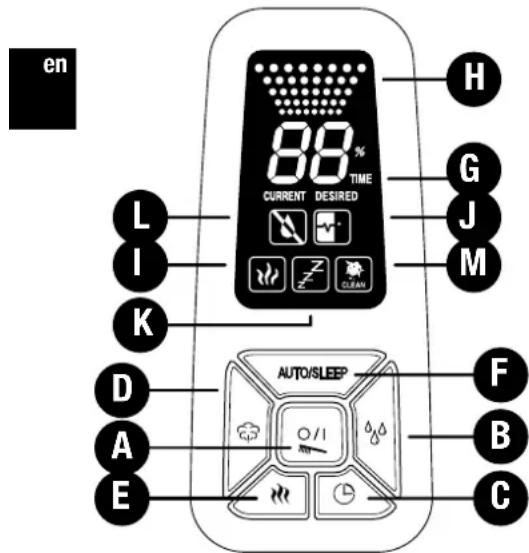
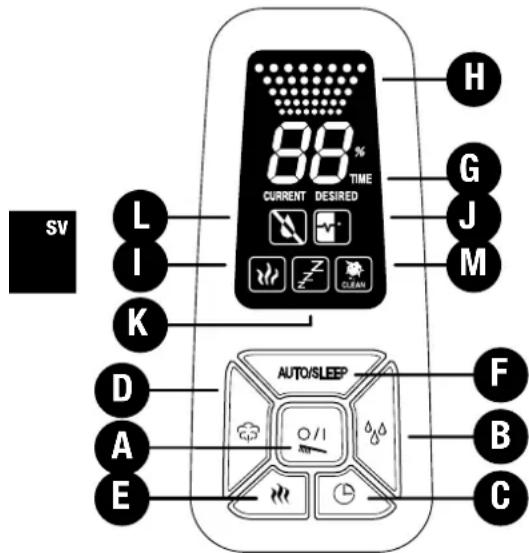
A) Switching on/off
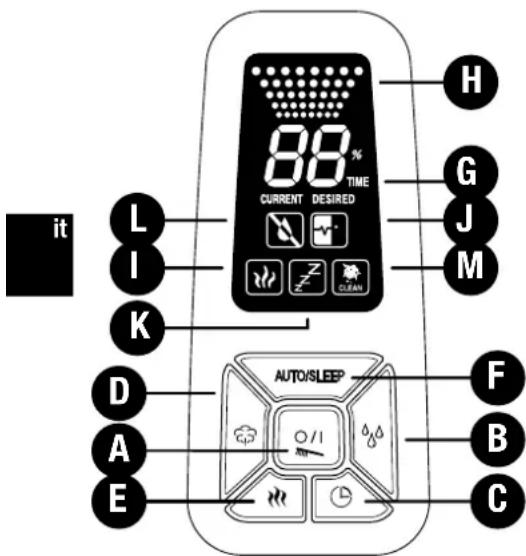
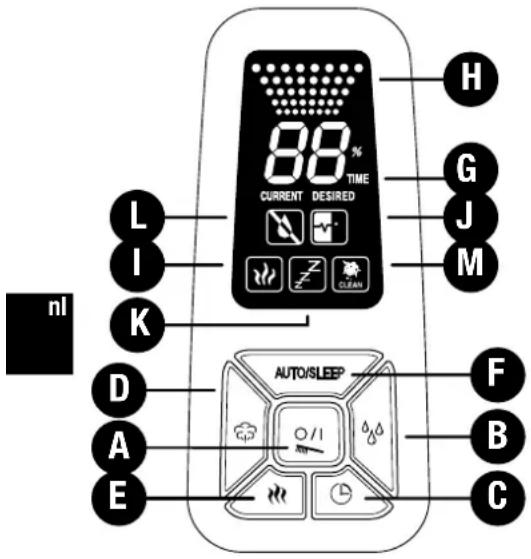
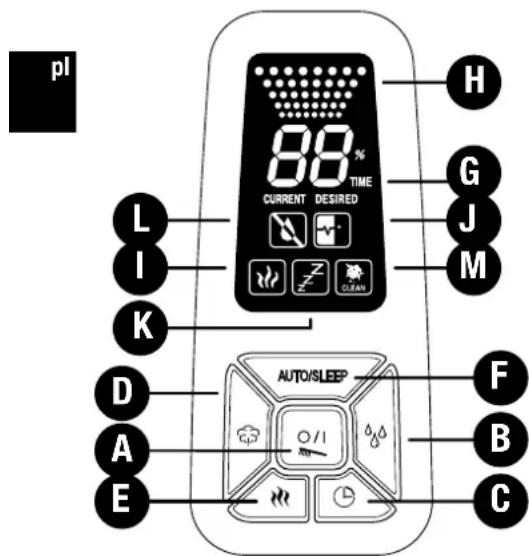
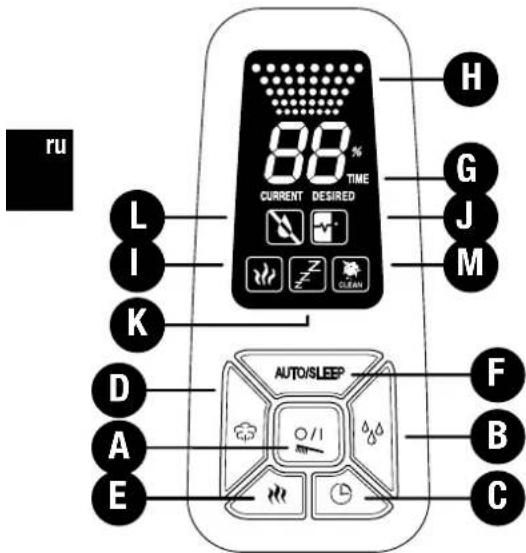
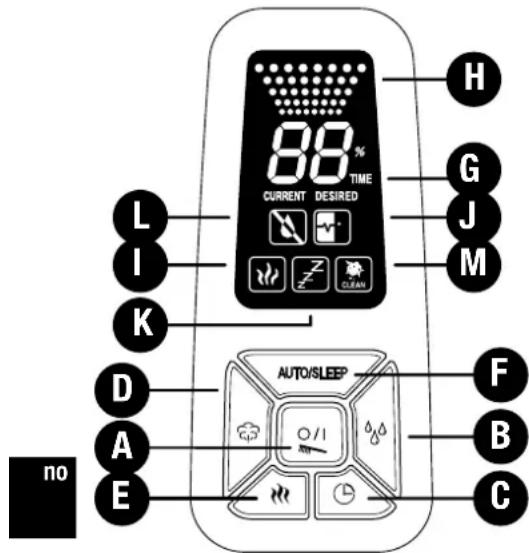
You can switch the unit on or off by pressing button A. This button is also used to reset the cleaning indicator light (by holding down).
B) Hygrostat (pre-set moisture level)
By pressing button B you can set the desired moisture level in %. A relative moisture of between 40 and 60% is recommended. The accuracy of measurement is +/- 5%. The unit will switch off when the moisture level exceeds the desired setting. During selection the target value is displayed. The display will automatically show the current value after a
C) Timer
Using button C, the operation time can be set - adjustable between 1 and 8 hours, or continuous operation. Letter G shows the operating period that has been set (1h/2h/3h/4h/5h/6h/7h/8h). The display will automatically show the current value after a few seconds.
D) Controlling mist output and Evaporator output
By repeatedly pressing button D you can control the mist output. The LO/ME/HI display (H) shows which of the three levels (low/medium/high) you have selected.
E) Operation with pre-heating
Button E is used for switching the pre-heating on and off (letter I lights up). As a result, the water is pre-heated to a temperature of 80 °C before entering the nebuliser space. It takes approx. 10 to 15 minutes for the water in the base to warm up. The mist now leaves the nebuliser space at a pleasant temperature of 40 °C. The advantage of this is that the room temperature does not drop and, in addition, it significantly improves the water quality maintenance (bacteria are killed).
F) Auto/Sleep
The automatic and sleep modes can be activated by pressing button F. By pressing the button once, the automatic function is switched on (letter J appears on the display), maintaining the optimum humidity subject to the temperature. Control takes place by means of output quantity and pre-set target value. If the sleep function is switched on (the letter K appears on the display), the target humidity is 60%; the operation time is automatically set at 6 hours; the heating is switched on. In addition, the output quantity is also controlled subject to the difference between the target value and the actual value.
The Timer cannot be changed in either mode. If other but-
mode.
L) Empty indicator
The transparent water tank makes it possible to see the water level well. Furthermore, the unit shows on the display (L) when water should be added.
Please read the chapter «Filling the tank» for more information. The symbol L may stay illuminated for some seconds with a refilled tank until the base is filled with water.
M) Cleaning indicator
If symbol M and «CLEAN» appear on the display, the appliance should be cleaned as recommended by the manufacturer. This symbol comes on automatically every 2 weeks, depending on the level of use. The display can be cancelled by depressing button A for between 10 and 15 seconds.
Cleaning/Maintenance

Always switch the appliance off before removing the water tank. Do not reach inside the nebuliser space while the appliance is running!
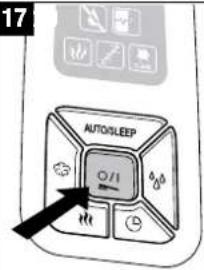
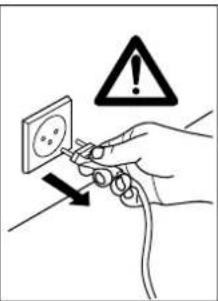
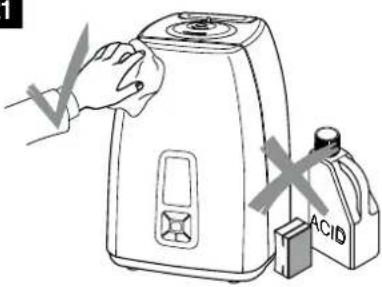
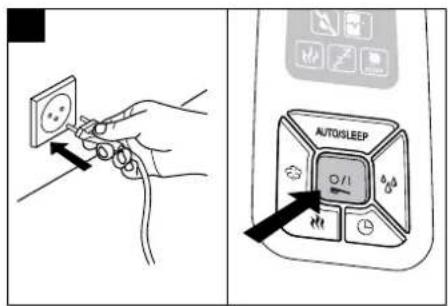
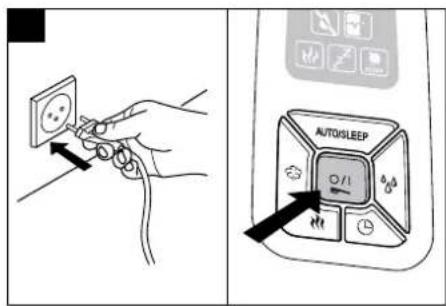
- Switch off the appliance and remove the plug from the mains socket before cleaning (17).
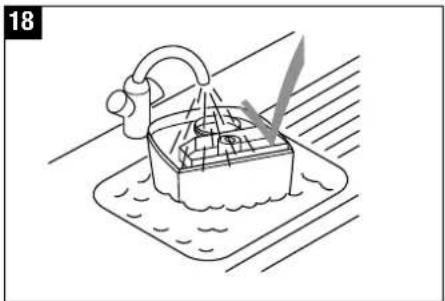
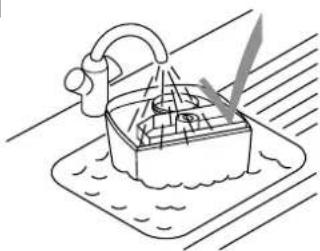
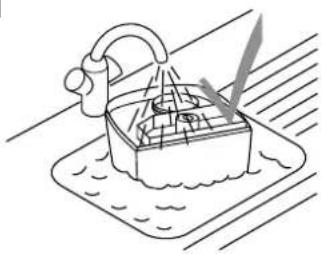
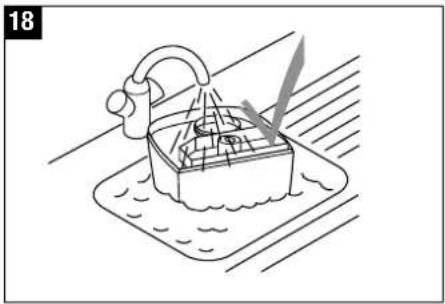
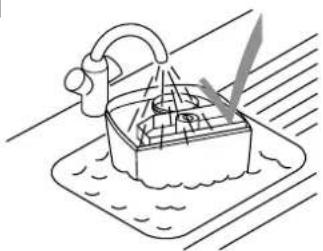
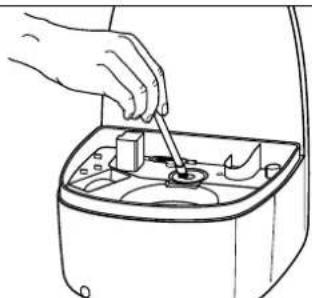
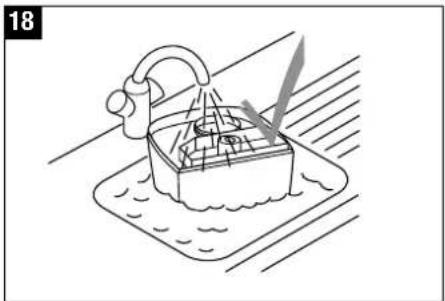
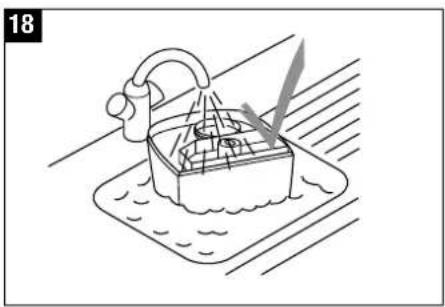
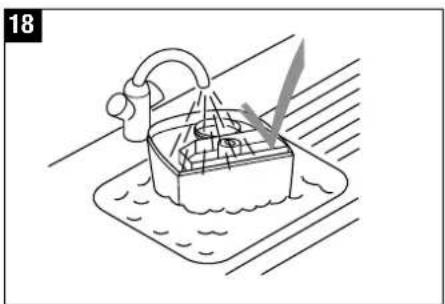
- Clean the water tank and the nebuliser space regularly once a week (use only water, without detergent) (18).
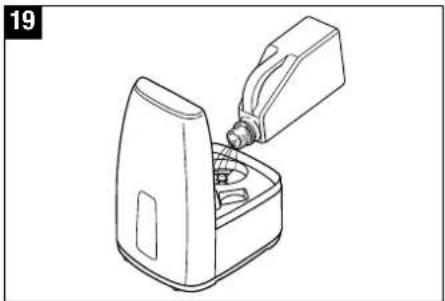
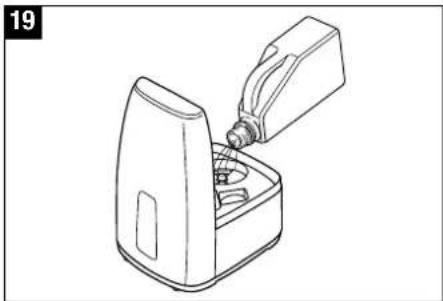
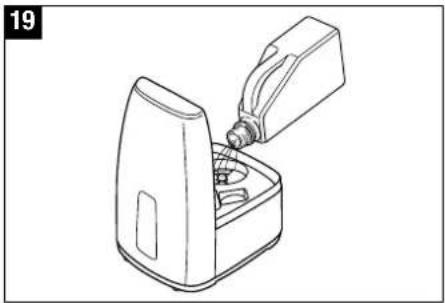
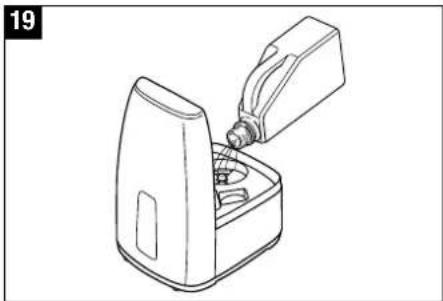
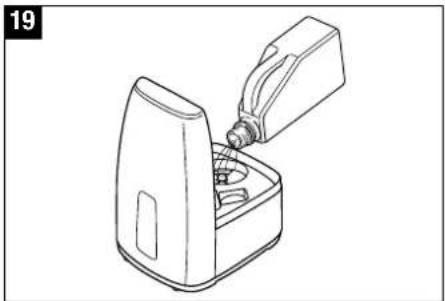
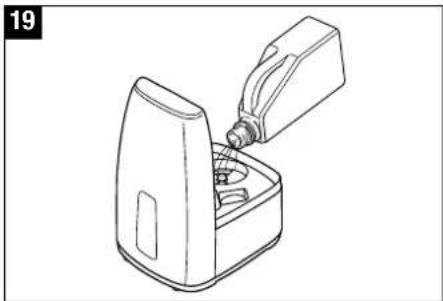
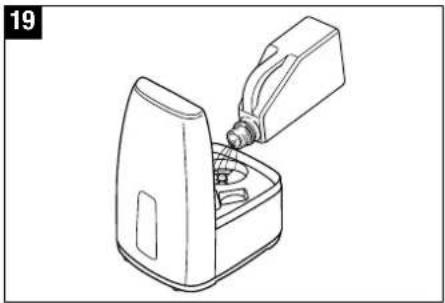
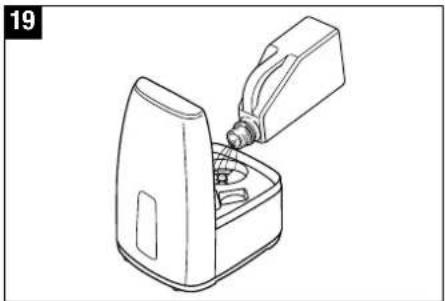
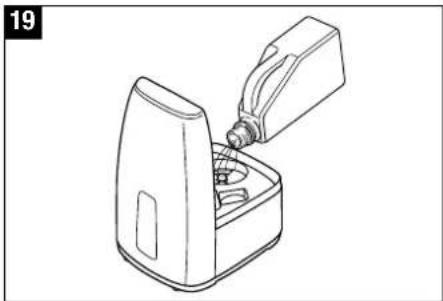
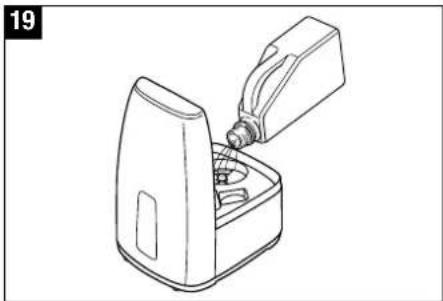
- Please decalcify the water base regularly using commercially available decalcification agents (19). Rinse out the decalcification agent thoroughly with plenty of water.
Important
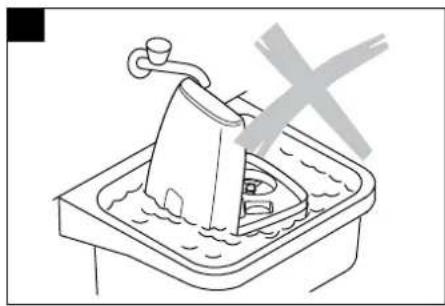
- Make sure that no water gets into the lower part of the main body (20).
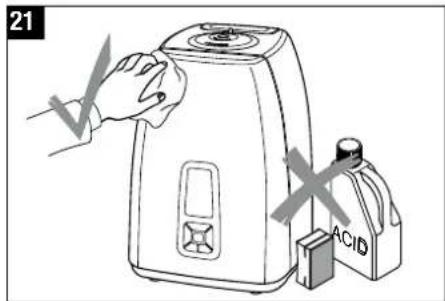
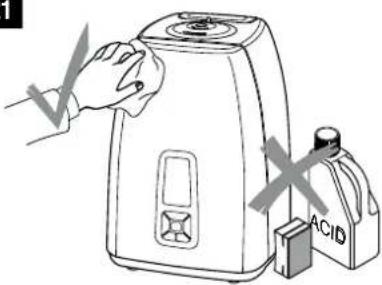
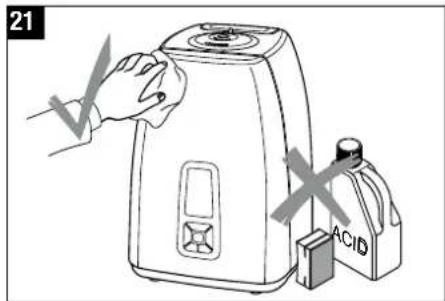
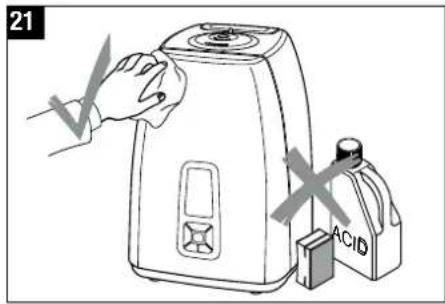
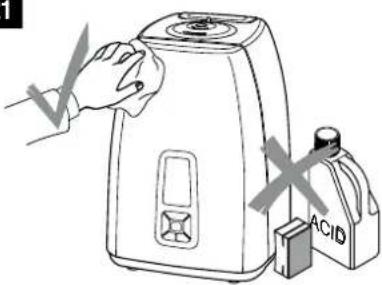
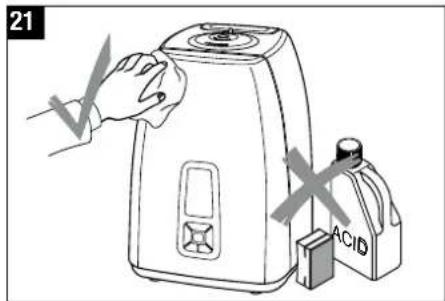
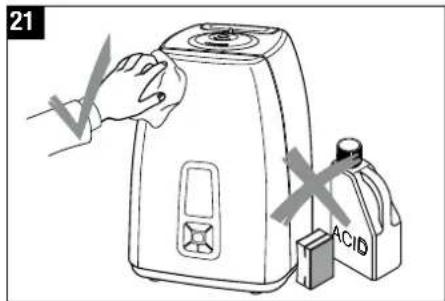
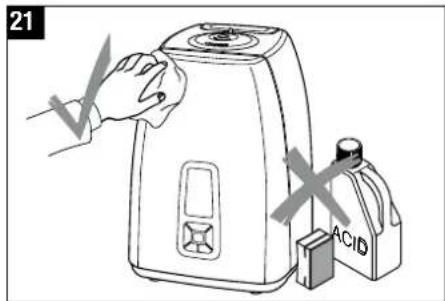
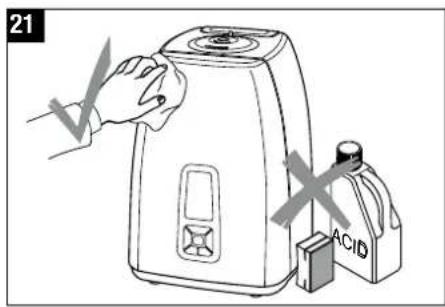
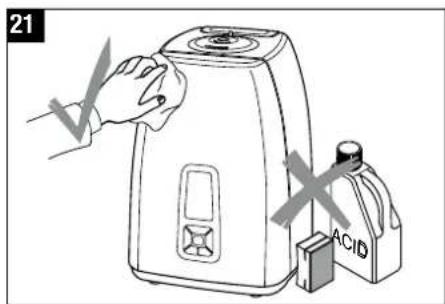
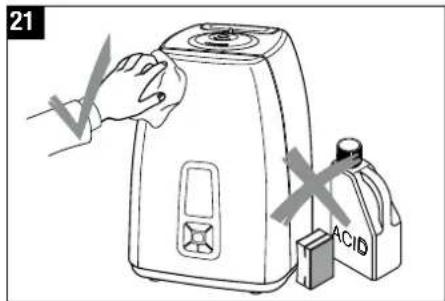
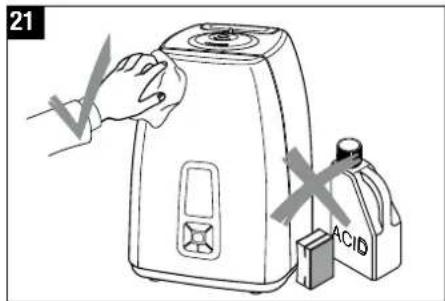
- Clean the inner parts with a soft cloth. Never use benzene, window cleaners or solvents (21).
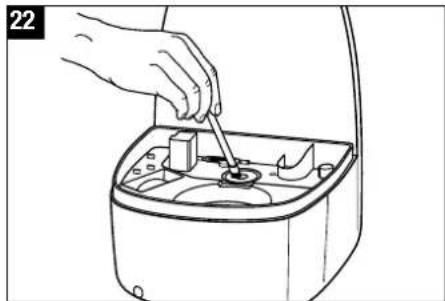
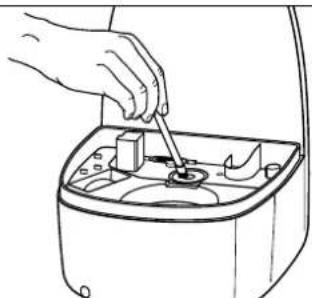
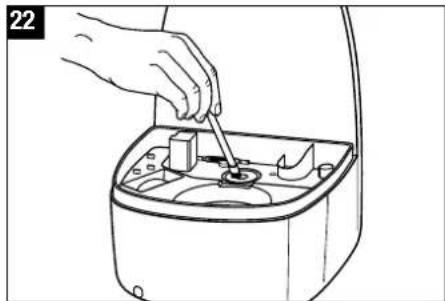
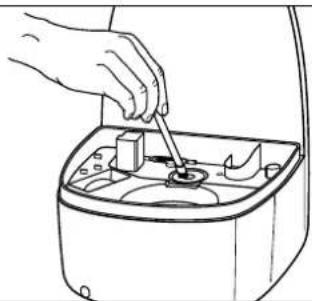
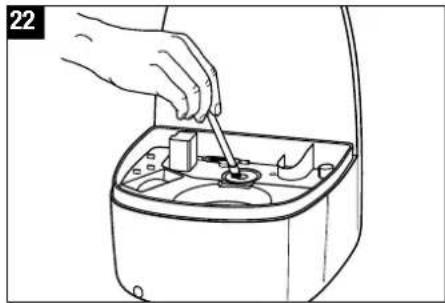
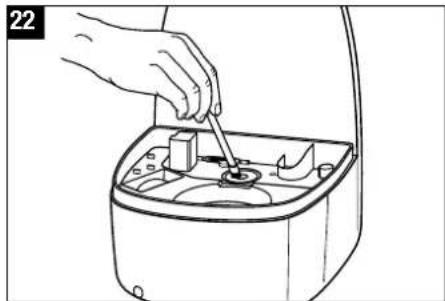
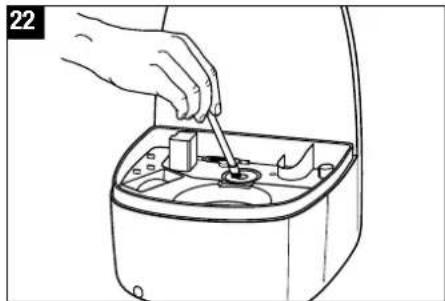
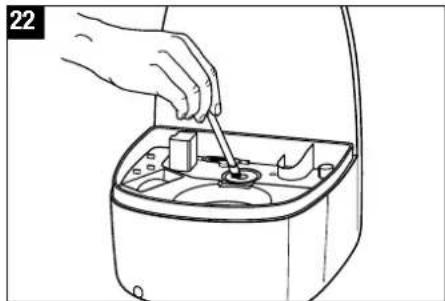
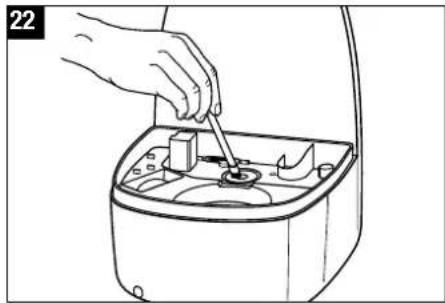
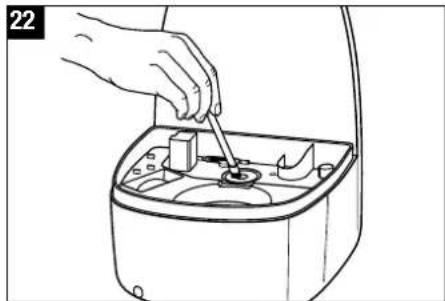
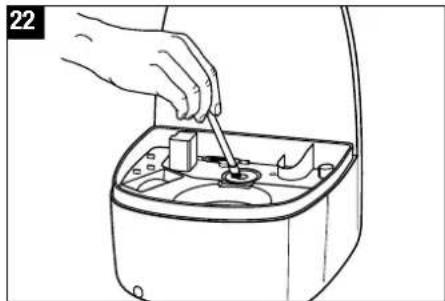
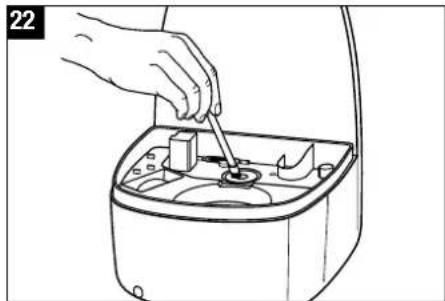
- Only use the brush to clean the membrane (22). This should be done once a week.
- Change the water in the tank at least once a week.
17
18
∴ m = 3/11
19
21
22
Replacement of the demineralisation cartridge

Always switch off the appliance before removing the water tank. Do not reach inside the nebuliser space while the appliance is running!
The cartridge must be replaced every 2 – 3 months. If the water is very hard, it may be necessary to replace the cartridge earlier. White dust around the appliance is a sure sign that the cartridge needs replacing. If white residues continues to form around the appliance after a new cartridge has been inserted, please make sure that the water you are using is untreated. If the water flows through a domestic decalcification system before it is used in the unit, salt will precipitate around the appliance.
Option A: Replace the resin
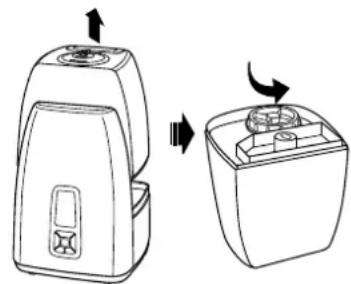
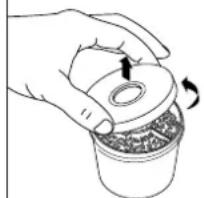
- Remove the water tank from the base and unscrew the water tank cap (23).
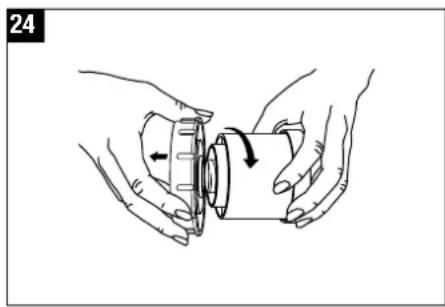
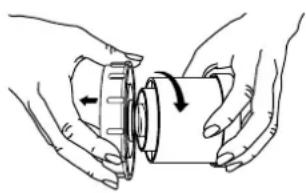
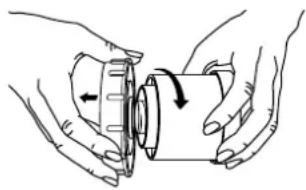
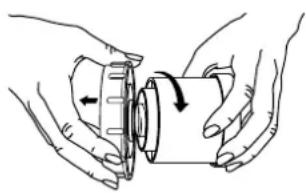
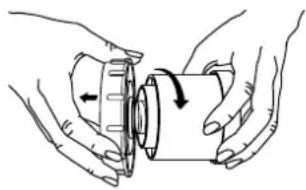
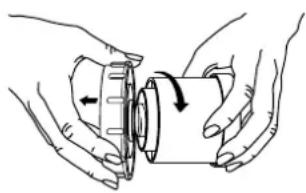
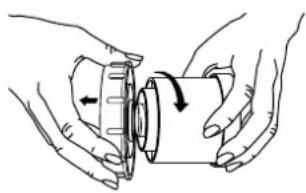
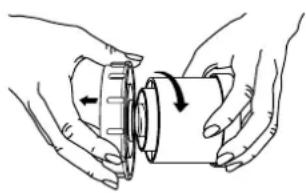
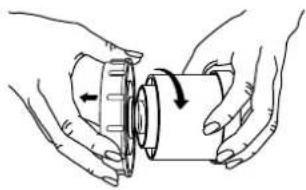
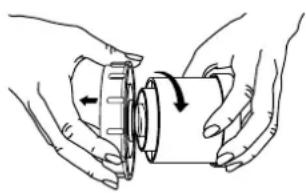
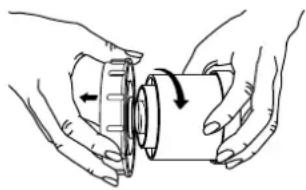
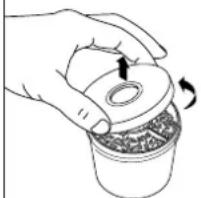
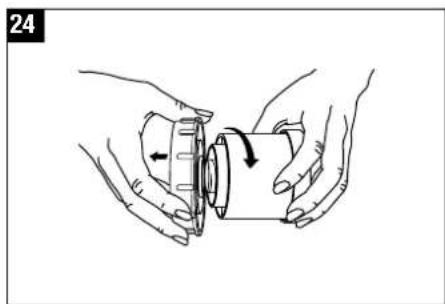
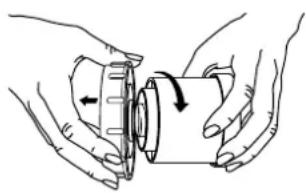
- The demineralisation cartridge is attached to the inside of the cap. Unscrew the cartridge from the cap by turning it anti-clockwise (24). Important: do NOT dispose of the tank cap!
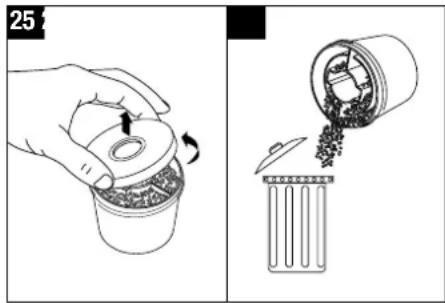
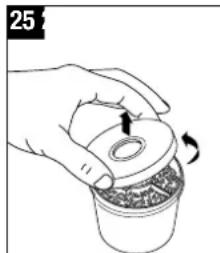
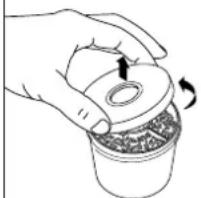
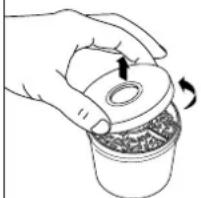
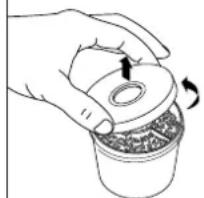
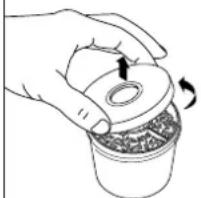
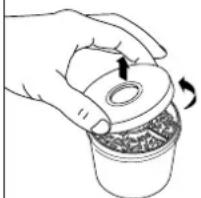
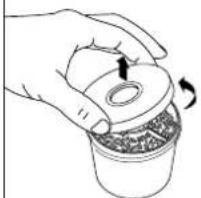
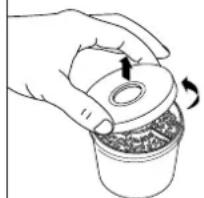
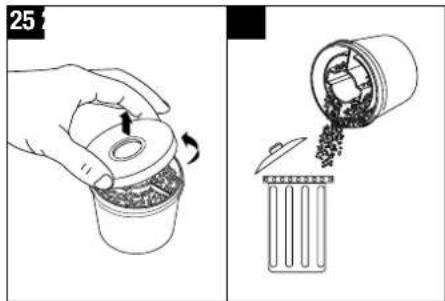
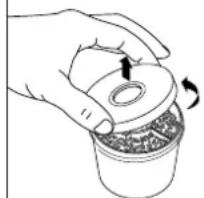
- Open the cartridge (25).
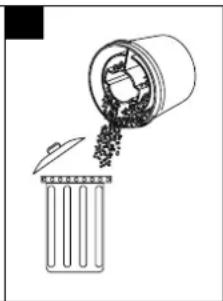
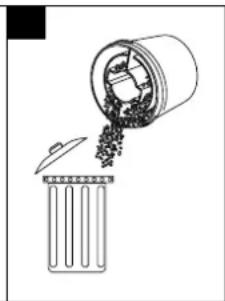
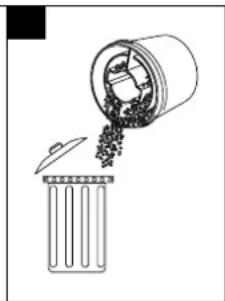
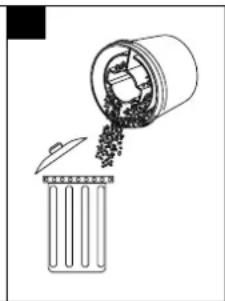
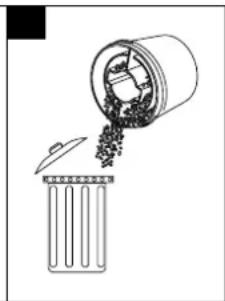
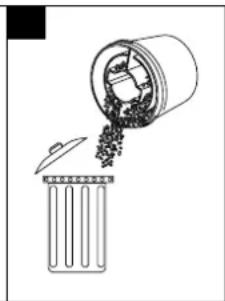
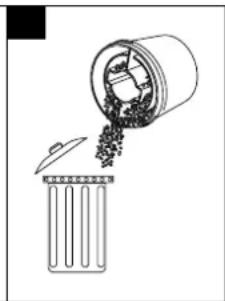
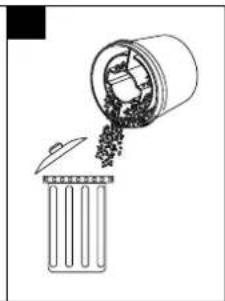
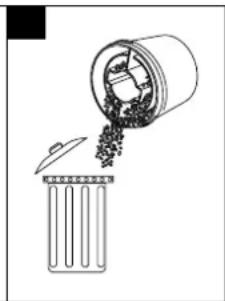
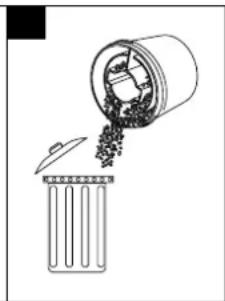
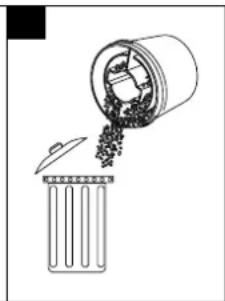
- Dispose of the contents of the cartridge (resin) (26) Caution! Resin that lands on a smooth floor can be very slippery!
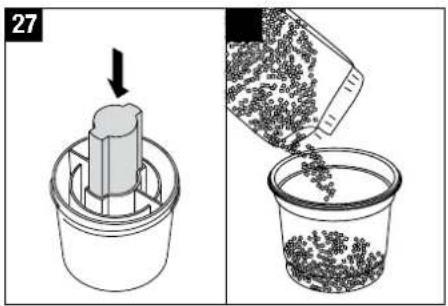
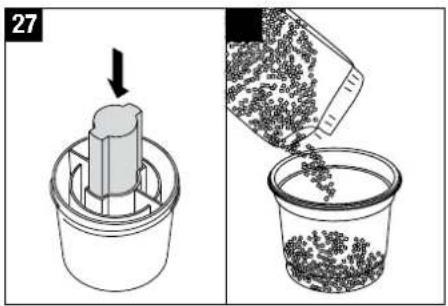
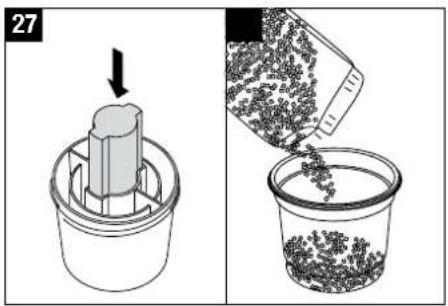
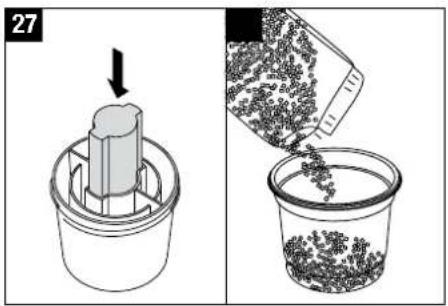
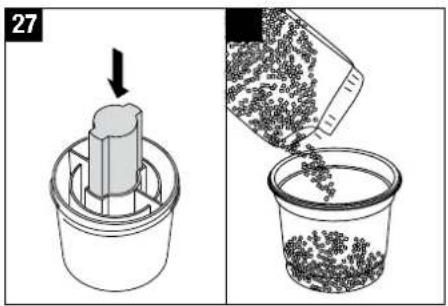
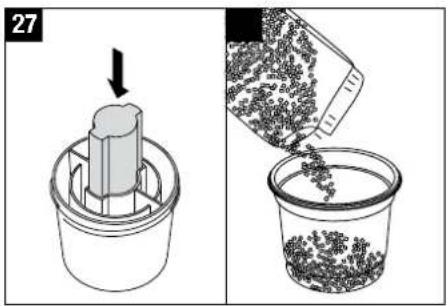
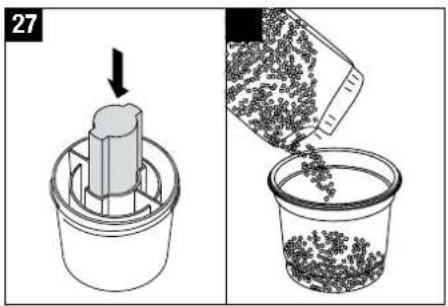
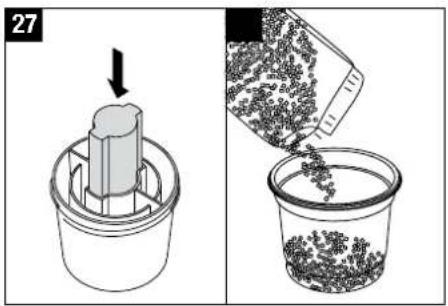
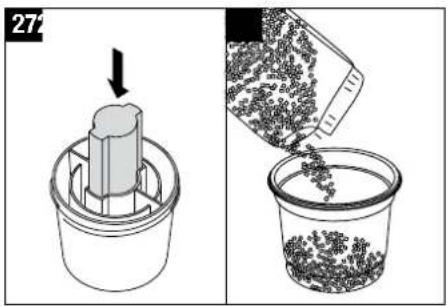
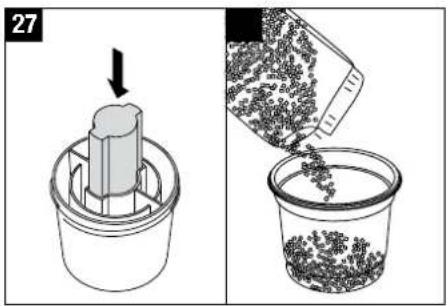
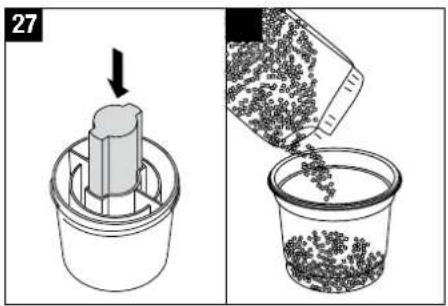
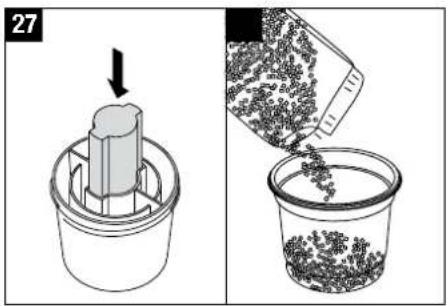
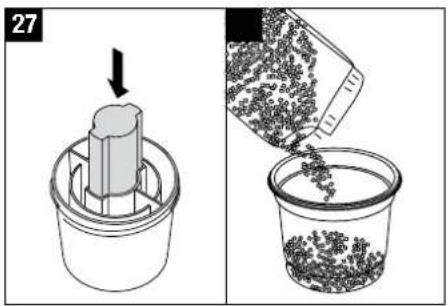
- Place the enclosed pink styrofoam piece in the center of the cartridge. Do not push it to the bottom as it will be difficult to remove afterwards (27).
- Pour the contents of one refill resin bag into the plastic cup that is included with the refill resin packaging (28).
-
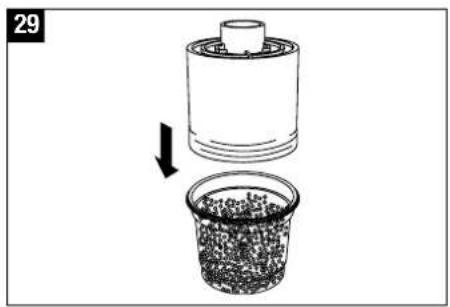
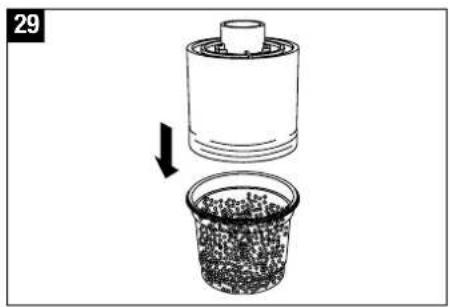
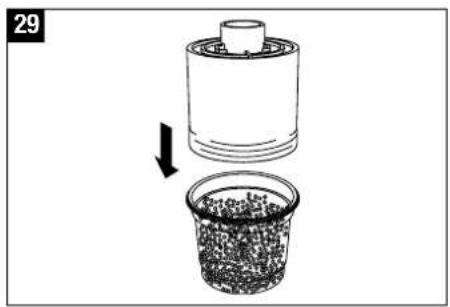
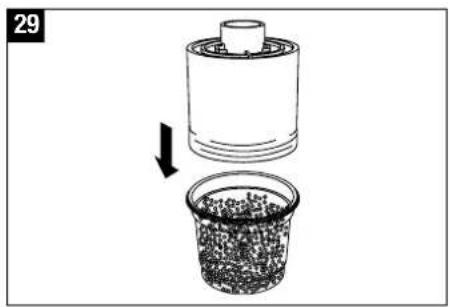
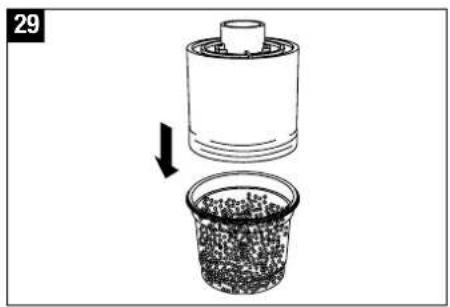
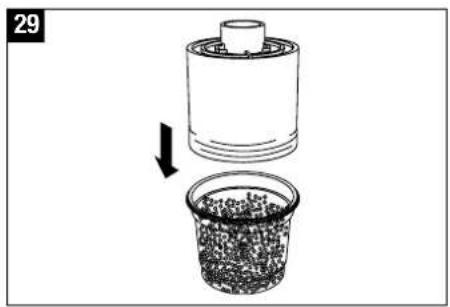
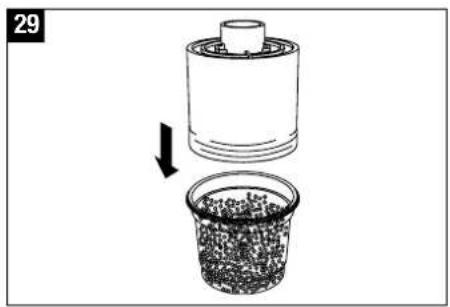
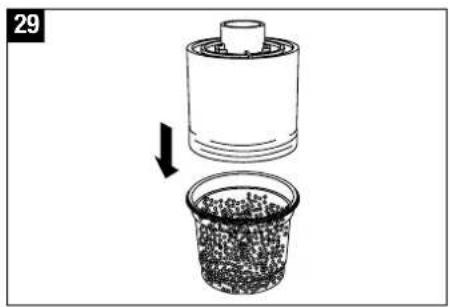
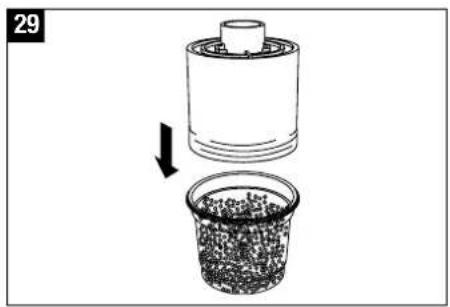
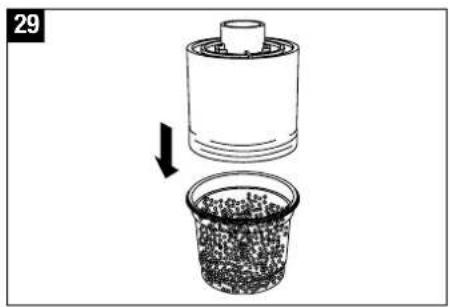
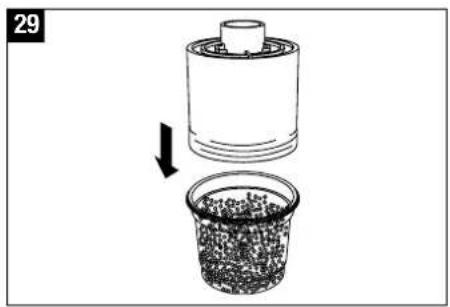
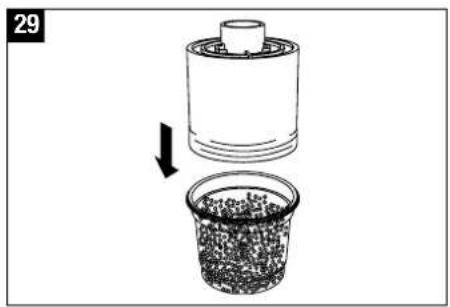
Place the empty cartridge with the plug in the center onto the plastic cup (29).
-
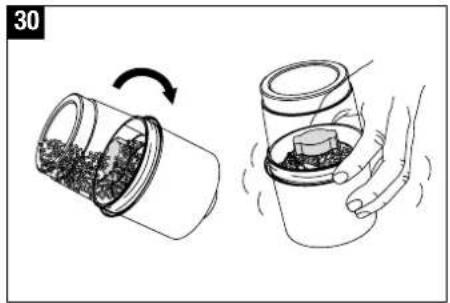
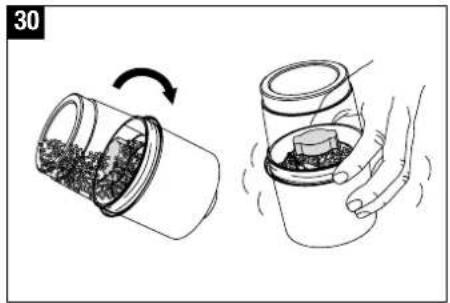
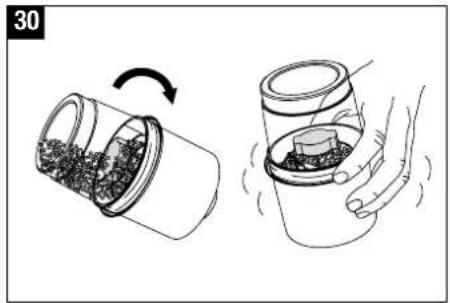
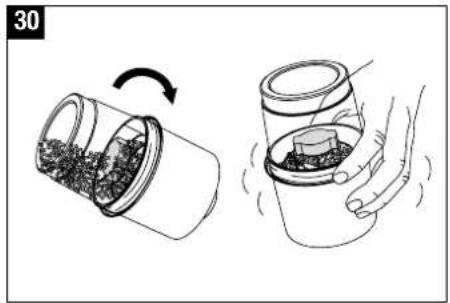
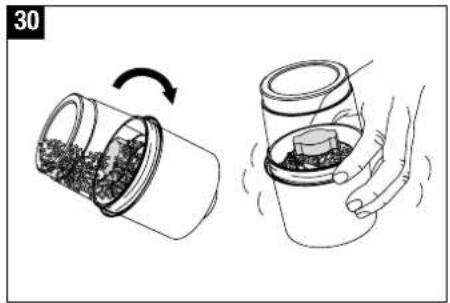
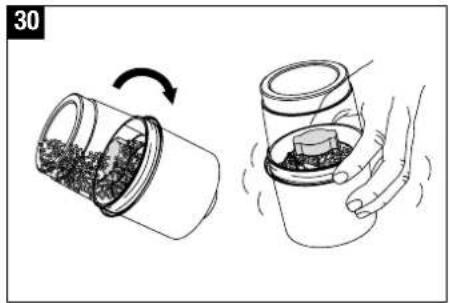
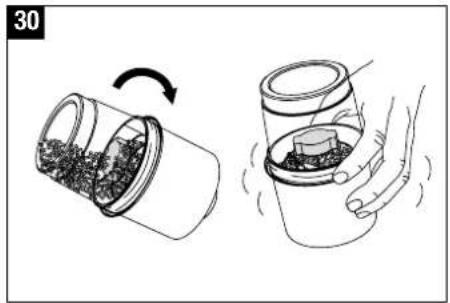
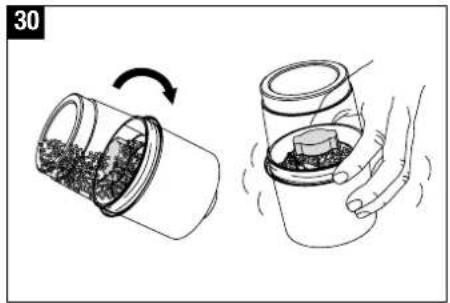
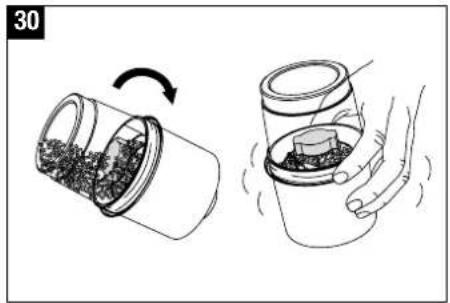
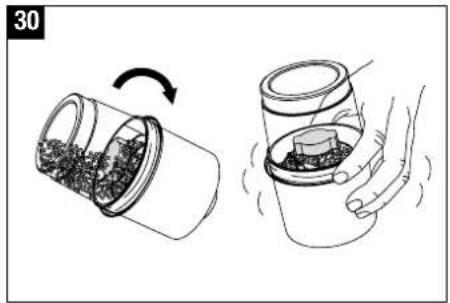
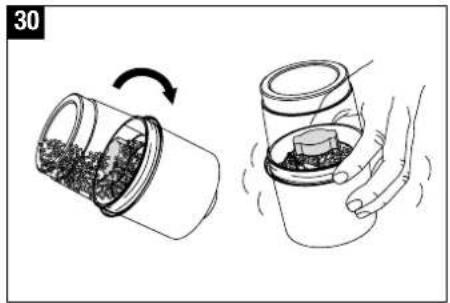
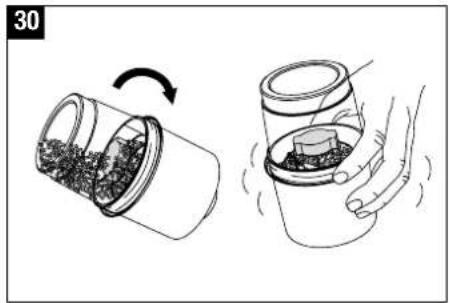
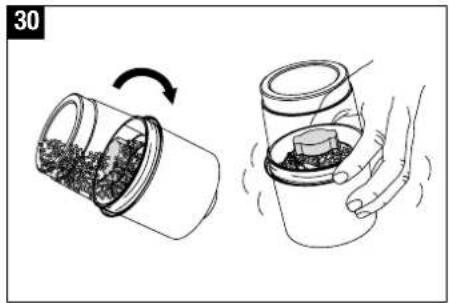
Turn the plastic cup and cartridge over and shake until all resin is in the cartridge (30).
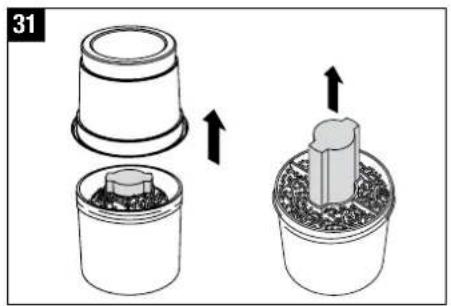
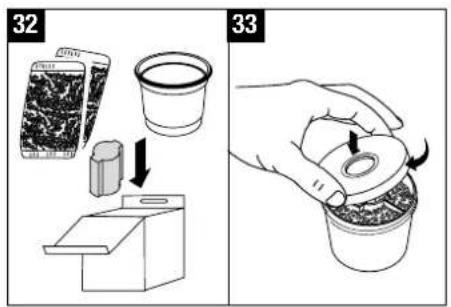
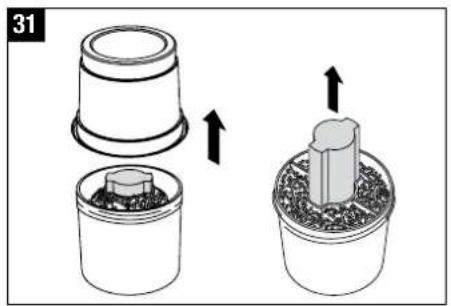
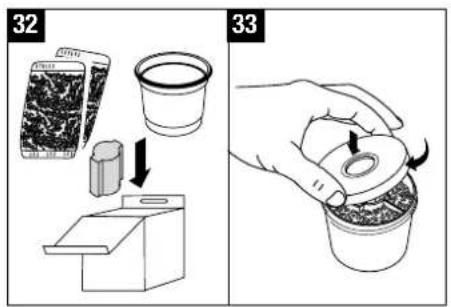
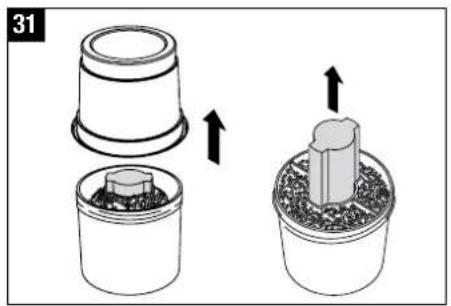
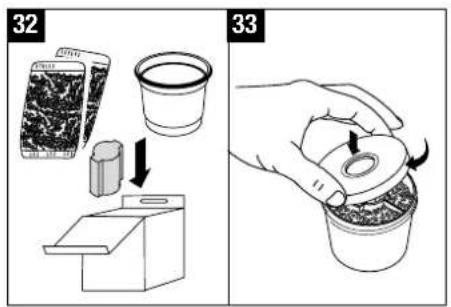
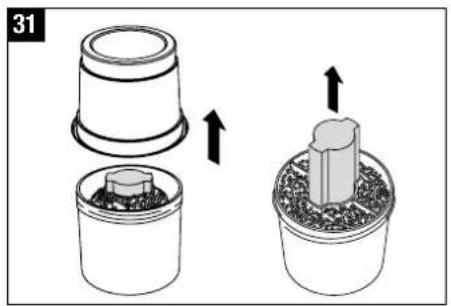
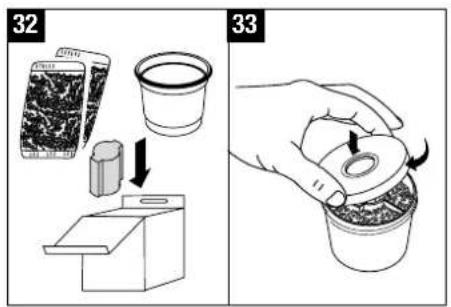
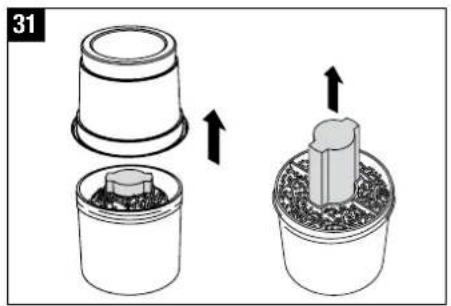
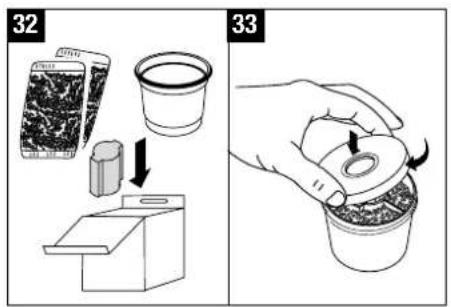
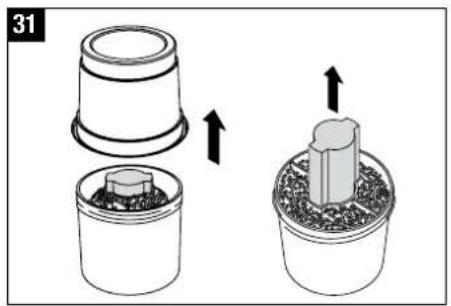
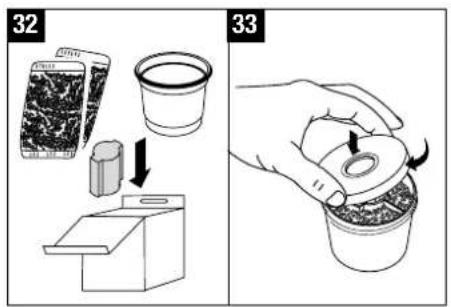
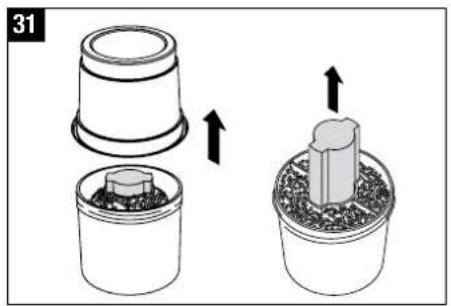
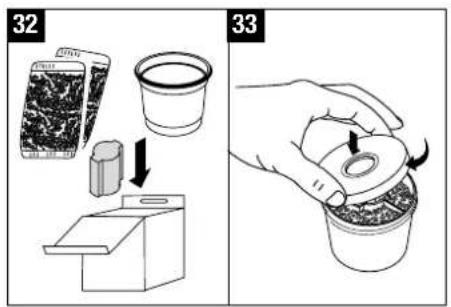
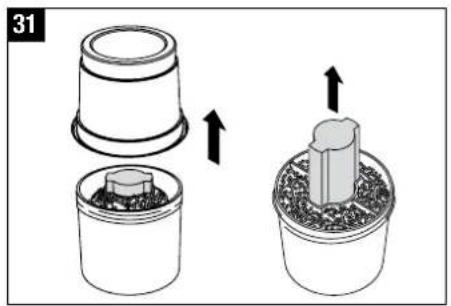
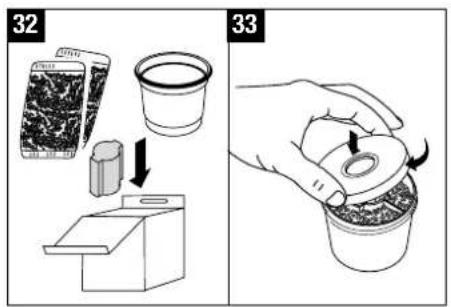
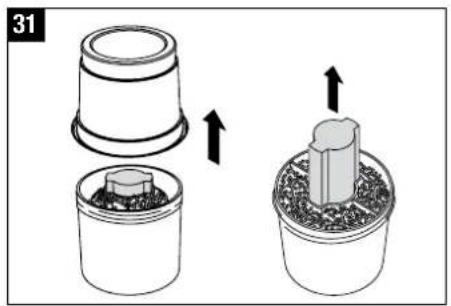
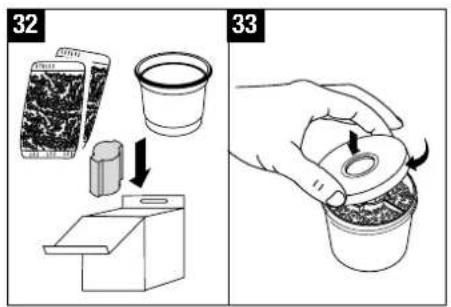
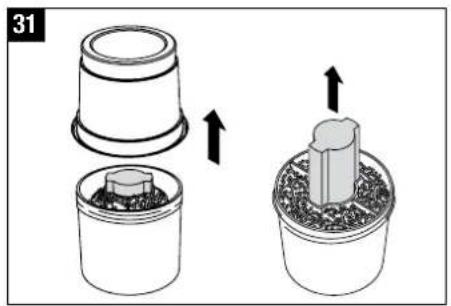
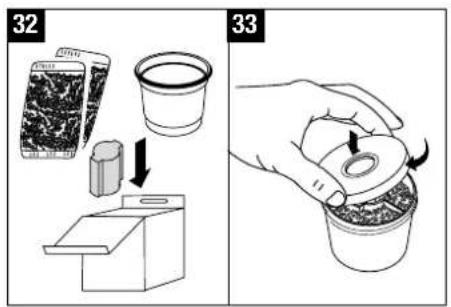
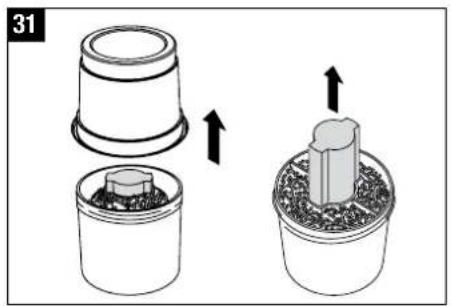
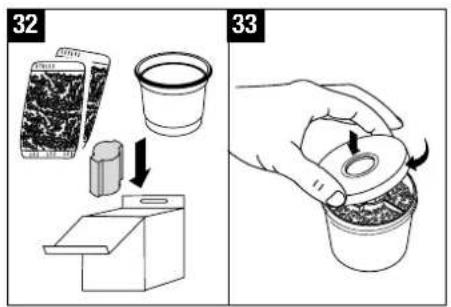
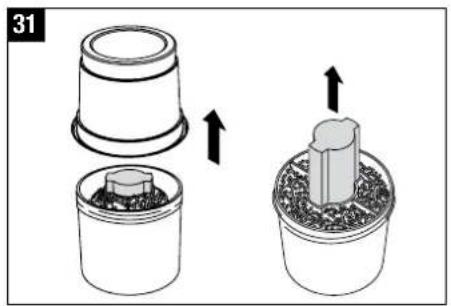
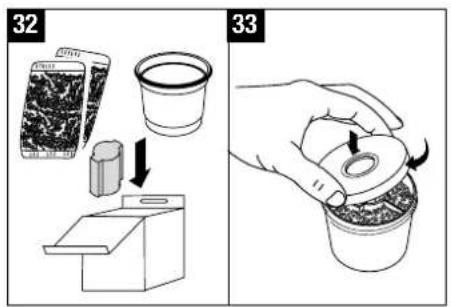
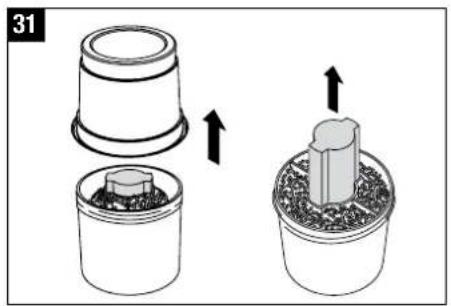
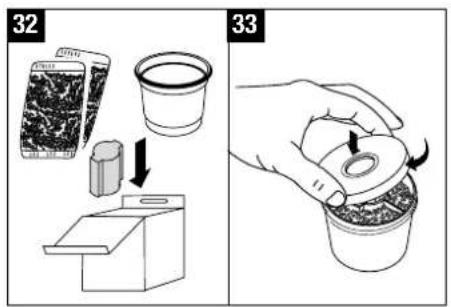
- Remove the plastic cup and the pink styrofoam piece from the cartridge (31) and retain for future use (the refill resin consists of 3 refill bags) (32).
- Close the cap (33).
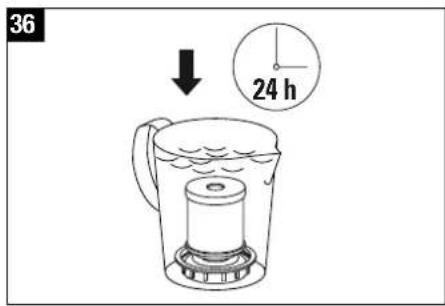
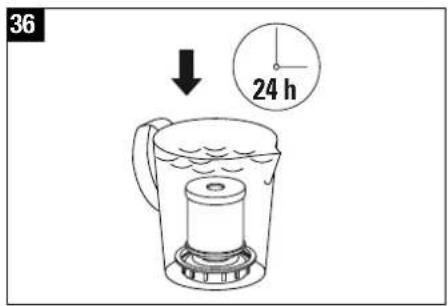
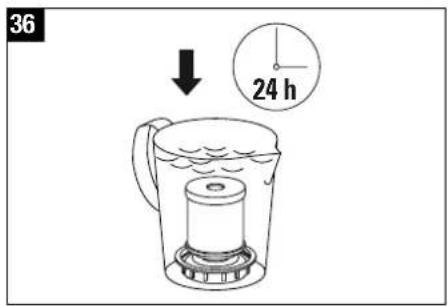
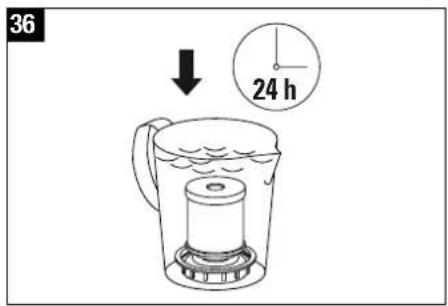
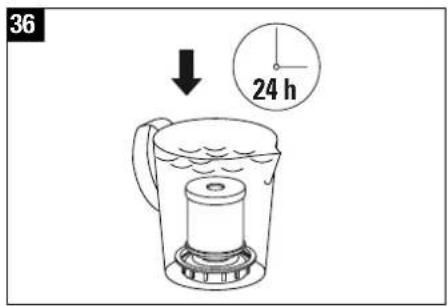
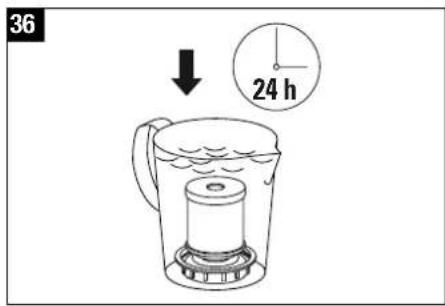
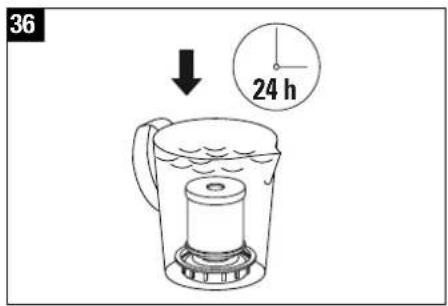
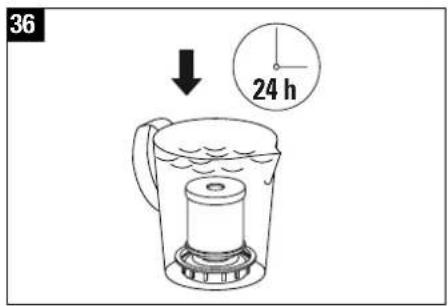
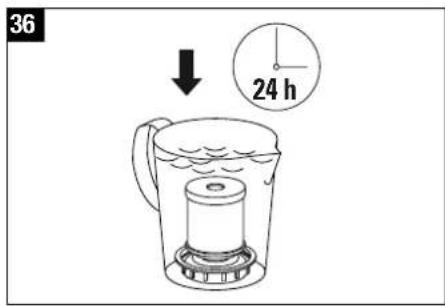
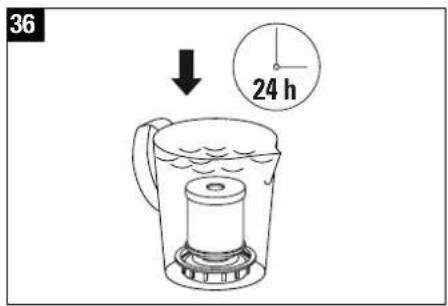
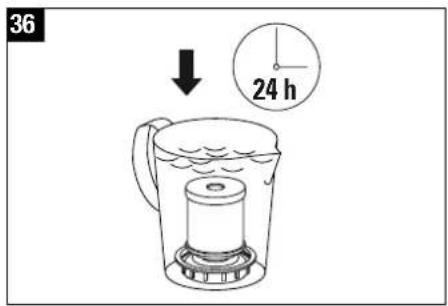
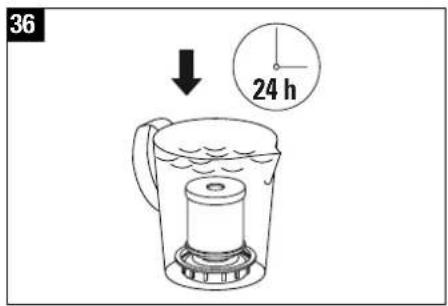
- Soak the demineralisation cartridge in a bowl of water for at least 24 hours before use (36). The resin has to absorb water to achieve full performance!
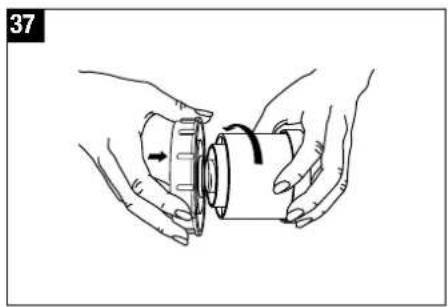
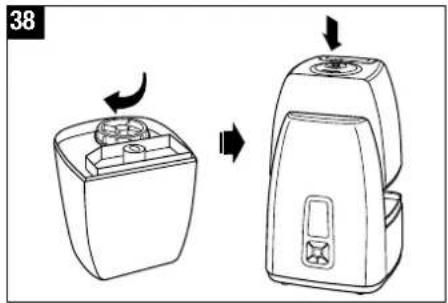
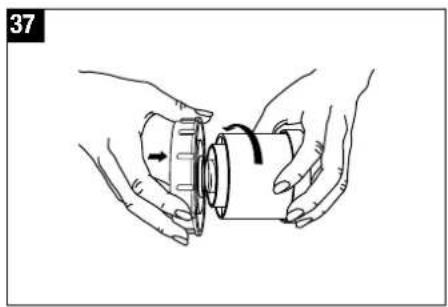
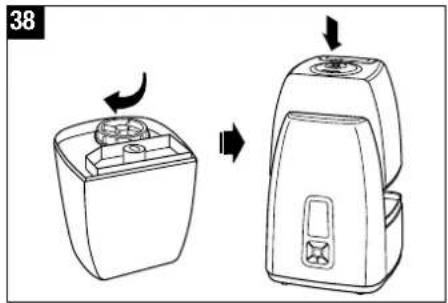
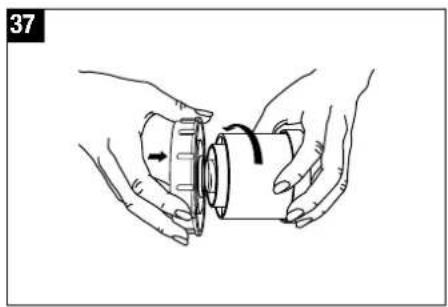
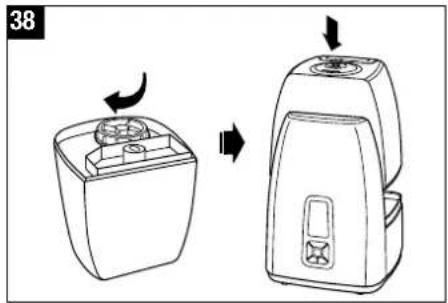
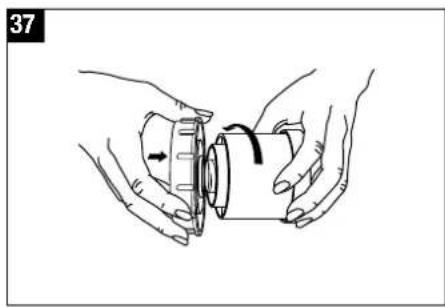
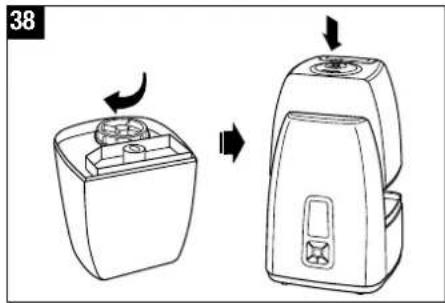
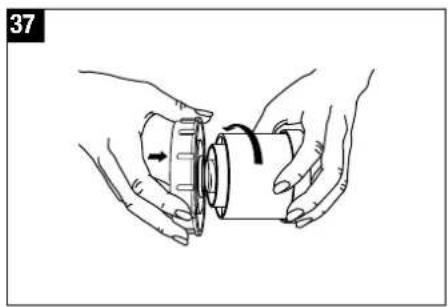
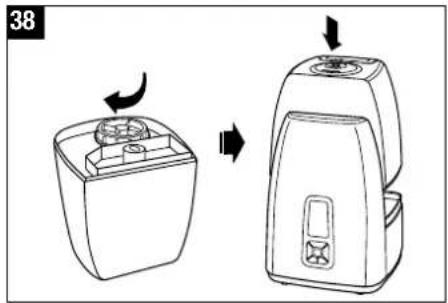
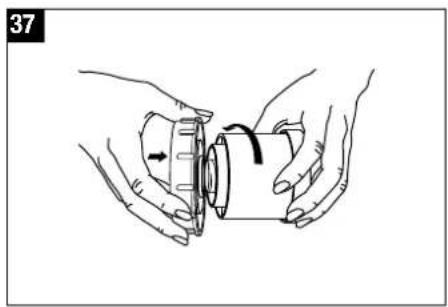
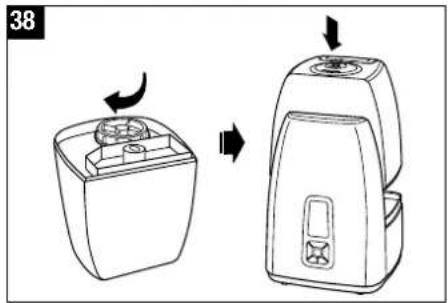
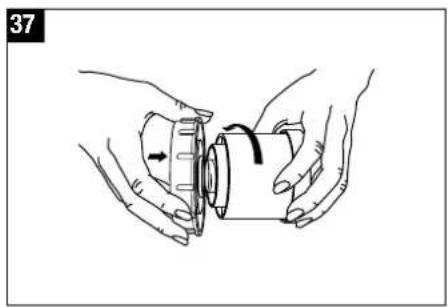
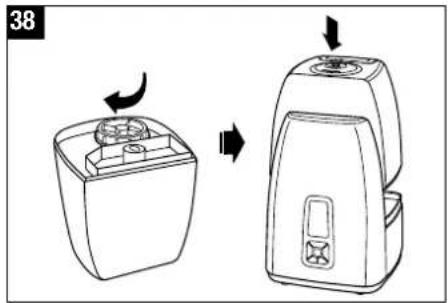
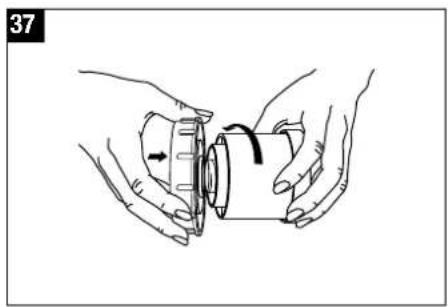
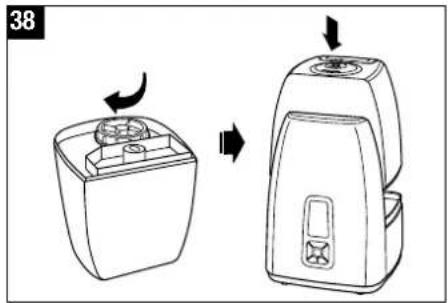
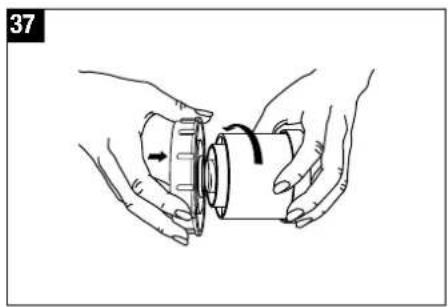
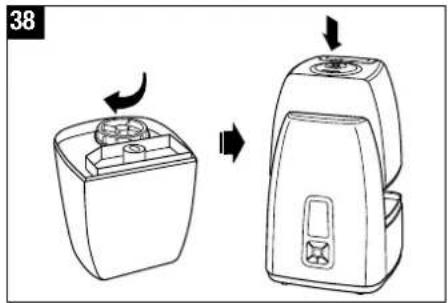
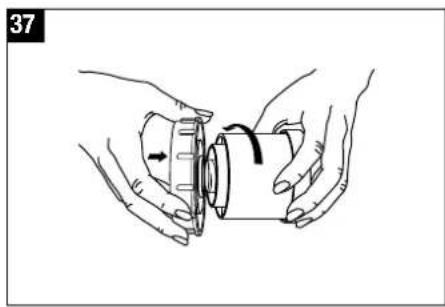
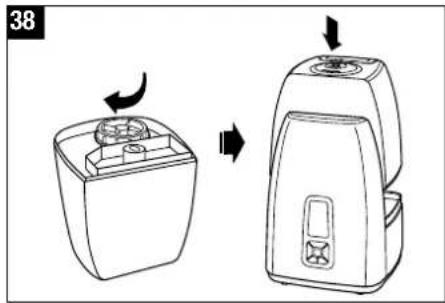
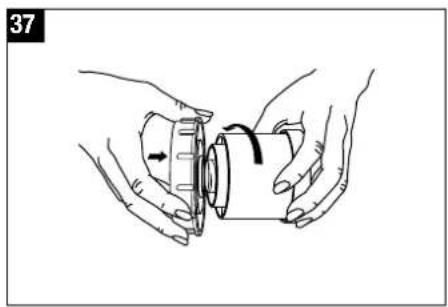
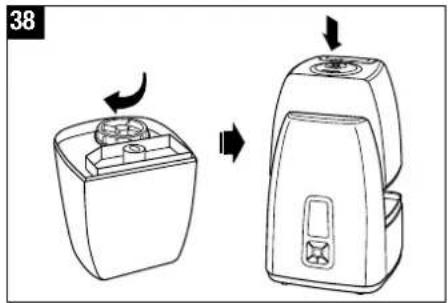
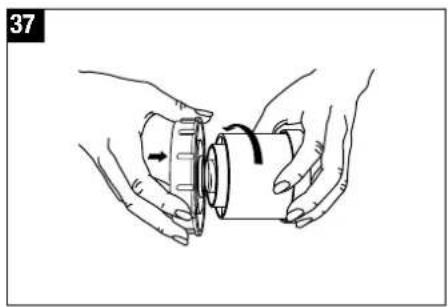
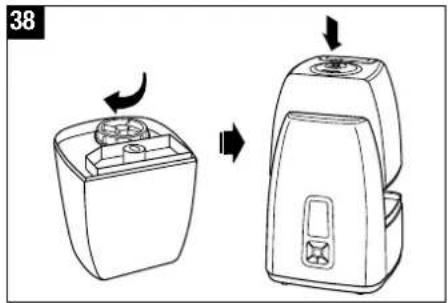
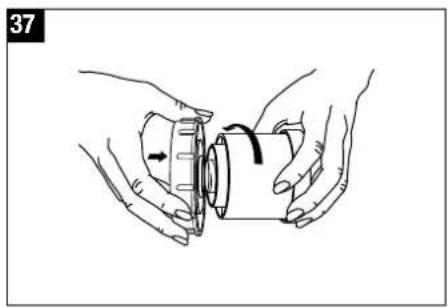
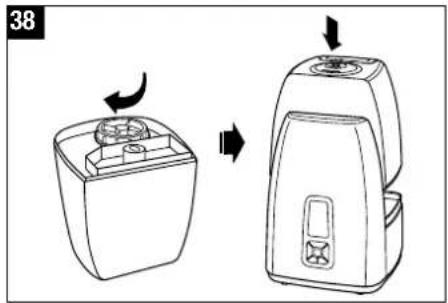
- Now screw the cartridge onto the water tank cap (37). Close the tank cap securely! Place the water tank onto the base (38).
Option B: Replace the entire cartridge
- Remove the water tank from the base and unscrew the water tank cap (23).
- The demineralisation cartridge is attached to the inside of the tank cap. Unscrew the cartridge from the cap by turning it anti-clockwise (24). Important: do NOT dispose of the tank cap!
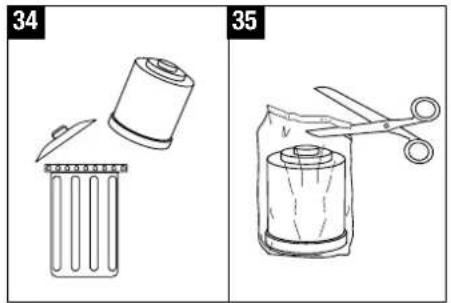
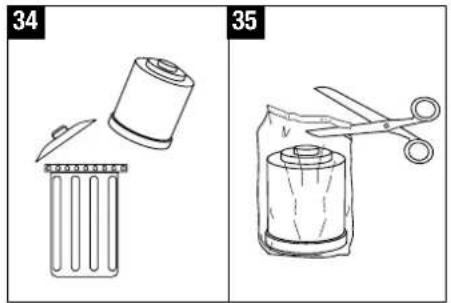
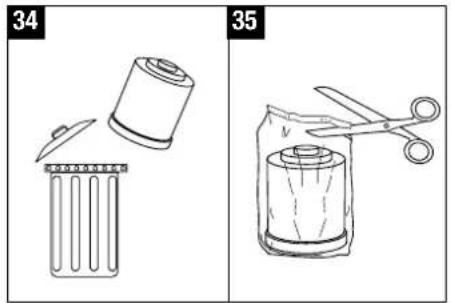
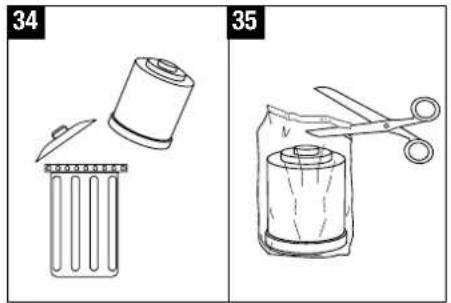
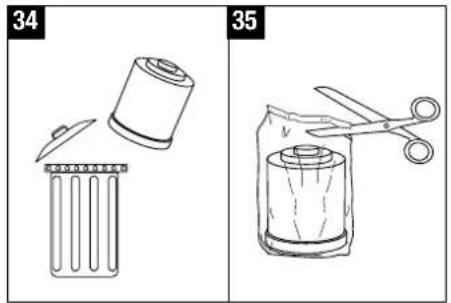
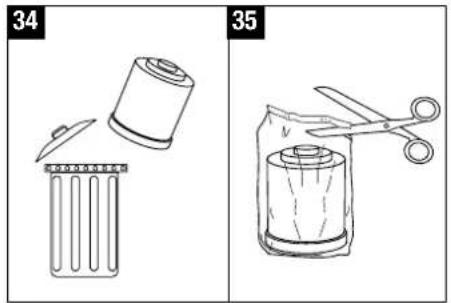
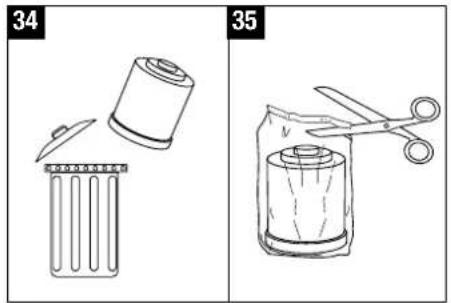
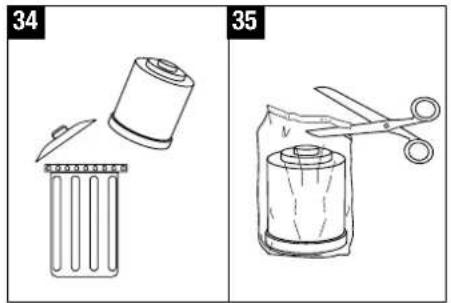
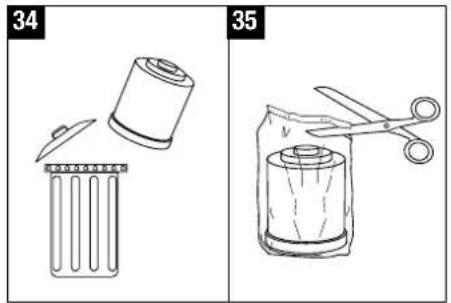
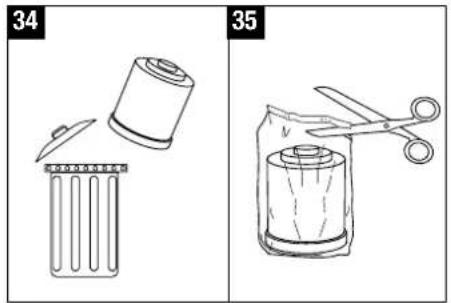
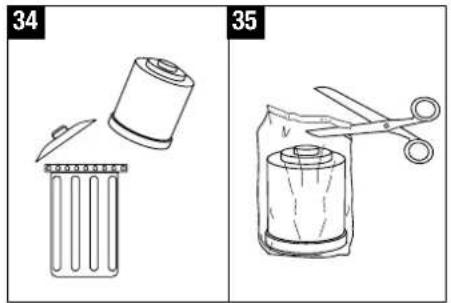
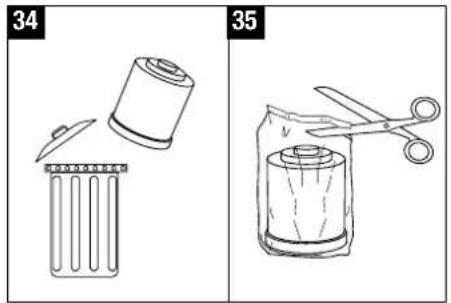
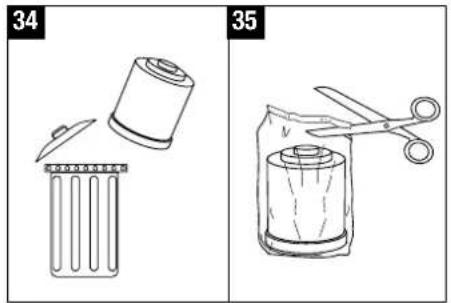
- Dispose of the old cartridge (34).
- Unpack the new cartridge (35).
- Soak the new cartridge in a bowl of water for at least 24 hours before use (36). The resin has to absorb water to achieve full performance!
- Now screw the cartridge onto the water tank cap (37). Close the tank cap securely! Place the water tank onto the base (38).
23
24
Storing the appliance for extended periods
Clean the appliance as described earlier and allow to dry thoroughly. Preferably store the appliance in its original box, in a dry place away from high temperatures.
Disposal
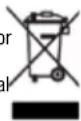
Return your worn out unit to your dealer for proper disposal. You can obtain information on other ways to dispose of the unit from your local district or town council.
Warranty
The warranty conditions are defined by our representative in the country of sale. Please contact your dealer if, despite strict quality control, your appliance becomes defective. You must present your original receipt when making a claim under the warranty.
Technical specifications
Mains voltage 230 - 240 V / 50 Hz
Power consumption 45 / 130 - 140 W*
Humidity output 400 / 550 g/h*
Suitable for rooms up to 60 m 2 /150 m 3
Water capacity 5.5 litres
Dimensions 254 x 290 x 347 mm
Weight (empty) 4.0 kg
Operating noise level < 25 dB(A)
Accessories Demineralisation cartridge
Ionic Silver Stick (ISS)
* when used with pre-heating to 80 °C
Troubleshooting
| Problem | Possible cause | What to do |
| Unit does not operate | Power plug not plugged in | Plug in power plug into mains socket |
| No water in the tank(Empty indicator flashing) | Fill tank with water | |
| No mist outputthan actual | Desired humidity level lower Increase humidity setting | |
| Cleaning agent residues | Rinse with clear water | |
| Weak mist output | Water temperature too low appliance will work properly again after 10 minutes. | Set mist output to maximum. The |
| Mineral deposits on membrane | Clean membrane | |
| White deposit around the appliance | Demineralisation cartridge exhausted | Replace demineralisation cartridge or resin |

Désemballage
A) Allumer/Eteindre
24
25
Funzionamento U7144
18
19
∴ m = 3/11
21
22
24
25
Uitpakken
Bediening U7144 L) Leegstandindicator
24
25
Desembalaje
Depuración del agua
18
∴ m = 3/11
21
19
22
24
25



Kicsomagolás

A) Be-/Kikapcsolás

Szczotka
Srebrna Elektroda Ionic Silver Stick ®
Przetwomik piezoelektrycz ny
Korytko
Obsługa U7144
24
25

Управление U7144
24
252
Uppackning
Vattenrenhållning
Manövrering U7144 L) Tomindikator
A) Till/Frånkoppling
24
25
Vedenpuhdistus
24
25
Ionic Silver Stick (ISS)


Udpakning
Vandforureningskontrol
Drift U7144 Se yderligere oplysninger i kapitlet «Fyldning a€)Timer
A) Tænd/sluk
Utpakking
Betjening U7144 L) Vannivåindikator
A) Slå på/av
24
25
BONECO is a brand name of PLASTON AG, Switzerland.


- VORWORT
- AUSPACKEN
- WASSERREINHALTUNG
- EIN-/AUSSCHALTEN
- FOREWORD
- EN
- GENERAL INFORMATION
- SAFETY INSTRUCTIONS
- UNPACKING
- PUTTING INTO OPERATION
- FILLING THE TANK
- WATER QUALITY MAINTENANCE
- USE OF FRAGRANCES
- OPERATION U7144 TONS ARE PRESSED, THE UNIT WILL NO LONGER FOR SECONDS OR SLEEP
- SWITCHING ON/OFF
- HYGROSTAT (PRE-SET MOISTURE LEVEL)
- TIMER
- CONTROLLING MIST OUTPUT AND EVAPORATOR OUTPUT
- OPERATION WITH PRE-HEATING
- AUTO/SLEEP
- EMPTY INDICATOR
- CLEANING INDICATOR
- CLEANING/MAINTENANCE
- IMPORTANT
- REPLACEMENT OF THE DEMINERALISATION CARTRIDGE
- OPTION A: REPLACE THE RESIN
- OPTION B: REPLACE THE ENTIRE CARTRIDGE
- STORING THE APPLIANCE FOR EXTENDED PERIODS
- DISPOSAL
- WARRANTY
- TECHNICAL SPECIFICATIONS
- DÉSEMBALLAGE
- ALLUMER/ETEINDRE
- 24
- 25
- UITPAKKEN
- DESEMBALAJE
- DEPURACIÓN DEL AGUA
- KICSOMAGOLÁS
- BE-/KIKAPCSOLÁS
- OBSŁUGA U7144
- UPPACKNING
- VATTENRENHÅLLNING
- TILL/FRÅNKOPPLING
- VEDENPUHDISTUS
- UDPAKNING
- VANDFORURENINGSKONTROL
- DRIFT U7144 SE YDERLIGERE OPLYSNINGER I KAPITLET «FYLDNING A€)TIMER
- TÆND/SLUK
- UTPAKKING
- SLÅ PÅ/AV
Brand : BONECO
Model : U7144
Category : Humidifier