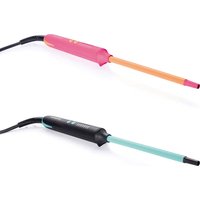
SHTB 3 A1 - Curling iron SILVERCREST - Free user manual and instructions
Find the device manual for free SHTB 3 A1 SILVERCREST in PDF.
Frequently Asked Questions - SHTB 3 A1 SILVERCREST
User questions about SHTB 3 A1 SILVERCREST
0 question about this device. Answer the ones you know or ask your own.
Ask a new question about this device
Download the instructions for your Curling iron in PDF format for free! Find your manual SHTB 3 A1 - SILVERCREST and take your electronic device back in hand. On this page are published all the documents necessary for the use of your device. SHTB 3 A1 by SILVERCREST.
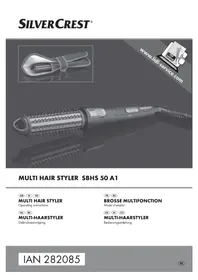
USER MANUAL SHTB 3 A1 SILVERCREST
Operating instructions
IAN 275953
DE AT CH
Before reading, unfold the page containing the illustrations and familiarise yourself with all functions of the device.
text_image
SILVERCREST ① ② ③ ④ ⑤ ⑥Inhaltsverzeichnis
Einleitung 2
Urheberrecht 2
KOMPERNASS HANDELS GMBH
BURGSTRASSE 21
44867 BOCHUM
GERMANY
www.kompernass.com
Table des matières
Introduction 14
Droits d'auteur 14
Usage conforme....14
text_image
1 3 SILVER CRESTKOMPERNASS HANDELS GMBH
BURGSTRASSE 21
44867 BOCHUM
GERMANY
www.kompernass.com
Indice
Introduzione....26
Copyright. 26
Uso conforme 26
text_image
1 3 SILVER CRESTKOMPERNASS HANDELS GMBH
BURGSTRASSE 21
44867 BOCHUM
GERMANY
www.kompernass.com
Contents
Introduction 38
Copyright. 38
Proper use 38
Safety information 39
Package contents 41
Disposal of the packaging....41
Appliance description 42
Inserting/replacing the batteries 42
Before use 42
Use 43
Twisting hair strands. 43
Twisting hair strands into a braid 44
Incorporating hair ornaments 44
Cleaning 45
Technical details 46
Storage/disposal 46
Storage 46
Disposal of the appliance 46
Congratulations on the purchase of your new appliance.
You have selected a high-quality product. The operating instructions are part of this product. They contain important information about safety, usage and disposal. Before using the product, please familiarise yourself with all operating and safety instructions. Use the product only as described and for the range of applications specified. Please also pass these operating instructions on to any future owner.
Copyright
This documentation is protected by copyright.
Any copying or reproduction, including in the form of extracts, or any reproduction of images (even in a modified state), is permitted only with the written authorisation of the legal owner.
Proper use
This appliance is intended for twisting or braiding human hair, wigs or hairpieces made of synthetic material. This appliance is intended exclusively for private use. Pay heed to all of the information in this operating manual, especially the safety instructions. This appliance is not intended for commercial applications.
The appliance is not intended for any other purpose, nor for use beyond the scope described. No claims of any kind will be accepted for damage arising as a result of incorrect use. The risk shall be borne solely by the user.
Safety information
⚠ WARNING! RISK OF INJURY!
- Do not operate the appliance if it has been dropped or is damaged in any way. Have the appliance checked and/or repaired by qualified technicians if necessary.
This appliance may be used by children of the age of 8 years or more and by persons with reduced physical, sensory or mental capabilities or lack of experience and/or knowledge ONLY if they are being supervised or have been instructed with regard to the safe use of the appliance and have understood the potential risks.
▶ Children must not play with the appliance.
▶ Cleaning and user maintenance should not be carried out by children, unless they are under supervision.
CAUTION - PROPERTY DAMAGE!
▶ When inserting the batteries, ensure that the polarity is correct. Do not use any force to insert the batteries.
- Avoid contact with solvents and with corrosive or abrasive cleansing agents!
4NFORMATION ON USING BATTERIES
This appliance uses batteries. When handling batteries, please observe the following:
RISK OF EXPLOSION!
▶ Do not throw batteries into a fire. Do not recharge batteries.
▶ Never open batteries and never solder or weld batteries. There is a risk of explosion and injury!
▶ Check the condition of the batteries at regular intervals. Leaking batteries can cause damage to the appliance.
▶ If you do not intend to use the appliance for an extended period, remove the batteries.
▶ If the batteries have leaked, use protective gloves. Clean the battery compartment and the battery contacts with a dry cloth.
- Keep batteries out of the reach of children. Children might put batteries into their mouth and swallow them. If a battery is swallowed, medical assistance must be sought immediately.
Package contents
The appliance is supplied with the following components as a standard:
- Hair Twister
• 2 batteries (type: Mignon/AA/LR6) - 10 hair ties
• Manual for braided hairstyles - Operating instructions
1) Remove all parts of the appliance and the operating instructions from the carton.
2) Remove all packaging material.
3) Clean all parts of the appliance as described in the section entitled "Cleaning".
NOTE
▶ Check the package for completeness and signs of visible damage.
▶ If any items are missing or damaged as a result of defective packaging or transportation, contact the service hotline (see section "Service").
Disposal of the packaging
The packaging protects the appliance from damage during transport. The packaging materials have been selected for their environmental friendliness and ease of disposal, and are therefore recyclable.

Returning the packaging to the material cycle conserves raw materials and reduces the amount of waste that is generated. Dispose of packaging materials that are no longer needed in accordance with applicable local regulations.
NOTE
If possible, keep the original packaging during the warranty period so that the appliance can be properly packed for returning in the event of a warranty claim.
Appliance description
① Gripper
② Rotator
③ Slider (for raising gripper)
4 Gripper button I
5 Rotator button II
6 Battery compartment
Inserting/replacing the batteries
NOTE
Insert only AA/Mignon/LR6 batteries in the battery compartment ⑥!
1) Turn the appliance over and place it on a soft underlay to avoid scratching the surface.
2) Remove the locking screw.
3) Open the battery compartment ⑥.
4) Remove the old batteries if any are inserted.
5) Insert the new batteries:
- Note the polarity marked in the battery compartment 6.
- First push one end of the batteries into the bottom bulge in the appliance handle.
- After this, push them into the battery compartment.
6) Close the battery compartment ⑥.
7) Screw the locking screw in.
Before use
Comb the hair thoroughly before twisting so that there are no knots in it.
Use
Twisting hair strands
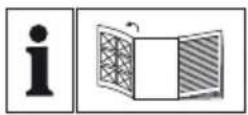
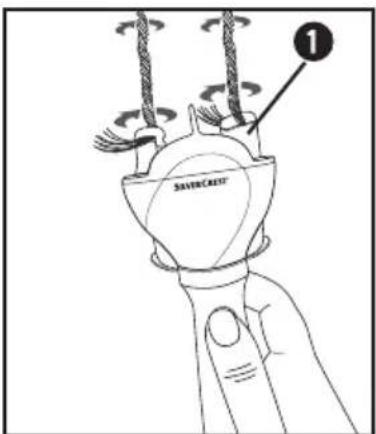
1) Separate two hair strands from your hair and comb them thoroughly. The quantity of hair you need for each strand depends on how thick you want your braid to be. However, you should ensure that the hair can be held in the grippers ① without any problems.
2) Press one of the sliders ③ for raising the gripper ① upwards.
3) Place the end of the hair strand in the gripper ① and release the slider ③ again.
text_image
1 3 SILVER CREST4) Fix the other strand of hair under the second gripper ①.
5) Tighten the hair strands by holding the appliance at a distance away from your head. The grippers must be pointing towards your head.
6) Press gripper button I ④ and keep it pressed down. The grippers ① rotate around each other and twist the hair strands individually as they do so.
text_image
1 SARVERCASTNOTE
If your hair comes out of the grippers you have made the hair strands too thick.
7) Once your strands have been twisted over their entire length, release gripper button I 4.
NOTE
▶ Ensure that you do not overtwist your hair strands. The hair could become knotted at the ends.
Twisting hair strands into a braid
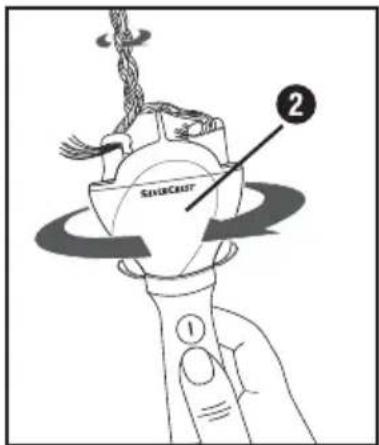
1) Press rotator button II ⑤ and keep it pressed down. The rotator ② rotates and the two hair strands are twisted around each other.
text_image
SINUCRUST ②2) Once the two hair strands have been twisted completely around each other, release rotator button II ⑤.
NOTE
▶ Depending on your requirements, you can twist your hair strands tightly or loosely together by keeping rotator button II ⑤ pressed down for a shorter or longer time. Here too, ensure that you do not overtwist your hair strands.
3) Remove the hair strands from the grippers ①, by raising the gripper ① with the sliders ③.
4) Tie off the braid with a hair tie. You can find more hair ties in any well-stocked drugstore or hairdressing suppliers
Incorporating hair ornaments
You can incorporate hair ornaments such as satin ribbons, pearl ribbons or other decorative ribbons in your braids. Decorative ribbons are available from craft supply stores.
1) Separate two hair strands from your hair and comb them thoroughly.
2) Knot the required decorative ribbon into the beginning of the braid.
3) Press one of the sliders ③ for raising the gripper ① upwards.
4) Place the end of the hair strand and the decorative ribbon in the gripper ① and release the slider ③ again.
5) Fix the other strand of hair under the second gripper ①.
6) Tighten the hair strands by holding the appliance at a distance away from your head. The grippers must be pointing towards your head.
7) Press gripper button I ④ and keep it pressed down. The grippers rotate around each other and twist the hair strands individually as they do so.
8) Once your strands have been twisted over their entire length, release gripper button I 4.
9) Press rotator button II ⑤ and keep it pressed down. The rotator ② rotates and the two hair strands and the decorative ribbon are twisted around each other.
10) Once the two hair strands have been twisted completely around each other, release rotator button II ⑤.
11) Remove the hair strands from the grippers ①, by raising the gripper ① with the sliders ③. Hold one end of the braid firmly while doing so.
12) Tie off the braid with a hair tie or similar.
NOTE
▶ You can also insert feathers into the completed braid or attach other hair decorations.
Cleaning

RISK OF ELECTRIC SHOCK
▶ Never immerse the appliance in water or other liquids during cleaning!
CAUTION - PROPERTY DAMAGE!
- Do not use any aggressive cleaning liquids or solvents. They could damage the surface.
1) Wipe the housing with a damp cloth.
2) For stubborn soiling, add a mild detergent to the cloth. Wipe off any detergent residue using a cloth moistened with clean water only.
3) Allow the appliance to dry fully before using it again.
Technical details
| Power supply: 2 x 1.5 V | --- |
| Battery type: Mignon, AA, LR6 | |
| Protection class: | III III |
Storage/disposal
Storage
Store the appliance in a clean and dry location. Remove the batteries before long periods of non-use.
Disposal of the appliance
Never dispose of the appliance in your normal domestic waste. This product is subject to the provisions of European Directive 2012/19/EU-WEEE (Waste Electrical and Electronic Equipment).
Dispose of the appliance via an approved disposal company or your municipal waste facility. Please comply with all applicable regulations. Please contact your waste disposal centre if you are in any doubt.

Batteries should not be disposed of in the domestic waste.
For this reason, you should always remove the batteries from the appliance before disposing of it. Consumers are legally obliged to dispose of (rechargeable) batteries at a collection point in their community/city district or at a retail store.
This obligation is intended to ensure that batteries are disposed of in an environmentally responsible manner. Only return batteries or rechargeable batteries when they are fully discharged.
This appliance has a 3-year warranty valid from the date of purchase. If this product has any faults, you, the buyer, have certain statutory rights. Your statutory rights are not restricted in any way by the warranty described below.
Warranty conditions
The validity period of the warranty starts from the date of purchase. Please keep your original receipt in a safe place. This document will be required as proof of purchase.
If any material or production fault occurs within three years of the date of purchase of the product, we will either repair or replace the product for you at our discretion. This warranty service is dependent on you presenting the defective appliance and the proof of purchase (receipt) and a short written description of the fault and its time of occurrence.
If the defect is covered by the warranty, your product will either be repaired or replaced by us. The repair or replacement of a product does not signify the beginning of a new warranty period.
Warranty period and statutory claims for defects
The warranty period is not prolonged by repairs eff ected under the warranty. This also applies to replaced and repaired components. Any damage and defects present at the time of purchase must be reported immediately after unpacking. Repairs carried out after expiry of the warranty period shall be subject to a fee.
Scope of the warranty
This appliance has been manufactured in accordance with strict quality guidelines and inspected meticulously prior to delivery.
The warranty covers material faults or production faults. The warranty does not extend to product parts subject to normal wear and tear or fragile parts such as switches, batteries, baking moulds or parts made of glass.
The warranty does not apply if the product has been damaged, improperly used or improperly maintained. The directions in the operating instructions for the product regarding proper use of the product are to be strictly followed. Uses and actions that are discouraged in the operating instructions or which are warned against must be avoided.
This product is intended solely for private use and not for commercial purposes. The warranty shall be deemed void in cases of misuse or improper handling, use of force and modifications / repairs which have not been carried out by one of our authorised Service centres.
Warranty claim procedure
To ensure quick processing of your case, please observe the following instructions:
■ Please have the till receipt and the item number (e.g. IAN 12345) available as proof of purchase.
■ You will find the item number on the type plate, an engraving on the front page of the instructions (bottom left), or as a sticker on the rear or bottom of the appliance.
If functional or other defects occur, please contact the service department listed either by telephone or by e-mail.
■ You can return a defective product to us free of charge to the service address that will be provided to you. Ensure that you enclose the proof of purchase (till receipt) and information about what the defect is and when it occurred.
You can download these instructions along with many other manuals, product videos and software on www.lidl-service.com.
Service
GB Service Great Britain
Tel.: 0871 5000 720 (£ 0.10/Min.)
E-Mail: kompernass@lidl.co.uk
IAN 275953
Importer
Please note that the following address is not the service address. Please use the service address provided in the operating instructions.
KOMPERNASS HANDELS GMBH
BURGSTRASSE 21
44867 BOCHUM
GERMANY
www.kompernass.com
KOMPERNASS HANDELS GMBH
BURGSTRASSE 21
44867 BOCHUM
DEUTSCHLAND / GERMANY
www.kompernass.com