
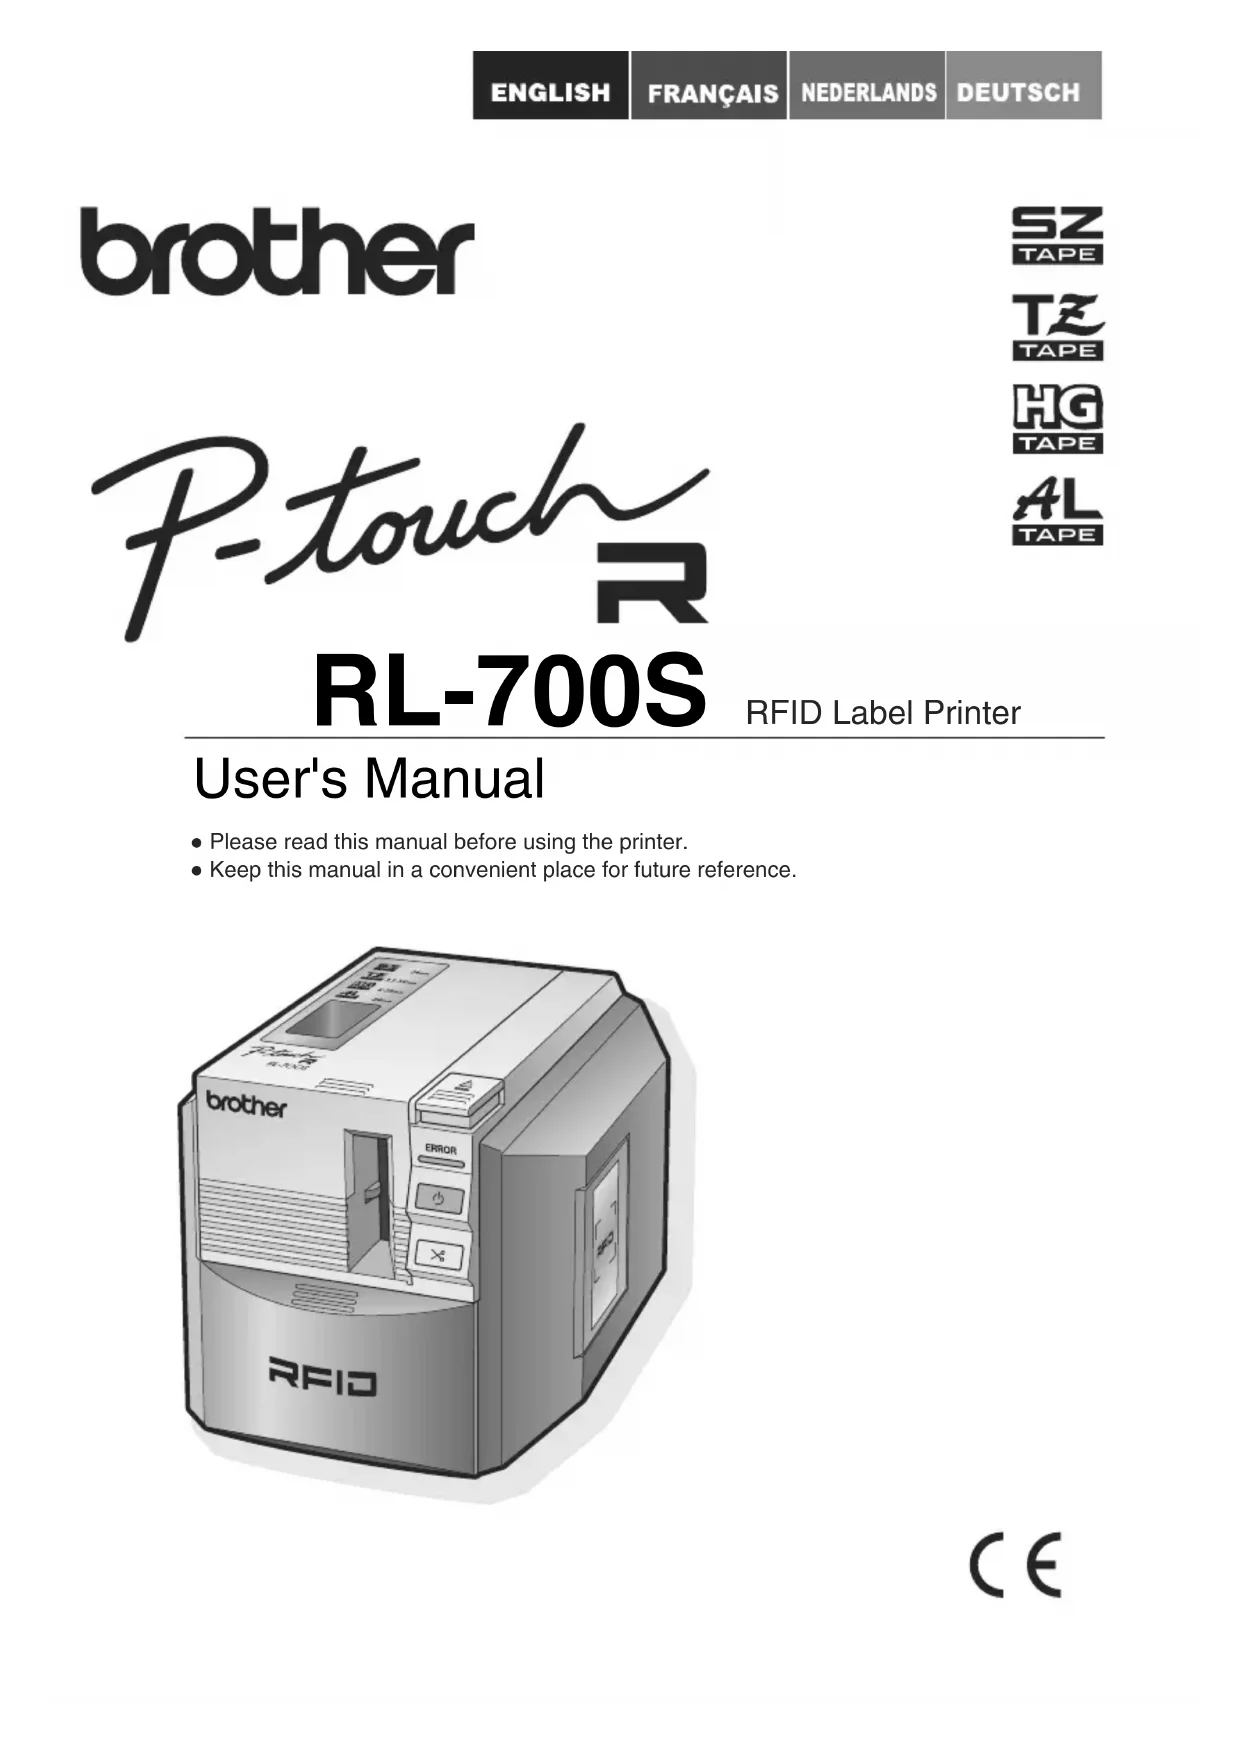
PTouch RL700S - Printer BROTHER - Free user manual and instructions
Find the device manual for free PTouch RL700S BROTHER in PDF.
| Product Type | RFID Label Printer |
| Brand | Brother |
| Model | PTouch RL700S |
| Printing Technology | Thermal transfer lamination / thermal printing |
| Print Resolution | 360 dpi (TZ, SZ, AL); up to 360 x 720 dpi (HG high-definition mode) |
| Print Speed | Up to 20 mm/s (TZ, SZ, AL); up to 40 mm/s (HG high-speed mode) |
| Maximum Print Width | 27.1 mm |
| Compatible Tape Types | SZ (RFID) 24 mm, TZ (3.5-36 mm), HG (6-36 mm), AL (24 mm) |
| Interface | USB 2.0 (High Speed) |
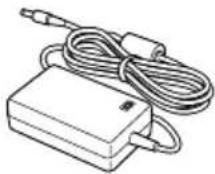
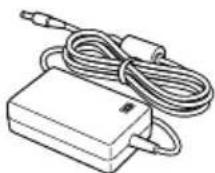
| Power Supply | 220-240 V AC, 50/60 Hz (AC adapter AD9100 included) |
| Power Consumption (Printing) | Approx. 30 W |
| Power Consumption (Standby) | Approx. 2 W |
| Dimensions (W x D x H) | 135 mm x 190 mm x 130 mm |
| Weight | Approx. 1.5 kg |
| RFID Frequency | 13.56 MHz (I-Code SLI, compliant with ISO/IEC 15693 and 18000-3) |
| Main Functions | Custom label printing; RFID tag read/write; label creation with barcodes, tables, images; integration with Microsoft Office |
| Included Software | P-touch Editor 4.2, printer driver, RFID sample applications, RL-700S SDK |
| Maintenance and Cleaning | Clean the exterior with a soft cloth; clean the cutter blade with a cotton swab; auto or manual print head cleaning; cleaning cassette TZ-CL6 available |
| Safety | Do not use solvents; do not disassemble; use only the supplied adapter; keep RFID tags away from microwaves; follow instructions in the manual |
| Box Contents | Printer, AC adapter with power cord, USB cable, SZ 24 mm cassette (30 RFID tags), TZ 24 mm cassette (8 m), user manual |
| Operating Temperature | 10°C to 35°C |
| Operating Humidity | 20% to 80% RH (no condensation) |
Frequently Asked Questions - PTouch RL700S BROTHER
User questions about PTouch RL700S BROTHER
0 question about this device. Answer the ones you know or ask your own.
Ask a new question about this device
Download the instructions for your Printer in PDF format for free! Find your manual PTouch RL700S - BROTHER and take your electronic device back in hand. On this page are published all the documents necessary for the use of your device. PTouch RL700S by BROTHER.
USER MANUAL PTouch RL700S BROTHER
- Please read this manual before using the printer.
- Keep this manual in a convenient place for future reference.
C ∈
Introduction
Thank you for purchasing the RL-700S.
The RL-700S (hereafter, referred to as "this machine") is an RFID label printer that enables you to easily create custom labels and read/write Brother SZ tapes (RFID labels) when the printer is connected to a computer. The machine can also use readily available TZ tapes, HG tapes, and AL tapes.
About the machine
- We shall not be liable to you or others for any damage, loss of any equipment, media, programs, or data, and any claims of third parties arising out of the use of this product.
- The rights and copyrights of bundled software (including but not limited to the program, images, clip art, templates and text incorporated into the software) and attached manuals and other documents, and any copies of the software, are owned by Brother Industries, Ltd. and its suppliers. The user may not resell, duplicate, change, reverse-engineer, disassemble, or decompile any part of the above software without prior written permission.
About the manual
- The contents of this manual are subject to change without notice.
- No part of this manual may be reproduced in any form, including photocopying or reprinting, without prior consent.
- We aim to produce the highest quality documentation possible, and we welcome your feedback. If you have any comments or suggestions, please contact us.
About the trademarks
- Micr ^ , Windows ^ , and Windows Vista ^ are registered trademarks of Microsoft Corporation in the US and other countries.
- Adobe ^® , Acrobat ^® , and Adobe ^® Reader ^® are registered trademarks of Adobe Systems Incorporated.
- I-CODE SLI is a registered trademark of NXP Semiconductors (formerly Philips Semiconductors).
- All other software and product names mentioned are trademarks or registered trademarks of their respective companies.
brother
EC Declaration of Conformity
Manufacturer
Brother Industries Ltd.
15-1, Naeshiro-cho, Mizuho-ku, Nagoya 467-8561, Japan
Plant
Zhuhai Brother Industries Co., Ltd.
254 Gangchang Road, Gongbei, Zhuhai City S.E.Z. Guang Dong, China
Herewith declare that:
Products description : RFID Label Printer
Model Number : RL-700S
is in conformity with provisions of the R & TTE Directive (1999/5/EC) and we declare compliance with the following standards:
Harmonized standards applied :
Safety EN60950-1:2001+A11:2004
EMC EN55022: 2006 Class B
EN55024: 1998 + A1: 2001 + A2: 2003
EN61000-3-2:2006
EN61000-3-3: 1995 + A1: 2001 + A2: 2005
Radio EN301 489-1 V1.6.1
EN301 489·3 V1.4.1
EN300 330-2 V1.3.1
Year in which CE marking was first affixed : 2007
Issued by : Brother Industries, Ltd.
Date : 17th December, 2007
Place : Nagoya, Japan
Signature :
Junji Shiota
General Manager
Quality Management Dept.
Printing & Solutions Company

European Union only
Note: Marking is in compliance with EU Directive 2002/96/EC and EN50419.
This equipment is marked with the above recycling symbol. It means that at the end of the life of the equipment you must dispose of it separately at an appropriate collection point and not place it in the normal domestic unsorted waste stream. This will benefit the environment for all. (European Union only)
Contents
Introduction 2
About the machine 2
About the manual....2
About the trademarks.... 2
Contents 4
Before using your machine 6
Safety precautions 6
Installation precautions 7
General precautions 8
Printer 8
SZ (RFID) tape....9
Box contents 11
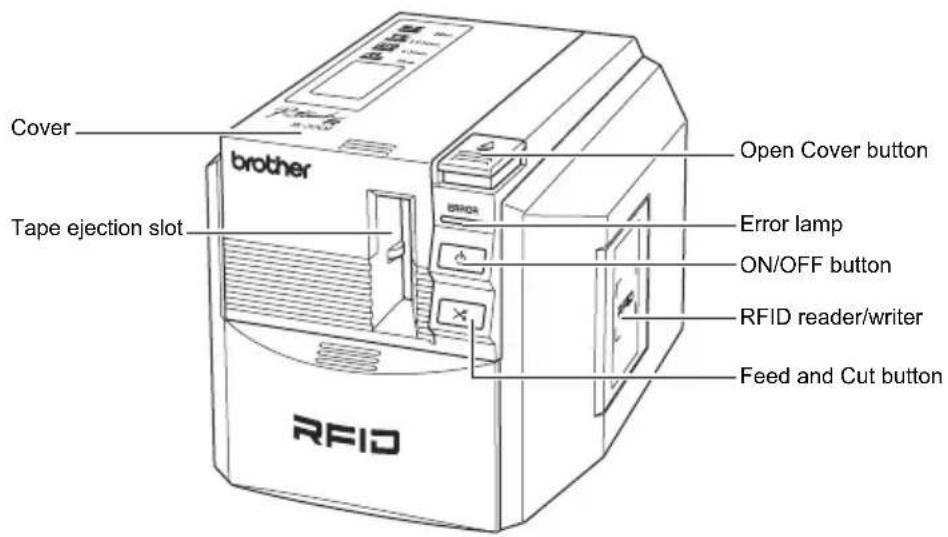
Description of parts.... 12
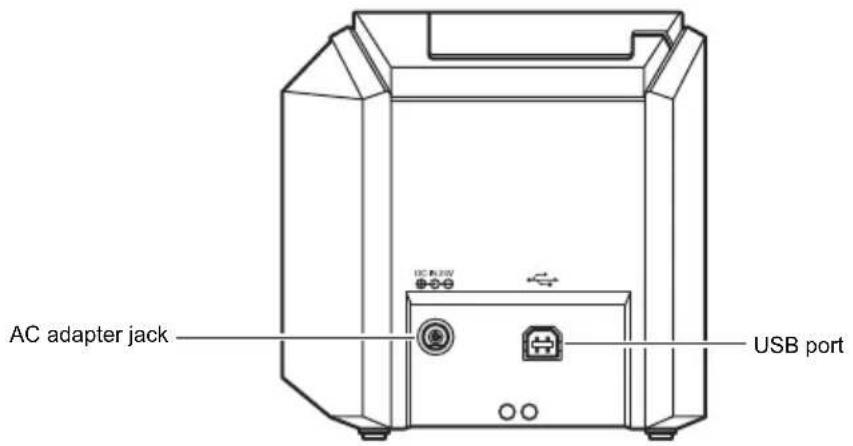
Front.... 12
Back 12
Description of buttons 13
Lamp display.... 13
Before printing labels 14
Connect the machine to a power point 14
Prepare a tape cassette 15
List of cassette types suitable for this machine:.... 15
Install the cassette 15
Install the software 18
Software overview.... 18
Preparing for installation 19
Software installation procedure.... 20
Creating labels 24
Starting P-touch Editor 24
P-touch Editor Edit window 25
View Help 26
Create different types of labels 28
Using RFID Labels 29
Reading and writing data on RFID labels 29
Experience RFID label applications (Sample Applications) ..... 30
Overview of sample applications.... 30
Support for application development. 32
SOFTWARE UPDATE 32
Cleaning and maintenance 33
Maintenance 33
Cleaning the outside of the machine.... 33
Cleaning the cutter blade 33
Cleaning the print head and head roller 34
Accessories.... 35
Tape cassettes.... 35
Troubleshooting 42
Storing your machine 43
Uninstalling software 43
Specifications 44
Computer system requirements 45
Before using your machine
Safety precautions
To prevent injury or damage, follow all warnings and caution informations with following symbols.
| Warning | Tell you what to do to avoid the risk of injury. |
| Caution | Tells you about procedures you must follow to prevent damage to the machine or its surroundings. |

Warning
AC Adapter
- Do not use voltages or adapters other than the specified voltage (220-240 V) and the included AC adapter (AD9100).
- Do not overload the electrical outlet.
- Do not use a damaged or modified power cord or plug.
- Do not put furniture or heavy objects on the power cord.
- Do not bend or pull the power cord.
- Do not touch the AC adapter or power plug with wet hands.
- Always make sure that the power plug is fully and securely inserted into the electrical socket.
- Do not disassemble or modify the AC adapter.
- Do not use in places of high humidity.
Printer
- Do not disassemble or modify the machine.
- Keep all liquids away from the machine.
- Do not touch the machine with wet hands.
- For internal inspection, adjustment, or repair, contact your dealer or authorized service center. (The warranty provided with machine does not cover damage arising from disassembly or modification by the customer).
- If the printer is damaged, comes into contact with liquid, foreign objects get inside (particularly metallic objects), or if you notice abnormal odours or smoke being released from the machine, turn off and unplug the printer immediately, and contact your dealer or authorized service center.
- Plastic bags are used in the packaging of your machine. To avoid danger of suffocation, keep these bags away from babies and children.
AC Adapter
- If the printer will not be used for an extended period, disconnect the AC adapter from the printer and electrical outlet.

Warning
Tape Cutter
- To avoid injury, do not touch the tape cutter.
Labels
- Depending on the location, material, and environmental conditions, the label may be difficult to remove, the colour of the label may change or may be transferred to other objects. Test the suitability of the surface first by affixing a small piece of the label to an inconspicuous area of the intended surface.
Installation precautions

Caution
- Do not place the machine on an unstable cart, stand, or table. The product may fall, causing serious damage to the product.
- To avoid damage, do not place any heavy objects on top of the printer.
- Do not bring RFID (non-contact RFID tags) within 50 mm in front of, above, or on the right side of the printer when the printer is in use. If you do so, it may interfere with the data writing during printing. Even beyond this range, some types of RFID tags may interfere with writing. Be extremely careful when using high-sensitivity RFID tags.
- Do not place the printer within the read range of other RFID reader/writers.
- The printer is a communication device using 13.56 MHz radio waves on the ISM band. It may generate interference, depending on how and where the printer is used. To minimize the effect of any interference, we recommend checking interference by or to the printer in advance. Be extremely careful when you use it near radio astronomy or medical equipment, as the printer may affect operation of the equipment.
General precautions
Printer

Warning
The printer is not designed or manufactured for applications requiring an extremely high level of safety, such as in nuclear reaction control systems of nuclear power plants, aircraft autopilot systems, air traffic control towers, driving control of mass transit systems, life-support systems, missile launch control of defense systems, or other applications posing a direct, significant risk of injury, loss of life, or damage if safety cannot be ensured.

Caution
- Use only genuine Brother accessories and supplies (24 mm), (3.5 mm, 36 mm),
HG (6 - 36 mm), or (24 mm) mark.
- Do not insert or remove the tape forcibly.
- Do not insert any foreign objects into the label output slot, AC adapter inlet, or USB port. Do not obstruct these areas.
- To avoid damaging the print head, do not attempt to print labels with used tape cassettes or without inserting the tape cassette.
- Do not touch the print head with your fingers.
- Do not use paint thinner, benzene, alcohol, or other volatile organic solvents to clean the printer.
- Avoid using or storing the printer in direct sunlight or near heaters or sources of open flame, or where it is exposed to extremely high or low temperatures, high humidity, or excessive dust. The recommended environmental temperature range is 10^ C - 35^ C.
- The software contained on the CD-ROM is meant for use with the printer only. See the License Agreement on the CD-ROM for further details.
- Use only the USB cable included with the printer.
SZ (RFID) tape
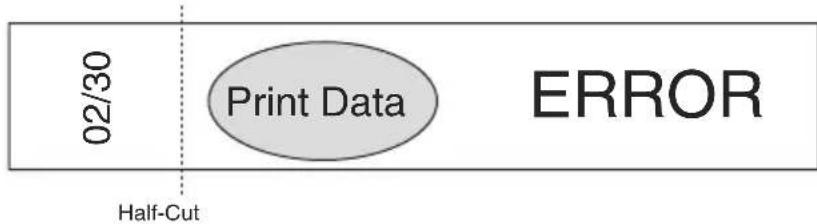
- SZ tapes can produce labels from 53.5mm to 100mm in length. When printing labels less than 100mm in length the machine will still feed the tape through as if a 100mm label had been printed. This is so the RFID tag is correctly positioned and ready to print the next label.
- When using SZ tapes the machine will print a label counter in the leading margin of each label in the format XX/30 ("XX" is a number between 2 and 30, indicating how many labels have been printed with that cassette).
When all 30 labels are used, the machine will print END, indicating that the cassette needs to be replaced.
- The RFID tags themselves are in the leading portion of labels printed on SZ tape. Avoid cutting or damaging this portion, as this may impair or disable the RFID tag.
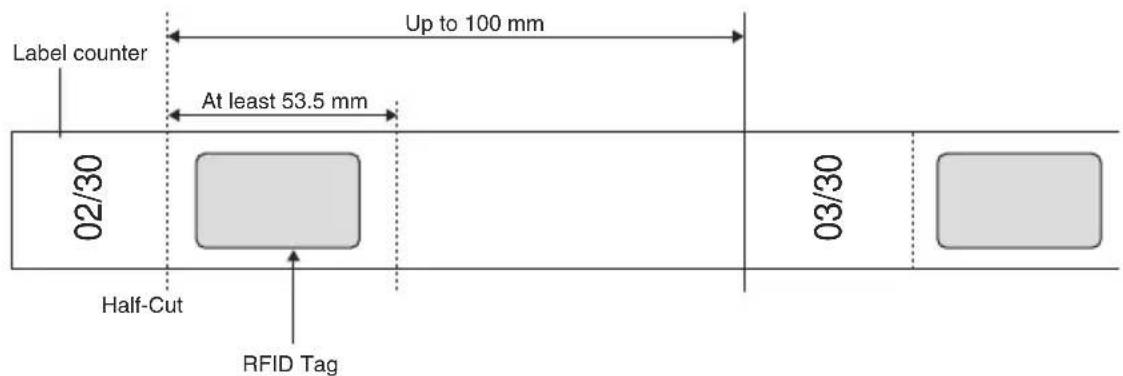
- If ERROR is printed in the trailing portion of a label, an error occurred when the machine attempted to write data to the RFID tag. Move the machine away from any other reader/writers or other devices that may interfere with access to RFID tags and try printing again.
flowchart
graph LR
    A["02/30"] --> B["Print Data"]
    B --> C["ERROR"]
    D["Half-Cut"] --> B
• To avoid damaging cassettes and preventing further use, do not pull out the tape.
- To avoid rendering data unreadable, do not apply labels to metal objects, electronic devices, or other RFID tags.
- Data reading may be significantly impaired if labels are applied directly to moist surfaces or near them. Test operation before applying labels to surfaces.
- Do not bring SZ tape cassettes or RFID tags within 50 mm in front of, above, or on the right side of the printer when it is in use. This may interfere data writing during printing.
- Do not bring SZ tape cassettes within the read range of other RFID reader/writers. This may interfere data writing during printing.
- To avoid damaging labels, do not bundle the tape, put objects on it, or scratch it using hard objects. Do not apply labels to objects where they will be subjected to strong vibration or impact.
- Check where you will apply labels before applying them.
Once labels are applied, you cannot reapply them elsewhere after peeling them off.
- Do not attempt to disassemble the cassettes or labels.
- Depending on environmental conditions and the location and material of objects labelled, labels may peel away, become irremovable, or leave a residue. Also, the label color may change over time, and the surface underneath may be damaged.
- Do not apply labels to skin.
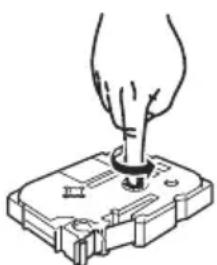
- Before setting the cassette, take up any slack in the ribbon by winding it in the direction shown 1 - 2 times around.
natural_image
Hand inserting a plug into a battery pack (no text or symbols visible)- Note that the margin of the first label printed is larger than other labels.
- To avoid label damage or data loss, do not use labels in extremely high or low temperatures.
- Note that applying labels to curved surfaces will lower the read rate because the antenna will be curved. Extremely curved surfaces may interfere reading, and the tape may peel off.
- Do not bend labels, which may break the antenna or damage the RFID tag.
- To avoid fire, do not put labels in microwave ovens.
- This product uses I-Code SLI RFID chips manufactured by NXP Semiconductors.
These chips are compatible with reader/writers conforming to ISO/IEC 15693 and 18000-3 standards. (Operation is not guaranteed with all reader/writers.)
- When introducing a system based on SZ tape labels, check the environment of use carefully to ensure correct operation before use.
- When tape or labels are no longer needed, cut the RFID tag portion or take other measures to interfere data reading or writing before disposal.
Box contents
Make sure that all the following items are included in the package before using the product. If any items are missing or damaged, please contact the dealer you purchased the product from.
■RL-700S
RFID label printer
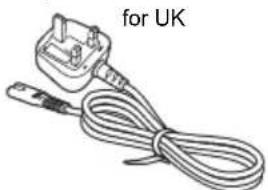
■AC Adapter
■Power cord
The design of adapter and plug may differ depending on which country the machine was purchased in.
natural_image
Line drawing of a UK-style electrical plug with coiled cable (no text or symbols)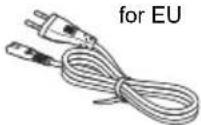
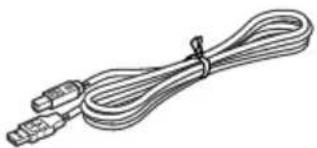
■USB cable
natural_image
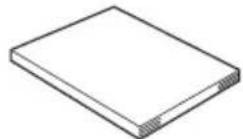
Line drawing of a broadband cable with two connectors and a strap (no text or symbols)■CD-ROM
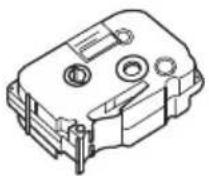
■SZ tape cassette (RFID tape)
24mm black on white (RFID tape). Makes up to 30 labels.

■TZ tape cassette
24mm black on white (non-RFID tape). 8 metres in length.
■User's manual (this booklet)
Description of parts
Front
Back
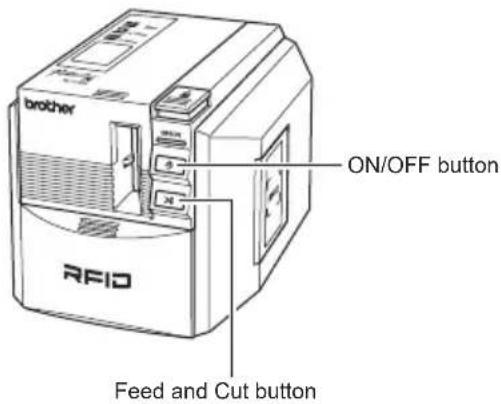
Description of buttons
| Button Function | |
| ON/OFF button ( ) | Turns the printer on and off. |
| Feed and Cut button ( ) | Feeds and cuts the printed labels.Use this button when the auto cut option in the printing dialog box is not checked.* Feed and cut does not function when SZ tapes are loaded. |
| Open Cover button Opens the cover. | |
Lamp display
The ON/OFF button lamp (blue) and Error lamp (red) indicate the current operating status.
| Lamp Status | Printer Status | |
| ON/OFF Button (Blue) | Error Lamp (Red) | |
| Off Off | The printer is off. | |
| On Off | The printer is working normally. | |
| Flashing Off | The printer is receiving data from the computer. | |
| Flashing On | The printer is receiving data from the computer, but unable to print.Load a tape cassette and close the cover. | |
| On On | No tape cassette is loaded, or the cover is open.Load a tape cassette and close the cover.The Feed and Cut button was pressed when SZ tape is loaded. (Unable to use the Feed and Cut button when SZ tape is loaded.)You reached the end of the SZ tape. Remove the SZ tape cassette and check the surface of the tape. If "END" is printed on the tape, replace the cassette with a new SZ tape cassette. | |
| On Flashing | A print job is received, but the printer cannot print. Load the correct tape cassette and close the cover.If ERROR is printed on the SZ tape, an error occurred when writing data to the RFID tag or the tag is damaged.Try printing again. | |
| On | Flashing Rapidly | Make sure that the tapes are not jammed in the printer.Turn the printer off and on.* If the problem is not solved, contact your dealer or authorized service center. |
| On | Flashing Very Rapidly | Turn off the printer, and then turn it on again.* If the problem is not solved, contact your dealer or authorized service center. |
Before printing labels
Connect the machine to a power point
1 Connect the AC adapter to the power cord.

natural_image
Line drawing of a rectangular electronic device with two cables and a connector (no text or symbols)2 Plug the connector of the AC adapter into the AC adapter jack on the rear of the printer.
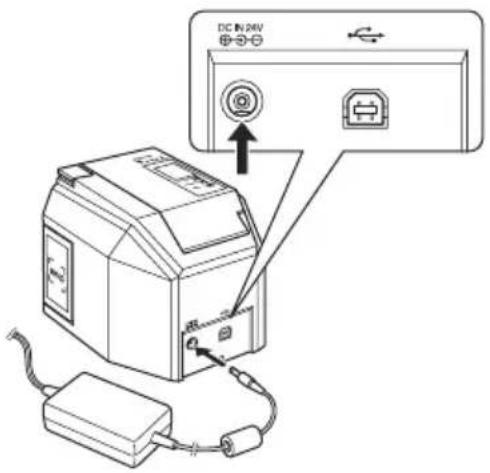
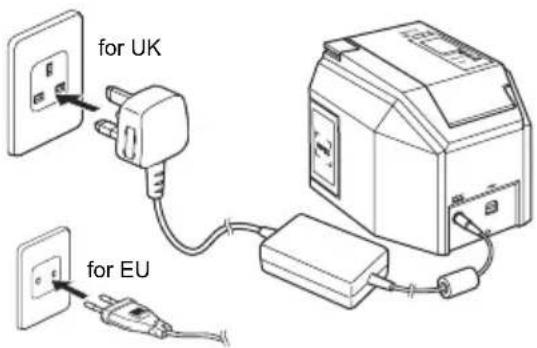
3 Connect the plug of the AC adapter to a household power point.

Memo
The design of adapter and plug may differ depending on which country the machine was purchased in.
Prepare a tape cassette
List of cassette types suitable for this machine:
■ SZ Tape (24 mm)
24 mm width tape cassettes with the SZ logo (SZ TAPE)
You can use this tape to create RFID labels.
■ TZ Tape (3.5-36 mm)
3.5 mm, 6 mm, 9 mm, 12 mm, 18 mm, 24 mm or 36 mm width tape cassettes with the TZ logo
(TZ) TAPE.
Enables printing at up to 20 mm/sec.
■ HG Tape (6-36 mm)
6 mm, 9 mm, 12 mm, 18 mm, 24 mm or 36 mm width tape cassettes with the HG logo (HG TAPE) Enables high-speed printing at up to 40 mm/sec.
Enables high-resolution printing at up to 360 x 720 dpi.
■ AL Tape (24 mm)
24 mm width tape cassettes with the AL logo (TAPE)

Memo
See p. 35 "Accessories" for detailed tape cassette information.
Install the cassette
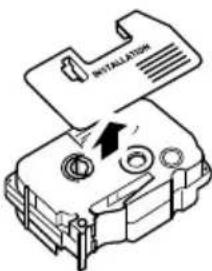
1
Remove the stopper from the tape cassette.

Memo
Some tape cassettes may not have the stopper.
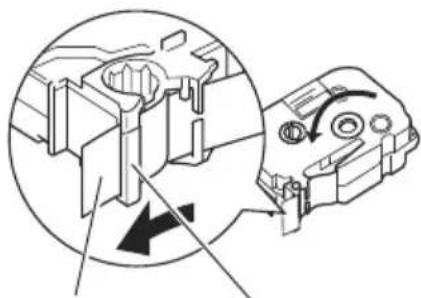
2 Check the tape cassette.
Make sure that the end of the tape is not bent and the tape is through the tape guide.
To pull in the slack of the tape, wind the take-up spool with your finger in the direction of the arrow for one or two turns.
natural_image
Mechanical assembly diagram showing internal components and directional arrows (no text or labels)The end of the tape
Tape guide
3 Press the Open Cover button to open the cover of the printer.
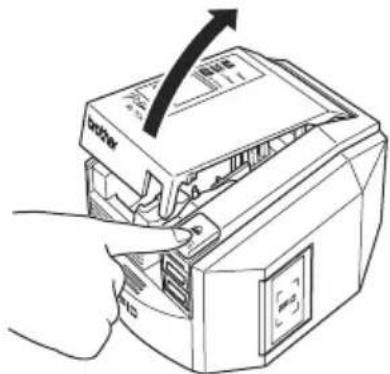
natural_image
Line drawing of a printer with a hand inserting a cable into it, showing the process (no text or symbols present)4 Put the tape cassette in the printer.

Memo
Make sure you position the tape cassette in the right direction.
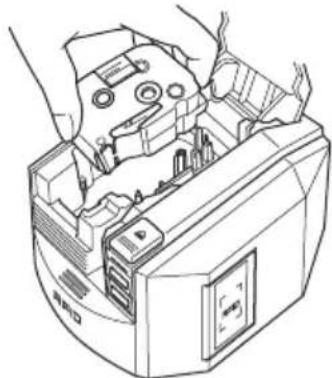
natural_image
Line drawing of hands operating a computer with an open rear panel and drive slots (no text or symbols)5 Close the cover.
6 Press the ON/OFF button.
The ON/OFF button lights up in blue.

Memo
If the cover is not properly closed or the tape cassette is not properly set, the ERROR lamp lights up. Repeat from Step 3 onwards.
7 Press the Feed and Cut button.
This procedure removes any slack in the tape cassette.

Memo
This step is not necessary for SZ tapes.
Caution
If you do not use the machine for 10 minutes, the machine will release the roller holder. If you disconnect the machine from the power before this happens (without turning the machine off with the ON/OFF button first) the tape cassette may be locked inside the printer. Please make sure you turn the machine off using the ON/OFF button before disconnecting the AC adapter.
Install the software
Software overview
Before connecting the printer to your computer, you must install the software on your computer, including software applications and the printer driver.
The following applications are included on the CD-ROM.
■ P-touch Editor 4.2
Advanced editing software to create label designs for a variety of purposes.
P-touch Editor is a standalone application for easy label design. It also provides many convenient features such as interaction with Microsoft® Office application using Add-Ins, database function, bar codes creation, and screen capture.
The following tools are also installed.
- P-touch Library 2.0
Instantly load previously printed labels created by P-touch Editor to print them easily.
• P-touch 4.2 Add-In Settings
Use the add-in icons for Microsoft ^® Word, Excel, or Outlook ^® to create labels using data from these programs.
Printer Driver
■ RL-700S Runtime Library
You must install this library with the printer driver to use RFID applications.
■ RFID Sample Applications
Sample applications that introduce the RFID functions.
Three types of applications are provided: NameLabel, FileOpen, and Itemlabel. If the PC does not have Microsoft .NET Framework 2.0 installed, it will be installed automatically.
■ RL-700S SDK
The SDK (Software Development Kit) is for developing RFID applications for use with your machine.
For detailed technical information, see the RL-700S SDK manual.
Preparing for installation
■ System requirements
Before installation, make sure your computer meets these requirements and that other required software is already installed.
| Item Details | |
| Operating System | Microsoft® Windows® 2000 Professional (SP4 or later), Windows® XP, or Windows Vista®* The computer should meet the recommendations provided by Microsoft® for the OS installed.* Internet Explorer® 5.01 or later is required to use the sample applications. |
| Interface USB port (USB 1.1 | or later) |
| Hard Disk | 70 MB or more of free space(required when installing all options) |
| Memory | Microsoft® Windows® 2000 Professional or Windows® XP: 128 MB or moreWindows Vista®: 512 MB or more |
| Monitor SVGA, 16 bit colour | or higher |
| Other CD-ROM drive | |
| Software Compatible With Microsoft® Office Add-Ins | Microsoft® Word 2000/2002/2003/2007Microsoft® Excel 2000/2002/2003/2007Microsoft® Outlook® 2000/2002/2003/2007 |
| Software Compatible With Sample Applications (Itemlabel) | Microsoft® Excel 2000/2002/2003/2007 |
If the PC does not have Microsoft .NET Framework 2.0, it will be installed automatically. This requires an additional 300 MB of free hard disk space.
■ Installation precautions
- Do not connect the USB cable to your computer before installing the software. If the USB cable is accidentally connected, click [Cancel] when the following screen is displayed and disconnect the USB cable.
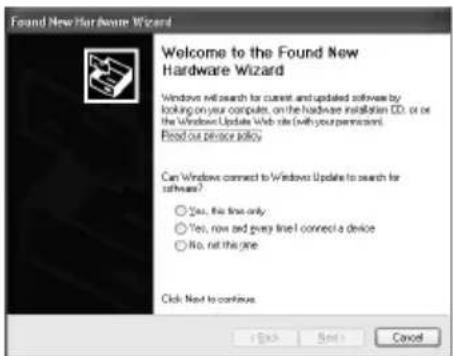
- You must be logged on with administrator rights to install this software.
Software installation procedure
Install screens are from Windows ^® XP. Some screens may be different with other versions of Windows ^® .
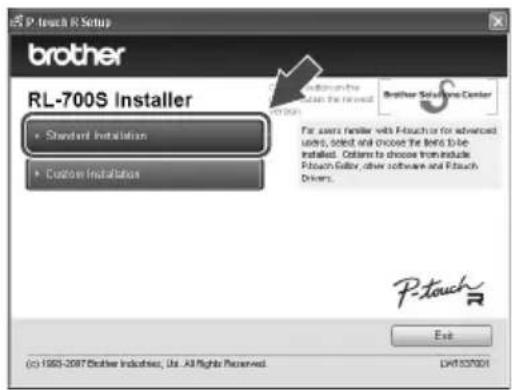
1 Start your computer and insert the CD-ROM in the CD-ROM drive. Select the language you want to install.
The RL-700S Installer starts up and the P-touch R Setup screen is displayed.

Memo
- It may take few moments before this screen is displayed.
- If it does not start up automatically, double-click the "Setup.exe" icon on the CD-ROM.
2 Click Standard Installation.

Memo
If Microsoft .NET Framework 2.0 and Windows Installer 3.0 or later are not installed on your computer, the installation screen is displayed. Follow the instructions on the screen to complete installation. If you cancel this step, no software will be installed.
The License Agreement screen is displayed.

Memo
• To install individual programs, click Custom Installation and select the programs you want to install.
- The RL-700S SDK is not installed as part of Standard Installation. Use Custom Installation after installing other software.
- For details on the RL-700S SDK, see the RL-700S SDK manuals in the SDK folder. RL-700S SDK manuals are installed under the following path.
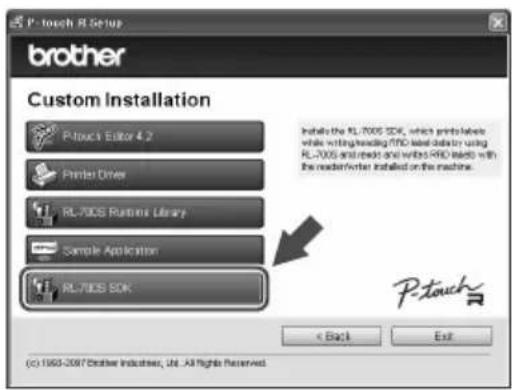
C:\Program Files\Brother RL-700S\SDK\Doc
3
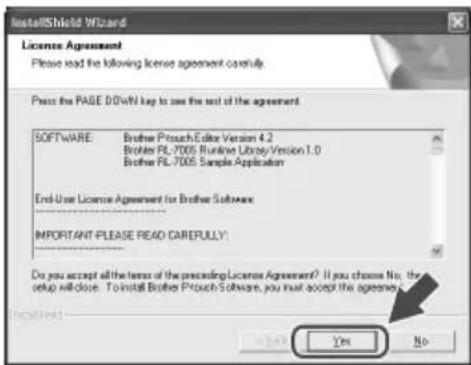
Read the license agreement very carefully. If you agree with the terms and conditions of the license agreement, click Yes to continue the installation.
The Customer Information screen is displayed.
4
Fill in the information requested by the installer, and then click Next.
Several screens may follow. You will need to provide the following information:
- Customer Information
- Choose Destination Location
- Add Shortcut
5
Check the settings are correct, then click Next.

Memo
- It may take few minutes before this screen is displayed.
- If any information is incorrect, click Back to re-enter it.
The Add-In Settings screen is displayed.

Memo
In Microsoft ^® Windows ^® XP or Windows Vista ^® , confirmation screens may be displayed during software installation.
In this case, choose the option to install anyway.
6 Select the programs you would like to install the Add-Ins to, and then click Next.

Memo
• Make sure that you closed all Microsoft ^® Office ^® applications before proceeding.
- For details on configuring Add-Ins, see the help file for P-touch Editor 4.2.
- Follow the instructions on the screen to complete installation.
The software is now installed. When installation is finished, the Driver Setup screen is displayed.
7 When the message "Connect Brother RL-700S, and then turn it on." is displayed, connect the USB cable to the printer's USB port.

Memo
Before connecting the USB cable, remove the warning sticker from the printer's USB port.
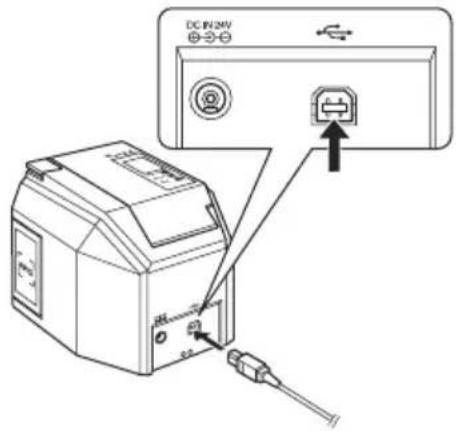
8
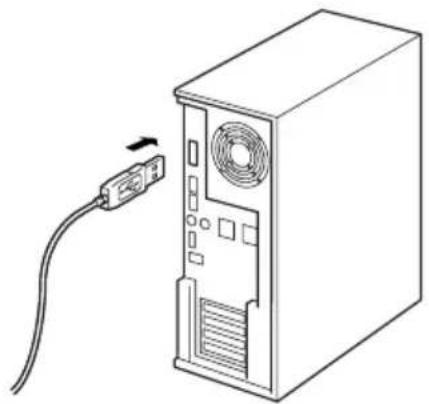
Connect the USB cable to the computer's USB port and turn on the printer.
When the computer detects the printer, the printer driver installs automatically.

Memo
If your machine is not detected, make sure that the USB cable is connected directly to your computer and not through a USB hub.
After the driver is installed, the Online User Registration screen is displayed.
natural_image
Line drawing of a desktop computer tower with an attached cable and ventilation slots (no text or symbols)9
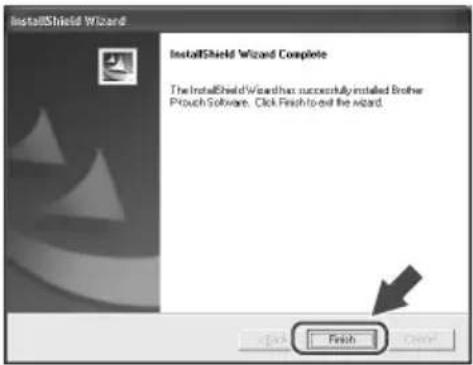
Click Finish.
Software installation is now complete.

Memo
After installation, you may be instructed to restart your computer. If so, choose to restart the computer and click Finish.
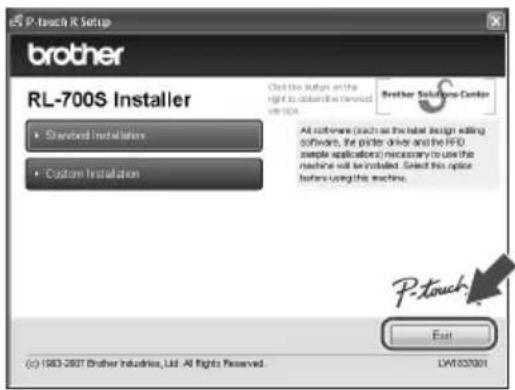
The RL-700S Installer screen is displayed.
10
Click Exit.
RL-700S installation is now complete.
Creating labels
This section explains how to create simple labels using P-touch Editor 4.2. You can find more detailed information in P-touch Editor Help (see "View Help" on page 26).

Memo
• To create RFID labels, install the RFID sample applications provided on the CD-ROM.
- P-touch Editor cannot write data to SZ tapes (RFID capable). To use the RFID capability of SZ tapes, install and run the RFID sample applications provided on the CD-ROM.
- You can print without writing to an RFID tag or design label templates for use in other RFID enabled applications by choosing "SZ 24mm (RFID)" in the Tape Width setting.
Starting P-touch Editor
1
To start P-touch Editor, click Start and then point to All programs, Brother P-touch, and click P-touch Editor 4.2.

Memo
You can also start P-touch Editor by double-clicking the shortcut on the desktop, or by clicking the shortcut on the Quick Launch bar.

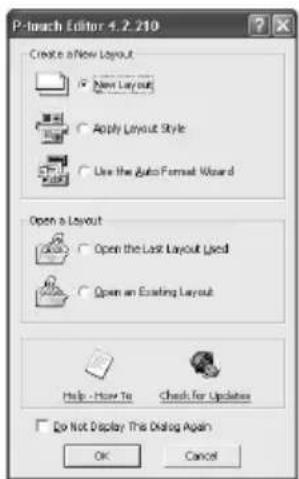
2
Choose an action in the dialog box and click OK.

Memo
To turn off the startup dialog, click Tools in the menu bar and then Options.... Uncheck Display Startup Dialog Box in the Operations box on the General tab.
P-touch Editor Edit window
![P-touch Editor - [Layout1] File Edit View Insert Format Tool Layout Window Help Normal Format 9.65° 0.24° 1-1/7" Sheet 1 1/1 Text Analog Text Blue Code Decorative Forma Table Image Screen Configure Op Art Symbol Paste Picture, Create and Tree Calendar Insert New Favorites History For Help, press FL](/content/2026/02/424629/images/c4ecfb6acaa1accd41384d2730c16572cc2aa2a357c4f4e9c13b65862cca4521.jpg)
①Menu
Commands are categorized in menus such as File, Edit, View, and Insert according to the functions.
②Standard Tool Bar
This tool bar includes the Menu commands that are most frequently used such as New layout, Open, Save and Auto-format.
③Properties Dock
The print properties, page properties, text properties, layout properties, and database properties appear in this part. You can choose to show or hide the properties by clicking the button on the left of the properties dock.
④Drawing Tool Bar
The tool bar includes functions such as Object Selection, Text Input, and Drawing.
⑤Layout Window
You can display and edit the inserted object in this area.
⑥Object Dock
The object dock facilitates the insertion of text, arranged text, bar codes, decorative frames, tables, and images and other objects.

Memo
- You can view or hide tool bars, docks or windows from the View menu.
- When you use a database or the label list, the edit screen shows the label lists/database window.
View Help
Find detailed information and instructions on how to use P-touch Editor.
1 In the P-touch Editor edit window, Click Help in the menu bar and then P-touch Editor Help.


Memo
You can also launch Help by the following steps.
- Click Start, All Programs, Brother P-touch and then P-touch Editor 4.2 Help.
- While the P-touch Editor edit window is on the screen, press the F1 key on the keyboard.
2 View P-touch Editor Help.
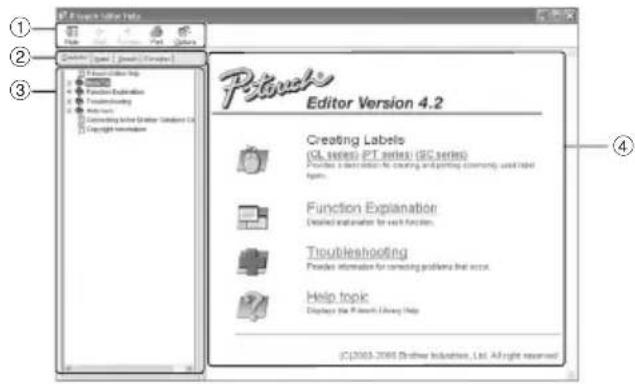
①Tool Bar
These icons facilitate quick viewing of the Help content.
②Tabs
You can look up the Help content via "Contents", "Index", "Search" or "Favorites".
③Menu
The menu shows the content according to the selected tab.
④Topic Area
The selected item is explained in detail in this area.
- How To: steps to create labels are explained with case examples.
- Function Explanation : functions of P-touch Editor are explained for each item.
- Troubleshooting: solve problems with your machine.
- Help topic : takes you to the P-touch Library Help.
3 Print P-touch Editor Help.
You can print out the contents of Help.
① Select topics to print out on the "Contents" tab.
② Click on the tool bar.
The "Print Topics" dialog box appears.
③ Specify the range of topics to print out and click "OK".
The "Print" dialog box appears.
④ Select the desired printer and then "Print".
The selected content of Help will be printed.
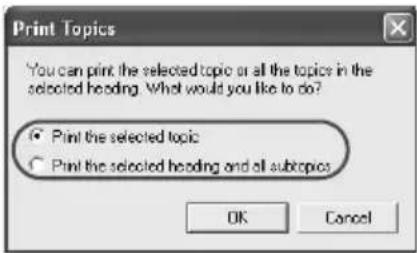

Memo
Select a standard printer that supports conventional paper sizes such as A4.
Create different types of labels
The steps to create the following types of labels are explained in the "How To" section (PT series) of the P-touch Editor Help.
| Operations Examples Introduced Functions | ||
| Creating name labels |  | · Specifying the size of the labels· Centre-justifying text labels· Drawing borders around the text |
| Creating labels for CD cases | 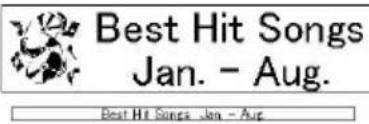 | · Specifying background theme· Inserting clip art· Putting together multiple labels using the sheet function |
| Printing labels with sequential numbers |  | · Setting numbering and printing numbered labels |
| Creating tables |  | · Inserting tables· Merging cells· Inserting text in a table |
| Creating labels for abbreviated dialing |  | · Creating a table without borders· Setting the width of cells |
| Creating bar-code labels |  | · Selecting a standard· Changing the size |
| Printing labels with data from Excel |  | · Connecting to an Excel file· Merging to the layout |
| Creating wide labels |  | · Setting wide labels· Characters inversion |
Using RFID Labels
Reading and writing data on RFID labels
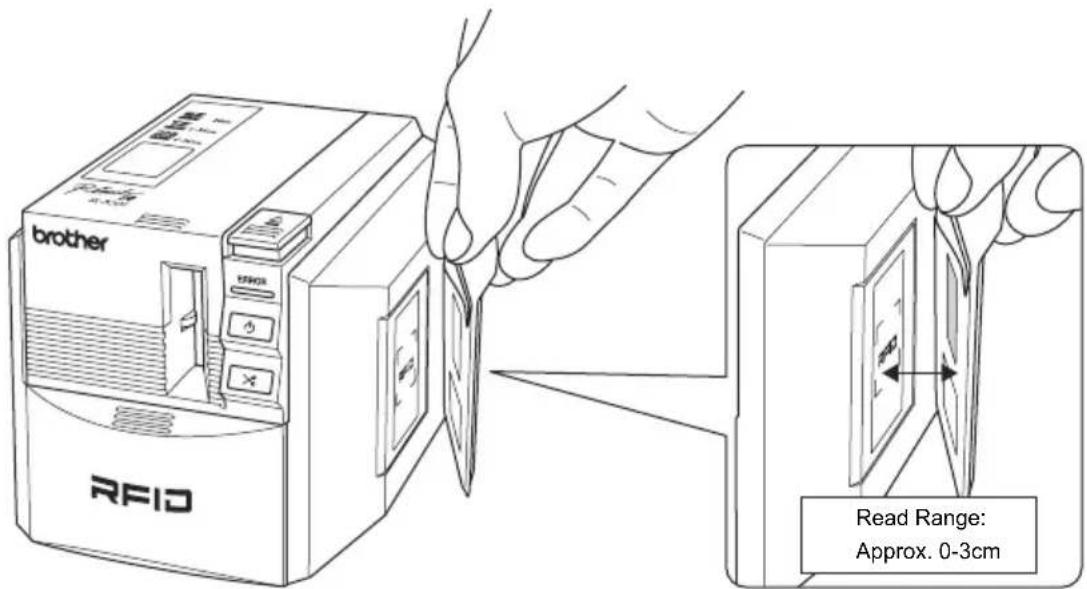
The printer has a built-in reader/writer for reading and writing RFID label data.
To use the reader/writer of the printer, you need to install a supporting application first. Install one of the included sample applications before use. See p. 30 "Experience RFID label applications (Sample Applications)".
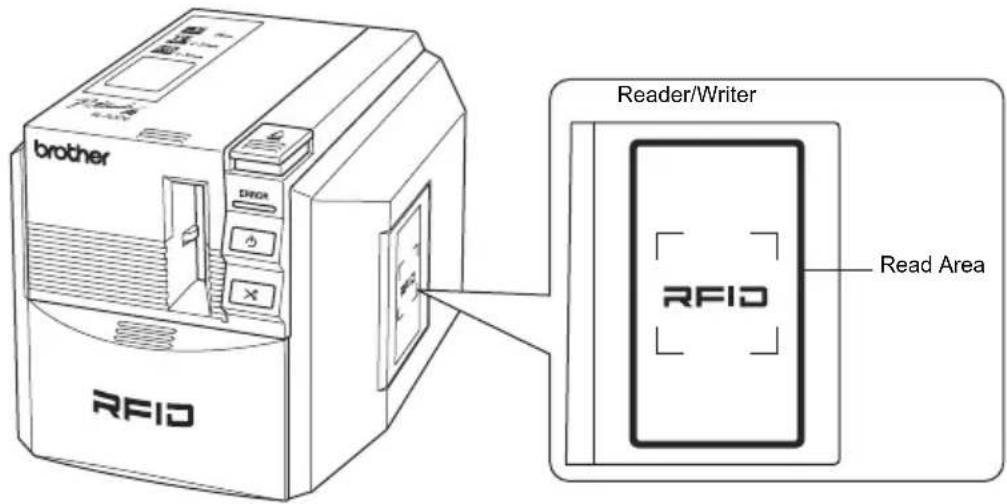
When the printer is functioning as a reader/writer, hold an RFID label near the read area to read the RFID label data.
Experience RFID label applications (Sample Applications)
For an introduction to use RFID labels, try installing and using one of the sample applications from the CD-ROM.

Memo
These programs are sample applications to introduce printer RFID functions. They are provided as a way to try common functions, but no guarantee is implied regarding actual use.
Overview of sample applications
NameLabel
An application for creating RFID tag-name labels, reading and writing the data with the printer. Issue the RFID Labels Read and Write the RFID Labels
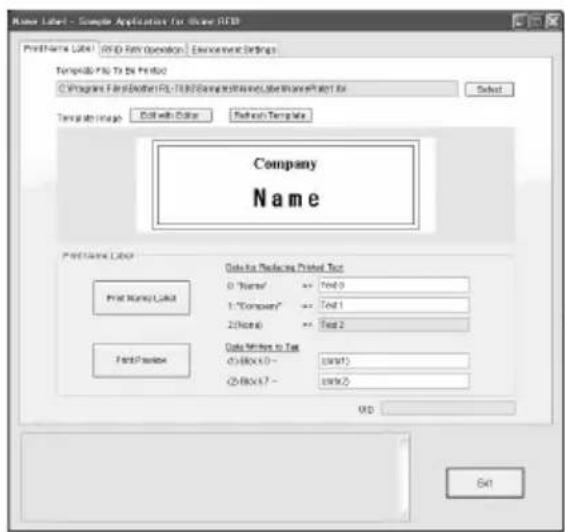
To issue name labels, choose a template and enter the information to the RFID tags. Then click "Print Name Label" to print out the finished tags.

![Raw Label - Sample Applications for Linux RFID Print Name Label RFID RW Operation Environment settings Tag: UDP R/W Remove UDP Number of UDP 1 UDP DIMESTIPASES User Data Channels MESH TEXT Tag Numbers Data Dividers Area and User Data RW Read Tag 0 ROB/ROB 10 OB/ROB 20 $800/800 1 ROB/ROB 11 OB/ROB 21 $800/800 PAR 2 ROB/ROB 12 OB/ROB 22 $800/800 DISABLED 3 ROB/ROB 13 OB/ROB 23 $800/800 4 ROB/ROB 14 OB/ROB 24 $800/800 API 5 ROB/ROB 15 OB/ROB 25 19727733 GO 6 ROB/ROB 16 OB/ROB 26 $800/800 T ROB/ROB 17 OB/ROB 27 $7338441 DISPD 9 ROB/ROB 18 OB/ROB GO 9 ROB/ROB 19 OB/ROB Data: R/W Use Tag RW Write User Code Email Block 0 RW Lock User Date Startbox 0 Closed Box Length APT: (RGB) : 1.9 RNET scoring for reader letter OPT: (RGB) : 1.9 Last user data work information for reader letter. Last Data Lock Interface (R/W) [RGB] Block Number : None Successful to scanned tax reports for reader letter. Edit](/content/2026/02/424629/images/a5ac33ab826527b8d6436e0c1eedfa96cdc983c069008e614481555ab91aa0ce.jpg)
Hold a label near the reader/writer of the printer and click the button to read or write the data.
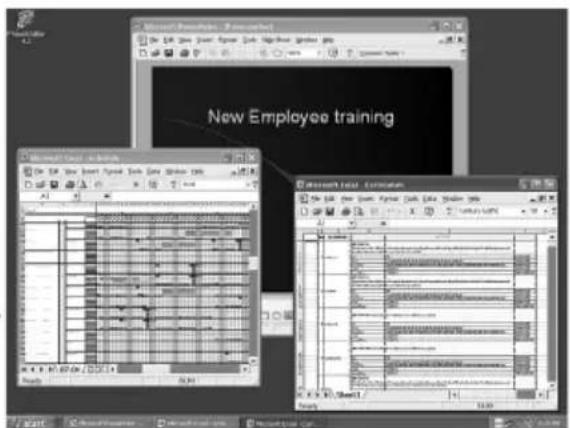
FileOpen
An application for opening multiple files (registered in advance) at once when you hold the RFID label near the reader/writer of the printer.
For example, this function is useful when several people give presentations on a single computer.
Issue the RFID Labels Read the RFID Labels
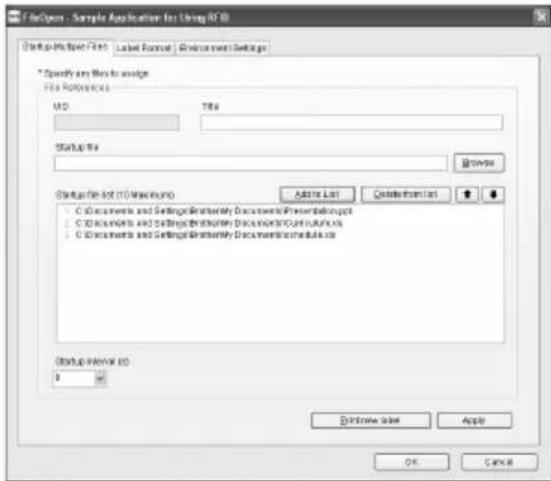
Register multiple files that you want to open, and then print the labels.
You can set up the Label Format as well.

Since this application is a resident application, you can open the registered files by holding the label near the reader/writer of the printer.
ItemLabel
An application for creating RFID labels and managing the RFID labels for users and items.
Issue the RFID Labels Read the RFID Labels
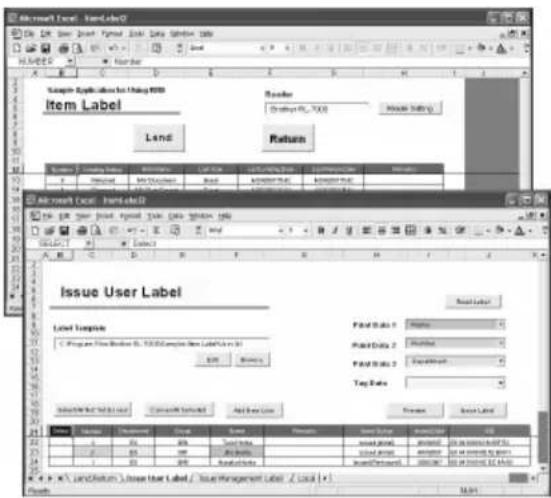
Register lending information for users and items, and then print their RFID labels.

When lending the items, read the both lending user and item labels.
When returning the items, read the lending item labels only.
Support for application development
The SDK (Software Development Kit) is provided so that you can develop applications that take full advantage of the RFID label creating capability of your RL-700S.
RL-700S SDK is provided as a library for use on Microsoft Windows ^® operating systems.
This SDK can be used with development languages such as Visual Studio .net, Visual C++, Visual C#, Visual Basic for Applications (VBA), VB Script, Delphi, Notes Script and ABAP, which can take advantage of COM automation.
P-touch Editor 4.2 allows you to design labels as you wish. You can change designs by simply editing with P-touch Editor 4.2 and saving them.
As all the settings are memorized in the label files, coding is only necessary for associating output data. No special knowledge is required for controlling output.
The modules used in SDK can be redistributed. You can provide users with the application software you created.
Refer to p. 20 "Software installation procedure" for installation instructions.
SOFTWARE UPDATE
You can download the latest versions of the software and manuals at http://solutions.brother.com.
Cleaning and maintenance
Maintenance
Follow the instructions in this section to keep your machine operating at optimum efficiency. Dusty environments may require shorter intervals between cleaning and maintenance procedures.
Cleaning the outside of the machine
Wipe off dirt and dust on the surface (outside) of the printer with a dry soft cloth. Use a moistened cloth to clean persistent dirt and stains.

Caution
Do not use volatile solvents or chemicals such as benzene, thinner and alcohol.
Doing so may deform or damage the case or surface of the printer.
Cleaning the cutter blade
You may need to clean the cutter blade if the printed labels are not cut properly, or have difficulty exiting the machine.

Turn off the power with the ON/OFF button and disconnect the machine from the power.

Press the Open Cover button to open the cover of the printer.

Remove the tape cassette.

Clean the cutter blade with a cotton bud.
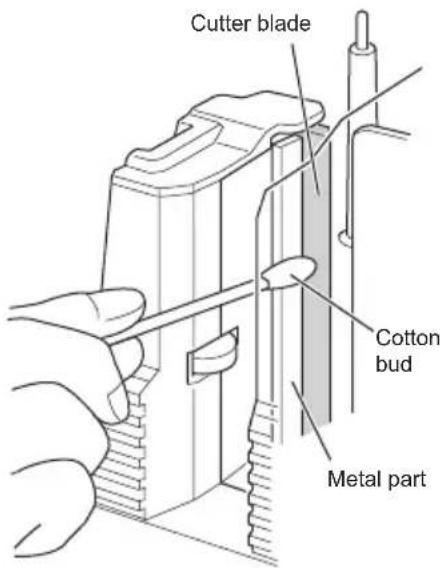

Warning
Do not touch the cutter blade.
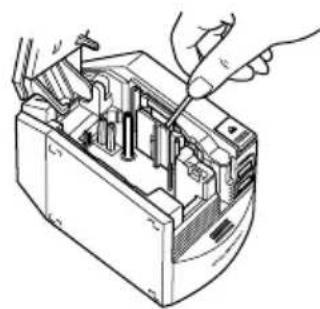
Cleaning the print head and head roller
If horizontal lines are printed on the labels or the prints are not very clear, the print head or head roller may need to be cleaned. Follow the steps below to clean the print head and head roller.
1 Clean the print head with the self cleaning function.
① Press the Open Cover button to open the cover of the printer.
② Remove the tape cassette.
③ Close the cover.
④ Press the Feed and Cut button.
Self-cleaning will be performed.
⑤ Press the Open Cover button to open the cover of the printer.
⑥ Put back the tape cassette and close the cover.
2 Cleaning with a cotton bud.
① Turn off the power with the ON/OFF button and pull out the AC plug.
② Press the Open Cover button to open the cover of the printer.
③ Remove the tape cassette.
④ Clean the print head and head roller with a cotton bud.
⑤ Put back the tape cassette and close the cover.
□Print head
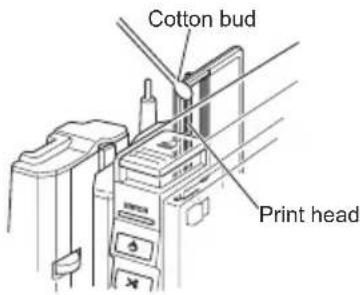
natural_image
Technical line drawing of a computer internal component being inserted, showing hands and wiring (no text or symbols)□Head roller
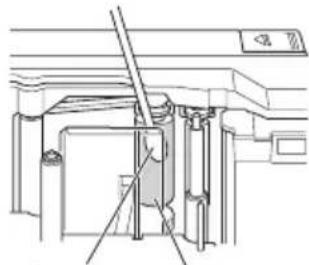
natural_image
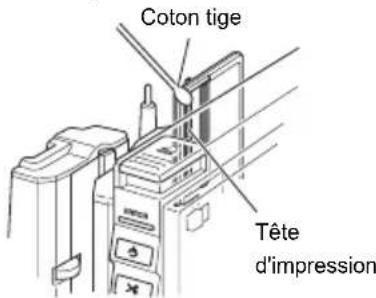
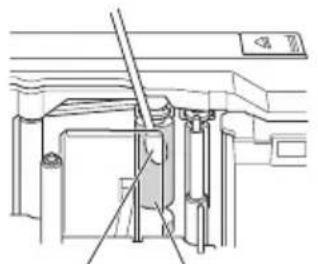
Technical line drawing of a mechanical assembly with no visible text or symbolsCotton bud Head roller
Warning
- Do not touch the cutter blade.
- The print head is at a high temperature immediately after labels are printed. Avoid cleaning the print head immediately after printing as doing so may burn your fingers.

Memo
Cleaning tape TZ-CL6 (width: 36 mm) is available to purchase to ease cleaning. For details of how to use the cleaning tape, refer to the documentation provided with the tape.
Accessories
Brother recommends the use of genuine Brother accessories (tape cassettes, AC adaptor, etc.) with your P-touch. The use of other products may effect the print quality or may damage your P-touch. Availability of accessories subject to change without notice.
Tape cassettes
Not all tape cassettes are available in all countries.

Memo
Do not use tapes that do not have the


■ SZ Tapes
You can create RFID labels using this tape. One roll of tape has 30 sheets of labels. Laminated tapes
Stock No. Description
SZ-2511 24 mm SZ tape (black characters on white tape)
■ HG Tapes (length: 8 m)
This tape allows high-speed printing at a maximum of 40 mm/sec. or high-resolution printing at 360 x 720 dpi.
Laminated tapes
| Stock No. | Description |
| HG-211 6 mm | HG tape (black characters on white tape) |
| HG-221 9 mm | HG tape (black characters on white tape) |
| HG-231 12 mm | HG tape (black characters on white tape) |
| HG-241 18 mm | HG tape (black characters on white tape) |
| HG-251 24 mm | HG tape (black characters on white tape) |
| HG-261 36 mm | HG tape (black characters on white tape) |
■ Laminated tapes (length: 8 m)
The surface of laminated tapes is protected by a transparent film. This prevents characters from smudging or being erased if the label becomes wet.
| Stock No. Description | |
| 36 mm | |
| TZ-161 Black | characters on clear tape |
| TZ-164 Gold | characters on clear tape |
| TZ-261 Black | characters on white tape |
| Stock No. | Description |
| TZ-262 | Red characters on white tape |
| TZ-263 | Blue characters on white tape |
| TZ-364 | Gold characters on black tape |
| TZ-365 | White characters on black tape |
| TZ-461 | Black characters on red tape |
| TZ-561 | Black characters on blue tape |
| TZ-661 | Black characters on yellow tape |
| TZ-M961 | Black characters on silver (matt) tape |
| 24 mm | |
| TZ-151 | Black characters on clear tape |
| TZ-M51 | Black characters on clear (matt) tape |
| TZ-152 | Red characters on clear tape |
| TZ-153 | Blue characters on clear tape |
| TZ-155 | White characters on clear tape |
| TZ-251 | Black characters on white tape |
| TZ-252 | Red characters on white tape |
| TZ-253 | Blue characters on white tape |
| TZ-354 | Gold characters on black tape |
| TZ-355 | White characters on black tape |
| TZ-451 | Black characters on red tape |
| TZ-455 | White characters on red tape |
| TZ-551 | Black characters on blue tape |
| TZ-555 | White characters on blue tape |
| TZ-651 | Black characters on yellow tape |
| TZ-655 | White characters on orange tape |
| TZ-751 | Black characters on green tape |
| TZ-755 | White characters on green tape |
| TZ-951 | Black characters on silver tape |
| TZ-M951 | Black characters on silver (mat) tape |
| TZ-B51 | Black characters on fluorescent orange tape |
| TZ-C51 | Black characters on fluorescent yellow tape |
| TZ-D51 | Black characters on fluorescent green tape |
Stock No. Description
| 18 mm | |
| TZ-141 Black | characters on clear tape |
| TZ-241 Black | characters on white tape |
| TZ-242 Red | characters on white tape |
| TZ-243 Blue | characters on white tape |
| TZ-344 Gold | characters on black tape |
| TZ-145 White | characters on clear tape |
| TZ-345 White | characters on black tape |
| TZ-441 Black | characters on red tape |
| TZ-541 Black | characters on blue tape |
| TZ-641 Black | characters on yellow tape |
| TZ-741 Black | characters on green tape |
| 12 mm | |
| TZ-131 Black | characters on clear tape |
| TZ-132 Red | characters on clear tape |
| TZ-133 Blue | characters on clear tape |
| TZ-135 White | characters on clear tape |
| TZ-231 Black | characters on white tape |
| TZ-232 Red | characters on white tape |
| TZ-233 Blue | characters on white tape |
| TZ-334 Gold | characters on black tape |
| TZ-335 White | characters on black tape |
| TZ-431 Black | characters on red tape |
| TZ-435 White | characters on red tape |
| TZ-531 Black | characters on blue tape |
| TZ-535 White | characters on blue tape |
| TZ-631 Black | characters on yellow tape |
| TZ-635 White | characters on orange tape |
| TZ-731 Black | characters on green tape |
| TZ-735 White | characters on green tape |
| TZ-931 Black | characters on silver tape |
| TZ-M931 Black | characters on silver (mat) tape |
| TZ-B31 Black | characters on fluorescent orange tape (length: 5 m) |
| TZ-C31 Black | characters on fluorescent yellow tape (length: 5 m) |
| TZ-D31 Black | characters on fluorescent green tape (length: 5 m) |
| Stock No. Description | |
| TZ-M31 Black | characters on clear (mat) tape |
| 9 mm | |
| TZ-121 Black | characters on clear tape |
| TZ-122 Red | characters on clear tape |
| TZ-123 Blue | characters on clear tape |
| TZ-221 Black | characters on white tape |
| TZ-222 Red | characters on white tape |
| TZ-223 Blue | characters on white tape |
| TZ-324 Gold | characters on black tape |
| TZ-325 White | characters on black tape |
| TZ-421 Black | characters on red tape |
| TZ-521 Black | characters on blue tape |
| TZ-621 Black | characters on yellow tape |
| TZ-721 Black | characters on green tape |
| TZ-M21 Black | characters on clear (mat) tape |
| 6 mm | |
| TZ-111 Black | characters on clear tape |
| TZ-211 Black | characters on white tape |
| TZ-315 White | characters on black tape |
| TZ-611 Black | characters on yellow tape |
■ Non-laminated tapes (length: 8 m)
| Stock No. Description | |
| 24 mm | |
| TZ-N251 Black characters on white tape | |
| 18 mm | |
| TZ-N241 Black characters on white tape | |
| TZ-N242 Red characters on white tape | |
| TZ-N641 Black characters on yellow tape | |
| TZ-PH41 Black characters on tape with a heart design (length: 4 m) | |
| TZ-PF41 Black characters on tape with a fruit design (length: 4 m) | |
| TZ-PM41 Black characters on tape with a marine design (length: 4 m) | |
| 12 mm | |
| TZ-N231 Black characters on white tape | |
| TZ-N232 Red characters on white tape | |
| Stock No. | Description |
| TZ-N531 | characters on blue tape |
| TZ-N631 | characters on yellow tape |
| 9 mm | |
| TZ-N221 | characters on white tape |
| 6 mm | |
| TZ-N211 | characters on white tape |
| 3.5 mm | |
| TZ-N201 | characters on white tape |
■ Strong adhesive tapes (length: 8 m)
Laminated tapes with stronger adhesive, ideal for rough surfaces or harsh environments.
| Stock No. | Description |
| 36 mm | |
| TZ-S161 Black | characters on clear tape |
| TZ-S261 Black | characters on white tape |
| TZ-S661 Black | characters on yellow tape |
| 24 mm | |
| TZ-S151 Black | characters on clear tape |
| TZ-S251 Black | characters on white tape |
| TZ-S651 Black | characters on yellow tape |
| 18 mm | |
| TZ-S141 Black | characters on clear tape |
| TZ-S241 Black | characters on white tape |
| TZ-S641 Black | characters on yellow tape |
| 12 mm | |
| TZ-S131 Black | characters on clear tape |
| TZ-S231 Black | characters on white tape |
| TZ-S631 Black | characters on yellow tape |
| 9 mm | |
| TZ-S121 Black | characters on clear tape |
| TZ-S221 Black | characters on white tape |
| TZ-S621 Black | characters on yellow tape |
| 6 mm | |
| TZ-S111 Black | characters on clear tape |
| TZ-S211 Black | characters on white tape |
Stock No. Description
TZ-S611 Black characters on yellow tape
■ Flexible ID tapes (length: 8 m)
Flexible laminated tapes ideal for labelling network cables, electrical wires, etc.
| Stock No. Description | |
| 36 mm | |
| TZ-FX161 Black characters on clear tape | |
| TZ-FX261 Black characters on white tape | |
| TZ-FX661 Black characters on yellow tape | |
| 24 mm | |
| TZ-FX151 Black characters on clear tape | |
| TZ-FX251 Black characters on white tape | |
| TZ-FX651 Black characters on yellow tape | |
| 18 mm | |
| TZ-FX141 Black characters on clear tape | |
| TZ-FX241 Black characters on white tape | |
| TZ-FX641 Black characters on yellow tape | |
| 12 mm | |
| TZ-FX131 Black characters on clear tape | |
| TZ-FX231 Black characters on white tape | |
| TZ-FX631 Black characters on yellow tape | |
| 9 mm | |
| TZ-FX121 Black characters on clear tape | |
| TZ-FX221 Black characters on white tape | |
| TZ-FX621 Black characters on yellow tape | |
| 6 mm | |
| TZ-FX111 Black characters on clear tape | |
| TZ-FX211 Black characters on white tape | |
| TZ-FX611 Black characters on yellow tape |
■ Security tape (length: 8 m)
This tape leaves a checkered pattern when removed.
| Stock No. Description | |
| 18 mm | |
| TZ-SE4 Black | characters on white tape |
■ Fabric tape (length: 3 m)
These fabric labels can be affixed to other fabric using an iron.
| Stock No. Description | |
| 18 mm | |
| TZ-FA4B Blue | characters on white tape |
| 12 mm | |
| TZ-FA3 Blue | characters on white tape |
■ Thermal Paper tape (length: 7 m)
| Stock No. Description |
| AL-K251 24 mm thermal paper tape (black characters on white tape) |
■ Print head cleaning cassette
Cassette tape for cleaning the print head of your P-touch.
| Stock No. Description | |
| 36 mm | |
| TZ-CL6 Print | head cleaning cassette (cleans approx. 100 times) |
Troubleshooting
Refer to the following if you have trouble using your machine.
| Trouble Causes | Solutions | |
| The printer does not print.A writing error occurs. | The cables are not properly plugged in. | Check the cables, tape cassette, cover or other parts of the printer. |
| The tape cassette is not properly placed in the printer. | ||
| The cover is open. | ||
| Stripes appear on TZ, HG or AL tapes. | The tape has run out. | Install a new tape cassette and press the Feed and Cut button. |
| The ON/OFF button of the printer does not light up. | The power cable is not properly plugged in. | Check the power cable. If the problem persists, contact the dealer you purchased the product or a Brother service centre. |
| Unwanted lines are printed on tape. | The print head of head roller may be dirty. | See p. 34 "Cleaning the print head and head roller" and clean the print head and head roller. |
| The tape does not exit the machine properly. | The cutter blade may be dirty. | See p. 33 "Cleaning the cutter blade" and clean the cutter blade. |
| The ink ribbon exits with the tape. | The ink ribbon was slack when the tape cassette was set in the printer.The printed tape was forcibly pulled out by hand. | Replace the tape cassette with a new tape cassette. |
| "ERROR" message is printed on the tape. | RFID writing has failed. | Check if there are any materials that could affect writing to the RFID tag.Then, click restart button. |
| Check if there are any materials blocking the label output slot or touching the tape during the printing process.Then, click the restart button. |
Storing your machine
Make sure you disconnect the machine from the power for your safety if you are not going to use it for an extended period of time.
Uninstalling software
Steps to uninstall software vary depending on the operating system.
Refer to the documentation for your operating system for further details.
■ P-touch Editor 4.2
■ Printer Driver
■ RL-700S Runtime Library
■ RFID Sample Applications
■ RL-700S SDK
Specifications
| Item Details | ||
| Display LED lamps (blue and red) | ||
| Printing Method | Thermal transfer lamination/thermal printing | |
| Print Head 360 dpi, 384 dots | ||
| Resolution | TZ, SZ or AL tape: 360 dpiHG tape, high resolution mode: 360 x 720 dpi (in feed direction) | |
| Speed | TZ, SZ or AL tape: up to 20 mm/secHG tape, high-speed mode: up to 40 mm/sec | |
| Maximum Width | 27.1 mm | |
| Interface USB (Ver. 2.0, Full speed) | ||
| Power Supply 220-240 V AC, 50/60 Hz (with AC adapter) | ||
| Power Consumption | Printing Approx. | 30 W |
| Standby Approx. | 2 W | |
| Reading Approx. | 2.5 W | |
| Dimensions 135 mm (W) x 190 mm (D) x 130 mm (H) | ||
| Weight Approx. 1.5 kg | ||
| Cutter | Full cut and half-cut *1 *2 | |
| RFID Module | Frequency Band | 13.56MHz |
| Supported RFID | I-Code SLI*3 *4 | |
| Operating Temperature/Humidity | 10°C - 35°C, 20% - 80% RH | |
*1. Cutter life is approximately 30,000 cuts when using full cut, and 20,000 cuts when using half-cut.
*2. Half-cut is used only with laminated tape.
*3. I-Code SLI is a trademark or registered trademark of NXP Semiconductors (formerly Philips Semiconductors).
*4. I-Code SLI conforms to ISO/IEC 15693 and 18000-3 standards.
Computer system requirements
| Item Details | |
| Operating System | Microsoft® Windows® 2000 Professional(SP4 or later)/Windows® XP / Windows Vista®* Refer to Microsoft® guidelines for minimum hardware requirements for each operating system.* Internet Explorer®5.01 is required to use the RFID sample applications. |
| Interface USB port (USB 1.1 or later) | |
| Hard Disk | 70 MB or more of free space(to install all options) |
| Memory | Microsoft® Windows® 2000 Professional (SP4 or later) or Windows® XP : at least 128 MBWindows Vista® : at least 512 MB |
| Monitor SVGA, 16 bit colour or higher | |
| Other CD-ROM drive | |
| Software Compatible With Microsoft® Office Add-Ins | Microsoft® Word 2000/2002/2003/2007Microsoft® Excel 2000/2002/2003/2007Microsoft® Outlook® 2000/2002/2003/2007 |
| Software Compatible With Sample Applications(ItemLabel) | Microsoft® Excel 2000/2002/2003/2007 |
If the PC does not have Microsoft .NET Framework 2.0, it will be installed automatically. This requires an additional 300 MB of free hard disk space.
P-touch R
RL-700S
Introduction
Brother Industries Ltd.,
15-1, Naeshiro-cho, Mizuho-ku, Nagoya 467-8561, Japon
Usine
Zhuhai Brother Industries Co., Ltd.
254 Gangchang Road, Gongbei, Zhuhai City S.E.Z. Guang Dong, Chine
natural_image
Hand inserting a plug into a circuit board (no text or symbols visible)natural_image
Line drawing of a RFID scanner device with control panel and ports (no text or symbols)■Adaptateur secteur
natural_image
Line drawing of a broadband cable with two connectors (no text or symbols)■CD-ROM
■Cassette de ruban SZ (ruban RFID)
natural_image
Simple line drawing of a rectangular device with two cables and a connector, no text or symbols present.natural_image
Line drawing of a printer with an arrow indicating the process (no text or symbols present)natural_image
Line drawing of a computer monitor with hands operating it (no text or symbols)■ P-touch Editor 4.2
- P-touch Library 2.0
natural_image
Line drawing of a desktop computer tower with an attached cable (no text or symbols)9
①Menu
natural_image
Illustration of hands installing or adjusting internal components of a computer chassis (no text or symbols visible)□Tête d'impression
□Rouleau principal
natural_image
Technical line drawing of a mechanical assembly with no visible text or symbolsCoton tige
Rouleau principal
Avertissement
Introductie
Brother Industries Ltd.,
15-1, Naeshiro-cho, Mizuho-ku, Nagoya 467-8561, Japan
Fabriek
Zhuhai Brother Industries Co., Ltd.
254 Gangchang Road, Gongbei, Zhuhai City S.E.Z. Guang Dong, China
Printing & Solutions Company

European Union only
natural_image
Hand using a tool to press or install an electronic component (no text or symbols visible)■AC Adapter
■Netsnoer
natural_image
Line drawing of a utility plug with a coiled cable, labeled 'voor UK' (no other text or symbols)
■USB-kabel

natural_image
Line drawing of a coiled cable with two connectors (no text or symbols)■CD-ROM
natural_image
Line drawing of a rectangular electronic device with two cables and an input cable (no text or symbols)natural_image
Line drawing of a printer with an arrow indicating the process (no text or symbols present)natural_image
Line drawing of a computer monitor with hands operating it (no text or symbols)5 Sluit het deksel.
■ P-touch Editor 4.2
natural_image
Line drawing of a desktop computer tower with an attached cable and ventilation slots (no text or symbols)9
Klik op Voltooien.
De software-installatie is nu voltooid.

Memo
natural_image
Illustration of hands installing or adjusting internal components of a computer chassis (no text or symbols visible)
Waarschuwing
■ P-touch Editor 4.2
■ Printerstuurprogramma
■ RL-700S Runtime Library
Einführung
Brother Industries Ltd.
15-1, Naeshiro-cho, Mizuho-ku, Nagoya 467-8561, Japan
Werk
Zhuhai Brother Industries Co., Ltd.
254 Gangchang Road, Gongbei, Zhuhai City S.E.Z. Guang Dong, China
bestätigen, dass:
Datum : 6. November 2007
Ort : Nagoya, Japan
Quality Management Dept.
Printing & Solutions Company

European Union only
natural_image
Hand using a tool to press or install electronic components on a circuit board (no text or symbols visible)■Netzadapter
■Netzkabel
natural_image
Line drawing of a broadband cable with two connectors (no text or symbols)■CD-ROM

natural_image
Line drawing of a rectangular electronic device with two cables and a connector (no text or symbols)natural_image
Line drawing of a printer with a hand inserting a cable (no text or symbols)natural_image
Line drawing of hands installing or adjusting a computer tower (no text or symbols visible)■ P-touch Editor 4.2
- P-touch Library 2.0
natural_image
Line drawing of a desktop computer tower with an attached cable (no text or symbols)natural_image
Technical line drawing of a computer motherboard with hands operating the socket (no text or symbols)Druckkopfrollen
- Introduction
- About the machine
- About the manual
- About the trademarks
- brother
- EC Declaration of Conformity
- Manufacturer
- Plant
- Contents
- Before using your machine 6
- Before printing labels 14
- Creating labels 24
- Using RFID Labels 29
- Cleaning and maintenance 33
- Specifications 44
- Before using your machine
- Safety precautions
- Warning
- AC Adapter
- Printer
- Tape Cutter
- Labels
- Installation precautions
- Caution
- General precautions
- SZ (RFID) tape
- Box contents
- ■RL-700S
- ■AC Adapter
- ■Power cord
- ■USB cable
- ■CD-ROM
- ■SZ tape cassette (RFID tape)
- ■TZ tape cassette
- ■User's manual (this booklet)
- Description of parts
- Description of buttons
- Lamp display
- Before printing labels
- Connect the machine to a power point
- Memo
- Prepare a tape cassette
- List of cassette types suitable for this machine:
- Install the cassette
- Check the tape cassette.
- Press the Open Cover button to open the cover of the printer.
- Put the tape cassette in the printer.
- Close the cover.
- Press the ON/OFF button.
- Press the Feed and Cut button.
- Install the software
- Software overview
- ■ P-touch Editor 4.2
- Printer Driver
- ■ RL-700S Runtime Library
- ■ RFID Sample Applications
- ■ RL-700S SDK
- Preparing for installation
- ■ System requirements
- ■ Installation precautions
- Software installation procedure
- Click Standard Installation.
- 3
- 4
- 5
- Select the programs you would like to install the Add-Ins to, and then click Next.
- When the message "Connect Brother RL-700S, and then turn it on." is displayed, connect the USB cable to the printer's USB port.
- 8
- 9
- Click Finish.
- 10
- Click Exit.
- Creating labels
- Starting P-touch Editor
- 1
- 2
- P-touch Editor Edit window
- ①Menu
- ②Standard Tool Bar
- ③Properties Dock
- ④Drawing Tool Bar
- ⑤Layout Window
- ⑥Object Dock
- View Help
- Print P-touch Editor Help.
- Create different types of labels
- Using RFID Labels
- Reading and writing data on RFID labels
- Experience RFID label applications (Sample Applications)
- Overview of sample applications
- NameLabel
- FileOpen
- ItemLabel
- Support for application development
- SOFTWARE UPDATE
- Cleaning and maintenance
- Maintenance
- Cleaning the outside of the machine
- Cleaning the cutter blade
- Cleaning the print head and head roller
- Clean the print head with the self cleaning function.
- Cleaning with a cotton bud.
- Accessories
- Tape cassettes
- ■ SZ Tapes
- Stock No. Description
- ■ HG Tapes (length: 8 m)
- ■ Laminated tapes (length: 8 m)
- ■ Strong adhesive tapes (length: 8 m)
- ■ Flexible ID tapes (length: 8 m)
- ■ Security tape (length: 8 m)
- ■ Fabric tape (length: 3 m)
- ■ Thermal Paper tape (length: 7 m)
- ■ Print head cleaning cassette
- Troubleshooting
- Storing your machine
- Uninstalling software
- Specifications
- P-touch R
- RL-700S
- ■Adaptateur secteur
- ■Cassette de ruban SZ (ruban RFID)
- Avertissement
- Introductie
- ■Netsnoer
- ■USB-kabel
- Sluit het deksel.
- Klik op Voltooien.
- Waarschuwing
- Einführung
- ■Netzadapter
- ■Netzkabel
Brand : BROTHER
Model : PTouch RL700S
Category : Printer