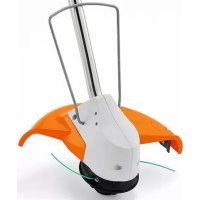
FSA 65 - Grass trimmer STIHL - Free user manual and instructions
Find the device manual for free FSA 65 STIHL in PDF.


| Product type | Battery-powered brushcutter (trimmer) |
| Brand | STIHL |
| Model | FSA 65 |
| Length without cutting tool | 1530 mm |
| Weight without battery, cutting tool and guard | 2.7 kg |
| Power supply | STIHL AP or AR lithium-ion battery (36 V) |
| Authorized battery | STIHL AP or STIHL AR |
| Cutting tool | AutoCut C 4-2 mowing head with round cutting line Ø 2.0 mm |
| Protective guard | Guard with integrated trimmer knife |
| Sound pressure level (LpA) | 75 dB(A) according to EN 50636-2-91 |
| Measured sound power level (LwA) | 89 dB(A) according to EN 50636-2-91 |
| Guaranteed sound power level | 91 dB(A) according to Directive 2000/14/EC |
| Vibrations at the control handle | 1.1 m/s² according to EN 50636-2-91 |
| Vibrations at the left handle | 1.3 m/s² according to EN 50636-2-91 |
| Battery temperature range | -10 °C to +50 °C |
| Compatible charger | STIHL AL 101, 300, 500 |
| Main functions | Mowing grass, adjustment of the loop handle |
| Safety devices | Trigger lock, snap-in lever, protective guard |
| Maintenance | Clean with clear water and damp cloth; maintenance by authorized dealer |
| Spare parts and repairability | Original STIHL parts available from dealer |
| General information | User manual in French, 120 pages |
Frequently Asked Questions - FSA 65 STIHL
User questions about FSA 65 STIHL
0 question about this device. Answer the ones you know or ask your own.
Ask a new question about this device
Download the instructions for your Grass trimmer in PDF format for free! Find your manual FSA 65 - STIHL and take your electronic device back in hand. On this page are published all the documents necessary for the use of your device. FSA 65 by STIHL.
USER MANUAL FSA 65 STIHL
20.1 Motorsensen STIHL FSA 65, FSA 85
1 Introduction 25
2 Guide to Using this Manual 25
2.1 Applicable Documentation 25
2.2 Symbols used with warnings in the text 26
2.3 Symbols in Text 26
3 Overview 26
3.1 Trimmer and Battery 26
3.2 Deflector and Cutting Attachments 27
3.3 Symbols 27
4 Safety Precautions 28
4.1 Warning Symbols 28
4.2 Intended Use 28
4.3 The Operator 28
4.4 Clothing and equipment 29
4.5 Work Area and Surroundings 29
4.6 Safe Condition 30
4.7 Operation 32
4.8 Transporting 32
4.9 Storing 33
4.10 Cleaning, Maintenance and Repairs 33
5 Preparing Trimmer for Operation 34
5.1 Preparing Trimmer for Operation 34
6 Charging the Battery, LEDs 34
6.1 Charging the Battery 34
6.2 Displaying State of Charge 34
6.3 LEDs on Battery 35
7Assembling the Trimmer 35
7.1 Mounting the Deflector 35
7.2 STIHL AutoCut C 4-2 Mowing Head 35
8 Adjusting Trimmer for User 36
8.1 Adjusting the Loop Handle 36
9 Removing and Fitting the Battery 36
9.1 Fitting the Battery 36
9.2 Removing the Battery 36
10 Switching the Trimmer On/Off 37
10.1 Switching On 37
10.2 Switching Off 37
11 Testing the Trimmer and Battery 37
11.1 Checking the Controls 37
11.2 Testing the Battery 38
12 Operating the Trimmer 38
12.1 Holding and Controlling the Trimmer 38
12.2 Mowing 38
12.3 Adjusting Nylon Line 38
13 After Finishing Work 38
13.1 After Finishing Work 38
14 Transporting 39
14.1 Transporting the brushcutter 39
14.2 Transporting the Battery 39
15 Storing 39
15.1 Storing the Trimmer 39
15.2 Storing the Battery 39
16 Cleaning 39
16.1 Cleaning the Trimmer 39
16.2 Cleaning the Deflector and Cutting Attachment 40
16.3 Cleaning the Battery 40
17 Maintenance and Repairs 40
17.1 Servicing and Repairing the Trimmer 40
17.2 Servicing and Repairing the Battery 40
18 Troubleshooting 41
18.1 Troubleshooting Brushcutter or Battery 41
19 Specifications 43
19.1 STIHL FSA 65, FSA 85 Trimmers 43
19.2 STIHL AP battery 43
1 Introduction
English
19.3 Noise and Vibration Data 43
19.4REACH 44
20 Combinations of Cutting Attachments and Deflectors 44
20.1 STIHLSFA65,FSA85 Trimmers 44
21 Spare Parts and Accessories 44
21.1 Spare Parts and Accessories 44
22 Disposal 44
22.1 Disposing of Trimmer and Battery 44
23 EC Declaration of Conformity 44
23.1 STIHFL FSA 65, FSA 85 Trimmers 44
1 Introduction
Dear Customer,
Thank you for choosing STIHL. We develop and manufacture our quality products to meet our customers' requirements. The products are designed for reliability even under extreme conditions.
STIHL also stands for premium service quality. Our specialist dealers guarantee competent advice and instruction as well as comprehensive service support.
We thank you for your confidence in us and hope you will enjoy working with your STIHL product.
S_ ACD = 12 · AC · PD = 12 × CD × PD = CD.
Dr. Nikolas Stihl
IMPORTANT: READ BEFORE USE AND KEEP IN A SAFE PLACE.
2 Guide to Using this Manual
2.1 Applicable Documentation
Local safety regulations apply.
-
Read, understand and save the following documents in addition to this instruction manual:
-
Instruction manual and packaging of the cutting attachment you are using
- Instruction manual of the carrying system you are using
-User instructions for STIHL AR battery
-User instructions for AP belt bag with connecting cable
Safety notes and precautions for STIHL AP battery - Instruction manual for STIHL AL 101, 300, 500 chargers
English
Safety information for STIHL batteries and products with built-in batteries: www.stihl.com/safety-datasheets
2.2 Symbols used with warnings in the text

WARNING
This symbol indicates dangers that can cause serious injuries or death.
The measures indicated can avoid serious injuries or death.
NOTICE
This symbol indicates dangers that can cause damage to property.
The measures indicated can avoid damage to property.
2.3 Symbols in Text

This symbol refers to a chapter in this instruction manual.
0000-GXX-4475-A0
3 Overview
3 O v e r v i e w
3.1 Trimmer and Battery
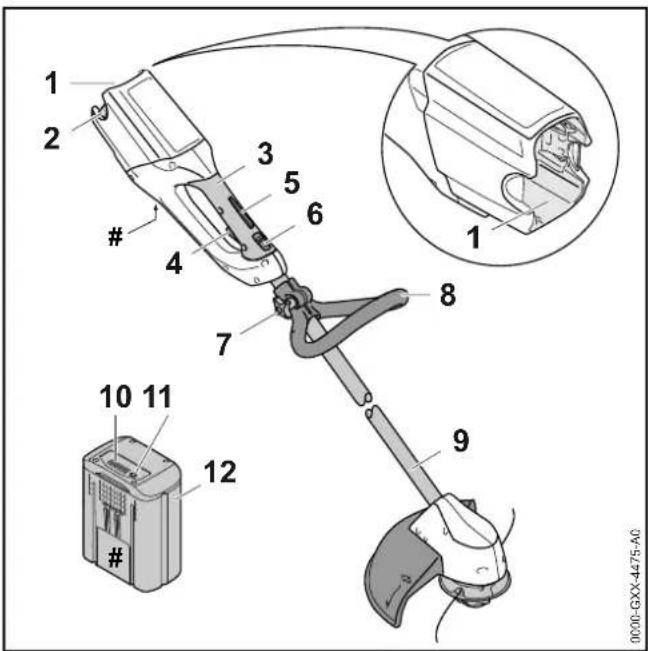
1 Battery Compartment
Accommodates the battery.
2 Locking Lever
Secures the battery in the battery compartment.
3 Control handle
For operating, holding and controlling the trimmer.
4 Trigger
The trigger switches the motor on and off.
5 Trigger Lockout
Locks trigger in position.
3 Overview
English
6 Retaining Latch
Operated together with the trigger lockout to unlock the trigger.
7 Star Knob Nut
Secures loop handle to shaft.
8 Loop handle
For holding and controlling the trimmer.
9 Shaft
Connects all components.
10 LEDs
Indicate battery's state of charge and malfunctions.
11 Button
Activates the LEDs on the battery.
12 Battery
Supplies power to the trimmer.
Rating label with serial number
3.2 Deflector and Cutting Attachments
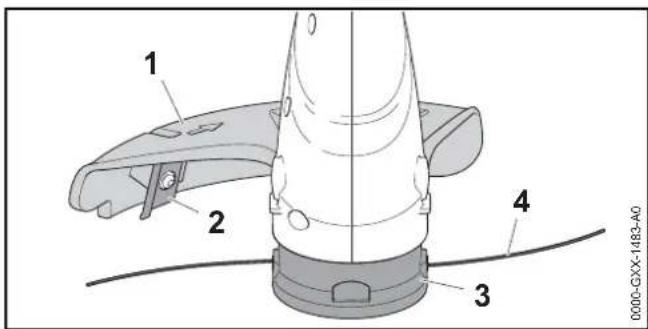
1 Deflector
Protects the user from flying debris and contact with the cutting attachment.
2 Line limiting blade
Line limiting blade trims nylon lines to correct length.
3 Mowing head
Moving head accommodates the mowing lines.
4 Mowing line
The mowing lines cut grass.
3.3 Symbols
Meanings of symbols that may be on the trimmer, deflector and battery:

Retaining latch unlocks the trigger in this position.

Retaining latch locks the trigger in this position.


1 LED glows red. Battery too hot or too cold.
4 LEDs flash red. There is a malfunction in the battery.
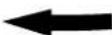
This symbol shows the direction of rotation of the cutting attachment.
max XXX This symbol shows the maximum diameter of the cutting attachment in millimeters.

This symbol shows the rated speed of the cutting attachment.

Guaranteed sound power level according to directive 2000/14/EC in dB(A) in order to make sound emissions of products comparable.

The data next to this symbol indicates the energy content of the battery according to the cell manufacturer's specification. The energy content available during operation is lower.

Do not dispose of the product with your household waste.
4 Safety Precautions
4.1 Warning Symbols
Meanings of warning signs on the brushcutter and battery:
Observe safety notices and take the necessary precautions.

Read, understand and keep the User Manual.

Wear safety glasses.
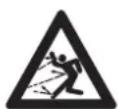
Observe the safety advice concerning flying objects and associated measures.
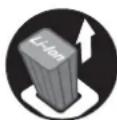
Remove the battery during work stoppages, transport, storage, maintenance or repair.
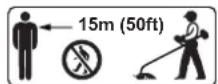
Maintain a safety distance.

Protect battery from heat and fire.

Do not immerse battery in fluids.
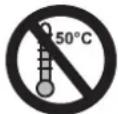
Observe the permitted battery temperature range.
4.2 Intended Use
The STIHL FSA 65/FSA 85 trimmer is designed for mowing grass.
The trimmer may be used in the rain.
The trimmer is powered by a STIHL AP battery or a STIHL AR battery.
WARNING
- Batteries not explicitly approved for the trimmer by STIHL may cause a fire or explosion. This can result in serious or fatal injuries and damage to property.
- Use the trimmer with a STIHL AP battery or a STIHL AR battery.
- Using the trimmer or the battery for purposes for which they were not designed may result in serious or fatal injuries and damage to property.
- Use the trimmer as described in this instruction manual.
- Use the battery as described in this instruction manual or the instruction manual for the STIHL AR battery.
4.3 The Operator
WARNING
- Users without adequate training or instruction cannot recognize or assess the risks involved in using the trimmer and battery. The user or other persons may sustain serious or fatal injuries.

Read, understand and save the instruction manual.
If the trimmer or battery are passed on to another person: Always give them the instruction manual.
- Make sure the user meets the following requirements:
-
The user must be rested.
-
The user must be in good physical condition and mental health to operate and work with the trimmer and battery. If the user's physical, sensory or mental ability is restricted, he or she may work only under the supervision of or as instructed by a responsible person.
- The user is able to recognize and assess the risks involved in using the trimmer and battery.
- The user must be of legal age or is being trained in a trade under supervision in accordance with national rules and regulations.
- The user has received instruction from a STIHL servicing dealer or other experienced user before working with the trimmer for the first time.
- The user must not be under the influence of alcohol, medication or drugs.
If you have any queries: Contact a STIHL servicing dealer for assistance.
4.4 Clothing and equipment
WARNING
- Objects can be thrown at high speed during operation. This may result in injury to the user.

Wear close-fitting safety glasses. Suitable safety glasses are tested in accordance with EN 166 or national regulations and available commercially with the corresponding marking.
Wear face protection.
Wear long trousers made from resistant material.
- Dust can be whipped up during operation. Whipped up dust can damage the respiratory passages and cause allergic reactions.
If dust is generated: Wear a dust respirator mask.
- Inappropriate clothing can snag on wood, brush or the brushcutter. Users not wearing suitable clothing are at risk of serious injury.
Wear close-fitting clothing.
- Remove scarves and jewelry.
- The user may come into contact with the rotating cutting attachment during operation. This may result in serious injury to the user.
Wear robust footwear.
- Wear long trousers made from resistant material.
The user may come into contact with the cutting attachment or line limiting blade during cleaning and maintenance work. This may result in injury to the user.
Wear work gloves made from resistant material.
Wearing unsuitable footwear may cause the user to slip. This may result in injury to the user.
Wear sturdy, closed-toed footwear with high-grip soles.
4.5 Work Area and Surroundings
4.5.1 Work Area and Surroundings
WARNING
- Bystanders, children and animals are not aware of the dangers of the trimmer or flying debris. Bystanders, children and animals may be seriously injured and damage to property may occur.
English
Do not allow bystanders, children or animals within 15 meters of the work area.
- Maintain a clearance of 15 meters from objects.
Do not leave the trimmer unattended. -
Make sure that children cannot play with the trimmer.
-
Electrical components of the trimmer can produce sparks. Sparks may cause a fire or an explosion in an easily combustible or explosive environment. This can result in serious or fatal injuries and damage to property.
- Do not work in an easily combustible or explosive environment.
4.5.2 Battery
WARNING
-
Bystanding people, children and animals cannot recognise or evaluate the dangers posed by the battery. This may result in serious injury to bystanding people, children and animals.
-
Keep bystanding people, children and animals out of the way.
- Do not leave the battery unattended.
- Make sure that children cannot play with the battery.
The battery is not protected against all ambient conditions. If exposed to certain ambient conditions, the battery may catch fire or explode. This may result in serious injury to people and damage to property.

Protect the battery from heat and fire.
Do not throw the battery into a fire.
Use and store the battery at temperatures between -10^ and +50^ .

-
Do not immerse the battery in liquids.
-
Keep the battery away from metallic objects.
Do not expose the battery to high pressure.
Do not expose the battery to microwaves.
Protect the battery from chemicals and salts.
4.6 Safe Condition
4.6.1 Brushcutter
The brushcutter is in a safe condition if the following points are observed:
- The brushcutter is not damaged.
- The brushcutter is clean.
- The controls function properly and have not been modified.
- A combination of cutting attachment and deflector recommended in this user manual is mounted.
- The cutting attachment and deflector are properly mounted.
- Only original STIHL accessories designed for this brushcutter are fitted.
- The accessories are correctly attached.
WARNING
If not in safe condition, components may no longer operate correctly and safety devices may be disabled. This may result in serous or fatal injury to people.
Work only with an undamaged brushcutter.
If the brushcutter is dirty: Clean the brushcutter.
- Never attempt to modify your brushcutter. Exception: Mounting one of the combinations of cutting attachment and deflector recommended in this user manual.
4 Safety Precautions
English
- If the controls do not function properly: Do not use your brushcutter.
- Never mount metal cutting attachments.
- Only fit original STIHL accessories designed for this brushcutter.
- Mount the cutting attachment and deflector as described in this user manual.
- Attach accessories as described in this User Manual or in the User Manual for the accessories.
- Never insert objects in the openings of the brushcutter.
Replace worn or damaged labels.
If you have any doubts, be sure to consult a STIHL dealer.
4.6.2 Deflector
The deflector is in a safe condition if the following points are observed:
- The deflector is not damaged.
- The line limiter blade is correctly installed.
WARNING
If the product does not comply with safety requirements, components will no longer function properly or safety devices may be rendered inoperative. This can result in serious injuries.
Work only with an undamaged deflector.
Work with a correctly installed line limiter blade.
If you have any queries: Contact your STIHL servicing dealer.
4.6.3 Mowing Head
The mowing head is in a safe condition if the following points are observed:
- The mowing head is not damaged.
-
The mowing head is not jammed.
-
The mowing lines are properly installed.
WARNING
If they are in an unsafe condition, parts of the mowing head or mowing lines may come off and be thrown at high speed. This can result in serious injuries.
Work only with an undamaged mowing head.
- Never use metal elements in place of the nylon mowing lines.
If you have any queries: Contact your STIHL servicing dealer for assistance.
4.6.4 Battery
The battery is in safe condition when the following conditions are met:
- The battery is not damaged.
- The battery is clean and dry.
- The battery is working and has not been modified.
WARNING
The battery cannot function safely if it is not in safe condition. There is a risk of serious injury to persons.
Use an undamaged and functioning battery.
Do not charge a damaged or defective battery.
- If the battery is dirty or wet: clean the battery and allow it to dry.
Do not modify the battery.
Do not insert objects into the apertures in the battery.
- Never connect the battery terminals to metallic objects and cause a short circuit.
Do not open the battery.
Replace worn or damaged warning signs.
English
- Fluid may leak from a damaged battery. If the fluid contacts the skin or eyes, this may cause irritation.
- Avoid contact with the fluid.
In the event of contact with the skin: wash the affected areas with plenty of soap and water.
In the event of contact with the eyes: rinse the eyes with plenty of water for at least 15 minutes and seek medical attention.
A damaged or defective battery may emit an unusual odour, smoke or catch fire. This may result in serious or fatal injury to people and damage to property. - If the battery emits an unusual odour or smoke: do not use the battery and keep it away from flammable materials.
- If the battery catches fire: try to extinguish the battery using a fire extinguisher or water.
4.7 Operation
WARNING
- The user cannot concentrate on the work in certain situations. The user may stumble, fall and be seriously injured.
Work calmly and carefully.
If light and visibility are poor: Do not use your trimmer.
Operatethe trimmeralone. - Keep the cutting attachment close to the ground.
Watch out for obstacles. - Stand on the ground while working and keep a good balance.
If you begin to feel tired: Take a break. - The rotating cutting attachment can cut the user. This can result in serious injuries.
- Do not touch the rotating cutting attachment.
- If the cutting attachment is blocked by an object: Switch off the trimmer and remove the battery. Then remove the object causing the blockage.
If the behavior of the trimmer changes during operation or feels unusual, it may no longer be in a safe condition. This can result in serious injuries and damage to property.
- Stop work, remove the battery and contact your STIHL servicing dealer for assistance.
- Trimmer vibrations may occur during operation.
Wear gloves.
Take regular breaks.
- If signs of circulation problems occur: Seek medical advice.
If the cutting attachment makes contact with a foreign object during operation, the object or parts of it may be thrown at high speed. This may result in personal injuries and damage to property.
Clear away all foreign objects from the work area.
Note that the cutting attachment continues to rotate for a short period after you release the trigger. This can result in serious injuries.
- Wait until the cutting attachment comes to a complete stop.
4.8 Transporting
4.8.1 Trimmer
WARNING
The trimmer may turn over or shift during transport. This may result in personal injuries and damage to property.
Push the retaining latch into position
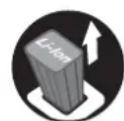
Remove the battery.
- Secure the trimmer with lashing straps or a net to prevent it turning over and moving.
4.8.2 Battery
WARNING
-
The battery is not protected against all ambient conditions. The battery may be damaged if it is exposed to certain ambient conditions and damage to property may occur.
-
Never transport a damaged battery.
- Store the battery in non-conductive packaging.
The battery may turn over or shift during transport. This may result in personal injuries and damage to property.
- Pack the battery in packaging in such a way that it cannot move.
- Secure the packaging so that it cannot move.
4.9 Storing
4.9.1 Trimmer
WARNING
Children are not aware of and cannot assess the dangers of a trimmer and can be seriously injured.
Push the retaining latch into position
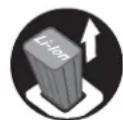
Remove the battery.
-
Store the trimmer out of the reach of children.
-
Dampness can corrode the electrical contacts on the trimmer and metal components. This can damage the trimmer.
Push the retaining latch into position 6
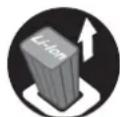
Remove the battery.
- Store the trimmer in a clean and dry condition.
4.9.2 Battery
WARNING
Children are not aware of and cannot assess the dangers of the battery and can be seriously injured.
- Store the battery out of the reach of children.
The battery is not protected against all ambient conditions. The battery may be damaged if it is exposed to certain ambient conditions.
-
Store the battery in a clean and dry condition.
-
Store the battery in a confined space.
-
Store the battery separately from the trimmer and charger.
-
Store the battery in non-conductive packaging.
-
Use and store the battery at temperatures between - 10^ and +50^ .
4.10 Cleaning, Maintenance and Repairs
WARNING
The trimmer may start unintentionally if the battery is left in place during cleaning, maintenance or repair operations. This can result in serious injuries and damage to property.
Push the retaining latch into position
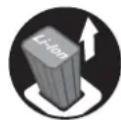
Remove the battery.
Aggressive cleaning agents, a water jet or pointed objects can damage the trimmer, deflector, cutting attachment and the battery. If the trimmer, deflector, cutting attachment or battery are not cleaned correctly,
English
5 Preparing Trimmer for Operation
components may no longer function properly or safety devices may be rendered inoperative. This can result in serious injuries.
- Clean the trimmer, deflector, cutting attachment and battery as described in this instruction manual.
If the trimmer, deflector, cutting attachment or battery are not serviced or repaired correctly, components may no longer function properly or safety devices may be rendered inoperative. This can result in serious or fatal injuries.
- Do not attempt to service or repair the trimmer, deflector, cutting attachment or battery.
- If the trimmer, deflector, cutting attachment or battery require servicing or repairs: Contact your STIHL servicing dealer for assistance.
- Maintain the cutting attachment as described in the instructions supplied with the cutting attachment being used or on the cutting attachment's packaging.
5 Preparing Trimmer for Operation
5.1 Preparing Trimmer for Operation
Perform the following steps before starting work:
- Make sure the following components are in a safe condition:
-
Trimmer, 4.6.1.
-Deflector, 4.6.2.
-Mowing head,4.6.3.
-Battery, 14.6.4. -
Check the battery, 11.2.
- Recharge the battery fully as described in the instruction manual for the STIHL AL 101, 300, 500 chargers.
Clean the trimmer, 16.1.
Mount the deflector, 7.1. - Mount the mowing head, 7.2.1.
Adjust the loop handle, 18.1.
Check the controls, 11.1.
- If 3 LEDs on the battery flash red while you are checking the controls: Remove the battery and contact your STIHL servicing dealer.
There is a malfunction in the trimmer.
- If you cannot carry out this work: Do not use your trimmer and contact your STIHL servicing dealer.
6 Charging the Battery, LEDs
6.1 Charging the Battery
The charging time depends on several factors, e.g. temperature of the battery or the ambient temperature. The actual charging time may differ from the specified charging time. For specified charging times see www.stihl.com/charging-times.
- Recharge the battery fully as described in the instruction manual for the STIHL AL 101, 300, 500 chargers.
6.2 Displaying State of Charge
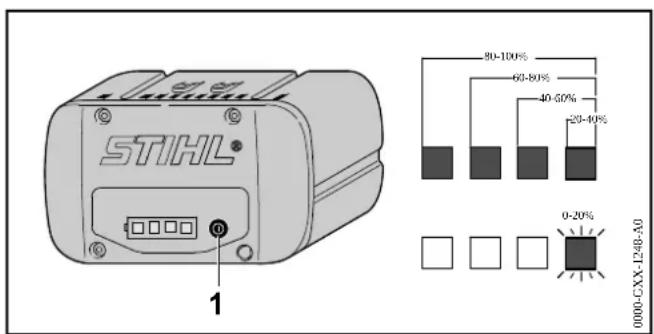
- Press the button (1). The LEDs (5) glow green for about 5 seconds and indicate the state of charge.
If the LED on the right flashes green: Charge the battery.
7 Assembling the Trimmer
English
6.3 LEDs on Battery
The LEDs can show the state of charge or malfunctions. The LEDs can glow or flash green or red.
The state of charge is indicated when the LEDs glow or flash green.
If the LEDs glow or flash red: Troubleshooting, 18. Malfunction in trimmer or battery.
7 Assembling the Trimmer
7.1 Mounting the Deflector
- Switch off the trimmer, push retaining latch to position and remove the battery.
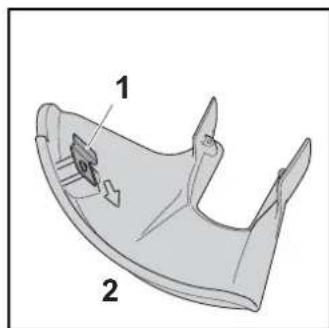
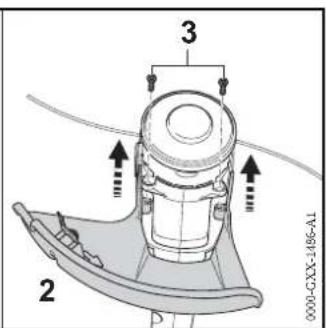
The line limiting blade (1) is already installed in the deflector (2) and must not be removed.
- Push the deflector (2) into the guides on the housing as far as stop.
The deflector (2) is tight against the housing.
Insert and tighten down the screws (3).
The deflector must not be removed again.
7.2 STIHL AutoCut C 4-2 Mowing Head
7.2.1 Mounting the Mowing Head
- Switch off the trimmer, push retaining latch to position and remove the battery.
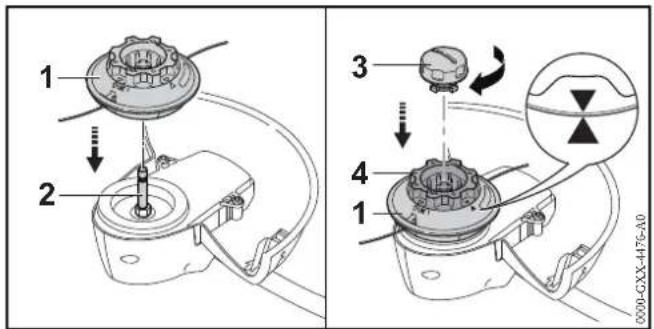
Fit the mounting head (1) on the shaft (2).
- Rotate the spool (4) until the arrow heads on the spool and mowing head (1) are in alignment.
- Fit the cap (3) in the spool (4) and tighten it down firmly by hand (clockwise).
7.2.2 Removing the Mowing Head
- Switch off the trimmer and remove the battery.

- Hold the mowing head (2) steady and rotate the cap (1) counterclockwise until it can be removed.
- Remove the cap (1) and mowing head (2).
8 Adjusting Trimmer for User
8.1 Adjusting the Loop Handle
The loop handle can be set to different positions to suit the height and reach of the user.
- Switch off the trimmer, push retaining latch to position and remove the battery.
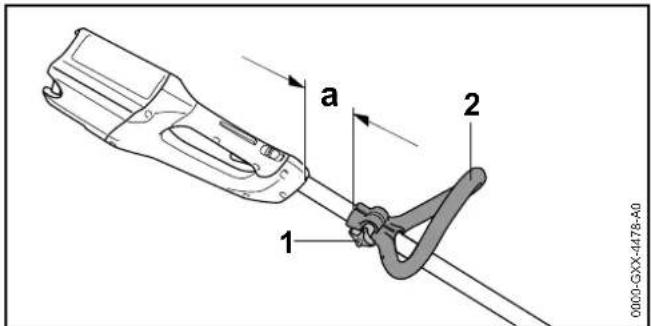
- Loosen the star knob nut (1).
- Move the loop handle (2) to the required position and make sure that distance 'a' is no more than 30~cm .
- Tighten down the star knob nut (1) firmly.
9 Removing and Fitting the Battery
9.1 Fitting the Battery
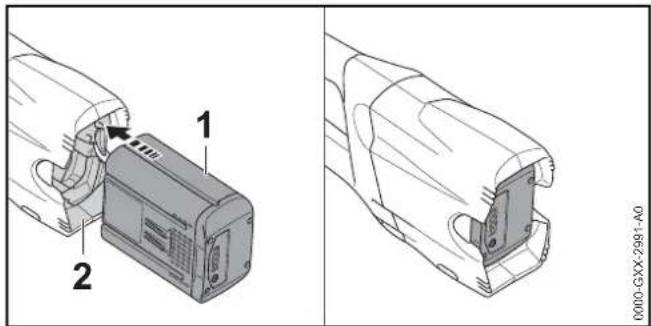
- Push the battery (1) into the battery compartment (2) as far as stop. The battery (1) engages in position with a click.
9.2 Removing the Battery
- Stand the trimmer on a level surface.
- Hold one hand in front of the battery compartment to ensure the battery (2) does not fall out.
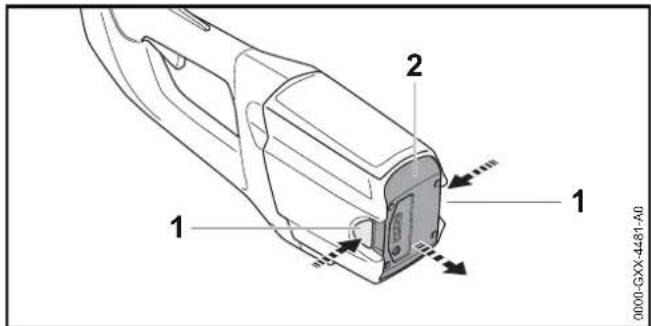
Press both locking levers (1). The battery (2) is unlocked and can be removed.
10 Switching the Trimmer On/Off
10.1 Switching On
- Hold the trimmer with one hand on the control handle - wrap your thumb around the control handle.
- Hold the trimmer with the other hand on the loop handle - wrap your thumb around the loop handle.
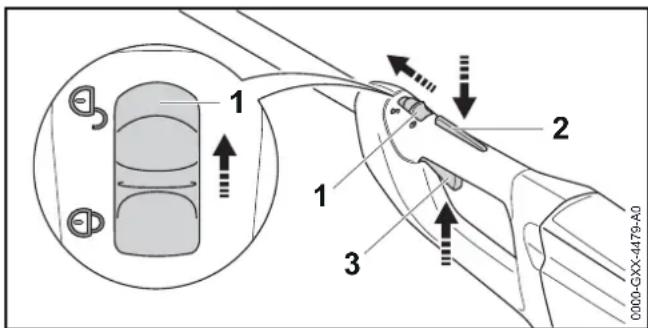
Push the retaining latch (1) with your thumb to position
Depress the trigger lockout (3) with your hand and hold it there.
Pull the trigger (2) with your index finger and hold it there. The motor accelerates and the cutting attachment rotates.
FSA 85
The speed of the cutting attachment is controlled with the trigger.
10.2 Switching Off
Release the trigger and trigger lockout lever.
Wait for the cutting attachment to come to a standstill.
- If the cutting attachment continues to rotate: Remove the battery and contact your STIHL servicing dealer for assistance.
The trimmer has a malfunction.
Push the retaining latch into position 6
11 Testing the Trimmer and Battery
11.1 Checking the Controls
Trigger lockout lever and trigger
Remove the battery.
Push the retaining latch into position
- Attempt to pull the trigger without depressing the lockout lever.
- If the trigger can be pulled: Do not use your trimmer and contact your STIHL dealer for assistance. Retaining latch or trigger lockout is faulty.
Push the retaining latch into position
Depress the trigger lockout lever and hold it in that position.
Pull the trigger.
Release the trigger and trigger lockout lever.
- If the trigger or trigger lockout is stiff or does not spring back to the idle position: Do not use your trimmer and contact your STIHL dealer for assistance. Trigger or trigger lockout is faulty.
Switching On
Fit the battery.
Depress the trigger lockout lever and hold it in that position.
Pull the trigger and hold it there. The cutting attachment rotates.
- If 3 LEDs on the battery flash red: Remove the battery and contact your STIHL dealer for assistance. There is a malfunction in the trimmer.
- Release the trigger and trigger lockout lever. The cutting attachment comes to a standstill.
- If the cutting attachment continues to rotate: Remove the battery and contact your STIHL dealer for assistance. The trimmer has a malfunction.
11.2 Testing the Battery
Press button on battery. The LEDs glow or flash.
If the LEDs do not glow or flash: Do not use the battery and contact your STIHL servicing dealer. There is a malfunction in the battery.
12 Operating the Trimmer
12.1 Holding and Controlling the Trimmer
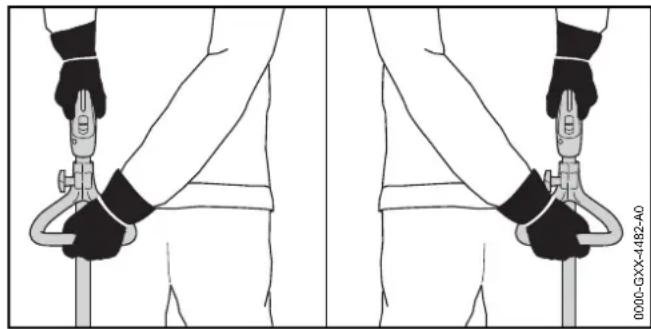
- Hold the trimmer with one hand on the control handle - wrap your thumb around the control handle.
- Hold the trimmer with the other hand on the loop handle - wrap your thumb around the loop handle.
12.2 Mowing
The cutting height is determined by the distance of the cutting attachment from the ground.
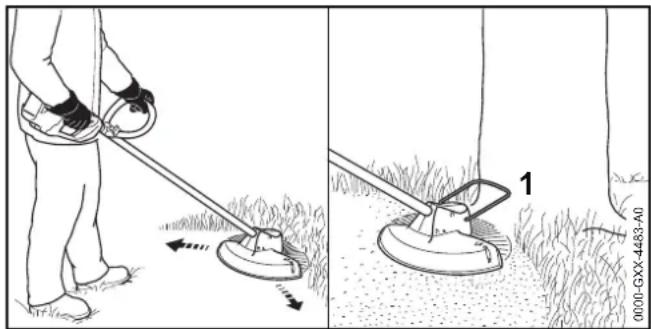
- Swing the trimmer back and forth in an arc.
- Walk slowly and steadily forwards.
If you work with a bump guard (1, special accessory): Extend the bump guard (1) fully.
12.3 Adjusting Nylon Line
Tap the rotating mowing head on the ground. About 30~mm of fresh nylon line is advanced.
The line limiting blade in the deflector trims the mowing lines to the correct length.
Automatic feed will not take place if the mowing lines are shorter than 25mm
- Switch off the trimmer and remove the battery.
Press the button on the mowing head and hold it depressed.
Pull out the mowing lines. - If the mowing lines cannot be pulled out to required length: Replace nylon line.
The spool is empty.
13 After Finishing Work
13.1 After Finishing Work
- Switch off the trimmer, push retaining latch to position and remove the battery.
14 Transporting
English
If the trimmer is wet: Allow the trimmer to dry.
If the battery is wet: Allow the battery to dry.
Clean the trimmer.
Clean the deflector.
Clean the cutting attachment.
Clean the battery.
14 Transporting
14.1 Transporting the brushcutter
- Switch off the brushcutter, push the retaining latch to position and remove the battery.
Carrying the brushcutter
- Carry the brushcutter in one hand properly balanced by the shaft, with the cutting attachment behind you.
Transporting the brushcutter in the car
- Secure the brushcutter to prevent turnover and movement.
14.2 Transporting the Battery
- Switch off the trimmer and remove the battery.
- Make sure the battery is in a safe condition.
-
Observe the following points when packing the battery: - The packaging must be non-conductive.
-
Make sure the battery cannot shift inside the packaging.
-
Secure the packaging so that it cannot move.
The battery is subject to the requirements for the transport of dangerous goods. The battery is classified as UN 3480 (lithium-ion batteries) and has been tested in accordance with UN Manual of Tests and Criteria, Part III, sub-section 38.3.
For transport regulations see www.stihl.com/safety-datasheets
15 Storing
15.1 Storing the Trimmer
- Switch off the trimmer, push retaining latch to position and remove the battery.
- Observe the following points when storing the trimmer: - The trimmer is out of the reach of children.
- The trimmer is clean and dry.
If you store the trimmer for more than 3 months: Remove the mowing head.
15.2 Storing the Battery
STIHL recommends that you store the battery with a charge between 40% and 60% (2 LEDs glow green).
- Observe the following points when storing the battery: - Battery is out of the reach of children.
Battery is clean and dry. - Battery is in an enclosed space.
- Store the battery separately from the trimmer and charger.
- Battery is in non-conductive packaging.
- Battery is in a temperature range between -10^ and +50^ .
16 Cleaning
16.1 Cleaning the Trimmer
- Switch off the trimmer, push retaining latch to position and remove the battery.
- Clean the trimmer with a damp cloth.
- Remove foreign matter from the battery compartment and clean the battery compartment with a damp cloth.
- Clean electrical contacts in the battery compartment with a soft brush.
English
17 Maintenance and Repairs
16.2 Cleaning the Deflector and Cutting Attachment
- Switch off the trimmer, push retaining latch to position and remove the battery.
- Clean the deflector and cutting attachment with a damp cloth or a soft brush.
16.3 Cleaning the Battery
Clean the battery with a damp cloth.
17 Maintenance and Repairs
17.1 Servicing and Repairing the Trimmer
The trimmer cannot be serviced or repaired by the user.
If your trimmer has a malfunction or is damaged or requires servicing: Contact your STIHL servicing dealer.
17.2 Servicing and Repairing the Battery
The battery requires no servicing and cannot be repaired.
- If the battery has a malfunction or is damaged: Replace the battery.
18 Troubleshooting
18.1 Troubleshooting Brushcutter or Battery
| Fault LEDs on the | battery | Cause Remedy | |
| The brushcutter does not start when switched on. | 1 LED flashing green. | State of charge of the battery is too low. | • Recharge the battery fully as described in the User Manual for the STIHL AL 101, 300, 500 chargers. |
| 1 LED emits red light. | The battery is too warm or too cold. | • Remove the battery. • Allow the battery to cool down or warm up. | |
| 3 LEDs flash red. | The brushcutter has a malfunction. | • Remove the battery. • Clean electrical contacts in the battery compartment. • Insert battery. • Switch on the brushcutter. • If 3 LEDs continue to flash red: Do not use your brushcutter and contact your STIHL dealer for assistance. | |
| 3 LEDs light up red. | Trimmer is too hot. ▶ Remove the battery. | • Allow trimmer to cool down. | |
| 4 LEDs flashing red. | There is a fault in the battery. | • Remove battery and reinsert it. • Switch on the brushcutter. • If 4 LEDs continue to flash red: Do not use the battery and contact your STIHL dealer for assistance. | |
| No electrical contact between brushcutter and battery. | • Remove the battery. • Clean electrical contacts in the battery compartment. • Insert battery. | ||
| The brushcutter or battery is damp. | • Allow the brushcutter or battery to dry. | ||
| The brushcutter cuts out during operation. | 3 LEDs light up red. | Trimmer is too hot. ▶ Remove the battery. | • Allow trimmer to cool down. |
English
18 Troubleshooting
| Fault LEDs on the | battery | Cause Remedy | |
| There is an electrical fault. | Remove battery and reinsert it. Switch on the brushcutter. | ||
| The runtime of the brushcutter is too short. | The battery is not fully charged. | Recharge the battery fully as described in the User Manual for the STIHL AL 101, 300, 500 chargers. | |
| The battery life has been exceeded. | Replace battery. |
19 Specifications
19.1 STIHL FSA 65, FSA 85 Trimmers
FSA 65
Approved batteries:
-STIHLAP
-STIHLAR
- Weight without battery, cutting attachment and deflector: 2.7 kg
- Length without cutting attachment: 1530 mm
FSA 85
Approved batteries:
-STIHLAP
STIHLAR
- Weight without battery, cutting attachment and deflector: 2.8 kg
Length without cutting attachment: 1650mm
For battery life see www.stihl.com/battery-life.
19.2 STIHL AP battery
- Battery Technology: Lithium-ion
Voltage: 36 V - Capacity in Ah: see rating label
- Energy content in Wh: see rating label
Weight in kg: see rating label - Permissible temperature range for operation and storage: -10°C to +50°C
19.3 Noise and Vibration Data
K-value for sound pressure level is 2 dB(A). K-value for sound power level is 2 dB(A). K-value for vibration level is 2m / s^2
FSA 65
STIHL recommends that you wear hearing protection.
Sound pressure level LpA measured according to EN 50636-2-91:75 dB(A)
Sound power level LwA measured according to EN 50636-2-91:89 dB(A)
Vibration level a_hv measured according to EN 50636-2-91
Control handle: 1.1m / s^2
- Left handle: 1.3m / s^2
FSA 85
STIHL recommends that you wear hearing protection.
Sound pressure level LpA measured according to EN 50636-2-91:77 dB(A)
- Sound power level LwA measured according to EN 50636-2-91: 92 dB(A)
Vibration level a_hy measured according to EN 50636-2-91
- Control handle: 0.8m / s^2
- Left handle: 1.4m / s^2
The vibration values quoted above have been measured according to a standardized test procedure and may be used to compare electric power tools. Depending on the type of usage, the vibrations that actually occur may differ from the values quoted. The vibration values quoted may be used for an initial assessment of the user's exposure to vibrations. The actual exposure to vibrations has to be estimated. This process may also take into account times during which the electric power tool is switched off and times during which it is switched on but running off load.
Information on compliance with Vibration Directive 2002/44/EC is available at www.stihl.com/vib.
English
19.4 REACH
REACH is an EC regulation and stands for the Registration, Evaluation, Authorisation and Restriction of Chemical substances.
For information on compliance with the REACH regulation see www.stihl.com/reach.
20 Combinations of Cutting Attachments and Deflectors
20.1 STIHL FSA 65, FSA 85 Trimmers
The following mowing heads may be mounted together with the deflector for mowing heads:
- AutoCut 4-2 mowing head with 2.0mm diameter "round, quiet" nylon line
21 Spare Parts and Accessories
21.1 Spare Parts and Accessories
STIHL These symbols identify original STIH replacement parts and original STIHL accessories.
STIHL recommends the use of original STIHL replacement parts and accessories.
Original STIHL replacement parts and original STIHL accessories are available from STIHL servicing dealers.
22 Disposal
22.1 Disposing of Trimmer and Battery
Contact your STIHL servicing dealer for information on disposal.
20 Combinations of Cutting Attachments and Deflectors
- Dispose of the trimmer, deflector, cutting attachment, battery, charger, accessories and packaging in accordance with local regulations and environmental requirements.
23 EC Declaration of Conformity
23.1 STIHL FSA 65, FSA 85 Trimmers
declare in exclusive responsibility that
Category: Cordless electric trimmer
-Make:STIHL
- Model: FSA 65, FSA 85
- Serial identification: 4852
conforms to the relevant provisions of Directives 2011/65/EU, 2006/42/EC, 2014/30/EU and 2000/14/EC and has been developed and manufactured in compliance with the following standards in the versions valid on the date of production: EN 55014-1, EN 55014-2, EN 60335-1 and EN ISO 12100 taking EN 50636-2-91 into account.
The measured and guaranteed sound power levels were determined according to Directive 2000/14/EC, Annex V.
Notified body involved: TÜV Rheinland Product Safety GmbH, Am Grauen Stein, 51105 Cologne, Germany
FSA 65
Measured sound power level: 89 dB(A)
Guaranteed sound power level: 91 dB(A)
FSA 85
Measured sound power level: 92 dB(A)
Guaranteed sound power level: 94 dB(A)
23 EC Declaration of Conformity
English
Technical documents are deposited at ANDREAS STIHL AG & Co. KG Produktzulassung (Product Licensing).
The year of manufacture, country of manufacture and serial number are applied to the trimmer.
Done at Waiblingen, 01.03.2017
Thomas Elsner, Director Product Management and Services
Table des matieres
1 Preface 47
2 Informations concernant la presente Notice d'emploi 47
Chere clientele, cher client,
Le tube relie les differents composants.
10 DEL
1 led brandt rood. De accu is te warm of te koud.
De motorzeis is defect.
Arreterhendel in stand schuiven.
11 Motorzeis en accu controleren
11.1 Bedieningselementen controleren
Schakelhendelblokkering en schakelhendel

- Motorsensen STIHL FSA 65, FSA 85
- Introduction
- Dear Customer,
- Guide to Using this Manual
- Applicable Documentation
- English
- Symbols used with warnings in the text
- WARNING
- NOTICE
- Symbols in Text
- O v e r v i e w
- Trimmer and Battery
- Overview
- Deflector and Cutting Attachments
- Symbols
- Safety Precautions
- Warning Symbols
- Intended Use
- The Operator
- Clothing and equipment
- Work Area and Surroundings
- Work Area and Surroundings
- Battery
- Safe Condition
- Brushcutter
- Deflector
- WARNING
- Mowing Head
- Battery
- Operation
- Transporting
- Trimmer
- Battery
- Storing
- Trimmer
- Battery
- Cleaning, Maintenance and Repairs
- Preparing Trimmer for Operation
- Preparing Trimmer for Operation
- Charging the Battery, LEDs
- Charging the Battery
- Displaying State of Charge
- Assembling the Trimmer
- LEDs on Battery
- Mounting the Deflector
- STIHL AutoCut C 4-2 Mowing Head
- Mounting the Mowing Head
- Removing the Mowing Head
- Adjusting Trimmer for User
- Adjusting the Loop Handle
- Removing and Fitting the Battery
- Fitting the Battery
- Removing the Battery
- Switching the Trimmer On/Off
- Switching On
- FSA 85
- Switching Off
- Testing the Trimmer and Battery
- Checking the Controls
- Trigger lockout lever and trigger
- Switching On
- Testing the Battery
- Operating the Trimmer
- Holding and Controlling the Trimmer
- Mowing
- Adjusting Nylon Line
- After Finishing Work
- After Finishing Work
- Transporting
- Transporting the brushcutter
- Carrying the brushcutter
- Transporting the brushcutter in the car
- Transporting the Battery
- Storing
- Storing the Trimmer
- Storing the Battery
- Cleaning
- Cleaning the Trimmer
- Cleaning the Deflector and Cutting Attachment
- Cleaning the Battery
- Maintenance and Repairs
- Servicing and Repairing the Trimmer
- Servicing and Repairing the Battery
- Troubleshooting
- Troubleshooting Brushcutter or Battery
- Specifications
- STIHL FSA 65, FSA 85 Trimmers
- FSA 65
- STIHL AP battery
- Noise and Vibration Data
- REACH
- Combinations of Cutting Attachments and Deflectors
- STIHL FSA 65, FSA 85 Trimmers
- Spare Parts and Accessories
- Spare Parts and Accessories
- Disposal
- Disposing of Trimmer and Battery
- EC Declaration of Conformity
- STIHL FSA 65, FSA 85 Trimmers
- Table des matieres
- Motorzeis en accu controleren
- Bedieningselementen controleren
Brand : STIHL
Model : FSA 65
Category : Grass trimmer