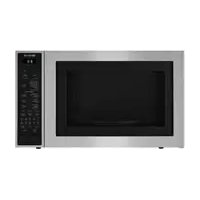
JMC3415ES - Microwave Oven JENN-AIR - Free user manual and instructions
Find the device manual for free JMC3415ES JENN-AIR in PDF.


Frequently Asked Questions - JMC3415ES JENN-AIR
User questions about JMC3415ES JENN-AIR
0 question about this device. Answer the ones you know or ask your own.
Ask a new question about this device
Download the instructions for your Microwave Oven in PDF format for free! Find your manual JMC3415ES - JENN-AIR and take your electronic device back in hand. On this page are published all the documents necessary for the use of your device. JMC3415ES by JENN-AIR.
USER MANUAL JMC3415ES JENN-AIR
THANK YOU for purchasing this high-quality product. Register your microwave oven at www.jennair.com.
In Canada, register your microwave oven at www.jennair.ca.
For future reference, please make a note of your product model and serial numbers. These can be found on the label located on the microwave oven frame behind the top right side of the microwave oven door.
Model Number Serial Number
Location Requirements 4
Electrical Requirements 4
PARTS AND FEATURES 5
Turntable. 6
Low Convection Rack. 6
High Convection Rack 6
Food Characteristics. 9
Cooking Guidelines 9
Cookware and Dinnerware. 10
Aluminum Foil and Metal 10
Before Operating. 10
Setting the Clock. 10
Stop/Clear 10
Microwave Cooking Power 11
Time Cooking 11
Convection and Automatic Mix Cooking. 11
Broil Cooking. 13
Slow Cooking 13
Sensor Defrosting. 13
Manual Defrosting 14
Sensor Cooking. 14
Convect Bake/Roast/Broil 16
Multiple Sequence Cooking. 17
More or Less Time Adjustment 17
Add Minute. 17
Touch On 17
General Cleaning. 18
TROUBLESHOOTING 19
ACCESSORIES 21
WARRANTY 22
Your safety and the safety of others are very important.
We have provided many important safety messages in this manual and on your appliance. Always read and obey all safety messages.

This is the safety alert symbol.
This symbol alerts you to potential hazards that can kill or hurt you and others.
All safety messages will follow the safety alert symbol and either the word "DANGER" or "WARNING." These words mean:
DANGER
You can be killed or seriously injured if you don't immediately follow instructions.
WARNING
You can be killed or seriously injured if you don't follow instructions.
All safety messages will tell you what the potential hazard is, tell you how to reduce the chance of injury, and tell you what can happen if the instructions are not followed.
IMPORTANT SAFETY INSTRUCTIONS
When using electrical appliances basic safety precautions should be followed, including the following:
WARNING: To reduce the risk of burns, electric shock, fire, injury to persons, or exposure to excessive microwave energy:
Read all instructions before using the microwave oven.
Read and follow the specific "PRECAUTIONS TO AVOID POSSIBLE EXPOSURE TO EXCESSIVE MICROWAVE ENERGY" found in this section.
The microwave oven must be grounded. Connect only to properly grounded outlet. See "GROUNDING INSTRUCTIONS" found in the "INSTALLATION INSTRUCTIONS" section.
Install or locate the microwave oven only in accordance with the provided Installation Instructions.
Some products such as whole eggs in the shell and sealed containers - for example, closed glass jars - are able to explode and should not be heated in the microwave oven.
- Use the microwave oven only for its intended use as described in the manual. Do not use corrosive chemicals or vapors in the microwave oven. This type of oven is specifically designed to heat, cook, or dry food. It is not designed for industrial or laboratory use.
As with any appliance, close supervision is necessary when used by children.
- Do not operate the microwave oven if it has a damaged cord or plug, if it is not working properly, or if it has been damaged or dropped.
The microwave oven should be serviced only by qualified service personnel. Call an authorized service company for examination, repair, or adjustment.
- Do not cover or block any openings on the microwave oven.
- Do not store this microwave oven outdoors. Do not use the microwave oven near water - for example, near a kitchen sink, in a wet basement, near a swimming pool, or similar locations.
- Do not immerse cord or plug in water.
- Keep cord away from heated surfaces.
- Do not let cord hang over edge of table or counter.
See door surface cleaning instructions in the "Microwave Oven Care" section.
To reduce the risk of fire in the oven cavity:
- Do not overcook food. Carefully attend the microwave oven when paper, plastic, or other combustible materials are placed inside the oven to facilitate cooking.
- Remove wire twist-ties from paper or plastic bags before placing bags in oven.
- If materials inside the oven ignite, keep oven door closed, turn oven off, and disconnect the power cord, or shut off power at the fuse or circuit breaker panel.
- Do not use the cavity for storage purposes. Do not leave paper products, cooking utensils, or food in the cavity when not in use.
SAVE THESE INSTRUCTIONS
IMPORTANT SAFETY INSTRUCTIONS
Liquids, such as water, coffee, or tea are able to be overheated beyond the boiling point without appearing to be boiling. Visible bubbling or boiling when the container is removed from the microwave oven is not always present. THIS COULD RESULT IN VERY HOT LIQUIDS SUDDENLY BOILING OVER WHEN THE CONTAINER IS DISTURBED OR A SPOON OR OTHER UTENSIL IS INSERTED INTO THE LIQUID.
To reduce the risk of injury to persons:
- Do not overheat the liquid.
- Stir the liquid both before and halfway through heating it.
- Do not use straight-sided containers with narrow necks.
- After heating, allow the container to stand in the microwave oven for a short time before removing the container.
- Use extreme care when inserting a spoon or other utensil into the container.
Do not mount over a sink.
- Do not store anything directly on top of the microwave oven when the microwave oven is in operation.
SAVE THESE INSTRUCTIONS
PRECAUTIONS TO AVOID POSSIBLE EXPOSURE TO EXCESSIVE MICROWAVE ENERGY
(a) Do not attempt to operate this oven with the door open since open-door operation can result in harmful exposure to microwave energy. It is important not to defeat or tamper with the safety interlocks.
(b) Do not place any object between the oven front face and the door or allow soil or cleaner residue to accumulate on sealing surfaces.
(c) Do not operate the oven if it is damaged. It is particularly important that the oven door close properly and that there is no damage to the:
(1) Door (bent),
(2) Hinges and latches (broken or loosened),
(3) Door seals and sealing surfaces.
(d) The oven should not be adjusted or repaired by anyone except properly qualified service personnel.
State of California Proposition 65 Warnings:
WARNING: This product contains one or more chemicals known to the State of California to cause cancer.
WARNING: This product contains one or more chemicals known to the State of California to cause birth defects or other reproductive harm.
This device complies with Part 18 of the FCC Rules.
This device complies with Industry Canada ICES-001.
Installation Instructions
Unpacking
- Empty the microwave oven of any packing materials.
- Clean the inside with a soft, damp cloth.
- Check for damage, such as:
a door that is not lined up
damage around the door, or
- dents on the interior or exterior of the microwave oven
If there is any damage, do not operate the microwave oven until a designated service technician has checked it and made any needed repairs.
NOTE: To avoid damage to the microwave oven, do not remove microwave inlet cover. See the "Parts and Features" section.
Location Requirements
WARNING
Excessive Weight Hazard
Use two or more people to move and install microwave oven.
Failure to do so can result in back or other injury.
IMPORTANT: The control side of the microwave oven is the heavy side. Handle the microwave oven gently. The weight of the microwave oven is over 35 lbs (15.9 kg).
- Place the microwave oven on a cart, counter, table, or shelf that is strong enough to hold the microwave oven and the food and utensils you place inside it.
The microwave oven should be at a temperature above 50^ (10^) for proper operation.
NOTE: The microwave oven must be on a surface that is a minimum of 36^ (91.4 cm) above the floor.
- Do not block the exhaust vents or air intake openings. Allow a few inches of space at the back and side of the microwave oven where the exhaust vents are located. Blocking the exhaust vents could cause damage to the microwave oven as well as poor cooking results.
Make sure the microwave oven legs are in place to ensure proper airflow. If vents are blocked, a sensitive thermal device may automatically turn the microwave oven off. The microwave oven should work properly once it has cooled.
Electrical Requirements
WARNING
Electrical Shock Hazard
Plug into a grounded 3 prong outlet.
Do not remove ground prong.
Do not use an adapter.
Do not use an extension cord.
Failure to follow these instructions can result in death, fire, or electrical shock.
Observe all governing codes and ordinances.
Required:
A 120-volt, 60Hz AC-only, 15- or 20-amp electrical supply with a fuse or circuit breaker
Recommended:
A time-delay fuse or time-delay circuit breaker
A separate circuit serving only this microwave oven
GROUNDING INSTRUCTIONS
For all cord connected appliances:
The microwave oven must be grounded. In the event of an electrical short circuit, grounding reduces the risk of electric shock by providing an escape wire for the electric current. The microwave oven is equipped with a cord having a grounding wire with a grounding plug. The plug must be plugged into an outlet that is properly installed and grounded.
WARNING: Improper use of the grounding plug can result in a risk of electric shock. Consult a qualified electrician or serviceman if the grounding instructions are not completely understood, or if doubt exists as to whether the microwave oven is properly grounded.
Do not use an extension cord. If the power supply cord is too short, have a qualified electrician or serviceman install an outlet near the microwave oven.
SAVE THESE INSTRUCTIONS
Parts and Features
Refer to this manual or the Frequently Asked Questions (FAQs) section of our website at www.jennair.com for more detailed instructions. In Canada, refer to the Customer Service Section at www.jennair.ca.
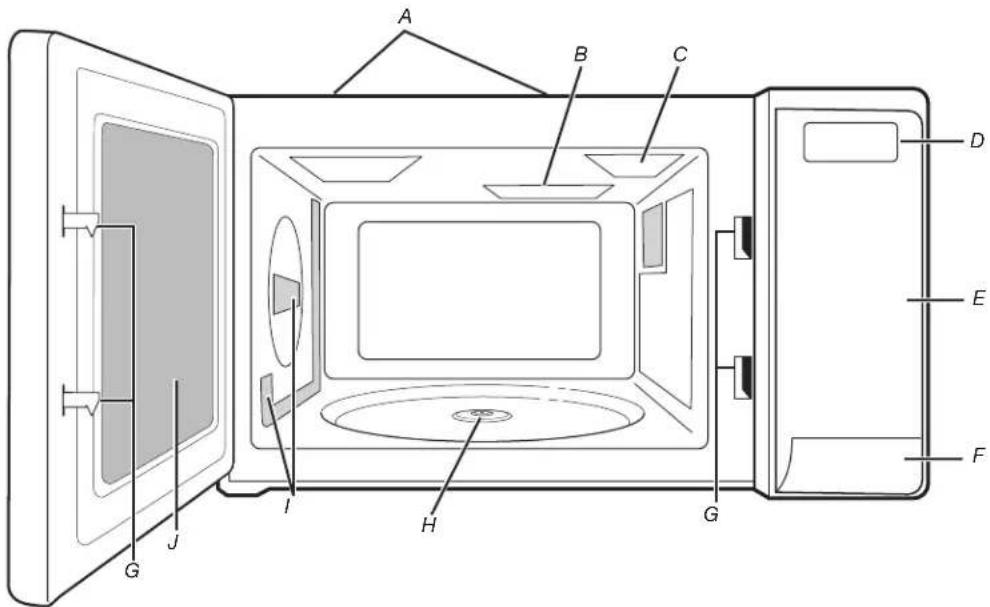
A. Ventilation openings (rear side)
B. Inlet cover
C. Microwave oven light
D. Display
E. Control panel
F. Door open push button
G. Door lock system
H. Turntable motor shaft
1. Convection air openings
J. Window
Parts and Features not shown
Turntable
Turntable support
Low convection rack
High convection rack
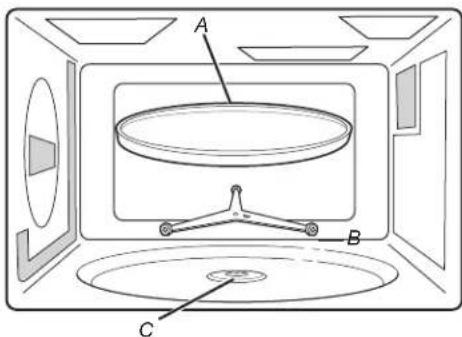
A. Turntable
B. Turntable support
C. Turntable motor shaft
The turntable rotates in both directions to help cook food more evenly. Do not operate the microwave oven without having the turntable in place. See the "Accessories" section to reorder any of the parts.
Place the turntable support, with the engraved word "Top" facing up, securely on the turntable motor shaft. Place the turntable on the turntable support. The turntable support should be placed with all 3 rollers in contact with the flat underside surface of the turntable and inside the bottom ridge.
NOTE: The microwave oven light and cooling fan will continue to run until the microwave door is opened or Stop/Clear is touched.
Low Convection Rack (on some models)
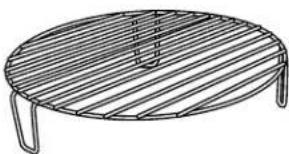
The convection rack provides optimal heat circulation for convection cooking (on some models). It is recommended for convection cooking and for broiling.
The rack will become hot. Always use oven mitts or pot holders when handling.
To avoid damage to the microwave oven, do not allow the rack to touch the inside cavity walls, ceiling, or floor.
Always use the turntable.
To avoid damage to the microwave oven, do not store the rack in the microwave oven.
■For best results, do not place popcorn bags on the rack.
- The rack is designed specifically for this microwave oven. For best cooking results, do not attempt to use any other rack in this microwave oven.
High Convection Rack (on some models)
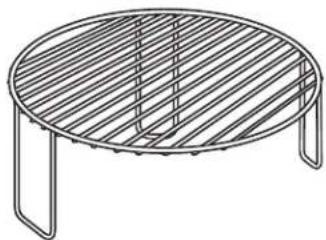
This rack is for two-level convection baking.
The rack will become hot. Always use oven mitts or pot holders when handling.
To avoid damage to the microwave oven, do not allow the rack to touch the inside cavity walls, ceiling, or floor.
Always use the turntable.
To avoid damage to the microwave oven, do not store the rack in the microwave oven.
For best results, do not place popcorn bags on the rack.
- The rack is designed specifically for this microwave oven. For best cooking results, do not attempt to use any other rack in this microwave oven.
Accessory Configurations
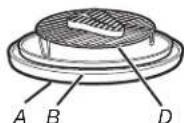
Broiling
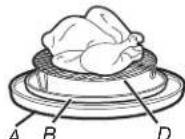
Roasting
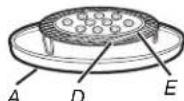
Baking
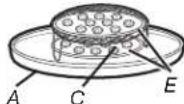
2-Level Baking
A. Turntable
B. Pan (not provided)
C. High convection rack
D. Low convection rack
E. Cookie sheet (not provided)
Microwave Oven Control
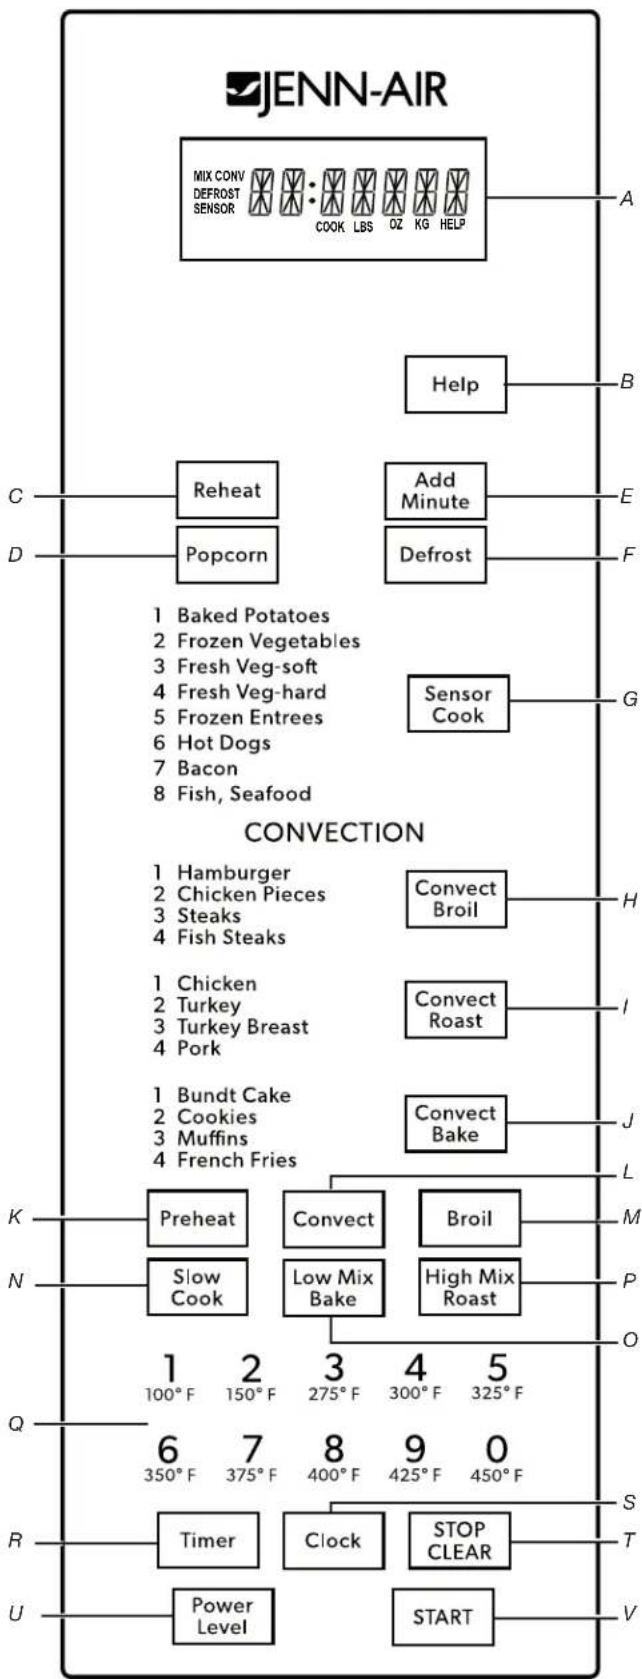
A. Interactive display
H. Convect Broil
P. High Mix/Roast
B. Help
I. Convect Roast
Q. Number/Temperature keypads
C. Rehe
J. Convect Bake
R. Timer
D. Popcorn
K. Preheat
S. Clock
E. Add Minute
M. Broil
T. Stop/Clear
G. Sensor Cook
N. Slow Cook
U. Power Level
O. Low Mix/Bake
V. Start
The microwave oven's controls are accessed through the control panel and interactive display.
Display
Words will light in the display to indicate features and cooking instructions.
Menu Demonstration
To allow the control to demonstrate cooking operations or specific special features with no power in the microwave oven, follow these steps:
- Touch CLOCK.
- Touch number keypad "0."
- Touch and hold START for 3 seconds. Display shows: DEMO ON.
Now you can run a demonstration.
Example for Add Minute:
- Touch ADD MINUTE. Display shows: 1:00
The display will then count down quickly until you see "END."
To cancel:
- Touch CLOCK.
- Touch number keypad "0."
- Touch STOP/CLEAR.
Help
Help provides 6 features to customize your microwave oven for your specific needs.
Lock
This feature shuts down the control panel keypads to avoid unintended use of the microwave oven.
To set:
- Touch HELP.
- Touch number keypad "1."
- Touch START.
After Lock is set, if any keypad is touched, "LOCK" will appear in the display.
To cancel:
- Touch HELP.
- Touch STOP/CLEAR.
Deactivating Tones
To deactivate tones:
- Touch HELP.
- Touch number keypad "2."
- Touch STOP/CLEAR.
To cancel and restore tones:
- Touch HELP
- Touch number keypad "2."
- Touch START.
Auto Start
This feature allows you to program your microwave oven to begin cooking automatically at a designated time of day.
To enable:
WARNING
Food Poisoning Hazard
Do not let food sit in oven more than one hour before or after cooking.
Doing so can result in food poisoning or sickness.
- Touch HELP.
- Touch number keypad "3" to select AUTO START.
- Touch number keypads to enter the start time. For example, touch "4," "3," and "0" to start the cycle at 4:30.
- Touch CLOCK.
- Touch POWER LEVEL followed by a number keypad to set the power level. For example, touch "5" for 50% power.
- Touch the number keypads to set the cooking time. For example, touch "2," "0," "0," and "0" for 2 minutes.
- Touch START. The selected Auto Start time will appear in the display.
NOTES:
Auto Start will not work with the following cooking cycles: Sensor Cook, Reheat, Popcorn, or Defrost.
If the microwave oven door is opened after programming Auto Start, it is necessary to touch the Start keypad to resume the countdown to the Auto Start time.
To display the time of day after Auto Start is set, touch and hold CLOCK. Release the Clock keypad to return the display to the Auto Start time.
Language Selection
The microwave oven comes set for the English language.
To change language selection:
- Touch HELP.
- Touch number keypad "4" and tap until your choice is selected in the table below.
NUMBER 4 LANGUAGE DISPLAY
One time English ENGLISH
Two times Spanish ESPANOL
Three times French FR
3. Touch START.
Weight/Temp Selection
The microwave oven comes set for U.S. Customary Unit - pounds.
To change weight/temp selection:
- Touch HELP.
- Touch number keypad "5" and tap until your choice is selected in the table below.
| NUMBER 5 | STANDARD OF WEIGHT AND TEMPERATURE | DISPLAY |
| Once | lb °F | Lb °F |
| Twice | kg °C | KG °C |
3. Touch START.
Help
Each setting of Defrost, Convect Bake, Convect Roast, Convect Broil, Sensor Cook, and Instant Sensor has a cooking hint. To see the cooking hint in a specific setting, touch HELP whenever "HELP" is displayed.
Timer
To set:
- Touch TIMER.
- Touch the number keypads to enter the desired time. For example, touch "3," "0," and "0" for 3 minutes.
- Touch START.
Microwave Oven Use
A magnetron in the microwave oven produces microwaves that reflect off the metal floor, walls, and ceiling and pass through the turntable and appropriate cookware to the food. Microwaves are attracted to and absorbed by fat, sugar, and water molecules in the food, causing them to move, producing friction and heat, which cooks the food.
To avoid damage to the microwave oven, do not lean on or allow children to swing on the microwave oven door.
To avoid damage to the microwave oven, do not operate microwave oven when it is empty.
The turntable must be in place and correct-side up when microwave oven is in use. Do not use if turntable is chipped or broken. See the "Accessories" section to reorder.
Baby bottles and baby food jars should not be heated in microwave oven.
Clothes, flowers, fruit, herbs, wood, gourds, paper, including brown paper bags and newspaper, should not be dried in the microwave oven.
- Paraffin wax will not melt in the microwave oven because it does not absorb microwaves.
Use oven mitts or pot holders when removing containers from microwave oven.
- Do not overcook potatoes. At the end of the recommended cook time, potatoes should be slightly firm. Let potatoes stand for 5 minutes. They will finish cooking while standing.
- Do not cook or reheat whole eggs inside the shell. Steam buildup in whole eggs may cause them to burst. Cover poached eggs, and allow a standing time.
Food Characteristics
When microwave cooking, the amount, size and shape, starting temperature, composition, and density of the food affect cooking results.
Amount of Food
The more food heated at once, the longer the cook time needed. Check for doneness and add small increments of time if necessary.
Size and Shape
Smaller pieces of food will cook more quickly than larger pieces, and uniformly shaped foods cook more evenly than irregularly shaped food.
Starting Temperature
Room temperature foods will heat faster than refrigerated foods, and refrigerated foods will heat faster than frozen foods.
Composition and Density
Foods high in fat and sugar will reach a higher temperature and will heat faster than other foods. Heavy, dense foods, such as meat and potatoes, require a longer cook time than the same size of a light, porous food such as cake.
Cooking Guidelines
Covering
Covering food helps retain moisture, shorten cook time, and reduce spattering. Use the lid supplied with cookware. If a lid is not available, wax paper, paper towels, or plastic wrap approved for microwave ovens may be used. Plastic wrap should be turned back at one corner to provide an opening to vent steam. Condensation on the door and cavity surfaces is normal during heavy cooking.
Stirring and Turning
Stirring and turning redistribute heat evenly to avoid overcooking the outer edges of food. Stir from outside to center. If possible, turn food over from bottom to top.
Arranging
If heating irregularly shaped or different-sized foods, arrange the thinner parts and smaller-sized items toward the center. If cooking several items of the same size and shape, place them in a ring pattern, leaving the center of the ring empty.
Piercing
Before heating, use a fork or small knife to pierce or prick foods that have a skin or membrane, such as potatoes, egg yolks, chicken livers, hot dogs, and sausage. Prick in several places to allow steam to vent.
Shielding
Use small, flat pieces of aluminum foil to cover the thin pieces of irregularly shaped foods, bones, and foods such as chicken wings, leg tips, and fish tails: see the "Aluminum Foil and Metal" section first.
Standing Time
Food will continue to cook by the natural conduction of heat, even after the microwave cooking cycle ends. The length of standing time depends on the volume and density of the food.
Cookware and Dinnerware
Cookware and dinnerware must fit on the turntable. Always use oven mitts or pot holders when handling because any dish may become hot from heat transferred from the food. Do not use cookware and dinnerware with gold or silver trim. Use the following chart as a guide, then test before using.
MATERIAL RECOMMENDATIONS
| Aluminum Foil, Metal | See the "Aluminum Foil and Metal" section. |
| Browning Dish | Bottom must be at least 3/16" (5 mm) above the turntable. Follow manufacturer's recommendations. |
| Ceramic Glass, Glass | Acceptable for use |
| China, Earthenware | Follow manufacturer's recommendations. |
| Melamine | Follow manufacturer's recommendations. |
| Paper: Towels, Dinnerware, Napkins | Use non-recycled and those approved by the manufacturer for microwave oven use. |
| Plastic: Wraps, Bags, Covers, Dinnerware, Containers | Use those approved by the manufacturer for microwave oven use. |
| Pottery and Clay | Follow manufacturer's recommendations. |
| Silicone Bakeware | Follow manufacturer's recommendations. |
| Straw, Wicker, Wooden Containers | Do not use in microwave oven. |
| Styrofoam®† | Do not use in microwave oven. |
| Wax Paper | Acceptable for use |
To Test Cookware or Dinnerware for Microwave Oven Use:
- Place cookware or dinnerware in microwave oven with 1 cup (250~mL) of water beside it.
- Cook at 100% cooking power for 1 minute.
Do not use cookware or dinnerware if it becomes hot and the water stays cool.
Aluminum Foil and Metal
Always use oven mitts or pot holders when removing dishes from the microwave oven.
Aluminum foil and some metal can be used in the microwave oven. If not used properly, arcing (a blue flash of light) can occur and cause damage to the microwave oven.
OK for Use
Racks and bakeware supplied with the microwave oven, aluminum foil for shielding, and approved meat thermometers may be used with the following guidelines:
To avoid damage to the microwave oven, do not allow aluminum foil or metal to touch the inside cavity walls, ceiling, or floor.
Always use the turntable.
To avoid damage to the microwave oven, do not allow contact with another metal object during microwave cooking.
Do Not Use
Metal cookware and bakeware, gold, silver, pewter, non-approved meat thermometers, skewers, twist ties, foil liners, such as sandwich wrappers, staples, and objects with gold or silver trim or a metallic glaze should not be used in the microwave oven.
Before Operating
WARNING
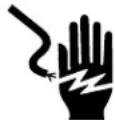
Electrical Shock Hazard
Plug into a grounded 3 prong outlet.
Do not remove ground prong.
Do not use an adapter.
Do not use an extension cord.
Failure to follow these instructions can result in death, fire, or electrical shock.
Before operating your new microwave oven, make sure you read and understand this User Guide completely.
Before the microwave oven can be used, follow these steps:
- Plug in the microwave oven and close the door. The display will show "WELCOME PRESS CLEAR AND PRESS CLOCK."
- Touch STOP/CLEAR and ":" will be displayed.
- Touch CLOCK.
Setting the Clock
To enter the time of day:
- TouchCLOCK.
- Enter the correct time of day by touching the number keypads. For example, touch "1," "2," "3," and "0" for 12:30.
- Touch CLOCK again.
NOTES:
This is a 12-hour clock. If you attempt to enter an incorrect clock time, "ERROR" will appear in the display. Touch STOP/CLEAR and re-enter the time.
If the electrical power supply to your microwave oven should be interrupted, the display will intermittently show "WELCOME" PRESS CLEAR AND PRESS CLOCK after the power comes back on. If this occurs during cooking, the set time will be erased. Touch STOP/CLEAR and reset the correct time of day.
Stop/Clear
Touch STOP/CLEAR to:
Erase programming if an error was made.
■Cancel the Timer.
- Stop the microwave oven temporarily during cooking.
Return the time of day to the display.
- Cancel a program during cooking (touch twice).
Microwave Cooking Power
Many recipes for microwave cooking specify which cooking power to use by percent, name, or number. For example, 70% = 7 = Medium-High.
Use the following chart as a general guide for the suggested cooking power of specific foods.
Microwave Cooking Power Chart
PERCENT/NAME NUMBER USE
| 100%, High (default setting) | 10 Quick heating convenience foods and foods with high water content such as soups, beverages, and most vegetables |
| 90% | 9 Cooking small, tender pieces of meat, ground meat, poultry pieces, and fish fillets Heating cream soups |
| 80% | 8 Heating rice, pasta, or casseroles Cooking and heating foods that need a cook power lower than High, for example, whole fish and meat loaf |
| 70%, Medium-High | 7 Reheating a single serving of food |
| 60% | 6 Cooking sensitive foods such as cheese and egg dishes, pudding, and custards Cooking non-stirrable casseroles such as lasagna |
| 50%, Medium | 5 Cooking ham, whole poultry, and pot roasts Simmering stews |
| 40% | 4 Melting chocolate Heating bread, rolls, and pastries |
| 30%, Medium-Low, Defrost | 3 Defrosting bread, fish, meats, poultry, and precooked foods |
| 20% | 2 Softening butter, cheese, and ice cream |
| 10%, Low | 1 Taking chill out of fruit |
NOTE: A percentage of 0% is also acceptable. This will not heat up.
Time Cooking
Your microwave oven can be programmed for 99 minutes, 99 seconds. Always enter the seconds after the minutes, even if they are both zeros.
To set at 100% cook power:
- Touch number keypads to enter cooking time. For example, touch "5," "0," and "0" for 5 minutes.
- Touch START.
To set at a lower cook power:
- Touch number keypads to enter cooking time. For example, touch "5," "0," and "0" for 5 minutes.
- Touch POWER LEVEL, followed by a number keypad (for example, "3" for 30% ).
- Touch START.
You can program up to 4 automatic cooking sequences. (See the "Multiple Sequence Cooking" section.) Note that Power Level must be entered first when programming multiple sequences.
Convection and Automatic Mix Cooking
IMPORTANT: The microwave oven should not be used without the turntable in place, and it should never be restricted so that it cannot rotate. You can remove the turntable when preheating the microwave oven and when preparing food to be cooked directly on the turntable.
Convection Cooking
The convection system circulates hot air through the microwave oven cavity with a fan. The constantly moving air surrounds the food to heat the outer portion quickly. This microwave oven can be programmed for 10 different convection cooking temperatures for up to 99 minutes, 99 seconds.
To cook with convection:
- Touch CONVECT.
- Touch a temperature keypad. For example, touch "6" for 350^ (177^) .
-
Touch number keypads to enter cooking time. For example, touch "2," "0," and "0" for 2 minutes.
-
Touch START.
NOTE: To see the programmed microwave oven temperature, touch and hold CONVECT.
Preheating and Cooking with Convection
The microwave oven can be programmed to combine preheating and convection cooking operations. You can preheat to the same temperature as the convection temperature or change to a higher or lower temperature.
To program:
- Touch PREHEAT.
- Touch a temperature keypad for the preheat temperature. For example, touch "6" for 350^ (177^) .
- Touch CONVECT.
- Touch a temperature keypad for the cooking temperature. For example, touch "7" for 375^ (191°C).
- Touch number keypads to enter cooking time. For example, touch "2," "5," "0," and "0" for 25 minutes.
- Touch START.
When the microwave oven reaches the programmed temperature, a tone will sound 4 times. The microwave oven will stop and directions will be displayed. Follow the displayed directions.
- Open the door, place food in the microwave oven, and close the door.
-
Touch START.
-
If the microwave oven door is not opened, the microwave oven will automatically hold at the preheat temperature for 30 minutes. After this time has elapsed, a tone will sound and the microwave oven will turn off.
To program only preheat:
Touch START after the previous Step 2. Preheating will start. When the microwave oven reaches the programmed temperature, follow the displayed directions.
To preheat and cook with the same temperature:
Enter the same temperature in steps 2 and 4.
Automatic Mix Cooking
Automatic Mix cooking produces juicy meats, moist and tender cakes, and fine-textured breads, all with just the right amount of browning and crispness. Although some foods are best cooked with convection heat only, most foods can be mix cooked with either Low Mix/Bake or High Mix/Roast.
The microwave oven has two pre-programmed settings for automatic cooking with both convection heat and microwaves:
SETTING OVEN
TEMPERATURE
MICROWAVE
POWER
High Mix/Roast 300^ (150^) 30%
Low Mix/Bake 350^ (177^) 10%
Although the microwave oven temperature can be changed, microwave power cannot. The microwave oven temperature can be changed from 100^ (38^) to 450^ (232^) .
To change the temperature:
- Touch HIGH MIX/ROAST or LOW MIX/BAKE twice.
- When the display shows "SELECT TEMP," touch the desired temperature keypad. For example, number keypad "7" for 375^ (191^) .
To cook with Automatic Mix:
- Touch LOW MIX/BAKE.
- Touch the number keypads for the cooking time, for example "2," "5," "0," and "0" for 25 minutes.
- Touch START.
To preheat and cook with Automatic Mix:
The microwave oven can be programmed to combine preheating and Automatic Mix cooking. You can preheat at the same temperature as the preset combination temperature or change it to a different temperature.
To program:
- Touch PREHEAT.
- Touch a Temperature keypad for the preheat temperature. For example, touch "6" for 350^ (177^) .
- Touch LOW MIX/BAKE twice.
- Touch a Temperature keypad for the cooking temperature. For example, touch "5" for 325^ (163^)
- Touch number keypads to enter cooking time. For example, touch "2," "5," "0," and "0" for 25 minutes.
- Touch START.
When the microwave oven reaches the programmed temperature, a tone will sound 4 times. The microwave oven will stop, and directions will be displayed.
- Open the door, place food in the microwave oven, and close the door.
-
Touch START.
-
If the microwave oven door is not opened, the microwave oven will automatically hold at the preheat temperature for 30 minutes. After this time has elapsed, a tone will sound and the microwave oven will turn off.
To program only preheat:
Touch START after Step 2 above. Preheating will start. When the microwave oven reaches the programmed temperature, follow the displayed directions.
Helpful Hints for Convection and Automatic Mix Cooking
General:
The microwave oven cannot be used without the turntable in place. Never restrict the movement of the turntable.
Convection Cooking:
The microwave oven cavity and door will become hot during the convection cycle. The use of oven mitts is recommended.
Use the provided convection racks.
- Do not use light plastic containers, plastic wrap, or paper products. All ovenproof cookware can be used with the Convect function.
No special techniques are needed to adapt standard oven recipes to convection cooking, although some temperatures might need to be reduced and some cooking times might need to be shortened.
- When preheating, the turntable can be left in or removed.
- When using the high rack for two-shelf baking in a preheated microwave oven, it is easier to remove the turntable for preheat. Place the high rack on the turntable along with food.
- When preheating is over, open the microwave oven door and quickly place the turntable, high rack, and food to be baked inside.
- Do not cover the turntable, low rack, or high rack with aluminum foil. It interferes with airflow that cooks food.
Round pizza pans are excellent cooking utensils for many convection-only items. Choose pans that do not have extended handles.
Using a preheated low rack can give a grilled appearance to steaks, hot dogs, etc.
Automatic Mix Cooking:
Meats are best when roasted directly on the low rack. A microwave-safe dish can be placed below the meat if gravy is to be made from the drippings.
Less tender cuts of meat can be roasted and tenderized using oven cooking bags.
- When baking, check for doneness after time has elapsed. If not completely done, let stand in microwave oven a few minutes to complete cooking.
NOTE: During Mix baking, some metal baking utensils may cause arcing when they come in contact with the microwave oven walls or accessory racks. Arcing is a discharge of electricity that occurs when microwaves come in contact with metal. If arcing occurs, place a heat-resistant dish (Pyrex®) pie plate, glass pizza dish, or dinner plate) between the pan and the rack. If arcing occurs with other metal baking utensils, discontinue their use for Mix cooking.
Broil Cooking
Cook with Broil for steaks, chops, chicken pieces, and many other foods. Programming only requires entry of the cooking time. Preheating is automatic and a tone will sound when 450^ (232^) is reached. The microwave oven temperature cannot be changed.
To set (before placing food in microwave oven):
- Touch BROIL.
- Touch the number keypads to enter cooking time. For example, touch "1," "5," "0," and "0" for 15 minutes.
- Touch START.
When the microwave oven reaches the programmed temperature, a tone will sound 4 times. The microwave oven will stop and directions will be displayed.
- Open the door, place food in the microwave oven, and close the door.
-
Touch START.
-
If the microwave oven door is not opened, the microwave oven will automatically hold at the preheat temperature for 30 minutes. After this time has elapsed, a tone will sound and the microwave oven will turn off.
NOTES:
Preheating for Broil may take from 7 to 10 minutes, depending on temperature of the room and available power.
Although time is usually set for the maximum broiling time, always check food at the minimum time recommended in the recipe. This avoids reprogramming the microwave oven if additional cooking time is needed. Close the microwave oven door and touch START to continue.
If more broiling time is needed, reprogram within 1 minute before the current set time is reached to avoid preheating.
Slow Cooking
Use this feature for foods such as baked beans or marinated chuck steak. Slow Cook is preset at 300^ (150^) for 4 hours. The temperature can be changed to below 300^ (150^) , but the cooking time cannot be changed.
To set:
- Touch SLOW COOK. If you want to slow cook at 300^ (150^) , skip steps 2 and 3.
- Touch SLOW COOK again if you want a cooking temperature below 300^ (150°C).
- Touch a number keypad to enter the new cooking temperature. For example, touch "3" for 275^ ( 135^ ).
- Touch START.
Sensor Defrosting
This feature automatically defrosts foods shown in the following chart.
Unwrap foods and remove lids (for example, from fruit juice containers) before defrosting.
Shallow packages will defrost more quickly than deep blocks.
- Separate food pieces as soon as possible during or at the end of the cycle for more even defrosting.
Use small pieces of aluminum foil to shield parts of food, such as chicken wings, leg tips, and fish tails. See the "Aluminum Foil and Metal" section first.
To set:
- Touch DEFROST.
- To select the food to be defrosted, touch DEFROST again until the desired food name is displayed.
- Touch the number keypads to enter weight. For example, touch "2" and "0" for 2.0 lbs.
- Touch START.
The microwave oven will stop and directions will be displayed. Follow the displayed directions.
- After the first stage, open the door, turn over food, shield any warm portions, and close the door.
- Touch START.
- After the second stage, open the door, shield any warm portions, and close the door.
- Touch START.
- After the Defrost cycle ends, cover food and let stand as shown in the chart below.
NOTES:
If you attempt to enter more or less than the allowed amount shown in the following chart, an error message will appear in the display.
- Defrost can be programmed with More or Less Time Adjustment. Touch POWER LEVEL once or twice after selecting the amount. See the "More or Less Time Adjustment" section.
To defrost other foods or foods above or below the weights allowed in the "Sensor Defrost Chart," enter a cooking time with the number keypads and set a 30% power level. See the "Manual Defrosting" section.
Sensor Defrost Chart
| FOOD AMOUNT PROCEDURE | ||
| Ground meat | 0.5–3.0 lbs (0.3–1.3 kg) | Do not defrost less than 1/4 lb (113 g) or two 4 oz (113 g) patties. Place in microwave-safe baking dish. Do not cover. |
| Steaks | 0.5–4.0 lbs | The narrow or fatty areas of irregularly shaped cuts should be shielded with aluminum foil before defrosting. Place in microwave-safe baking dish. Do not cover. |
| Chops | (0.3–1.8 kg) | |
| Fish | ||
| Chicken pieces | 0.5–3.0 lbs (0.3–1.3 kg) | Place in microwave-safe baking dish, chicken breast-side up. Do not cover. |
NOTE: Check foods when microwave oven signals. After the final stage, small sections may still be icy. Let stand to continue thawing. Do not defrost until all ice crystals are thawed. Shielding prevents cooking from occurring before the center of the food is defrosted. Use small, smooth strips of aluminum foil to cover edges and thinner sections of the food.
Manual Defrosting
If the food that you want to defrost is not listed in the "Sensor Defrost Chart" or is above or below the range of amounts shown in the chart, you need to defrost manually.
You can defrost any frozen food, either raw or previously cooked, by using Power Level 3. Follow the exact 3-step procedure found in the "Time Cooking" section. Estimate defrosting time and touch "3" for 30% when you select the power level.
For either raw or previously cooked frozen food, the rule of thumb is approximately 5 minutes per pound. For example, defrost 5 minutes for 1 pound of frozen spaghetti sauce.
Always stop the microwave oven periodically to remove or separate the portions that are defrosted. If food is not defrosted at the end of the estimated defrosting time, program the microwave oven in 1-minute increments at Power Level 3 until totally defrosted.
When using plastic containers from the freezer, defrost only long enough to remove from the plastic in order to place in a microwave-safe dish.
Sensor Cooking
A sensor in the microwave oven detects humidity released from the food as it heats and adjusts the cook time accordingly.
Many sensor cycles require the covering of foods.
Microwave-safe containers or steamers with loose-fitting lids are recommended. The loose-fitting lid allows enough steam to escape to be detected by the sensor. When covering foods with plastic wrap, be sure to leave a large enough vent opening to allow the steam to escape. This will allow the sensor to accurately determine cooking time.
Using Sensor:
After the microwave oven is plugged in, wait 3 minutes before using sensor settings.
- Be sure the exterior of the cooking container and the interior of the microwave oven are dry. Wipe off any moisture with a dry cloth or paper towel.
The room temperature should not exceed 95^ (35^)
- Reheat and Popcorn can only be entered within 1 minute after cooking, opening and closing the door, or touching STOP/CLEAR.
During the first part of sensor cooking, the food name will appear on the display. Do not open the microwave oven door or touch STOP/CLEAR during this part of the cooking cycle. The measurement of vapor will be interrupted. If this occurs, an error message will appear. To continue cooking, touch STOP/CLEAR and select cooking time and variable power.
- When the sensor detects the vapor emitted from the food, the remainder of cooking time will appear. Door may be opened when the remaining cooking time appears on the display. At this time, you may stir or season food as desired.
Check food for temperature after cooking. If additional time is needed, continue to cook with variable power and time.
If the sensor does not detect vapor properly when popping popcorn, the microwave oven will turn off and the correct time of day will be displayed. If the sensor does not detect vapor properly when using sensor reheat, "ERROR" will be displayed and the microwave oven will turn off.
Any Sensor Cooking mode can be programmed with More or Less Time Adjustment. See the "More or Less Time Adjustment" section.
Each food has a cooking hint. Touch HELP when the Help indicator is lit in the display.
Selecting Foods:
- The sensor works with foods at normal storage temperature. For example, food for dinner plate reheating would be at refrigerator temperature and popcorn would be at room temperature.
Foods weighing less than 3 ounces should be reheated by time and variable power.
Instant Sensors
Your microwave oven has Instant Sensor Popcorn and Instant Sensor Reheat. To use either, touch the corresponding keypad. The microwave oven will start automatically.
Sensor Reheat
You can reheat many foods by touching just 1 keypad. It is unnecessary to calculate reheating time or power level.
To set:
- Touch REHEAT.
When the sensor detects the vapor emitted from the food, the remainder of reheating time will appear.
IMPORTANT: Slowly remove any covering to allow steam to escape away from you.
Popcorn
The sensor in the microwave oven determines the appropriate popping time of commercially packaged microwavable popcorn. This function is programmed to detect popping times for 3.5 oz (99 g), 3.0 oz (85 g), and 1.75 oz (50 g) bags.
NOTE: During Sensor Popcorn function, as with all microwave cooking functions, the microwave oven should be attended at all times. Listen for popping to slow to 1 pop every 1 or 2 seconds, then stop the cycle.
To avoid damage to the microwave oven, do not use regular paper bags or glassware.
■Pop only 1 package of popcorn at a time.
■Follow manufacturer's instructions when using a microwave popcorn popper.
For best cooking results, do not try to pop unpopped kernels.
Use fresh bags of popcorn for optimal results.
Cooking results may vary by brand and fat content. For bag sizes not listed in this section, follow package directions.
To set:
- Touch POPCORN once for a 3.0-3.5 oz. bag or twice for a 1.5-1.75 oz. bag.
Instant Sensor Chart
FOOD AMOUNT PROCEDURE
| Sensor | 4-36 oz | Place food on microwave-safe plate, cover with plastic wrap, and vent. |
| Reheat | (0.12-1.0 kg) | |
| Leftovers | ||
| such as rice, potatoes, vegetables, casserole |
Soups 1-4 cups Place in microwave-safe
| container, cover with plastic wrap, and vent. Stir, recover, and let stand 2-3 minutes after reheating is complete. | ||
| Canned entrees and vegetables | 4-36 oz(0.12-1.0 kg) | Use Less Time Adjustment by touching POWER LEVEL twice for small quantities of canned vegetables. |
Sensor Cook
To set:
- Touch SENSOR COOK.
- Touch a number keypad corresponding to the desired sensor setting. For example, touch "1" for baked potatoes.
- Touch START. When the sensor detects the vapor emitted by the food, the remainder of cooking time will appear.
Sensor Cook Chart
| SETTING/FOOD AMOUNT PROCEDURE | ||
| 1. Baked potatoes | 1-8 medium | Pierce each one several times with a fork. Place on turntable around edges, at least 1" (2.5 cm) apart. Let stand 5 minutes after cooking. |
| 2. Frozen vegetables | 1-8 cups | Place in microwave-safe container and add 2-4 Tbsp (30-60 mL) water. Cover with plastic wrap and vent.* Stir and let stand 2-3 minutes after cooking. |
| 3. Fresh vegetables, soft: Broccoli | 1/4-2 lbs | |
| Brussels sprouts | 1/4-2 lbs | |
| Cabbage | 1/4-2 lbs | |
| Cauliflower (flowerets) | 1/4-2 lbs | |
| Cauliflower (whole) | 1 medium | |
| Spinach | 1/4-1 lb | |
| Zucchini | 1/4-2 lbs | |
| Baked apples | 2-4 medium | |
| (0.2-0.9 kg) | ||
| 4. Fresh vegetables, hard: Carrots, sliced | 1/4-11/2 lbs | Place in microwave-safe container and add 2-4 Tbsp (30-60 mL) water. Cover with plastic wrap and vent.* Stir and let stand 2-5 minutes after cooking. |
| Corn on cob | 2-4 pieces | |
| Green beans | 1/4-11/2 lbs | |
| Winter squash, diced halves | 1/4-11/2 lbs | |
| 1-2 (0.2-0.6 kg) | ||
| 5. Frozen entrees | 6-17 oz bag | Remove from package. Loosen cover on 3 sides. If entree is not in microwave-safe container, place on plate, cover with plastic wrap, and vent. Let stand 1-3 minutes after cooking. |
| (0.17-0.48 kg) | ||
| 6. Hot dogs | 1-4 servings Place hot dog in bun and wrap in paper towel or paper napkin. | |
| 7. Bacon | 2-6 slices Place bacon on paper plate lined with paper towel. Bacon should not extend over the rim of plate. Cover with paper towel. Put another paper plate upside down on turntable. Place plate of bacon on top of overturned plate. | |
| 8. Fish, seafood | 1/2-2 lbs | Place in microwave-safe dish and add 2 to 4 Tbsp liquid. Cover with plastic wrap and vent. Let stand 2-3 minutes after cooking. |
| (0.2-0.9 kg) | ||
- When covering foods, make sure the vent opening is large enough for the moisture to escape. This will allow the sensor to accurately determine cooking time.
Convect Cooking lets you prepare 12 popular foods by selecting a food category and amount.
Convect Bake
To set:
- Touch CONVECT BAKE.
- Touch a number keypad corresponding to the desired setting. For example, touch "1" for bundt cake.
- TouchSTART.
Convect BakeChart
NOTE: Convect Bake can be programmed with More/Less Time Adjustment. See the "More or Less Time Adjustment" section.
For helpful hints, simply touch HELP any time "HELP" is highlighted in the display.
| SETTING/FOOD PAN/QTY RACK PROCEDURE | |||
| 1. Bundt cake 1 cake No rack | Prepare according to package or recipe directions and place in a greased and floured bundt pan. Place pan in microwave oven. Cool before frosting and serving. | ||
| 2. Cookies 1 or 2 pizza pans 1 pizza pan | No rack | Prepare according to package or recipe directions and place on a greased 12" pizza pan. After preheating, place pan in microwave oven. Cool before serving. | |
| 2 pizza pans | |||
| High | |||
| 3.Muffins1 or 2 6-cup muffin pans | 1 pan | Prepare according to package or recipe directions and place in muffin pan. After preheating, place pan in microwave oven. | |
| No rack | |||
| 2 pans | |||
| High | |||
| 4. French fries | 3-24 oz (0.09–0.68 kg) | 1 pizza pan | Use frozen French fries. No preheating is required. Place on pizza pan. |
| 1 or 2 pizza pans | No rack | For shoestring potatoes, touch Power Level keypad twice to enter less time before touching Start keypad. | |
| For more than 12 oz, use 2 pans. | 2 pizza pans | ||
Convect Roast
To set:
- Touch CONVECT ROAST.
- Touch a number keypad corresponding to the desired setting. For example, touch "1" for chicken.
-
Touch the number keypads to enter the weight. For example, touch "2" and "5" for 2.5 lbs.
-
TouchSTART.
After the Convect Roast cycle ends, a long tone will sound. Follow the displayed directions.
Convect Roast Chart
NOTES:
Convect Roast can be programmed with More/Less Time Adjustment. See the "More or Less Time Adjustment" section.
If you attempt to enter more or less than the allowed weight as indicated in the chart below, an error message will appear in the display.
A microwave- and heat-safe dish may be placed under the rack to catch the drippings.
| SETTING/FOOD AMOUNT RACK | PROCEDURE | ||
| 1. Chicken | 2.5–7.5 lbs (1.2–3.4 kg) | Low | Place directly on the low rack. |
| 2. Turkey | 6.5–16.0 lbs (3.0–7.2 kg) | Low | Place directly on the low rack. After cooking, cover with foil and let stand 10 minutes. Internal temperature of white meat should be 170°F (77°C) and of dark meat, 180°F (82°C). |
| 3. Turkey breast | 3.0–6.0 lbs (1.4–2.7 kg) | Low | Place directly on the low rack. After cooking, cover with foil and let stand 10 minutes. Internal temperature of white meat should be 170°F (77°C). |
| 4. Pork | 2.0–3.5 lbs (0.9–1.5 kg) | Low | Place directly on the low rack. After cooking, remove from microwave oven, cover with foil, and allow to stand 5–10 minutes. Internal temperature should be 160°F (71°C). |
Convect Broil
To set:
- Touch CONVECT BROIL.
- Touch a number keypad corresponding to the desired setting. For example, touch "1" for hamburgers.
- Touch the number keypad to enter the quantity. For example, touch "2" for 2 patties. Follow information in display for cooking information.
- TouchSTART.
- After Broil Preheating cycle ends, the microwave oven will stop and directions will be displayed. Open the door, place hamburgers in the microwave oven, and close the door.
Convect Broil Chart
| SETTING/FOOD AMOUNT RACK PROCEDURE | ||
| 1. Hamburgers | 1-8 pieces 1/4 lb each | Low Place directly on the low rack. |
| 2. Chicken pieces | 0.5-3.5 lbs (0.3-1.5 kg) | Low Place directly on the low rack. After cooking, let stand 3-5 minutes. Dark meat should be 180°F (82°C) and white meat should be 170°F (77%). |
| 3. Steaks | 0.5-2.0 lbs (0.3-0.9 kg) | Low Steaks should be 3/4"-1" thick. Place directly on the low rack. For well done, touch POWER LEVEL once; for less than well-done, touch POWER LEVEL twice. |
| 4. Fish steaks | 0.5-2.0 lbs (0.3-0.9 kg) | Low Fish steaks should be 3/4"-1" thick. Place directly on the low rack. |
Multiple Sequence Cooking
The microwave oven can be programmed for up to 4 automatic cooking sequences for the Microwave mode and 2 automatic cooking sequences with preheat for Convection/Mix mode, switching from one lower level setting to another automatically. Sometimes cooking directions tell you to start on one power level and then change to a different power level. Your microwave oven can do this automatically.
To set:
- Touch POWER LEVEL.
- Touch the number keypads to enter the cooking time. For example, touch "5," "0," and "0" for 5 minutes.
- Touch POWER LEVEL, followed by a number keypad to enter the Power Level. For example, touch "5" for 50% power.
- Touch the number keypads to enter the second cooking time. For example, touch "3," "0," "0," and "0" for 30 minutes.
- Touch START.
NOTES:
■If POWER LEVEL is touched twice, "HIGH" will be displayed.
To display the Power Level, touch and hold POWER LEVEL.
More or Less Time Adjustment
More
To cook foods slightly more done for Instant Sensor, Sensor Cook, Defrost, Convect Bake, ConvectRoast, or ConvectBroil, touch POWER LEVEL once after touching the other keypads.
Less
To cook foods slightly less done for Instant Sensor, Sensor Cook, Defrost, Convect Bake, ConvectRoast, or ConvectBroil, touch POWER LEVEL twice after touching the other keypads.
- Touch START.
For well-done hamburgers, touch Power Level keypad once; for less than well-done, touch Power Level keypad twice. See the "More or Less Time Adjustment" section.
NOTES:
Convect Broil can be programmed with More/Less Time Adjustment. See the "More or Less Time Adjustment" section.
If you attempt to enter more or less than the allowed amount as indicated in the chart below, an error message will appear in the display.
A microwave- and heat-safe dish may be placed under the rack to catch the drippings.
Add Minute
Add Minute allows you to cook for a minute at 100% by touching only the Add Minute keypad. You can also extend cooking time in multiples of 1 minute by repeatedly touching the Add Minute keypad during manual cooking.
To set:
Touch ADD MINUTE.
NOTES:
To use Add Minute, touch the keypad within 1 minute after cooking, closing the door, touching Stop/Clear, or during cooking.
- Add Minute cannot be used with Sensor or Convect features.
Touch On
Touch On allows you to cook at 100% power by touching START continuously. Touch On is ideal for melting cheese, bringing milk to just below boiling, etc. The maximum cooking time is 3 minutes.
To set for melting cheese on a slice of toast:
- Touch and hold START. The cooking time will begin counting down.
- When cheese is melted to the desired amount, release the Start keypad. The microwave oven will stop immediately.
NOTES:
Note the time it takes for frequently used foods and program that time in the future.
To use Touch On, touch the Start keypad within 1 minute after cooking, opening and closing the door, or touching STOP/CLEAR.
- Touch On can only be used 3 times in a row. If more times are needed, open and close the door or touch STOP/CLEAR.
Microwave Oven Care
General Cleaning
IMPORTANT: Before cleaning, make sure all controls are OFF and the microwave oven is cool. Always follow label instructions on cleaning products. For additional information, you can visit the Frequently Asked Questions (FAQs) section of our website at www.jennair.com. In Canada, refer to the Customer Service section at www.jennair.ca.
Soap, water, and a soft cloth or sponge are suggested first, unless otherwise noted.
STAINLESS STEEL (on some models)
NOTE: To avoid damage to stainless steel surfaces, do not use soap-filled scouring pads, abrasive cleaners, Cooktop Polishing Creme, steel-wool pads, gritty washcloths, or some paper towels. Damage may occur to stainless steel surfaces, even with one-time or limited use.
Cleaning Method:
Rub in direction of grain to avoid damaging.
Liquid detergent or all-purpose cleaner: Rinse with clean water and dry with soft, lint-free cloth.
Vinegar for hard water spots
■affresh 念 Stainless Steel Cleaner Part Number W10355016 (not included): See the "Accessories" section for more information.
MICROWAVE OVEN DOOR EXTERIOR
Cleaning Method:
Glass cleaner and a soft cloth or sponge: Apply glass cleaner to soft cloth or sponge, not directly on panel.
■affresh 念 Kitchen and Appliance Cleaner Part Number W10355010 (not included): See the "Accessories" section for more information.
To avoid damage to microwave oven cavity, do not use soap-filled scouring pads, abrasive cleaners, steel-wool pads, gritty washcloths, or some recycled paper towels.
On stainless steel models, rub in direction of grain to avoid damaging.
The area where the microwave oven door and frame touch when closed should be kept clean.
Cleaning Method:
Average Soil
Mild, nonabrasive soaps and detergents: Rinse with clean water and dry with soft, lint-free cloth.
Heavy Soil
Mild, nonabrasive soaps and detergents: Heat 1 cup (250 mL) of water for 2-5 minutes in microwave oven. Steam will soften soil. Rinse with clean water and dry with soft, lint-free cloth.
Odors
Lemon juice or vinegar: Heat 1 cup (250~mL) of water with 1 Tbsp (15~mL) of either lemon juice or vinegar for 2-5 minutes in microwave oven.
CONTROL PANEL/DISPLAY
To avoid damage to the control panel, do not use abrasive cleaners, steel-wool pads, or gritty washcloths.
Use gentle pressure when wiping the touch screen.
Cleaning Method:
Glass cleaner and soft cloth: Apply glass cleaner to soft cloth or sponge, not directly on panel.
Mild soap, water, and soft washcloth
■affresh 念 Kitchen and Appliance Cleaner Part Number W10355010 (not included): See the "Accessories" section for more information.
INLET COVER
Gently wash any food particles from the wave guide cover located on the ceiling in the microwave oven cavity.
TURNTABLE
Replace turntable immediately after cleaning. Do not operate the microwave oven without the turntable in place. For stubborn stains, use a mild cleanser and a nonabrasive scouring sponge. Use top rack of dishwasher for turntable support.
Cleaning Method:
■Mild cleanser and nonabrasive scouring pad
Dishwasher
RACKS
Nonabrasive scouring pad
Dishwasher
TURNTABLE SUPPORT AND ROLLERS
Dishwasher
Troubleshooting
First try the solutions suggested here. If you need further assistance or more recommendations that may help you avoid a service call, refer to the warranty page in this manual and scan the code there with your mobile device, or visit https://jennair.custhelp.com. In Canada, visit http://www.jennair.ca.
Contact us by mail with any questions or concerns at the address below:
In the U.S.A.:
Jenn-Air Brand Home Appliances
Customer eXperience Center
553 Benson Road
Benton Harbor, MI 49022-2692
Please include a daytime phone number in your correspondence.
WARNING
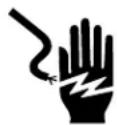
Electrical Shock Hazard
Plug into a grounded 3 prong outlet.
Do not remove ground prong.
Do not use an adapter.
Do not use an extension cord.
Failure to follow these instructions can result in death, fire, or electrical shock.
PROBLEM POSSIBLE CAUSES AND/OR SOLUTIONS
| Nothing will operate. | Has a household fuse blown or has a circuit breaker tripped? Replace the fuse or reset the circuit breaker. If the problem continues, call an electrician. Is the power supply unplugged? Plug into a grounded outlet. |
| Microwave oven will not operate. | Is the door completely closed? Firmly close door. Is the electronic microwave oven control set correctly? See the “Microwave Oven Control” section. Is the magnetron working properly? Try to heat 1 cup (250 mL) of cold water for 2 minutes at 100% cooking power. If water does not heat, call for service. |
| Microwave oven makes humming noise. | This is normal and occurs when the transformer in the magnetron cycles on. |
| Microwave oven door looks wavy. | This is normal and will not affect performance. |
| Turntable will not operate. | Is the turntable properly in place? Make sure turntable is correct-side up and is sitting securely on the turntable support. Is the turntable support operating properly? Remove turntable. Remove and clean turntable support and rollers. Replace turntable support. Replace turntable. Place 1 cup (250 mL) of water on the turntable, then restart microwave oven. If it still is not working, call for service. Do not operate the microwave oven without turntable and turntable support working properly. |
| Turntable rotates in both directions. | This is normal and depends on motor rotation at beginning of cycle. |
| Display shows time countdown, but is not operating. | Is the Timer in use? See “Timer” in the “Microwave Oven Control” section. |
| Tones are not sounding. | Are tones disabled? See “Deactivating Tones” in the “Help” section. |
| PROBLEM POSSIBLE | CAUSES AND/OR SOLUTIONS |
| Smoke is coming from microwave oven vent during broiling. | Some smoke is normal and occurs just as in conventional crisping. |
| Sparking during broiling | This is normal and occurs as fat burns off from past cooking. Spending will stop once fat is completely burned off. |
| Cooking times seem too long. | Are large amounts of food being heated? Larger amounts of food need longer cooking times. Is the incoming voltage less than that specified in the "Electrical Requirements" section? Have a qualified electrician check the electrical system of the house. |
| Radio or TV interference | Is the radio or TV receiver near the microwave oven? Move the receiver away from the microwave oven or adjust the radio or TV antenna. Are the microwave oven door and sealing surfaces clean? Make sure these areas are clean. |
Accessories
For accessories, you can visit our website at www.jennair.com or call us at 1-800-JENNAIR (1-800-536-6247). In Canada, visit our website at www.jennair.ca or call us at 1-800-JENNAIR (1-800-536-6247).
affresh® Stainless Steel Cleaning Wipes
(stainless steel models)
Order Part Number W10355049
affresh® Stainless Steel Cleaner
(stainless steel models)
Order Part Number W10355016
affresh® Kitchen and Appliance Cleaner
Order Part Number W10355010
Turntable
Order Part Number W10811508
Support Turntable
Order Part Number W10811509
High Convection Rack
Order Part Number W10811510
Low Convection Rack
Order Part Number W10811511
Trim Kits
27" Traditional SS - Order Part Number W10810351
30" Traditional SS - Order Part Number W10810353
27" Flush SS - Order Part Number W10810350
30" Flush SS - Order Part Number W10810352
JENN-AIR® COOKING LIMITED WARRANTY
ATTACH YOUR RECEIPT HERE. PROOF OF PURCHASE IS REQUIRED TO OBTAIN WARRANTY SERVICE.
Please have the following information available when you call the Customer eXperience Center:
Name, address and telephone number
■Model number and serial number
A clear, detailed description of the problem
Proof of purchase including dealer or retailer name and address
IF YOU NEED SERVICE:
- Before contacting us to arrange service, please determine whether your product requires repair. Some questions can be addressed without service. Please take a few minutes to review the Troubleshooting or Problem Solver section of the Use and Care Guide, scan the QR code on the right to access additional resources, or visit https://jennair.custhelp.com.
- All warranty service is provided exclusively by our authorized Jenn-Air Service Providers. In the U.S. and Canada, direct all requests for warranty service to:
Jenn-Air Customer eXperience Center
1-800-JENNAIR (1-800-536-6247).
https://jennair.custhelp.com
If outside the 50 United States or Canada, contact your authorized Jenn-Air dealer to determine whether another warranty applies.
FIVE YEAR LIMITED WARRANTY
WHAT IS COVERED WHAT IS NOT COVERED
TWO YEAR LIMITED WARRANTY (PARTS & LABOR)
For two years from the date of purchase, when this major appliance is installed, operated and maintained according to instructions attached to or furnished with the product, Jenn-Air brand of Whirlpool Corporation or Whirlpool Canada, LP (hereafter "Jenn-Air") will pay for factory specified replacement parts and repair labor to correct defects in materials or workmanship that existed when this major appliance was purchased or, at its sole discretion replace the product. In the event of product replacement, your appliance will be warranted for the remaining term of the original unit's warranty period.
THIRD THROUGH FIFTH YEAR LIMITED WARRANTY (CERTAIN COMPONENT PARTS ONLY - LABOR NOT INCLUDED)
In the third through fifth years from the date of original purchase, when this major appliance is installed, operated and maintained according to instructions attached to or furnished with the product, Jenn-Air will pay for factory specified parts for the following components to correct non-cosmetic defects in materials or workmanship in these parts that prevent function of this major appliance and that existed when this major appliance was purchased. This is a limited 5-year warranty on the below named parts only and does not include repair labor.
Electric element
Touch Pad and microprocessor
Glass ceramic cooktop: if due to thermal breakage
Electronic controls
Magnetron tube
Sealed gas burners
YOUR SOLE AND EXCLUSIVE REMEDY UNDER THIS LIMITED WARRANTY SHALL BE PRODUCT REPAIR AS PROVIDED HEREIN. Service must be provided by a Jenn-Air designated service company. This limited warranty is valid only in the United States or Canada and applies only when the major appliance is used in the country in which it was purchased. This limited warranty is effective from the date of original consumer purchase. Proof of original purchase date is required to obtain service under this limited warranty.
- Commercial, non-residential, multiple-family use, or use inconsistent with published user, operator or installation instructions.
- In-home instruction on how to use your product.
- Service to correct improper product maintenance or installation, installation not in accordance with electrical or plumbing codes or correction of household electrical or plumbing (i.e. house wiring, fuses or water inlet hoses).
- Consumable parts (i.e. light bulbs, batteries, air or water filters, preservation solutions, etc.).
- Defects or damage caused by the use of non-genuine Jenn-Air parts or accessories.
- Conversion of products from natural gas or L.P. gas.
- Damage from accident, misuse, abuse, fire, floods, acts of God or use with products not approved by Jenn-Air.
- Repairs to parts or systems to correct product damage or defects caused by unauthorized service, alteration or modification of the appliance.
- Cosmetic damage including scratches, dents, chips, and other damage to the appliance finishes unless such damage results from defects in materials and workmanship and is reported to Jenn-Air within 30 days.
- Discoloration, rust or oxidation of surfaces resulting from caustic or corrosive environments including but not limited to high salt concentrations, high moisture or humidity or exposure to chemicals.
- Food or medicine loss due to product failure.
- Pick-up or delivery. This product is intended for in-home repair.
- Travel or transportation expenses for service in remote locations where an authorized Jenn-Air servicer is not available.
- Removal or reinstallation of inaccessible appliances or built-in fixtures (i.e. trim, decorative panels, flooring, cabinetry, islands, countertops, drywall, etc.) that interfere with servicing, removal or replacement of the product.
- Service or parts for appliances with original model/serial numbers removed, altered or not easily determined.
The cost of repair or replacement under these excluded circumstances shall be borne by the customer.
DISCLAIMER OF IMPLIED WARRANTYES
IMPLIED WARRANTY, INCLUDING ANY IMPLIED WARRANTY OF MERCHANTABILITY OR IMPLIED WARRANTY OF FITNESS FOR A PARTICULAR PURPOSE, ARE LIMITED TO ONE YEAR OR THE SHORTEST PERIOD ALLOWED BY LAW. Some states and provinces do not allow limitations on the duration of implied warranties of merchantability or fitness, so this limitation may not apply to you. This warranty gives you specific legal rights, and you also may have other rights that vary from state to state or province to province.
DISCLAIMER OF REPRESENTATIONS OUTSIDE OF WARRANTY
Jenn-Air makes no representations about the quality, durability, or need for service or repair of this major appliance other than the representations contained in this warranty. If you want a longer or more comprehensive warranty than the limited warranty that comes with this major appliance, you should ask Jenn-Air or your retailer about buying an extended warranty.
LIMITATION OF REMEDIES; EXCLUSION OF INCIDENTAL AND CONSEQUENTIAL DAMAGES
YOR t h i r t t e o t t t t t t t t t t t t t t t t t t t t t t t t t t t t t t t t t t t t t t t t t t t t t t t t t t d s a s s s s s s s s s s s s s s s s s s s s s s s s s s s s s s s s s s s s s s s s s s s s s s s s s s S
JENN-AIR
Four convection/micro-ondes
PROBLEM CAUSES ET/OU SOLUTIONS POSSIBLES
https://www.jennair.ca