
BGS2UPWER2 - Aspirateur BOSCH - Free user manual and instructions
Find the device manual for free BGS2UPWER2 BOSCH in PDF.
Download the instructions for your Aspirateur in PDF format for free! Find your manual BGS2UPWER2 - BOSCH and take your electronic device back in hand. On this page are published all the documents necessary for the use of your device. BGS2UPWER2 by BOSCH.
USER MANUAL BGS2UPWER2 BOSCH
Please note Using unsuitable or inferior-quality spare parts, (spe- cial) accessories and dust bags can damage your vacuum cleaner. Damage caused by the use of such products is not covered by our guarantee. Safety information This vacuum cleaner complies with the re- cognised rules of technology and the rele- vant safety regulations. The appliance may be used by children over the age of 8 years and by persons with reduced physical, sensory or mental capacity or by persons with a lack of ex- perience or knowledge if they are super- vised or have been instructed on the safe use of the appliance and the have under- stood the potential dangers of using the appliance. Children must never play with the appli- ance. Cleaning and user maintenance must ne- ver be carried out by children without su- pervision. en4 Plastic bags and films must be kept out of the reach of children before disposal. >= Risk of suffocation. Proper use Only connect and use the vacuum cleaner in ac- cordance with the specifications on the rating plate. Never vacuum without the dust bag or dust container, motor protection or exhaust filter. >= This may damage the vacuum cleaner. Always keep the vacuum cleaner away from your head when using nozzles and tubes. >= This could cause injury! When vacuuming stairs, the appliance must always be positioned below the user. Do not use the power cord or the hose to carry or transport the vacuum cleaner. For safety reasons, if this appliance's mains power cable becomes damaged, it must be replaced by the manufacturer, their after-sales service department or a similarlyqualified person. If using the appliance for longer than 30 minutes, pull out the power cord completely. When disconnecting the appliance from the mains, pull on the plug itself to remove it; do not pull on the power cord. Do not pull the power cord over sharp edges or allow it to become trapped. When the cable is being automatically rewound, en- sure that the mains plug is not thrown towards per- sons, body parts, animals or objects. >= Use the mains plug to guide the power cord. Pull out the mains plug before carrying out any work on the vacuum cleaner. Do not operate the vacuum cleaner if it is damaged. Unplug the appliance from the mains if a fault is de- tected. For safety reasons, only authorised after-sales service personnel are permitted to carry out repairs and fit replacement parts to the vacuum cleaner. Protect the vacuum cleaner from the weather, moistu- re and sources of heat. Do not pour flammable substances or substances con- taining alcohol onto the filters (dust bag, motor pro- tection filter, exhaust filter, etc.). The vacuum cleaner is not suitable for use on con- struction sites. >= Vacuuming up building rubble could damage the appliance. When not in use, switch off the appliance and pull out the mains plug. At the end of its life, the appliance should immediately be rendered unusable, then disposed of in an appro- priate manner.
Please note The mains socket must be protected by at least a 16 amp circuit breaker. If a circuit breaker is tripped when you switch on the vacuum cleaner, this may be because other electrical appliances which have a high current draw are connected to the same power circuit. To prevent the circuit breaker from tripping, select the lowest power setting before switching the appliance on, and increase the power only once it is running. Disposal information Packaging The packaging is designed to protect the vacuum cleaner from being damaged during transportation. It is made of environmentally friendly materials and can therefore be recycled. Dispose of packaging that is no longer required at an appropriate recyc- ling point. Old appliance Old appliances still contain many valuable mate- rials. Therefore, please take appliances that have reached the end of their service life to your retailer or recycling centre so that they can be recycled. For current disposal methods, please enquire at a retailer or your local council. Disposal of filters and dust bags Filters and dust bags are manufactured from environmentally friendly materials. Provided they do not contain substances that are not permitted in household waste, you can dispose of them with your normal household waste. General information Accessories Your accessories (nozzle, suction pipe, etc.) may look different from but work in the same way as those depicted in the illustrations in this instruc- tion manual. Notes on the energy label This vacuum cleaner is a general purpose vacuum cleaner. To achieve the declared energy efficiency and cleaning performance class on carpet and hard floor, please use the interchangeable universal nozzle. These calculations are based on the delegated regu- lation (EU) no. 665/2013 established by the commis- sion on 3rd May 2013 as a supplement to Directive 2010/30/EU. All of the procedures in these instructions that are not described in more precise detail were listed based on
Congratulations on your purchase of a Bosch GL20 va- cuum cleaner. This instruction manual describes various GL20 models, which means that some of the equipment features and functions described may not apply to your model. You should only use original Bosch accessories, which have been specially developed for your vacuum cleaner, in order to achieve the best possible vacuuming results. Please keep this instruction manual for future refe- rence. When passing the vacuum cleaner on to a third party, also pass on this instruction manual. Please fold out the illustrated pages. Your vacuum cleaner 1 Adjustable floor nozzle* (For the same functions, the appearance of the nozzle may differ from the picture) 2 Telescopic tube with sliding switch but without acces- sory connection* 3 Telescopic tube with adjusting sleeve and accessory connection* 4 Suction hose 5 Handle 6 Parking aid on the back of the appliance 7 Power cord 8 Carrying handle 9 On/off button with electronic suction regulator 10 Filter control indicator (Sensor Control)* 11 Dust container 12 Storage aid on the underside of the appliance 13 Fluff filter 14 Upholstery nozzle 15 Crevice nozzle 16 Hard-floor nozzle* 17 Animal-hair nozzle* Replacement parts and special accesso- ries A Hard-floor nozzle BBZ123HD For vacuuming hard floors (parquet, tiles, terracotta, etc.)
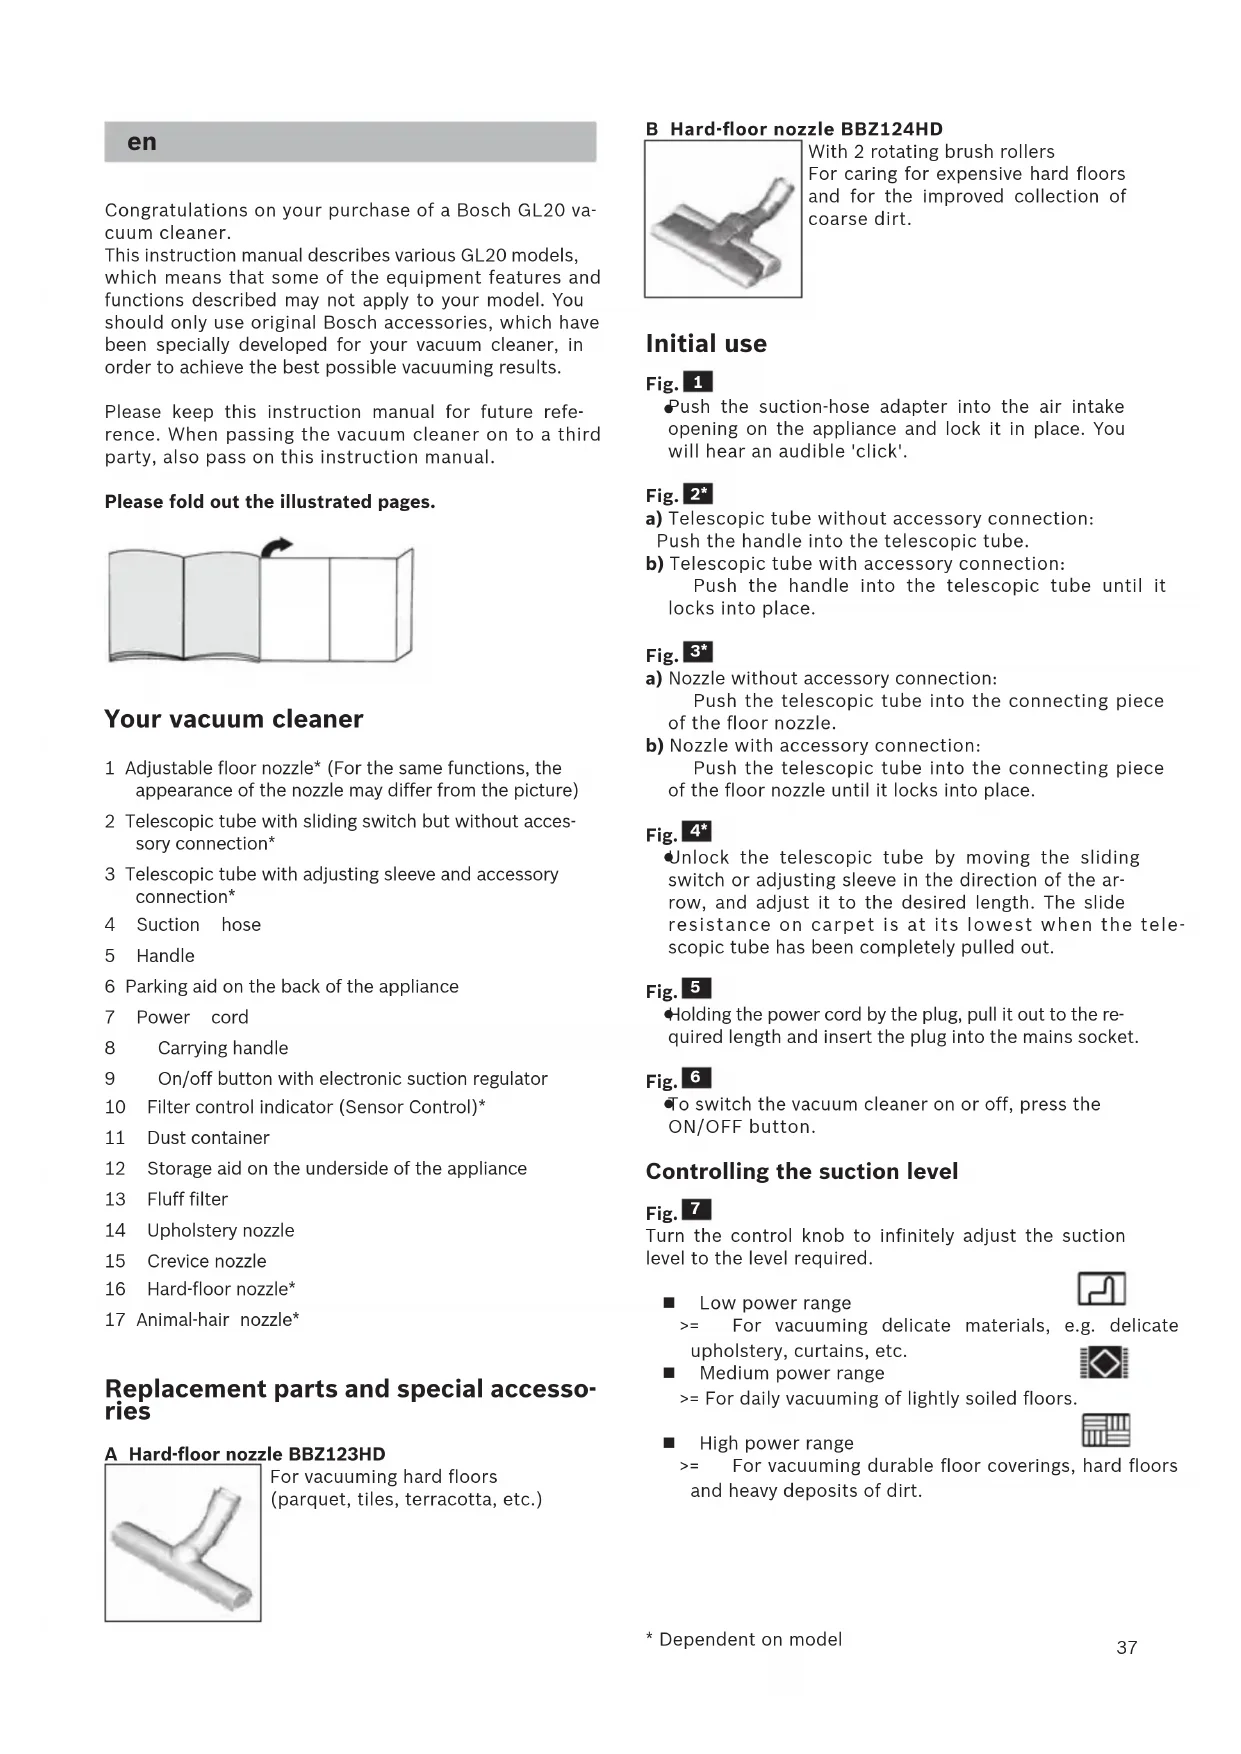
With 2 rotating brush rollers For caring for expensive hard floors and for the improved collection of coarse dirt. Initial use Fig.
Push the suction-hose adapter into the air intake opening on the appliance and lock it in place. You will hear an audible 'click'. Fig.
a) Telescopic tube without accessory connection: Push the handle into the telescopic tube. b) Telescopic tube with accessory connection: Push the handle into the telescopic tube until it locks into place. Fig.
a) Nozzle without accessory connection: Push the telescopic tube into the connecting piece of the floor nozzle. b) Nozzle with accessory connection: Push the telescopic tube into the connecting piece of the floor nozzle until it locks into place. Fig.
Unlock the telescopic tube by moving the sliding switch or adjusting sleeve in the direction of the ar- row, and adjust it to the desired length. The slide resistance on carpet is at its lowest when the tele- scopic tube has been completely pulled out. Fig.
Holding the power cord by the plug, pull it out to the re- quired length and insert the plug into the mains socket. Fig.
To switch the vacuum cleaner on or off, press the ON/OFF button. Controlling the suction level Fig.
Turn the control knob to infinitely adjust the suction level to the level required. Low power range >= For vacuuming delicate materials, e.g. delicate upholstery, curtains, etc. Medium power range >= For daily vacuuming of lightly soiled floors. High power range >= For vacuuming durable floor coverings, hard floors and heavy deposits of dirt.38 Vacuuming
Caution Floor nozzles are subject to a certain amount of wear, depending on the type of hard floors you have (e.g. rough, rustic tiles). You must therefore check the underside of the floor nozzle at regular intervals. Worn undersides of floor nozzles may have sharp edges that can damage delicate hard floors, such as parquet or linoleum. The manufacturer does not ac- cept any responsibility for damage caused by worn floor nozzles. Fig.
Set the adjustable floor nozzle: Rugs and carpets => Hard floors/parquet => If you are vacuuming up relatively large particles, make sure that you vacuum them up successively and careful- ly to ensure that the vacuum channel of the floor nozzle does not become blocked. If necessary, you should raise the nozzle in order to better vacuum up the dirt particles. Vacuuming with accessories Fig.
Attach the nozzles to the suction pipe or handle as re- quired: a) Crevice nozzle for vacuuming crevices and corners, etc. b) Upholstery nozzle for vacuuming upholstered furni- ture, curtains, etc. c) Animal-hair nozzle d) Hard-floor nozzle for vacuuming hard floor coverings (tiles, parquet flooring, etc.) Fig.
You can use the parking aid on the back of the vacuum cleaner if you want to stop vacuuming for a short time.
After switching off the appliance, slide the hook on the floor nozzle into the parking aid. Fig.
When vacuuming stairs, the appliance must be positi- oned at the bottom of the stairs. If it does not reach far enough, the appliance can also be carried using the carrying handle. After vacuuming Fig.
Switch off the appliance.
Briefly pull on the power cord and then let go. (The power cord retracts automatically.) Fig. 13*
Unlock the telescopic tube by moving the sliding switch in the direction of the arrow, and slide one tube into the other.
To store the appliance, use the storage aid on the un- derside. a) Prop up the appliance on the hose or dust-container handle. b) Slide the hook on the floor nozzle into the storage aid. Disassembly Fig.
To remove the suction hose, press the two catches together and pull out the hose from the appliance's suction opening. Fig. 16* a) Telescopic tube without accessory connection: To release the connection, turn the handle slightly and pull it out of the telescopic tube. b) Telescopic tube with accessory connection: To release the connection, press the locking collar on the telescopic tube and and pull out the handle. Fig. 17* a) Nozzle without accessory connection: To release the connection, turn the telescopic tube slightly and pull it out of the floor nozzle. b) Nozzle with accessory connection: To release the connection, press the locking collar and pull the telescopic tube out of the floor nozzle. Cleaning & maintenance Emptying the dust container Fig.
In order to achieve the best possible vacuuming re- sults, the dust container should be emptied after every use or, at the latest, when dust in the dust container has reached the marking at any point.
Caution The dust container can only be removed when the appliance is in a horizontal position. Therefore, place the appliance on the floor to unlock the re- lease button. Fig.
a) Remove the dust container from the appliance by pulling it upwards out of the cover. b) Press on the upper catch to unlock the lid of the dust container and empty the dust container. c) Check the fluff filter and rinse it under running wa- ter, if necessary. Allow to dry before putting it back in the dust container. Close and lock the lid. d) Insert the dust container into the appliance.39 Maintaining the dust-collection system Your appliance is equipped with a Sensor Control indi- cator. This function constantly monitors whether your vacuum cleaner is working at its optimum power level. Fig.
The indicator (blue ring) flashes red when the filter in the dust container needs to be cleaned. The appliance is automatically adjusted to the lowest power level. Cleaning the filter in the dust container Switch off the appliance. Fig.
a) Open the bottom plate of the dust container by pulling on the lower catch. b) Fold out the filter cartridge with foam filter and fleece filter. c) Remove the foam filter and the fleece filter from the bottom plate of the dust container. d) Tapping out both parts is all that is required to be able to stop the suction process. e) Then clean the foam filter and the fleece filter under running water. Alternatively, the two filters can be cleaned in the washing machine at max. 30 °C using a gentle pro- gramme and the lowest spin speed. TIP: To protect the filters, place them in a laundry bag. f) Allow the foam filter and the fleece filter to dry com- pletely for at least 24 hours and then place both fil- ters back in the bottom plate of the dust container. g) Close and lock the bottom plate. Maintaining the exhaust filter The exhaust filter is designed so that it does not need to be replaced, provided the appliance is used as inten- ded in the household. To ensure that the vacuum cleaner is working at its op- timum power level, the exhaust filter should be rinsed out after one year. The filtering action of the filter re- mains intact, even if the filter surface becomes disco- loured. Fig. 22* a) Open the top cover by pressing on both sides of the catch and remove it upwards. b) Unlock the exhaust filter and remove it from the ap- pliance. c) Tap out the exhaust filter and rinse it under running water. Alternatively, the unit can be cleaned in a washing machine at max. 30 °C using a gentle programme and the lowest spin speed. TIP: To protect the other items in the machine, place the filter unit in a laundry bag. d) Once the exhaust filter has dried completely (for at least 24 hours), put it back into the appliance and lock it in place. >= Put the top cover back on the appliance so that it 'clicks' audibly into place.
- Dependent on model Cleaning instructions Always switch off the vacuum cleaner and disconnect the power cord from the mains before cleaning the va- cuum cleaner. The vacuum cleaner and plastic acces- sories can be cleaned with an ordinary plastic cleaner.