
BikePilot2 - Gps BLAUPUNKT - Free user manual and instructions
Find the device manual for free BikePilot2 BLAUPUNKT in PDF.
| Product Type | GPS Navigation System for Bike |
| Brand | Blaupunkt |
| Model | BikePilot 2 |
| Power Supply | Rechargeable battery via Micro-USB cable, power adapter included (model PGAK0500150U1EU) |
| Operating Temperature | -10°C to 60°C |
| Storage Temperature | -20°C to 70°C |
| Screen | Capacitive touchscreen |
| Maps | OpenStreetMap (OSM), updates via Blaupunkt website |
| Main Functions | GPS navigation, route calculation, altitude profile, GPX recording, trip computer, multi-flow menu, destination entry (address, POI, coordinates) |
| Route Options | Flat, mountainous or neutral type; choice of paths (steep gradients, via ferrata, trails, etc.) |
| Connectivity | Micro-USB port, Micro SD card reader (waterproof cover) |
| Mounting | Base compatible with HR 4Quickfix™, handlebar mount with cable ties and elastic band |
| Included Accessories | Pouch, bike mount set with 2 cable ties, USB cable, power adapter |
| Warranty | 24 months from date of purchase |
| Safety | Do not use while riding; always remove the device when parking; obey traffic rules |
| Maintenance and Cleaning | Protect from moisture; close USB/SD cover after use; clean with a soft, slightly damp cloth |
| Repairability and Spare Parts | Contact Blaupunkt customer service (www.blaupunkt.de); use only Blaupunkt accessories |
| General Information | Compliant with RED directive 2014/53/EU; declaration of conformity available on Blaupunkt website |
Frequently Asked Questions - BikePilot2 BLAUPUNKT
User questions about BikePilot2 BLAUPUNKT
0 question about this device. Answer the ones you know or ask your own.
Ask a new question about this device
Download the instructions for your Gps in PDF format for free! Find your manual BikePilot2 - BLAUPUNKT and take your electronic device back in hand. On this page are published all the documents necessary for the use of your device. BikePilot2 by BLAUPUNKT.
USER MANUAL BikePilot2 BLAUPUNKT
"Häkchen" started the Routenführung
2.6 Routeziehen
Thank you for buying the Blaupunkt navigation system for bicycles.
A good choice. We wish you a lot of fun and congestion-free kilometers with your new BikePilot².
In the worst case we will help you.
For technical questions and / or problems, please contact us via our webpage
www.blaupunkt.de
The complete manuals for the hardware and software and manuals for other languages can be downloaded as well from www.blaupunkt.de
Please register your product as soon as possible on our website. This will give you benefits such as latest software and the latest map data, etc. - Most of it, of course, free.
Updates and additional maps, you can also order over our website www.blaupunkt.de.
Please note!
The product is subject change without notice. Please accept our apology for your inconvenience.
-
Please back up your data and information in the GPS navigator. Blaupunkt assumes no responsibility for any loss caused by material loss.
-
The manual might contain a few mistakes though it has been checked. If any mistake is found, please contact the Blaupunkt customer service center.
-
Please read the instructions in this manual and use only accessories of Blaupunkt to avoid unpredicted damage. Failure to follow the instructions will invalidate warranty and might endanger personnel safety, for which Baros GmbH assumes no responsibility.
-
Data of navigation electronic maps might be inconsistent with actual traffic signals due to transportation development. Please follow traffic regulations and signs and drive according to road situation.
-
Operating the GPS navigator device while driving might cause serious accidents. Baros GmbH assumes no responsibility for accidents and loss due to improper use.
-
For information of software update and upgrade, please go to our website www.blaupunkt.de
The pictures in the manual are subject to the material object.
To operate the device, please use ONLY a blunt stylus or your fingertips. The screen is easily scratched. Do not use objects with sharp edges or long fingernails.
For your own safety, do not operate the controls of the product while riding your bicycle!
Use this product prudently. The product is intend to be used only as a navigation aid. It is not for precise measurement of direction, distance, location or topography.
The calculated route is for reference only. It is the user's responsibility to follow the traffic signs and local regulations along the road.
Your BikePilot uses mapping material from Open Street Map (OSM).
These maps are drawn up and continuously extended through community effort. It is possible that, depending on the country and locality, they may not be complete in some regions, especially house numbers are only partially covered in OSM. We like to excuse such omissions. Nevertheless, the maps provided by OSM are the best ones available to our knowledge.
Especially in off-road areas these maps offer unbeatable advantages, and we are sure that you will come to appreciate them on your bike trips.
When you leave your bicycle unattended, please make sure that the device is not exposed to direct sunlight over a long period of time. The overheating of the battery can cause malfunction and/or danger. And please bear in mind that it may be stolen! We advise you to remove the BikePilot² whenever you leave your bicycle unattended and to switch it off or to standby mode.
GPS is operated by the United States government, which is solely responsible for the performance of GPS. Any change to the GPS system can affect the accuracy of all GPS equipments.
GPS satellite signal can not pass through solid materials (except glass). When you are inside a tunnel or building, GPS positioning is not available.
A minimum of 4 GPS satellite signal is needed to determine current GPS position. Signal reception can be affected by situations such as bad weather or dense overhead obstacles (e.g. trees and tall buildings).
Other wireless devices in the vehicle might interface with the reception of satellite signals and cause the reception to be unstable.
Important Information
Make sure you observe the following safety instructions in order to prevent accidents or serious injuries:
- This navigation device for outdoor use is merely an orientation and navigation aid which cannot be a substitute for making a sensible assessment of the situation you are in. Please in any event note the particular characteristics of the terrain and the routes you are using. Do not follow any routes or suggested routes which would entail a dangerous or illegal form of riding or would place you in a dangerous situation.
- The road traffic regulations must be complied with at all times, for example when cycling, and have priority over the routes of the navigation device.
- Never operate the navigation device while riding and do not allow yourself to be distracted by the device while riding.
- Please note that Baros GmbH does not accept any liability for any damage caused by the device/bracket becoming detached from the bicycle.
- The map data which is used may include inaccurate or incomplete data. You should therefore check the calculated route to see if it makes sense and choose your own alternative route if necessary.
If the device does show no reaction please proceed as follows:
Open the cover for USB / Micro SD slot and stick with a paperclip into the small hole above the slot for Micro SD.
Press inside it until the device starts a reboot.
CAUTION:
The navigation device is not suitable for use as a vehicle navigation system! The navigation device comes with a capacitive touchscreen. Please note that in operation with gloves full finger gloves with touch sensors could be necessary. Capacitive Touchscreens can react sensitive under wet conditions.
Operating temperature: The maximum operating temperature is -10^ to 60^ . Storage temperature: -20^ to 70^ .
1 BikePilot2
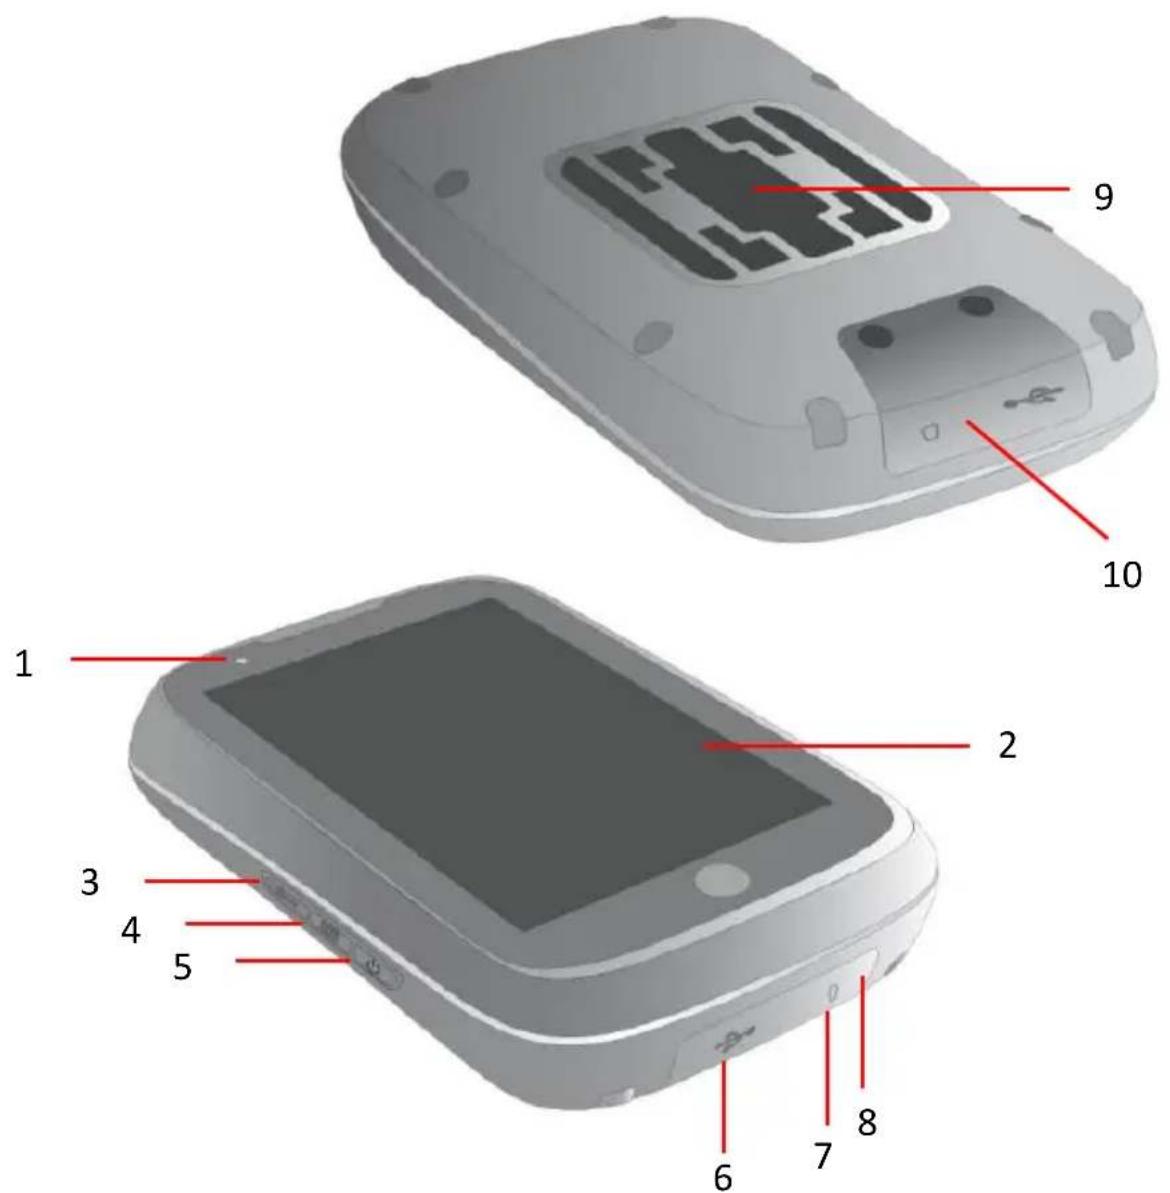
| 1. Charger lamp (red - device charging) | 2. Touchscreen |
| 3. Options | 4. Track recording |
| 5. On / off button | 6. Micro-USB |
| 7. Micro SD card slot | 8. Reset Button (inside) |
| 9. Socket Compatible to HR 4Quickfix™ Holdersystems | 10. Micro-USB/Micro SD card slot cover needs be closed in order to secure water resistance |
Accessories
Bag, Bicycle bracket set with 2 cable ties, USB cable and Power adapter (PGAK0500150U1EU).
2 Initial Start-Up
When you start your BikePilot² for the first time, enter your home address. This will allow you to be navigated home easily with just one click.
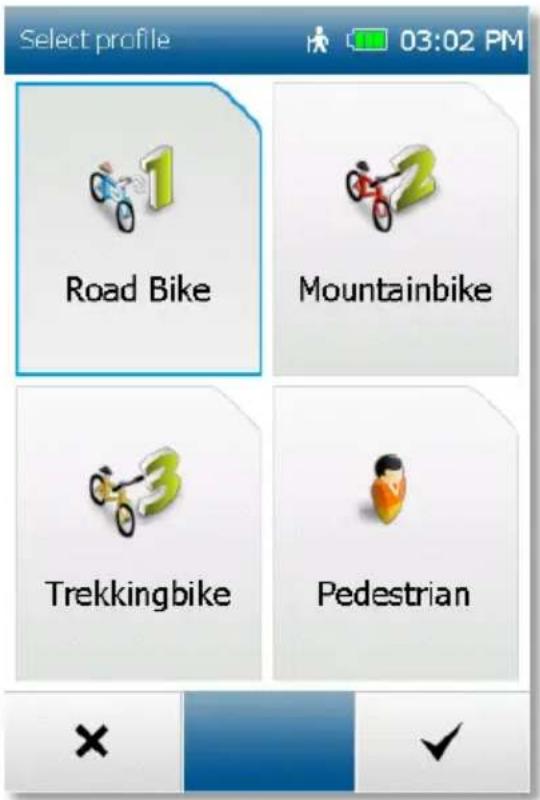
2.1 Set own profiles
You can edit your profiles via Settings > Profiles.
Here you can for example change your bicycle profile if you use different types of bikes.
Important:
The menu items „Edit bicycle profile" relate to the bicycle profile which is currently set.
2.2 Multi-Flow Menu
The BikePilot ^2 is equipped with the Multi-Flow Menu which allows you while you are travelling easily to switch back and forth between the map screen, the trip computer and the navigation screen by swiping across the display. To do this, simply swipe from left to right or from right to left with your finger across the display. On the trip computer level you can also swipe upwards with your finger to display further data. The menu screens of the BikePilot ^2 can also be managed easily and quickly with the Multi-Flow Menu. You can swipe both horizontally and vertically through menus and lists. Red dots at the top of the screen show you what level you are currently on.
The 3 main functions of your BikePilot2

These 3 main functions are easily to access by sliding your finger horizontally over the screen.
With this functionality, you always have an easy access to all relevant information during your ride.
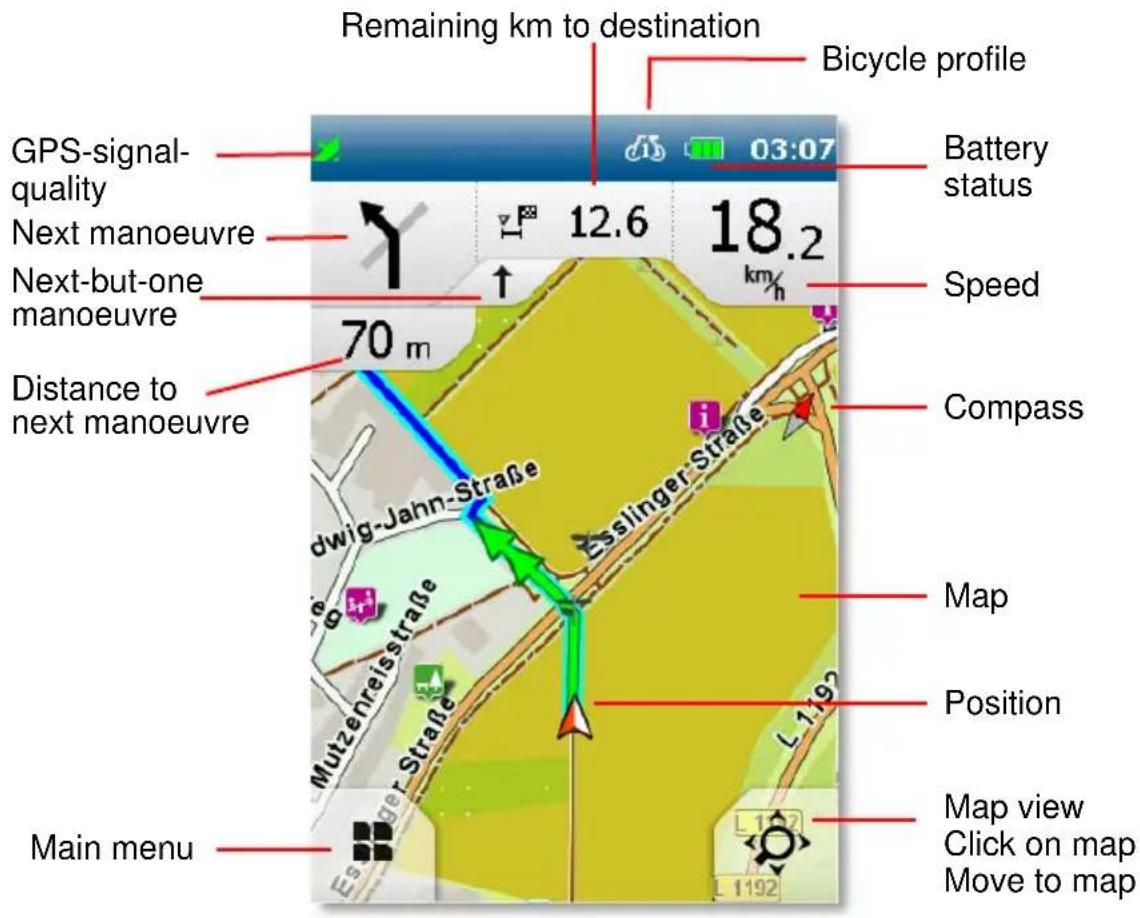
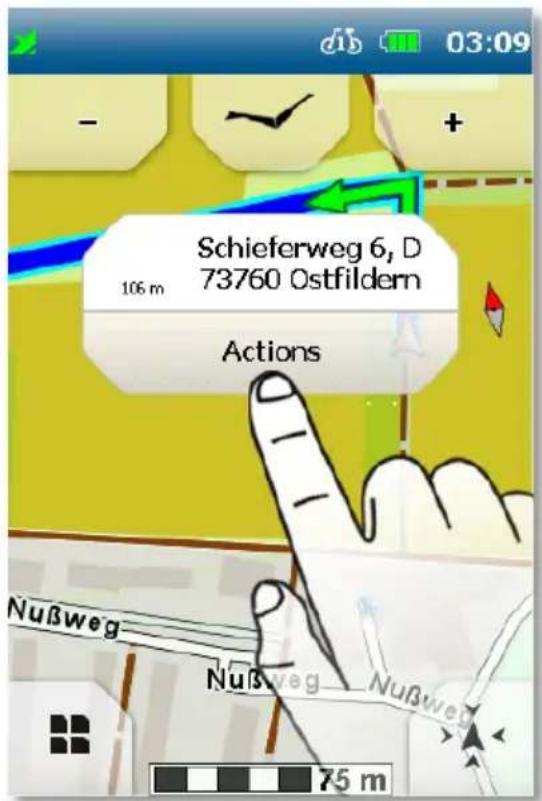
2.3 Navigation view
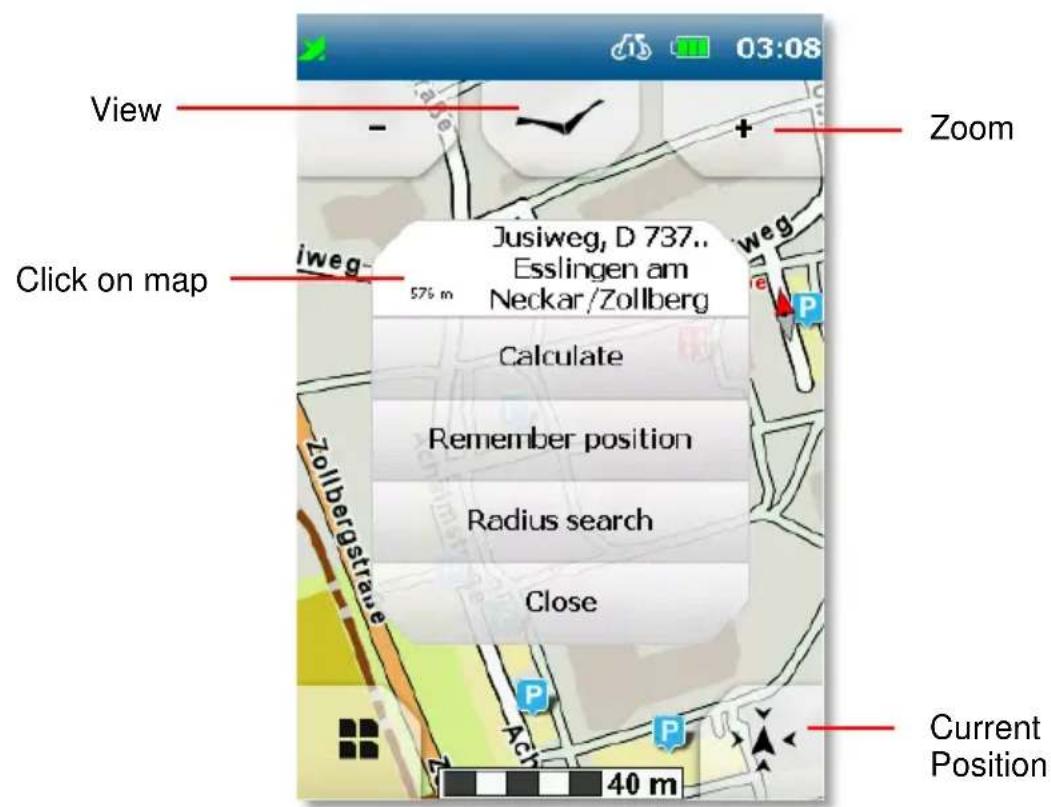
When you tap on the magnifying glass at the bottom right, you can click on the map to zoom in and out of it.
Click on map: When you tap on a point on the map, the point is marked with a pin and the address or position is displayed.
When you tap on „Actions“, you could for example navigate to the marked point or save the position.
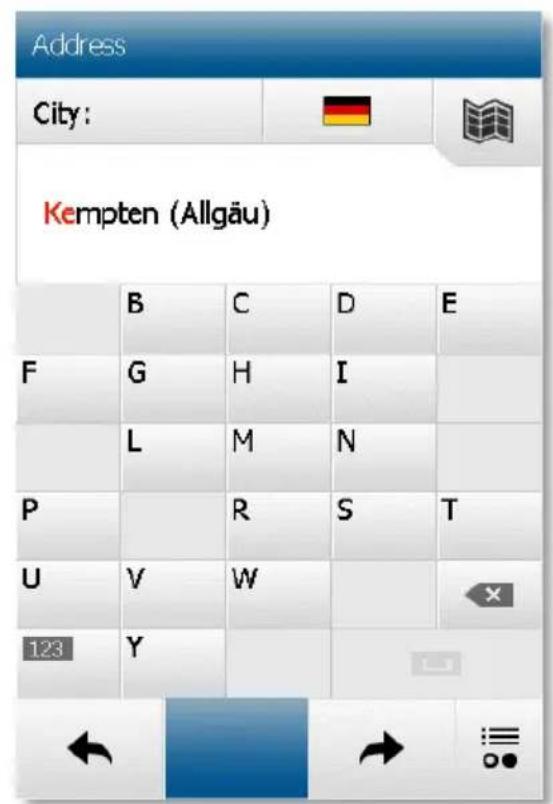
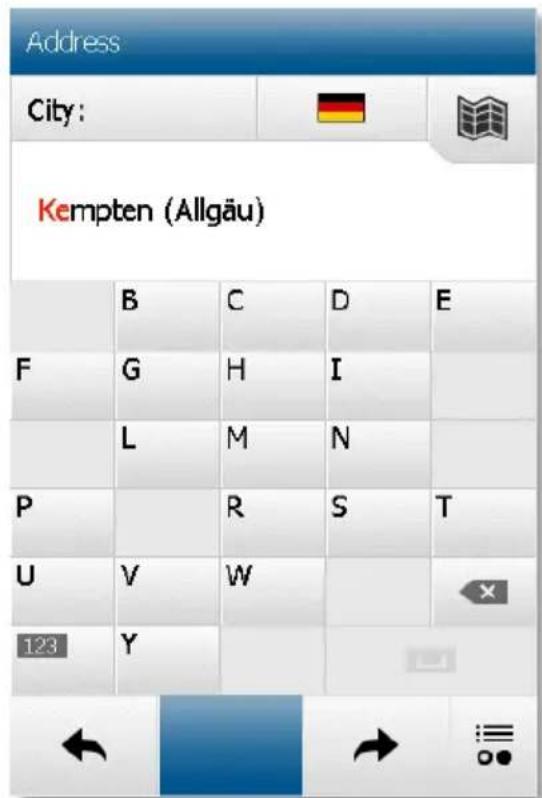
2.4 Destination Entry
On the main menu select „Destination Entry > Address".
You can use the keypad which is shown to enter first the city, then the street and street number.
Confirm your entry for city, street and street number in each case by clicking on the right arrow and then on the "OK tick" to start the route calculation. Alternatively, when it comes to entering the street, you can click on the middle button to be navigated to the city centre or to the middle of the street when entering the street number.
As well as entering an address, other entry options are available to you such as POIs, waypoints or coordinates.
2.5 Route Options
Create your own individual route by adjusting the route options to your needs. You can set the route options after every destination entry. Or you tap on the main menu on „Settings > Navigation > Route Options".
First select the means of transport (bicycle or pedestrian). Tap on „Next“.
Now specify the type of route:
plain gives preference to routes with inclines of 0 - 4%
mountainous gives preference to routes with inclines of 4 - 8%
neutral calculates the shortest route to the destination, regardless of inclines
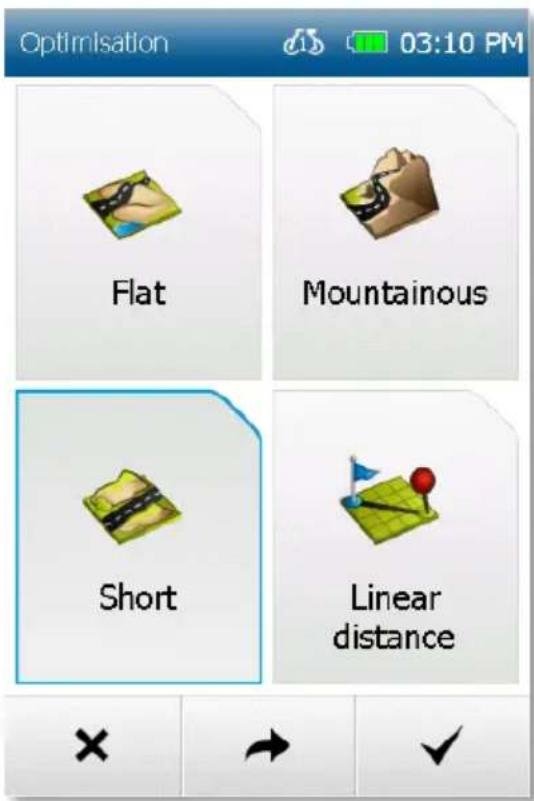
Tap on „Next“.
Choose the modes of transport that you want to use, prefer or avoid on the route, for example steep gradients, via ferrata or hiking trails.
Confirm your selection with „Done“.
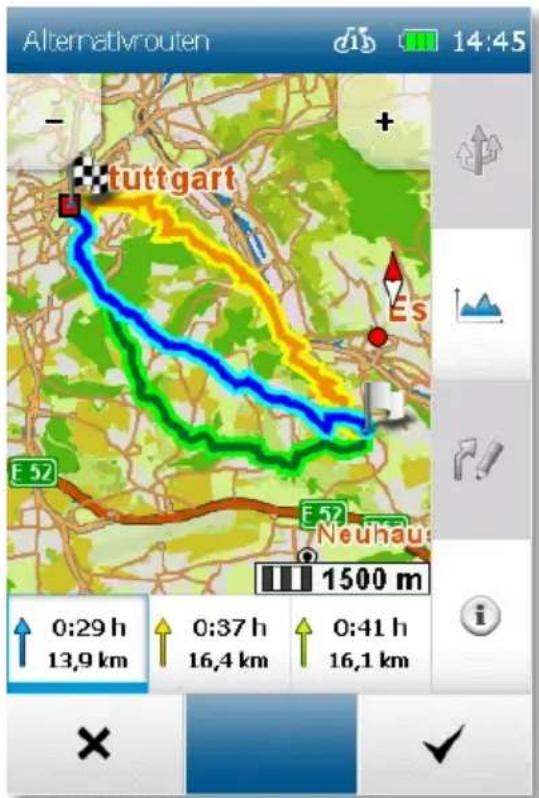
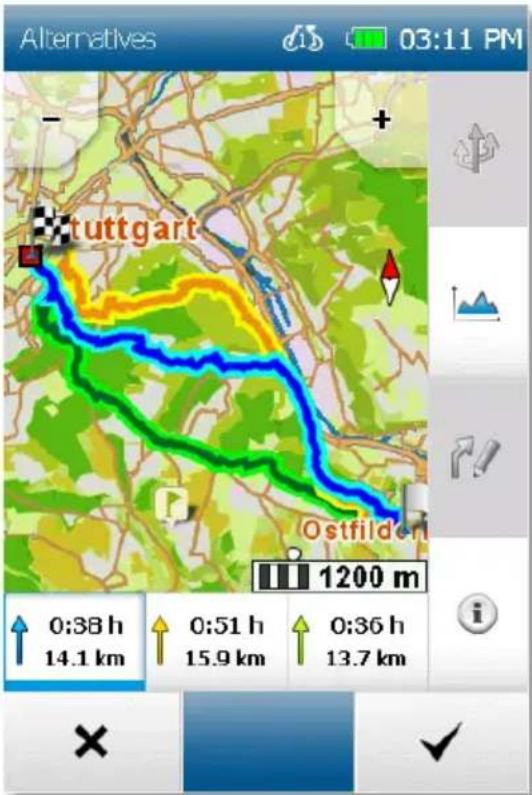
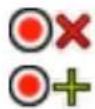
After the route calculation, you have the following options:

Calculates two alternative routes

Change the route options

Shows the altitude profile for the calculated route

Shows information about the route

"tick" starts the route guidance
2.6 Drag and Drop Route
After calculating a route via the destination entry, you have the option of manually changing the calculated route.
- After calculating the route, tap on the fold-down button Change route and
then on the button Drag and drop route

- Tap on the section of the route which you would like to change. A marking

appears.
-
Now tap (within a radius of 300 km ) on the point on the map to which you would like to move the route. The new route will be calculated and displayed. The original point is marked
-
Two buttons are shown which allow you to edit the route further.
Delete point - the marking set previously is cancelled.
Fix point and set further point - the set marking is adopted and fixed, the new route is calculated.
Fixed points are marked with
A fixed point can be selected again, moved or deleted at any time.

NOTE: If the point is set away from a road, the nearest link to a segment of road is searched for and the route is calculated via this point.
2.7 Loop me!
Via the function „Trip Manager“ you can call up the feature „Loop me!“.
You can now plan a circuit either from your current position or from any other point you want, such as a POI, a city or your home address.
As a next step, you can set your desired parameters. This may for example be the desired distance or you can also restrict the duration of the circuit.
It is possible, for example, for you to enter 20km or correspondingly 3 hours.

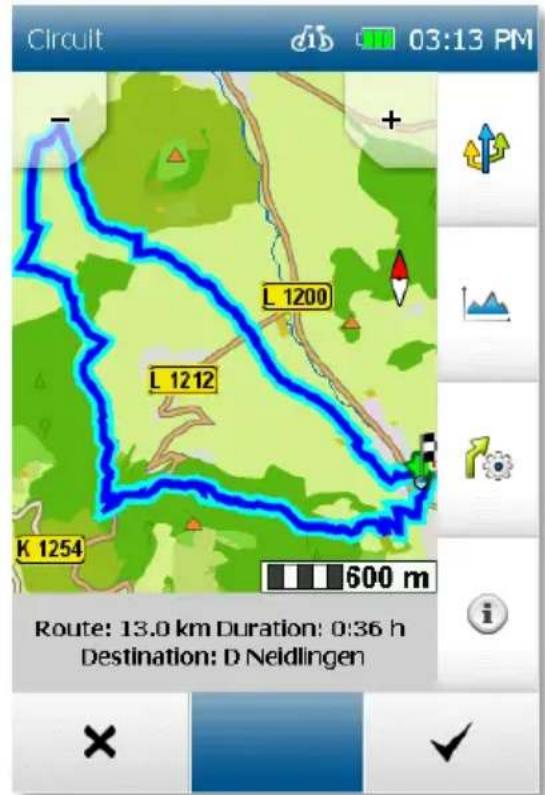
In a next step, you are asked what activity you are performing. If you are out cycling and you want to do a circuit, click on „Bicycle“; if you are out walking, click on „Pedestrian“.
You can now select what your circuit should look like. For example, if you would prefer to plan a more sporty route, then click on „Hilly“; if you would prefer not to climb too many hills, then click on „Flat“. Once you have done this, you can now stipulate what type of routes you would mainly like to travel on. For example, you can set it so that you will be guided primarily along cycle paths.
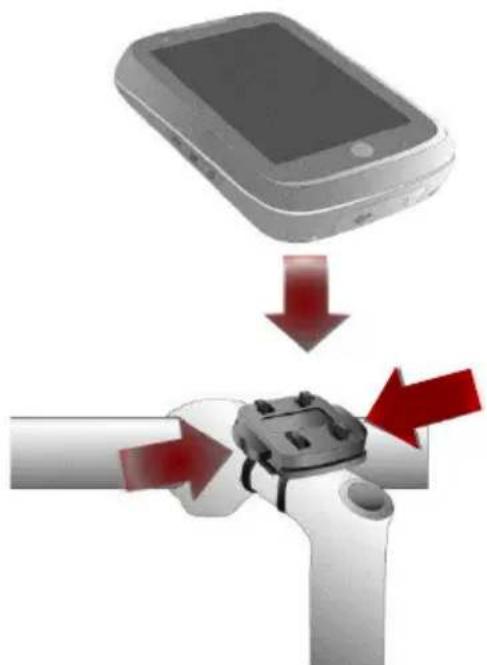
3 Fitting the bracket to the bicycle handlebar
With 2 cable ties (reusable) you can fix the bicycle bracket on the handlebar.
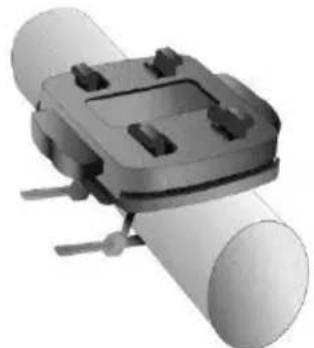
With the rubber band you can attach the bicycle bracket to the handlebar or to the handlebar stem.
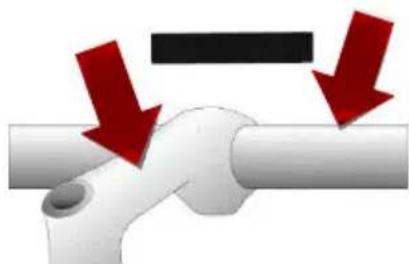
Place your device with the bicycle bracket base into the bicycle bracket and lock it firmly in place. Check whether it is firmly seated on the handlebar stem.
Please attach the navigation system to your bicycle in such a way that it will not cause injury if an accident occurs or you fall.
Turn the screen to a position that ensures minimum glare through reflection. The bracket should be attached to the handlebars in such a way that it can be seen as easily as possible with the least possible glare.
When you leave your bicycle unattended we recommend that you remove the device so that it does not get stolen!
Note!
Check whether any local laws regarding limitations to the attachment of items to bicycles apply!
Do not fix the device close to gear mechanisms or any other items in such a way that may impede the operation or affect the safety of your bicycle.
Guarantee
Please keep the proof of purchase for this device for the entire duration of the guarantee period, as it must be produced in the event of any claim.
You (as the end user) receive a 24-month guarantee from the date of sale. The article has been manufactured using the most modern production methods and subjected to strict quality controls.
Please contact only the manufacturer (not the dealer where you purchased it) in the event of any defects during the guarantee period.
Contact Service: www.blaupunkt.de
The guarantee does not cover damage caused by improper use or external influence (water, falling, sunlight, breakage or impact).
Declaration of Conformity
Hereby Baros GmbH, declares, that the device Blaupunkt BikePilot², is in compliance with the essential requirements and other relevant regulations of Directive 2014/53/EU (RED).
The Declaration of Conformity can be found at:
http://www.blaupunkt.com/en/nc/productsnavigation/bikepilot/products/single/16402
UserInfo/Contact
If your device has a defect or you have problems with it, please contact our Service & Support Center.
If you need to send your device to us, please attend to the following points:
- Use only the original packaging
- Add a detailed error description
- Add your full name and address and a copy of your purchase receipt
- Stamp and send the package to us (sufficient postage)
Address of our Service Center:
First Service Center
Kleine Duxelstr 21
DE-30171 Hannover/Germany

BLAUPUNKT
Verandert derouteopties.

Klantenservice/Contact
support@first-servicecenter.de
