SEMD 12 A2 - Ice machine SILVERCREST - Free user manual and instructions
Find the device manual for free SEMD 12 A2 SILVERCREST in PDF.
Frequently Asked Questions - SEMD 12 A2 SILVERCREST
User questions about SEMD 12 A2 SILVERCREST
0 question about this device. Answer the ones you know or ask your own.
Ask a new question about this device
Download the instructions for your Ice machine in PDF format for free! Find your manual SEMD 12 A2 - SILVERCREST and take your electronic device back in hand. On this page are published all the documents necessary for the use of your device. SEMD 12 A2 by SILVERCREST.
USER MANUAL SEMD 12 A2 SILVERCREST
Operating instructions
DE AT CH
DUO-EISCREMEMASCHINE
Bedienungsanleitung
IAN 274311
FR BE
Before reading, unfold the page containing the illustrations and familiarise yourself with all functions of the device.
| GB | Operating | instructions | Page | 21 |
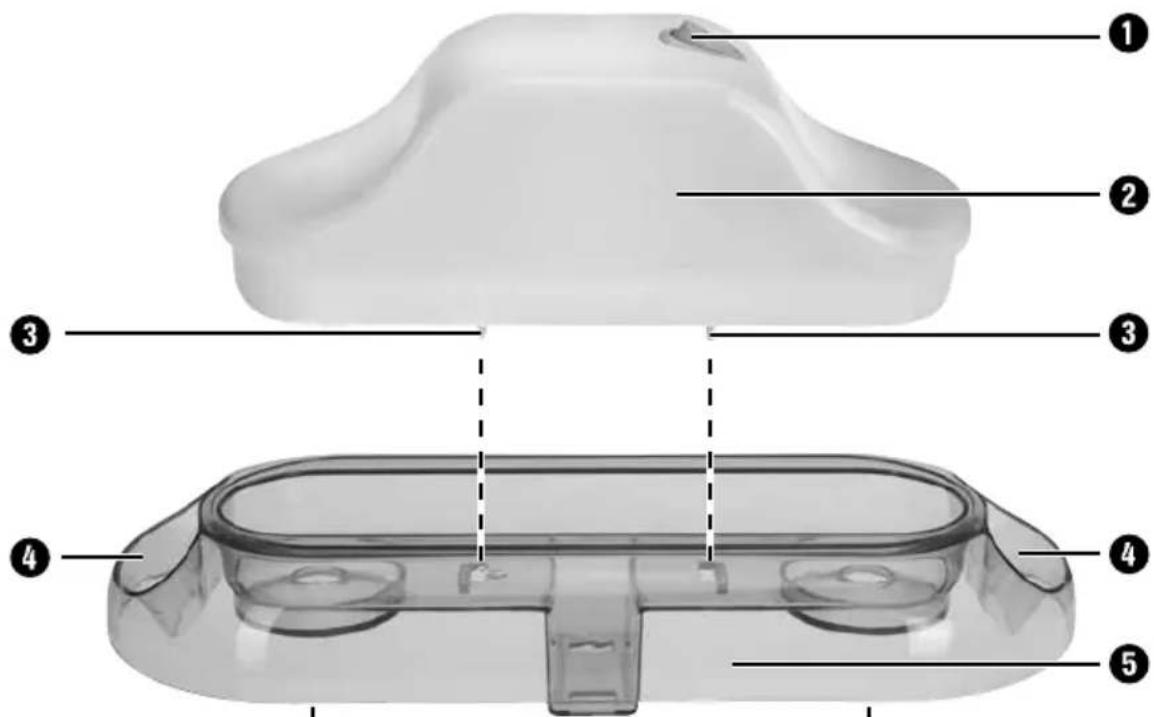
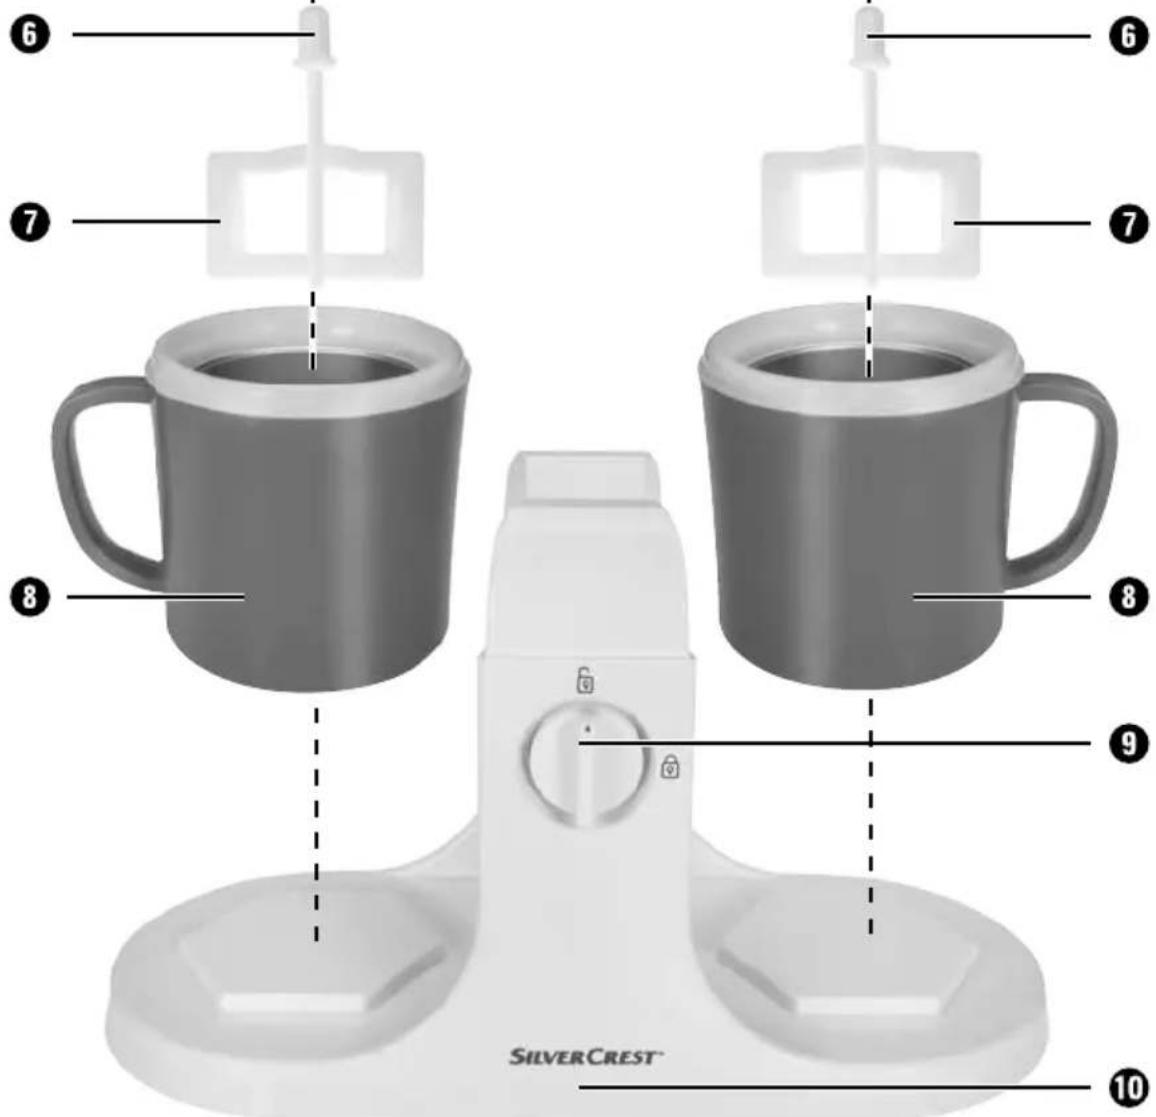
Table des matieres
Introduction 2
Usage conforme 2
Matériel livre 2
KOMPERNASS HANDELS GMBH
BURGSTRASSE 21
44867 BOCHUM
GERMANY
www.kompernass.com
Recettes
REMARQUE
KOMPERNASS HANDELS GMBH
BURGSTRASSE 21
44867BOCHUM
GERMANY
www.kompernass.com
Rezepte
HINWEIS
Description of the appliance 22
Technical data 22
Safety guidelines 23
Assembly 25
Preparation 25
Making ice cream 26
Cleaning and care 27
Storage 27
Warranty and service 28
Disposal 28
Importer 28
Recipes 29
Vanilla ice cream 29
Strawberry ice cream 29
Banana ice cream 29
Mango ice cream 30
Nut ice cream 30
Introduction
Congratulations on the purchase of your new appliance.
You have selected a high quality product. The operating instructions are part of this product. They contain important information on safety, usage and disposal. Before using the product, familiarise yourself with all handling and safety instructions. Use the product only as described and for the range of applications specified. Please also pass these operating instructions on to any future owner(s).
Intended use
This appliance is intended exclusively for making ice cream. This appliance is intended solely for use in private households. Do not use it for commercial purposes.
Package contents
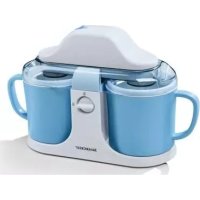
DUO Ice Cream Maker
Operating instructions
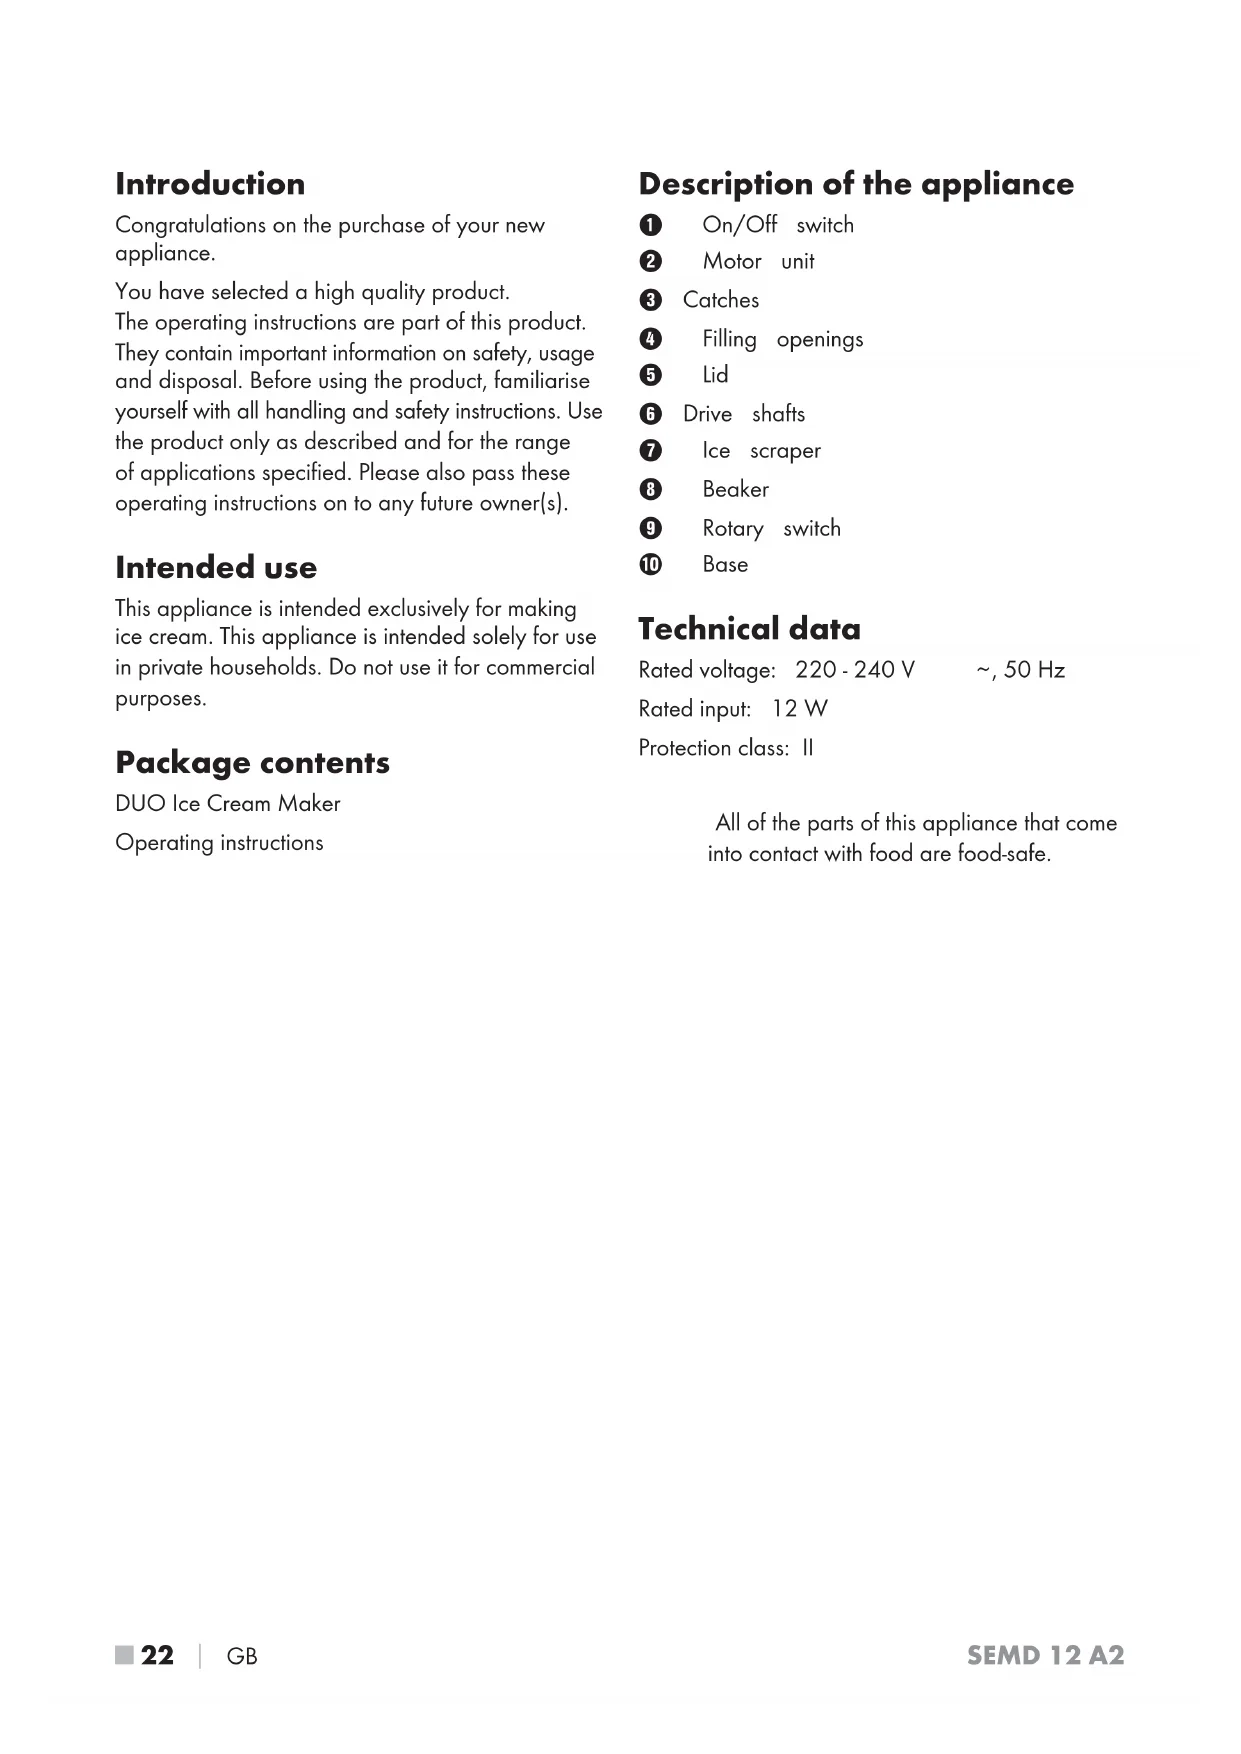
Description of the appliance
On/Off switch
2 Motor unit
Catches
Filling openings
5 Lid
Drive shafts
Ice scraper
8 Beaker
Rotary switch
10 Base
Technical data
Rated voltage: 220 - 240 V , 50 Hz
Rated input: 12 W
Protection class: II
All of the parts of this appliance that come into contact with food are food-safe.
Safety guidelines
RISK OF ELECTRIC SHOCK
- Connect the appliance only to mains power sockets supplying a mains power voltage of 220 - 240V 50Hz
- To prevent accidents, have defective plugs and/or power cables replaced immediately by an authorised specialist technician or our Customer Service department.
In event of operating malfunctions and before cleaning the appliance, remove the power plug from the mains power socket.
Always remove the power cable from the socket by pulling on the plug, not on the power cable itself. - Do not kink or crush the power cable, and route the cable so that it cannot be stepped on or tripped over.
- Do not expose the appliance to humidity and do not use it outdoors. If liquid gets into the housing, disconnect the appliance from the mains power socket immediately and have it repaired by a qualified technician.
- Never handle the power cable or the power plug with wet hands.
- Do not open the appliance motor unit. Doing so can lead to risks and also invalidates the warranty.
- Disconnect the appliance from the mains power source immediately after use. The appliance is completely free of electrical power ONLY when unplugged.
The appliance is for indoor use only.

Never immerse the motor unit of the appliance in liquid and do not allow any liquids to enter the housing of the motor unit.
WARNING! RISK OF INJURY!
- This appliance may be used by children aged 8 years or over if they are supervised or have been told how to use the appliance safely and are aware of the potential risks.
- Cleaning and user maintenance tasks must not be carried out by children unless they are aged 8 years or more and are supervised.
The appliance and its connecting cable must be kept away from children younger than 8 years old. - This appliance may be used by persons with limited physical, sensory or mental capabilities or lack of experience and knowledge, provided that they are under supervision or have been told how to use the appliance safely and are aware of the potential risks.
Children must not use the appliance as a plaything.
The appliance should always be disconnected from the mains when unattended and before assembly, disassembly or cleaning.
Before changing accessories or additional parts that are in motion during operation, the appliance must be switched off and disconnected from mains power.
Assembly
Use the diagrams on the fold-out page as a guide for assembly!
1) Remove all packaging materials and any stickers from the appliance.
2) Clean the appliance as described in the section "Cleaning and Care".
3) Place the base 10 on a flat surface.
4) Place the two beakers onto the hexagonal bases so that the handles of the beakers face outwards.
5) Insert the two ice scrapers into the recesses in the breakers 8. The drive shafts 6 must be pointing upwards.
NOTE
- Ensure that the rotary switch is set to when removing or replacing the lid.
6) Place the lid 5 on the beakers 8. Ensure that the drive shafts 6 are sticking up through the holes in the lid 5.
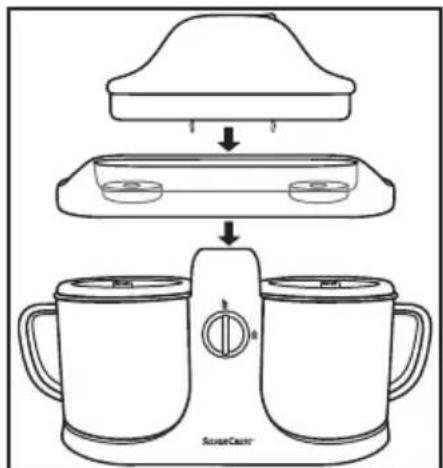
7) Place the motor unit 2 onto the lid 5 so that the power cord is to the rear. The catches 3 must click into the lid 5.
8) Turn the rotary switch to the position. The lid with the motor unit can now no longer be removed.
9) Insert the plug into a mains power socket. The appliance is now ready for use.
Preparation
Place the two beakers 8 in the deep freeze for about 8-12 hours at a temperature of no more than -18^.
TIPS
- Keep the breakers ⑧ upright in the freezer.
Ensure that the breakers 8 are completely dry before you place them in the freezer.
Place a plastic bag, for instance a freezer bag, in each beaker 8 before freezing.
Before processing, place the fruit, the milk and cream in the fridge. This ensures that the fruit is already cold and thus the ice cream mixture will not require so long to cool down.
Puree the fruit with a hand blender and mix all the ingredients as described in the recipe.
Allow the mixture to cool down to about 5 - 10^ in the fridge.
Making ice cream
CAUTION! MATERIAL DAMAGE!
Start the appliance first and then add ingredients. Otherwise the ice mixture will freeze onto the sides of the beaker 8 and block the ice scrapers 7. This will cause the motor to overheat!
CAUTION! MATERIAL DAMAGE!
Do not stop the appliance during processing! Otherwise the ice mixture will freeze onto the sides of the beaker 8 and block the ice scrapers 7 when the machine is restarted. This will cause the motor to overheat!
1) Remove the breakers 8 from the freezer and put the appliance together as described in the section "Assembly".
2) Switch the appliance on by moving the On/ Off switch 1 to the position I. The two ice scrapers 7 start turning.
3) Now fill the prepared ice mixture into the beakers through the filling openings. Ideally, use a bowl with a spout. Never add more than 300 ml per beaker. During processing the mixture increases in volume!
NOTE
You can also fill only one beaker with ingredients. However, always use the appliance with both beakers.
NOTE
The ice scrapers may occasionally change their direction of rotation. This happens when the mixture becomes too stiff. This is normal and not an appliance defect.
4) Allow the appliance to continue running until you are satisfied with the consistency of the mixture. After a maximum of 20 to 30 minutes, the ice cream is ready.
5) Switch the appliance off at the On/Off switch 1 and pull the mains power plug out of the socket.
6) Turn the rotary switch 9 to 9 to remove the lid 5 with the motor unit 2.
7) Pull the ice scrapers out of the ice cream. If the ice cream sticks to them, scrape it off with a plastic spoon or similar.
8) Lift the beakers ⑧ out of the appliance and remove the ice cream. Use only plastic or wooden implements to do this.
CA
CAUTION! MATERIAL DAMAGE!
- Do not use metal utensils to remove the ice cream from the beakers 8.
Cleaning and care

RISK OF ELECTRIC SHOCK
Always remove the plug from the mains power socket before you clean the appliance.

Ensure you never submerge the motor unit 2 in liquid, and never allow liquid to enter the motor unit housing 2.

CAUTION! MATERIAL DAMAGE!
Do not use abrasive, chemical or caustic cleaning agents to clean this appliance. They can cause damage to the surfaces.
Do not clean the components of this appliance in a dishwasher!
If assembled, take the appliance apart to clean it.
Turn the rotary switch to to remove the lid with the motor unit 2.
- Rotate the lid 5 together with the motor unit 2. Press the two catches 3 which project through the lid 5 gently inwards and push them out of the lid 5 at the same time. The motor unit 2 will now detach from the lid 5.
Take the ice scrapers 7 out of the breakers 8.
- Remove the breakers 8 from the base 10.
Clean the motor unit 2 with a moist cloth after every use. If there is heavy soiling, add mild detergent to the cloth. Rinse detergent residues off with clear water. Ensure that there are no detergent residues on the appliance, and that the appliance is completely dry before renewed use.
Allow the breakers 8 to warm up to room temperature before cleaning them.
Wash the beakers 8, the ice scraper 7 and the lid 5 in lukewarm water with a little washing-up liquid. Afterwards, rinse these parts with plenty of clean water to remove all detergent residues.
Wipe the base with a damp cloth. If there is heavy soiling, add mild detergent to the cloth.
Ensure that all parts are completely dry before re-use.
Storage
Always clean the appliance thoroughly before storing.
Store the appliance in a clean and dry location.
Warranty and service
You are provided a 3-year warranty on this appliance, valid from the date of purchase. This appliance has been manufactured with care and inspected meticulously prior to delivery. Please retain your receipt as proof of purchase. In the event of a warranty claim, please contact your Customer Service unit by telephone. This is the only way to guarantee free return of your merchandise.
The warranty only covers claims for material and manufacturing defects, not for damage sustained during carriage, components subject to wear and tear or damage to fragile components such as switches or batteries. This appliance is intended solely for private use and not for commercial purposes.
The warranty shall be deemed void in the case of misuse or improper handling, use of force or interventions which were not carried out by one of our authorised Service centres.
Your statutory rights are not restricted by this warranty.
The warranty period is not prolonged by repairs made under the warranty. This also applies to replaced and repaired components. Any damage or defects present at the time of purchase must be reported immediately after unpacking, but no later than two days after the date of purchase. Repairs carried out after expiry of the warranty period shall be subject to charge.
Disposal
Never dispose of the applice in the normal domestic waste. This product is subject to the provisions of European Directive 2012/19/EU.
Dispose of the appliance via an approved waste disposal company or your municipal waste disposal facility. Please observe applicable regulations. Please contact your waste disposal facility if you are in any doubt.

The packaging is made from environmentally friendly material and can be disposed of at your local recycling plant.
Importer
KOMPERNASS HANDELS GMBH
BURGSTRASSE 21
44867 BOCHUM
GERMANY
www.kompernass.com
GB Service Great Britain
Tel.: 0871 5000 720 (£ 0.10/Min.)
E-Mail: kompernass@lidl.co.uk
IAN 274311
Recipes
NOTE
These recipes are provided without guarantee. All information on ingredients and preparation is indicative only. Modify the suggested recipes to taste.
The recipes each provide enough mixture to fill one beaker 8.
The max. filling capacity of a beaker 8 produces around 2-3 scoops of ice cream.
We recommend beating the cream required for the recipes in advance. As it can be difficult to beat such small quantities of cream, we recommend beating more cream than you require and using the excess to decorate the finished ice cream later.
Vanilla ice cream
Ingredients
170 ml full cream milk
85ml / 85g cream
25g icing sugar
10 g vanilla sugar
Preparation
1) Beat the cream until it is slightly stiff.
2) Mix the cream with the milk, the vanilla sugar and the icing sugar.
3) Allow the mixture to cool down to about 5 - 10^ in the fridge.
Now you can process the mixture as described in the instructions.
Strawberry ice cream
Ingredients
Approx. 120 g strawberries
70 ml/70 g full cream milk
60ml / 60g cream
30g icing sugar
Preparation
1) Puree the strawberries.
2) Beat the cream until it is slightly stiff.
3) Mix the pureed strawberries with the cream, the milk and the icing sugar.
4) Allow the mixture to cool down to about 5 - 10^ in the fridge.
Now you can process the mixture as described in the instructions.
Banana ice cream
Ingredients
1/2-1 bananas (approx. 75g)
115 ml/115 g full cream milk
55 ml/55 g cream
35g icing sugar
Preparation
1) Puree the bananas.
2) Beat the cream until it is slightly stiff.
3) Mix the pureed bananas with the cream, the milk and the icing sugar.
4) Allow the mixture to cool down to about 5 - 10^ in the fridge.
Now you can process the mixture as described in the instructions.
Mango ice cream
Ingredients
90 g mango flesh
90 ml/90 g full cream milk
50ml / 50g cream
25g icing sugar
Preparation
Puree the mango.
2) Beat the cream until it is slightly stiff.
3) Mix the pureed mango with the cream, the milk and the icing sugar.
4) Allow the mixture to cool down to about 5 - 10^ in the fridge.
Now you can process the mixture as described in the instructions.
Nut ice cream
Ingredients
40 g nuts
80 ml / 80 ~g full cream milk
60ml / 60g cream
50g icing sugar
Preparation
1) Chop the nuts finely.
2) Beat the cream until it is slightly stiff.
3) Mix the milk, cream and powdered sugar.
4) Allow the mixture to cool down to about 5 - 10^ in the fridge.
5) Add the mixture to the appliance as described in the section "Making ice cream".
6) Wait approximately 5 minutes and then add the finely chopped nuts gradually without switching off the appliance.
7 Wait until the ice cream is ready.

KOMPERNASS HANDELS GMBH
BURGSTRASSE 21
44867 BOCHUM
DEUTSCHLAND/GERMANY
www.kompernass.com
Last Information Update:
01/2016·Ident.-No.:SEMD12A2-122015-2