
1LD4206 - Smartwatch CRIVIT - Free user manual and instructions
Find the device manual for free 1LD4206 CRIVIT in PDF.
| Product type | Heart rate monitor watch (smartwatch) |
| Brand | CRIVIT |
| Model | 1LD4206 |
| Dimensions (without strap) | 4.3 x 4.6 cm |
| Screen dimensions | 2.5 x 2.6 cm |
| Weight (watch) | 46 g |
| Weight (chest strap) | 51 g |
| Power supply | CR2032 3V battery (watch and strap) |
| Water resistance (watch) | Waterproof up to 3 bar (DIN8310 standard) |
| Water resistance (strap) | IPx7 |
| Main functions | Time, alarm, stopwatch, counter, heart rate monitor, target HR zone, calories, fat burned, BMI, fitness, memory |
| Backlight | Yes, LIGHT button |
| Second time zone | Yes |
| HR transmission | 5.3 kHz, digital coding (channels CH10 to CH14) |
| Accessories included | Chest strap, bike mount, user manual |
| Warranty | 3 years (by digi-tech gmbh) |
| Maintenance and cleaning | Watch: dry lint-free cloth; strap: lukewarm soapy water and sponge, air dry (do not wet the watch) |
| Safety | Consult a doctor before training; not recommended for pacemaker wearers without medical advice; keep batteries out of reach of children |
| Strap sensor dimensions | 7 x 3.3 x 1.2 cm |
| Operating temperature | 0 to 50 °C |
Frequently Asked Questions - 1LD4206 CRIVIT
User questions about 1LD4206 CRIVIT
0 question about this device. Answer the ones you know or ask your own.
Ask a new question about this device
Download the instructions for your Smartwatch in PDF format for free! Find your manual 1LD4206 - CRIVIT and take your electronic device back in hand. On this page are published all the documents necessary for the use of your device. 1LD4206 by CRIVIT.
USER MANUAL 1LD4206 CRIVIT
Usage and safety instructions
NL BE
Horlogemet
hartfrequeniemeter
IMPERIAL M-LB M-B M-LB
| CHRNO ST-UHR CHRNO CRNO |
Pulsmesser
| HRM PULS FC PULSD |
Uhrzeit
| TIME ZEIT TEMPS HORA |
CHIME STDALARM SIGN HOR HORA AL
| 3 BAR | ✓ | × | × | × |
| 5 BAR | ✓ | ✓ | × | × |
| 10 BAR | ✓ | ✓ | ✓ | × |
| 20 BAR | ✓ | ✓ | ✓ | ✓ |
GB usage and safety instructions
Table of contents
Table of contents. 24
Introduction 26
Intended use. 26
Scope of delivery 26
Technical specifications 26
Important safety information. 27
Batteries 27
User. 28
Chest belt. 28
Wearing the chest belt 28
Coded transmission 29-
Bicycle holder. 29
Light. 30
Speed setting 30
Setup of the heart rate monitor. -30
Important notes on the operation of the heart rate monitor 31 -
Time and basic settings. 32
Second time zone 32
Alarm. 33
Snooze feature 33
Timer (max. 23:59:00)
Stop watch 34
Memory feature 34
Heart rate measurement 34
Warning light 36
Timer. 36
Memory feature 36
-24
GBIE
Target heart rate 37
Calories, fat burn and BMI 38
Notes on the BMI 39
Fitness. 39
Troubleshooting 39
The heart rate is not shown or is shown incorrectly. 39
The display is unreadable / the light does not work 40
Replacing the batteries 40
Replacing the watch battery 40
Battery low indicator -40
Replacing the chest belt battery 41
Reset. -41
Water resistance of the heart rate monitor -41
Water resistance of the chest belt -41
Cleaning instructions 42
Disposal of the electronic appliance . 42
Disposal of the batteries. 42
digi-tech gmbh warranty -42
Warranty conditions 42
Warranty period and defects liability 43
Scope of the warranty. 43
Warranty claim procedure 43
Service 44-
Supplier 44
Heart Rate Monitor
Introduction
Congratulations on the purchase of your new heart rate monitor. You have chosen a high quality product. The instruction manual is part of the product- it contains important information about safety, use and disposal. Read the manual with all usage and safety notes before using the watch. Only use the watch in the intended way and for the intended applications. If the watch is given to someone else, include all documentation with the heart rate watch with chest belt.
Intended use
This electronic appliance is intended for time display and the described additional features. Any other use or modification of the electronic appliance does not comply with the intended uses. The manufacturer is not liable for damages caused by improper use or misuse. The device is not intended for commercial use.
Scope of delivery
Please note: Check the scope of delivery after purchase. Please ensure that all parts are included and undamaged.
Heart rate monitor incl. battery (CR2032)
- Chest belt incl. battery (CR2032)
- Bicycle holder
- Instruction manual
Technical specifications
Heart rate monitor
| Operating temperature | 0-50°C |
| Dimensions | 4,3 x 4,6 cm |
| Display | 2,5 x 2,6 cm |
| Weight | 46g |
| Battery | CR 2032/3V |
-26
Chest belt
| Operating temperature | 0-50°C |
| Dimensions | 7 x 3,3 x 1,2 cm |
| Frequency | 5,3 kHz |
| Weight | 51g |
| Battery | CR 2032/3V |
Important safety information

ATTENTION: Consult your doctor before you begin any training program. Your doctor can help you choose the proper training intensity and heart rate guidelines for your exercises.
This heart rate monitor is not a medical device and should only be used as a guide for your training.
Batteries
Keep batteries out of reach of small children. If a battery is swallowed, you must seek medical attention immediately. Batteries/rechargeable batteries must always be inserted in the correct polarity. If necessary, clean the battery and device contacts. Never attempt to recharge non-rechargeable batteries. Never short-circuit or attempt to open batteries. Never throw batteries into fire as they may explode. If the device will not be used for an extended time period, remove the battery and store the device in a dry and dust-free area. Improper use of the battery can lead to explosion or leakage. If the battery leaks, avoid contact with skin, eyes and mucous membranes. Use gloves. If you are exposed to battery acid, rinse the affected areas with plenty of clean water and immediately seek medical attention. Remove discharged batteries from the device as they present an increased risk of leakage.
User
This device may be used by persons (including children over 8 years of age) with reduced physical, sensory or mental abilities or lack of experience and knowledge, if they are supervised or instructed regarding the safe use of the device and understand the dangers that may arise. Children may not play with the device. Cleaning and user maintenance of the device may not be performed by children without supervision. Keep packaging films out of the hands of children. There is a danger of suffocation.
Chest belt

ATTENTION: Pacemaker patients should consult their physicians before
using the chest belt.
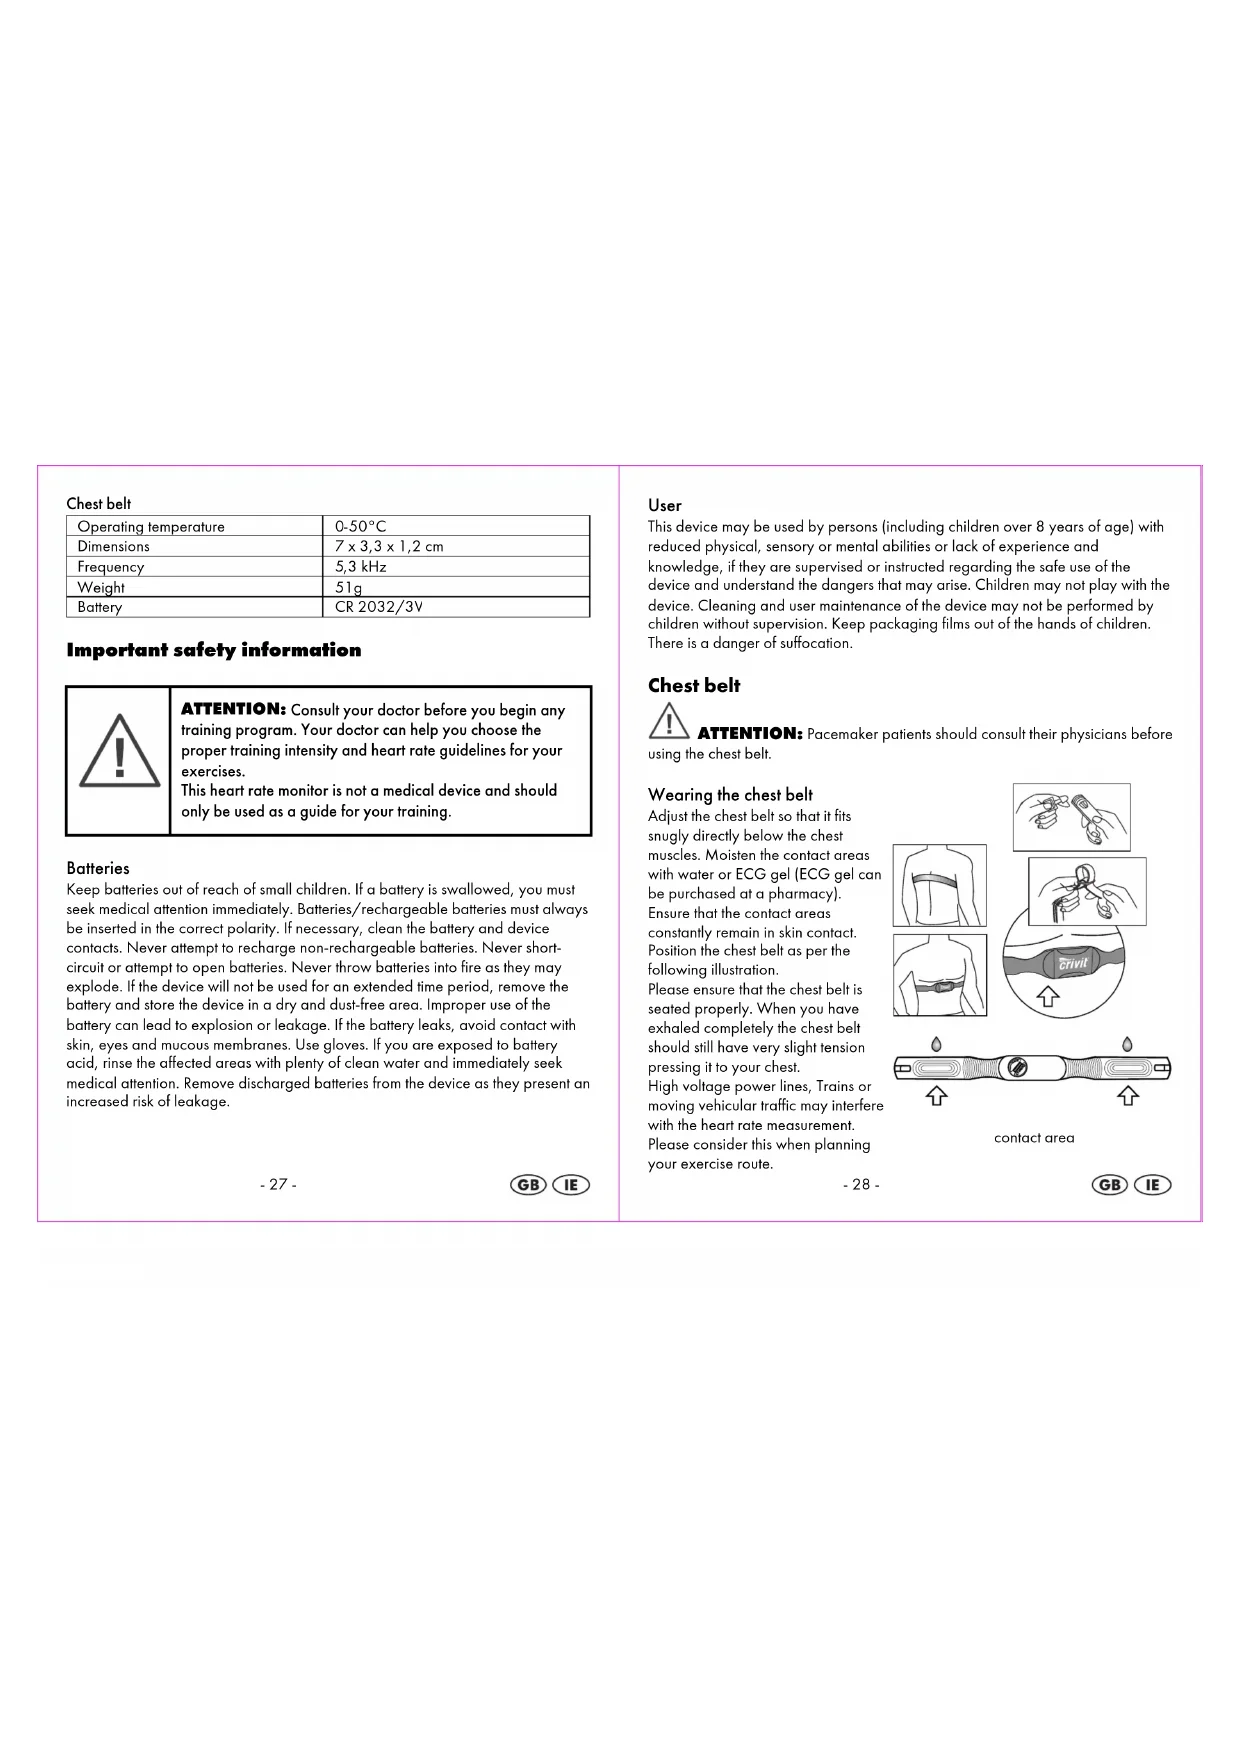
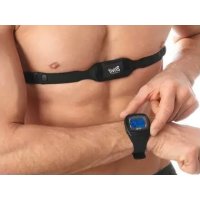
Wearing the chest belt
Adjust the chest belt so that it fits snugly directly below the chest muscles. Moisten the contact areas with water or ECG gel (ECG gel can be purchased at a pharmacy). Ensure that the contact areas constantly remain in skin contact. Position the chest belt as per the following illustration. Please ensure that the chest belt is seated properly. When you have exhaled completely the chest belt should still have very slight tension pressing it to your chest. High voltage power lines, Trains or moving vehicular traffic may interfere with the heart rate measurement. Please consider this when planning your exercise route.
contact area
Coded transmission
The chest belt's transmissions are digitally coded to prevent interference if you are training with a training partner who is using an identical watch and chest belt.
When using the chest belt for the first time, a random channel is selected automatically. The channel is briefly displayed at the top of the display upon entering the heart rate display mode. The available channels are CH10, CH11, CH12, CH13 and CH14.
The channel can be changed by briefly removing the battery from the chest best and reinserting it. The chest belt will randomly select a channel and after approx. 1 minute the heart rate and the new channel will appear on the display of the watch.
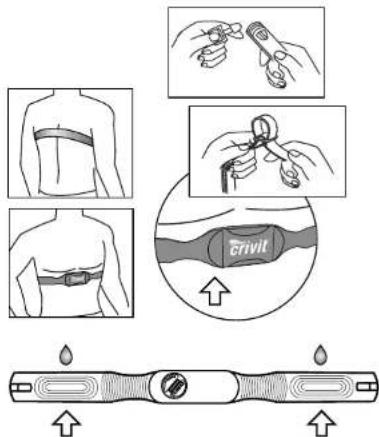
Bicycle holder
The included bicycle holder can be used to attach the heart rate monitor to the handlebar of a bicycle.
Press the bicycle holder onto the top of the handlebar. Handlebars with an especially large diameter may require the use of additional force to snap on the bicycle holder. The heart rate monitor can now be attached to the bicycle holder in the same way that you would attach it to your wrist.
-29-
GBIE
The maximum range of 70cm between the heart rate monitor and the chest belt should not be exceeded.
Light
Briefly press LIGHT to temporarily activate the light.
Speed setting
When setting numerical values, press and hold SEL to use the speed setting feature.
Setup of the heart rate monitor
Remove the protective film from the display and press MODE, SEL or SET. Now select English, German, French or Spanish language by pressing SEL confirm your setting by pressing SET.
Select the unit KM-KG
| METRIC KM - KG KM - KG KM - KG |
or Miles/pounds
| IMPERIAL | M - LB | M - | LB | M - LB |
in the same way. The 12 or 24 hour selection will blink on the display. Press SEL to select a setting and confirm your setting by pressing SET. Set the seconds, minutes, hours, year, month and day in the same way.
Now the basic settings will follow. First the year of the birthday setting will appear
| BIRTHDAY | GEB-TAG | DATNAISS | CUMPL-AN |
Press SEL to set the year and press SET to confirm your setting. Set the month and day in the same way.
Now the weight will appear
| WEIGHT GEWICHT POIDS PESO |
Set the digits of your weight by pressing SEL and confirm each digit by pressing SET.
-30
GB IE
Now the height display will appear
Set each digit of your height by pressing SEL and confirm each digit by pressing SET.
Complete the setting procedure by pressing MODE.
Press SET and SEL simultaneously to totally reset the watch. This is the only way to change language and the units of measurement.
Important notes on the operation of the heart rate monitor
The watch has 3 different Modes of Operation.
Press MODE to select the mode of operation of the watch.
The order of the modes is as follows:
Stop watch
| CHRONO ST-UHR CHRNO CRONO |
Heart rate
HRM PULS FC PULSD
Time
TIME ZEIT TEMPS HORA
Each mode of operation may have several subfeatures.
The subfeatures can always be accessed by pressing SELSEL
-31-
GBIE
Time and basic settings
Press MODE to select the feature before proceeding.
The subfeatures of the time mode can be accessed by pressing SEL.
Alarm
| ALARM | ALARM | ALARM | ALARM |
Timer
| TIMER | TIMER | COMPUTE | TIMER |
Time
| TIME ZEIT TEMPS HORA |
Press and hold SET for 3 seconds to access setting mode.
The display will show
| HOLD TO SET | HALTEN= EINST. | MAINT= REGLER | MANT= AJUST |
and the 12 or 24 hour selection will blink on the display. Press SEL to select a setting and confirm your setting by pressing SET. Set the seconds, minutes, hours, year, month and day in the same way. Now follow the instructions in "Setup of the heart rate monitor" to adjust the basic settings.
Exit setting mode by pressing MODE.
Second time zone
Press and hold SEL for 3 seconds. The watch will switch to the second time zone display and T2 will appear on the display. The second time zone can be set as described in "Setup of the heart rate monitor".
Press and hold SEL for 3 seconds to return to normal time mode.
-32
GBIE
Alarm
| ALARM ALARM ALARM | ALARM |
Press and hold SET for 3 seconds to enter setting mode.
"AL" will appear on the display and the minutes of the alarm time will blink.
Press SEL to set the minutes and press SET to confirm your setting. Set the hours in the same way.
You may optionally set the month and day as well.
If neither month nor day are set the alarm will sound daily. If the day is set, the alarm will sound monthly. If both the month and the day are set the alarm will sound only at the set date.
The hourly chime setting will now appear on the display
| CHIME | STDALARM | SIGN HOR | HORA | AL |
Press SEL to select a setting and confirm your setting by pressing SET
ON/EIN/ACTIF/ENCENDID=on
OFF/AUS/INACTIF/APAGADO=off).
If the chime is activated, the bell symbol will appear and the watch will chime at the beginning of every hour.
Exit setting mode by pressing MODE. The alarm can be activated or deactivated by pressing SET. If the alarm is activated the alarm symbol will appear.
When the alarm sounds, press SET, SEL or MODE to stop the alarm.
Snoopze feature
If no button is pressed when the alarm sounds, the alarm will shut off after about 30 seconds and the symbol will blink on the display. The alarm will stop and will resume after sounding after about 90 seconds. The process will repeat itself 4 times.
Timer (max. 23:59:00)
| TIMER TIMER COMPTE TIMER |
Press and hold SET for 3 seconds to enter setting mode.
The minutes of the timer time will blink on the display.
-33
GBIE
Press SEL to set minutes of the timer time and confirm your setting by pressing SET. Set the hours in the same way.
Now the additional settings for the timer will follow. Press SEL to select the desired mode:
Cd r After reaching 0:00 the timer will count the set time again
Cd U After reaching 0:00 the timer will count forward
Cd S After reaching 0:00 the timer will stop
Exit setting mode by pressing MODE.
The timer can be started or stopped by pressing SET.
Press and hold SET to reset the timer.
After the timer time is up an alarm will sound.
Stop watch
Press MODE to select the feature before proceeding.
| CHRONOCHROIST-UHRUHR | CHRONOCHRONORON |
Press SET to start or stop the stop watch. Press SEL while the stop watch is running to record a lap time. Up to 99 laps can be recorded.
Press and hold SET to reset the stop watch.
Memory feature
| DATA RECALL | ANSICHT DATEN | APPEL DONNEES | RECUP DATOS |
Press SEL while the stop watch is stopped to display the fastest lap on the display. Press SET to display the other lap times.
Please note: The memory feature can only be used if at least one lap time was recorded.
Heart rate measurement
Press MODE to select the feature before proceeding.
| HRMHRM | PULS | FC | PULSO |
-34
GB IE
The subfeatures of the heart rate measurement can only be used when the chest belt is connected.
Press SEL to access the subfeatures of the heart rate watch.
Timer
TIMER TIMER COMPTE TEMPORIZADOR
Memory feature
MEMORY SPEICHER MEMOIRE MEMORIA
Target heart rate
Calories, fat burn and BMI
CALORIE KALORIEN CALORIES CALORIAS
Fitness
FITNESS LEVEL FITNESS LEVEL NIV FORM PHYSIQ NIVEL FIT
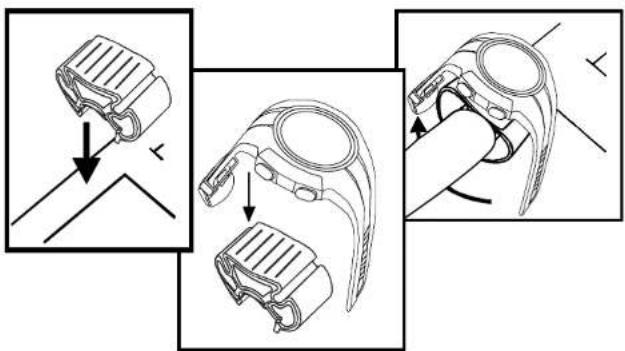
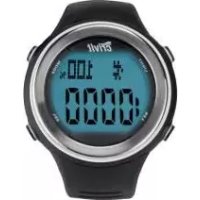
In the middle row of the display the heart rate is shown while wearing the chest belt. If the signal is received from the chest belt the heart symbol will flash. To the right of the heart rate the heart rate in percent of the maximum heart rate is shown. The maximum heart rate is calculated by evaluating your age, weight and height.
-35
GBIE
Warning light
If your heart rate reaches or exceeds 99% of your maximum heart rate, or your heart rate exceeds the target zone values (see target zone) the red warning light will blink and an alarm will sound.
Timer
TIMER TIMER COMPTE TEMPORIZADOR
The bottom row of the display will show the elapsed training time. The middle row will show your heart rate and the heart rate in percent of the maximum heart rate. The timer will start automatically when the chest belt starts measuring the heart rate. The timer will continue counting the time if the feature mode of the watch is changed.
Press SET to select the timer mode:
TIMER total training time
Training time in heart rate target zone
training time with heart rate over target zone
training time with heart rate below target zone
Press and hold SET to reset the training time.
Memory feature
MEMORY SPEICHER MEMOIRE MEMORIA
The stored values are shown in the bottom row of the display.
-36
GB IE
maximum heart rate during training
| HI H F O AL |
minimum heart rate during training
| LO N FA EA |
average heart rate during training
| AV D NO PR |
Press SET to show the stored values in succession.
Press and hold SET to reset the stored values.
Target heart rate
| ZONE | BEREICH | ZONE | ZONA |
The bottom row of the display will show the lower and upper limit value of the target zone.
The selected training type is shown on the top row of the display.
L-U user defined
L-1 Health (50-65% of maximum heart rate)
L-2 Fitness (65-80% of maximum heart rate)
L-3 Performance (80-95% of maximum heart rate)
Press and hold SET for 3 seconds to enter setting mode.
Select the training type by pressing SEL. If "U" is selected (user defined) the lower and upper limits can be set. Press SET. The display will show the lower limit.
-37
GB IE
Set the value by pressing SEL and confirm your setting by pressing SET. Set the upper limit in the same way.
Exit setting mode by pressing MODE. Press and hold SEL to activate the heart rate alarm. When the heart rate alarm is activated, the alarm symbol will appear on and an alarm will sound when the measured heart rate is not within the set zone "BEEP-BEEP...BEEP-BEEP...BEEP-BEEP".
If the measured heart rate is at or above 99% of the maximum heart rate the max. heart rate alarm will sound. "BEEP-BEEP-BEEP-BEEP-BEEP-BEEP". The max. heart alarm is independant of the training zone and the heart rate alarm of the training zone.
Calories, fat burn and BMI
CALORIE KALORIEN CALORIES CALORIAS
The lower row will show the burned calories.
CALORIE KALORIEN CALORIES CALORIAS
Press SET to switch to the display of fat burn in gram
FAT FETT CONSGRAISES GRASA BURN
or to the display of your BMI
EMI EMI IMC IMC
In the display for calorie burn or fat burn the values can be reset by pressing and holding SET.
Note: To increase the accuracy of the calorie and fat burn displays your age and weight must be set correctly.
Note: The counter for fat burn is only activated while your heart rate is above 120 beats per minute.
-38-
GBIE
Notes on the BMI
The BMI is a statistical measurement that can be used to judge a persons weight. For adults, a value between 18.5 and 25 is considered normal. Values below
18.5 are considered "underweight". Values above 25 are considered "overweight". Values above 30 are considered "Obese".
The BMI is only a coarse guideline because it does not take a persons body type and body composition into consideration.
The watch automatically calculates your BMI from the values entered during setup.
Fitness
FITNESS LEVEL
FITNESS LEVEL
NIV FORM PHYSIO
NIVEL FIT
After your training, immediately press SET. A 5 minute countdown will start (cool down phase). The bar will show the remaining time. On the left side of the display the heart rate at the beginning of cool down is shown. On the right side of the display the current heart rate is shown. The countdown time is shown on the bottom row of the display.
After 5 minutes your fitness level will appear.
Fitness level Heart rate
6>130
5 130-120
4 120-110
3 110-105
2 105-100
1 <100
Troubleshooting
The heart rate is not shown or is shown incorrectly
Make sure the chest belt is positioned correctly and fits well.
Your skin should not be too dry or too cold.
The contact areas can be slightly moistened to improve function.
Electromagnetic interference may have an adverse effect on reception.
-39
GBIE
The distance between watch and chest belt must be under 70cm.
Other heart rate measuring devices within a 2m range may also cause interference.
Wireless bicycle computers may cause interference.
The batteries may be low and require replacing.
The display is unreadable / the light does not work
Replace the batteries.
Replacing the batteries
Replacing the watch battery
The battery replacement can be performed by a watch maker in addition to a water resistance test.
To replace the battery yourself, please read the following instructions first:
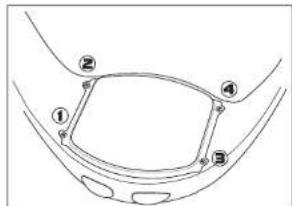
Remove the screws (1, 2, 3 and 4) from the back side of the watch with a small Phillips screwdriver. Remove the caseback and the battery sticker.
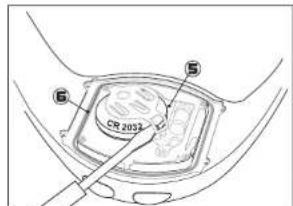
Use a small, flat tool to open the latch (5) of the battery holder. Remove the
battery and insert a fresh 3V CR2032 battery with the (+) terminal facing upwards.
Ensure that the gasket (6) is seated correctly. Close the latch of the battery holder.
Replace the battery sticker and the caseback and replace the screws.
Battery low indicator
If the battery voltage on the chest belt battery drops below the voltage required for normal operation,
-40
GBIE
| TXBELT LO BAT | TXGURT BATT | SNGLTX PILE | TXBCIN BAT BA |
will appear on the display. Replace the battery of the chest belt.
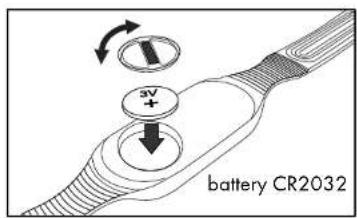
Replacing the chest belt battery
Use a coin to unscrew the battery cover on the back side of the chest belt and insert the 3V battery with the (+) sign facing up. Screw the battery compartment cover back into the case.
Reset
Press SET and SEL simultaneously to totally reset the watch. All stored data will be lost. Set up the watch as described in the chapter "Setup of the heart rate monitor".
Water resistance of the heart rate monitor
Water resistant up to 3 bar. The bar value specifies the atmospheric overpressure which is applied during testing (DIN 8310).
| 3 BAR | ✓ | × | × | × |
| 5 BAR | ✓ | ✓ | × | × |
| 10 BAR | ✓ | ✓ | ✓ | × |
| 20 BAR | ✓ | ✓ | ✓ | ✓ |
Water resistance of the chest belt
Water resistance according to IEC 60529 IPx7.

Cleaning instructions
Clean the heart rate monitor with a soft, dry and lint-free cloth. A glasses cleaning cloth is ideal. After each use, clean the chest belt and the watch strap using lukewarm water, mild soap solution and a sponge. Please take care not to get the watch wet. Dry all parts with a towel and hang the chest belt to dry. Sweat and contaminants are detrimental to the function of the sensor.
Disposal of the electronic appliance
This electronic appliance may not be disposed of with normal household waste. Dispos of the unit at an approved disposal facility or at your local recycling centre. Please observe the current rules and regulations when disposing of the appliance. Contact the disposal system if in doubt.
Disposal of the batteries
Please dispose of your batteries properly in containers especially set up at retailers. Batteries do not belong in household waste. Dispose of the batteries at an approved disposal facility or at your local recycling centre. Contact the disposal system if in doubt.
digi-tech gmbh warranty
This watch includes a 3 year warranty starting on the day of purchase. In case of defects of this heart rate monitor you have, by law, certain rights regarding the vendor of the heart rate monitor. These rights are not changed by the warranty which is described in the following paragraphs.
Warranty conditions
The warranty duration starts on the date of purchase. Please keep the original receipt in a safe place. The receipt is needed as a proof of purchase. If a defect occurs in the heart rate monitor within 3 years, the heart rate monitor will be repaired or replaced (according to our choice) free of charge. This warranty requires that, within the 3 year warranty period, the watch and the receipt can be made available to us along with a short written description of the defect and when

it occurred. If the defect is covered by the warranty, you will receive the repaired heart rate monitor or a new heart rate monitor. Repair or replacement does not cause the warranty period to restart.
Warranty period and defects liability
The warranty period is not increased by the defect liability. This also applies to repaired or replaced parts. If defects are noticed at the time of purchase they must be reported immediately upon unpacking the item. Paid repair may be available after the end of the warranty period.
Scope of the warranty
The heart rate monitor was manufactured according to strict quality guidelines and was carefully inspected before delivery. The warranty does not include parts that experience normal wear and tear and can thus be seen as wear parts or fragile parts that are damaged. Examples include Switches, Batteries or parts made of glass. This warranty becomes void if the heart rate monitor is damaged, is not used in the recommended way or is improperly repaired. For proper use of the heart rate monitor all instructions in this manual must be adhered to exactly. Use of the heart rate monitor in a way that is discouraged in the manual must be avoided. The heart rate monitor not intended for commercial use. Abusive or improper use, excessive force and changes that are made by non-authorized repair centers will void the warranty.
Warranty claim procedure
To ensure that your call is processed in a fast and efficient manner please note the following directions:
- Have your receipt (as proof of purchase) and the article number (271556) handy.
- The article number can be found on the type label, an engraving, the front page of the manual (bottom left) or a sticker on the back side or bottom side of the case.
- In case defects occur, please first contact the service center (see below) by phone or email.
-43-


Visit www.lidl-service.com to download this and many other manuals, product videos and software.
Service
Please note that the following address is not a service address. Please first contact the service address (see above).
Name: digi-tech gmbh
Street: Valterweg 27A
Town:Eppstein 65817
Country: Germany
-44-

Cardio-frequencemente 57
Témoin alarmé 58
Compteur 59
-45
FR BE
Fonction mémoire 59
Montre cardio-frequencemetre
ou Miles/Pounds (M-LB)
| IMPERIAL | M-LB | M-LB | M-LB |
CHIME STDALARM SIGN HOR HORA L
| 3 BAR | ✓ | × | × | × |
| 5 BAR | ✓ | ✓ | × | × |
| 10 BAR | ✓ | ✓ | ✓ | × |
| 20 BAR | ✓ | ✓ | ✓ | ✓ |
Leverantiebepaling. -71
Technische Gegevens -72
of Mijlen/Pond (M-LB)
IMPERIAL M-LB M-LB M-LB
CHIME STDALARM SIGN HOR HORAL
| 3 BAR | ✓ | × | × | × |
| 5 BAR | ✓ | ✓ | × | × |
| 10 BAR | ✓ | ✓ | ✓ | × |
| 20 BAR | ✓ | ✓ | ✓ | ✓ |
| IMPERIAL M - LB M - LB M - LB |
CHIME STDALARM SIGN HOR HORA AL
Pro nastaveni stisknete tlacitko SEL a nastaveni potvrde stisknutim tlacitka SET (ON/EIN/ACTIF/ENCENDID=zapnuto, OFF/AUS/INACTIF/APAGADO=yvpnuto).
| 3 BAR | ✓ | × | × | × |
| 5 BAR | ✓ | ✓ | × | × |
| 10 BAR | ✓ | ✓ | ✓ | × |
| 20 BAR | ✓ | ✓ | ✓ | ✓ |


- Pulsmesser
- Uhrzeit
- GB usage and safety instructions
- Table of contents
- Heart Rate Monitor
- Introduction
- Intended use
- Scope of delivery
- Important safety information
- Batteries
- User
- Chest belt
- Wearing the chest belt
- Coded transmission
- Bicycle holder
- Light
- Speed setting
- Setup of the heart rate monitor
- Important notes on the operation of the heart rate monitor
- Stop watch
- Heart rate
- Time
- Time and basic settings
- Alarm
- Timer
- Second time zone
- Snoopze feature
- Timer (max. 23:59:00)
- Memory feature
- Heart rate measurement
- Target heart rate
- Calories, fat burn and BMI
- Fitness
- Warning light
- Notes on the BMI
- Troubleshooting
- The heart rate is not shown or is shown incorrectly
- Replacing the batteries
- Replacing the watch battery
- Battery low indicator
- Replacing the chest belt battery
- Reset
- Water resistance of the heart rate monitor
- Water resistance of the chest belt
- Cleaning instructions
- Disposal of the electronic appliance
- Disposal of the batteries
- digi-tech gmbh warranty
- Warranty conditions
- Warranty period and defects liability
- Scope of the warranty
- Warranty claim procedure
- Service
- CHIME STDALARM SIGN HOR HORA L
Brand : CRIVIT
Model : 1LD4206
Category : Smartwatch