DR 870TV - TV ALBRECHT - Free user manual and instructions
Find the device manual for free DR 870TV ALBRECHT in PDF.
| Product type | 7" LCD Internet TV |
| Brand | Albrecht |
| Model | DR 870TV |
| Screen | 7" TFT high resolution 800 x 480 pixels, 16:9 format |
| TV output | CVBS and HDMI, resolution up to 1280 x 720 pixels |
| Speakers | 2 x 2W built-in Hi-Fi |
| Network connectivity | Wi-Fi IEEE 802.11 b/g (WPA, WPA2, WEP), Ethernet port |
| Ports and connectors | Stereo headphone jack, 3.5 mm line-in jack, CVBS jack, HDMI, mini USB 5P (power), SD/MMC slot |
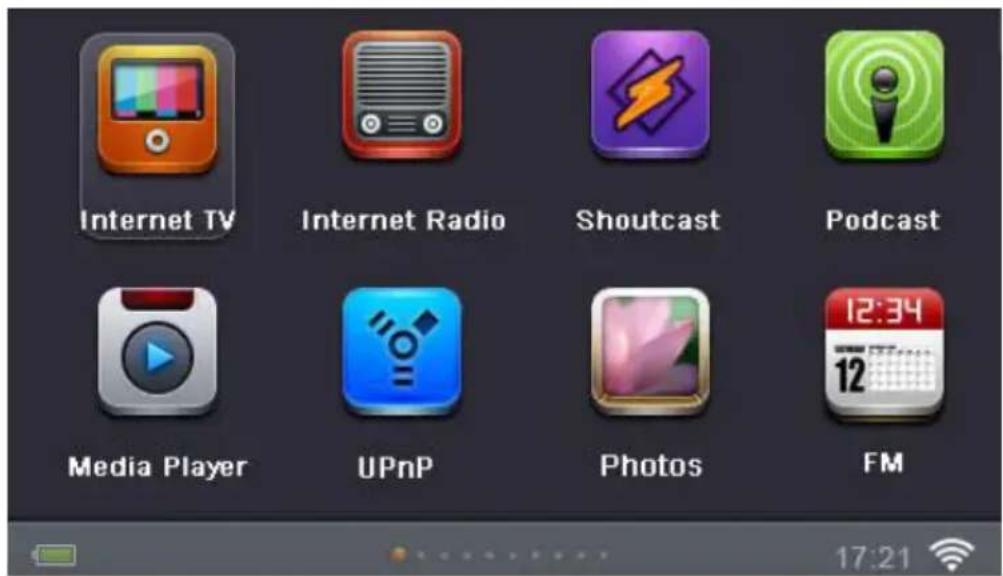
| Main functions | Internet TV, Internet radio (SHOUTcast), podcasts, media player (video, music, pictures), FM radio, picture viewer, UPnP, dual alarm/calendar |
| Supported formats | Video, music and picture files (via SD card, internal memory, UPnP) |
| Internal memory | Yes (formatting required before first use) |
| Power supply | AC adapter 5V/2A (included) |
| Dimensions (W x H x D) | 258 x 125 x 56 mm |
| Weight | Not specified (approx. 500 g) |
| Remote control | Included with full functions |
| FM antenna | Flexible FM antenna included |
| Wireless security | WPA, WPA2, WEP |
| Warranty | 2 years from date of purchase |
| Care and cleaning | Use a soft, dry cloth. Avoid solvents. Unplug before cleaning. |
| General information | User manual available in multiple languages. Telephone support in Germany. |
Frequently Asked Questions - DR 870TV ALBRECHT
User questions about DR 870TV ALBRECHT
0 question about this device. Answer the ones you know or ask your own.
Ask a new question about this device
Download the instructions for your TV in PDF format for free! Find your manual DR 870TV - ALBRECHT and take your electronic device back in hand. On this page are published all the documents necessary for the use of your device. DR 870TV by ALBRECHT.
USER MANUAL DR 870TV ALBRECHT
6.10 Firmware Update:
PST professional support technologies GmbH Breitscheider Weg 117a 40885 Ratingen
1 Table of Contents
1 Table of Contents 2
2 Introduction 5
3 About the Product 6
3.1 Product Description 6
3.2 Product Features 6
3.3 Accessory List 7
4 Getting Started 8
4.1 Controls and Connectors 8
4.1.1 Main Unit-Top 8
4.1.2 Location of Connectors on the Rear 8
4.1.3 Remote Control 9
5 Operation Instructions 12
5.1 Start Menu 12
5.2 Connect to the Internet through Wi-Fi 12
5.3 Internet TV 15
5.4 Internet Radio 16
5.5 Revision3 17
5.6 Inmoo 17
5.7 Blubrry 18
5.8 UrLlama 18
5.9 LookeSound 19
5.10 SHOUTcast Internet Radio Program 19
5.11 Podcast 20
5.12 Media Player 21
5.13 UPnP File Sharing - Play files from your PC 24
5.14 Line-In 27
5.15 Photo Viewer 27
5.16 Setting Time, Date, Calendar and Alarm 28
5.17 FM Radio Setup 30
5.18 TV/LCD Output 31
6 Other Settings 33
6.1 Language: 33
6.2 Network Setup: 33
6.2.1 Wi-Fi Setup: 33
6.2.2 Network Type: 33
6.2.3 Network Status: 33
6.3 Alarm: 33
6.4 Key Tone Setting: 33
6.5 Slideshow Setting: 34
6.6 FM Setting: 34
6.6.1 Region Setting: 34
6.6.2 Auto Scan: 34
6.7 Screenshotaver Time: 34
6.8 Time Zone: 34
6.9 Date & Time: 34
6.10 Firmware Update: 34
6.11 Auto Power-Off: 35
6.12 Restore Default Factory Setting: 35
6.13 About: 35
7 Troubleshooting Guide 36
7.1 TV-Out: No Screen Display 36
7.2 TV-Out: No Sound 36
7.3 TV-Out: Black and White Screen 36
7.4 Remote control is not working 36
7.5 Cannot connect to Wi-Fi Network 36
8 User Safety Guide 37
9 Specifications 38
10 Warranty and Recycling Information 39
10.1 2-Year Warranty From Date Of Purchase 39
10.2 WEEE and Recycling 40
10.3 Service Address and Technical Hotline (for units sold in Germany) 40
2 Introduction
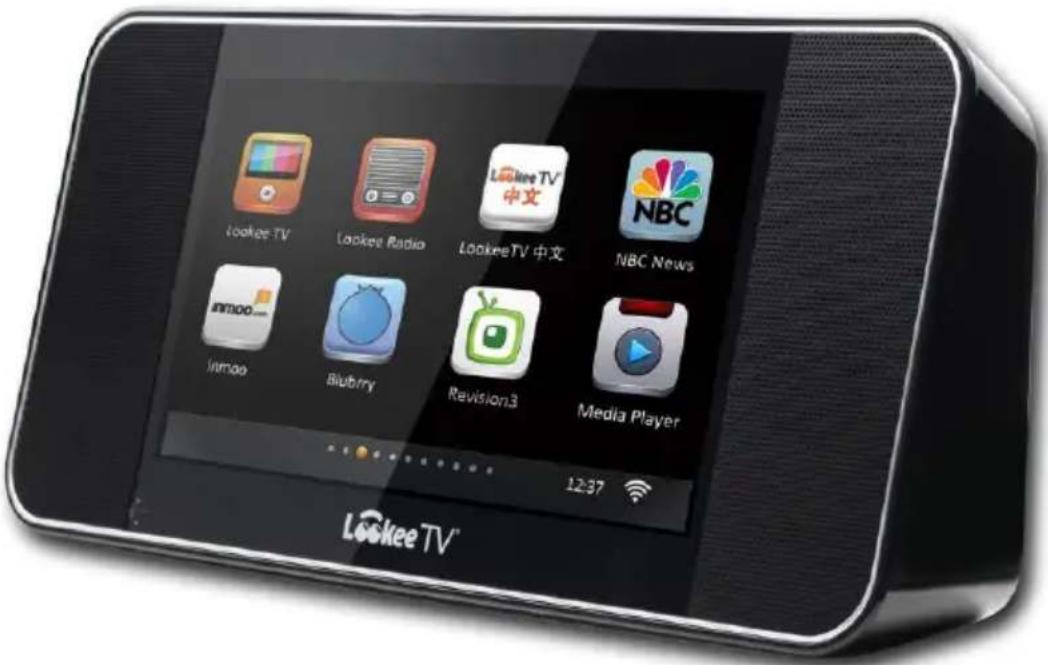
Congratulations on your purchase of our product. The DR 870 HD-TV will allow you to enjoy TV channels, radio stations and podcast throughout the world via Wi-Fi internet connection. Its TV-out function will turn your home TV into an internet TV.
Please read this manual carefully before you start to use it. This instruction manual contains the important information you will need. Please keep this manual for future reference.
3 About the Product
3.1 Product Description
Bringing over thousands of worldwide Internet TV channels, radio stations and podcasts throughout the world via Wi-Fi connection, the DR 870 HD-TV not only allow you to enjoy these on its 7'' high resolution LCD screen and built-in speaker/earphone, but also let you take these to your big home TV screen. Moreover, it can play video, music, and pictures from SD/MMC card. And, you can stream video, music, pictures from your home or office PC to the DR 870 HD-TV by UPnP. It has multiple other features like FM Radio, Picture Viewer and more... The powerful built-in speakers allow you to listen to your music with depth and clarity.
3.2 Product Features
- Stream over 1000 TV channels and over 30000 radio stations and podcasts throughout the world via Wi-Fi internet connection.
- Support SHOUTcast, Podcast, Live Internet radio stations and video broadcasting.
- Browse channels by regions, genres, languages, keyword search, and my favorite's lists
- Media player reads and plays videos, music and picture files from local disk with built-in memory and SD/MMC card.
- Stream videos, music and pictures from your home or office PC to the DR 870 HD-TV by UPnP.
- TV-out function supports resolutions at 1280 × 720 pixels.
- Support TV output in: CVBS and HDMI.
-
Support Wi-Fi in 3 protocols: Static IP, DHCP and PPOE.
FM radio and dual alarm clock/calendar. -
Wake up to internet radio, FM radio, music or a buzzer.
- Auxiliary line input for any audio device with 3.5 mm jack.
- Easy operation with a remote control or Top Keys on unit.
3.3 Accessory List
- Main Unit
Remote Control - AC Adapter 5V/2A
CVBS Cable - Flexible FM antenna
- Instruction Manual
4 Getting Started
4.1 Controls and Connectors
4.1.1 Main Unit-Top

M MENU: Press once to go back to the previous directory or sub directory. Long press for about 3 seconds to go to the main menu.
POWER: Press to turn it ON/OFF.
UP/VOL+: Scroll up or increase the volume
DOWN / VOL-: Scroll down or decrease the volume
LEFT: Short press to the previous track/menu, hold for fast backward during media playing.
RIGHT: Short press to the next track/menu, hold for fast forward during media playing.
ENTER: Press to confirm your selection. It can be used to switch the screen display mode.
4.1.2 Location of Connectors on the Rear
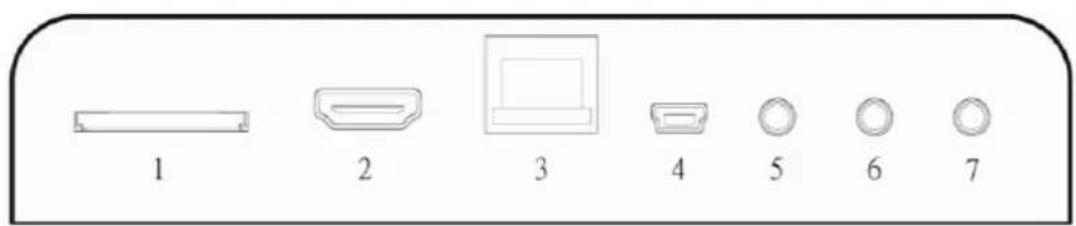
- SD/MMC Card Slot
- HDMI Output
-
RJ45 Ethernet Jack
-
USB Mini 5P and AC/DC Power jack
- Earphone Jack
- CVBS Output
- FM/Line in (Audio)
4.1.3 Remote Control
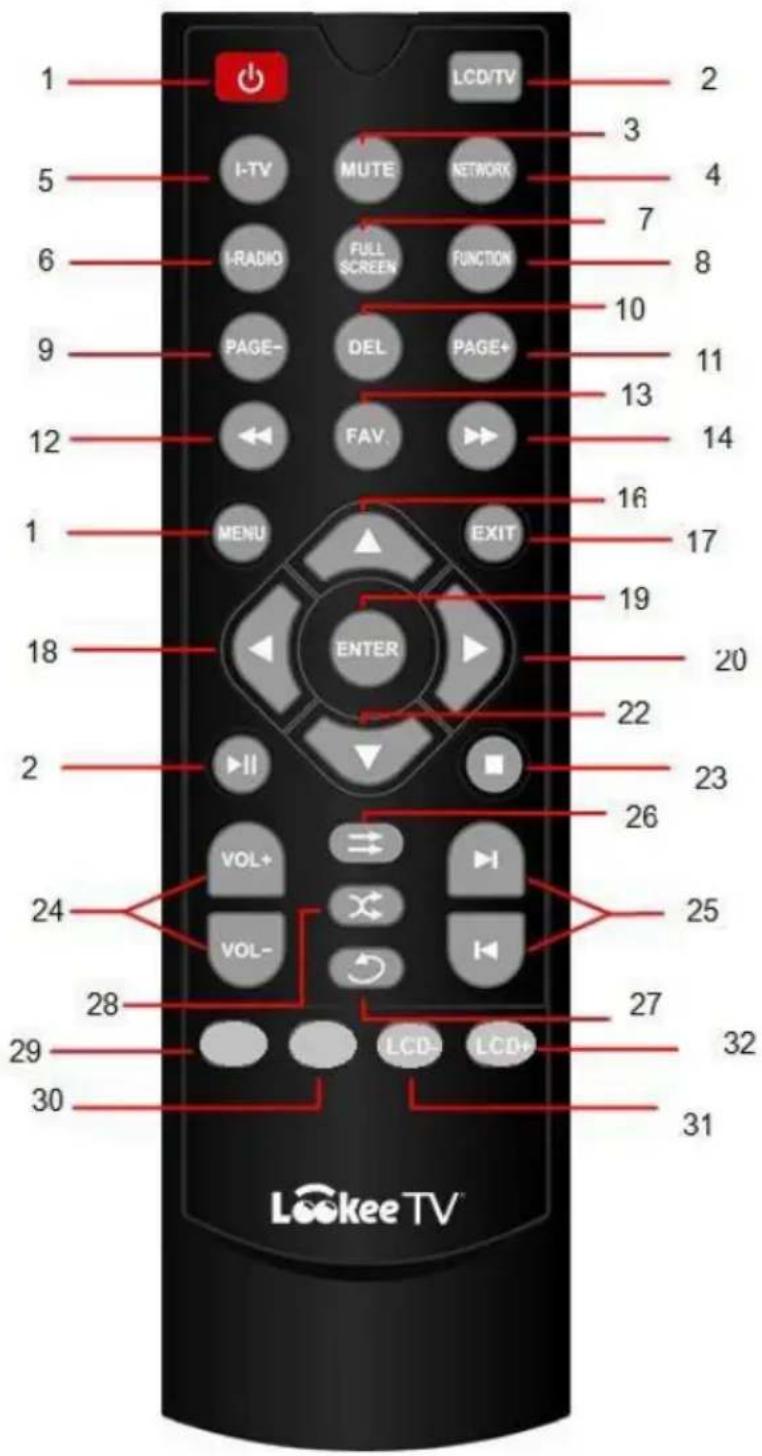
- POWER on/off. When LookeeTV is on, button is pressed to activate/deactivate low light sleep mode. NOTE: to turn power on/off completely, press and hold the power button on LookeeTV device for two (2) seconds.
- LCD/TV: switch LCD/TV
- MUTE
- NETWORK: Shortcut key to open Network Settings quickly
- I-TV: Lookee TV shortcut key
- I-RADIO: Lookee Radio shortcut key
- FULL SCREEN: Switch three screen display mode
- FUNCTION: Multi-use key specially made for use with certain apps
- PAGE-: Go to previous page
- DEL: Delete
- PAGE+: Go to next page
- FAST BACKWARD
- FAV: Add to My Favorites list
- FAST FORWARD
- MENU: Go to the main menu
- UP: Direction Key, Scroll up to increase the volume (when playing video/audio)
- EXIT: Back or Return to the previous menu, or return to previous page when using certain apps
- LEFT KEY: Direction Key and Return to the previous track/menu, or adjust FM radio stations manually
- OK: Press to confirm your selection. It can be used to switch the screen mode.
- RIGHT KEY: Direction Key and Go to the next page/menu/track/channel, or adjust FM radio stations manually
- PLAY/PAUSE
-
DOWN: Direction Key, Scroll down to decrease the volume (when playing video/audio)
-
STOP
- VOL-: decrease the volume VOL+: increase the volume
- PREVIOUS: Go to the previous Track NEXT: Go to the next Track
- PLAY IN ORDER: Play video/music in order on playlist
- REPEAT: Repeat playing the selected video/music on playlist
- SHUFFLE: Randomly select and play video/music on playlist
- No Function
- No Function
- LCD-: brighten display illumination
- LCD+: darken display illumination
5 Operation Instructions
5.1 Start Menu
After connecting the main unit to a power outlet, press the POWER button on the unit or on the remote control to turn the unit on. Then the start-up screen will show up and after that you can see the main menu as below. For the navigation please use the UP/DOWN/LEFT/RIGHT buttons and select the options. Press ENTER to go to the menu you want.
5.2 Connect to the Internet through Wi-Fi
To use all the feature of the DR 870 HD-TV you need a router with internet access and a wireless network.
1: Select Settings > Network Setting > Wi-Fi Setup > Auto Search. (The ‘>’ indicates selecting the option which leads to further menus.) The Auto Search system will automatically search all available wireless networks within reach. Once the available networks are found, these will be listed as below for your selection.
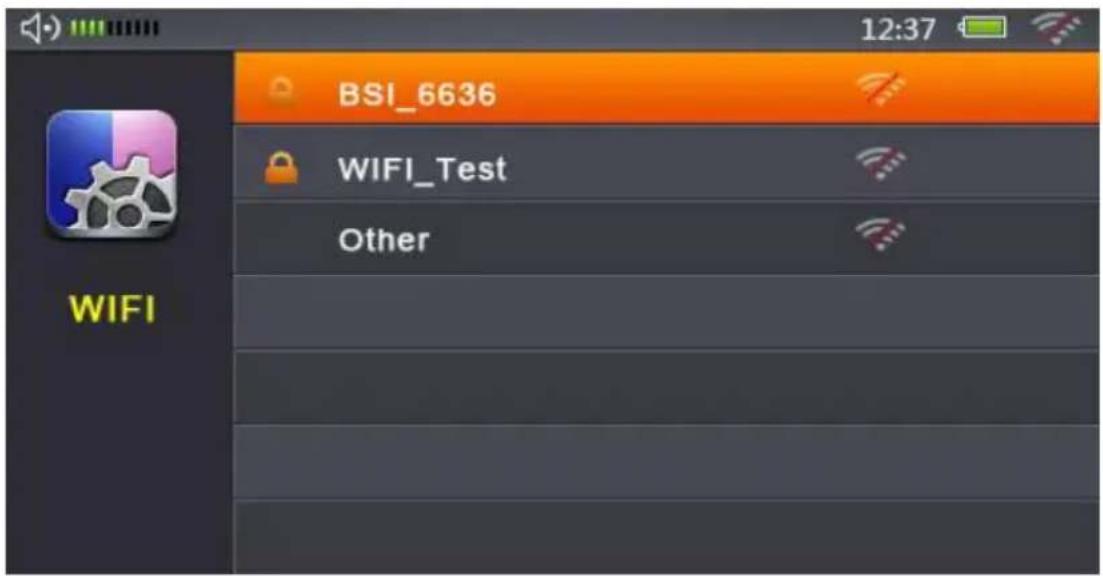
2: There are two types of network:
- Encrypted network: Shows a "lock" icon and a password is required for accessing the network.
- Unencrypted network: There is no "lock" icon and a password is not required for connecting.
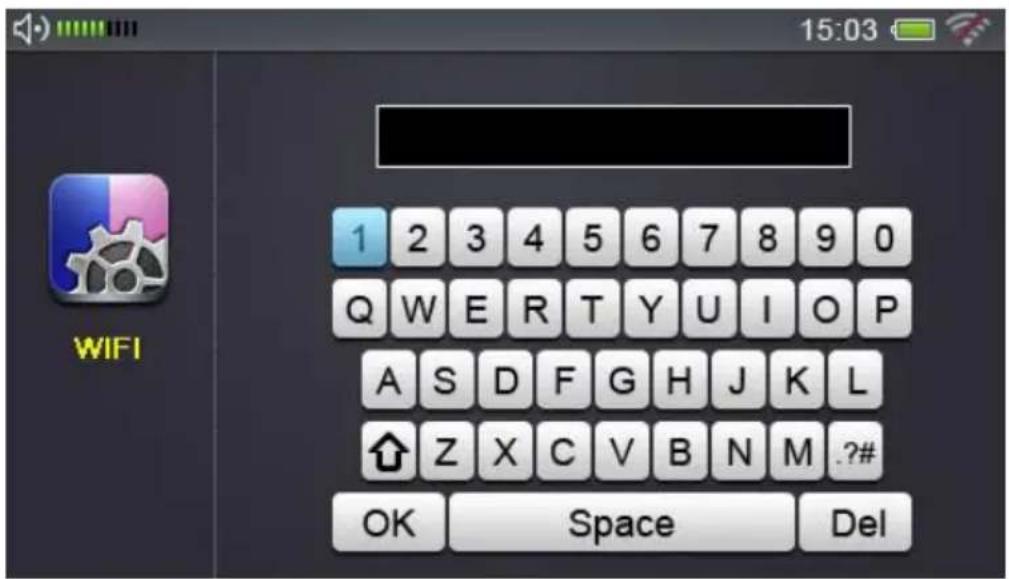
Use the remote control to select a particular network and press ENTER to connect. The radio will automatically start to connect if an unencrypted network is selected. If a WPA/WPA2 encrypted network is selected, you will be brought to another screen to enter the password (assigned by the administrator of the network). If a WEP encrypted network you will be asked if your network is using Open System or the Shared Key Authentication before you have to enter the password. Normally Open System is used. Press UP/DOWN/LEFT/RIGHT, and ENTER on the remote control or the main unit to enter the password. To confirm the password and connect to the network please select OK.
If the radio is successfully connected to the selected network, a notification will show "Wi-Fi Connected Successfully"; otherwise "Wi-Fi password Invalid" will appear. Please re-enter the correct password. If "Wi-Fi Connection time out" shows up, please try again to connect.
Remark: This item supports 3 protocols: Static IP, DHCP and PPOE. DHCP is the default protocol to be used by the system automatically. Please check the network setting and review which protocol is being set – you will need to manually connect the unit to the network if Static IP or PPOE is in use.
When your product is connected to internet and there is a newer Firmware available, the DR 870 HD-TV will detect it automatically and show up this message on screen as a reminder: A new version of firmware is available. Would you like to update it now? Yes (Enter) or No (Exit). If you click ENTER, the product will start to download and upgrade automatically.
5.3 Internet TV
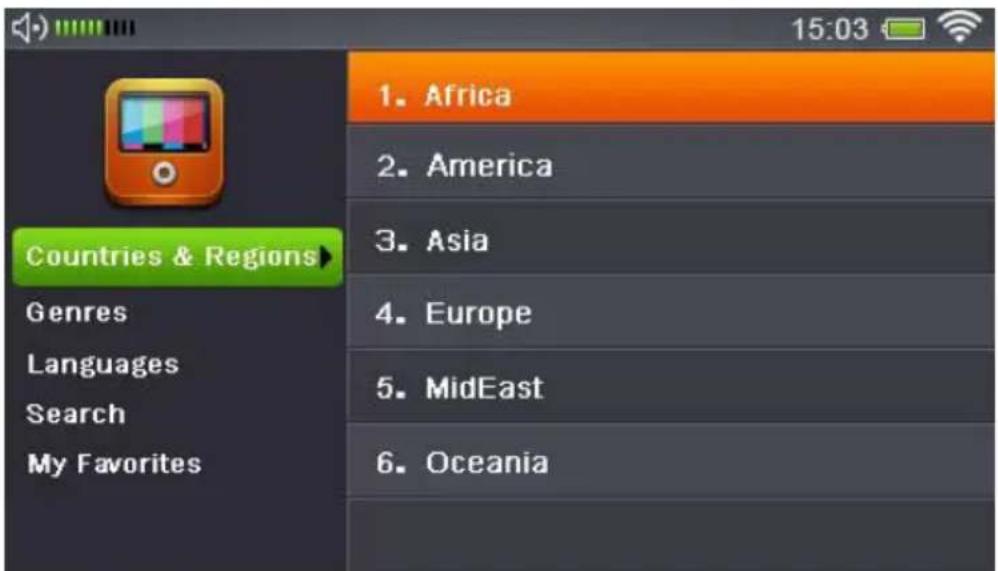
When you select the Internet TV menu, the DR 870 HD-TV connects to the Internet portal and provides a list of TV channels, organized into different categories such as Region, Genres, and Languages. Press UP/DOWN/LEFT/RIGHT, and ENTER on the remote control or the main unit to choose different categories/channels.
- Countries & Regions: Sort by Countries & Regions
Genres: Sort by Drama, Movie, Music, Sport, Animation... - Languages: Sort by broadcasting languages
Search: Enter keywords to search - My Favourites: Press FAV on the remote control to store a playing station under "My Favourites"
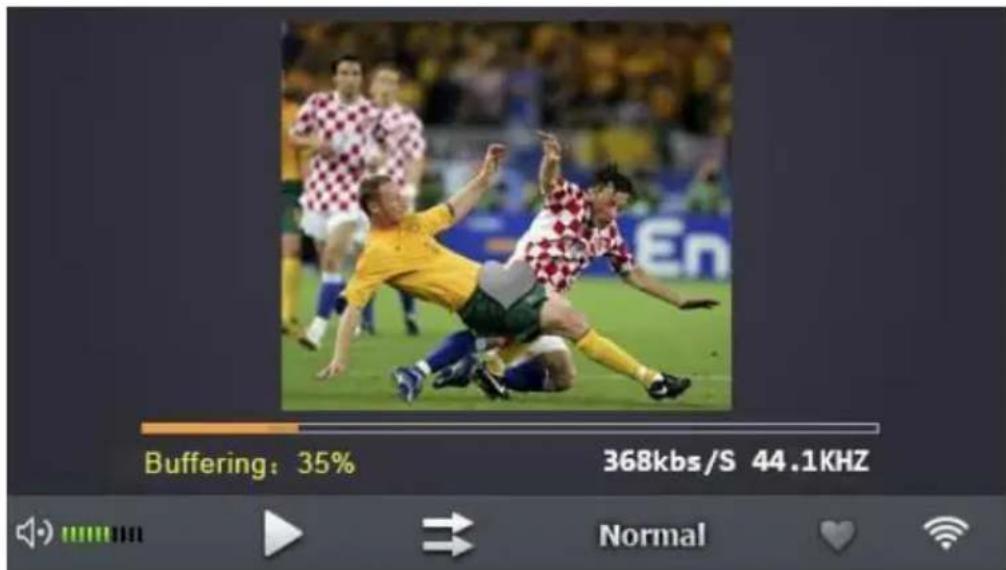
This image shows an Internet TV station being played:
You can switch the program to different screen modes: Full screen, default and 4:3 by
- Pressing ENTER on the main unit
- Pressing ENTER or FULL SCREEN on the remote control Other instructions:
UP/DOWN or VOL+/VOL-: Adjust the volume +/-
LEFT/RIGHT: Go to the next/previous channel
STOP/EXIT: Exit from the current playing channel and go back to Internet TV Menu
5.4 Internet Radio
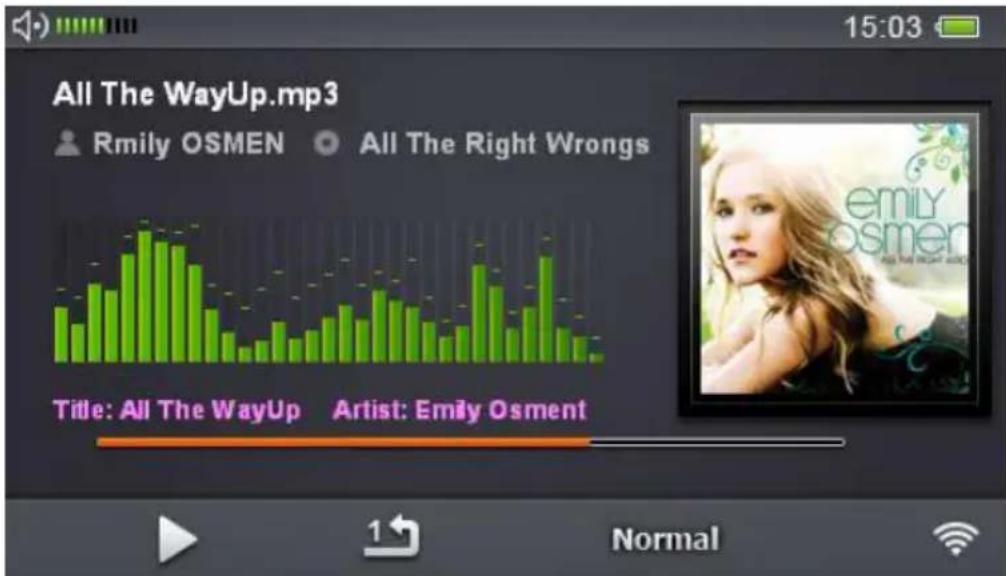
When you select Internet Radio mode, the DR 870 HD-TV connects to the Internet portal and provides a list of Radio stations, organized into different categories such as Location, Genres, and Languages. Press UP/DOWN/LEFT/RIGHT, and ENTER on the remote control or the main unit to choose different stations. The operation works like in the Internet TV mode.
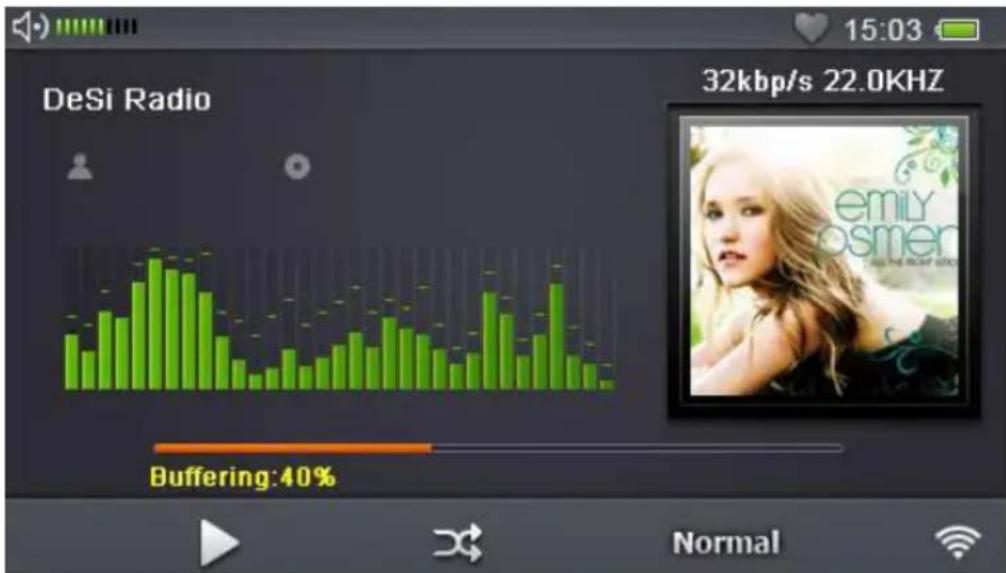
The image shows an Internet Radio station being played:
5.5 Revision3
Revision3 has emerged as a leading online video network that has attracted top internet video talent and partners. They produce and distribute all- original weekly and daily episodic community-driven programs that are enjoyed by a vast and passionate fan base. The shows are offered in 100 % HD, and run from under a minute to over an hour. DR 870 HD- TV brings all of this great content right to you with the official Revision3 app.
5.6 Inmoo
Gain access to original content from 100 countries in more than 60 languages. This includes thousands of films ranging from comedy and drama to documentaries. Inmoo is reshaping the way independent movies are being distributed, and now you can take part simply by watching it happen right on your DR 870 HD-TV.
5.7 Blubrry
The Blubrry app on DR 870 HD-TV enables access to a large assortment of video and audio podcasts from creative individuals.
Access thousands of popular podcasts that are easy to navigate and feature content based on topics like business, art, culture, education, comedy, sports, gaming, and more.
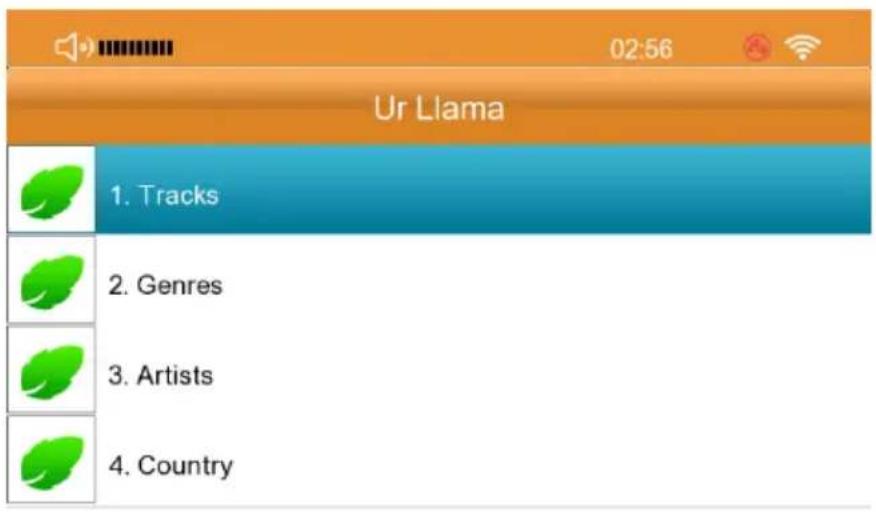
5.8 UrLlama
The UrLlama app on DR 870 HD-TV lets you find high quality live music streams based on genres, artists, and countries of origin. This app allows the listener to immediately receive intelligent recommendations for new audio tracks. Some popular genres include 80's, Alternative, Dance, Electronica, Rock, Pop, and many more. Some artists you can search for are The Beatles, Michael Jackson, Elvis Presley, Madonna, U2, and other big names. You can also search for streams from over 50 countries.
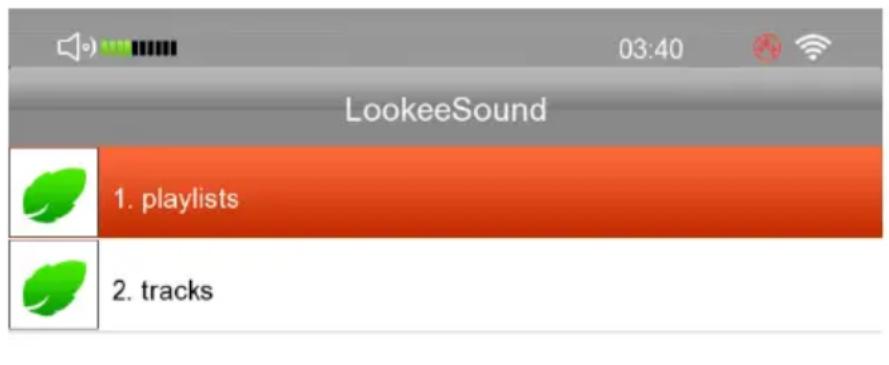
5.9 LookeSound
Powered by the renowned SoundCloud audio distribution platform, LookeSound allows you free access to original music from established and up-and-coming artists from all over the world. Collaborate, record, upload, promote and share the sounds you create with the world's largest community of sound creators on the planet.
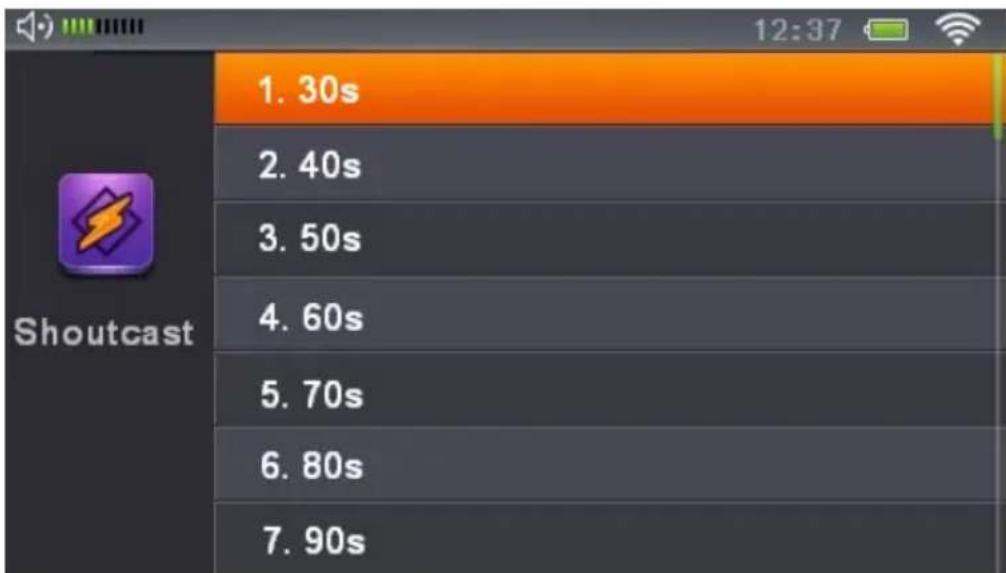
5.10 SHOUTcast Internet Radio Program
The SHOUTcast Internet Radio Program offers thousands of Internet Radio Stations through the internet. The programs and playing lists are continuously updated and refreshed. Press UP/DOWN/LEFT/RIGHT, and ENTER on the remote control or the main unit to choose different stations.
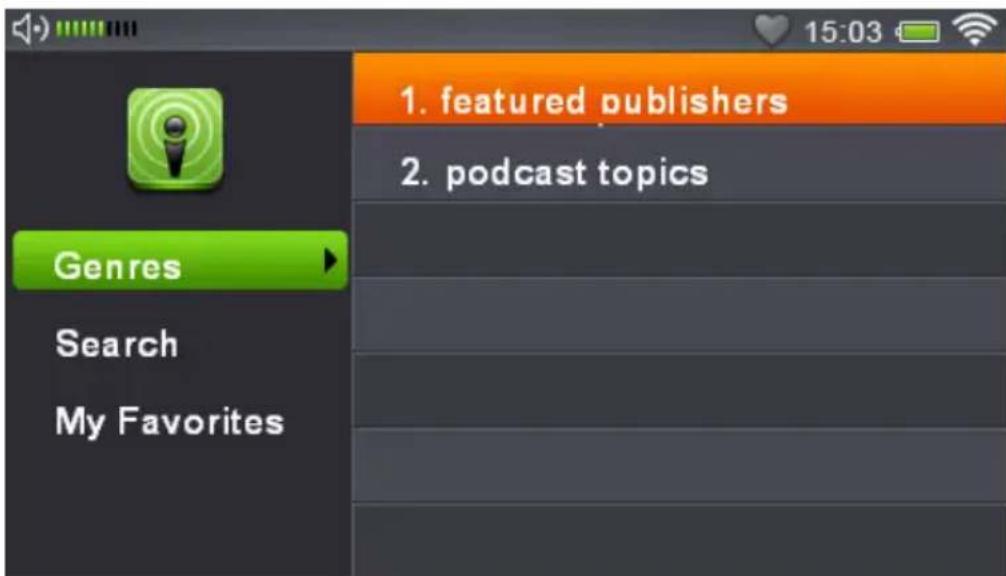
5.11 Podcast
Podcasts are audio programs such as series which are mostly updated regularly with new episodes. You can listen to the programs stored by the publishers and sort by Genres, Search and add to my favourites. Press UP/DOWN/LEFT/RIGHT, and ENTER on the remote control or the main unit to choose different stations. Please refer to Internet TV mode instruction.
5.12 Media Player
1) Playing Video/Music/Picture Files from Local Disk (Built-in Memory)
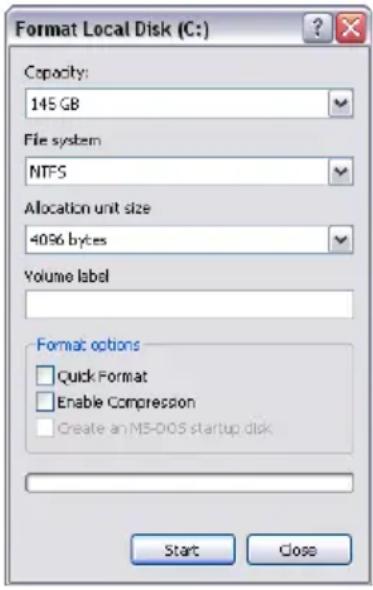
This unit comes with a built-in memory. You can exchange the data between this unit and other sources via USB cable. If you are using it for the first time, please format the disk by the following procedures:
- Connect the main unit and PC via USB cable.
-
Turn on the DR 870 HD-TV and it will be recognized by the PC. Double click on pop up window will ask you if you want to ONLY for the first time of use)
-
Press YES to format the disk and a window as shown on the left will pop up:
Capacity: Currently Available built-in memory
File System: FAT32 (Recommended), FAT, exFAT
Allocation Unit Size: Choose "Default allocation unit"
Volume Label: Use to label the drive (optional)
Quick Format: Recommend to use
Press Start to format. This will take a bit of time.
Once it's completed, a pop up window will indicate "Format complete". Then DR 870 HD-TV is ready for the data transfer between the PC and the device. You can now copy files from your harddisk to the DR 870 HD-TV. These files can be played with the Media Player. To start this one please follow the next steps.
- Go to Main Menu > Media Player > Disk (As the figure below)
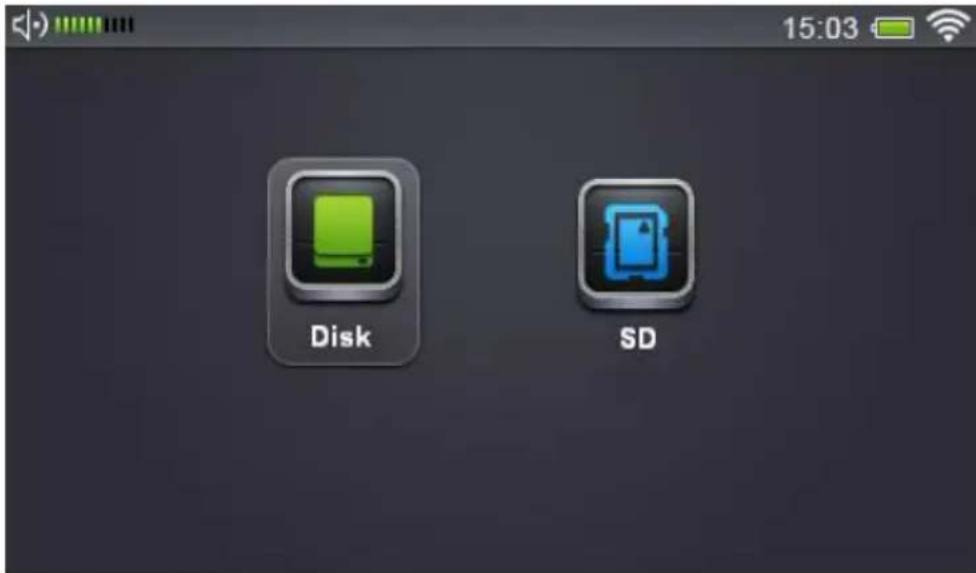
Press ENTER to select Local Disk and then three folders are shown: Video, Music and Picture.
Press UP/DOWN/LEFT/RIGHT on the remote control or the main unit to select the category you want. Here is an example to show the Music playing list.
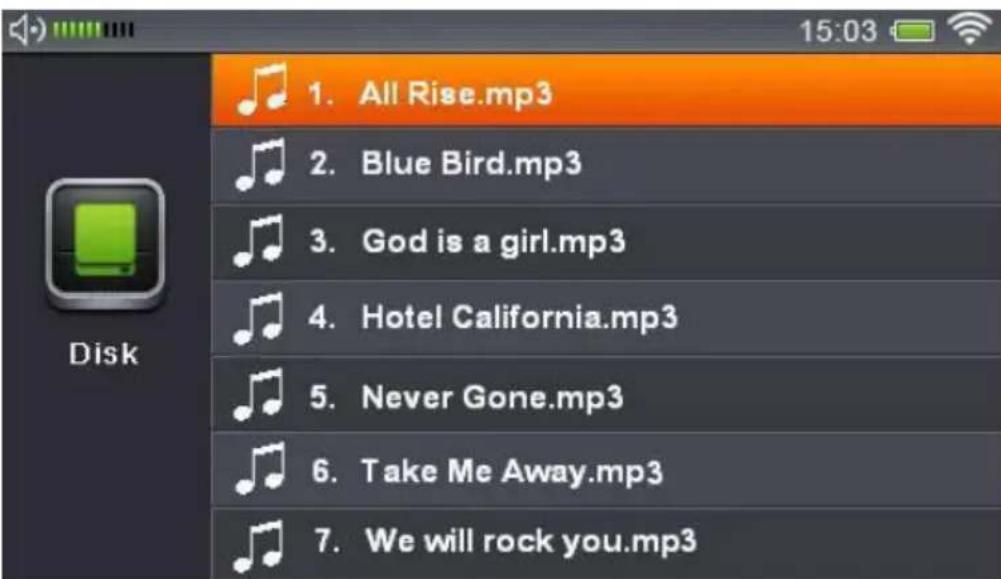
Press UP/DOWN to select the songs and press ENTER to play.
Other instructions:
LEFT/RIGHT: Select the next and previous song, hold for backward/forward.
VOL-/VOL+: Adjust the volume
EXIT: Exit from the current Music playing Mode. Once it's selected, a warning –“Turn Off
Music” pops up. Press YES to exit and stop playing music or NO to exit and leave music on as background music.
STOP: Quit music playing mode including background music.
2) Playing Video/Music/Picture Files from a SD Card
Insert the SD card into the SD card slot at the rear of the main unit.
Go to Main Menu > Media Player > SD Card to play stored Video/Music/Picture files.
5.13 UPnP File Sharing – Play files from your PC
Universal Plug and Play (UPnP) allows you to stream videos, music and pictures from your PC. This is done with an UPnP Server in your local network. There are several possibilities to setup an UPnP server. First of all there are several programs which turn your PC into an UPnP server. Just search the internet for "UPnP Media Server". Another possibility is the usage of a NAS (network attached storage) harddisk, some of them can act as an UPnP server too. But naturally the operation of the programs differs. As an example we will use the Windows Media player. The following steps tell you how to setup your PC to work as an UPnP server with the Windows Media Player.
-
Open the Windows Media Player and make sure it is update-to-date (Version 11 is recommended).
-
Click "Library" on the top menu, and choose "Media Sharing".
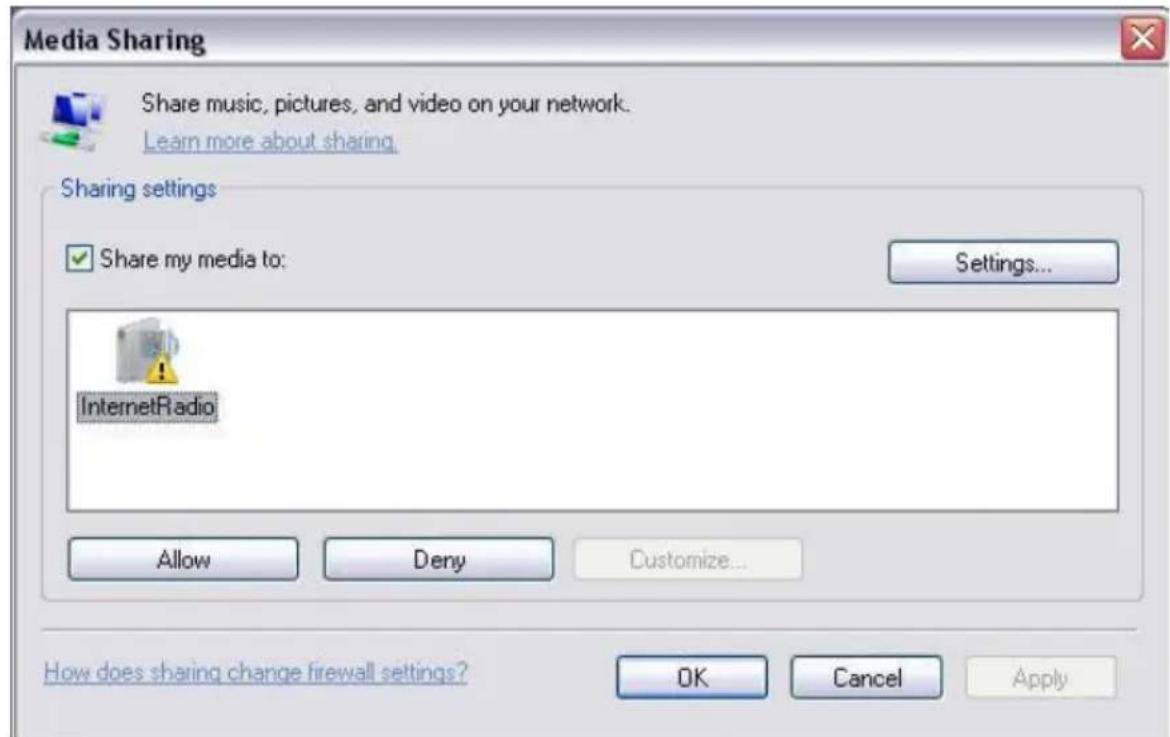
- Select the "InternetRadio" icon and click the "Allow" button to activate the sharing function. Press "OK" to confirm the settings.
- Go to Library > Add to Library and then Select "My folders and those of others that I can access". Click "Advanced Options" to choose the sharing folders.
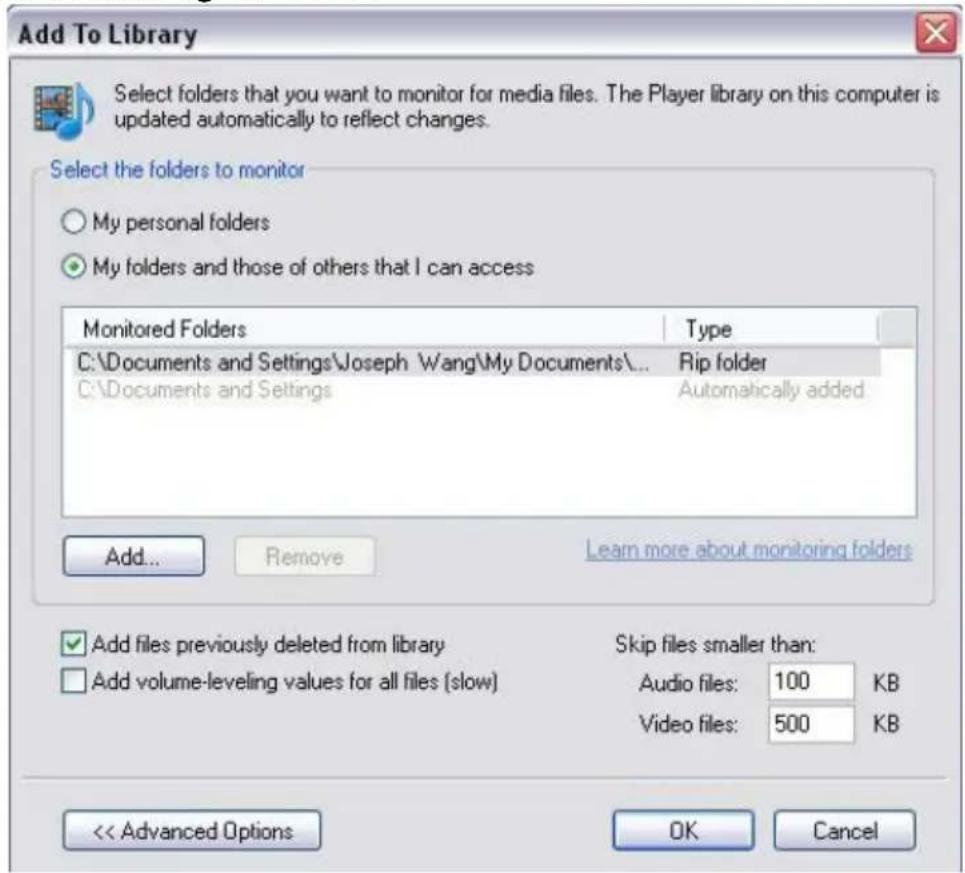
- Click "OK" to confirm and the selected files/documents are added to the library.
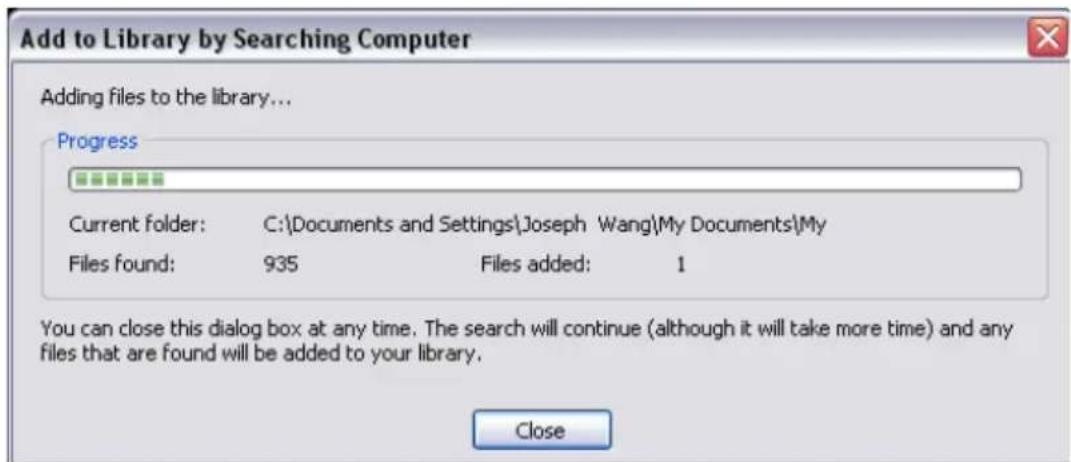
-
Click "Close" when the adding process is complete.
-
Switch on the DR 870 HD-TV and select UPnP and press ENTER to search all available UPnP devices. Press UP/DOWN on the remote control or the main unit to select the UPnP device on the list and press ENTER.
-
Once you're in UPnP mode, all sharing files are organized in different categories such as music, video, picture etc. Press UP/DOWN on the remote control to select and play videos/music/pictures.

Remark: For best performance, please try to stream smaller size videos in lower resolution.
5.14 Line-In
This feature allows you to hear all songs from any MP3-Player which is connected to the Line-In of the DR 870 HD-TV. All you have to do is to connect the MP3-Player with an audio connection cable with 3.5mm plug on each end to the Line-In Socket of the DR 870 HD-TV. Then select "Line-In" from the main menu. Now you will hear all songs played on the MP3-Player over the speaker of the DR 870 HD-TV.
5.15 Photo Viewer
You have two options to use the Photo Viewer function:
- Go to "Photos" in the main menu, Press ENTER, then you will have to choose between "Disk"(built-in memory) or "SD"(inserted SD Card), after that select with ENTER the pictures you want to browse.
- Go to "Media Player" in the main menu and then choose the media with your pictures, "Disk" (built-in memory) or "SD" (inserted SD Card), in the following menu you have to select "Picture" to browse the pictures stored.
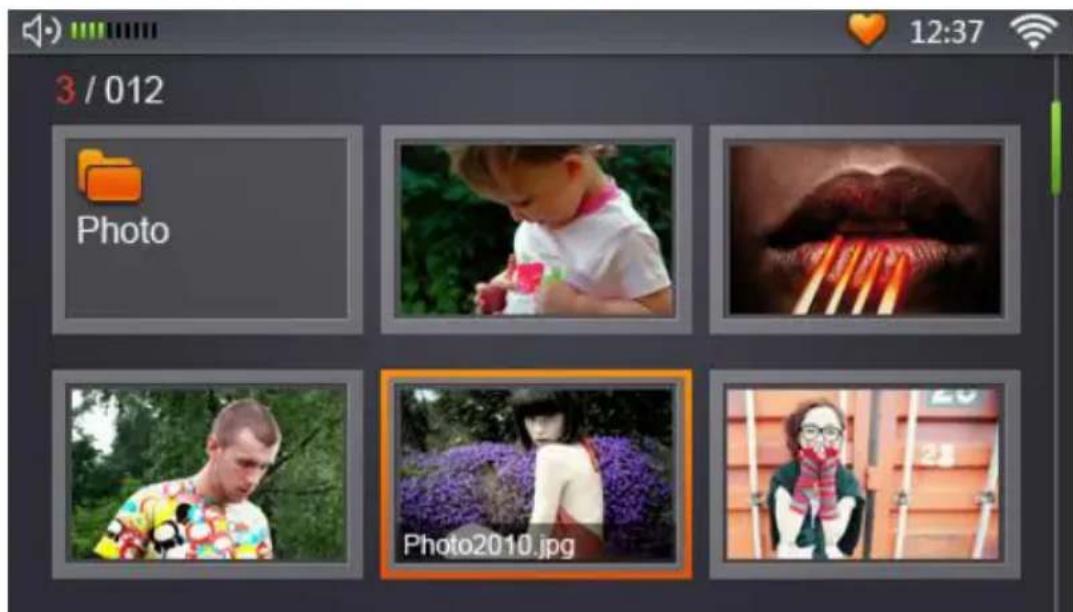
- Press UP/DOWN/LEFT/RIGHT on the remote control or the main unit to select the folder or files to browse, and press ENTER. If you want to enjoy a picture slideshow with background music: please go to Media Player, Internet Radio or FM Radio to choose the music you like and exit with music on, and then come here to choose the option slideshow.


Remark: For better performance, please try to avoid displaying large sized pictures.
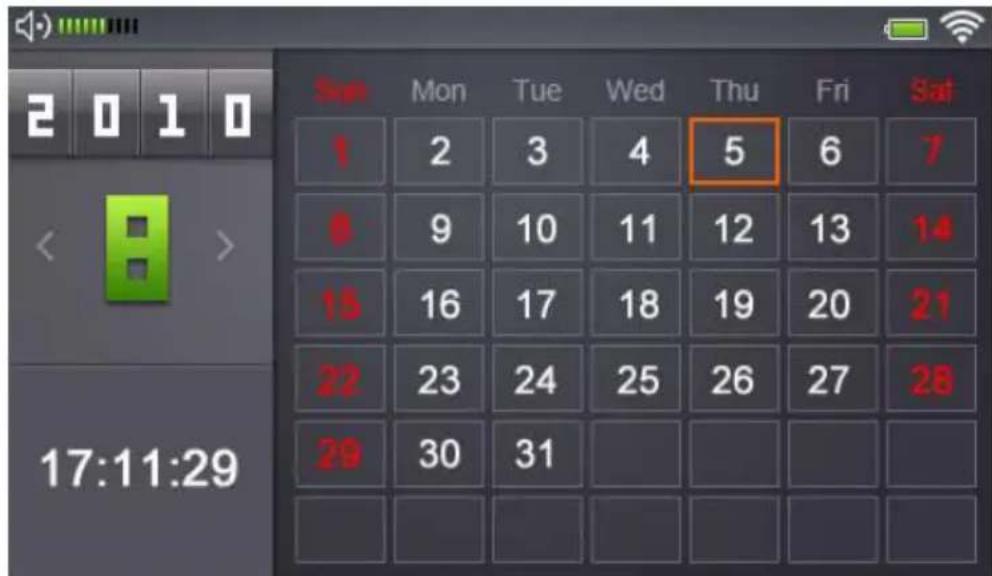
5.16 Setting Time, Date, Calendar and Alarm
Before you set the Time and Date, please go to the "Settings" menu to choose and confirm your Time Zone first. And then go to the "Date & Time" menu in "Settings" or "Clock" in the main menu, and press ENTER.
- Clock Display: Shows the current date, time and week.
Calendar: Full Calendar display - Alarm: Two different Alarms are available.
- Clock Setting: Allows you to set the time manually.

This image shows the calendar.
This image shows the alarm menu.
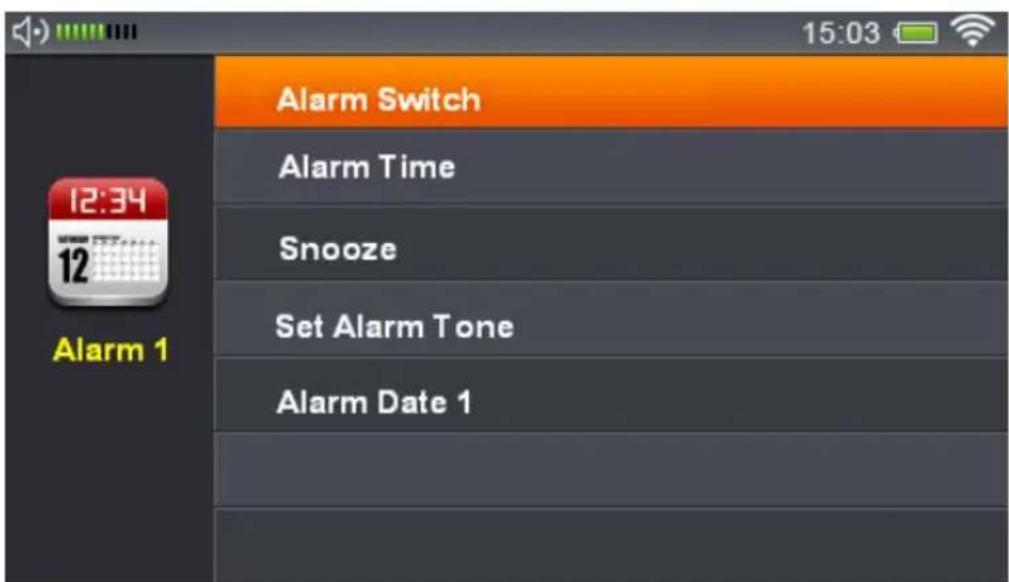
Alarm On/Off: Turn the alarm on/off.
Alarm Time: Press UP/Down/Left/Right on the remote control or the main unit to set the alarm. Confirm the time by pressing Enter. Snooze: Snooze time options: 5, 10 and 20 minutes. The system will automatically switch to Time & Date screen saving when no command is given in the period of time set by the user. You can disable the alarm by pressing the Menu button on either the remote control or the main unit. Every other button will disable the alarm temporarily but leave the device in Snooze mode.
Set Alarm Tone: Particular alarm tone can be set from: Default Ring, radio, Music from local built-in memory and SD card.
Alarm Date: Alarm set to be in effective in 4 options: once, daily, working day (Monday - Friday or Monday - Saturday).
5.17 FM Radio Setup
- Connect the FM antenna to the YPbPr jack at the rear side of the main unit.
- Go to the Settings menu > FM setting > Region Setting and select from the available regions: Japanese FM Band or FM
Broadcast Band.
-
Auto Scan: Go to Setting menu > FM setting > Auto Scan. Press ENTER on the remote control or the main unit, and a message on the LCD will remind you to connect the FM antenna. After that press ENTER again to search for FM stations. After Searching, a list with available FM Stations will show up. You can test listening on every station here. If you want to delete one station here, just highlight it and press DEL on the Remote Control, or press and hold ENTER on the main unit, then a message will appear on the screen: Confirm the deletion by ENTER or Cancel by EXIT. If you want to select a radio station which starts up when you play FM radio, you have to highlight one station and then press the ENTER key on the main unit or the remote control to set it up.
-
Listen to FM stations: Select "FM" in the main menu to play FM stations your unit found during the last Auto Scan.
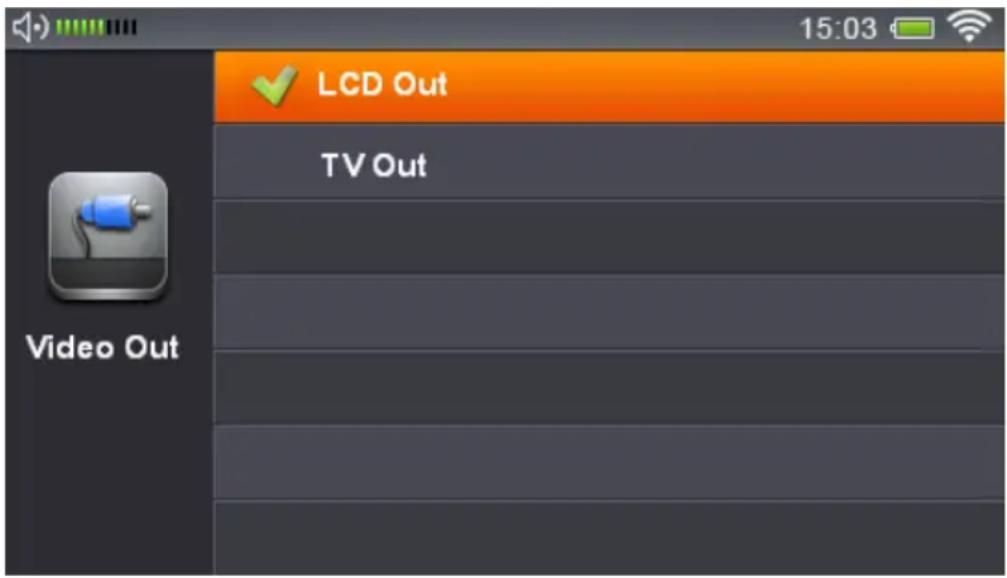
5.18 TV / LCD Output
This product supports two types of video and audio output:
- LCD output from the main unit: 7" TFT high resolution 800 x 480 pixels, 16:9 LCD
- TV output: Signal received from the main unit will be output to TV via CVBS or HDMI with a resolution of up to 1280 × 720 .
Before switching TV output, follow the steps below to connect the main unit and TV:
-
Connect the 3.5mm plug of the CVBS cable (included in the package) to the CVBS socket at the main unit, and connect the other plugs (Yellow plug for composite video, Red and White for audio) to the AV jacks of a TV.
-
Turn on the TV and switch to the AV channel or another particular channel depending on the TV model.
- Make sure the main unit is powered on.
Two ways to initiate the TV output after the connection is complete:
- Go to "TV OUT" menu and select TV Out. After that you have to select if you want to use CVBS or YPbPr. And at last you have to select between PAL and NTSC. If you are using the TV in Europe then your TV is most likely supporting PAL. When you have activated the TV-Out the display on the DR-800 will shut down and you will see the display on your TV.
- On the second time you want to enable the TV-Out you can repeat the procedure from step 1 or you just press the LCD/TV button on the remote control.
Now you can enjoy the video, audio and picture files from the main unit projected on your TV screen!
6 Other Settings
Select "Settings" menu and choose the following options.
6.1 Language:
Press UP/DOWN on the remote control to choose the language, and press ENTER to save the changes. The change will take effect immediately after going back to the Main Menu or other interfaces.
6.2 Network Setup:
(Also see section 4.2)
6.2.1 Wi-Fi Setup:
You will see the three options here: A. Auto Search: Auto Search for Wi-Fi connections available. B. Manual: Here you can enter the settings for a network manually. C. Saved Networks: Check and Manage all saved networks you used before. The DR 870 HD-TV will automatically connect to one of those networks as soon as they are available.
6.2.2 Network Type:
Information contains IP address, Mask, Route and DNS to determine if the system is Wi-Fi connected.
6.3 Alarm:
Please refer to the information provided in section 4.10
6.4 Key Tone Setting:
Tone On - turns the tones on, and then you can select out of 5
Key tones; Tone Off - Turns the tones off.
6.5 Slideshow Setting:
Change the display periods for each image of the slideshow mode to 5, 10, 15 or 30 seconds.
6.6 FM Setting:
6.6.1 Region Setting:
Choose your FM Region.
6.6.2 Auto Scan:
Search FM stations automatically. Please refer to 5.12 FM setup for more info.
6.7 Screenshotaver Time:
Switch to Clock Display Mode automatically if no command given within a period of time set by the user. The system will return to the previous interface after you press EXIT or return to the main menu by clicking MENU.
6.8 Time Zone:
Choose and confirm your time zone first before Set Date & Time.
6.9 Date & Time:
Press UP/DOWN to adjust the time and date. Press LEFT/RIGHT to change setting, and press ENTER to save the change. (Time Format: 12/24 hours)
6.10 Firmware Update:
Please check Firmware Update from time to time to improve your product with more functionality and stability.
Update methods:
Online - System will check online, download and install the latest firmware automatically
Local Disk - Update the firmware manually from the local disk or SD card.
The DR-800 also has an auto check function which will show up a message when you turn on the unit and an update is available.
Please refer to 4.2.
6.11 Auto Power-Off:
The unit will shut down automatically if no command given within a period of time set by the user. To disable the Auto Power-Off function select Manual Power-Off, this is the default too.
6.12 Restore Default Factory Setting:
Restores the system to the manufacturer's default settings.
6.13 About:
Firmware version, Model number and Wi-Fi Mac address.
7 Troubleshooting Guide
7.1 TV-Out: No Screen Display
- Check the connections between the main unit and TV.
- Check if the Main Unit is powered on.
- Check if the TV is tuned to AV channel.
7.2 TV-Out: No Sound
- Check if the audio plugs and jacks are connected properly and correctly.
- Check if one of the devices is in Mute mode.
7.3 TV-Out: Black and White Screen
- Unplug and re-plug all cables properly.
- Check the settings of the TV connected to the Main Unit.
7.4 Remote control is not working
- Use the remote control within the effective range (6 meters).
7.5 Cannot connect to Wi-Fi Network
- Check if the Wi-Fi connection is available.
- Check if the settings for this network are correct, especially the password. Please refer to 4.2 instructions for connecting to a network.
- Restart the Main Unit
8 User Safety Guide
- Place the device on a plain surface away from sources of direct sunlight, heat, or water to prevent fire or shock hazard.
- Place the device in a clean and dry condition.
- Store the cables and accessories in a safe place. Avoid walking on or pulling the cables.
- Use only the accessories provided by the manufacturer.
- It is normal that top and rear of the main unit will be warm after use for a while.
- Place a cloth or other protective material between it and the furniture if necessary.
- Do not attempt to disassemble or repair the unit. Please refer all servicing to qualified service personnel.
- Unplug the appliance when unused for long period of time or during thunderstorm and lighting.
9 Specifications
LCD: 7" TFT 800 x 480 pixels, high resolution 16:9 display
AV Out: CVBS and HDMI
Audio Output: 2 x 2W HiFi Speaker
I/O ports:
- USB connector and Power jack
- Stereo Earphone jack
Line-in 3.5mm jack
CVBS AV jack
HDMI AV jack - SD card slot
- Ethernet Jack
Wi-Fi:
- WLAN security: Support WPA, WPA2, WEP
Wi-Fi search: Auto Search; Manual Search - IEEE 802.11 b/g
Dimensions (W x H x D): 258 x 125 x 56mm
10 Warranty and Recycling Information
We are legally obliged to include disposal and warranty information as well as EU declaration of conformity with the use instructions in different countries for every unit. Please find this information on the following pages.
10.1 2-Year Warranty From Date Of Purchase
The manufacturer/retailer guarantees this product for two years from date of purchase. This warranty includes all malfunctions caused by defective components or incorrect functions within the warranty period excluding wear and tear, such as exhausted batteries, scratches on the display, defective casing, broken antenna and defects due to external effects such as corrosion, over voltage through improper external power supply or the use of unsuitable accessories. Defects due to unintended use are also excluded from the warranty.
Please contact your local dealer for warranty claims. The dealer will repair or exchange the product or forward it to an authorized service center.
You can also contact our service partner directly. Please include your proof of purchase with the product and describe the malfunction as clearly as possible.
10.2 WEEE and Recycling

The European laws do not allow any more the disposal of old or defective electric or electronic devices with the household waste. Return your product to a municipal collection point for recycling to dispose of it. This system
is financed by the industry and ensures environmentally responsible disposal and the recycling of valuable raw materials.
10.3 Service Address and Technical Hotline (for units sold in Germany)
PST professional support technologies GmbH Breitscheider Weg 117a D - 40885 Ratingen
Contact our service hotline by phone 01805-012204 (14 cent/minute from German fixed network) or e-mail at alan-service@ps-tech.de.
Before returning the product, check the chapter "Troubleshooting" for some easy steps and tests or contact our hotline.

ALBRECHT
DR 870 HD-TV
PST professional support technologies GmbH Breitscheider Weg 117a 40885 Ratingen