
SPD3600CC - CD Player PHILIPS - Free user manual and instructions
Find the device manual for free SPD3600CC PHILIPS in PDF.

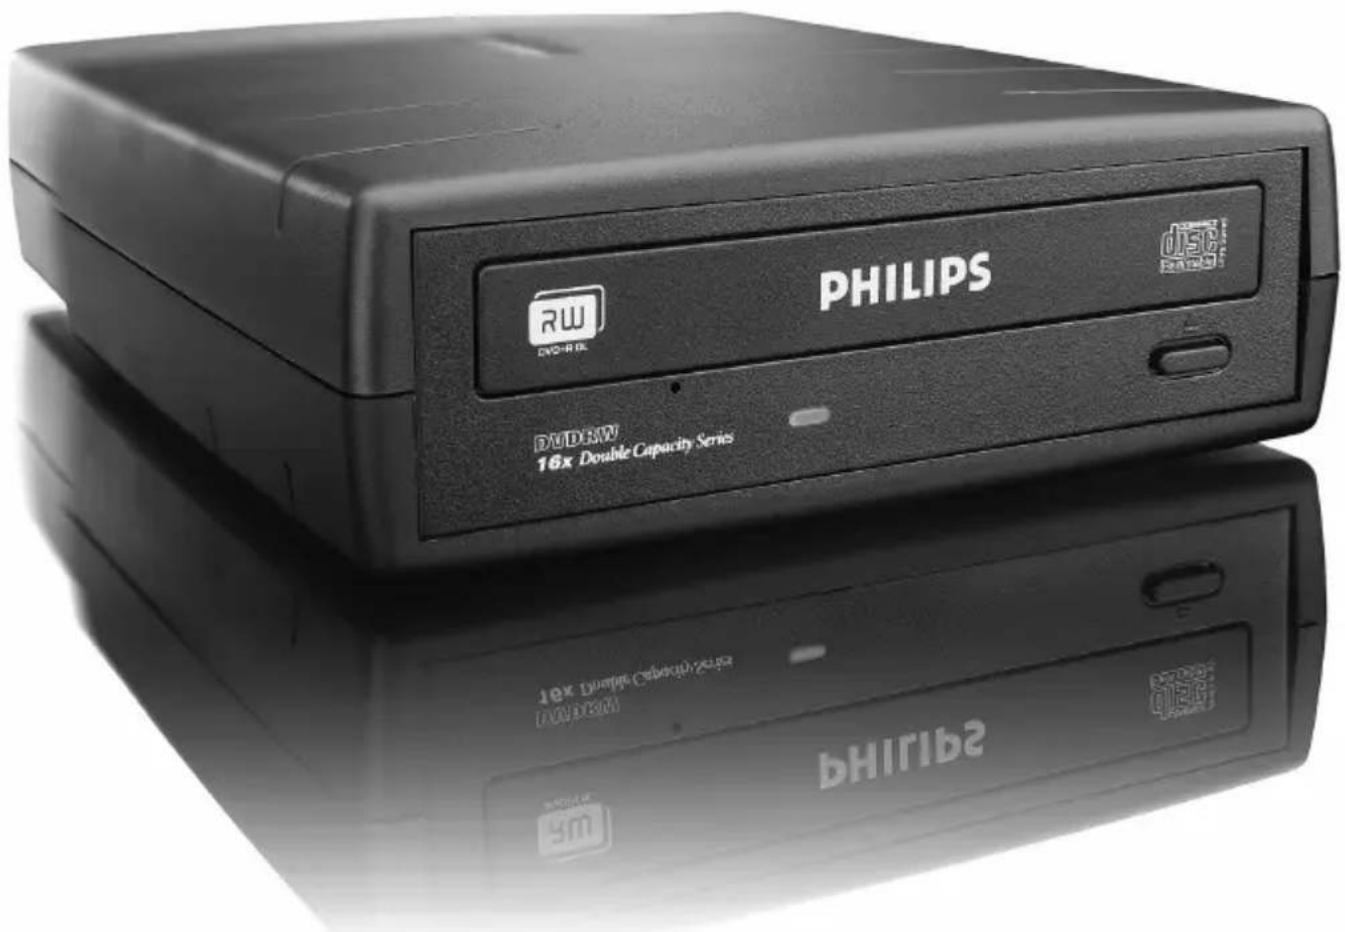
| Product Type | External DVD burner (CD/DVD reader/writer) |
| Brand | Philips |
| Model | SPD3600CC |
| Connectivity | USB 2.0 high-speed (upstream USB port) |
| Power supply | External (power adapter included) |
| Supported disc formats | CD-R, CD-RW, DVD±R, DVD±RW, DVD+R DL (typical) |
| Burning speeds | Up to 16x for CD-R, 8x for DVD±R (estimated) |
| Dimensions (approx.) | 14 x 14 x 2 cm |
| Weight (approx.) | 300 g |
| Included software | Nero StartSmart (burning suite) |
| Compatible operating systems | Windows 98SE, ME, 2000, XP (mentioned in the manual) |
| Main functions | Burning and reading CD/DVD, creating audio, video (DVD video) and data discs |
| Disc maintenance | Clean with a soft cloth from the center to the edges; avoid solvents |
| Safety precautions | Do not expose to moisture, dust, heat; flat and stable surface; ventilation space of at least 2.5 cm |
Frequently Asked Questions - SPD3600CC PHILIPS
User questions about SPD3600CC PHILIPS
0 question about this device. Answer the ones you know or ask your own.
Ask a new question about this device
Download the instructions for your CD Player in PDF format for free! Find your manual SPD3600CC - PHILIPS and take your electronic device back in hand. On this page are published all the documents necessary for the use of your device. SPD3600CC by PHILIPS.
USER MANUAL SPD3600CC PHILIPS
How to... for External ReWriters
us Install Guide
D Installationsanleitung
F Guide d'installation
Guida d'installazione
NL Installatiegids
E Guía de instalación
PT Guia de Instalação
TR Kurulum Kilavuzu
PL Instrukcja montażu
sv Installationsguide
US
Contents
How to connect the External ReWriter to my computer? 5
How to disconnect the External ReWriter without shutting down the computer? 15
How to capture video from a digital DV-camcorder? 17
How to make a video disc from video files which are on the hard disk or a disc? 21
How to copy a disc? 27
How to make a Data disc? 31
How to make an Audio disc? 37
Warranty, Environment, Safety and Frequently Asked Questions (FAQ) 42
D
Inhalt
How to connect the External ReWriter to my computer?
The next pages show how to connect your new External ReWriter to a computer.
Since there are many brands and types of computers available, the next photographs show only examples on how your External ReWriter could be installed.
For specific information on your computer, please refer to your computer manual or contact your local dealer.
1
The image is too blurry to recognize any text content.
natural_image
Three electronic devices labeled A, B, and C: a black device with ports, two connected cables, and a power adapter (no visible text or symbols on the devices themselves)US You will find an External ReWriter device and following cables in the retail box:
A: External rewriter device.
B: Power supply (2 parts).
C: HiSpeed USB Cable.
US At the back side, you will find the plugs you need for connecting your External ReWriter to your computer.
A: Power.
B: HiSpeed USB.
C: Audio connector.
US Connect the power cables together and connect them to the External ReWriter and a power outlet.
natural_image
Hand inserting a USB into a Philips 3.0C device (no text or symbols visible on device body)4
US Plug the USB cable in the External ReWriter. Do not connect the cable to the computer at this moment.
natural_image
Hand inserting a USB into a device labeled 'Sd11Hd' (no additional text or symbols visible)
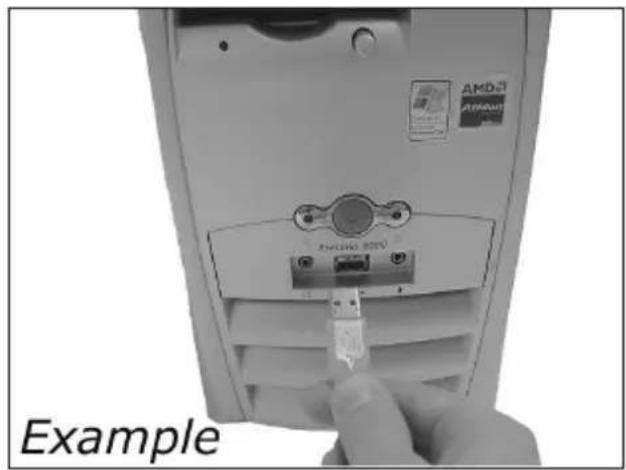
US Search for the HiSpeed USB connector on your PC.
A: Logo for the preferred HiSpeed USB or connector.
B: Logo for the alternative LowSpeed USB connector. When connected to LowSpeed USB (or USB 1.x), speeds are limited (4x writing and 6x reading on CD, 0.7x reading on DVD) and it is not possible to write on DVD or to watch video.
US Identify your Operating System by right clicking on "My Computer" and choosing "Properties". When you are using Windows 98 Second Edition, please go to step 11, otherwise continue with step 7.
natural_image
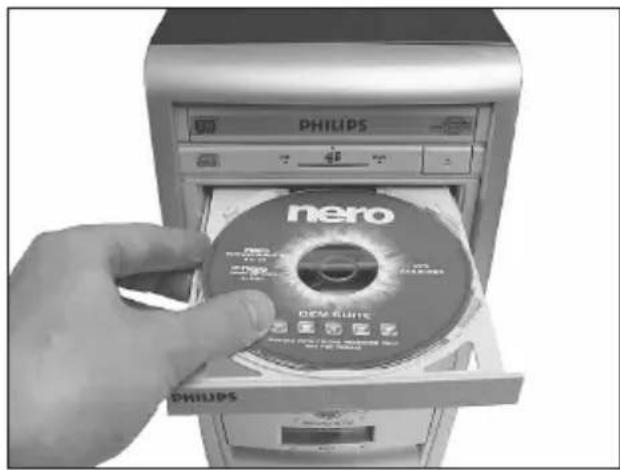
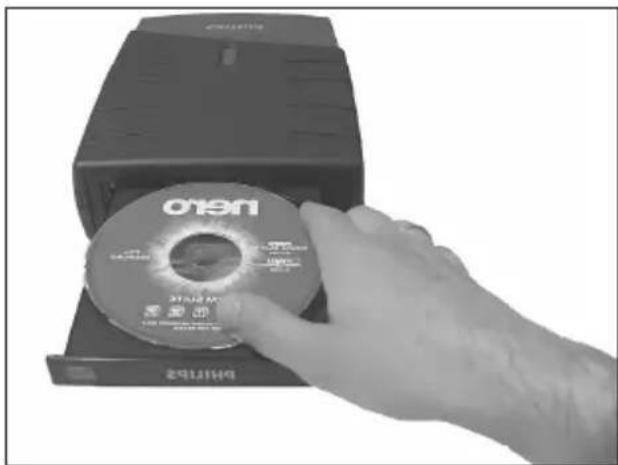
Hand inserting a CD into a Philips flash drive (no visible text or symbols on the device itself)US Insert the Nero Disc in the External ReWriter. Go to step 15!
D Legen Sie die Nero-CD in den Externen Brenner-Laufwerk ein.
Fahren Sie mit Schritt 15 fort!
F Insérez le disque Nero dans le Graveur DVD externe. Passez à l'étape 15.
Inserite il disco di Nero nel Masterizzatore esterno.
Procedete al punto 15!
NL Leg de Nero-CD in de Externe brander. Ga naar stap 15!
13
US Windows 98 Second Edition only! Connect the USB cable to the computer.
D Nur Windows 98 Second Edition!
Schließen Sie das USB-Kabel an den Computer an.
F Windows 98 Deuxième Édition uniquement!
Branchez le câble USB à l'ordinateur.
Solo per Windows 98 Second Edition!
Collegate il cavo USB al computer.
NL Alleen voor Windows 98 Tweede Edition!
Sluit de USB-kabel op de computer aan.

natural_image
Close-up of a computer tower rear panel showing an inserted USB port and a CD-ROM logo, with no visible text or symbols on the device itself.
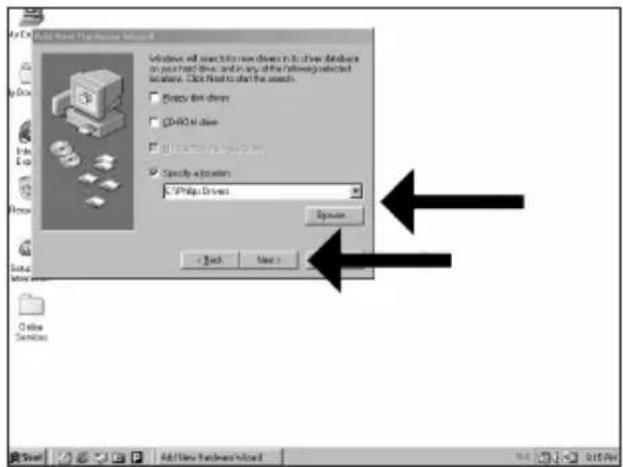
US Windows 98 Second Edition only!
The "Add New Hardware Wizard" will pop up.
Follow these steps:
A. Click "Next" in "The wizard searches for new drivers...":
B. Choose "Search for the best drivers...".
C. Choose "Specify a location".
D. Browse to the directory "Philips drivers" on the Nero disc and click Next.
E. The drivers will be installed.
F. Continue with step 15.
US Click on "Install Suite" to install the main software.
The software will ask to reboot the PC at the end of the installation process.
US Remember the typenumber of your External ReWriter, which is located on the sticker on the bottom of the device.
This model number will allow you to find easily information and updates on the Philips website. Find more info on www.philips.com/storage Find updates on www.philips.com/storageupdates
US After installing the software, you should reboot your computer.
Congratulations. Your Philips device is now ready for use.
How to use it and what software applications you need to perform your tasks, is described in the next chapters of this How To Manual.
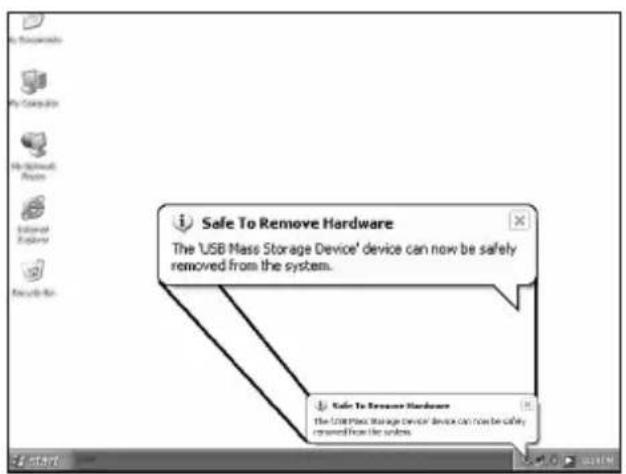
How to disconnect the External ReWriter without shutting down the computer?
The next pages show how to disconnect your new External ReWriter to a computer.
The screenshots are representing the Microsoft Windows XP ^TM operating system.
Other operating systems may show different popups.
1
The image is too blurry to recognize any text content.
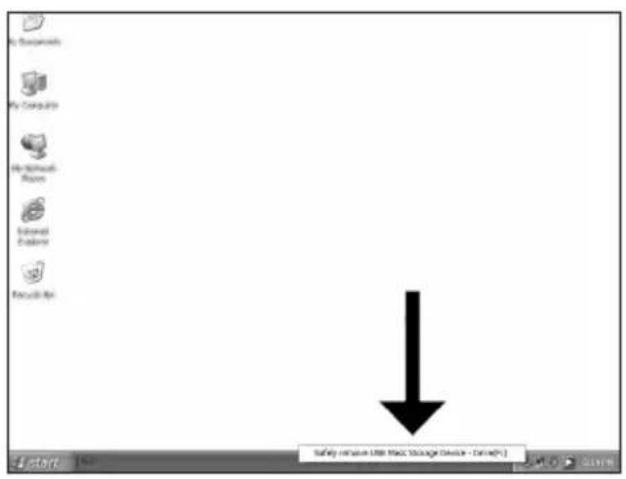
US Click on "Safely remove USB...".
D Klicken Sie auf "USB auf sichere Weise entfernen...".
F Cliquez sur "Safely remove USB" (Retirer un périphérique USB en toute sécurité...).
Fate clic su "Rimozione sicura USB...".
NL Klik op "USB veilig verwijderen...".

US When this popup appears, you may disconnect the External ReWriter.
D Wenn diese Anzeige erscheint, können Sie die Verbindung zum Externen Brenner trennen.
F Lorsque ce message apparaît, vous pouvez déconnecter le Graveur DVD exteme.
1 Quando compare questo messaggio potete scollegare il Masterizzatore esterno.
NL Als dit venster verschijnt, kunt u de Externe brander ontkoppelen.
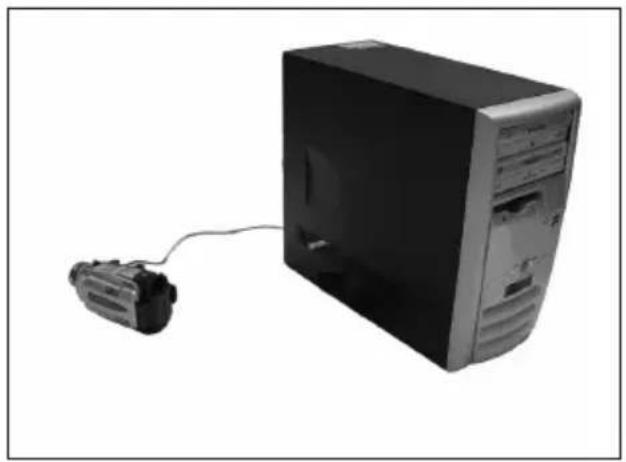
How to capture video from a digital DV-camcorder?
This manual shows an example on how to capture video from a digital DV-camcorder which is connected via FireWire (IEEE1394) to the computer.
The image is too blurry to recognize any text content.
The image is too blurry to recognize any text content.
The application software used here is: Nero Vision Express from Nero AG

US Start "Nero StartSmart" from the desktop.
D Starten Sie "Nero StartSmart" von Ihrer Oberfläche aus.
F Lancez "Nero StartSmart" depuis le bureau.
1 Aprire "Nero StartSmart" dal desktop.
NL Start "Nero StartSmart" vanaf het bureaublad.

natural_image
Black-and-white photo of a desktop computer tower connected to a cable via a cable (no visible text or labels)US Connect your camera to the computer and switch it on.
D Verbinden Sie Ihre Kamera mit dem Computer und schalten Sie sie ein.
F Connectez votre caméra à l'ordinateur et allumez-la.
1 Collegare la camera al computer ed accendere.
NL Sluit uw camera op de computer aan en schakel hem in.

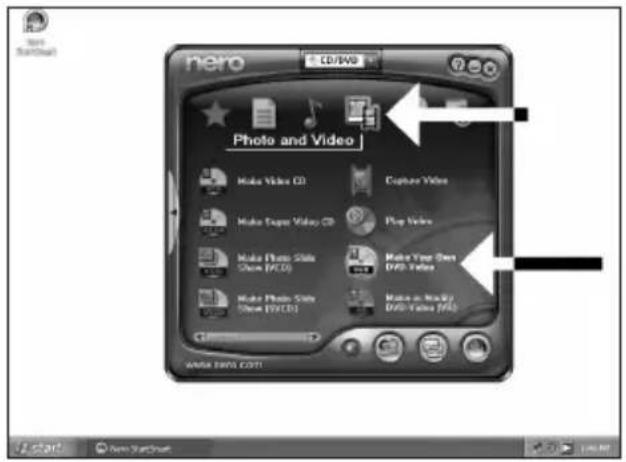
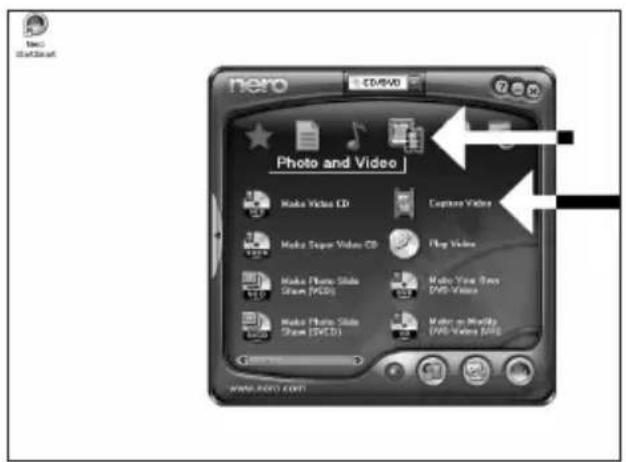
US Choose "Photo and video" and click "Capture video".
D Wählen Sie "Photo und Video" und klicken Sie auf "Video aufnehmen".
F Choisissez "Photo et vidéo" puis cliquez sur "Capturer une vidéo".
1 Selezionare "Foto e video" e fare clic su "Cattura video".
NL Kies "Foto en video" en klik op "Video vastleggen".
4
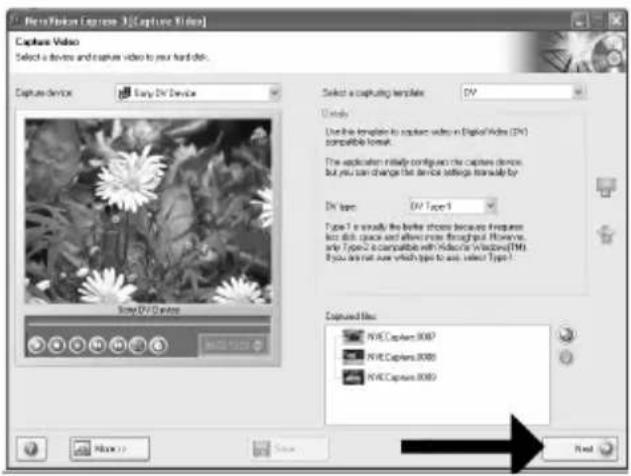
US Choose your DV-Camcorder and use the buttons to control your DV-camera. Press the "Record" button to record video.
D Wählen Sie Ihren DV-Camcorder und benutzen Sie die Tasten, um Ihre DV-Kamera zu steuern. Drücken Sie die Taste "Aufnehmen", um Videoinformationen aufzunehmen.
F Choisissez votre caméscope DV et utilisez les boutons de commande. Appuyez sur le bouton "Enregistrer" pour enregistrer de la vidéo.
1 Selezionate il Camcorder DV ed utilizzate i tasti per controllare la camera-DV. Premere il tasto "Registra" per registrare il video.
NL Selecteer uw DV-Camcorder en gebruik de knoppen om uw DV-camera te bedienen. Druk op de knop "Opnemen" om videobeelden op te nemen.
![NewVision License 3[Capture Video] Capture Video Select a device and capture video in your hard disk. Capture devices Soap DV Device Details Use this description to capture video in Digital Video (DV1) compatible format. The application initially configes the capture device. but you can change the device settings manually by. DV type: DV Type 1 Type 1 is usually the before choose because I computer to a file space and allows have from print. However, only Type 2 is compatible with Video to Windows [TM]. If you can not care which type to save, select Type 1.](/content/2026/02/420347/images/0a9588c997fb19e4f54bc43f83de5ad2664dcd393704eb02f2ee8565f32279b6.jpg)
5
US During capturing, you will see the progress here.
D Während der Aufnahme sehen Sie hier den Fortschritt.
F La progression de l'acquisition est affichée ici.
Durante la cattura qui viene visualizzata la sua progressione.
NL Tijdens het opnemen ziet u hier de voortgang.
![New Vision Capture 3 [Capture Video] Capture Video Select a device and capture Video to your hard disk. Capture devices Copy PDF Document Capture capturing templates: Default Use the image in each video with any other (the Web) or other types. The image is used to use images for creating a new video file. DO type: The Type 1 Type 1 is usually the content class because it requires free data server and how more features are developed. It uses and use Image 2 to compatible with Video by Windows (TM) If you have not sure which type to use, select Type 1. Capture information from captured/slapped ISO](/content/2026/02/420347/images/bc04d23484ab61c07905f7a606d8e663b247a96c41e809162985527ad79ff7b5.jpg)
6
US When all video sequences are captured, click "Next".
D Wenn alle Videosequenzen aufgenommen sind, klicken Sie auf "Weiter".
F Une fois l'acquisition de toutes les séquences vidéo terminée, cliquez sur "Suivant".
Dopo aver catturato tutte le sequenze video, fare clic su "Avanti".
NL Na het opnemen van alle videofragmenten klikt u op "Verder".
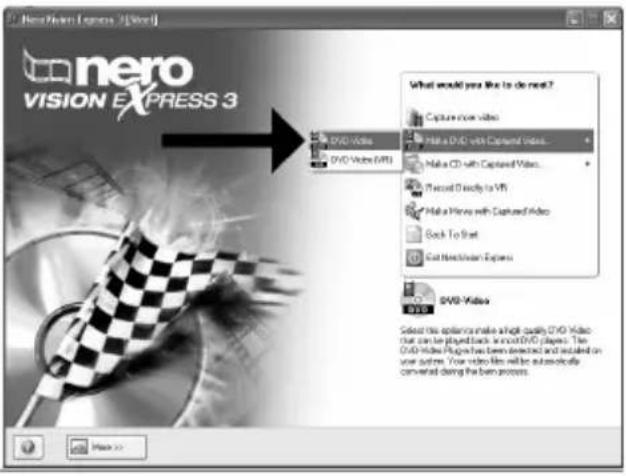
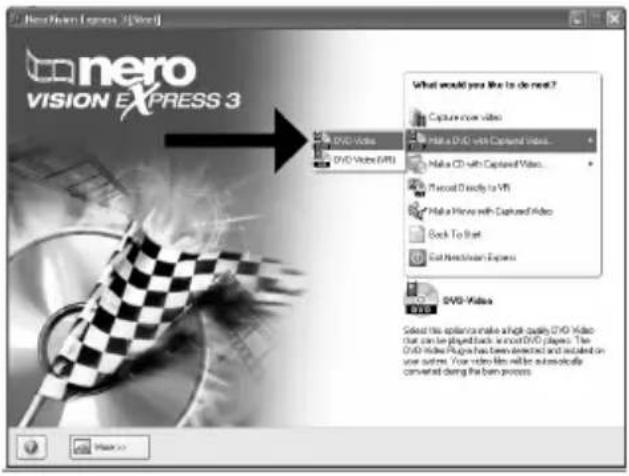
US Choose "Make DVD with captured video" and "DVD-Video".
D Wählen Sie "DVD mit aufgenommenen Videodaten erstellen" und "DVD-Video".
F Choisissez "Créer un DVD avec la vidéo capturée" et "DVD-Vidéo".
Selezionare "Crea DVD con video acquisito" e "DVD-Video".
NL Kies "DVD met vastgelegde video maken" en dan "DVD-Video".
How to make a video disc from video files which are on the hard disk or a disc?
This manual will show you how to make a DVD-Video from source files which are stored on your hard disc or on one or more discs and that can be played in most DVD-players.
A DVD Video is a DVD disc with video files in a special format, which you can play on a DVD Video Player or on a DVD-ROM.
[NO TEXT]
The application software used here is: Nero Vision Express from Nero AG
US Start "Nero StartSmart" from the desktop.
D Starten Sie "Nero StartSmart" von Ihrer Oberfläche aus.
F Lancez "Nero StartSmart" depuis le bureau.
1 Aprire "Nero StartSmart" dal desktop.
NL Start "Nero StartSmart" vanaf het bureaublad.
5
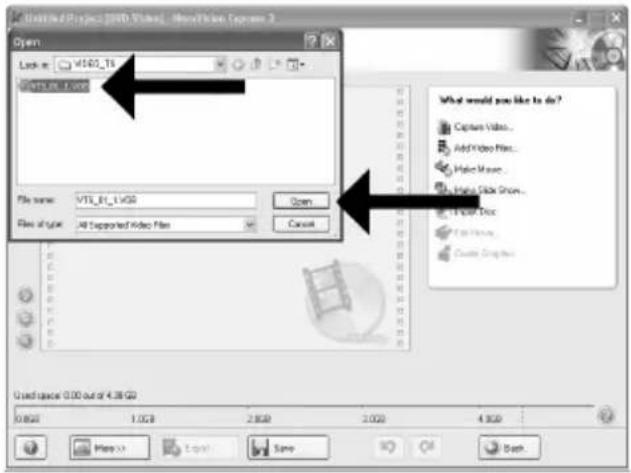
US The movies you loaded are shown here. You can edit them by choosing "Edit Movie".
D Hier werden die geladenen Filme gezeigt. Sie können sie editieren, indem Sie "Film bearbeiten" wählen.
F Les films que vous venez de charger sont répertoriés ici. Vous pouvez les monter en choisissant "Editer le film".
1 Qui sono visualizzati i filmati caricati.
E' possibile modificarli selezionando "Modifica Filmato".
NL Hier ziet u welke bestanden u hebt toegevoegd. U kunt die bewerken door "Film bewerken" te kiezen.
![Untitled Project * [DVD Video] - New Flakes Express 3 Content Create and recognize to your project. 1. VTL_01 8001 Video Title: In 80m X5 Target video option: 70E+576 (CDR/601 01) - 4.3 2. VTL_01 8001 Video Title: In 80m X5 Target video option: 70E+576 (CDR/601 01) - 4.3 3. VTL_01 8001 Video Title: In 80m X5 Target video option: 70E+576 (CDR/601 01) - 4.3 What would you like to do? Capture Video... Add Video Data... Make Movies... Make Slide Stores... Import Data Edit Image... Create Channels... Last you click the highlighted video title User space: $5K out of 4.30 GB 0.000 1.000 2.000 3.000 4.000 More... Next Save Next Such Next](/content/2026/02/420347/images/9535f245636f0566cfd3b0db7a9beb1b0ee466193ee752f6b964666dc2245127.jpg)
6
US In the Edit Movie screen, you can add video effects, text effects and transitions.
D Auf der Anzeige Edit Movie können Sie Video-effekte, Texteffekte und Übergänge hinzufügen.
F L'écran Edit Movie vous permet d'ajouter des effets vidéo et textuels, ainsi que des transitions.
Nello schermo Edit Movie, è possibile aggiungere effetti video, effetti testo e transizioni.
NL In het scherm "Edit Movie" kunt u video- en teksteffecten en overgangen toevoegen.
![File Edit / Project * [2003-Video] - New Vision Express 3 PHILIPS My Media files VTR-DL0005 Import Export Save Next](/content/2026/02/420347/images/17ebef48dea5acae4e1ab44428ef8a61f47a3625ab7695caa848f592a30171c8.jpg)
![Untitled Project * [DVD-Video] - NewWindow Express 3 PHILIPS My Web1.dwg V70_28.0005 File Edit View Help Import Export Save Next](/content/2026/02/420347/images/e9b6d378d05f0f468d4aa9351d02ae842f78115a84f57367fb9f07b170908e70.jpg)
US You can also trim the recorded video. When done, choose "Next".
US After editing all files, choose "Next".
US Enter the title in the "Header" field and click "Edit menu" to change the layout and background of the disc menu.
US You can change the layout, the background, add titles, ... here. When done, choose "Next".
11
US You can preview the finished movie by pressing on the thumbnails. When done, choose "Next".
12
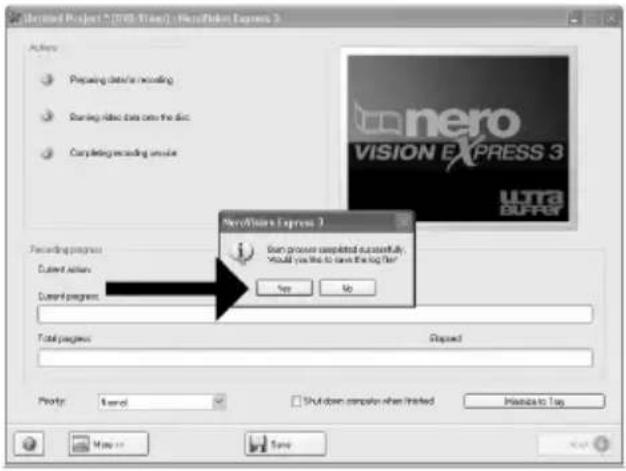
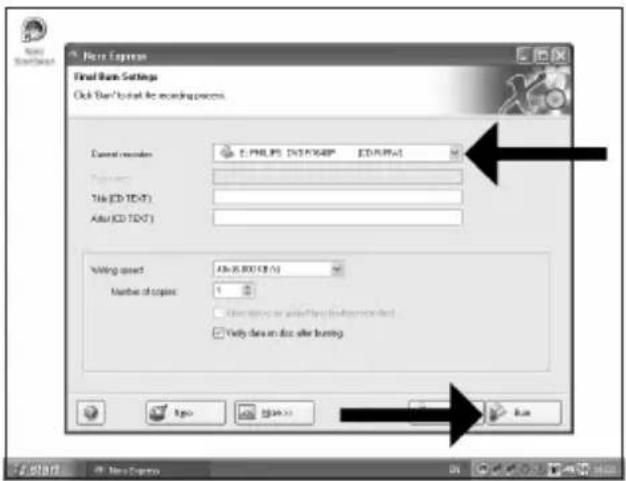
US Choose "Burn to", choose your recorder and choose "Burn".
![Untitled Project * [0780-81.0x] - New Flakes Express 3 Actions Preparing data is recording Warning video data onto the class Completing encoding service PHILIPS Recording progress Current session: Transmitting and writing NT$_01.0004 Download progress: Resetting On 10x 20s Disagred On 62x 80x Total progress: Resetting On 10x 20s Disagred On 62x 80s Preview: Shut down computer when limited Hide to Top Make up Save About](/content/2026/02/420347/images/312c4b40a071af88221e06f0a015a35cc4c7fbb61581113f0357bd5e3faa176b.jpg)
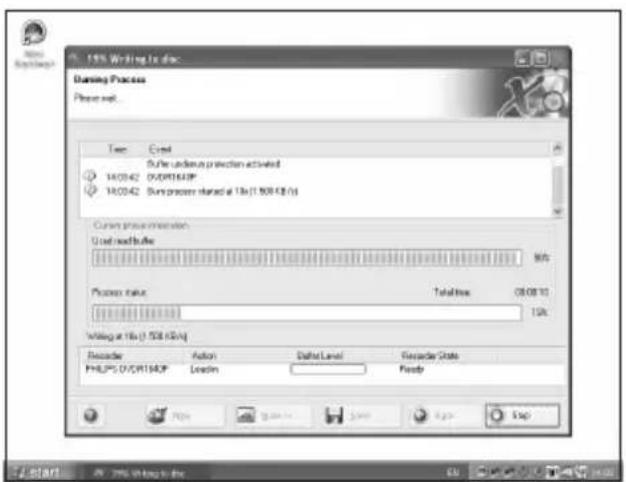
US NeroVision Express is transcoding and burning your disc.
D NeroVision Express transcodiert und brennt Ihre Disk.
F NeroVision Express procède au transcodage et à la gravure de votre disque.
NeroVision Express è in fase di trascodifica e scrittura del disco.
NL NeroVision Express zet de informatie om en brandt die op de disc.

This manual shows an example of how to copy a disc.
[NO TEXT]
The application software used here is: Nero - Burning Rom from Nero AG
us Start "Nero StartSmart" from the desktop.
D Starten Sie "Nero StartSmart" von Ihrer Oberfläche aus.
F Lancez "Nero StartSmart" depuis le bureau.
1 Aprire "Nero StartSmart" dal desktop.
NL Start "Nero StartSmart" vanaf het bureaublad.

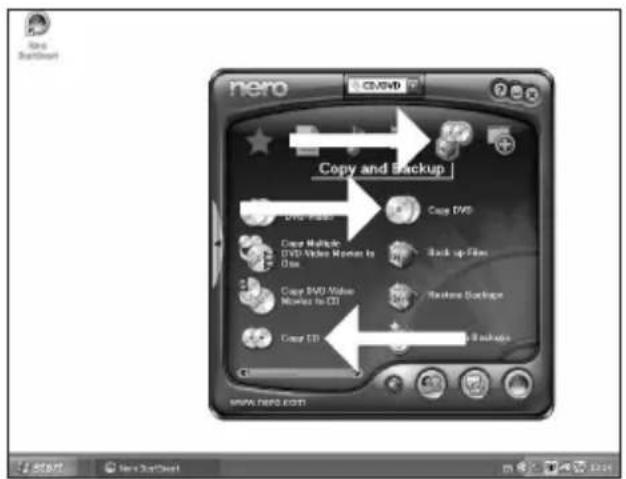
US Choose "Copy and Backup" and click "Copy CD" or "Copy DVD".
D Wählen Sie "Kopieren und Sichem" und klicken Sie auf "CD kopieren" oder "DVD kopieren".
F Choisissez "Copier et sauvegarder" puis cliquez sur "Copier CD" ou "Copier DVD".
1 Selezionare "Copia e Backup" e fare clic su "Copia CD" ovvero "Copia DVD".
NL Kies "Kopiëren en backup" en klik op "CD kopiëren" of "DVD kopiëren".
![None Express Select source and destination. Please select source and destination drives and insert source disk. Source drive: E:\PHILIPS\PCZ\5576P1 Destination drive: E:\PHILIPS\AVCRTG4KP [CD-057A] Custom Time drive cannot be copied. They may be copy protected in certain errors. If you are not sure if your disk can be aspect, please run a train simulation mode (click an Mean 13 and select Simulated) Quick copy Select the option to copy directly from the source to the destination drive. No space will be contained you next drive. Winning speed: Altx (GB) KG/kg Number of copies: 1 ✓ Verify data as close when learning](/content/2026/02/420347/images/0cf33a3bd193289b70a641637f77d7335445cae2f756078893ef9434e094d60a.jpg)
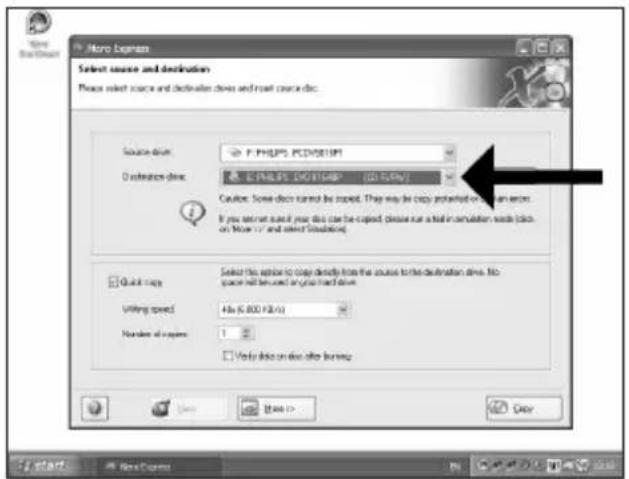
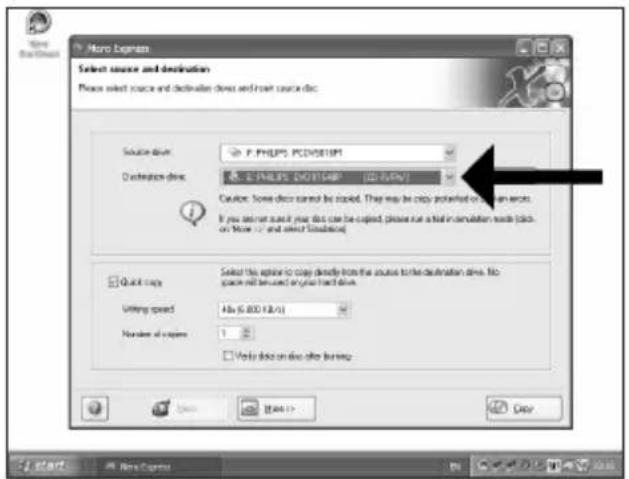
US Choose the source drive and insert the source disc in this drive.
D Wählen Sie das Quelllaufwerk und legen Sie die Quell-Disk in dieses Laufwerk ein.
F Choisissez le disque source puis insérez-le dans le lecteur source.
1 Selezionare lettore sorgente ed inserire il disco di origini in questa unità.
NL Kies het bronstation en leg de bronschijf in dat station.
4
US Choose the destination drive.
D Wählen Sie das Ziellaufwerk.
F Choisissez l'unité de destination.
Selezionare drive di destinazione.
NL Kies het doelstation.
5
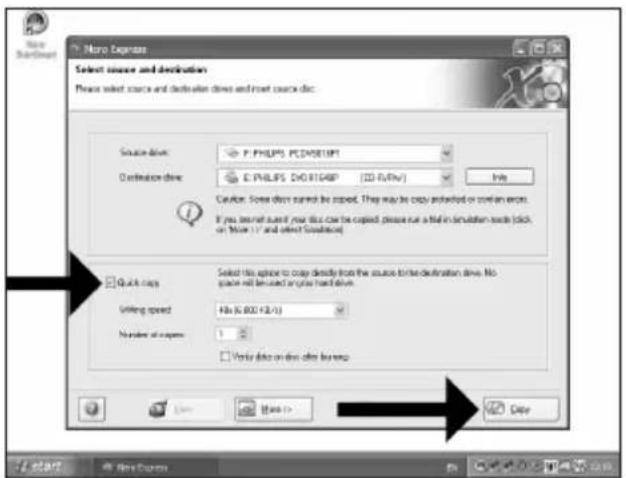
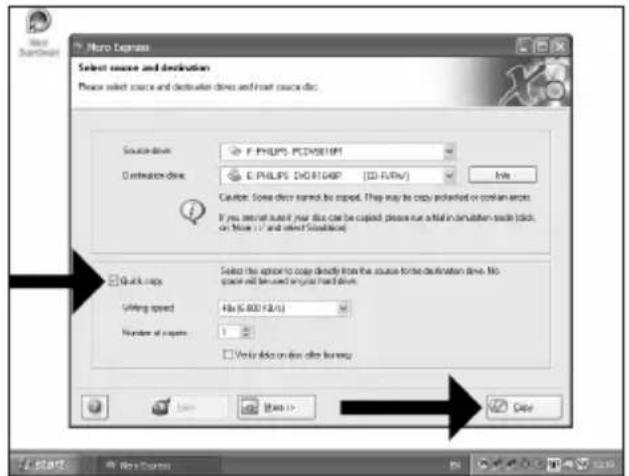
US If possible, you may mark the checkbox "Quick copy" if your source drive is fast enough. Otherwise, unmark the checkbox. Click "Burn".
D Wenn Ihr Quelllaufwerk schnell genug ist, können Sie bei Bedarf das Kästchen "Direktkopie" ankreuzen. Andernfalls löschen Sie das Kreuz oder Häkchen in dem Kästchen. Klicken Sie auf "Kopieren".
F Si votre lecteur source est suffisamment rapide, vous pouvez cocher l'option "Copie rapide". Sinon, décochez cette case. Cliquez sur "Copier".
Se possibile, selezionare la casella "Copia rapida" se l'unità sorgente è sufficientemente veloce. Altrimenti, deselezionare la casella. Fare clic su "Copia".
NL Indien mogelijk kunt u het vakje "Snel kopieren" aanvinken, maar alleen als uw bronstation snel genoeg is. Is dat niet zo, verwijder dan het vinkje. Klik op "Kopieren".
6
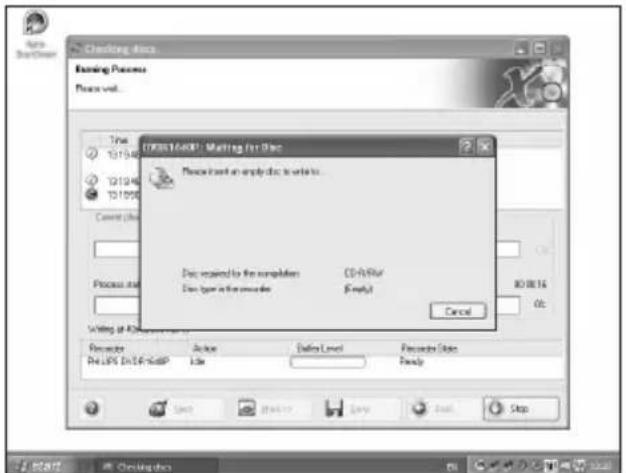
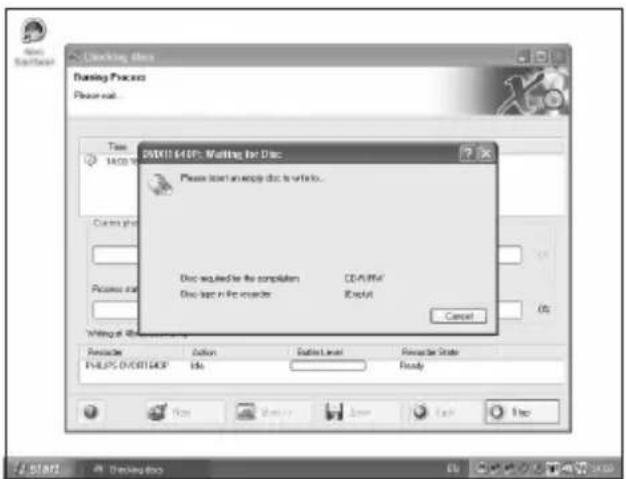
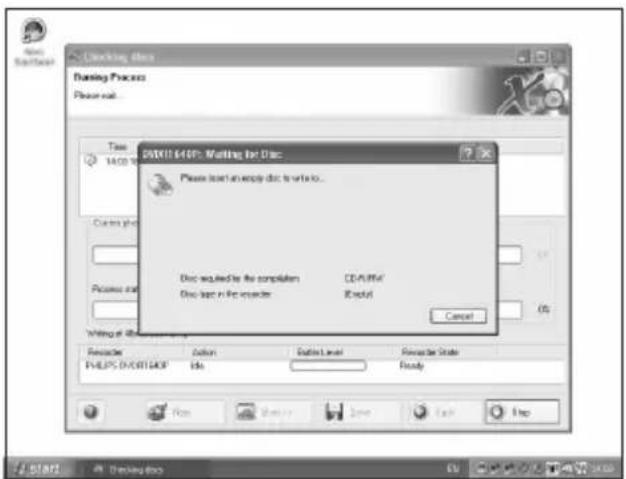
US Insert an empty disc in your destination drive.
D Legen Sie eine leere Disk in Ihr Ziellaufwerk ein.
F Insérez un disque vierge dans votre lecteur de destination.
Inserire un disco vuoto nell'unità di destinazione.
NL Leg een lege schijf in het doelstation.
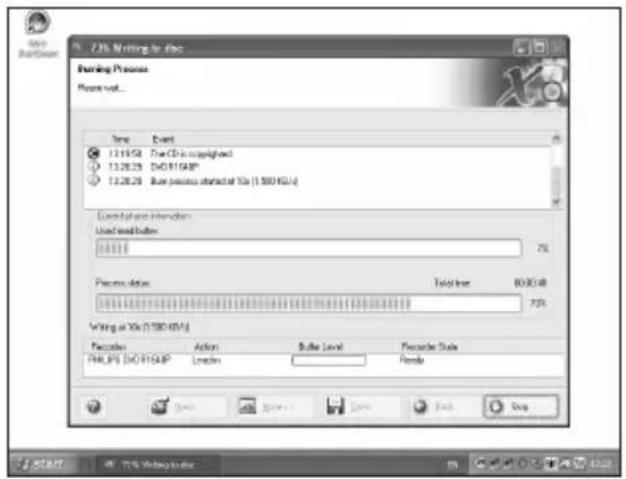
US "Nero" will now burn your disc.
D "Nero" wird jetzt Ihre Disk brennen.
F "Nero" grave alors votre disque.
"Nero" inizierà a scrivere sul disco.
NL "Nero" zal nu uw CD branden.

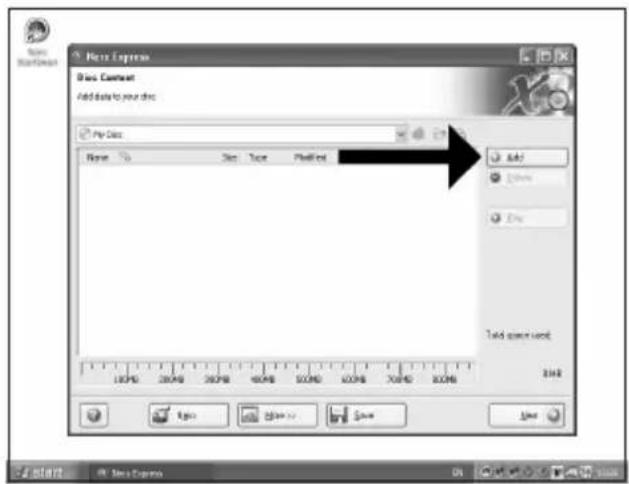
How to make a Data disc?
This manual shows you an example of how to make a Data disc.
-
The application software used here is: Nero - Burning Rom from Nero AG

US Start "Nero StartSmart" from the desktop.
D Starten Sie "Nero StartSmart" von Ihrer Oberfläche aus.
F Lancez "Nero StartSmart" depuis le bureau.
1 Aprire "Nero StartSmart" dal desktop.
NL Start "Nero StartSmart" vanaf het bureaublad.

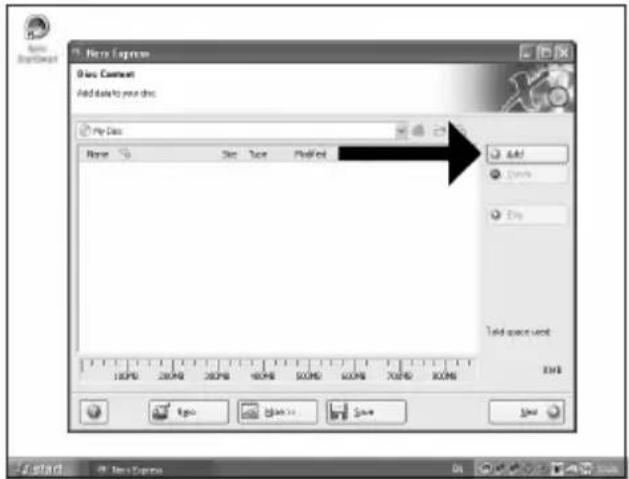
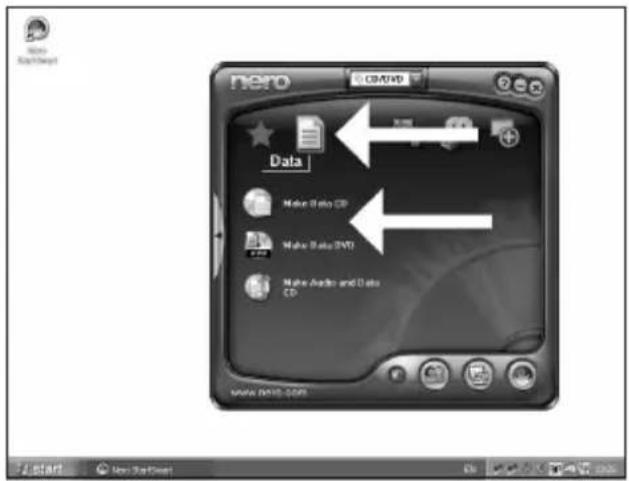
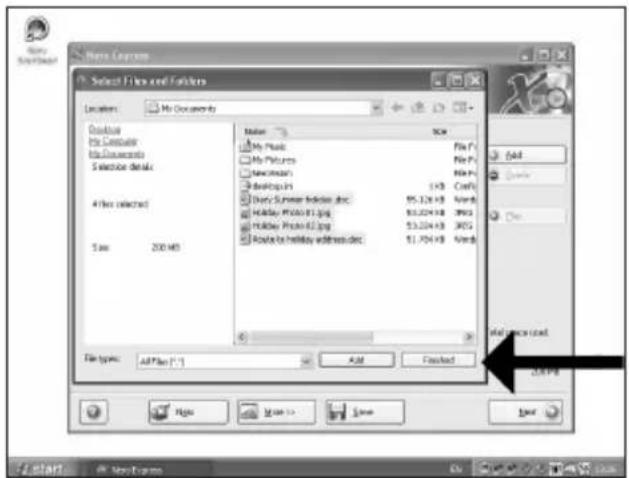
US Choose "Data" and click "Make a data CD" or "Make a data DVD".
D Wählen Sie "Daten" und klicken Sie auf "Daten CD erstellen" oder "Daten DVD erstellen".
F Choisissez "Données" puis cliquez sur "Créer un CD de données" ou "Créer un DVD de données".
1 Selezionare "Dati" e fare clic su "Creare CD dati" ovvero "Creare DVD dati".
NL Kies "Data" en klik op "Data-cd maken" of "Data-dvd maken".
6
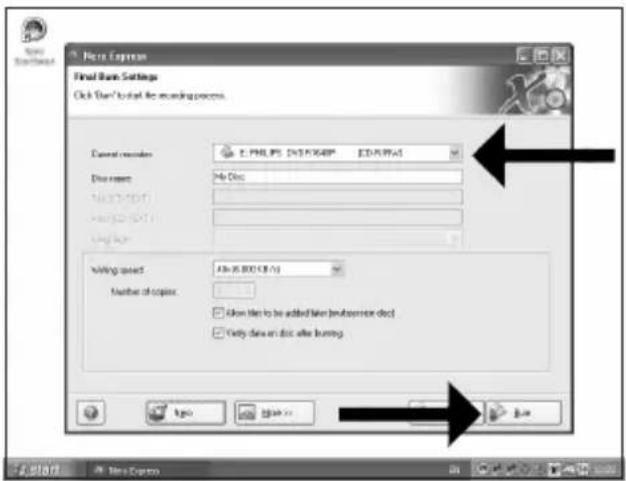
US Choose the drive you use for burning and click "Bum".
D Wählen Sie das Laufwerk zum Brennen der Disk und klicken Sie auf "Brennen".
F Choisissez le lecteur à utiliser pour la gravure puis cliquez sur "Graver".
1 Selezionare l'unità da utilizzare per la scrittura e fare clic su "Scrivi".
NL Kies de recorder waarmee u de disc wilt branden en klik op "Branden".

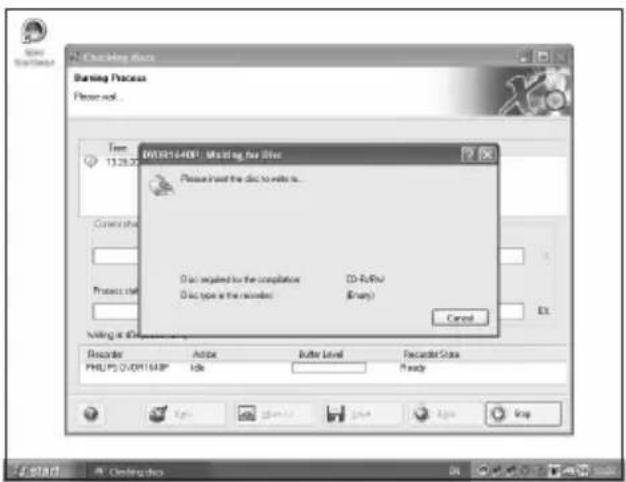
US Insert an empty disc.
D Legen Sie eine leere Disk ein.
F Insérez un disque vierge.
Inserire un disco vuoto.
NL Plaats een lege disc in uw recorder.
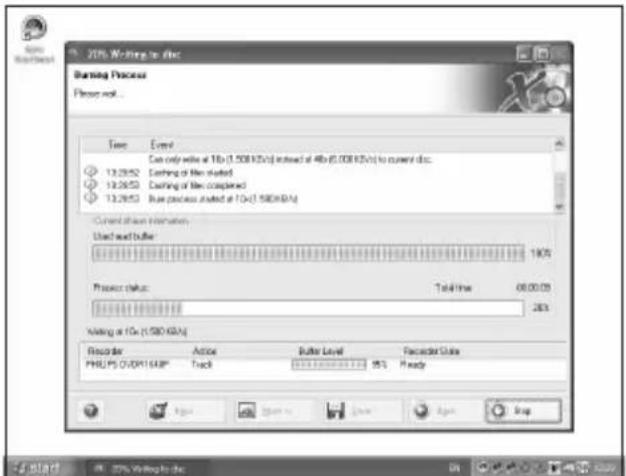
US "Nero" will now burn your disc.
D "Nero" wird jetzt Ihre Disk brennen.
F "Nero" grave alors votre disque.
"Nero" inizierà a scrivere sul disco.
NL "Nero" zal nu uw disc branden.
10
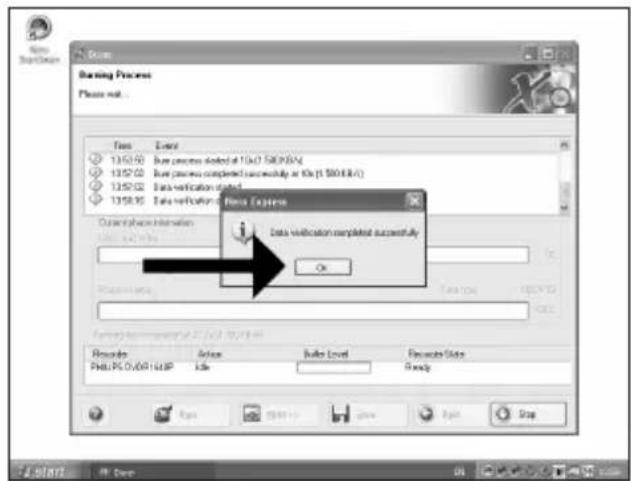
US Congratulations, your disc has been written successfully. Click "OK". You may exit the application now.
D Herzlichen Glückwunsch – Ihre Disk wurde erfolgreich erstellt. Klicken Sie auf "OK". Sie können jetzt die Anwendung verlassen.
F Félicitations, votre disque est prêt. Cliquez sur "OK". Vous pouvez maintenant fermer l'application.
1 Congratulazioni, il disco è stato scritto correttamente. Fare clic su "OK". Ora è possibile chiudere l'applicazione.
NL Gefeliciteerd! Uw disc is met succes gebrand. Klik op "OK".U kunt het programma nu afsluiten.


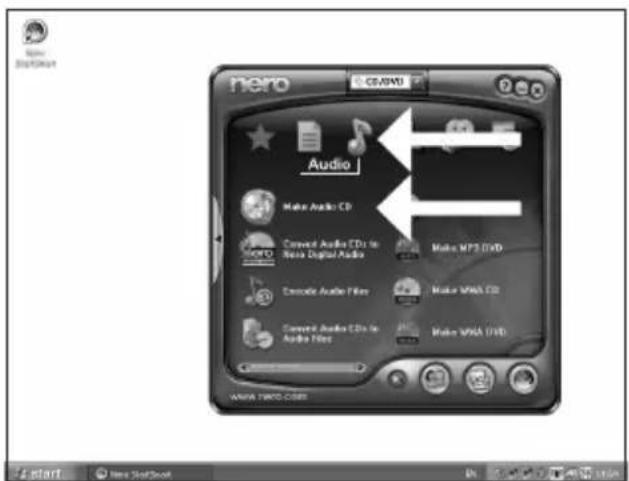
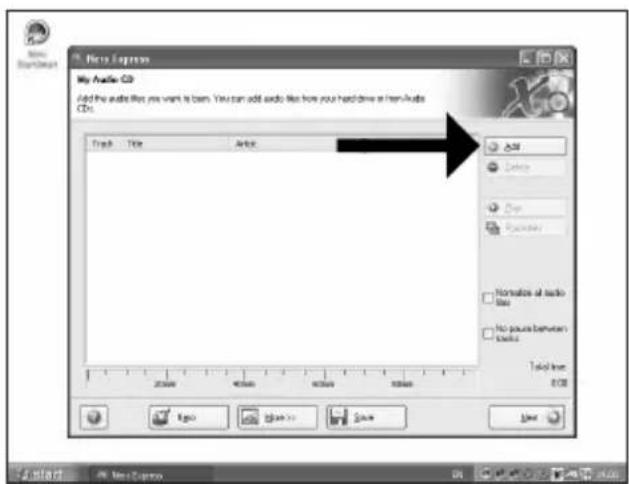
How to make an Audio disc?
This manual shows you an example of how to make an Audio disc which can be played in any CD-Player
-
The application software used here is: Nero - Burning Rom from Nero AG
US Start "Nero StartSmart" from the desktop.
US Choose "Audio" and "Make Audio CD".
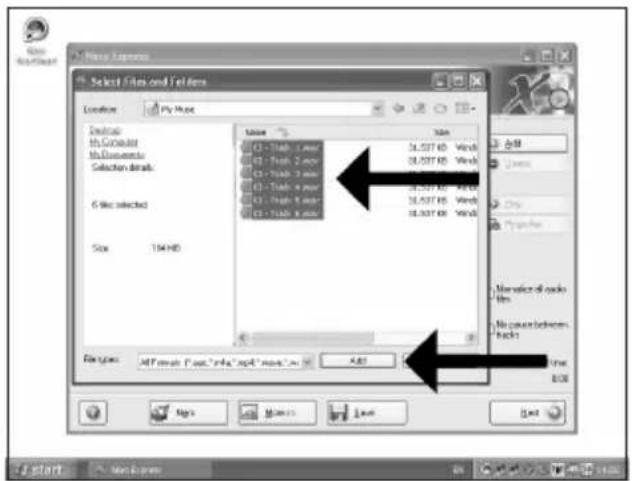
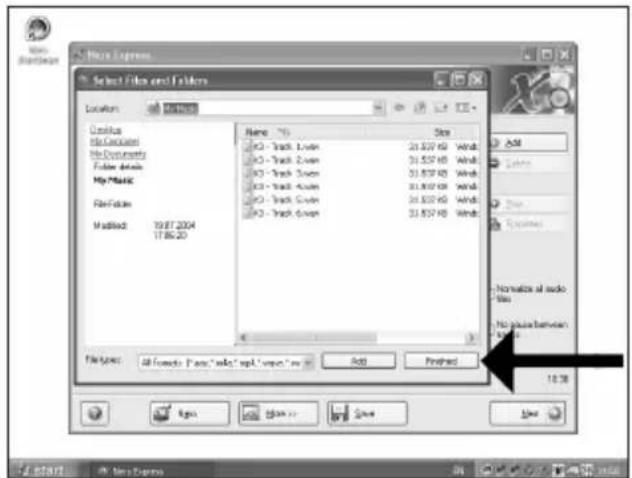
us Click "Add".
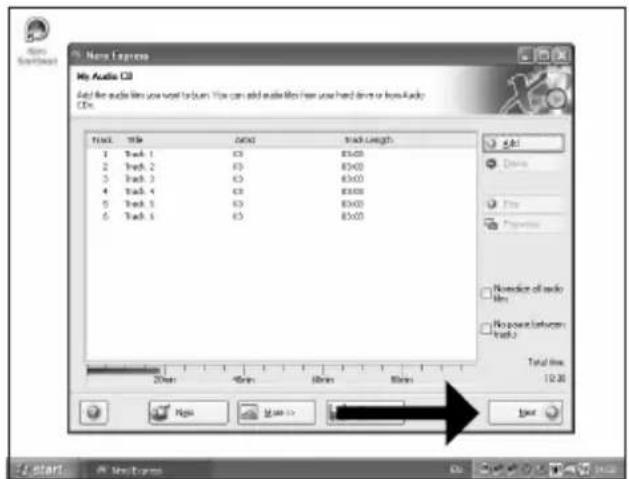
US Choose your recorder and click "Bum".
D Wählen Sie Ihren Recorder und klicken Sie auf "Brennen".
F Choisissez le périphérique d'enregistrement puis cliquez sur "Graver".
Selezionare il recorder e fare clic su "Scrivi".
NL Kies uw recorder en klik op "Branden".
7
US Insert an empty disc.
D Legen Sie eine leere Disk ein.
F Insérez un disque vierge.
Inserire un disco vuoto.
NL Plaats een lege disc in uw recorder.
8
US "Nero" will now burn your disc.
D "Nero" wird jetzt Ihre Disk brennen.
F "Nero" grave alors votre disque.
"Nero" inizierà a scrivere sul disco.
NL "Nero" zal nu uw disc branden.
9
10
US Congratulations, your disc has been written successfully. Click "OK". You may exit the application now.
D Herzlichen Glückwunsch – Ihre Disk wurde erfolgreich erstellt. Klicken Sie auf "OK". Sie können jetzt die Anwendung verlassen.
F Félicitations, votre disque est prêt. Cliquez sur "OK". Vous pouvez maintenant fermer l'application.
1 Congratulazioni, il disco è stato scritto correttamente. Fare clic su "OK". Ora è possibile chiudere l'applicazione.
NL Gefeliciteerd! Uw disc is met succes gebrand. Klik op "OK". U kunt het programma nu afsluiten.

Warranty, Environment, Safety and Frequently Asked Questions (FAQ)
How to find warranty information?
1 Insert the Nero disc again, and click "Exit".
2 Click on the "My Computer" icon on your desktop or click "Start", "My Computer".
3 Click with the right mouse button on the "Nero" icon and choose "Explore".
4 Choose the "Philips Warranty" folder and you will find the warranty documents.
If you do not have Adobe Acrobat Reader, you can find it in the folder "Acrobat Reader" on this disc or find it for free on http://www.adobe.com

"The making of unauthorised copies of copy-protected material, including computer programmes, files, broadcasts and sound recordings, may be an infringement of copyrights and constitute a criminal offence.
This equipment should not be used for such purposes."
WEEE mark: "Information to the Consumer"
Disposal of your old product
Your product is designed and manufactured with high quality materials and components, which can be recycled and reused.
Please inform yourself about the local separate collection system for electrical and electronic products, including those marked by following symbol.
Please act according to your local rules and do not dispose of your old products with your normal household waste.
WARNING
Plastic bags can be dangerous.
To avoid danger of suffocation, keep this bag away from babies and small children.
Frequently Asked Questions (FAQ)
Question 1: I have a Windows 98 Second Edition PC and there is no CDROM device in the computer but I have another PC. How do I install the drivers?
- Start another computer.
- Insert the Nero disc for the External ReWriter into the CDROM device.
- Click "Exit" when the Nero Installation screen appears.
- Click on "My Computer".
- Click on the "Nero"-logo.
- Click on the right mouse button and choose "Explore".
- Go to the directory "Philips Drivers".
- Copy the contents of this directory on a floppy disc.
- Attach your External ReWriter to your Windows 98SE computer.
- When Windows asks for the drivers, insert the floppy from step 8 and point windows to this floppy.
- The drivers will be installed. You can now use your External ReWriter to install the software by inserting the Install disc.
Question 2: I have a windows 98 Second Edition PC and there is no CDROM device in the computer but I have access to the internet. How do I install the drivers?
- Start the computer.
- Start Internet Explorer (or another web browser).
- Go to the Philips website: http://www.philips.com/storageupdates
- Choose "Drivers and manuals".
- Search for the External ReWriter.
- Download the Windows 98SE drivers.
- Unzip the drivers and remember where you saved the unzipped drivers.
- Plug in the External ReWriter.
- When Windows asks for drivers, refer to the location where you saved the drivers in step 7.
- Your External ReWriter will work now.
Question 3: How do I keep my External ReWriter in good shape?
- Do not expose to moisture, rain, sand or heat.
- Place it on a firm, flat surface.
- Keep away from domestic heat and direct sunlight.
- Give the External ReWriter enough place: approx. 2,5cm (1 inch) to all sides is required.
- Do not place anything on the External ReWriter.
Question 4: I have connected the External ReWriter to an USB connector but Windows does not react and the External ReWriter is not recognized.
- Make sure the External ReWriter is connected properly to a power outlet.
- Make sure the USB connectors are switched on (also in the PC Bios, consult your PC manual).
- Check if all drivers are installed (run windows update, check your PC manual and download if required drivers for the PC from the manufacturer's website).
Question 5: Burning or reading takes far too long. How does this come?
- You have connected the External ReWriter to a low speed USB connector, which has a very limited throughput. Connect the drive to a highspeed USB adapter.
- You may have to install drivers for your USB-adapter. Consult the manual and or download drivers from the manufacturer's website.
Question 6: I inserted a disc and it is not played.
- Ensure the disc label is facing up.
- Clean the disc.
- Check whether the disc has the same region code as the player.
- Check if the disc is defective by trying another disc.
- Check to see if the disc is defective, badly scratched or warped (not flat).
Question 7: Player does not respond to some operating commands during playback.
Check whether a PC connection is active. Unplug the USB cable to de-activate the PC connection. The operations may not be permitted by the disc. Refer to the instructions of the disc.
Question 8: I tried to burn a disc and this failed. What happened?
- Check to ensure that there are no scratches or finger marks on the disc.
- Use a new disc and retry the writing sequence.
- Use a different (Philips) branded disc to check that your drive is working correctly.
Question 9: I cannot read from a disc.
- Check to ensure that there are no scratches or finger marks on the disc.
- Use another disc and retry to see if your drive can read a other disc.
Question 10: How can I clean a dirty disc?
Some problems may occur because the disc inside the player is dirty. To avoid these problems clean your discs regularly, in the following way:
When a disc becomes dirty, clean it with a cleaning cloth. Wipe the disc from the center out, in a straight line.
Question 11: May I use chemicals to clean a disc?
No, do not use solvents such as benzene, thinner, commercially available cleaners, or anti-static spray intended for analogue discs.
Question 12: May I use cleaning discs to clean the lens of the External ReWriter?
No, do not use commercially available cleaning discs to clean the lens, as these discs may damage the optical unit.
Be responsible Respect copyrights
Be responsible Respect copyrights
The image is too blurry to recognize any text content.
natural_image
Three electronic devices labeled A, B, and C: a black device with ports, two connected cables, and a power adapter (no visible text or symbols on the devices themselves)natural_image
Hand inserting a USB into a Philips 3.0C device (no text or symbols visible on device body)4
natural_image
Hand inserting a USB into a device labeled 'Sd11Hd' (no additional text or symbols visible)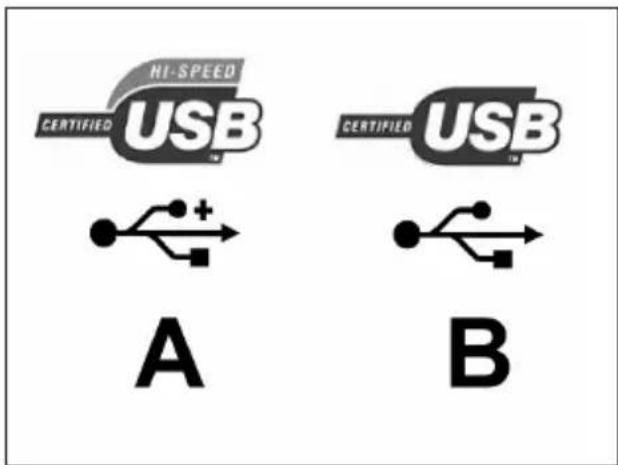
9
Los controladores se instalarán automáticamente. Esto puede tardar unos segundos.
Las ventanas emergentes que aparecen dependerán del sistema operativo.
PT Os controladores serão instalados automaticamente.
Esta operação poderá demorar alguns segundos. As mensagens "pop-up" dependem do sistema operativo.
TR Sürücülerin kurulum işlemi, otomatik olarak yapılacaktır.
Bu birkaç saniye sürebilir.
Gösterilen açılır menüler, işletim sistemine bağlıdır.
PL Instalacja sterowników przebiegnie automatycznie.
Może to potrwać kilka sekund.
Wyświetlane ekrany różnią się odpowiednio do systemu operacyjnego.
sv Drivrutinerna installeras automatiskt.
Det kan ta några sekunder.
Vilka popupmeddelanden som visas beror på operativsystemet.
natural_image
Hand holding a CD inside a BERTI23 flash drive (no visible text or symbols on the CD or background)E Inserte el disco de Nero en Grabadora externa. Vaya al paso 15.
PT Introduza o disco do software Nero no Gravador Extemo.
Avance para o passo 15!
TR Harici DVD Yazıcı'ye Nero diskini yerleştiriniz. 15. adıma geçiniz!
PL Wlóż płytę programu Nero do napędu Extem DVD brännare.
Przejdź do punktu 15!
SV Sätt in Nero-skivan i Extern DVD brännare. Gå till steg 15!

13
E Sólo para Windows 98 Second Edition!
Conecte el cable USB al ordenador.
PT Apenas para o Windows 98 Second Edition!
Ligue o cabo USB ao computador.
TR Sadece Windows 98 Second Edition (İkinci Sürüm)! USB kablosunu bilgisayara takınız.
PL Dotyczy tylko systemu Windows 98 Second Edition! Podłącz kabel USB do komputera.
sv Endast Windows 98 Second Edition!
Anslut USB-kabeln till datorn.
The image is too blurry to recognize any text content.
Para desconectar Grabadora externa sin apagar el ordenador, haga clic en este símbolo.
PT Para desligar o Gravador Extemo sem desligar o computador, clique neste símbolo.
TR Bilgisayarınızı kapatmaksızın Harici DVD Yazıcı'nin bağlantısını kesmek için, bu sembol üzerine tıklatınız.
PL Aby odłączyć napęd Napęd Zewnętrzny nie wyłączając komputera, kliknij ten symbol.
SV Klicka på den här symbolen om du vill koppla bort Extern DVD brännare utan att stänga av datom.
E Haga clic en "Quitar hardware con seguridad...".
PT Clique em "Safely remove USB..." (Remover em segurança USB...).
TR "Safely remove USB..." (Güvenlice USB'yi çıkar...) üzerine tıklatınız.
PL Kliknij "Safely remove USB..." (Bezpieczne odlaczanie urządzeń USB...).
SV Klicka på "Safely remove USB..." (Säker borttagning av USB).
E Cuando aparezca esta pantalla, puede desconectar Grabadora extema.
PT Quando esta mensagem "pop-up" surgir, pode desligar o Gravador Externo.
TR Bu açılır menü belirdiğinde, Harici DVD Yazıcı'nin bağlantısını kesebilirsiniz.
PL Kiedy pojawi się to okno, możesz odłączyć Napęd Zewnętrzny.
SV När det här popupmeddelandet visas kan du koppla bort Extern DVD brännare.

The image is too blurry to recognize any text content.
The application software used here is: Nero Vision Express from Nero AG
E Inicie "Nero StartSmart" desde el escritorio.
PT Inicie o "Nero StartSmart" a partir da área de trabalho.
TR Masaüstünden "Nero StartSmart"ı başlatınız.
PL Uruchom program "Nero StartSmart" z pulpitu.
sv Starta "Nero StartSmart" från skrivbordet.
1
natural_image
Black-and-white photo of a desktop computer tower connected to a cable via a cable (no visible text or labels)E Conecte la cámara al ordenador y enciéndala.
PT Conecte a sua câmera ao computador e ligue-a.
TR Kameranızı bilgisayara takıp çalıştırınız.
PL Podłącz kamere do komputera i uruchom.
SV Anslut din kamera till datorn och slå på den.
2
E Seleccione "Foto y vídeo" y haga clic en "Capturar vídeo".
PT Escolha "Foto e Vídeo" e clique em "Capturar vídeo".
TR "Fotograf ve video"yu seçip "Video yakala" üzerine tıklatınız.
PL Kliknij "Foto i wideo" oraz "Przechwyć wideo".
SV Välj "Foto och video" och klicka på "Fånga video".
3
4
E Seleccione su videograbadora digital y utilice los botones para controlar su cámara digital. Pulse el botón "Grabar" para grabar vídeo.
PT Escolha o seu DV Camcorder e use os botões para controlar a sua DV câmera. Pressione o botão "Gravar" para gravar o vídeo.
TR DV-Camcorder'ınızı (DV-kaydedici kamera) seçip DV-kameranıza kumanda etmede düğmeleri kullanız. Videoyu kaydetmek için "Kaydet" düğmesine basınız.
PL Wybierz posiadaną kamerę DV i użyj przycisków, aby nią sterować. Naciśnij przycisk "Nagraj", aby nagrać obraz wideo.
SV Välj din DV-Camcorder och använd kontrollknappama för din DV-kamera. Tryck på "Bränn"-knappen för att spela in video.
![New Vision License 3 [Capture Video] Capture Video Select a device and capture video in your hard disk. Capture devices Soap DV Device DV Details Use this image to capture video in Digital Video (DV1) compatible format. The application initially configes the capture device. but you can change the device settings manually by. DV type: DV Type 1 Type 1 is usually the before choice because I computer to a file space and allows here from Google. However, only Type 2 is compatible with Video to Windows (TM). If you can use which type to save, select Type 1. Save DV Device Save Back](/content/2026/02/420347/images/1e7e750fa61c9bda664ac7579d4fc073c972d18c3471a208ff386360d6e85d0b.jpg)
5
6
E Una vez capturadas las secuencias de vídeo, haga clic en "Siguiente".
PT Quando todas as sequências de vídeo estiverem capturadas, clique em "Avançar".
TR Tüm video dizisi yakalandığında, "İleri" üzerine tıklatınız.
PL Po przechwyceniu wszystkich sekwencji wideo, kliknij "Dalej".
SV När alla videosekvenser har fångats klickar du på "Nästa".
![MetaVision Capture 3.0 [Capture Video] Capture Video Select a device and capture video to your hand disk. Capture device: Easy DV Device Select a capturing template: DV Use this template to capture video in DigitalVideo (DV) compatible format. The application is initially configured to capture devices but you can change the device settings available for DV type: DV Type-1 Type 1 is usually the better video because it contains free disk space and allows more throughput. However, and Type 2 is compatible with Video or Wireless (TM) You can not use which type to use, select Type 1. Capture Mode: RVCE Captive 8007 RVCE Captive 8005 RVCE Captive 8003 View >... Save... Next](/content/2026/02/420347/images/66be777e3b30ffc57b8248915640bb85ca7745691bcfce49b987a40b32c3b68e.jpg)
The application software used here is: Nero Vision Express from Nero AG

E Inicie "Nero StartSmart" desde el escritorio.
PT Inicie o "Nero StartSmart" a partir da área de trabalho.
TR Masaüstünden "Nero StartSmart"ı başlatınız.
PL Uruchom program "Nero StartSmart" z pulpitu.
sv Starta "Nero StartSmart" från skrivbordet.
1

E Seleccione "Foto y vídeo" y haga clic en "Crear DVD de vídeo proprio".
PT Escolha "Foto e Vídeo" e "Crie seu próprio DVD de vídeo".
TR "Fotoğraf ve video" ve "Kendi DVD-Video'nu yarat"ı seçiniz.
PL Kliknij "Foto i wideo" oraz "Twórz własne DVD-Video".
SV Välj "Foto och video" och "Gör din egen dvd-video".
2
![Untitled Project [2003-Video] - New/Fiction Express 3 Content Create and manage this for your project. What would you like to do? Express Video... Add Video File... Make Movies... Make Slide Show... Import Disc Edit History Create Chapters Add Video Files... Here you can add some or more video files from your hard drive as disc and add them to your project. Used space: 8.00 out of 4.30 $B 0.000 1.000 2.000 2.800 4.000 Next > Back](/content/2026/02/420347/images/8fb3a2b8a8a6290e1d051090db1dfa3d2f0ecd9e97c1fca3741a9eef6210fd07.jpg)
E Seleccione "Añadir archivos de vídeo".
PT Escolha "Adicionar arquivos de vídeo".
TR "Video dosyası ekle"yi seçiniz.
PL Kliknij "Dodaj pliki wideo".
sv Välj "Addera videofiler".
3
4
E Seleccione los archivos que desea añadir y haga clic en "Abrir".
PT Escolha os arquivos que deseja adicionar e clique em "Abrir".
TR Eklemek istediğiniz dosyaları seçip "Aç" üzerine tıklatınız.
PL Wybierz pliki, które chcesz dodać i kliknij "Otwórz".
SV Välj filema som ska läggas till och klicka på "Öppna".
5
Los vídeos que ha cargado se muestran aquí. Puede editarlos seleccionando "Editar película".
PT Os filmes carregados serão exibidos aqui. É possível editá-los escolhendo "Editar filme".
TR Yüklediğiniz filmler, burada gösterilir. "Filmi Düzenle"yi seçerek onlar üzerinde düzenleme yapabilirsiniz.
PL Załadowane filmy są wyświetlane tutaj. Możesz je edytować, klikając "Edytuj film".
SV De filmer som du har laddat visas här.
Du kan redigera dem genom att välja "Redigera film".
![UntitledProject * [DVD-Video] - New/iVision Express 3 Content Create and reagretion by your project. 1. V15_01 8001 Video Title: In 80m Xo Target retro options: 70E+576 (CDR/681 31) - 4.3 2. V15_01 8001 Video Title: In 80m Xo Target retro options: 70E+576 (CDR/681 31) - 4.3 3. V15_01 8001 Video Title: In 80m Xo Target retro options: 70E+576 (CDR/681 31) - 4.3 What would you like to do? Capture Video... Add Video Files... Make Movies... Make Slide Maps... Import Data Edit Movie... Create Channels... Let you add the highlighted video title Used space: $5K out of 4.30 GB 0.000 1.000 2.000 3.000 4.000 More... Export Save Back Next](/content/2026/02/420347/images/2e98664955f631db941202e819f7539a107856b19ea4b25eef42f5f10b447f0e.jpg)
6
E En la pantalla Edit Movie puede añadir efectos de vídeo, de texto y transiciones.
PT Na tela Editar filme, você poderá adicionar efeitos de vídeo, efeitos de texto e transições.
TR Filmi Düzenle ekranında, video efektleri, metin efektleri ve geçişler ekleyebilirsiniz.
PL W oknie Edytuj film, możesz dodawać efekty wideo, efekty tekstowe i przejścia.
SV På skärmen för filmredigering kan du lägga till videoeffekter, texteffekter och övergångar.
![Untitled Project * [RMS-Video] - NewVideo Express 1 PHILIPS My Media Map VTS_GK_0003](/content/2026/02/420347/images/ac327689a41fff654bc43dcb9fe2edb649dc71893a139be733e9a40719b378fe.jpg)
![Untitled Project * [DVD-Video] - NewWindow Express 7 PHILIPS My Web1.dwg VTR_01.0008 Home TV Export Sets Host](/content/2026/02/420347/images/20a7f274f9c95b963af12041d3de89605d7df53b577858a17064d6347d56f9dd.jpg)
E También puede recortar el vídeo grabado. Cuando termine, haga clic en "Siguiente".
PT Também é possível fazer adaptações no vídeo gravado. Ao concluir o procedimento, escolha "Avançar".
TR Kaydedilen video üzerinde kırpma da yapabilirsiniz. Tamamlandığında, "İleri"yi seçiniz.
PL Możesz również przycinać nagrane wideo. Po zakończeniu kliknij "Dalej".
SV Du kan också trimma en inspelad video. När du är klar, välj "Nästa".
7
![Untitled / Project * [RMS-Video] - NewWindow Express 3 Created Create and manage files in your project 1. YTS_01_0001 Video Title—On Data 17s Target video options: 720 x 576 (CCOR/681 31) - 4.3 2. YTS_01_0001 Video Title—On Data 17s Target video options: 720 x 576 (CCOR/681 31) - 4.3 3. YTS_01_0001 Video Title—On Data 27s Target video options: 720 x 576 (CCOR/681 31) - 4.3 What would you like to do? Capture Video... Add Video Film... Make Home... Make Slids Show... Import Disc Edit Movie... Create Chapters... Used space: 0.30 unit of $0.00 GB 0 KB 1 KB 2 KB 3 KB 4 KB Next](/content/2026/02/420347/images/315cfb491001522216d1a56a0d7bf533f80f304c5bed93973a03cb008876bcc8.jpg)
E Cuando haya editado todos los archivos, haga clic en "Siguiente".
PT Após editar todos os arquivos, escolha "Avançar".
TR Tüm dosyalar üzerinde düzenleme yaptıktan sonra, "İleri"yi seçiniz.
PL Po zakończeniu edycji wszystkich plików kliknij "Dalej".
sv När du har redigerar alla filer, välj "Nästa".
8
![HotBox Project * [DVD-Video] - NewWindow Express 3 Select Menu Select menu menu to this menu. Select menu: MainMenu Holiday 2005 1. V75 92.0007 7. V75 81.0001 5. V75 4.0001 Preview: Holiday 2005 Edit Menu... 0.000 1.000 2.000 3.000 4.000 Add Next](/content/2026/02/420347/images/cdd4010ac968888bd07ef4378b6777c57d92d37b5f60859a1b782e74978caf2b.jpg)
11
12
![Certified Project * [0780-X-line] - MacRakken Express 3 Actions Preparing data is incoming Drawing video data onto the class Completing recording service PHILIPS Recording progress Current action: Transcoding and editing MTV_01.0004 Download progress: Remaining On 10x 20s Closed On 62x 85s Total progress: Remaining On 10x 20s Closed On 62x 95s Priority: Shut down computer when installed Hide to Top Map 11 Save About](/content/2026/02/420347/images/0a63b1d25cab9192b7f49a13af7c04b264daa6d38d8a85d18c15504fed5eeb69.jpg)
E NeroVision Express está transcodificando y grabando el disco.
PT O NeroVision Express irá transcodificar e gravar o seu disco.
TR NeroVision Express; kod çevrimi yapıyor ve diskiniz yazıyor/kaydediyor.
PL Program NeroVision Express transkoduje i nagrywa płytę.
sv NeroVision Express omvandlar kod och bränner din skiva.
E Enhorabuena, su disco se ha grabado correctamente. Haga clic en "Aceptar". Ahora puede cerrar la aplicación.
PT Parabéns, o seu disco foi gravado com êxito. Clique em "Não". Agora, você poderá fechar o aplicativo.
TR Tebrikler, diskinize başarıyla yazdındı. "Hayır" üzerine tıklatınız. Şimdi uygulamadan çıkabilirsiniz.
PL Gratulacje! Zapis płyty zakończył się pomyślnie. Kliknij "Nie". Możesz zakończyć pracę programu.
The application software used here is: Nero - Burning Rom from Nero AG

E Inicie "Nero StartSmart" desde el escritorio.
PT Inicie o "Nero StartSmart" a partir da área de trabalho.
TR Masaüstünden "Nero StartSmart"ı başlatınız.
PL Uruchom program "Nero StartSmart" z pulpitu.
SV Starta "Nero StartSmart" från skrivbordet.
E Seleccione la unidad origen y coloque el disco de origen en esta unidad.
PT Escolha a unidade de origem e insira o disco de origem nesta unidade.
TR Kaynak sürücüyü seçip kaynak diski bu sürücüye yerleştiriniz.
PL Wybierz napęd źródłowy i umieść w nim płytę źródłową.
SV Välj källenhet och sätt i källskivan i enheten.
4
E Seleccione la unidad de destino.
PT Escolha o drive de destino.
TR Hedef sürücüyü seçiniz.
PL Wybierz napęd docelowy.
sv Välj målenheten.
5
E Si la velocidad de la unidad de origen lo permite, marque la casilla "Copia rápida". En caso contrario, deje la casilla sin marcar. Haga clic en "Copiar".
PT Se possível, você poderá marcar a caixa de seleção "Cópia rápida" se a unidade de origem for rápida o suficiente. Caso contrário, desmarque-a. Clique em "Gravar".
TR Olanaklı olduğu durumlarda, eğer kaynak sürücünüz yeterince hızlı ise, "Hızlı kopyala" onay kutusunu işaretleyebilirsiniz. Aksi takdirde, onay kutusundaki işaretlemeyi kaldınniz. "Yazdır" üzerine tıklatınız.
PL Jeśli to możliwe, zaznacz pole wyboru "Szybka kopia", o ile napęd źródłowy jest dostatecznie szybki. W przeciwnym razie wyczyść pole wyboru. Kliknij "Zapis".
SV Markera rutan "Snabbkopia" om din källenhet är tillräckligt snabb. Lämna rutan tom i annat fall. Klicka på "Kopiera".
6
E Coloque un disco vacío en la unidad de destino.
PT Insira um disco vazio no drive de destino.
TR Hedef sürücünüze boş bir disk yerleştiriniz
PL Włóż czystą płytę do napędu docelowego.
sv Sätt i en tom skiva i målenheten


E "Nero" grabará ahora el disco.
PT O "Nero" irá gravar o seu disco.
TR "Nero" artık diskinizin üzerine yazacaktır.
PL Program "Nero" rozpocznie nagrywanie płyty.
sv "Nero" kommer nu att bränna din skiva.

E Enhorabuena, su disco se ha grabado correctamente. Haga clic en "Aceptar". Ahora puede cerrar la aplicación.
PT Parabéns, o seu disco foi gravado com êxito. Clique em "OK". Agora, você poderá fechar o aplicativo.
TR Tebrikler, diskinize başarıyla yazdırıldı. "OK" üzerine tıklatınız. Şimdi uygulamadan çıkabilirsiniz.
PL Gratulacje! Zapis płyty zakończył się pomyślnie. Kliknij "OK". Możesz zakończyć pracę programu.
The application software used here is: Nero - Burning Rom from Nero AG
E Inicie "Nero StartSmart" desde el escritorio.
PT Inicie o "Nero StartSmart" a partir da área de trabalho.
TR Masaüstünden "Nero StartSmart"ı başlatınız.
PL Uruchom program "Nero StartSmart" z pulpitu.
SV Starta "Nero StartSmart" från skrivbordet.
E Seleccione "Datos" y haga clic en "Crear CD de datos" e "Crear DVD de datos".
PT Escolha "Dados" e clique em "Criar CD de Dados" ou "Criar DVD de Dados".
TR "Veri"yi seçip "Veri CD'si Yarat" ya da "Veri DVD'si Yarat" üzerine tıklatınız.
PL Kliknij "Dane", a następnie "Utwórz dysk CD z danymi" lub "Utwórz dysk DVD z danymi".
SV Välj "Data" och klicka på "Skapa data-cd" eller "Skapa data-dvd".
E Haga clic en "Añadir".
PT Clique em "Adicionar".
TR "Ekle" üzerine tıklatınız.
PL Kliknij "Dodaj".
sv Klicka på "Lägg till".
4
E Seleccione los archivos que desee grabar y haga clic en "Añadir".
PT Escolha os arquivos a serem gravados e clique em "Adicionar".
TR Kaydedilecek/Yazdınlacak dosyaları seçip "Ekle" üzerine tıklatınız.
PL Wybierz pliki do nagrania i kliknij "Dodaj".
SV Välj filema som ska brännas och klicka på "Lägg till".
5
E Una vez añadidos todos los archivos, haga clic en "Finalizado".
PT Ao finalizar a inclusão de todos os arquivos, clique em "Concluído".
TR Tüm dosyalar eklendiğinde, "Bitti" üzerine tıklatınız.
PL Po dodaniu wszystkich plików kliknij "Zakończono".
SV När alla filer har lagts till klickar du på "Avslutat".
6
E Haga clic en "Siguiente".
PT Clique em "Avançar".
TR "İleri" üzerine tıklatınız.
PL Kliknij "Dalej".
sv Klicka på "Nästa".

E Seleccione la unidad para la grabación y haga clic en "Grabar".
PT Escolha a unidade utilizada para gravação e clique em "Gravar".
TR Yazdırma/kaydetme için kullandığınız sürücüyü seçip "Yazdır" üzerine tıklatınız.
PL Wybierz napęd używany do nagrywania i kliknij "Zapis".
SV Välj filema enheten som ska användas för att bränna och klicka på "Bränn".
7
E "Nero" grabará ahora el disco.
PT O "Nero" gravará o seu disco.
TR "Nero" artık diskinizin üzerine yazacaktır.
PL Program "Nero" rozpocznie nagrywanie płyty.
sv "Nero" kommer nu att bränna din skiva.
9
10
E Enhorabuena, su disco se ha grabado correctamente. Haga clic en "Aceptar". Ahora puede cerrar la aplicación.
PT Parabéns, o seu disco foi gravado com êxito. Clique em "OK". Agora, você poderá fechar o aplicativo.
TR Tebrikler, diskinize başarıyla yazdırıldı. "OK" üzerine tıklatınız. Şimdi uygulamadan çıkabilirsiniz.
PL Gratulacje! Zapis płyty zakończył się pomyślnie. Kliknij "OK". Możesz zakończyć pracę programu.
SV Grattis! din skiva har bränts utan fel. Klicka på "OK". Du kan avsluta programmet nu.

The application software used here is: Nero - Burning Rom from Nero AG
E Inicie "Nero StartSmart" desde el escritorio.
PT Inicie o "Nero StartSmart" a partir da área de trabalho.
TR Masaüstünden "Nero StartSmart"ı başlatınız.
PL Uruchom program "Nero StartSmart" z pulpitu.
SV Starta "Nero StartSmart" från skrivbordet.
E Seleccione "Audio" y "Crear CD de audio".
PT Escolha "Áudio" e "Criar CD de Áudio".
TR "Ses" ve "Müzik/Ses CD'si Yarat"ı seçiniz.
PL Kliknij "Audio" i "Utwórz Audio CD".
sv Välj "Audio" och "Skapa Audio-cd".
E Haga clic en "Añadir".
PT Clique em "Adicionar".
TR "Ekle" üzerine tıklatınız.
PL Kliknij "Dodaj".
sv Klicka på "Lägg till".
4
E Seleccione los archivos de audio (*.wav) que desea incluir en su nuevo disco de audio y haga clic en "Añadir".
PT Selecione os arquivos de áudio (*.wav) que deseja gravar em seu novo disco e clique em "Adicionar".
TR Yeni ses diskiniz üzerinde olmasını istediğiniz ses dosyalarını (*.wav) seçip "Ekle" üzerine tıklatınız.
PL Wybierz pliki audio (*.wav), które chcesz umieścić na nowej płycie audio i kliknij "Dodaj".
SV Välj audiofilema (*.wav) som du vill ha på din nya audioskiva och klicka på "Lägg till".
5
E Una vez añadidos todos los archivos, haga clic en "Finalizado".
PT Ao finalizar a inclusão dos arquivos, clique em "Concluído".
TR Tüm dosyalar eklendiğinde, "Bitti" üzerine tıklatınız.
PL Po dodaniu wszystkich plików kliknij "Zakończono".
sv När alla filer har lagts till klickar du på "Avslutat".
6
E Haga clic en "Siguiente".
PT Clique em "Avançar".
TR "İleri" üzerine tıklatınız.
PL Kliknij "Dalej".
sv Klicka på "Nästa".
E Seleccione su grabadora y haga clic en "Grabar".
PT Escolha o seu gravador e clique em "Gravar".
TR Kaydedicinizi seçip "Yazdır" üzerine tıklatınız.
PL Wybierz nagrywarkę i kliknij "Zapis".
sv Välj din spelare klicka på "Bränn".
7
E "Nero" grabará ahora el disco.
PT O "Nero" irá gravar o seu disco.
TR "Nero" artık diskinizin üzerine yazacaktır.
PL Program "Nero" rozpoczęnie nagrywanie płyty.
sv "Nero" kommer nu att bränna din skiva.
9
10
E Enhorabuena, su disco se ha grabado correctamente. Haga clic en "Aceptar". Ahora puede cerrar la aplicación.
PT Parabéns, o seu disco foi gravado com êxito. Clique em "OK". Agora, você poderá fechar o aplicativo.
TR Tebrikler, diskinize başarıyla yazdırıldı. "OK" üzerine tıklatınız. Şimdi uygulamadan çıkabilirsiniz.
PL Gratulacje! Zapis płyty zakończył się pomyślnie. Kliknij "OK". Możesz zakończyć pracę programu.
SV Grattis! din skiva har bränts utan fel. Klicka på "OK". Du kan avsluta programmet nu.

Be responsible Respect copyrights
Be responsible Respect copyrights
Be responsible Respect copyrights
Be responsible Respect copyrights
USA/Canada: This player is for use only with IBM compatible UL listed Personal Computers or Macintosh UL listed workstations, weighing less than 18 kg.
LASER SAFETY
This unit employs a laser. Do not remove the cover or attempt to service this device when connected due to the possibility of eye damage.
LASER-SICHERHEIT
USE OF CONTROLS OR ADJUSTMENTS OR PERFORMANCE OF PROCEDURES OTHER THAN THOSE SPECIFIED HEREIN MAY RESULT IN HAZARDOUS LASER RADIATION EXPOSURE.
WARNUNG
Output power......(measured above the objective lens)
Read: 0,2 mW (CD) - 2 mW (DVD)
......Write: 78 mW (CD) – 54 mW (DVD)
Beam divergence....60 degree
KLASS 1 LASERAPPARAT
CLASS 1 LASER PRODUCT
LUOKAN 1 LASERLAITE
KLASSE 1 LASER-PRODUCT
Notes
Additional information available at our website:
www.philips.com/storage
www.philips.com/storageupdates
Specifications subject to change without notice.
All dimensions shown are approximate.
All rights reserved.
Reproduction, copying, usage, modifying, hiring, renting,
public performance, transmission and/or broadcasting in whole or part is prohibited without the written consent of Philips Electronics N.V.


- How to... for External ReWriters
- US
- Contents
- D
- Inhalt
- How to connect the External ReWriter to my computer?
- 1
- The image is too blurry to recognize any text content.
- 13
- How to disconnect the External ReWriter without shutting down the computer?
- How to capture video from a digital DV-camcorder?
- 4
- 5
- 6
- How to make a video disc from video files which are on the hard disk or a disc?
- [NO TEXT]
- 11
- 12
- How to make a Data disc?
- -
- 10
- How to make an Audio disc?
- Warranty, Environment, Safety and Frequently Asked Questions (FAQ)
- How to find warranty information?
- WEEE mark: "Information to the Consumer"
- Disposal of your old product
- WARNING
- Frequently Asked Questions (FAQ)
- Question 1: I have a Windows 98 Second Edition PC and there is no CDROM device in the computer but I have another PC. How do I install the drivers?
- Question 2: I have a windows 98 Second Edition PC and there is no CDROM device in the computer but I have access to the internet. How do I install the drivers?
- Question 3: How do I keep my External ReWriter in good shape?
- Question 4: I have connected the External ReWriter to an USB connector but Windows does not react and the External ReWriter is not recognized.
- Question 5: Burning or reading takes far too long. How does this come?
- Question 6: I inserted a disc and it is not played.
- Question 7: Player does not respond to some operating commands during playback.
- Question 8: I tried to burn a disc and this failed. What happened?
- Question 9: I cannot read from a disc.
- Question 10: How can I clean a dirty disc?
- Question 11: May I use chemicals to clean a disc?
- Question 12: May I use cleaning discs to clean the lens of the External ReWriter?
- Be responsible Respect copyrights
- 9
- LASER SAFETY
- LASER-SICHERHEIT
- WARNUNG
- Notes
Brand : PHILIPS
Model : SPD3600CC
Category : CD Player