
BB204 - Baby monitors Basbau - Free user manual and instructions
Find the device manual for free BB204 Basbau in PDF.

| Product Type | Baby Monitor |
| Brand | Basbau |
| Model | BB204 |
| Camera Power Supply | 6V DC Power Adapter |
| Monitor Power Supply | Li-ion 3.7V 1100mAh Battery or 6V DC Power Adapter |
| Range | 300 meters (950 feet) in open field |
| Night Vision | 8 Infrared LEDs, automatic activation |
| Digital Zoom | 2x |
| Room Temperature | Display and configurable alert (Celsius/Fahrenheit) |
| Music | 3 built-in melodies |
| Talk-back | Yes, via reply button |
| VOX Mode (voice activation) | Yes, with adjustable sensitivity |
| TCV Mode (voice transmission) | Screen off, automatic activation with sound |
| Box Contents | Camera, monitor, 2 adapters, battery, 2 cable clips, screws and wall anchor, velcro, manual |
| Maintenance | Soft dry cloth; do not touch the lens with fingers |
| Safety | Keep cable at least 1 meter away from baby; do not use extension cord |
| Repairability | Do not open the casing; no user serviceable parts |
Frequently Asked Questions - BB204 Basbau
User questions about BB204 Basbau
0 question about this device. Answer the ones you know or ask your own.
Ask a new question about this device
Download the instructions for your Baby monitors in PDF format for free! Find your manual BB204 - Basbau and take your electronic device back in hand. On this page are published all the documents necessary for the use of your device. BB204 by Basbau.
USER MANUAL BB204 Basbau
3.5 " LCD Wireless Video Baby Monitor
User's Manual Manuel de l'utilisateur Manual del Usuario Bedienungsanleitung Manuale d'uso
natural_image
Line drawing of a digital tablet device with control panel and buttons (no text or symbols)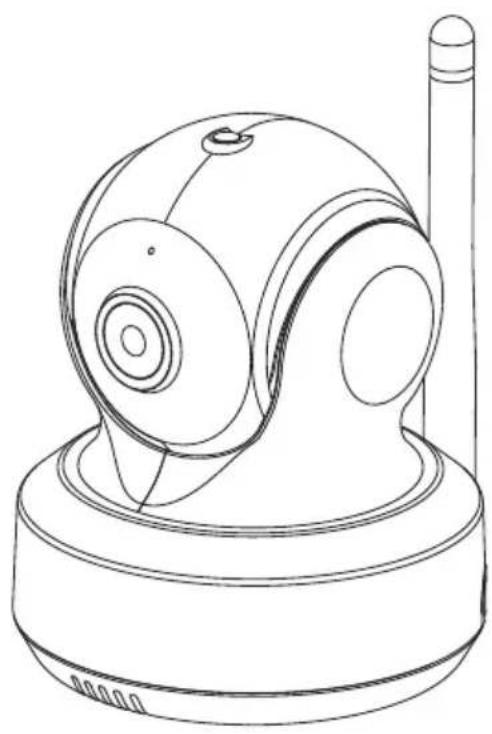
natural_image
Line drawing of a smart home control device with a spherical head and antenna (no text or symbols)natural_image
Line drawing of a mechanical device with rotating components and directional arrows indicating motion (no text or symbols)Fig. 4
2 Monitor Setup/Installation du moniteur/Configuración del monitor /Monitoreinrichtung/Installazione del monitor
2.1 Power Supply/Alimentation/Fuente de alimentación/Stromversorgung/Alimentazione
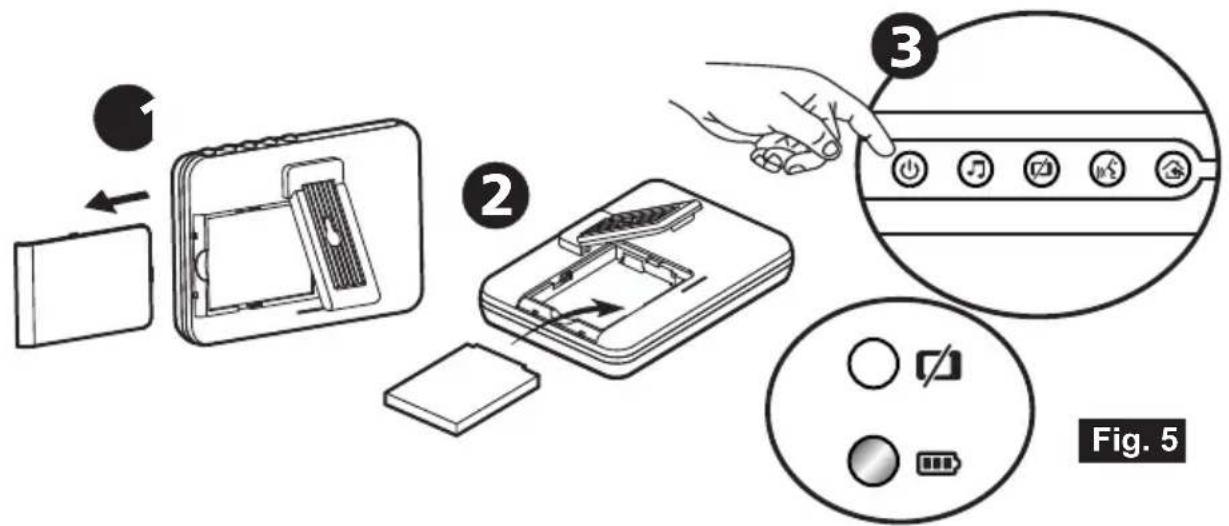
Loading the Battery/Installation de la batterie/Insertar las pilas /Akku einlegen/Inserimento delle batterie
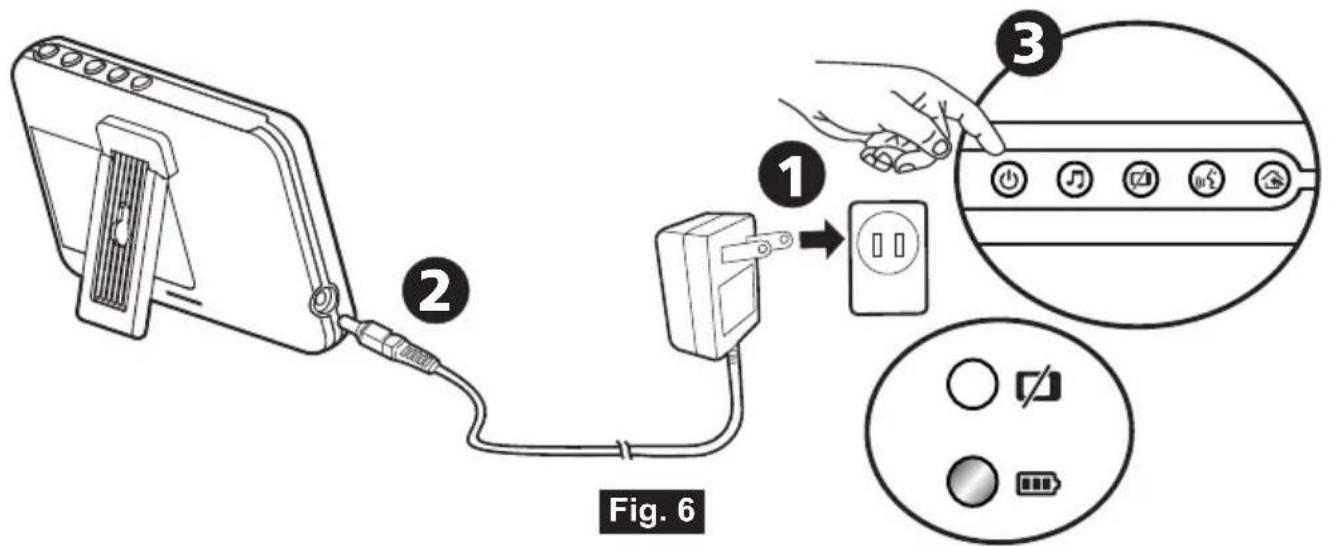
Using AC Power/Utilisation de l'alimentation secteur /Uso de la alimentación de CA/Netzstrom verwenden /Uso dell'alimentazione CA
2.2 Volume Setting/Réglage du volume
/ Configuración del volumen
/Lautstärkeeinstellung / Impostazione del volume
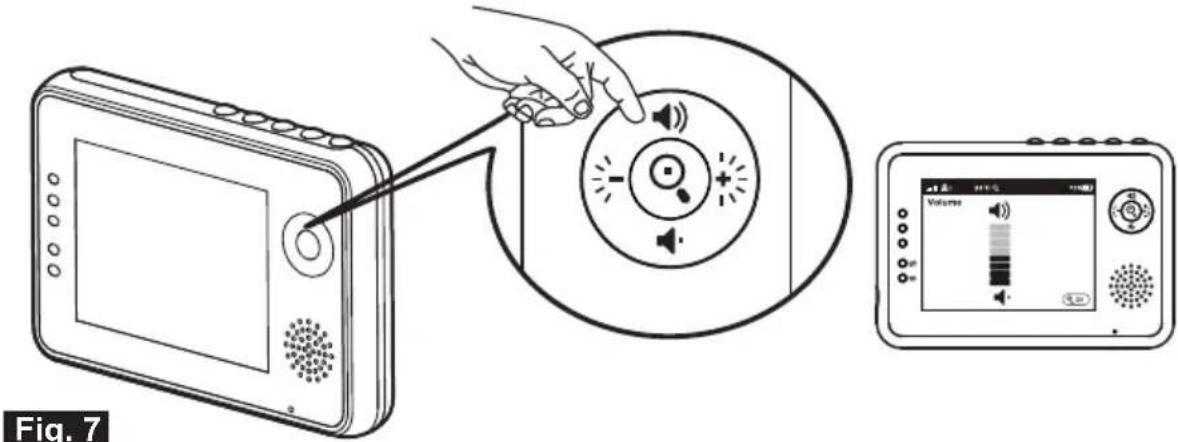
Fig. 7
Fig. 9
2.5 VOX (Voice-Operated Transmission) Function Fonction TCV (Transmission de Commande Vocale) Función VOX (transmisión de activación por voz) VOX-Funktion (geräuschaktivierte Übertragung) Funzione VOX (trasmissione attivata a voce)
2.6 Music Function/Fonction de musique/Función de música / Musikfunktion/Funzione musica
flowchart
graph TD
    A["Hand Tool"] --> B["Play Control Panel"]
    B --> C["Audio Record System"]
    C --> D["Output Stage 1"]
    C --> E["Output Stage 2"]
    C --> F["Output Stage 3"]
2.7 Talkback Function / Fonction de réponse / Función de intercomunicador / Gegensprechfunktion / Funzione interfono
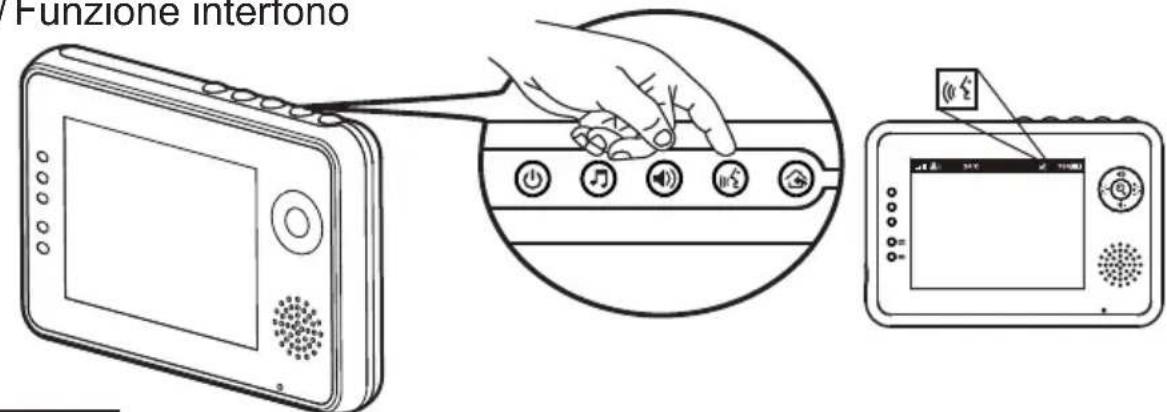
Fig. 13
3.1 Camera Selection / Sélection de la caméra / Selección de la cámara / Kameraauswahl / Selezione telecamera
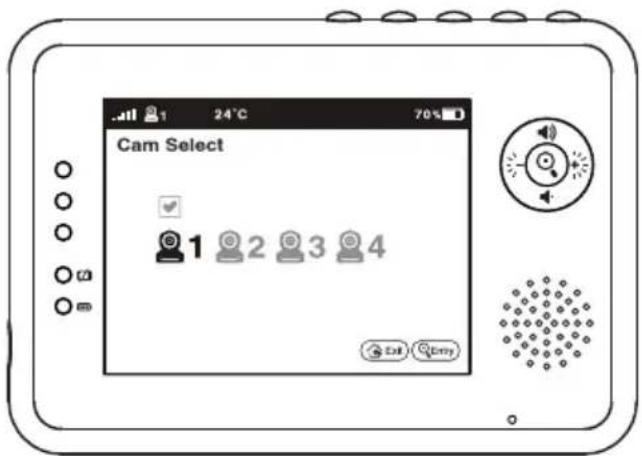
Fig. 14
3.2 Feed Timer Setting / Paramètre du minuteur d'alimentation / Configuración del temporizador para las comidas / Fütterungstimer-Einstellung / Impostazione timer alimentazione
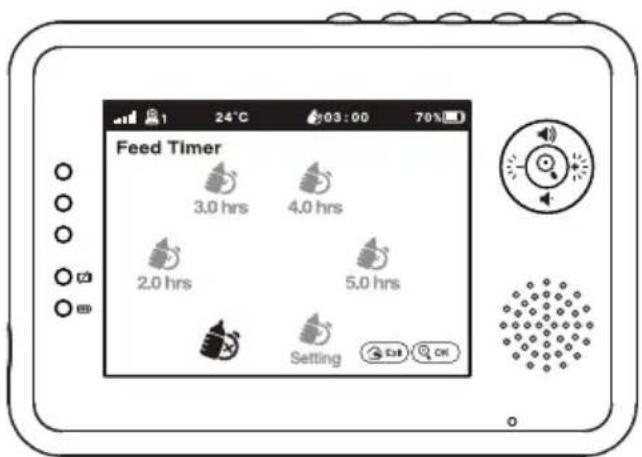
Fig. 15
3.3 Temperature Setting / Réglage de la température / Configuración de la temperatura / Temperatureinstellung / Impostazione temperatura

3.4 Camera Setting / Paramètre caméra / Configuración de la cámara / Kameraeinstellung / Impostazione videocamera

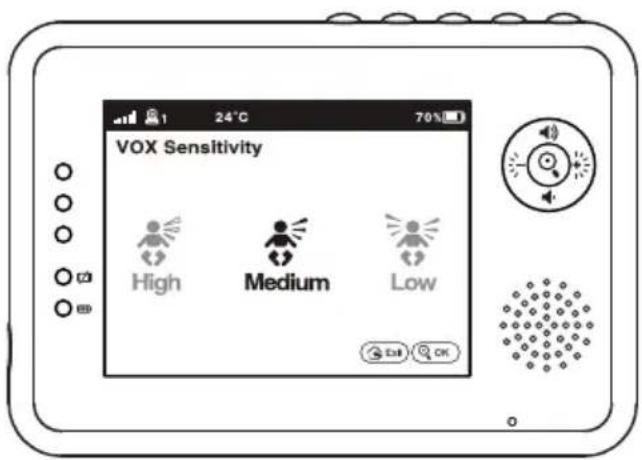
3.5 VOX Sensitivity / Sensibilité VOX / Sensibilidad de VOX / VOX-Empfindlichkeit / Sensibilità VOX
4 Status Information/Informations de statut / Información de estado/Statusinformationen / Informazioni di stato
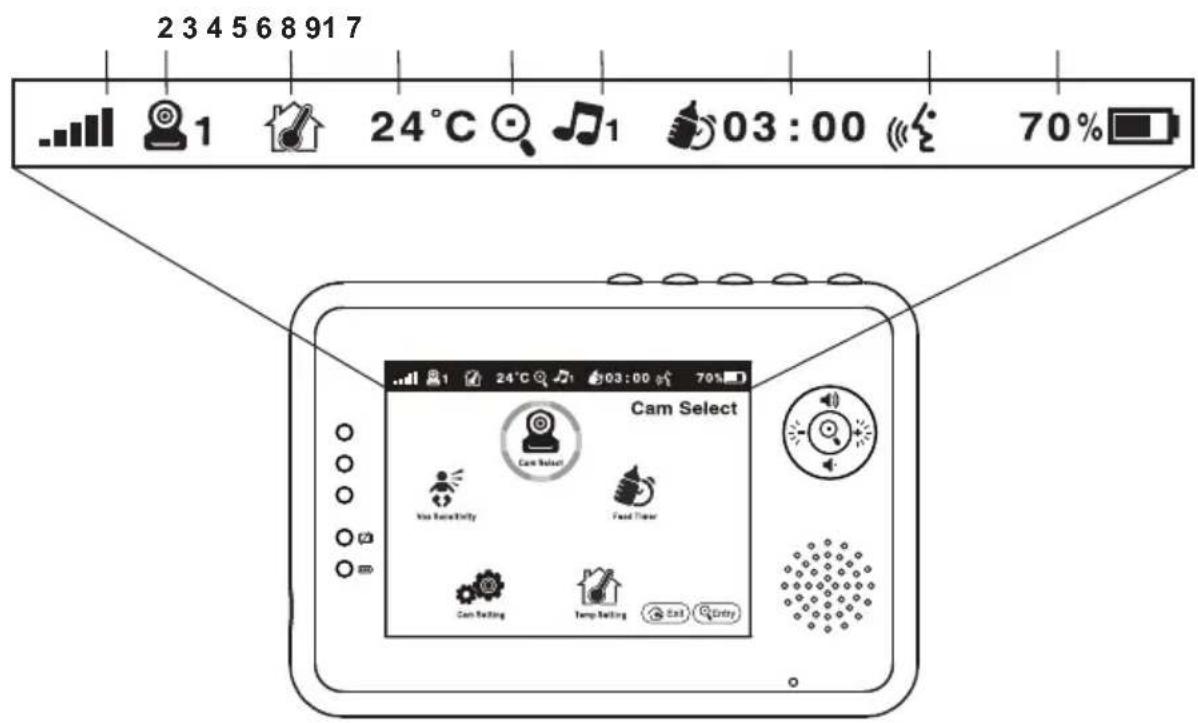
Fig. 19
Package Contents
- One Camera
- One Monitor
- Two Power Adapters
• Battery for Monitor (3.7V 1100mAh Li-ion) - Two Cable Clips
• One Screw and One Wall Anchor - Velcro System
- User's Manual
Product Layout
Camera (Fig. 1)
- Light sensor
- Microphone
- Lens
- Infrared LEDs
- Speaker
- Power adapter plug
- Power/Pairing button
- Antenna
- Temperature sensor
- Power indicator LED
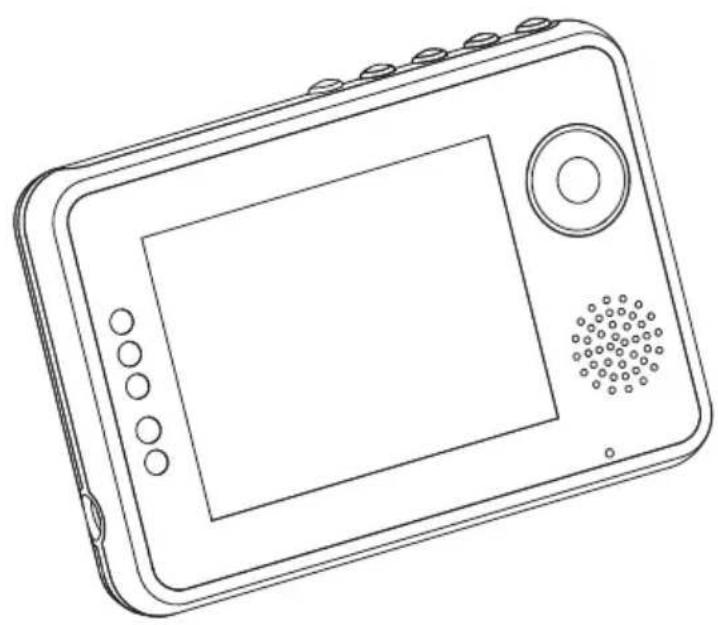
Monitor (Fig. 2)
- LCD screen
- Brightness down button
- Volume up button
- Zoom/OK button
- Brightness up button
- Volume down button
- Speaker
- Microphone
- Power indicator LED
- VOX indicator LED
- Volume indicator LEDs
- Power/VOX button
- Music button
- VOX button
- Talkback button
- Menu button
- Battery compartment
- Holder
- Power adapter plug
Setup
1 Camera Setup
1.1 Power Supply - Using AC Power
- Plug one end of the provided power adapter into a wall outlet and the other end into the back of the camera. See Fig. 3.
Note : Use the adapter labeled OUTPUT: 6V DC with the camera.
- Press the POWER button ⏻ and keep it around 3 seconds to turn on the camera. The LED on the camera will light up (green light). See Fig. 3.
Note : Press the POWER button and keep it around 3 seconds to turn off the camera.
1.2 Fine Tuning
Place the camera in a convenient location, point the lens toward the observation area and adjust the angle by rotating the lens head. See Fig. 4.
1.3 Night Vision
The camera has eight high-intensity LEDs for picking up clear images in the dark. When the light sensor detects low ambient light levels, the LEDs will be automatically activated.
1.4 Room Temperature Measurement
Temperature sensor can measure room temperature on camera side and the room temperature indicator will be displayed on the screen of the monitor unit.
2 Monitor Setup
2.1 Power Supply
The monitor uses 3.7V 1100mAh (Li-ion) battery or the household AC power current.
Loading the Battery
- Open the battery compartment cover on the rear of the monitor. See Fig. 5.
- Insert the battery with the metal facing the battery compartment. See Fig. 5.
- Close the battery compartment cover, and make sure it is locked securely.
- Press the POWER button ⏻ and keep it around 3 seconds to turn the monitor on. See Fig. 5.
Note 1: When power is sufficient, the "Power/Charging" LED will light up (green light); When battery is low, the red LED light will start blinking.
Note 2: Press the POWER button and keep it around 3 seconds to turn off the monitor.
Using AC Power
- Plug one end of the provided power adapter into a wall outlet and the other end into the monitor. See Fig. 6.
Note : Use the adapter labeled OUTPUT: 6V DC with the monitor.
- Press the POWER button ⏻ and keep it around 3 seconds to turn the monitor on. See Fig. 6.
Note 1: When charging starts or power on the monitor, "Power/Charging" LED will light up (green light).
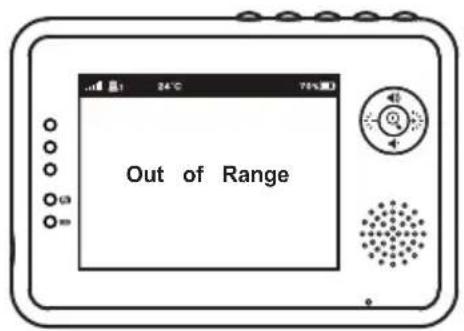
Note 2: "Out of Range" will be displayed on the LCD screen if the monitor exceeds the range (unlink).
Note 3: Press the POWER button and keep it around 3 seconds to turn off the monitor.
2.2 Volume Setting
Press the volume selection button 🔊 & 🔔 to adjust volume level, and then press the Zoom/OK button 🔒 to confirm the setting. See Fig. 7.
2.3 Brightness Setting
Press the brightness selection button ⚙️ & ✪ to adjust brightness level, and then press the Zoom/OK button 🔒 to confirm the setting. See Fig. 8.
2.4 Zoom in Function
Press the Zoom/OK button ⚙️ on monitor once for a 2X zoom of image and press again to change back to normal view. See Fig. 9.
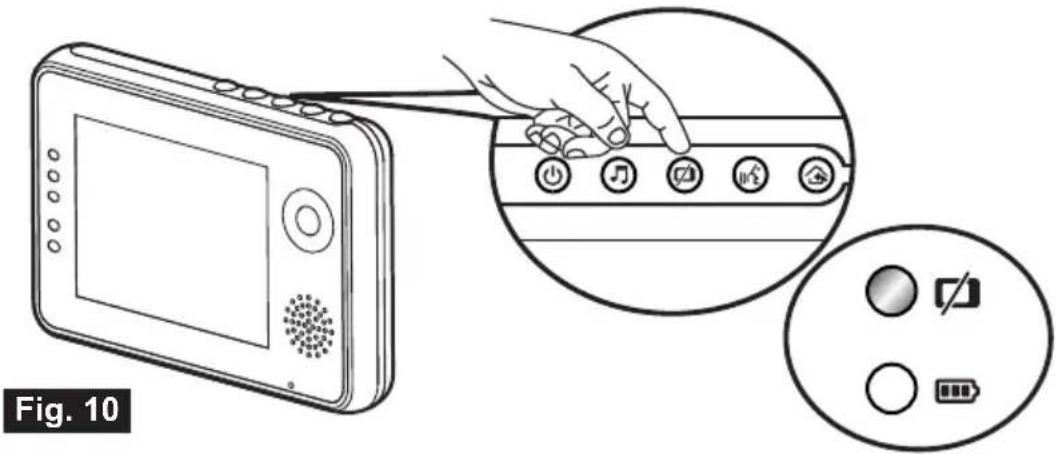
2.5 VOX (Voice-Operated Transmission) Function
-
Press the VOX button ☐ on the monitor unit. This will turn off the screen but VOX LED ☐ will remain ON (green). See Fig. 10.
-
When the sound from the camera reaches the setting level (See Fig. 18), the screen will turn ON automatically. It will turn OFF again after 30 seconds. If the sound from the camera still reaches the setting level during the 30 seconds, it will extend 30 seconds to turn OFF the screen from the last voice event.
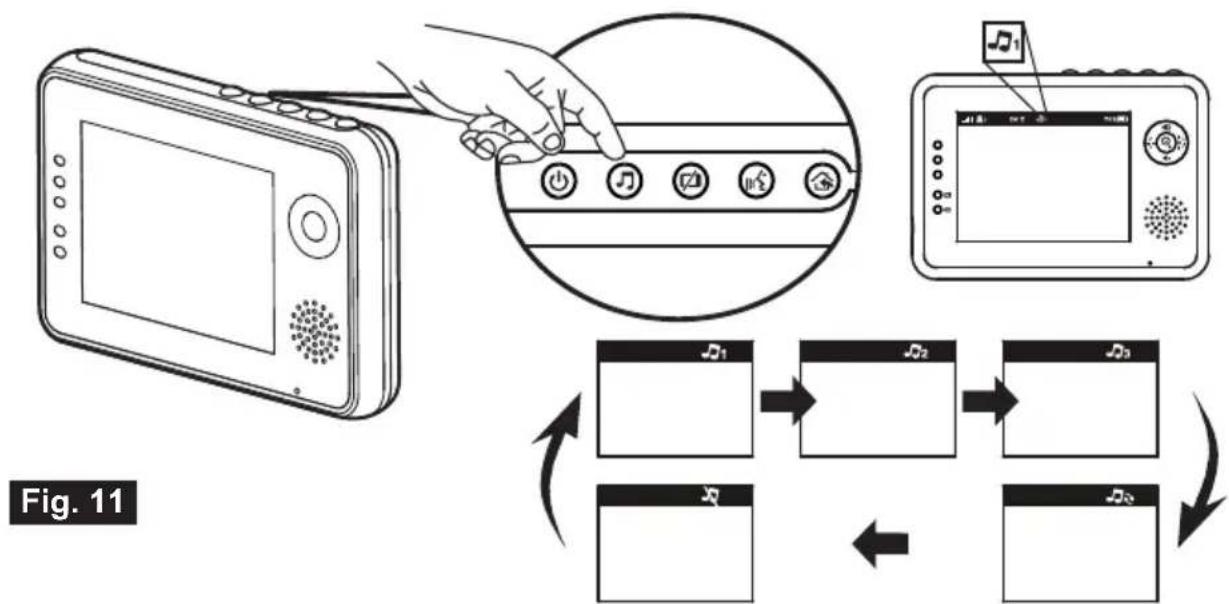
2.6 Music Function
You can play the music with the camera (three pieces of music).
-
Press the music button ♪, the camera will play music. See Fig. 11.
-
Press the music button 🎯 again, the camera will play the next song.
2.7 Talkback Function
Press the talkback button “ ” to speak through the camera unit, and the “ ” icon will then be displayed on the screen. See Fig. 12.
3 Menu Options
- Press the menu button ⚙️ on the monitor unit to display the main menu on the screen. See Fig. 13.
- Use the brightness down ✦ and brightness up ✦ buttons to navigate through the menu.
- Press the Zoom/OK ⏻ button to confirm a setting.
- The main menu contains 5 submenus.
3.1 Camera Selection (Camera Select)
In this submenu you can switch between multiple cameras if the cameras have been paired. See Fig. 14.
3.2 Feed Timer Setting (Feed Timer)
In this submenu you can set up feed timer to remind you the timing. See Fig. 15.
3.3 Temperature Setting (Temp. Setting)
- In this submenu you can choose the temperature unit between degrees Celsius or degrees Fahrenheit. See Fig. 16.
- You can set the temperature range of the temperature alert. If you select "Alert On" to enable the temperature alert and the temperature is outside the range, a warning sound will be emitted from the monitor unit.
See Fig. 16.
3.4 Camera Setting (Camera Setting)
The system comes with a camera unit that has already been paired with the monitor unit. The "Cam Setting" function gives each baby unit a separate channel on the monitor unit. This is necessary for configuring additional camera units.
- If you want to add a new camera, please choose which number of cameras you want to add, and then select add camera icon 🔒 and press the 🔒 button to confirm your selection (See Fig. 17).
The screen will show "Press the pairing button on the Baby unit", and then please also press and hold the power button less than 1 second on the camera side at the same time.
- If you want to delete a paired camera, please choose which number of cameras you want to delete, and then select delete camera icon 📋 to delete the camera (See Fig. 17).
3.5 VOX Sensitivity (VOX Sensitivity)
This submenu lets you choose the VOX (voice activation) sensitivity level. When the level set to high, the screen will turn on by lower sounds.
See Fig. 18.
4 Status Information
The status bar will be displayed on the top of the screen. See Fig. 19.
- Signal strength indicator
- Camera number indicator
- Temperature alert on/off indicator
- Room temperature indicator
- Zoom in indicator
- Music indicator
- Feed timer
- Talkback indicator
- Battery status/Charging indicator
Troubleshooting
You don't getting any signal at all
• Make sure the camera and the monitor are turned on.
• Make sure the power plugs are pushed all the way in.
If the signal is poor, or there is interference
- If there is a microwave oven in use in the path between the camera and monitor, remove the microwave oven or turn it off.
• Make sure the camera and the monitor are within range of each other (range of approximately 950 feet; 300 meters in a clear line of sight). - If the power LED is on but only voice signal input is detected, the monitor can be in voice-activated mode. Press the VOX button to turn on the screen.
Care and Maintenance
- Keep all parts and accessories out of children's reach.
- Fingerprints or dirt on the lens surface can adversely affect camera performances. Avoid touching the lens surface with your fingers.
- Should the lens become dirty, use a blower to blow off dirt and dust, or a soft, dry cloth to wipe off the lens.
- Keep the camera dry. Precipitation, humidity, and other liquids contain minerals will corrode electronic circuits.
• Do not use or store in dusty, dirty areas. - Do not store in hot areas. High temperatures can shorten the life of electronic devices and warp or melt certain plastics.
- Do not store in very cold areas. When the system warms up (to its normal temperature), moisture can form inside the case, which may damage electronic circuit boards.
- Do not attempt to open the case. Non-expert handling of the device may damage the system.
- Avoid dropping or strong shocks.
- Operate this product using only with the power supply included or provided as an accessory.
- Do not overload electrical outlets or extension cords this can result in fire or electric shocks.
FCC Statement
This equipment has been tested and found to comply with the limits for a Class B digital device, pursuant to Part 15 of the FCC Rules. These limits are designed to provide reasonable protection against harmful interference in a residential installation. This equipment generates, uses and can radiate radio frequency energy and, if not installed and used in accordance with the instructions, may cause harmful interference to radio communications. However, there is no guarantee that interference will not occur in a particular installation. If this equipment does cause harmful interference to radio or television reception, which can be determined by turning the equipment off and on, the user is encouraged to try to correct the interference by one or more of the following measures:
• Reorient or relocate the receiving antenna
- Increase the separation between the equipment and receiver
- Connect the equipment into an outlet on a circuit different from that to which the receiver is connected
- Consult the dealer or an experienced radio/TV technician for help
This device complies with Part 15 of the FCC Rules. Operation is subject to the following two conditions: (1) this device may not cause harmful interference, and (2) this device must accept any interference received, including interference that may cause undesired operation.
Caution
- To comply with FCC RF exposure compliance requirements, a separation distance of at least 20 cm must be maintained between the antenna of this device and all persons.
- This Transmitter must not be co-located or operating in conjunction with any other antenna or transmitter.
- Changes or modifications to this unit not expressly approved by the party responsible for compliance could void the user authority to operate the equipment.
Following the safety tips
To prevent accidents and injuries associated with baby monitor cords :
- Make sure the baby unit and AC adapter cords are always out of reach of the baby at least 3 feet (1 meter) away.
Note : It's important even if your baby is not yet standing or mobile.
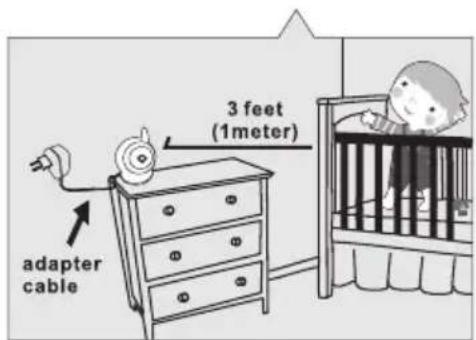
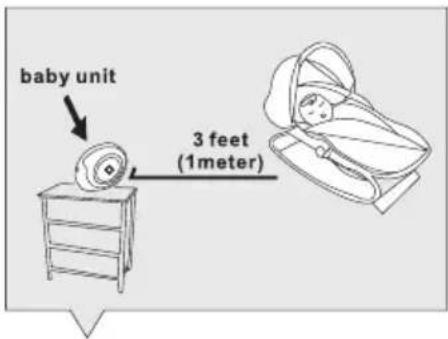
- Use a wireless baby monitor to avoid risk of strangulation.
- Never use extension cords with AC adapters. Only use the AC adapters provided.
Specifications
Camera
Frequency
Antenna
Transmission distance
Modulation
Image Sensor
Lens
IR LED
Dimensions
Weight
Power
Operating temperature
2.4 GHz
Dipole antenna
300 M (Line of Sight)
GFSK, FHSS
CMOS image sensor
f 3.0mm, F 2.4
8 pcs
8.5(W) x 11(H) x 10(D) cm
140g
DC 6V, 800mA
0^ 40^ (32°F \~ 104°F)
Monitor
Frequency
Antenna
Modulation
Display
Display colors
Brightness Control
VOX
Dimensions
Weight
Power
Operating temperature
2.4 GHz
Monopole antenna
GFSK, FHSS
3.5" LCD panel
Full-color
8 levels
Voice activation
12(W) x 8.3(H) x 2.6(D) cm
154g
DC 6V, 800mA or Li battery
0^ 40^ (32°F \~ 104°F)
Specifications subject to change without notice

This device is for indoor use only
This item is in compliance with the essential requirements and other relevant provisions of Directive 1999/5/EC.
Basbau Innovation declares that the BB-204 White Digital is in compliance with the essential requirements and other relevant provisions of Directive 1999/5/EC. This declaration of conformity may be consulted at: www.basbau.com/declarationofconformity/1999/5/EC=8437012400061/bb204whitedigital.pdf