
ISCR51 - Cassette player Ices - Free user manual and instructions
Find the device manual for free ISCR51 Ices in PDF.

| Product type | Portable cassette player with radio and CD player |
| Brand | Ices |
| Model | ISCR51 |
| AC power | 230 V ~ 50 Hz |
| Battery power | 6 C-size batteries (LR14) |
| Dimensions (approx.) | 30 x 20 x 10 cm |
| Weight (approx.) | 2 kg |
| Radio bands | AM 540-1600 kHz, FM 88-108 MHz |
| CD player | Plays audio CDs, repeat and skip functions |
| Cassette | Play and record, pause, stop, fast forward/rewind functions |
| Maintenance | Clean with a soft, dry cloth |
| Safety | Warning: dangerous voltage inside; Class 1 laser product |
| General information | User manual available in PDF at notice-facile.com |
| Recycling | Do not dispose with household waste, take to a recycling center |
Frequently Asked Questions - ISCR51 Ices
User questions about ISCR51 Ices
0 question about this device. Answer the ones you know or ask your own.
Ask a new question about this device
Download the instructions for your Cassette player in PDF format for free! Find your manual ISCR51 - Ices and take your electronic device back in hand. On this page are published all the documents necessary for the use of your device. ISCR51 by Ices.
USER MANUAL ISCR51 Ices
WAARSCHUWING: NIET OPENEN, GEVAAR VAN ELEKTRISCHE SCHOK

CLASS 1 LASER PRODUCT
CLASS 1 LASER APPARAT
LUOKEN 1 LAISERLAITE
KLASSE 1 LASER PRODUKT
LABEL LASERPRODUCT VAN KLASSE 1
TO PREVENT FIRE OR SHOCK HAZARD DO NOT EXPOSE THIS APPLIANCE TO RAIN OR MOISTURE.
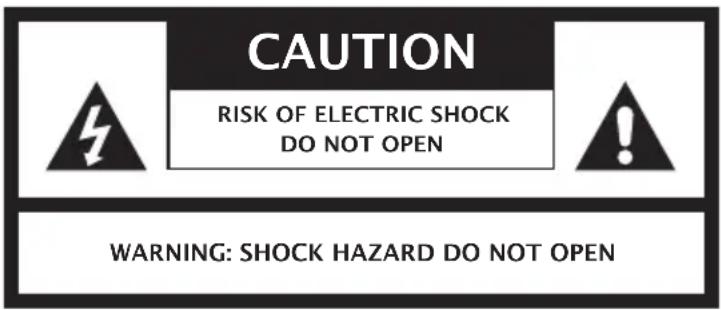

LIGHTING FLASH WITH ARROWHEAD SYMBOL- Within an equilateral triangle, is intended to alert the user to the presence of uninsulated dangerous voltage within the products enclosure that may be of sufficient magnitude to constitute a risk of electric shock to persons.

EXCLAMATION POINT- within an equilateral triangle, is used to indicate that a specific component shall be replaced only by the component specified in that documentation for safety reason.
The following label has been affixed to the unit, listing the proper procedure for working with the laser beam:
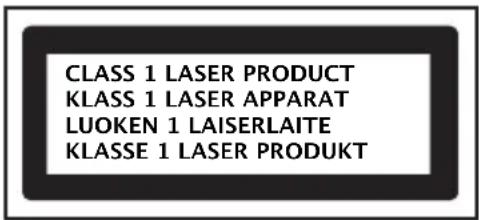
CLASS 1 LASER PRODUCT LABEL-
This label is attached to the place as illustrated to inform that the apparatus contains a laser component.
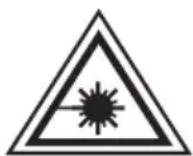
WARNING LABEL INFORMING OF RADIATION:
This label is placed inside the unit. As shown in the illustration. To warn against further measures on the unit. The equipment contains a laser radiating laser rays according to the limit of laser product of class 1.
POWER SOURCES
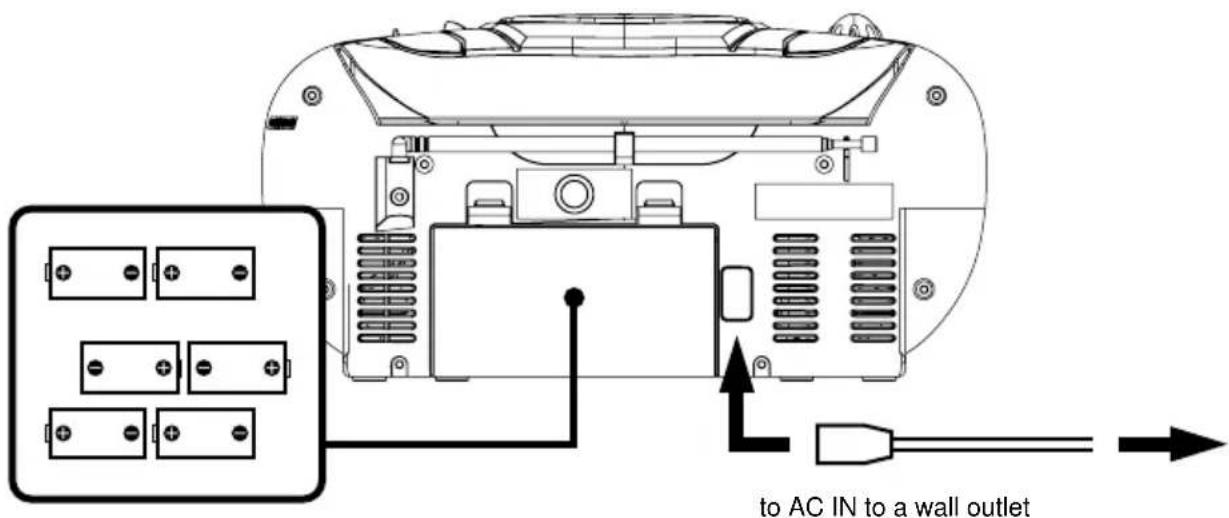
Insert 6 x "C" size batteries into the battery compartment
AC POWER
You can power your portable system by plugging the detachable AC power cord into the AC inlet at the back of the unit and into a wall AC power outlet. Check that the rated voltage of your appliance matches your local voltage. Make sure that the AC power cord is fully inserted into the appliance.
BATTERY POWER
Insert 6 × "C" size batteries into the battery compartment. Be sure that the batteries are inserted correctly to avoid damage to the appliance. Always remove the batteries when appliance will not be used for a long period of time, as this will cause leakage to the batteries and subsequently damage to your set.
Notes:
- Use batteries of the same type. Never use different types of batteries together.
- To use the appliance with batteries, disconnect the AC power cord from it.
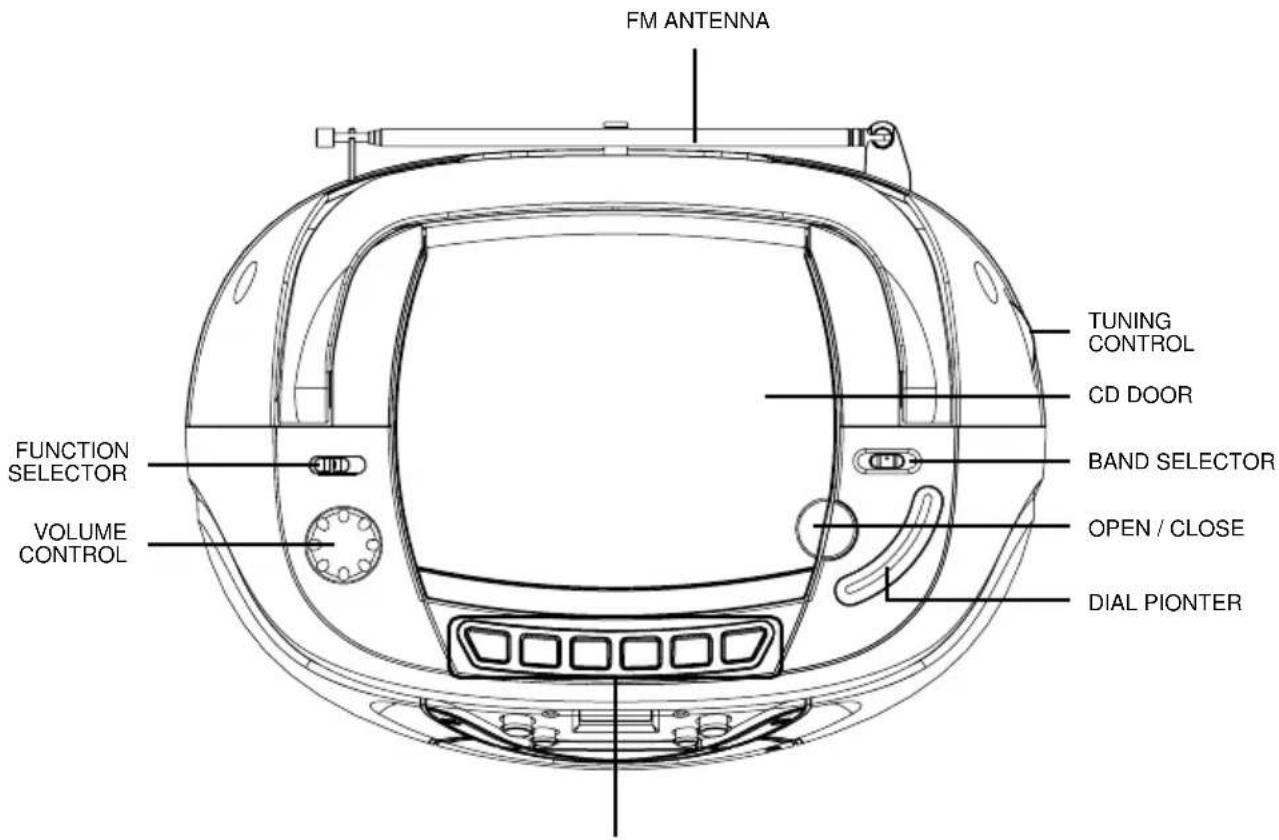
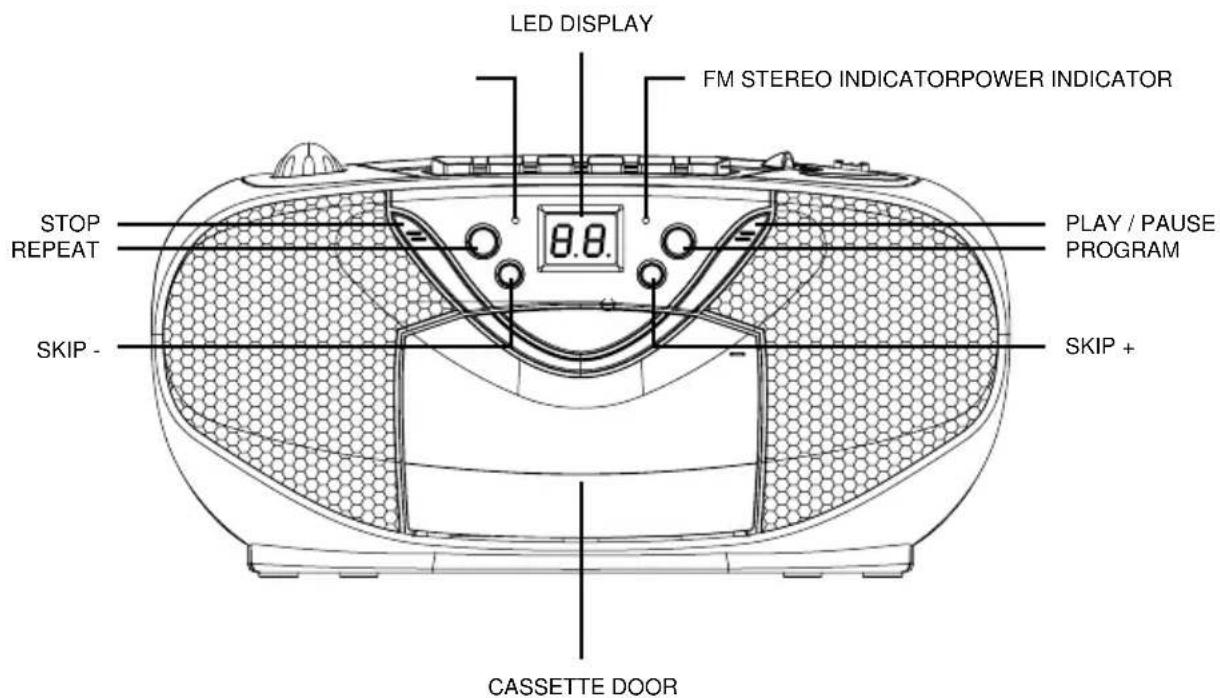
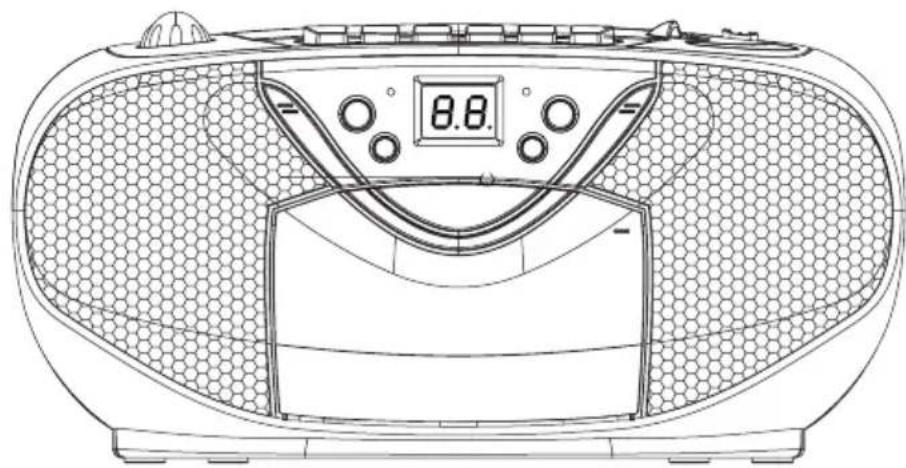
LOCATION OF CONTROL
TAPE BUTTONS - PAUSE, STOP / EJECT, FAST FORWARD, REWIND, PLAY, RECORD
RADIO OPERATION
GENERAL OPERATION
- Set the "FUNCTION" selector to "RADIO" mode.
- Select desired band by using the "BAND" selector.
- Adjust radio frequency to your desired station by using the "TUNING" control.
- Adjust the "VOLUME" control to the desired level.
FM / FM-STEREO RECEPTION
- Set the "BAND" selector to FM mode for MONO reception.
- Set the "BAND" selector to FM ST. mode for FM STEREO reception. The Stereo indicator light up to show FM ST. mode.
FOR BETTER RECEPTION
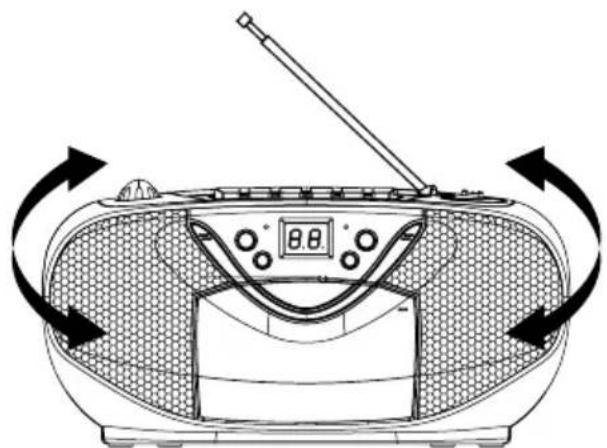
- Reorient the antenna for better reception.
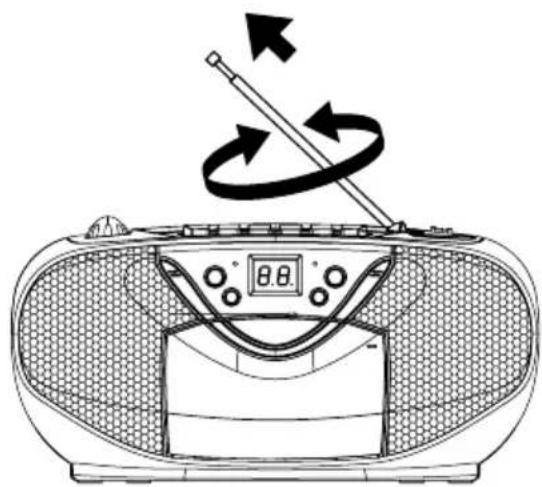
- Reorient the appliance to get better AM reception.
TAPE OPERATION
GENERAL OPERATION
PAUSE II Press to stop playing tape operation temporarily.
Press again to resume tape operation.
STOP / EJECT Press to stop tape operations.
Press again to open the cassette door after the tape spools stop turning.
FAST FORWARD & Press to start rapid tape winding either forward or reverse direction.
REWIND
PLAY Press to start playing tape.
RECORD Press it together with "PLAY" button to start recording.
PLAYBACK
- Set the "FUNCTION" selector to "TAPE" mode.
- Press the "STOP / EJECT" button to open the cassette door and insert your tape.
- Close the cassette door.
- Press the "PLAY" button to start playing tape.
- Adjust the "VOLUME" control to the desired level.
- Press the "PAUSE" button when you want to stop playing tape operation temporarily.
- Press the "STOP / EJECT" button when finished.
RECORDING
- Press the "STOP / EJECT" button to open the cassette door and insert a blank tape.
- Select the source you want to record.
To record from radio - Set the "FUNCTION" selector to "RADIO" mode and adjust the desired station. To record from CD / MP3 - Place a disc on the CD compartment. Set the "FUNCTION" selector to "CD / MP3" mode and select the desired track.
- Press the "RECORD" button together with the "PLAY" button to start recording.
- Press the "STOP / EJECT" button when finished.
CD OPERATION
GENERAL OPERATION
PLAY / PAUSE Press to start playing CD disc.
Press again to stop playing CD operation temporarily.
Press again to resume playback.
SKIP + ▶▶I &
Press to go to the next track or back to the previous track.
SKIP - Press and hold while playing until you find the point of the sound.
STOP Press to stop all CD operation.
PLAYBACK
- Set the "FUNCTION" selector to "CD" mode.
- Open the CD door and place a CD disc with the label up in the CD compartment.
- Close the CD door.
- Focus search is performed if disc is inside. Total number of tracks is read and appears on the display.
- Press the "PLAY / PAUSE" button to start playing CD disc.
- Adjust the "VOLUME" control to the desired level.
- Press the "PLAY / PAUSE" button again when you want to stop playback temporarily.
- Press the "STOP" button when finished.
CD OPERATION
PROGRAM
Up to 20 tracks can be programmed for disc play in any order.
Be sure to press the "STOP" button before use.
- Press the "PROGRAM" button, the display will show "01" and flash.
- Select desired track by using the "SKIP +" or "SKIP -" button.
- Press the "PROGRAM" button again to confirm desired track into the program memory.
- Repeat step 2 and 3 to enter additional tracks into the program memory.
- When all the desired tracks have been programmed. Press the "PLAY / PAUSE" button to play the disc in the order you have programmed and the program indicator flashes.
- Press the "STOP" button twice to terminate programmed play and the program indicator will turn off.
REPEAT
Press the "REPEAT" button before or during playing CD, a single track or all the tracks can be repeated.
Each press switches the repeat mode as follows:
1 - REPEAT 1 (The repeat indicator is flashing.)
2 - REPEAT ALL (The repeat indicator is steadily on.)
3-NORMAL PLAYBACK

SPECIFICATION
Power Supply: AC 230V ~ 50Hz
DC 9V (6 x UM-2) Batteries not included
Radio Section:
Frequency range: AM: 540 - 1600 KHz
FM:88-108MHz

Instructions on environment protection
Do not dispose of this product in the usual household garbage at the end of
Its life cycle; hand it over at a collection point for the recycling of electrical and electronic appliances. The symbol on the product, the instructions for use or the packing will inform about the methods for disposal.
The materials are recyclable as mentioned in its marking. By recycling, material recycling or other forms of re-utilization of old appliances, you are making an important contribution to protect our environment.
Please inquire at the community administration for the authorized disposal location.


iOES
ISCR-51
ATTENTION
POUR EVITER LES RISQUES D'INCENDIE OU D'ÉLECTROCUTION, N'EXPOSEZ PAS CET APPAREIL À LA PLUIE OU À L'HUMIDITÉ.

ATTENTION
RISQUE D' ELECTROCUTION NE PAS OUVRIR

ATTENTION: DANGER D'ÉLECTROCUTION. NE PAS OUVRIR


L'ECLAIR AVEC LE SYMBOLE DE FLECHE
CLASS 1 LASER PRODUCT
KCLASS 1 LASER APPARAT
LUOKEN 1 LAISERLAITE
KLASSE 1 LASER PRODUKT
ÉTIQUETTE PRODUIT LASER DE CLASSE 1
RECEPTION FM ET STEREO FM
- REGLEZ LE SELECTEUR DE BANDE SUR "FM". LES PROGRAMMES SONT EMIS EN MODE MONO. NOTAMMENT QUAND LA RECEPTION STEREO EST MAUVAISE. IL EST DONC PREFERABLE DANS CE CAS D'ETRE EN MODE MONO.
- REGLEZ LE SELECTEUR DE BANDE SUR "FM ST" POUR RECEVOIR LES PROGRAMMES EN MODE STEREO. LE VOYANT STEREO S'ALLUME POUR INDIQUER CE MODE.
POUR UNE MEILLEURE RECEPTION
DC 9V (6 x UM-2) Piles non comprises
Section Radio :
LIGHTING FLASH WITH ARROWHEAD SYMBOL- Within an equilateral triangle, is intended to alert the user to the presence of uninsulated dangerous voltage within the products enclosure that may be of sufficient magnitude to constitute a risk of electric shock to persons.

EXCLAMATION POINT- within an equilateral triangle, is used to indicate that a specific component shall be replaced only by the component specified in that documentation for safety reason.


- LABEL LASERPRODUCT VAN KLASSE 1
- CLASS 1 LASER PRODUCT LABEL-
- WARNING LABEL INFORMING OF RADIATION:
- POWER SOURCES
- AC POWER
- BATTERY POWER
- Notes:
- LOCATION OF CONTROL
- RADIO OPERATION
- GENERAL OPERATION
- FM / FM-STEREO RECEPTION
- FOR BETTER RECEPTION
- TAPE OPERATION
- PLAYBACK
- RECORDING
- CD OPERATION
- PROGRAM
- REPEAT
- SPECIFICATION
- ATTENTION
- L'ECLAIR AVEC LE SYMBOLE DE FLECHE
- ÉTIQUETTE PRODUIT LASER DE CLASSE 1
- RECEPTION FM ET STEREO FM
- POUR UNE MEILLEURE RECEPTION
Brand : Ices
Model : ISCR51
Category : Cassette player