EXP511 - Portable CD player PHILIPS - Free user manual and instructions
Find the device manual for free EXP511 PHILIPS in PDF.

User questions about EXP511 PHILIPS
0 question about this device. Answer the ones you know or ask your own.
Ask a new question about this device
Download the instructions for your Portable CD player in PDF format for free! Find your manual EXP511 - PHILIPS and take your electronic device back in hand. On this page are published all the documents necessary for the use of your device. EXP511 by PHILIPS.
USER MANUAL EXP511 PHILIPS
text_image
Technical diagram of a circular device with numbered components for identification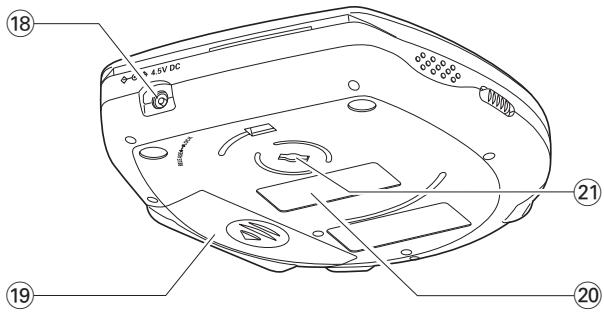
text_image
18 Φ-6 4.0V DC 21 19 20MAGYARORSZÁG
Minőségtanúsítás
Environmental information 9
MP3 music files 10–11
Firmware upgrade 12
Power supply
Batteries 13
ECO-Plus NiMH batteries 14
Mains adapter 15
Headphones 15
Basic functions
Playing a disc 16
Pause 17
Display information 17
Volume and sound 18
Selecting and searching on all discs 19
Selecting on MP3-CDs 20
Features
Playing a selection of tracks – favourites 21
Playing tracks repeatedly or in random order - MODE — 22
Storing the last position played – RESUME 23
Locking all buttons – HOLD 23
ESP and powersaving 24
Beep 24
Accessories
In-car connections (supplied or optionally available) — 25
Remote control AY 3769 (supplied or optionally available) — 26–27
Belt clip 27
Troubleshooting 28–29
1
natural_image
Diagram showing airflow or movement around a document with arrows indicating direction (no text or symbols)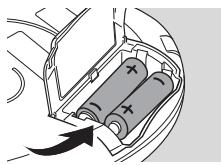
natural_image
Diagram of a car interior showing battery and motor components with an arrow indicating direction (no text or symbols)2
natural_image
Diagram showing cable connection with a connector and cable (no text or symbols)3
natural_image
Diagram of a car's side profile showing curved roof and side-mounted sensors (no text or symbols)
natural_image
Illustration of hands using a tool to adjust or install a CD or DVD disc (no text or symbols visible)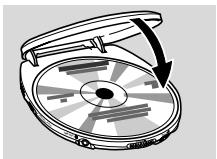
natural_image
Diagram of a CD or DVD disc with an open lid and arrow indicating rotation (no text or symbols)4 HOLD → OFF
text_image
OFF + RESUME + HOLD5 PLAY ▶II
text_image
Diagram illustrating video playback control with labeled buttons and directional arrows6 VOL
text_image
Diagram illustrating sound pressure with a speaker emitting music notes, showing directional arrows and text labels!!!
natural_image
Illustration of a vacuum cleaner emitting heat and solar radiation (no text or symbols)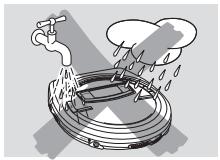
natural_image
Illustration of a faucet spraying water over a circular tank with raindrops, no text or symbols present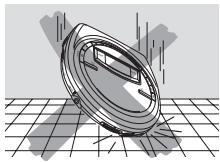
natural_image
3D rendered mechanical component with a circular housing and grid background (no text or symbols)This set complies with the radio interference requirements of the European Community.
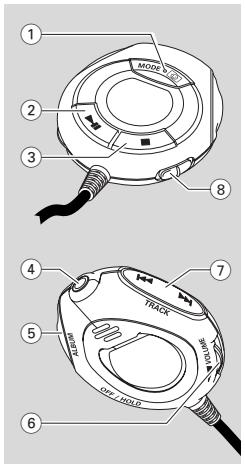
① OPEN▶
opens the CD lid
② VOL
adjusts the volume
③ 😊
😊
marks and unmarks a favourite
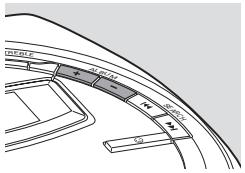
④
◀◀
skips backward and searches
backward
⑤
▶▶
skips forward and searches
forward
⑥ -
-
MP3-CD only: selects the previous album or skips backward
⑦ +
MP3-CD only: selects the next album or skips forward
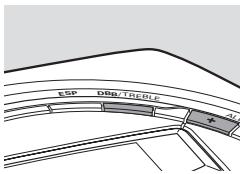
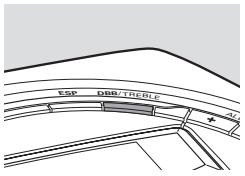
⑧ DBB/TREBLE
selects the bass and treble adjustment
⑨ ESP
ESP
Electronic Skip Protection prevents music interruptions caused by shocks
⑩ display
⑪ MODE
selects playback options such as
SHUFFLE and REPEAT
⑫ DISPLAY
selects the track and album information
13
stops playback and switches the set off
14
switches the set on, starts playback and interrupts playback
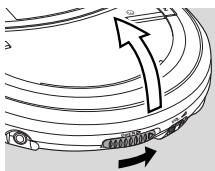
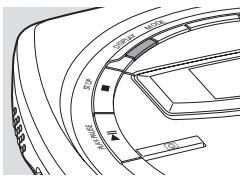
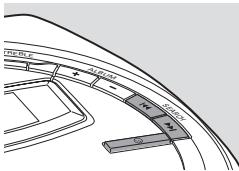
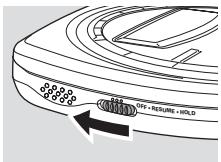
⑮ OFF·RESUME·HOLD
OFF switches RESUME and HOLD off RESUME stores the last position played HOLD locks all buttons
16
#
selects playback of favourites
⑰ LINE OUT/
3.5 mm line out to connect
– the headphones
– the remote control
– this set to the audio input of your stereo equipment
⑱ 4.5V DC
to connect the external power supply
⑲ battery compartment
⑳ type plate
②1 belt clip hole
CAUTION
Use of controls or adjustments or performance of procedures other than herein may result in hazardous radiation exposure or other unsafe operation.
Maintenance
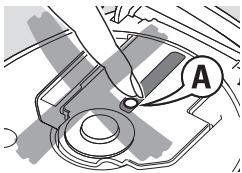
Do not touch the lens Ⓐ of the set.
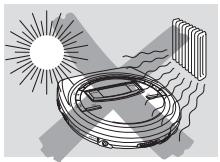
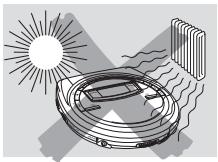
Do not expose the set, batteries or discs to humidity, rain, sand or excessive heat (caused by heating equipment or direct sunlight).
The lens may cloud over when the set is suddenly moved from cold to warm
surroundings. Playing is not possible then. Leave the set in a warm environment until the moisture evaporates.
text_image
Technical diagram showing a mechanical component with labeled section A, likely illustrating a turning or assembly process.Active mobile phones in the vicinity of this set may cause malfunctions.
Avoid dropping the set as this may cause damage.
Clean the set with a soft, slightly dampened lint-free cloth. Do not use any cleaning agents as they may have a corrosive effect.
To clean a disc, wipe it in a straight line from the centre towards the edge using a soft, lint-free cloth. Cleaning agents may damage the disc.
Environmental information
All redundant packing material has been omitted. We have done our utmost to make the packaging easily separable into three mono materials: cardboard (box), polystyrene foam (buffer) and polyethylene (bags, protective foam sheet).
Your set consists of materials which can be recycled if disassembled by a specialized company. Please observe the local regulations regarding the disposal of packing materials, exhausted batteries and old equipment.
MP3 music files
The music compression technology MP3 (MPEG Audio Layer 3) reduces the digital data of an audio CD significantly while maintaining CD-like sound quality. With MP3 you can record up to 10 hours of CD-like music on a single CD-ROM.
How to get music files
Either download legal music files from the internet to your computer hard disc or create them from your own audio CDs. For this, insert an audio CD into your computer's CD-ROM drive and convert the music using an appropriate encoder software. To achieve a good sound quality, a bit rate of 128 kbps or higher is recommended for MP3 music files.
How to organize music files
In order to easily handle the large number of music files on a CD-ROM, you can organize them in folders (“albums”).
The tracks of an album will be played in alphabetical order. If you want to arrange them in a certain order, let the file names start with numbers. For example:
001-ONEWORLD.MP3
002-FIRESTARTER.MP3
003-DEEP.MP3
The albums will be arranged in alphabetical order. If albums are located in an album, they will be played after this album. Albums without MP3 files will be skipped.
If there are MP3 files which you did not put into an album, you will find them in the album Various with album number 0. Various is the first album that will be played.
When playing a disc with CD Audio tracks and MP3 files, the CD Audio tracks will be played first.
How to make a CD-ROM with MP3 files
Use your computer's CD burner to record ("burn") the music files from your hard disc on a CD-ROM. Use either ISO 9660 disc format or UDF. Some CD burner software like e.g. "DirectCD" support the UDF format.
Make sure that the file names of the MP3 files end with .mp3.
Supported formats
This set supports:
- Disc format: ISO 9660, Joliet, Multisession, UDF, Enhanced Music CD, Mixed Mode CD
- MP3 bit rate: 32–320 kbps and variable bit rate
- Total number of music files and albums: around 350 (with a typical file name length of 20 characters)
Note: The number of music files that can be played depends on the length of the file names. With short file names more files will be supported.
All trademarks used are owned by their respective owners.
Firmware upgrade
Occasionally, Philips releases new software (“firmware”) for your set.
1 Connect the mains adapter to 4.5V DC on the set and to the wall socket (see "Mains adapter").
2 Keep MODE pressed for 3 seconds.
→ The type of your set and the current version of the firmware are displayed. Upgrade? is displayed.
3 Press ■.
4 Visit the Philips Audio homepage www.audio.philips.com. Check if there is a firmware file for your set and if the firmware version is higher than the current version of your set. Download the file and burn it on a CD-ROM.
5 Insert the CD-ROM into the set and keep MODE pressed for 3 seconds.
→ Upgrade? is displayed.
6 Press ▶II:
→ Upgrading is displayed and upgrading starts. This may take some minutes. After upgrading is finished, Upgrade complete is scrolled.
→Wrong upgrade file is scrolled: Your set already has the latest firmware or the downloaded file does not correspond to your set.
→Upgrade file defect is scrolled: The upgrade file has been damaged during the download or when burning the CD-ROM. Download the file again, burn a new CD-ROM and try again.
→No upgrade file is scrolled: No upgrade file was found on the inserted CD-ROM.
Note: If upgrading is interrupted accidentally, repeat step 6 until upgrading is completed successfully.
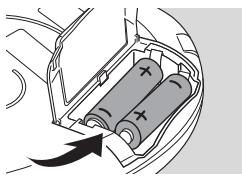
Batteries (supplied or optionally available)
Inserting batteries
Open the battery compartment and insert 2 alkaline batteries of type AA (LR6, UM3).
Do not use old and new or different types of batteries in combination.
Indication of empty batteries
- Replace the batteries or connect the mains adapter as soon as □ blinks and Replace batteries is scrolled.
Remove batteries if they are empty or if the set will not be used for a long time.
natural_image
Diagram of a car interior showing battery cells with an arrow indicating direction (no text or symbols)
text_image
Replace batteBatteries contain chemical substances, so they should be disposed of properly.
Average playing time of batteries under normal conditions:
| Alkaline batteries | ECO-PLUS NiMH batteries | |
| ESP on | 10 hours | 5 hours |
| ESP and powersaving on: | ||
| Audio disc | 15 hours | 7 hours |
| MP3-CD | 20 hours | 10 hours |
Note: To switch on powersaving, press ESP repeatedly during playback until ESP+LP is shown (see “ESP and powersaving”).
ECO-PLUS NiMH batteries (for versions supplied with ECO-PLUS NiMH batteries AY 3362 only)
Recharging works only on a set with supplied rechargeable ECO-PLUS NiMH batteries AY 3362.
Recharging the ECO-PLUS NiMH batteries
1 Insert the 2 rechargeable ECO-PLUS NiMH batteries AY 3362.
2 Connect the mains adapter to 4.5V DC on the set and to the wall socket.
→Charging batteries is scrolled once. While the battery symbol is changing, the set is recharging the NiMH batteries.

text_image
Charging batt3 When the batteries are fully recharged, is shown and Charge full is displayed.
ECO-PLUS NiMH battery information
Recharge only the supplied NiMH batteries AY 3362. Do not recharge any other type of batteries.
Recharging takes approximately 7 hours. Recharging stops during playback.
Recharging full or half-full batteries will shorten the battery lifetime.
Therefore, after using the rechargeable ECO-PLUS NiMH batteries a few times, discharge them completely before recharging.
To avoid a short circuit, the batteries should not touch any metal objects.
If the batteries quickly become empty after recharging, the contacts are dirty or the end of the battery lifetime has been reached.
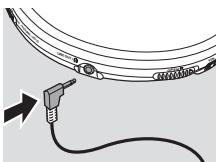
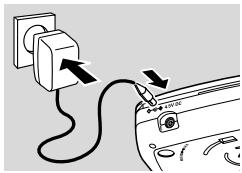
Mains adapter
Use only the AY 3170 mains adapter (4.5 V/300 mA direct current, positive pole to the centre pin). Any other product may damage the set.
1 Make sure the local voltage corresponds to the adapter's voltage.
2 Connect the mains adapter to 4.5V DC on the set and to the wall socket.
Note: Always disconnect the adapter if you are not using it.
text_image
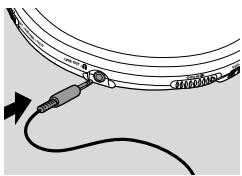
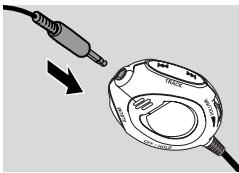
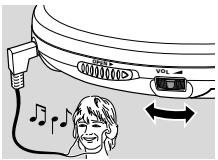
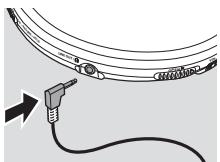
Diagram showing a plug inserted into a car with an arrow indicating the cable being inserted, labeled with Chinese text.Headphones (SBC HE 545)
- Connect the supplied headphones to LINE OUT/Ω.
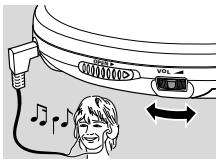
Note: LINE OUT/Ω can also be used for connecting this set to your HiFi system. Set VOL ▶ on this set to position 8 and adjust volume and sound with your HiFi system.
natural_image
Diagram of a cable connector with a cable and cable cord, showing no text or symbolsUse your head when using headphones
Hearing safety
Do not play your headphones at a high volume. Hearing experts advise that continuous use at high volume can permanently damage your hearing.
Traffic safety
Do not use headphones while driving a vehicle. It may create a hazard and it is illegal in many countries. Even if your headphones are an open-air type designed to let you hear outside sounds, do not turn up the volume so high that you cannot hear what is going on around you.
Playing a disc
With this set you can play
– all pre-recorded audio CDs
– all finalized audio CDRs and CDRWs
- MP3-CDs (CD-ROMs with MP3 files)
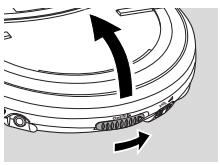
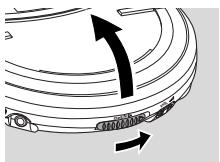
1 Push the OPEN▶ slider to open the CD lid.
2 Insert a disc, printed side up, by pressing gently on the disc's centre so that it fits onto the hub. Close the lid by pressing it down.
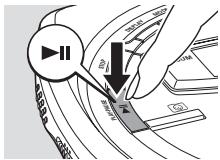
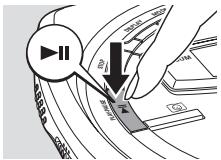
3 Press ▶II to start playback.
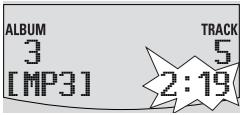
→Reading CD is displayed. Playback starts. The track type (CD or MP3), the current track number and the elapsed playing time are displayed. For an MP3 track, the album number is also displayed and the filename is scrolled twice.
4 Press ■ to stop playback.
→ The total number of tracks, the track types (CD, MP3), the number of albums on an MP3-CD and the total playing time (of an audio disc only) are displayed.
5 To remove the disc, hold it by its edge and press the hub gently while lifting the disc.
natural_image
Diagram of a mechanical component with curved lines and a directional arrow, no text or symbols present
text_image
100 200 300 400 500 600 700 800 900 1000 1100 1200 1300 1400 1500 1600 1700 1800 1900 2000 2100 2200 2300 2400 2500 2600 2700 2800 2900 3000 3100 3200 3300 3400 3500 3600 3700 3800 3900 4000 4100 4200 4300 4400 4500 4600 4700 4800 4900 5000 5100 5200 5300 5400 5500 5600 5700 5800 5900 6000 6100 6200 6300 6400 6500 6600 6700 6800 6900 7000 7100 7200 7300 7400 7500 7600 7700 7800 7900 8000 8100 8200 8300 8400 8500 8600 8700 8800 8900 9000 9100 9200 9300 9400 9500 9600 9700 9800 9900 100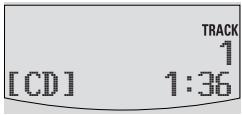
text_image
[CD] TRACK 1 1:36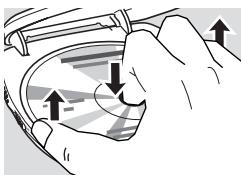
natural_image
Illustration of a hand holding a circular object with directional arrows indicating motion or force (no text or symbols)Notes:
After pressing ▶II it may take some time until the first MP3 track is played. 5 seconds after pressing ■ the set switches off automatically.
Pause
1 Press ▶II to interrupt playback.
→ The time where playback was interrupted blinks.
2 To resume playback press ▶II again.
text_image
ALBUM 3 [MP3] TRACK 5 2:19Display information (for MP3 tracks only)
1 Press DISPLAY repeatedly during playback to select the information to be displayed:
- Filename: the track's file name,
- Album: the album's folder name,
- Artist: the artist's name (if this ID3 tag information is available),
- Title: the track's title (if this ID3 tag information is available),
– the track type and the elapsed playing time.
2 The selected information is scrolled twice. The album number and track number are displayed.
text_image
379 100mm x 200mm (5)[Filename] Is this Love
Note: The ID3 tag is part of an MP3 file and contains various track information such as the track's title or the artist's name. Complete the ID3 tag information with your MP3 encoder software before burning the MP3-CD.
Volume and sound
Volume adjustment
- Adjust the volume by using VOL ▲.

natural_image
Diagram of a cable connector with labeled voltage and current direction arrows (no text or symbols beyond labels)Bass adjustment
1 Press DBB/TREBLE once during playback to select the bass adjustment.
→ The current bass setting blinks.
2 Press + repeatedly to select either:
- No Bass: no bass enhancement
– Bass 1: moderate bass enhancement
– Bass 2: strong bass enhancement
→ The selected bass setting blinks.
3 Press DBB/TREBLE to confirm your selection.
text_image
ESP DBB/TREBLE
text_image
Bass 1 Bass 2Treble adjustment
1 Press DBB/TREBLE twice during playback to select the treble adjustment.
→ The current treble setting blinks.
2 Press + repeatedly to select either:
- No Treble: no treble enhancement
- Treble: treble enhancement
→ The selected treble setting blinks.
3 Press DBB/TREBLE to confirm your selection.

text_image
No Treble TrebleSelecting and searching on all discs
Selecting a track during playback
- Briefly press ◀◀ or ▶▶ once or several times to skip to the beginning of the current, previous or subsequent track.
→ Playback continues with the selected track.

text_image
DEGREE HOLD FLOW MEDIUM 10Searching for a passage during playback
1 Keep ◀◀ or ▶▶ pressed to find a particular passage in backward or forward direction.
→ Searching starts and playback continues at a low volume. For CD audio tracks the search speeds up after 2 seconds.
2 Release the button at the desired passage.
→ Normal playback continues.
Note: During REPEAT, SHUFFLE, SHUFFLE ALL or while playing your favourites, searching is only possible within the current track.
Selecting on MP3-CDs
Selecting an album during playback
- Briefly press – or + once or several times to skip to the first track of the current, previous or subsequent album.
→ The first track of the selected album is played.
Selecting a track during playback
1 Keep - or + pressed to skip quickly to previous or subsequent MP3 tracks.
→ Skipping starts and speeds up after 5 seconds.
2 Release the button at the desired track.
→ Playback continues with the selected track.
Note: To skip from track to track at low speed, use ◀◀ or ▶▶.
text_image
DEELE 2 HIGH 18 HIGH 50 2Playing a selection of tracks – favourites
You can mark around 2000 tracks as your favourites. For each disc the set memorizes the favourites and in which order to play them.
Turning a track into a favourite
1 Select a track with ◀◀ or ▶▶.
2 Press 😊 to turn the track into a favourite.
→ 😊 😊 indicates that the track is a favourite.
To turn a favourite into a normal track, press 😊 while playing the favourite.
→ 😊 😊 disappears. The track continues to play but is no longer a favourite.
To review the favourites of the inserted disc, press 😊 for 2 seconds during playback.
→ All favourites are displayed in sequence.
text_image
F10-RLP A B C D E F G H I J K L M N O P Q R S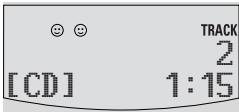
text_image
😊 😊 [CD] TRACK 2 1:15Playing favourites
- Press 😊 during playback to play the favourites of the inserted disc.
→ 😊 is shown and playback continues with the first favourite. All favourites will be played in the order that they were turned into favourites.
text_image
100 200 300 400 500 600 700 800 900 1000To return to normal playback, press 😊.
→ disappears. The current track and all subsequent tracks of the disc will be played.
Note: The favourites of the disc which you have not played for the longest time will be cleared if you mark more than 2000 tracks as favourites.
Playing tracks repeatedly or in random order - MODE
1 Press MODE repeatedly during playback to select either:
- SHUFFLE ALBUM (with MP3-CDs only): All tracks of the current album are played in random order once.
- SHUFFLE ALL: All tracks of the disc are played in random order once.
- REPEAT SHUFFLE ALBUM (with MP3-CDs only): All tracks of the current album are played repeatedly in random order.
- REPEAT SHUFFLE ALL: All tracks of the disc are played repeatedly in random order.
- REPEAT: The current track is played repeatedly.
- REPEAT ALBUM (with MP3-CDs only): All tracks of the current album are played repeatedly.
- REPEAT ALL: The entire disc is played repeatedly.
text_image
100mm 200mm 300mm 400mm 500mm 600mm 700mm 800mm 900mm 1000mm 1100mm 1200mm 1300mm 1400mm 1500mm 1600mm 1700mm 1800mm 1900mm 2000mm 2100mm 2200mm 2300mm 2400mm 2500mm 2600mm 2700mm 2800mm 2900mm 3000mm 3100mm 3200mm 3300mm 3400mm 3500mm 3600mm 3700mm 3800mm 3900mm 4000mm 4100mm 4200mm 4300mm 4400mm 4500mm 4600mm 4700mm 4800mm 4900mm 5000mm 5100mm 5200mm 5300mm 5400mm 5500mm 5600mm 5700mm 5800mm 5900mm 6000mm 6100mm 6200mm 6300mm 6400mm 6500mm 6600mm 6700mm 6800mm 6900mm 7000mm 7100mm 7200mm 7300mm 7400mm 7500mm 7600mm 7700mm 7800mm 7900mm 8000mm 8100mm 8200mm 8300mm 8400mm 8500mm 8600mm 8700mm 8800mm 8900mm 9000mm 9100mm 9200mm 9300mm 9400mm 9500mm 9600mm 9700mm 9800mm 9900mm 100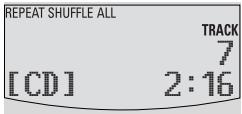
text_image
REPEAT SHUFFLE ALL TRACK 7 [CD] 2:162 Playback starts in the selected mode after 2 seconds.
3 To return to normal playback, press MODE repeatedly until REPEAT and SHUFFLE disappear.
Note: If 😊 (playback of favourites) is selected, SHUFFLE and REPEAT will affect the favourites only.
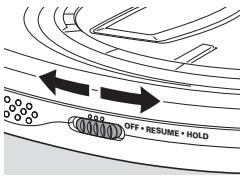
Storing the last position played – RESUME
You can store the last position played. When restarting, playback will continue from where you have stopped.
1 Switch the slider to RESUME during playback to activate RESUME.
→ RESUME is shown.
2 Press ■ whenever you want to stop playback.
3 Press ▶II to resume playback.
→ Playback continues from where you have stopped.
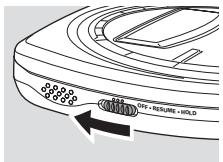
- To deactivate RESUME, switch the slider to OFF.
→ RESUME disappears.
text_image
OFF + RESUME + HOLD
text_image
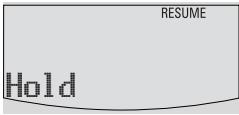
RESUME TRACK 3 [CD] 2:17Locking all buttons – HOLD
You can lock all buttons of the set. When you press any button, no action will be executed then.
- Switch the slider to HOLD to activate HOLD.
→ RESUME is shown and Hold is displayed. All buttons are locked. When pressing any button, Hold is displayed.
- To deactivate HOLD, switch the slider to OFF.
→ RESUME disappears.
text_image
RESUME HoldESP and powersaving
With a conventional portable disc player the music may stop while you are jogging, for example. The Electronic Skip Protection protects this set against loss of sound caused by light vibrations or shocks. Continuous playback is ensured. ESP does not protect the set against damage caused by dropping!

text_image
ESP DBB/TRENE +- Press ESP repeatedly during playback to select either:
- ESP on: ESP is shown and ESP is switched on.
- Longer battery playing time:
ESP+LP is shown. ESP and powersaving are switched on, resulting in a longer battery lifetime and a shorter skip protection.
- ESP off: ESP+LP disappears. ESP and powersaving are switched off for CD Audio tracks to achieve the highest sound quality.

text_image
ESP+LP Longer batterBeep
A beep confirms that you have pressed a button or that the batteries are empty.
- Keep DBB/TREBLE pressed for 2 seconds to switch beep either on or off:
→ Beep is displayed: Beep is switched on.
→ No beep is displayed: Beep is switched off.
text_image
ESP DBB/TREBLE +
text_image
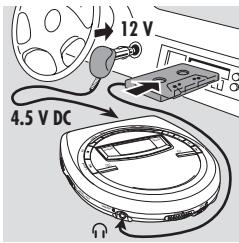
No beepIn-car connections (supplied or optionally available)
Use only the AY 3545 or AY 3548 car voltage converter (4.5 V DC, positive pole to the centre pin) and the AY 3501 car adapter cassette. Any other product may damage the set.
1 Put the set on a horizontal, vibration-free and stable surface. Make sure it is in a safe place, where the set is neither a danger nor an obstacle to the driver and the passengers.
2 Plug the voltage converter into the cigarette lighter socket (only for a 12V car battery, negative grounding), then connect the wired end with the 4.5V DC input socket on the set.
text_image
12 V 4.5 V DC3 If necessary, clean the cigarette lighter socket to obtain a good electrical contact.
4 Turn down the volume and connect the adapter cassette plug to LINE OUT/Ω on the set.
5 Carefully insert the adapter cassette into the car radio's cassette compartment.
6 Make sure the cord does not hinder your driving.
7 Set VOL ▶ on the set to position 8. Start playback on the set and adjust the sound with the car radio controls.
Always remove the voltage converter from the cigarette lighter socket when the set is not in use.
Note: If your car radio has a LINE IN socket, it is better to connect the set to this socket instead of using the adapter cassette. Connect LINE OUT/Ω of the set with the LINE IN socket of your car radio with an appropriate cable.
Remote control AY 3769 (supplied or optionally available)
Controls
① MODE·selects playback options such as SHUFFLE and REPEAT and playback of favourites
② ▶II
switches the set on, starts playback and interrupts playback
③ ■ stops playback and switches the set off
④ 3.5 mm plug to connect the headphones
⑤ + ALBUM –
MP3-CD only: selects the next/previous album or skips forward/backward
⑥ VOLUME adjusts the volume
⑦ TRACK >>
skips and searches forward/backward
⑧ OFF/HOLD
locks all buttons
text_image
MODE 2 3 8 4 7 TRACK 5 OFF HOLD 6All buttons on the remote control have the same functions as the corresponding buttons on the set except MODE·😊:
- Press MODE· repeatedly during playback to select one of the playback options described in “Playing tracks repeatedly or in random order – MODE”. The display of the remote control shows either:
SHUFFLE ALb - SHUFFLE ALL - REPEAT SHUFFLE ALb - REPEAT SHUFFLE ALL - REPEAT - REPEAT ALb - REPEAT ALL
- Keep MODE·💡 pressed for 2 seconds during playback to play the favourites of the inserted disc (see “Playing a selection of tracks – favourites”).
Connecting the remote control
Use only the AY 3769 remote control.
1 Press ■ on the set twice to switch off the set.
2 Firmly connect the remote control to LINE OUT/Ω on the set.
3 Firmly connect the headphones to the plug on the remote control.
4 On the remote control keep ▶II pressed for 1 second to switch on the set and to start playback.
→ Playback starts. The album number (MP3-CDs only) and the track number are displayed on the remote control's display.
5 Set VOL ▲ on the set to position 8 and adjust the volume with ▲VOLUME on the remote control.
natural_image
Diagram of a handheld device with a cable and connector, showing internal components (no text or symbols)Note: Replace the batteries as soon as no battery is displayed on the remote control's display.
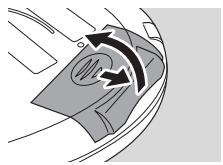
Belt clip
1 Align the belt clip as indicated in the illustration and press on the clip to insert its shaped pin into the hole in the set.
2 Turn the clip clockwise as indicated to lock the belt clip to the set.
To detach, gently lift the belt clip where LIFT is indicated and turn it counter-clockwise.

text_image
1 2WARNING
Under no circumstances should you try to repair the set yourself as this will invalidate the guarantee.
If a fault occurs, first check the points listed, before taking the set for repair. If you are unable to solve a problem by following these hints, consult your dealer or service centre.
| Problem | Solution |
| No power, playback does not start | – Insert the batteries correctly.– Replace the batteries.– Connect the mains adapter securely. |
| Hold indication and/or no reaction to controls | – Deactivate HOLD.– Disconnect the set from the power supply or take out the batteries for a few seconds. |
| No sound or bad sound quality | – Press ▶II to resume playback.– Adjust the volume.– Check and clean the connections.– Keep this set away from active mobile phones or strong magnetic fields. |
| Pls insert CD or No audio file indication | – Insert a disc, label upwards.– Clean or replace the disc.– Wait until the steamed up lens has cleared.– Make sure you have inserted an audio disc or an MP3-CD. |
| Unfinalized CD indication | – Make sure the inserted CDR or CDRW is finalized. |
| Music file is not played | - Make sure that the file names of the MP3 files end with .mp3 |
| Missing directories on MP3-CD | - Make sure the total number of files and albums on your MP3-CD does not exceed 350. - Only albums with MP3 files are shown. |
| The disc skips tracks | - Clean or replace the disc. - Make sure REPEAT, REPEAT ALBUM, SHUFFLE and 😊 are not selected. |
| Music skips or popping sound when playing an MP3 file | - Play the music file on your computer. If the problem persists, encode the audio track again and make a new CD-ROM. |
| Select songs indication and blinking 😊 😊 | - There are no favourites on the inserted disc. Turn a track into a favourite. |
| Music is interrupted and Oops indication | - Switch ESP on. |
| In-car use: No power, playback does not start | - Clean the cigarette lighter socket. - Switch on the ignition of your car. |
| In-car use: No sound or bad sound quality | - Insert the adapter cassette correctly. - Change the autoreverse direction of your car cassette player. - Let the set adjust to the temperature in the car. |
Table des matières
Mise en service rapide 31
Commandes 32
natural_image
Diagram showing airflow or movement of a device inside a car, with arrows indicating direction (no text or symbols)
natural_image
Diagram of a car interior showing battery and motor components with an arrow indicating direction (no text or symbols)2

natural_image
Diagram showing a cable with a connector and cable connectors, no text or symbols present3

natural_image
Diagram of a car's side profile showing curved arrows indicating movement or force (no text or symbols)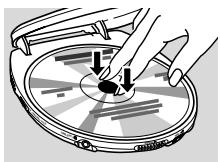
natural_image
Illustration of a hand using a tool to press down a circular object with arrows indicating motion (no text or symbols)
natural_image
Diagram of a CD or DVD disc with an arrow indicating rotation (no text or symbols present)4 HOLD → OFF

text_image
3858 OY + RESUME + HOLD5 PLAY ▶II
text_image
Diagram illustrating video playback control with labeled buttons and directional arrows6 VOL

text_image
Diagram illustrating sound recording setup with speaker, volume control, and musical notes!!!
natural_image
Illustration of a vacuum cleaner emitting heat and solar radiation (no text or symbols)
natural_image
Illustration of a faucet spraying water over a circular tank with raindrops, no text or symbols present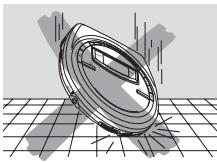
natural_image
3D rendered mechanical component with a circular housing and grid background (no text or symbols)text_image
Technical diagram showing a hand using a tool to adjust or install a component, labeled with letter Anatural_image
Diagram of a car interior showing battery arrangement and directional arrow (no text or symbols)Replace batte
text_image
Charging batttext_image
Diagram showing a plug inserted into a car with a cable, indicating electrical connection or power flow direction.natural_image
Diagram of a cable with a connector and cable cord, showing an arrow indicating direction (no text or symbols present)natural_image
Diagram of a mechanical component with curved lines and arrows indicating motion or force (no text or symbols)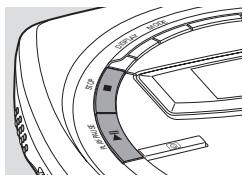
text_image
Technical diagram showing a curved mechanical or architectural component with labeled parts and directional arrows indicating flow or movement.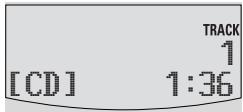
text_image
[CD] TRACK 1 1:36
natural_image
Illustration of a hand holding a curved object with directional arrows indicating movement or force (no text or symbols present)Remarques :
[Filename] Is this Love
natural_image
Diagram of a cable connector with attached connectors and a vol, showing no text or symbolsRéglage des graves
text_image
Bass 1 Bass 2text_image
Diagram of a car interior with labeled sections and directional arrows indicating movement or flow→ La lecture normale continue.
text_image
Technical diagram showing a curved mechanical or architectural component with labeled parts and dimensions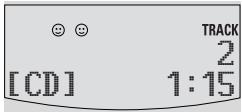
text_image
😊 😊 [CD] TRACK 2 1:15
text_image
Technical diagram of a car interior with labeled parts and measurement annotationstext_image
REPEAT SHUFFLE ALL TRACK 7 [CD] 2:16text_image
RESUME TRACK 3 [CD] 2:17text_image
RESUME Holdtext_image
ESP+LP Longer battertext_image
12 V 4.5 V DCnatural_image
Diagram showing a device with a cable and connector, no text or symbols presentClip ceinture
natural_image
Diagram showing airflow or motion around a curved surface with arrows indicating direction (no text or symbols)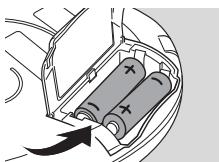
natural_image
Diagram of a car interior showing battery and motor components with an arrow indicating direction (no text or symbols)2

natural_image
Diagram showing a cable with a connector and cable connectors, no text or symbols present3

natural_image
Diagram of a car's side profile showing curved arrows indicating movement or force (no text or symbols)
natural_image
Illustration of a hand using a tool to press down a circular object with arrows indicating motion (no text or symbols)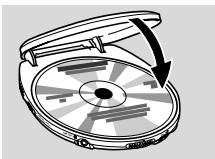
natural_image
Diagram of a CD or DVD disc with an arrow indicating rotation (no text or symbols present)4 HOLD → OFF
text_image
OFF + RESUME + HOLD5 PLAY ▶II

text_image
Diagram illustrating video playback control with labeled buttons and directional arrows6 VOL
text_image
Diagram illustrating sound pressure with speaker, volume, and musical notes, showing sound pressure change!!!

natural_image
Illustration of a vacuum cleaner emitting heat and solar radiation (no text or symbols)
natural_image
Illustration of a faucet spraying water over a circular tank with raindrops, no text or symbols present
natural_image
3D rendered mechanical component with a circular housing and grid background (no text or symbols)text_image
Technical diagram showing a mechanical assembly with labeled component 'A'natural_image
Diagram of a car interior showing battery arrangement and directional arrow (no text or symbols)
text_image
Replace battetext_image
Charging batttext_image
Diagram showing a plug inserted into a car with a cable, indicating electrical connection or power switch operation.Auriculares (SBC HE 545)
natural_image
Diagram of a cable connector with a probe inserted, showing wiring and a magnified view (no text or symbols)natural_image
Diagram of a mechanical component with curved lines and arrows indicating motion or force (no text or symbols)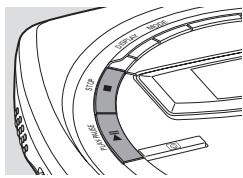
text_image
100 200 300 400 500 600 700 800 900 1000 1100 1200 1300 1400 1500 1600 1700 1800 1900 2000 2100 2200 2300 2400 2500 2600 2700 2800 2900 3000 3100 3200 3300 3400 3500 3600 3700 3800 3900 4000 4100 4200 4300 4400 4500 4600 4700 4800 4900 5000 5100 5200 5300 5400 5500 5600 5700 5800 5900 6000 6100 6200 6300 6400 6500 6600 6700 6800 6900 7000 7100 7200 7300 7400 7500 7600 7700 7800 7900 8000 8100 8200 8300 8400 8500 8600 8700 8800 8900 9000 9100 9200 9300 9400 9500 9600 9700 9800 9900 100
text_image
[CD] TRACK 1 1:36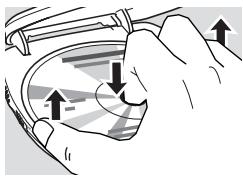
natural_image
Illustration of a hand holding a curved object with directional arrows indicating movement or force (no text or symbols present)Notas:
text_image
300mm 400mm 50mm 100mm 150mm 200mm 250mm 300mm 350mm 400mm 450mm 500mm[Filename] Is this Love
natural_image
Diagram of a cable connector with attached spring and switch (no text or symbols)Ajuste de graves
text_image
Bass 1 Bass 2text_image
Diagram of a car interior with labeled sections and directional arrows indicating movement or flowtext_image
REPEAT SHUFFLE ALL TRACK 7 [CD] 2:16text_image
OFF + RESUME + HOLD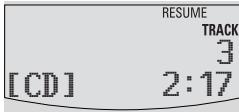
text_image
RESUME TRACK 3 [CD] 2:17text_image
RESUME Holdtext_image
ESP+LP Longer battertext_image
12 V 4.5 V DCtext_image
Technical diagram of a device with numbered parts labeled 1 through 8, including 'MODE', 'TRACK', and 'OFF HOLD' annotations.natural_image
Diagram showing a device with a cable and plug, connected to a device with a magnified view (no text or symbols)natural_image
Diagram showing airflow or motion around a curved surface with arrows indicating direction (no text or symbols)
natural_image
Diagram of a car interior showing battery and motor components with an arrow indicating direction (no text or symbols)2
natural_image
Diagram showing a cable with a connector and cable connectors, no text or symbols present3
natural_image
Diagram of a car's side profile showing curved arrows indicating movement or force (no text or symbols)
natural_image
Illustration of a hand using a tool to press down a circular object with arrows indicating motion (no text or symbols)
natural_image
Diagram of a CD or DVD disc with an arrow indicating rotation (no text or symbols present)4 HOLD → OFF

text_image
OFF + RESUME + HOLD5 PLAY ▶II

text_image
Diagram illustrating video playback control with labeled buttons and directional arrows6 VOL

text_image
Diagram illustrating sound pressure with speaker, volume, and musical notes, showing sound pressure application on a device.!!!

natural_image
Illustration of a vacuum cleaner emitting heat and solar radiation (no text or symbols)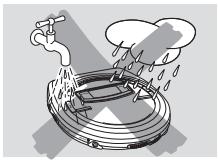
natural_image
Illustration of a faucet spraying water over a circular tank with raindrops, no text or symbols present
natural_image
3D rendered mechanical component with a circular housing and grid background (no text or symbols)text_image
Technical diagram showing a mechanical assembly with labeled component 'A'natural_image
Diagram of a car interior showing battery and motor components with an arrow indicating direction (no text or symbols)Replace batte
text_image
Charging batttext_image
Diagram showing plug connection to car with power outlet, indicating charging or discharging processnatural_image
Diagram of a cable connector with a probe inserted, showing wiring and a magnified view (no text or symbols)natural_image
Diagram of a mechanical component with curved lines and arrows indicating motion or force (no text or symbols)
text_image
R1583 100 200 300 400 500 600 700 800 900 1000 1100 1200 1300 1400 1500 1600 1700 1800 1900 2000 2100 2200 2300 2400 2500 2600 2700 2800 2900 3000 3100 3200 3300 3400 3500 3600 3700 3800 3900 4000 4100 4200 4300 4400 4500 4600 4700 4800 4900 5000 5100 5200 5300 5400 5500 5600 5700 5800 5900 6000 6100 6200 6300 6400 6500 6600 6700 6800 6900 7000 7100 7200 7300 7400 7500 7600 7700 7800 7900 8000 8100 8200 8300 8400 8500 8600 8700 8800 8900 9000 9100 9200 9300 9400 9500 9600 9700 9800 9900 100
text_image
[CD] TRACK 1 1:36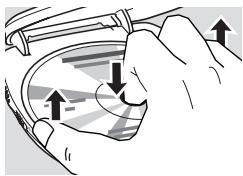
natural_image
Illustration of a hand holding a curved object with directional arrows indicating motion or force (no text or symbols)Anmerkungen:
[Filename] Is this Love
natural_image
Diagram of a cable connector with attached spring and switch, showing no text or symbolstext_image
Bass 1 Bass 2text_image
Diagram of a car interior with labeled sections and directional arrows indicating movement or flowtext_image
Technical diagram showing a curved road with labeled sections and directional arrows, likely illustrating a vehicle or road layout.![PHILIPS EXP511 - [Filename] Is this Love - 1](/content/2019/10/41812/images/535c5cc1c0a5173467ec4ce6af39641a329ca50b8521417f89afc8c271447a21.jpg)
text_image
😊 😊 [CD] TRACK 2 1:15text_image
REPEAT SHUFFLE ALL TRACK 7 [CD] 2:16text_image
OFF + RESUME + HOLD![PHILIPS EXP511 - [Filename] Is this Love - 2](/content/2019/10/41812/images/d00b740da1d8027a3eb71de7b13d3815f29af45a0883f3875cf29c443618d193.jpg)
text_image
RESUME TRACK 3 [CD] 2:17Sperren aller Tasten – HOLD
text_image
RESUME Holdtext_image
ESP+LP Longer batter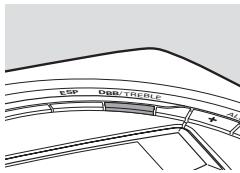
text_image
ESP DBB/TREBLE +
text_image
No beeptext_image
12 V 4.5 V DCnatural_image
Diagram showing a device with a cable and connector, no text or symbols presentGürtelklipp
CLASS 1 LASER PRODUCT
3103 306 1869.1