
VFE25S - Dishwasher FAGOR - Free user manual and instructions
Find the device manual for free VFE25S FAGOR in PDF.
| Product Type | Freestanding / built-in / integrated dishwasher |
| Brand | Fagor |
| Model | VFE25S |
| Capacity | 12 or 13 place settings according to EN-50242 standard |
| Wash programs | Cold prewash, Intensive (65°C), Normal (65°C or 55°C), Economic (55°C), Delicate (45°C), Quick (55°C) |
| Number of programs | Up to 6 depending on the version (1 to 5 additional buttons) |
| Water consumption | Not specified in the manual, typical estimate: 13-15 L per cycle |
| Power consumption | Max current 16 A, mains voltage (220-240 V) |
| Energy class | Not specified in the manual, estimate: A+ or A |
| Dimensions (W x H x D) | Built-in: 60 x 82-87 x 55 cm (approx.), freestanding: 60 x 85 x 60 cm (approx.) |
| Weight | About 35-45 kg depending on version |
| Noise level | Not specified, estimate: 45-50 dB(A) |
| Salt adjustment | 4-position regulator on the right inner side |
| Salt indicator | Optical (green float in cap) or indicator light depending on model |
| Rinse aid indicator | Transparent window or indicator light depending on model |
| Baskets | Height-adjustable upper basket (with or without disassembly), lower basket with foldable racks |
| Half-load function | Available on some models (dedicated button) |
| Filter | Removable wash filter with handle |
| Water connection | Cold water preferred, possible hot water up to 60°C, pressure 4.9-98 N/cm² |
| Electrical connection | Grounding required, power cord with earth |
| Installation | Freestanding, panel-ready, built-in or integrated depending on version |
Frequently Asked Questions - VFE25S FAGOR
User questions about VFE25S FAGOR
0 question about this device. Answer the ones you know or ask your own.
Ask a new question about this device
Download the instructions for your Dishwasher in PDF format for free! Find your manual VFE25S - FAGOR and take your electronic device back in hand. On this page are published all the documents necessary for the use of your device. VFE25S by FAGOR.
USER MANUAL VFE25S FAGOR
MANUEL D'UTILISATION ET D'INSTALLATION DU LAVE-VAISSELL
MANUAL DE UTILIZACO E INSTALAÇÃO DA MAQUINA DE LAVAR LOUÇA
MANUAL FOR THE USE AND INSTALLATION OF YOUR DISHWASER
HANBUCH FÜR INSTALLATION UND GEBRAUCH DER GESCHIRRSPÜLMASCHINE
MANUAL DE USO E INSTALLACION DEL LAVAVAJILAS
LAISSEZ CETTE PAGE DEPLIEE
POUR FACILITER LA LECTURE ET LA
COMPREHENSION DU MANUEL.
PARA UMA MELHORE E MAIS CÔMODA
COMPREENSAO DESTE MANUAL
MANTENHA ESTA FOLHA DESDOBRADA
DURANTE A SUA LEITURA.
FOR BETTER AND EASIER UNDERSTANDING
OF THIS MANUAL AND DISHWASHER FUNCTIONS
KEEP THIS PAGE OPEN
AND IT WILL THEN BE EASIER TO FOLLOW.
DAMIT IHNEN LEKTURE UND VERSTÄNDNIS
How to place your crockery correctly:
crockery co
Important advice:
··
Starting the dishwasher:
sher:
Programme selection:
on:
Wash programme selection:
selection: ..
How to solve problems:
ems:
INHALT
Seite
Wasser qualitat:
.
Reiniger:
.
ATTENTION AU CALCAIRE!
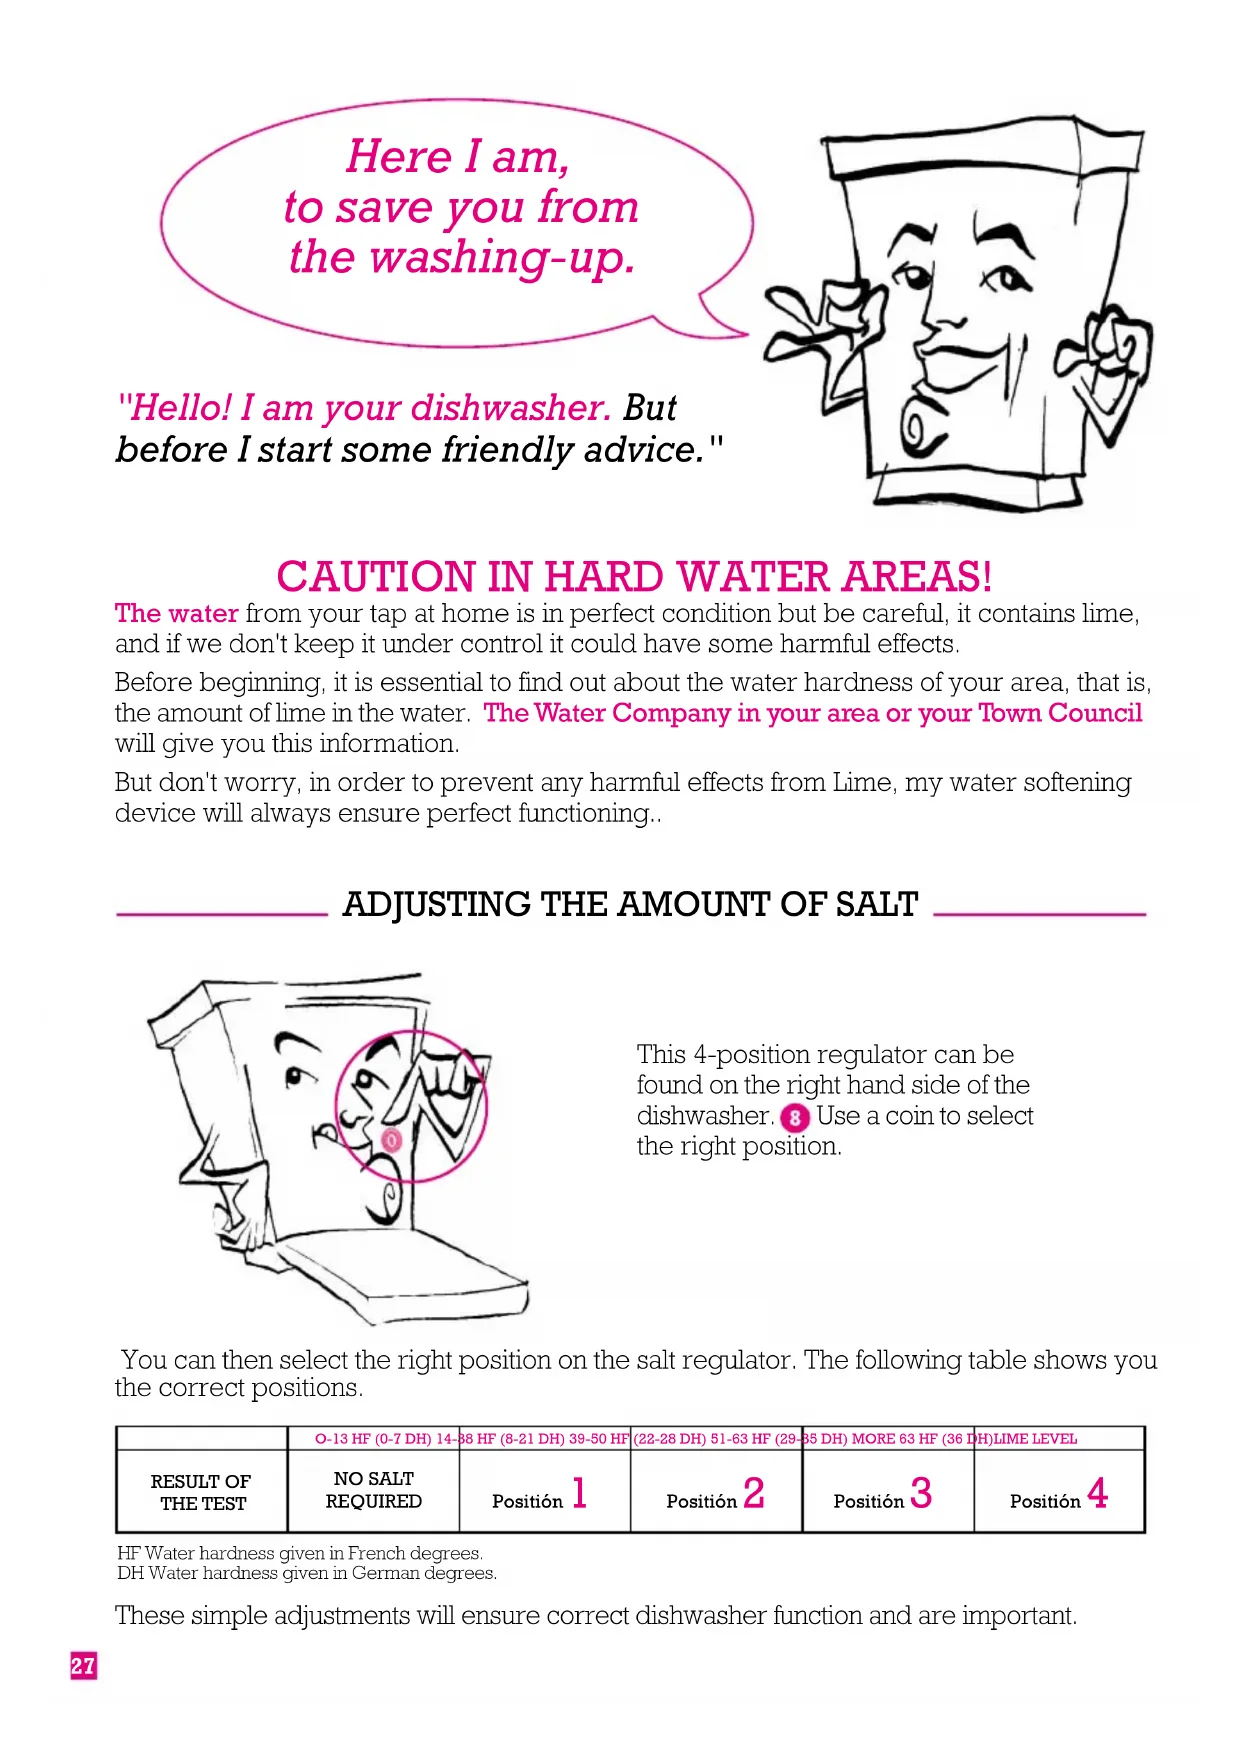
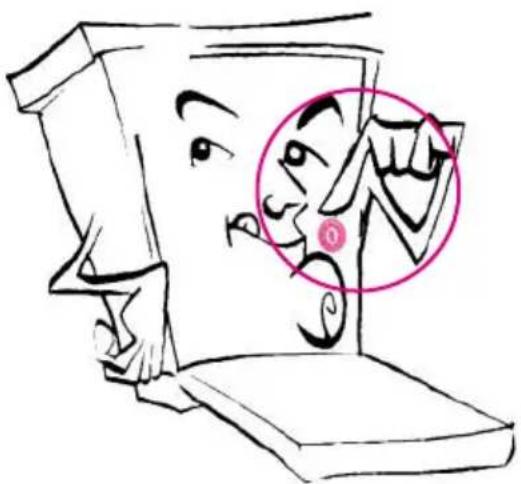
Here I am, to save you from the washing-up.
"Hello! I am your dishwasher. But before I start some friendly advice."

CAUTION IN HARD WATER AREAS!
The water from your tap at home is in perfect condition but be careful, it contains lime, and if we don't keep it under control it could have some harmful effects.
Before beginning, it is essential to find out about the water hardness of your area, that is, the amount of lime in the water. The Water Company in your area or your Town Council will give you this information.
But don't worry, in order to prevent any harmful effects from Lime, my water softening device will always ensure perfect functioning..
ADJUSTING THE AMOUNT OF SALT
This 4-position regulator can be found on the right hand side of the dishwasher. Use a coin to select the right position.
You can then select the right position on the salt regulator. The following table shows you the correct positions.
| O-13 HF (0-7 DH) 14-88 HF (8-21 DH) 39-50 HF | (22-28 DH) 51-63 HF (29-35 DH) MORE 63 HF (36 DH)LIME LEVEL | |||
| RESULT OF THE TEST | NO SALT REQUIRED | Posiún 1 | Posiún 2 | Posiún 3 |
| Posiún 4 | ||||
HF Water hardness given in French degrees.
DH Water hardness given in German degrees.
These simple adjustments will ensure correct dishwasher function and are important.
DISHWASHINGPRODUCTS
To ensure I am always in peak working condition I too need my own specific washing products. They are:
- SALT
- DETERGENT
- RINSE AID

1. SALT. So that lime does not cause any harmful effects.
I was fitted with a Water Softener, which takes the lime out of your water and leaves it clean for dishwashing; for my Water Softener to work you have to put salt in the salt container. But remember, only if the water hardness requires it.
Remember! Make sure not to use cooking salt, use only special salt for dishwashers available in all supermarkets.
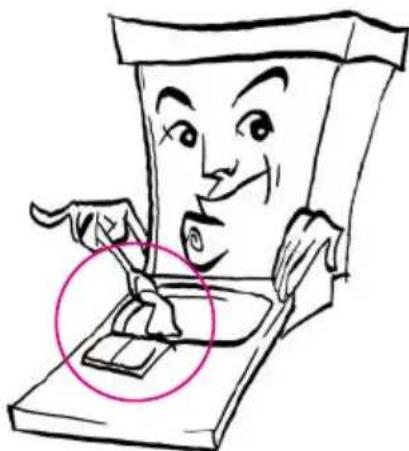
- Where and how is the salt added first time use?
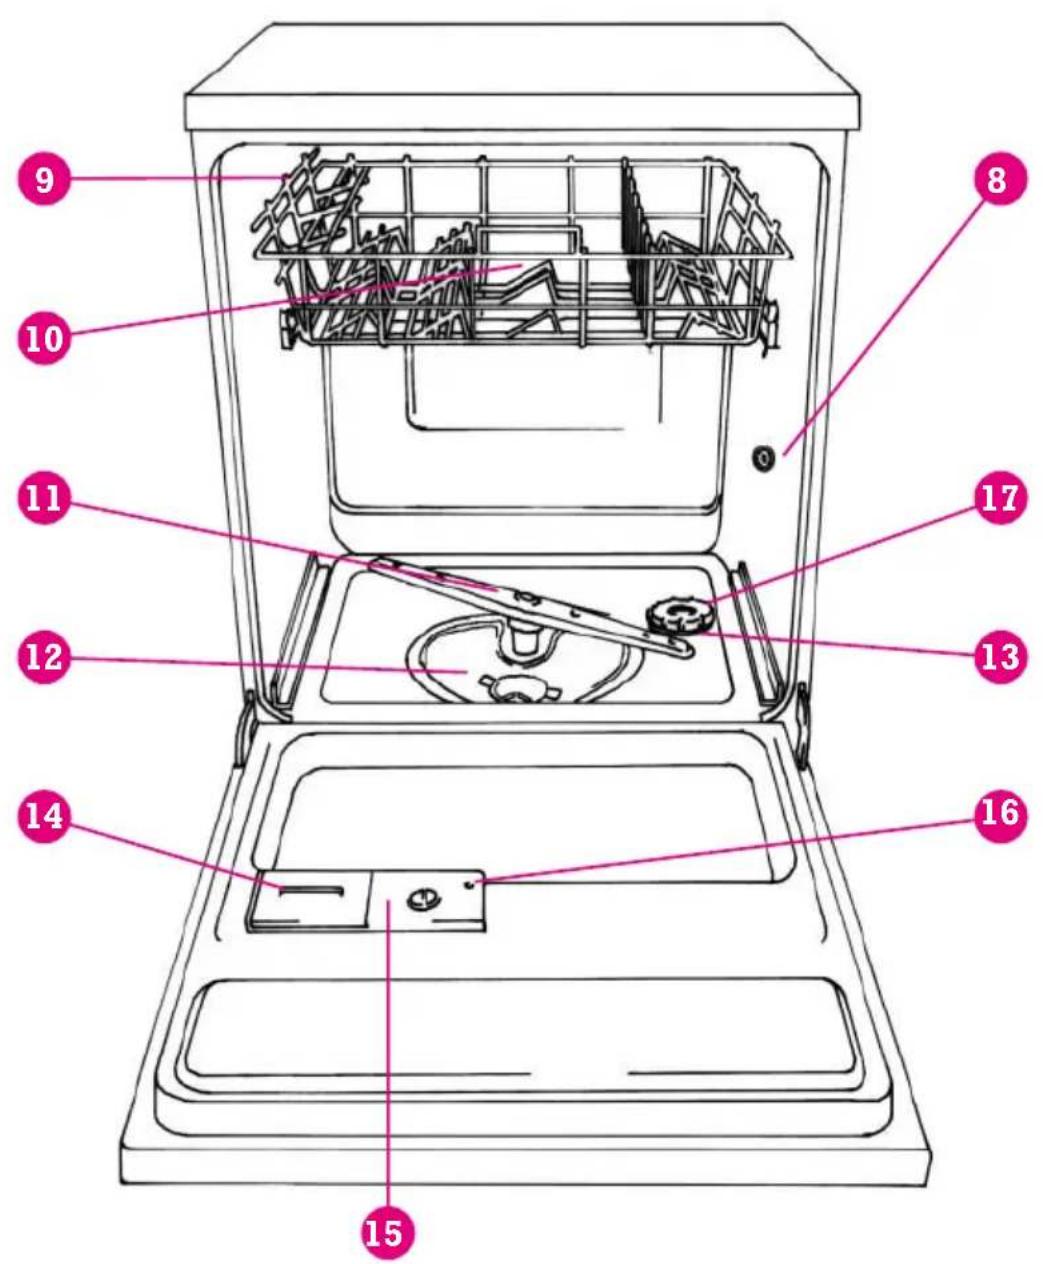
First you must take out my lower rack. Unscrew the dispenser cap 13 and take it off.
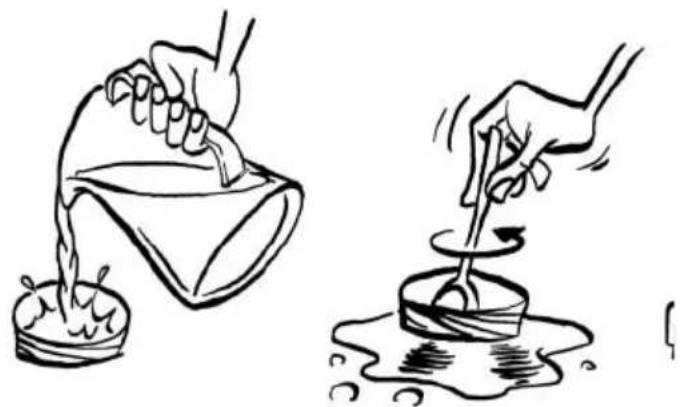
- Use the funnel provided with the dishwasher to fill the dispenser full of salt (about 1,5 Kg) and then fill with water.
- Always use a spoon to mix it properly.
Important: This operation must be carried out only before the first wash. Later you only need to top up the salt level.
- Once you have finished filling up with salt and water, make sure you screw the cap back on securely and that no traces of salt are left on the bottom of the dishwasher which could leave salt deposits.

- When do I need more salt?
Don't worry about it. The indicator on your dishwasher will tell you.
- Models with Optical Indicator: This is located in the cap of my salt dispenser.
The indicator is a green float which in its highest position indicates that I do not need salt. Conversely, if the float has fallen and, therefore the green colour is not visible, this means that you must add more salt.

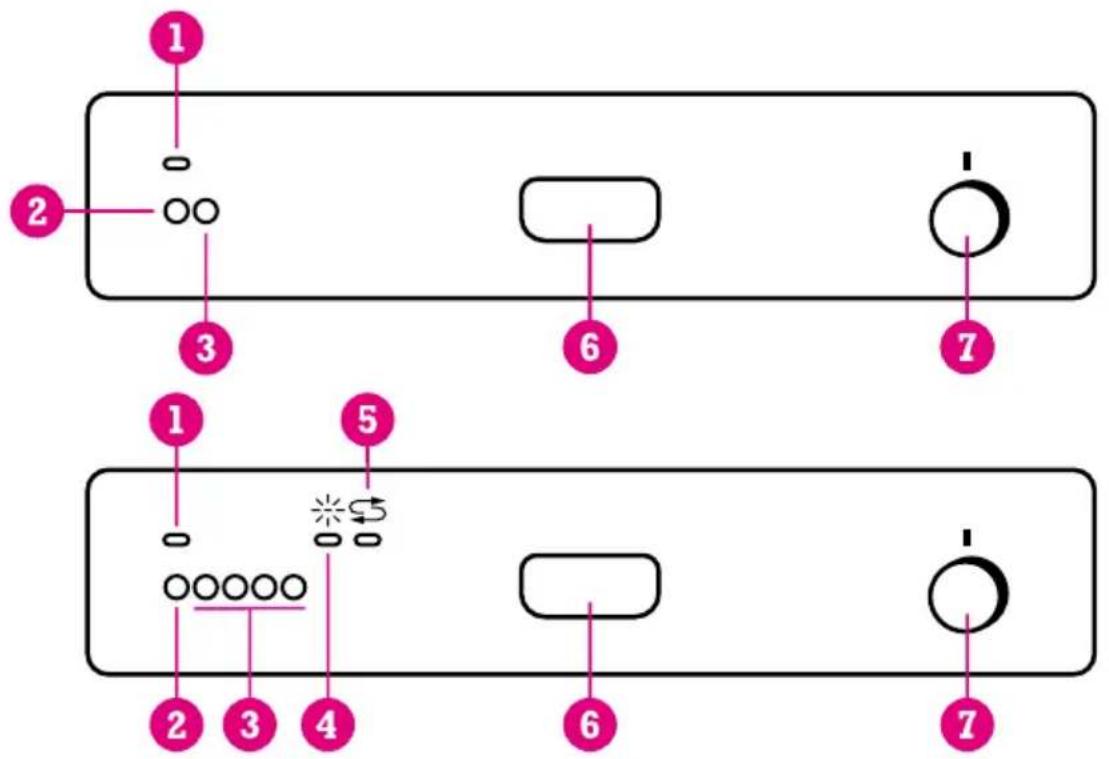
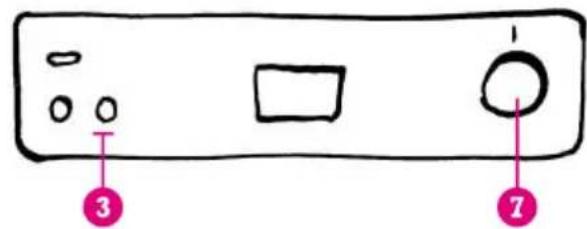
- Models with Luminous Indicator: 5 in the control panel. When the light comes on, fill the dispenser with salt.
As we have seen in the sections above, it is possible that the water hardness in your area does not require you to add salt; in that case do not worry if you see the luminous indicator lit.
It is important to remember that you should always fill the salt dispenser before using the dishwasher, never afterwards.
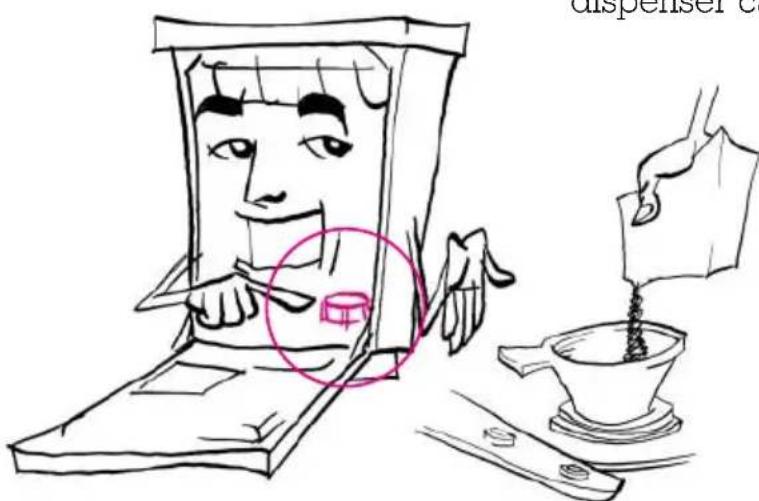
2.DETERGENT. The type of program will give you the quantity required.
But lets get to work. First, fill me up with detergent. Do you see the detergent compartment which is built into the inner door 14. That is where you put the detergent.

How much detergent do I need?
For a non-concentrated detergent in powder or tablet form;
- For a pre-washed - none.
- For a delicate, economic or rapid wash; 1 measure of 25 gr. (one and a half level soup spoonfuls or one tablet)
- For a normal or intensive wash, 2 measures, 1 of 25 gr. in the dispenser (or one tablet) and another of 5 gr or 15 gr. (a level soup spoonful or half a tablet) in the inner door.
For concentrated and liquid detergent follow the detergent manufacturers recommendations.
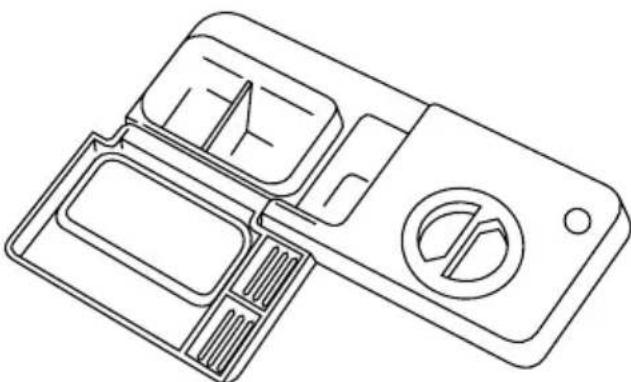
3. RINSE AID. Cleans and adds brilliance.
The principal function of this product is to facilitate drying and prevent water drops being left on the dishes after the wash, while at the same time giving all surfaces a brilliant shine.
- Where and how is rinse aid added?
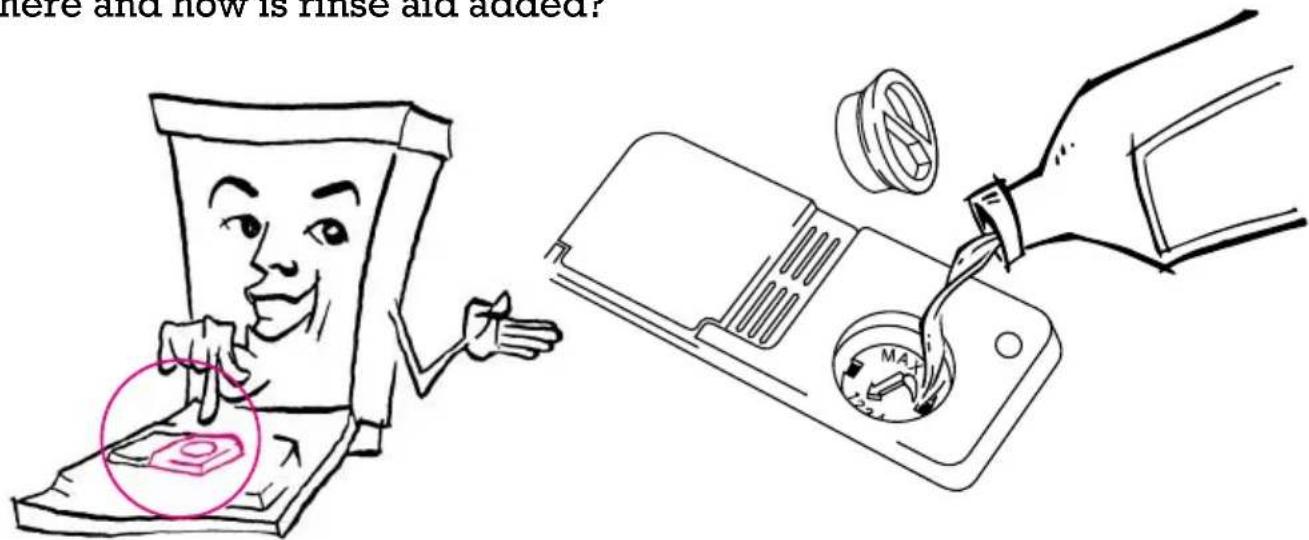
I have a compartment in the upper part of the inner door 15, just to the right of the detergent compartment.
Turn and take off the cap of this compartment, and add rinse aid up to the indicated maximum. Be careful that it does not over flow; if this occurs dry the spilt drops with a cloth so that the wash quality will be correct otherwise over foaming may occur.
- How is the rinse aid intake regulated?
Once you have filled the compartment, you can adjust the level of rinse aid released by moving the selector in the dispenser between numbers 1 to 6 (it leaves the factory in position no. 2).
Before adjustment, I recommend that you judge for yourself by observing the final result of each wash. If there are water drops or lime stains on the dishes, adjust the selector to a higher number, conversely adjust to a lower number to reduce the quantity released if the dishes show white, sticky streaks.
- When do you have to add rinse aid?
Only when it is indicated on your particular dishwasher model.
-
Models with Transparent-Window Indicator: This is beside the rinse aid compartment. If it is clear it needs rinse aid; fill it taking care that it does not overflow. If it is dark it has sufficient.
-
Models with Luminous Indicator: 12 When the liquid runs out, this light on the control panel comes on. This is a clear warning to refill with rinse aid.
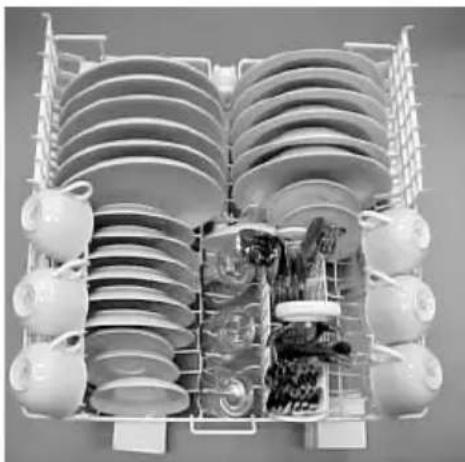
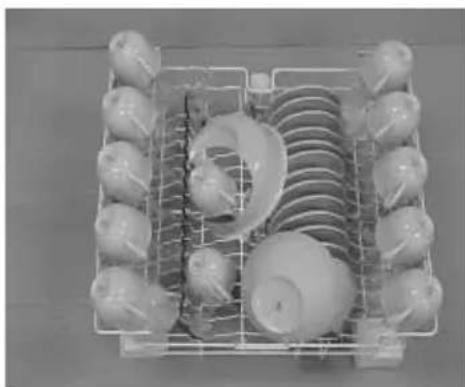
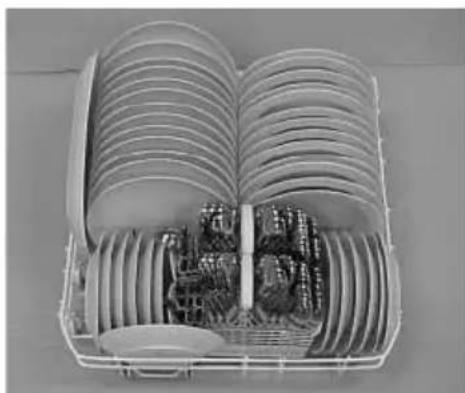
CORRECT LOADING OF THE DISHES
Because you should never play with your food.
To ensure good results, it is very important to load the dishes properly in my racks. Each dish should be individually located in either basket with sufficient clearance between each item for water to pass, this will guarantee a perfect wash and save you time and money.


- Regulating the height of the basket.
Depending upon your dishwasher model, you will be able to adjust the height of the upper basket so as to enable you to wash bigger plates. But how? It's easy!
1.Standard basket.
1Turn the wheel stop. (A)
2Pull the basket towards you and it will come out.
3 Put the basket back at the height you have chosen.
4Turn the wheel-stop back to its original position. (B)

2. Top range basket.
Without having to take the top basket out of its rails, you can adjust the height of the basket with a simple hand movement, even when there is crockery in the basket.
oth to raise and lower the position, pull upwards from the centre of the basket.
Regulating the upper basket means you can get the height you want.
With the basket at its highest level you will be able to put plates with a diameter of up to 19cm in the upper basket and up to 31 cm. in the lower basket.
With the basket at its lowest level you will be able to put plates with a diameter of up to 24cm in the upper basket and up to 26cm in the lower basket.
- Loading the dishes in the racks.
-
In the lower rack. The dirtiest and most resistant dishes, casseroles, oven dishes and plates (load the deep ones on the right and the shallow ones on the left). The dishes should always tilted towards you and make sure that there is sufficient clearance between them so that the water spray can reach and clean them. Saucepans always upside-down. If your dishwasher has folding supports, you can use them in the vertical position for plates and in the horizontal position for large items of crockery.
-
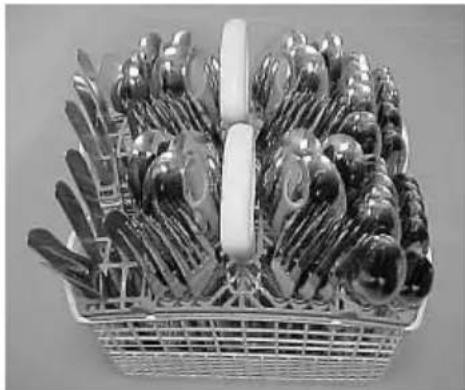
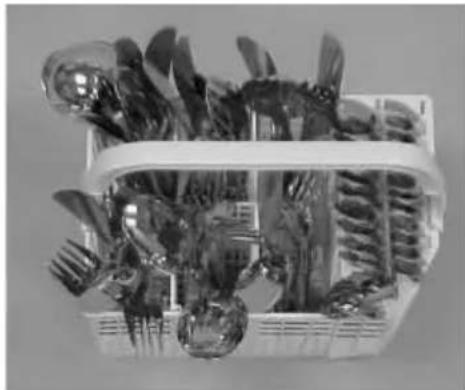
Cutlery basket. This is where the cutlery goes; it is located in the lower basket. The separate compartments allow you to segregate the different items always with the handle down.
-
In the upper rack. The more delicate dishes. Cups, glasses and porcelain. Take care that their rims face down (upside-down). Lead crystal should not be washed in the dishwasher, continued washing will make it go cloudy and it will lose its shine. When the half-load function is activated, in those dishwashers which have it, all the items must be put in this basket, even cutlery (which will be put in one of the parts of the double cutlery basket which is normally at the bottom).
Once you have loaded the dishes and cutlery, make sure that the spray arms revolve without hitting any plate, piece of cutlery, handle, etc.
Do not hang objects from the baskets as it will impede the spray arm rotation.
For IEC regulation EN-50242
For IEC regulation EN-50242
For IEC regulation EN-50242
Normalised according to EN-50242 (13 silver)
Normalised according to EN-50242 (12 silver)
Normalised according to EN-50242 (13 silver)
Normalised according to EN-50242 (13 silver)
IMPORTANT RECOMMENDATIONS
Reading an instruction manual and following its advice takes very little time but is very important for your satisfaction.
1. Recommendations for cleaning.

- Clean the wash filter when you see debris accumulating.
To take it out turn the handle. Clean it with running water and a brush. Refit the filter securely. This is very important. If it is not properly secured, it can cause problems such as blocked pipes and spray arms.
- Also clean your dishwasher periodically both inside and outside.
Inside, every six months, fill the Detergent Dispenser with a special Dishwasher-cleaning product, select the Economic Program and run the complete wash cycle.
Outside, you should use a damp cloth soaked in soapy water. Afterwards, dry me with a dry cloth. As a safety precaution, switch off all electrical connections to me (remove the plug from the socket).
2. Recommendations for dishes.
-Stainless cutlery: I can clean it without any problem.
-Silver cutlery: make sure that it is not in contact with other cutlery, for if it is, it can cause brownish stains. Keep in separate compartment.
-Aluminium: it is recommended that this should not be washed in the dishwasher, as it will cause more pronounced stains and darkening of the aluminium.
-Decorated porcelain: just as in hand washing, if the decoration is not top quality it will gradually wear away-it is not advisable to wash in dishwashers.
-Glass: only load glass suitable for dishwashers. It is recommended to use a low temperature program for glass: economic or delicate. Do not wash Lead Crystal.
- Plastic: heat-resistant plastic is suitable for dishwashers. But when in doubt, ask at the point of sale. Do not wash medication spoons or small light objects.
-Wood and earthenware: Do not place in dishwasher, these are not appropriate for dishwashers.

SWITCHING ON
Before starting-check the following points.

- Check that I am plugged into the electricity supply with the correct fuse rating in the plug top (13 Amp).
- Open the water mains tap..
- Check the salt and rinse aid level.
- Load the dishes as indicated.
- Fill the Dispenser with detergent. 14
- Select the wash program. See program selection below.
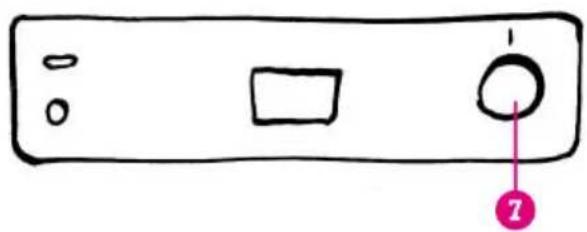
- Push the stop/start button. 2 The on/off pilot light will come on. 1
THE SELECTED WASH PROGRAM WILL NOW COMMENCE.
WARNING: Do not open the door of your DISHWASHER during the wash process. It could upset the PROGRAMME.
PROGRAM SELECTION
You have a whole range of possibilities.
Program Selection
To select the Wash Program turn the Indicator Control clockwise until the programme number reaches the start position.
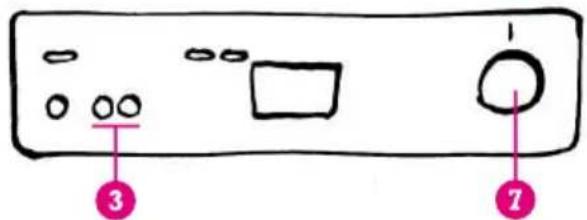
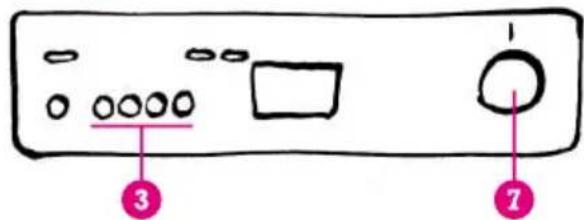
Additional function buttons 3
Depending on the model chosen your dishwasher will have additional buttons 3 which must be selected for the required programme.
Below, a detailed WASH PROGRAMS CHART is presented. Consult the chart for the one which applies to your type of dishwasher.
WASH PROGRAM SELECTION
PROGRAM CHART 1 BUTTON MODEL
| PROGRAM N° | PROGRAM TYPE | APPLICATIONS | DETERG. grs. | TEMP. °C |
| 1 | Cold pre-wash | Soaks dishes which are not to be used immediately | - | - |
| 2 | Intensive | For very dirty dishes and casseroles | 25 + 15 65 | |
| 3* | Normal | For dirty dishes | 25 + 5 | 65 |
| Normal without pre-wash | For not so dirty dishes | 25 65 |
PROGRAM CHART 2 BUTTON MODEL
| PROGRAM N° | ADDITIONAL BUTTONS | PROGRAM TYPE | APPLICATIONS | DETERG. grs. | TEMP. °C |
| 1 | - | Cold pre-wash | Soaks dishes which are not to be used immediately | - | - |
| Intensive | - | For very dirty dishes and casseroles | 25 + 15 65 | ||
| 3* Normal For-dirty | dishes | 25 + 5 | 55 | ||
| 4 | e | Economic | For not so dirty dishes | 25 | 55 |
| - | Rapid | For very lightly used dishes | 25 55 | ||
| PROGRAM N° | ADDITIONAL BUTTONS | PROGRAM TYPE | APPLICATIONS | DETERG. grs. | TEMP. °C |
| 1 | - | Cold pre-wash | Soaks dishes which are not to be used immediately | - | - |
| - | For very dirty dishes and casseroles | 25 + 15 652 | Intensive | ||
| - | 25 +5 55 | * Normal For dirty dishes | |||
| e | Economic 25 554 | For not so dirty dishes | |||
| Y | 25 454 | Delicate Special | |||
| - | Rápido 25 555 | For very lightly used dishes |
In dishwashers without 1/2 load
PROGRAM CHART 4 BUTTON MODEL
| PROGRAMA Na | ADDITIONAL BUTTONS | PROGRAM TYPE | APPLICATIONS | DETERG. grs. | TEMP. °C |
| 1 | - | Cold pre-wash | Soaks dishes which are not to be used immediately | - | - |
| 2 | - | Intensive | For very dirty dishes and casseroles | 25 + 15 65 | |
| 3* Normal | - | For dirty dishes | 25 + 5 55 | ||
| e | Economic 25 $54 For not so dirty dishes | ||||
| ¥ | 25 455 Delicate Special glass | ||||
| Rapid 25 555 | For very lightly used dishes | ||||
- Program 3. Program standardised in accordance with EN-50242
HALF LOAD
If your dishwasher has the button, you can wash just 6 place settings. To do this: 1) choose the programme indicated in the corresponding tables, 2) press the button and 3) put the crockerv in the top basket. The following amount of detergent is required 15 + 5g for the Intensive Programme and 15g for the other programmes.
PROGRAM CHART 5 BUTTON MODEL
| PROGRAM Na | ADDITIONAL BUTTONS | PROGRAM TYPE | APPLICATIONS | DETERG. grs. | TEMP. °C |
| 1 | - | Cold pre-wash | Soaks dishes which are not to be used immediately | - | - |
| 2 | Intensive | For very dirty dishes and casseroles | 25 + 15 65 | ||
| 3* Normal | - | For dirty dishes | 25 + 5 55 | ||
| e | Economic 25 $54 | For not so dirty dishes | |||
| Y | 25 454 | Delicate Special glass | |||
| Rapid 25 555 | For very lightly used dishes |
- Program 3. Program standardised in accordance with EN-50242
TROUBLE-SHOOTING
- In spite of everything I do not start. It could be that:


The electricity has been cut off. The plug is not correctly wired and 13 Amp fuse fitted.

You have not closed the door correctly.

You have not pressed the stop/start button.
- I switch on but there is no water coming in. What's wrong?

The mains water has been cut off. The mains tap has not been turned on.

The water intake electrovalve filter (located in the dishwasher) is blocked.
3. The dishes do not come out as clean and shining as you expect.

You have not used a special dishwasher detergent.

You have not filled the detergent dispenser or have not closed the detergent cover.

You have not loaded the dishes properly. Make sure that the plates are not piled together.
The spray arms are jammed by cutlery or dishes.

The spray holes on the arms are blocked with debris.

The filter has not been fitted correctly or has not been cleaned. Check that it is correctly fitted.

The drain hose is blocked.

The selected wash program is not correct.

An appropriate rinse aid has not been used.
The rinse aid intake has not been correctly adjusted. Or if you live in a hard water area, you have forgotten to add salt.

If, after consulting this guide, the problem persists, stop the machine, turn off the mains tap and call your local SERVICE CENTRE.
They know me inside-out.
Free-standing dishwashers 78
Panellable dishwashers 78
Fitting the panels 79
Built-in dishwashers 79
Panelling and adjusting the door 79
Integrated dishwashers 80
Water supply connection 81
Drainage connection 81
Electrical connections 82
DEUTSCH
In order to help install your DISHWASHER, we have included a series of drawings and diagrams at the end of this MANUAL.
They also provide a detailed list of all the elements, measurements and operations to keep in mind during installation.
Please open out the drawings and diagrams, as they will help you to understand the text and be a great help in solving small problems when installing the dishwasher.
Technical Specification Plate
The TECHNICAL SPECIFICATIONS PLATE, stuck on the side of the DISHWASHER door, contains technical information as well as the serial number of the appliance.
READ THIS INFORMATION before making the electrical connections.
Electrical Connections
The electrical connections should be carried out by a specialist who is familiar with the legal provisions as wellasthe standards and regulations in force in each country.
Warning
Before installing the appliance and connecting both the water and electricity supply, it is extremely important that you take into account whether your DISHWASHER is a PAnELLABLE or INTEGRATED model. You will need to perform a number of operations to ensure that you isr installed dishwasher properl.
Unpacking
Carefully remove all the protective packing from the appliance.
If your dishwasher is an integrated model, remove the brackets located at the bottom of the dishwasher. (Fig. 2).
Remove the packing from around the baskets inside the machine.
Free-standing dishwashers
Introduction
Our FREE-STANDING DISHWASHERS have been designed so taht you can put them on their own, in the most suitable spot.
Dimensions
Figure 2 gives the measurements of the appliance. Study them, as they will help you install the appliance.
Levelling and positioning
Before installing the DISHWASHER, the appliance must stand firmly on the floor and be as perpendicular as possible.
Level it accordingly. correcting any possible irregularities in the floor.
This may be done by adjusting the height of the feet at the bottom of the appliance (Figure 7) (0 - 20mm)
A maximum 2% inclination level is allowed.
Once you have completed these tasks, proceed with the electrical and water connections according to the instructions.
Panellable dishwashers
Introduction
Our PANELLABLE DISHWASHERS are designed so that you can put them on their own or in with the rest of your kitchen cabinets and appliances. In the latter case, you can adapt them to the decor and arrangement of your kitchen, by performing a few simple operations.
Dimensions
Figure 2 provides the measurements of the appliance and Figure 5 the minimum measurements of the kitchen units.
Levelling and positioning
Before installing the DISHWASHER, the ap
pliance must stand firmly on the floor and be as perpendicular as possible.
Level it accordingly. correcting any possible irregularities in the floor.
This may be done by adjusting the height of the feet at the bottom of the appliance (Figure 7) (0 - 20mm)
A maximum 2% inclination level is allowed.
Door decoration
You can fit decorative panels to the door of your DISHWASHER so that it matches the surrounding decor.
This pannelling may be up to 4.5mm thick.
Fitting the panels
1.- Remove the door frame from your dishwasher by undoing the screws as shown in Figure 3.
2.- Prepare the panel according to the measurements given in Figure 3 (597 x 587 mm).
3.- Fit the panel you have chosen and screw the frame back into place.
Once you have done this, proceed with the water and electricity supply connections according to the instructions.
Built-in dishwashers
Introduction
Although they can also be used as freestanding appliances, our BUILT-INDISHWASHERS are designed so that you can fit them into your kitchen under the work surface. You may easily adapt your dishwasher to the decor and door alignment of the rest of your kitchen by performing a few simple operations.
Dimensions
Figure 5 gives the measurements of your dishwasher and the minimum requirements for the kitchen units. These will help you in the installation process.
If you want to put your dishwasher under the kitchen work surface, you have to remove the top cover by undoing the two screws shown in Figure 4 and also remove the counter weight located at the top of the machine. (Fig. 2)
You can use these same screws later to secure your appliance to the kitchen work surface, thereby ensuring the stability of the dishwasher.
Levelling and positioning
Refer to the section on levelling and positioning for free-standing and panellable dishwashers.
Door decoration
You can fit decorative panels to the door of your DISHWASHER so that it matches the surrounding decor.
This panning may be up to 4.5mm thick.
Panelling and adjusting the door
1.- Remove the door frame form your dishwasher by undoing the screws as shwon in Figure 6.
2.- Cut the decorative panel according to the height required (h) to line it up with the kitchen units either side.
3.- Take the door frame and cut it, by sawing off the top ends, to the same height (h) as the decorative panel.
4.- Adjust the lower door shim to the right height (h).
5.- Fit the decorative panel to the door. At the same time secure the frame and re-mark the position of the new holes in the door. Make the holes with a 3.25mm drill bit. Screw the frame back into place.
Note
If you want to fit your dishwasher into a row of kitchen units with a single kickstrip, this is possible, although you should bear the following in mind:
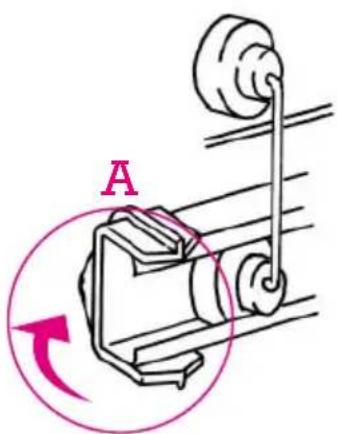
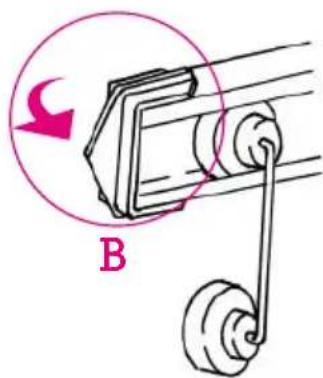
1.- Remove the base (1) and the feet (2) by undoing the screws (according to Figure 1).
2.-Do not forget to change the adjustable feet from Position A to Position B.
3.-Fit the kitchen unit kickstrip, sawing it to the size required (according to Figure 4).
Once you have completed these tasks, proceed with the electrical and water connections according to the instructions.
Integrated dishwashers
INFORMATION NOTE: The maximum and minimum weights recommended for the door covering to be fitted to the dish washers are:
-Maximum: 6,5 Kg
-Minimum: 4,5 kg
Introduction
Our INTEGRATED DISHWASHERS are designed so that the door covering and the control panel match the shape and size of 60 cm wide kitchen modules with a door and a drawer at the top.
To do this, proceed as follows:
Dimensions
Figure 5 gives the measurements of your dishwasher and the minimum requirements for the kitchen units. These will help you in the installation process
And remember if your dishwasher is an integrated model, remove the brackets located at the bottom of the dishwasher. (Fig. 2).
Levelling and positioning
Refer to the section on levelling and positioning for free-standing and panellable dishwashers.
Integrating your dishwasher
Adjusting the height of the dishwasher
Turn the dishwasher feet B anticlockwise, until the tip of the appliance comes into contact with the bottom of the kitchen work surface (Figure 7).
This enables the DISHWASHER height to be adjusted up to 870~mm .
Aligning the control panel (Figure 8)
This operation consists of aligning the control panel of the dishwasher until it is at the same height as the drawer panels of your kitchen units.
Use the spacing pieces and screws provided inside the appliance to carry out this operation.
If the height of the drawer panel is 110mm it is not necessary to make any adjustments. If it is higher, add as many spacing pieces as necessary (spacer A = 5 mm, spacer B = 10 mm), forming 5 mm modules, to adjust the height of the control panel to that of the drawer panels of adjacent units (Figure 8).
Once you have done this, bear in mind that when you fit the door panel, the bottom of it must be in line with the kickplate of your kitchen units.
Integrating your dishwasher
Once you have carried out the previous operations, proceed with the integration of your dishwasher, as follows:
1.-Fit the protective plastic cover supplied with the appliance to the underside of your kitchen work surface (Figure 9). This cover will prevent the condensation generated during the operation of your dishwasher from damaging the underside of your work surface.
2.-Using the template supplied with your appliance, mark the points where the brackets for fixing to the dishwasher are to go on the back of the door panel (Figure 10).
Note
When preparing the front panel you must take into account whetehr or not you have increased the height of the control panel with spacing pieces.
A) If you have not, align reference point 0, located on the top edge of the template, with the top edge of the door panel.
B) If, however, you have increased the height of the control panel, match the reference points marked on the template every 5 mm with the number of spacing pieces fitted to the top edge of the door panel.
3.-Fit the template, secure it and mark the the position of the holes. The drill them with a 2.5mm drill bit and screw the brackets to the panel, ensuring that the curved part of the bracket faces upwards (edge Y, Figure 11):
Take care not to drill too deeply.
4.- Take the door panel, with the edge (Y) facing upwards and fit the brackets in the slots in the door. Then pull the panel up until it touches the control panel, ensuring that all the brackets are properly secured in the slots in the door (Figure 12).
5.- Slowly open the dishwasher door, holding the panel at the same time. Then screw it tight using the screws supplied, ensuring that it is properly aligned with the door (Figure 13).
Note
To fit your integrated dishwasher into a row of kitchen units with a continuous kickstrip, proceed as follows:
6.- Fit the kickstrip, sawing it to the right size (Figure 4)
7.- Secure the dishwasher to the work surface (Figure 14)
8.- Check that the door opens and closes properly (Figure 15).
When these parts have been fitted, the dishwasher is ready for integration.
Once these operations have been carried out, proceed to connect the electricity and water supplies according to the instructions.
These figures can also be consulted on the template supplied with the appliance.
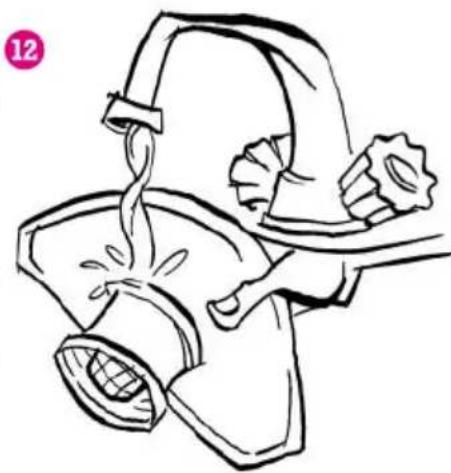
Water supply connection
To connect the DISHWASHER to the mains water supply, use the PRESSURE HOSE supplied with the machine. Join it to a water tap with a R 3/4" threaded mouth (Fig. 16).
The operating pressure should be between 4.9 - 98N / cm^2 . If it is higher, connect a pressure reducer valve, which you can buy in a shop selling plumbing supplies.
Very important
The water inlet hose should not have any kinks in it which might prevent the free entry of water into the DISHWASHER.
Hot water inlet
Although it is best to connect the machine to the cold water supply, some models can be connected to either the cold or hot water supply (max. 60^ ). Enquire at your local dealer.
Drainage connection
The DRAINAGE CONNECTION is made with a kneed hose that meets the following requirements:
1.- Less than 3 metres long.
2.- The end of the drainage pipe should be at a height of between 0.5m and 1m from the floor (Figure 17).
3.- A sump needs to be fitted for odour-free drainage.
4.- Avoid kinks which prevent the water from flowing out freely.
Very important
When you have completed the connection, ensure that the pipe elbow is well anchored to the outlet. This will avoid water leaks and the risk of floods.
Electrical connection
Our DISHWASHERS can withstand a maximum intensity of 16A. THE APPLIANCE MUST BE EARTHED.
The POWER CABLE supplied with teh machine has an earth terminal, which must be connected to a proper socket to guarantee the earth connection.
Before plugging the appliance in, check that your electricity supply voltage coincides with the operating voltage of your DISWASHER.
This information is given on the
CHARACTERISTICS PLAQUE located on the side of the Dishwasher door.
If the power cord is damaged, it must be replaced. It can only be replaced by the manufacturer, an authorized service centre or authorized service engineers.
THE MANUFACTURER CANNOT ACCEPT ANY RESPONSIBILITY IF THESE INSTRUCTIONS ARE NOT FOLLOWED.
This dishwasher complies with the provisions of European Directive 87/308/EEC concerning radio interference.
Lavavajillas panelables
Introduccion
Paraocularly, the two figures are not equal.
Dimensiones
- INHALT
- ATTENTION AU CALCAIRE!
- CAUTION IN HARD WATER AREAS!
- ADJUSTING THE AMOUNT OF SALT
- DISHWASHINGPRODUCTS
- SALT. So that lime does not cause any harmful effects.
- - Where and how is the salt added first time use?
- 2.DETERGENT. The type of program will give you the quantity required.
- RINSE AID. Cleans and adds brilliance.
- - How is the rinse aid intake regulated?
- - When do you have to add rinse aid?
- CORRECT LOADING OF THE DISHES
- Because you should never play with your food.
- 1.Standard basket.
- Top range basket.
- Regulating the upper basket means you can get the height you want.
- - Loading the dishes in the racks.
- IMPORTANT RECOMMENDATIONS
- Recommendations for cleaning.
- - Also clean your dishwasher periodically both inside and outside.
- Recommendations for dishes.
- SWITCHING ON
- Before starting-check the following points.
- PROGRAM SELECTION
- Additional function buttons 3
- WASH PROGRAM SELECTION
- HALF LOAD
- TROUBLE-SHOOTING
- The dishes do not come out as clean and shining as you expect.
- DEUTSCH
- Technical Specification Plate
- Electrical Connections
- Warning
- Unpacking
- Free-standing dishwashers
- Introduction
- Dimensions
- Levelling and positioning
- Panellable dishwashers
- Door decoration
- Fitting the panels
- Built-in dishwashers
- Panelling and adjusting the door
- Note
- Integrated dishwashers
- Integrating your dishwasher
- Adjusting the height of the dishwasher
- Aligning the control panel (Figure 8)
- Take care not to drill too deeply.
- Water supply connection
- Very important
- Hot water inlet
- Drainage connection
- Electrical connection
- Lavavajillas panelables
- Introduccion
- Dimensiones
Brand : FAGOR
Model : VFE25S
Category : Dishwasher