USER MANUAL PTS 480 A1 PARKSIDE
TAUCHSÄGE PTS 480 A1
DE AT CH
TAUCHSÄGE
Operation and Safety Notes
Translation of original operation manual

DE AT CH
Before reading, unfold the page containing the illustrations and familiarise yourself with all functions of the device.
GB Operation and Safety Notes Page 35

natural_image
Close-up of a metal cutting tool with a workpiece on a wooden surface, no visible text or symbols.
Einleitung
Semi Uguzlu
Directives machines (2006/42/CE)
Directive CE Basse tension (2006/95/EC)
RoHS Directive (2011/65/EU)
Semi Uguzlu
Intended use Page 36
Features Page 36
Scope of delivery....Page 36
Technical Data Page 36
-
Workplace safety Page 37
-
Electrical safety......Page 37
-
Personal safety......Page 37
-
Careful handling and use of the electrical power tool....Page 38
-
Service Page 38
Safety instructions for all saws Page 39
Safety instructions for plunge saws......Page 40
Safety recommendations for the correct use of superabrasives......Page 40
Additional safety information for circular saws......Page 41
Start-up
Switching on and off....Page 41
Releasing the plunge blocker....Page 41
Preselect cutting depth....Page 41
Fitting the guide fence....Page 41
Handling the plunge saw....Page 41
Marking cutting length....Page 41
Marking cutting line....Page 41
Connecting the saw dust extraction....Page 42
Replacing the saw blade....Page 42
Maintenance and Cleaning......Page 42
Service Page 42
Warranty Page 42
Disposal Page 43
Declaration of Conformity / Manufacturer......Page 43
Plunge saw PTS 480 A1
- Introduction
Congratulations on your purchase. You have selected a high quality product. The instructions for use are a part of this product. They contain important information about safety, use and disposal. Before using the product, please familiarise yourself with all the operating and safety instructions. Use the product only as described and for the specified applications. When passing this product on to others please be sure to also include all of its documentation.
Intended use
The machine is primarily intended for lengthwise and across cuts in plunge cut with solid support in solid wood, chipboard, plywood, aluminium, tiles, stone, plastic and lightweight construction materials. Please keep in mind that the pre-fitted saw blade is only suitable for cutting wood. Any other uses, and / or modifications to the appliance, are deemed to be improper usage and may result in serious physical injury. Not for commercial applications.
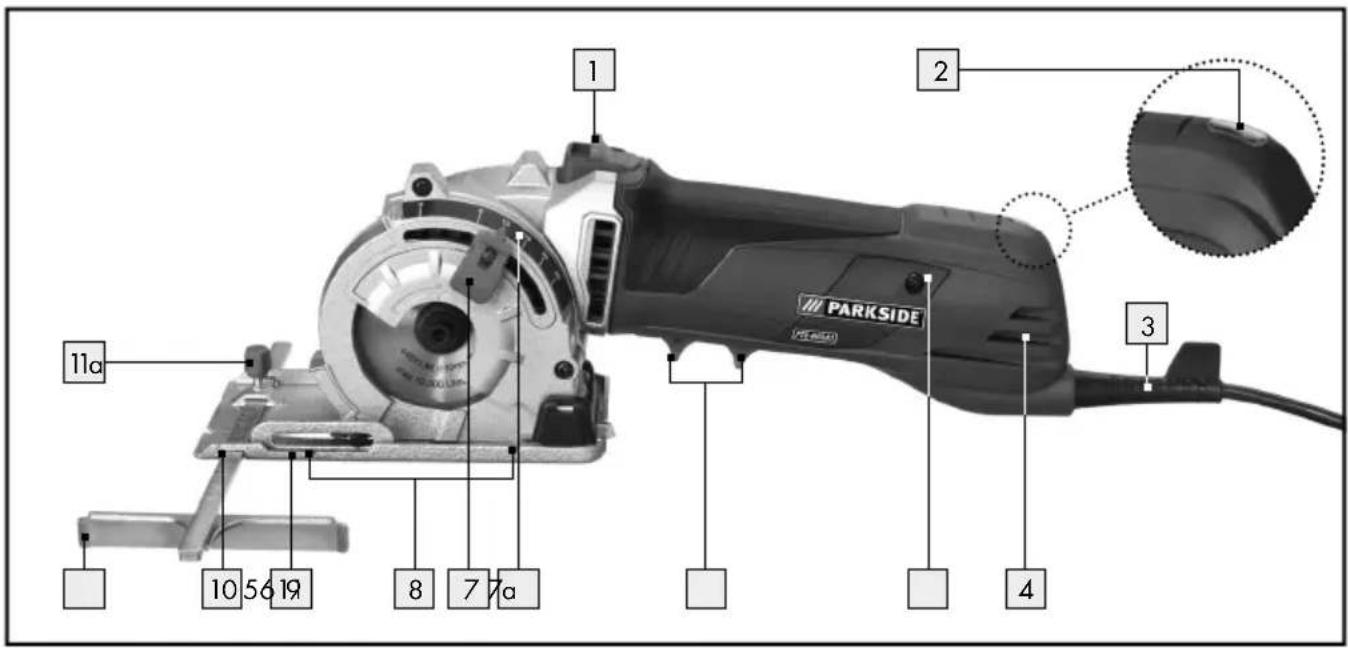
Features
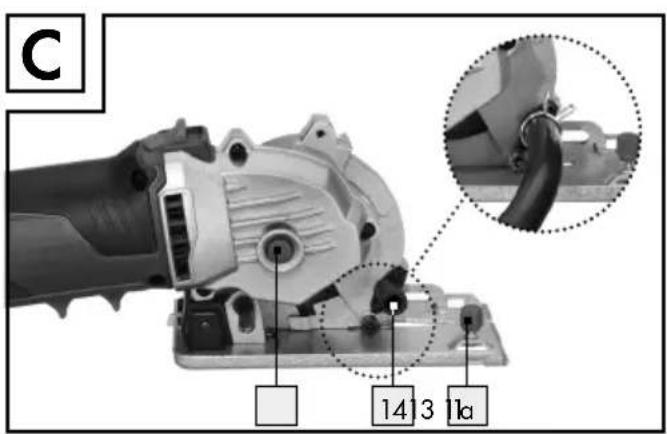
1 Mechanical plunge blocker
2 Power On/Control LED
3 Mains lead
4 Ventilation slits
5 Cover for brushes
6 ON/OFF switch
7 Pre-selector for cutting depth
7a Scale for cutting depth
8 Labelling cutting length
9 Base plate
10 Uptake parallel fence
11 Parallel fence
11a Screw for parallel fence
12 Window for cutting line
13 Spindle lock
14 Connection for dust extraction
15 Allen key
16 Saw blade
17 Clamping flange
18 Clamping screw and washer
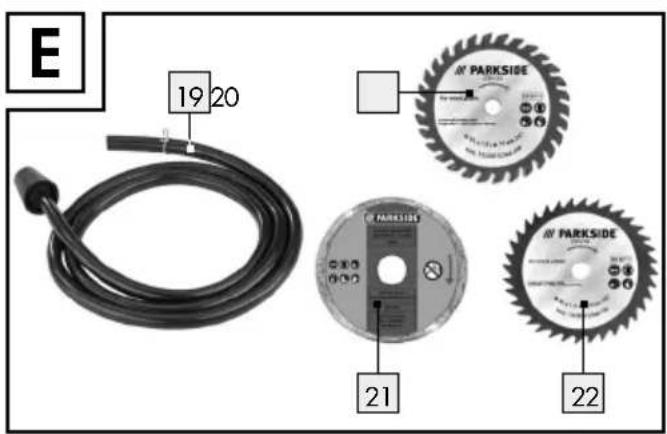
19 Dust extractor hose
20 HW-Circular saw blade Z85 / 30
21 Diamond cutting disc Z85VR
22 HS Circular saw blade Z85 / 36
- Scope of delivery
1 Plunge saw PTS 480 A1
1 HW Circular saw blade Z85 / 30
1 Diamond cutting disc Z85VR
1 HS Circular saw blade Z85 / 36
1 Parallel fence
1 Dust extractor hose
1 Allen key
1 Carry case
1 Set of operating instructions
Technical Data
Rated power: 480W
Rated voltage: 230V\~, 50Hz
Idling speed: n _0 4500 min ^-1
Max. cutting depth: 25 mm
Protection class: II/
Noise and vibration data:
Measurement for noise level, determined according to EN 60745. The A-rated noise levels of the electrical power tool are typically at:
Sound pressure level: 82 dB(A)
Sound power level: 93 dB(A)
Uncertainty K: 3 dB
Wear hearing protection!
Evaluated acceleration, typically:
Hand / arm vibration a_h = 2.266 m/s^2
Uncertainty K = 1.5 m/s ^4
WARNING! The vibration level given in these operating instructions has been measured in a pro-
cedure according to EN 60745 and can be used for the comparison of appliances. The vibration emission value specified can also serve as a preliminary assessment of the exposure.
Different uses of the device give rise to different vibration levels and in many cases they may exceed the values given in these instructions. It is easy to underestimate the vibration load if the electrical power tool is used regularly in particular circumstances.
Note: If you wish to make an accurate assessment of the vibration loads experienced during a particular period of work, you should also take into account the intervening periods of time when the device is switched off or is running but is not actually in use. This can result in a much lower vibration load over the whole of the work period.
WARNING! Please read all safety information and instructions. Failure to observe the safety information and instructions can result in electric shock, fire and / or serious injury.
For future reference keep all the safety advice and instructions in a safe place.
The term "electrical tool" used in the safety advice refers to electrical tools powered by mains electricity (by means of a mains lead) and electrical tools powered by rechargeable batteries (without a mains lead).
1. Workplace safety
a) Keep your working area clean and well lit. Untidy or poorly lit working areas can lead to accidents.
b) Do not work with the device in potentially explosive environments, which contain inflammable liquids, gases or dusts. Electrical power tools create sparks, which can ignite dusts or fumes.
c) Keep children and other people away while you are operating the electrical tool. Distractions can cause you to lose control of the device.
2. Electrical safety
a) The mains plug on the device must match the mains socket. The plug must not be modified in any way. Do not use an adapter plug with devices fitted with a protective earth. Unmodified plugs and matching sockets reduce the risk of electric shock.
b) Avoid touching grounded surfaces such as pipes, radiators, ovens, and refrigerators. There is an increased risk of electric shock if your body is earthed.
c) Keep the appliance away from rain or moisture. The penetration of water into the electrical device increases the risk of an electric shock.
d) Do not use the mains lead for purposes it was not intended for, e.g. to carry the device, to hang up the device or to pull the mains plug out of the mains socket. Keep the mains lead away from heat, oil, sharp edges or moving parts of the device. Damaged or tangled cables increase the risk of an electric shock.
e) If you are working outdoors with an electrical power tool, always use extension cords that are approved for outdoor use. The use of an extension cable suitable for outdoor use reduces the risk of electric shock.
f) Use a residual current device (RCD) for protection if the operation of the electrical power tool in a moist environment cannot be avoided. The use of an RCD reduces the risk of electric shock.
3. Personal safety
a) Remain alert at all times, watch what you are doing and always proceed
with caution when using an electrical tool. Do not use the electrical power tool if you are tired or under the influence of drugs, alcohol or medication.
One moment of carelessness when using the electrical power tool can lead to serious injury.
b) Wear personal protective equipment and always wear safety glasses. The wearing of personal protective equipment such as dust masks, non-slip safety shoes, safety helmets or ear protectors, appropriate to the type of electrical power tool used and work undertaken, reduces the risk of injury.
c) Avoid unintentional operation of the device. Check that the electrical power tool is switched off before you connect it to the mains, pick it up or carry it.
Accidents can happen if you carry the electrical tool with your finger on the ON / OFF switch or with the device switched on.
d) Remove any setting tools or spanners before you switch on the electrical tool.
A tool or spanner left attached to a rotating part of an electrical tool can lead to injury.
e) Avoid placing your body in an unnatural position. Keep proper footing and balance at all times. By doing this, you will be in a better position to control the electrical power tool in unforeseen circumstances.
f) Wear suitable clothing. Do not wear loose clothing or jewellery. Keep your hair, clothing and gloves clear of moving parts. Loose clothing, jewellery or long hair can become trapped in moving parts.
g) If vacuum dust extraction and collection devices are fitted, do not forget to check that they are properly connected and used correctly. The use of dust extraction reduces the hazard presented by dust.
a) Do not overload the device. Always use an electrical power tool that is intended for the task you are undertaking. By
using the right electrical power tool for the job, you will work safer and achieve a better result.
b) Do not use an electrical power tool if its switch is defective. An electrical power tool that can no longer be switched on and off is dangerous and must be repaired.
c) Pull the mains plug from the socket before you make any adjustments to the appliance, change accessories or when the device is laid aside. This precaution prevents the unintentional start of the electrical tool.
d) Always ensure that electrical power tools are kept out of reach of children when not in use. Do not let anyone use the device if they are not familiar with it or have not read the instructions and advice. Electrical power tools are dangerous when they are used by inexperienced persons.
e) Maintain the electrical power tool carefully. Check that moving parts are working properly and move freely. Check for any parts that are broken or damaged enough to detrimentally affect the functioning of the electrical power tool. Have damaged parts repaired before you use the device. Many accidents have their origins in poorly maintained electrical power tools.
f) Keep cutting tools clean and sharp. Carefully maintained cutting tools with sharp cutting edges are less likely to jam and are easier to control.
g) Use the electrical power tool, accessories, inserted tools etc. in accordance with these instructions. When doing this, take the working conditions into consideration, as well as the task at hand. The use of electrical power tools for purposes other than those intended can lead to dangerous situations.
5. Service
a) Only have electrical power tools repaired by qualified specialist personnel using OEM spare parts. This
ensures that the safety of the electrical power tool is maintained.
Safety instructions for all saws
a) DANGER: Stay with your hands out of the cutting area and keep off the cutting disc. If you hold the saw with both hands, they cannot be injured by the saw blade.
b) Do not reach underneath the workpiece. The protective cover will not protect you from the saw blade under the work piece.
c) Adjust the cutting depth to the thickness of the work piece. Less than the full width of a tooth should be visible from under the work piece.
d) Never hold the workpiece with the hand or lay it over a leg. Secure the workpiece on a stable fixture. It is important to fix the work piece safely, to minimise the danger of contact with the body, jamming of the saw blade or loss of control.
e) Hold the electrical power tool by the insulated handle surfaces when you are undertaking work where there is the danger of the tool striking hidden electricity cables or the device's mains lead. Contact with a live wire could cause metal parts of the electrical power tool to become live and lead to electric shock.
f) When cutting along the way always use a fence or a straight edge guide. That improves the precision of the cut and minimises the possibility that the saw blade jams.
g) Always use saw blades of the correct size and with matching mounting hole (e.g. star-shaped or round). Saw blades not matching the attachments of the saw run untrue and lead to loss of control.
h) Never use damaged or wrong saw blade washers or bolts. The saw blade washers and screws were specifically developed for your saw, for optimal performance and operating security.
Reasons for and how to avoid a kickback:
- A kickback is the sudden reaction, if the saw blade sticks, jams or is misaligned and the uncontrolled saw moves out of the work piece in the direction of the operator.
- If the saw blade wedges, sticks or jams itself into the closing saw gap, it blocks and the motor power kicks the saw back into the direction of the operator.
- If the saw blade is twisted or wrongly aligned in the saw gap, the teeth of the rear blade edge can jam in the surface of the work piece, causing the saw blade to move out of the saw gap and the saw to jump back in the direction of the operator.
A kickback is the result of wrong or unsuitable use of the saw. It can be avoided by taking the in the following described precautions.
a) Hold the saw with both hands and bring your arms into a position that allows you to absorb the forces of the kickback. Always stand to the side of the saw blade, never bring the saw blade into a line with your body. During a kickback the saw can jump backwards, however, the operator can master the forces of the kickback with suitable preventive measures.
b) Should the saw blade jam, or you stop the work, switch the saw off and hold it still in the work piece, until the saw blade has come to a standstill. Never attempt to remove the saw from the work piece or to pull it backwards, as long as the saw blade moves, as otherwise a kickback could occur. Find out and rectify the reason for the jamming of the saw blade.
c) If you want to restart a saw that stuck in the workpiece, centre the saw blade in the saw gap and check that the teeth are not stuck in the workpiece. If the saw blade jams, it can move out of the work piece or cause a kickback, when the saw is started anew.
d) Support big boards to reduce the risk of a kickback due to a jamming saw
blade. Big boards can bend through due to their own weight. Boards must be supported on both sides, at the outside and near the cutting edge.
e) Do not use blunt or damaged saw blades. Saw blades with blunt or wrongly set teeth cause increased friction, jamming of the blade and kickback due to a saw gap that is too tight.
f) Tighten the adjustments for cutting depth and cutting angle before starting to cut. If the adjustments change during cutting, the saw blade can jam and cause a kickback.
g) Take particular care, when plunge cutting into existing walls or other areas that you cannot inspect. The saw blade can jam when cutting into hidden objects and thereby causing a kickback.
● Safety instructions for plunge saws
a) Before every use check that the safety cover closes without problems. Do not use the saw, if the safety cover does not move freely and does not close instantly. Never fix or tie back the safety cover in the opened position. If the saw is dropped accidentally, the safety cover can be bent. Ensure that the safety cover moves freely and does not touch either the saw blade or other parts.
b) Check condition and function of the safety cover spring. If safety cover and spring do not work faultlessly, get the saw serviced before using it.
Damaged parts, sticky deposits or masses of wood shavings lead to delayed operation of the bottom safety cover.
c) If you plunge cut at angles other than right angles, secure the guide plate of the saw to prevent sliding sideways.
Lateral movement can lead to jamming of the saw blade and therewith to kickback.
d) Do not put the saw done on the bench or on the floor without covering the saw blade with the safety cover. An
unprotected saw blade moves the saw against the direction of the cut, and cuts everything that is in the way. Please keep in mind that the saw runs on.
Please ensure that only persons over 16 years of age operate this appliance according to the instructions in this operating instructions!
Note: Do not use grinding discs. Injuries and damage to objects could result.
Safety recommendations for the correct use of superabrasives
a) General
Superabrasives are breakable and shall therefore be handled with utmost care! The use of damaged or improperly mounted or used superabrasives is dangerous and can cause serious injuries.
b) Delivery, handling and storage
Superabrasives shall be handled and transportes with care. Superabrasives shall be stored in such a manner that they are not subjected to mechanical damages and harmful environmental influences.
Avoid the danger of death from electric shock:
Regularly check the condition of the appliance, mains cable and plug. Do not operate appliances with damaged parts of that description. Never open the appliance. Damaged appliances, mains cables or plugs main danger to life due to electric shock. Always have repairs or parts exchanges carried out at the service centre or by an electrician.
Do not operate the appliance when it is wet or in damp environments.
If you work outside, connect the device to a residual current (RCD) protective switch with a maximum 30 mA tripping current. Only use extension leads approved for outdoor use.
Note: Always hold the mains cable out of the operating range of the machine and move it towards the back of the machine.
• Additional safety information for circular saws
- Avoid overheating of the tips of the saw teeth.
■ When cutting plastic, avoid melting the plastic.
- Start-up
- Switching on and off
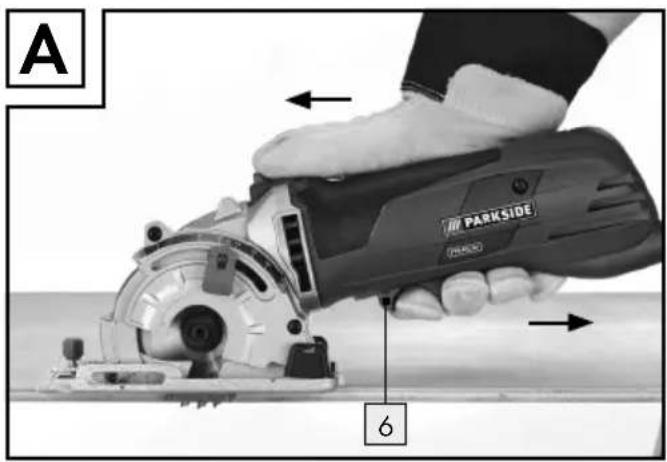
Switching on:
☐ Pull the ON / OFF switch towards the back (see Fig. A).
Switching off:
☐ Release the ON / OFF switch.
● Releasing the plunge blocker
☐ Push the plunge blocker towards the front and keep it pressed.
• Preselect cutting depth
Note: We recommend adjusting the cutting depth at least 2 mm deeper than the thickness of the material. This will result in a clean cut.
☐ Release the quick release of the cutting depth pre-selector 7, adjust the desired cutting depth at the scale 7a and refit the quick release.
• Fitting the guide fence
☐ Release the screw of the guide fended at the base plate 9 and insert the guide fence 11 into the guide fence fixture 10. Retighten these screws 11a.
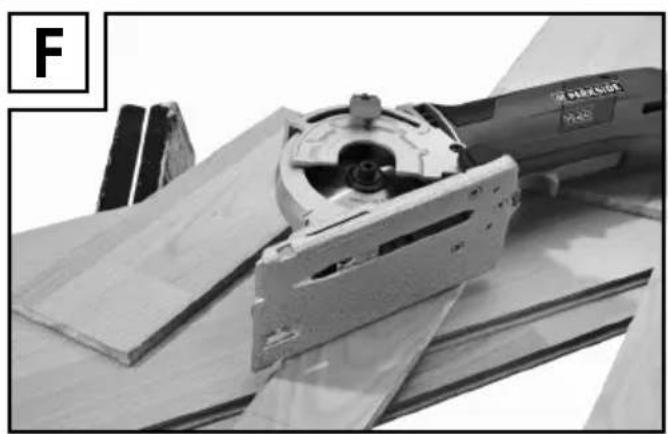
Handling the plunge saw
- Put the machine onto the material and switch it on as described in the chapter "Switching on and off".
- If necessary adjust the machine to the guide fence 11 or a drawn line.
- Hold the machine as shown in Figure A and cut with light pressure.
Types of saw blades:
The saw blades included cover the most common types of application.
HW Circular saw blade 20 Z85/30:
Description: 85 mm, 30 HW-teeth
Suitable for: Soft wood, hard wood, boards of any type, plastics
Diamond cutting disc 21 Z85VR:
Description: 85 mm, without teeth
Suitable for: Ceramics, plastics
HS Circular saw blade 22 Z85 / 36:
Description: 85 mm, 36 teeth – tooth setting
left/right
Suitable for: Soft wood, soft metals such as aluminium,
copper, plastics
- Marking cutting length
Orient yourself at the markings for the cutting length 8, in order to check where your cut starts and ends.
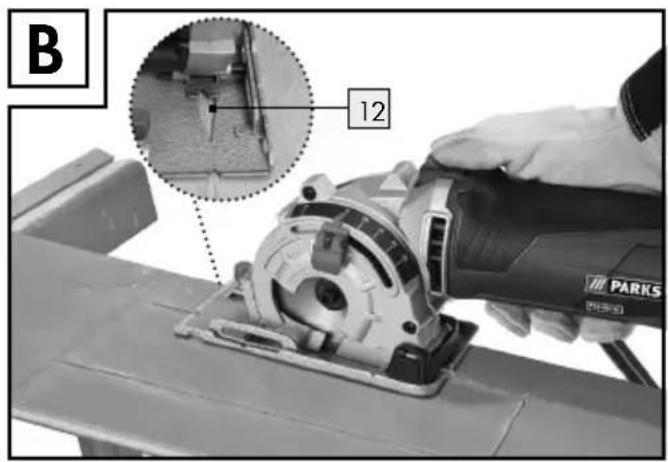
- Marking cutting line
The cutting line viewing window allows precise guidance of the machine along the cutting line applied to the workpiece.
In order to achieve an exact cut, place the machine on the workpiece so that the cutting length labelling appears in the cutting line viewing window 12, as depicted in Illustration B.
☐ Push the extraction air ho 39 onto the connection for dust extraction 14.
Connect a vacuum device approved for the extraction of sawdust and splinters to the dust extraction hose 19.
- Replacing the saw blade
- Operate the spindle lock 13 and loosen the clamping screw 18 with the Allen key (to open turn clockwise). Now lift off the clamping screw and washer 18 and the clamping flange 17 (see also Fig.D).
- Adjust cutting depth to the maximum position.
- Swing the base plate 9 upwards.
- Take off the saw blade.
- Refitting of the saw blade is the reversal of the removal.
- Operate the spindle lock 13 (until it clicks into place) and, using the Allen key, tighten the clamping screw 18.
The arrow on the saw blade must coincide with the arrow for the direction of rotation (marked on the appliance).
● Maintenance and Cleaning
WARNING! DANGER OF INJURY! Re-
move the mains plug from the mains socket before you carry out any work on the appliance.
□ Clean the appliance after finishing work.
☐ To clean the appliance, use a cloth and do not use petrol, solvents or cleaning fluids.
Service
A WASHYOR appliance repaired by qualified specialist personnel using OEM parts only. This ensures that the safety of the device is maintained.
WARNING! or mains lead needs to be replaced, always
have the replacement carried out by the manufacturer or its service centre.
This ensures that the safety of the device is maintained.
Warranty
The warranty for this appliance is for 3 years from the date of purchase. The appliance has been manufactured with care and meticulously examined before delivery. Please retain your receipt as proof of purchase. In the event of a warranty claim, please make contact by telephone with our Service Department. Only in this way can a post-free despatch for your goods be assured.
The warranty covers only claims for material and manufacturing defects, but not for transport damage, for wearing parts or for damage to fragile components, e.g. buttons or batteries. This product is for private use only and is not intended for commercial use.
The warranty is void in the case of abusive and improper handling, use of force and internal tampering not carried out by our authorized service branch. Your statutory rights are not restricted in any way by this warranty.
The warranty period will not be extended by repairs made unter warranty. This applies also to replaced and repaired parts. Any damage and defects extant on purchase must be reported immediately after unpacking the appliance, at the latest, two days after the purchase date. Repairs made after the expiration of the warranty period are subject to payment.
GB Service Great Britain
Tel.: 0871 5000 720
(0,10 GBP/Min.)
e-mail: kompernass@lidl.co.uk
IAN 55728
- Disposal

The packaging is made of environmentally friendly materials, which may be disposed through your local recycling acilities.
According to European Directive 2002/96/EC, used electrical goods must be collected and recycled in an environmentally friendly manner.
Contact your local refuse disposal authority for more details of how to dispose of your worn out electrical appliance.
We, KOMPERNASS HANDELS GMBH, the person responsible for documents: Mr Semi Uguzlu, BURGSTRASSE 21, 44867 BOCHUM, GERMANY, hereby declare that this product complies with the following standards, normative documents and EU directives:
Directive on Machinery (2006/42/EC)
EU Low Voltage Directive (2006/95/EC)
Electromagnetic Compatibility (2004/108/EC)
RoHS Directive (2011/65/EU)
Applicable harmonised standards
EN 60745-1/A11:2010
EN 60745-2-5:2010
EN 60745-2-22:2011
EN 55014-1/A2:2011
EN 55014-2/A2:2008
EN 61000-3-2/A2:2009
EN 61000-3-3:2008
Type designation of the machine:
Plunge saw PTS 480 A1
Date of manufacture: 11-2013
Serial number: IAN 55728
Bochum, 30.11.2013

Semi Uguzlu
- Quality Manager -
We reserve the right to make technical modifications in the course of product development.
KOMPERNASS HANDELS GMBH
BURGSTRASSE21
44867BOCHUM
DEUTSCHLAND