3320 - Fireplace Hwam - Free user manual and instructions
Find the device manual for free 3320 Hwam in PDF.

| Product type | Wood stove |
| Brand | Hwam |
| Model | 3320 |
| Weight (without base) | 95 kg |
| Weight (with base) | 110 kg |
| Nominal heat output | 5.0 kW |
| Permitted fuel | Wood (max. moisture content 20%) |
| Main features | HWAM automatic™ automation, optional ventilation system, shaking grate, ash vacuuming, combustion prolongation protection plate |
| Chimney connection | Min. diameter 150 mm, nominal draft 12 Pa |
| Safety distances (combustible wall) | Rear 15 cm, side 25 cm, front 80 cm |
| Safety distances (brick wall) | Rear 10 cm, side 10 cm, front 80 cm |
| Routine maintenance | External cleaning with vacuum or soft cloth, glass cleaned with damp paper and ash, empty ash container after cooling |
| Periodic maintenance | Annual chimney sweeping, preventive check every 2 years by a qualified installer, check of seals and automation |
| Rating plate | Present on the appliance (pages 58-59 of the manual) |
| Standards | EN 13240, NS 3058, NS 3059 |
| Warranty | Valid subject to compliance with maintenance instructions |
Frequently Asked Questions - 3320 Hwam
User questions about 3320 Hwam
0 question about this device. Answer the ones you know or ask your own.
Ask a new question about this device
Download the instructions for your Fireplace in PDF format for free! Find your manual 3320 - Hwam and take your electronic device back in hand. On this page are published all the documents necessary for the use of your device. 3320 by Hwam.
USER MANUAL 3320 Hwam
Table of contents, English
Drawings 3-5
Installation guide 49
Placement of separate components 50
Stoking instructions - wood 52
General tips about stoking your stove 53
Maintenance 54
Operating problems 56
Declaration of conformity 57
Type plate 58-59
A
B
C
C1
D

E

F
Wetgeving
StookInstructles - hout
Aspot legen (Tekening E)
Allumage - illustration E
E-post: hwam@hwam.com
E-post: hwam@hwam.com
dichiaraconilpresentedocumentoche:
Prodotto: Modello:
Stufa a legna HWAM 3310
HWAM 3320
EN 13240 Roomheaters fired by solid fuel
EN I3240/A2 Roomheaters fired by solid fuel
PotenciaTERMICA nominal 5,0 kW
Temperatura de humos 264^
The installation of your HWAM stove must always comply with all national and local building regulations. It is always a good idea to consult a chimney sweeper before you install the stove.
Requirements on the room
It must always be possible to obtain a supply of fresh air for the combustion to the room where the stove is to be installed. A window that can be opened or an adjustable ventilator is considered sufficient, but it is also possible to connect a HWAM fresh-air system to the stove. The air inlet/grating must be placed so that they do not become blocked.
Fresh air system (optional extra)
The HWAM 3310 and HWAM 3320 can be equipped with an optional fresh air system. If you wish to install a fresh air system on your stove, you have the following options:
1) Stove mounted on the wall: Connect the fresh air system on the lower back of the stove.
2) Stove mounted on a plinth: Connect the fresh air system either on the lower back of the stove or on the back of the plinth.
Please ensure that the hole (D4) is covered by the sealing plate accompanying the fresh air connection kit.
Load bearing surface
Before installing the stove, make sure that the surface it will stand on can carry the weight of the stove and the chimney. The weight of the chimney must be calculated based on its dimensions and height. The stove's weight:
HWAM 3310 without plinth: 92kg with plinth: 107kg
HWAM 3320 without plinth: 95kg with plinth: 110kg
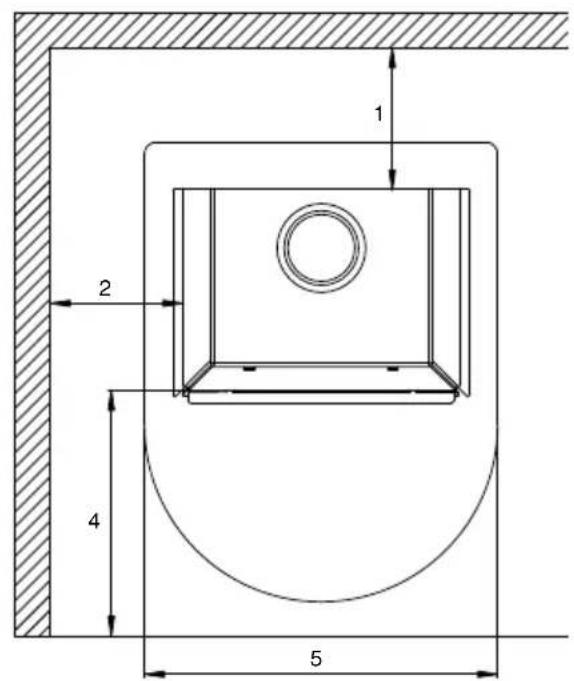
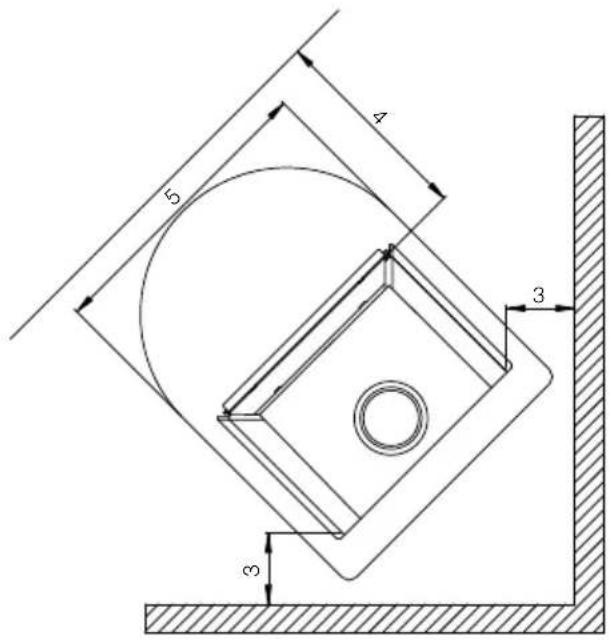
Distance to inflammable material, drawing A
Your HWAM stove must always be installed on a fire-proof surface. If installed on a wooden floor or similar surface, the floor must be covered by a fire-proof material.
Note: HWAM 3310 and HWAM 3320 must always be mounted on the wall or on a plinth.
Min. distances:
I. To brick wall at the rear 10cm^*
1. To inflammable wall at the rear 15 cm
2. To brick wall at the side 10 cm
2. To inflammable wall at the side 25 cm
3. To brick wall at the side, corner installation 10 cm
3. To inflammable wall at the side, corner installation 15 cm
4. Distance to furniture in front 80 cm
For wall-mounting, the stove must be placed at least 24cm above any inflammable flooring. This also applies to any floorboard placed on the floor.
Please be aware that not all glass parts are heat-resistant. For this reason, a glass wall should sometimes be treated as a flammable wall, in which case we ask you to contact your local chimney sweep or glass producer to hear at what distance the stove should be kept from glass.
Remember to pay attention to any regulations concerning the required distance between the wall and smoke pipe.
*The distance to a brick wall is set to facilitate the servicing of the automatics system.
The HWAM 3310/3320 with wall fittings can be mounted on a brick wall; however, this means that the stove must be taken down when the automatics system is to be serviced.
Requirements on the chimney
The chimney must be tall enough to provide a proper draught and prevent smoke problems.
Nominal draught requirement: Approx. 12 Pa.
The chimney must have a minimum internal diameter of 150mm
However, the chimney's minimum internal diameter must match the stove's outlet socket.
The chimney must be equipped with an easily accessible soot door.
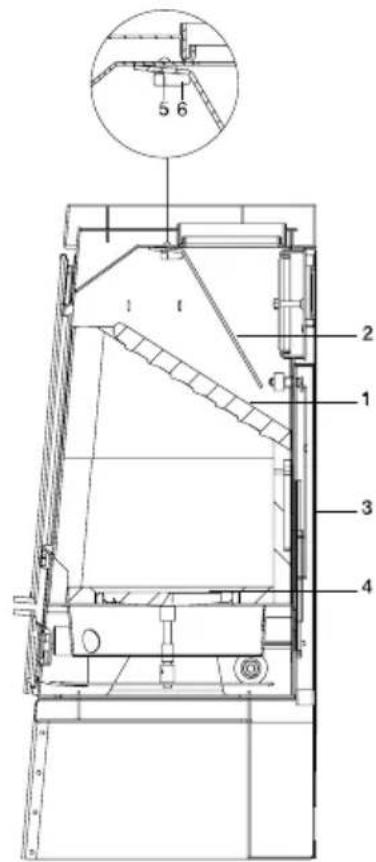
Placement of seParate comPonents
Before using the stove, please ensure that all separate components are correctly placed, cf. drawing B.
I. The smoke shelf must rest on the rear plate and on the slanted side panels.
2. The baffle plate must be secured with hooks at the top of the stove and slant backwards.
To access the baffle plate, you need to remove the smoke shelf, cf. the maintenance section.
- The removable rear plate which covers the automatic system must always be installed.
- Cover plate over shaking grate. Used to ensure extra long burning time.
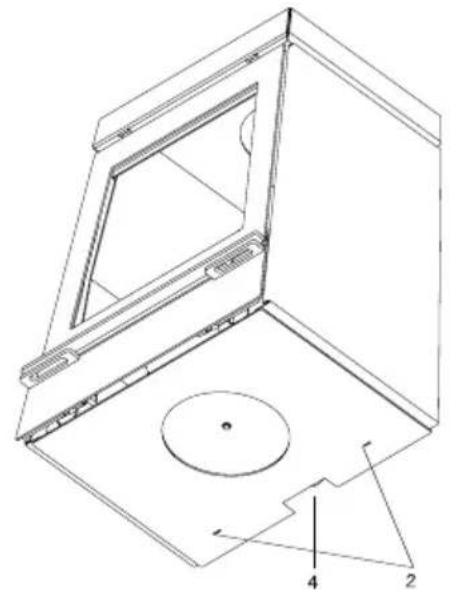
Mounting the stove on a plinth, drawing D
Mount the plinth with the open side facing forwards at the location where the stove is to be placed. Place the stove on top of the plinth so that the 2 guide pins (1) on top of the plinth fit into the 2 holes (2) in the bottom of the stove, and the guide block (3) fits into the hole (4) at the bottom rear edge of the stove.
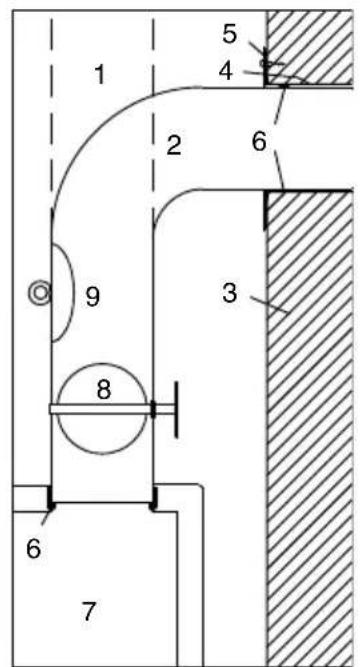
Connecting the chimney, drawing C
HWAM 3310 and HWAM 3320 are supplied with a top or rear outlet. This may be connected to either an approved steel chimney or a brick chimney.
Drawing C shows a vertical section of the smoke flue.
I. Steel chimney.
2. Fullform pipe. Fits inside the stove's flue duct socket.
3. Wall.
4. Built-in pipe sleeve. Fits the fullform pipe.
5. Wall rosette. Covers wall repairs around the pipe sleeve.
6. Joint. Sealed with packing material.
7. The HWAM stove's flue ducts.
8. Regulating damper in fullform pipe.
9. Soot door.
Chimney
The chimney is the stove's 'engine' and crucial for the functioning of the stove. The chimney draught provides a vacuum inside the stove. This vacuum removes the smoke from the stove, sucks air through the damper to the so-called window rinse which keeps the window free from soot, and draws in air for the combustion through the primary and secondary dampers.
The chimney draught is created by the difference between the temperatures inside and outside the chimney. The higher the temperature inside the chimney, the better the draught. It is therefore crucial to properly warm up the chimney before closing the dampers and limiting the combustion in the stove (a brick chimney takes longer to warm up than a steel chimney). On days where the weather and wind conditions create insufficient draught inside the chimney, it is even more important to warm up the chimney as quickly as possible. The trick is to quickly get some flames going. Split the wood into extra fine pieces, use an extra firelighter, etc.
If the stove has not been used for a longer period, it is important to check that the chimney pipe is not blocked.
It is possible to connect several devices to the same chimney. However, it is important to first check the applicable rules.
Even a good chimney may work poorly if it is used incorrectly. Similarly, a bad chimney may work well if used correctly.
Chimney sweeping
To prevent the risk of chimney fires, the chimney must be cleaned every year. The flue duct and the smoke chamber above the baffle plate must be cleaned together with the chimney. If the chimney is too tall to be cleaned from above, it must be equipped with a soot door.
In case of a chimney fire, close all dampers and call the firefighters. Before any further use, have the chimney checked by the chimney sweeper.
Test results from nominal test EN 13240 Nominal heating effect 5.0kW Smoke temperature 264^ Exhaust gas flow 7.4~g / sec
Stokling Instructions - wood
The first time you light up the stove, do it gently to allow all materials to acclimatise to the heat. The lacquer used for the stove coating will harden the first time the stove is lit. Therefore you should open the door very gently, as otherwise there is a risk that the gasket will get stuck in the lacquer. Furthermore, the lacquer will give off some odours the first time you light the stove. You should therefore make sure that the room is properly ventilated. Please be aware that the glove supplied with the stove could rub off the paint if the lacquer has not been allowed to harden sufficiently. Therefore you should always be careful not to touch the door itself until the stove has been lit 2-3 times.
Tips about fuel
Approved fuel types
The wood burning stove is EN approved for combustion of wood only. It is recommended to use dried chopped wood with a water content of a maximum of 20% . Stoking a fire with wet wood results in soot, environmental problems, and a less efficient fuel economy.
Recommended wood types
All types of wood, for instance birch, beech, oak, elm, ash, conifers, and fruit trees can be used as fuel in your wood burning stove. The great difference is not in the fuel value, but in the weight of the
wood types per cubic metre. Since beech weighs more per cubic metre than for instance common spruce, it will take more common spruce to produce the same amount of heat that you would get from a cubic metre of beech.
Banned fuel types
It is not allowed to stoke a fire with the following: printed matter, plywood, plastic, rubber, fluid fuels, and rubbish such as milk cartons, lacquered wood or impregnated wood. The reason that you should not apply any of the above is that during combustion they develop substances that are health hazardous and harmful to the environment. These substances could also damage your wood burning stove and chimney, rendering the product warranty void.
Storage of wood
A water content of a maximum of 20% is achieved by storing the wood for a minimum of one year, preferably two years, outdoors under a lean-to. Wood stored indoors has a tendency to become too dry and combust too quickly. However, it might be advantageous to store fuel for lighting a fire indoors for a few days prior to use.
Recommended dimensions
The dimensions of the fuel are important to good combustion. The dimensions should be as follows:
| Fuel type Length in cm Diameter in cm | ||
| Wood for kindling a fire (finely chopped) 25-33 | 2-5 | |
| Chopped wood 25-33 7-9 |
Opening and closing the door
Always hold the handle in the middle when opening and closing the door to avoid putting uneven pressure on the door lift mechanism.
Please note that it is important not to let go of the handle when opening and closing the door. The glass could be damaged if the door is allowed to open or close on its own.
Regulating the stove, drawing E
Regulating the primary air (rises through the grate in the stove). Turn the regulator knob (I) counterclockwise for minimum air and clockwise for maximum air.
Firing, drawing E
Turn the regulator knob (I) clockwise to the maximum setting (max. primary air).
Put an amount of split kindling wood corresponding to approx. 2-3 logs (approx. 2kg ) into the stove.
Put 2 firelighters between the uppermost layers of kindling wood. Light up and allow the fire to gradually spread.
During firing, condensation may form on the inside of the glass. To remedy this, lift the door approx. 5cm and keep it in this position until the glass is clear again (for approx. 30 sec.).
When all the kindling wood has caught fire, turn the regulator knob (1) to the middle setting.
If the fire is quenched by the regulation, reset the regulator knob to the maximum setting until the fire has caught on better. Return the regulator knob to the middle setting.
Let the kindling wood burn out completely until there are no more visible flames. You may then put in firewood.
Important! Do not open the ash pan when lighting up the stove, and always keep it closed when the stove is in use, as otherwise the automatic air regulation will be spoiled. Open the door only during lighting, re-firing and cleaning.
Burning, drawing E
When there are no more visible yellow flames and an appropriate layer of embers has formed, you may re-fire the stove. The layer of embers is appropriate when the wood pieces fall apart and the embers light at the shaking grate.
Put 2-3 logs of new firewood, up to 1kg a log, inside the stove. There is no need to further regulate the stove; this will be handled by the automatic system. However, you may adjust the temperature up and down with the regulator knob (I). When the knob is turned towards the minimum setting (counterclockwise), the combustion is reduced, and the burning time is increased. When the knob is turned towards the maximum setting (clockwise), the combustion is increased, and the burning time is decreased. Every time you need to add new firewood, wait until the layer of embers is again sufficiently low.
During combustion, the outer surfaces of the stove will become hot, and due care must therefore be shown.
Firing with coal, briquettes and coke
The HWAM 3310 and HWAM 3320 are not designed to use coal and coke. You may, however, use briquettes placed on top of the firewood embers. Turn the regulator knob to the maximum setting until the briquettes glow well.
Briquettes give off a lot of heat. Certain types expand significantly, causing an uncontrollable combustion.
Please note that using other types of fuel than wood may result in an increased risk of the pane sooting up.
general tIPs about stokling your stove
Fast or strong heat
Fast or strong heat is obtained by burning many small pieces of firewood.
Maximum burning
The maximum allowed amount of fuel per hour is:
Wood: 2.5kg Briquettes: 2.0kg 65 min
Typical re-firing interval at nominal performance:
Wood: 65 min Briquettes: 65 min
If you exceed these thresholds, the stove will no longer be covered by the factory warranty, as it could become damaged by excessive heat. The stove has been approved for intermittent use (periodical use).
Prolonged burning
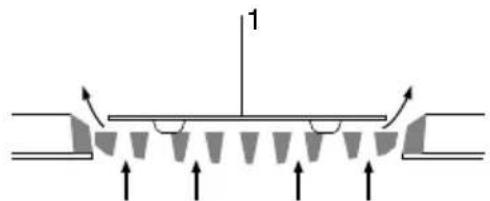
You will obtain a long burning time by burning a few (at least 2) very large logs and regulating as required with the regulator knob. You obtain the slowest combustion by turning the regulator knob counterclockwise to the minimum setting. At this setting, the primary air is completely shut off, which means that you need to manually supply combustion air after firing. You do this by first turning the regulator knob to the maximum setting, and then after 5 minutes slowly turning it back towards the minimum setting while making sure not to choke the flames. During slow combustion you may find it difficult to keep the glass pane clean. The included cover plate also helps increase the burning time, drawing C1. It is recommended that the cover plate is always applied. Place the cover plate (I) on top of the shaking grate. The cover plate is raised approx. 8mm over the grate to ensure that the primary combustion air is evenly distributed over the bottom of the combustion chamber.
Insufficient firing
If the fireproof materials in the combustion chamber are "black" after firing, the stove is polluting, and the automatic system is not working properly. You therefore need to open the air intake with the regulator knob. Burning a larger amount of wood may also be required.
Types of fuel
We recommend using birch or beechwood, which has been split and stored for at least one year outdoors under cover. Wood stored indoors tends to become too dry and burn too quickly.
Briquettes give off a lot of heat. Certain types expand considerably, thus causing an uncontrollable combustion.
How to achieve the best combustion
- Use clean and dry wood.
Wet wood results in inefficient combustion, plenty of smoke, and soot. Furthermore, the heat will dry the wood, not heat up the room.
- The fire should only be stoked with a little wood at a time.
You achieve the best combustion by starting up a fire often and using only a little wood. If you use too much firewood, it will take some time before the temperature reaches a level where you achieve a good combustion.
- Make sure there is the right amount of air.
You should also make sure that there is plenty of air - especially in the beginning - so the temperature in the wood burning stove climbs quickly. In this way the gasses and particles released during the combustion will be consumed by the fire. Otherwise they build up soot in the chimney (constituting a chimney fire risk) or will be released in a non-combusted state into the environment. The wrong amount of air supply creates inefficient combustion and a modest effect.
- Don't savour the fire during night time
We advise against adding fire wood to your stove and reducing the air supply at night in an attempt to still have some embers left in the morning. If you do so, large amounts of hazardous smoke will be emitted, and your chimney will be exposed to unnecessarily large amounts of soot with the risk of a chimney fire.
HWAM 3310 and HWAM 3320 are EN 13240 approved only for firing with wood. Do not use chipboard, lacquered, painted or impregnated wood, plastic, and rubber.
Maintenance should only be carried out on the stove when it is cold. The stove only requires a minimum of daily maintenance.
Emptying the ashpan, drawing E
HWAM 3310 and HWAM 3320 are equipped with a socket for sucking out ash from the ashpot.
Remove the cover plate (if used) over the shaking grate. Open the ash hatch in the lower part of the stove. Turn the wheel (2) beneath the stove one turn in the direction of the arrow, which shakes the ash from the combustion chamber down into the ashpot, and at the same time sweep in the direction of the socket opening (repeat if the ashpot is very full). Remove the socket cap (3), fit the ash bucket hose on the socket and turn on the motor/vacuum cleaner.
Note: The ash must be completely cold before you remove it from the stove! Please note that there may be embers in the ashes for up to 24 hours after the fire has gone out!
Cleaning
The easiest is to vacuum clean the stove on the outside using a small nozzle with soft brush-es. You can also wipe the stove clean using a dry, soft cloth or a soft duster. But remember only to do it when the stove is cold! Do not use water, spirit or any other kind of cleaner, as this will damage the lacquer. Thorough maintenance should be performed on the stove each year. Remove all ash and soot from the combustion chamber.
Service
The stove should have a thorough preventive service check at least every other year. This service check includes the following:
Thorough cleaning of the stove
- Checking of the door lift and possibly greasing with copper grease
- Check the spring in the automatic unit and replace if necessary.
- Checking gaskets. Replace gaskets if they are not intact or have softened
- Inspection of springs for chain drive. Inspection to ensure that the chain drive is equal on both sides, and that the door closes tightly all the way around.
- Checking of heat insulating material and possibly replacement
- Checking of the bottom/shaking grate
All service checks must be performed by an authorised fitter.
Use only original spare parts.
Cleaning
Before sweeping, the regulator knob must be turned to the minimum setting to prevent soot and ash from entering the automatic system.
Drawing B:
Remove the baffle plate (1). Push the plate forward and lift it up and slightly sideways. Tilt down one side; the plate is now free and can be removed from the combustion chamber. Remove the iron baffle plate (2). Straighten the transport lock (5). Lift the plate off the hooks (6) after which it may be removed.
Insulation
In time, the combustion chamber's efficient but porous insulation may become worn and damaged. Cracks in the rear plate could result in the secondary air being distributed incorrectly inside the combustion chamber, and the plate should therefore be replaced. Cracks in any of the side plates have no bearing on the efficiency of the stove.
However, the side plates and smoke shelf should be replaced if the wear exceeds half of the original thickness.
HWAM automaticTM (Drawing G)
Lift off the rear panel. On a cold stove, the starting point of the feeler is controlled. The starting point on a cold stove is about 10^ above horizontal.
It should feel easy going and bouncy when you push it, no matter if the stove is cold or hot. By rising or falling temperatures it must not move at a bound. The damper plates must be dry and clean and slide together unhindered. Control bars and slide gates may have to be smeared with WD40 (never oil).
Door/glass
Check that the air ducts in the doorframe are free from ash and soot particles.
If the glass has become sooted up, it may be cleaned with a slightly moist piece of paper dipped in ashes. Regularly check that the door gaskets are intact and flexible. If not, they should be replaced. Use only original gaskets.
Once a year, ensure that the glass has not moved sideways. The glass is fastened to the door as tightly as possible before leaving the factory, but not so tight as to cause the glass to burst as a result of temperature fluctuations.
The glass can be pushed back into the middle of the wood-burning stove by carefully loosening the two clips that hold it in place on the door.
Door lift, drawing F
The door lift mechanism consists of a chain pull placed on either side of the stove and a spring. If the door opens with difficulty, you may correct this by greasing the chain wheel boxes (1) and door hinges (2) with copper grease (we recommend a grease that can withstand temperatures of up to 1,100^ ). You should do this once every year. If the door still opens and closes too stiffly, the spring on the door lift mechanism can be loosened slightly. If the door slides too easily, the spring has loosened.
The spring can be loosened or tightened as follows:
Remove the loose side plate on the left side of the stove (seen from the front) by lifting it up and out to the side. Make sure the door of the combustion chamber (3) is closed. Attach the tightening tool (4) supplied with the stove to the toothed wheel (5). To tighten the spring so that the door closes more slowly (or can remain fully open), turn the toothed wheel (5) clockwise slightly. This can be done by turning the tightening tool (4) counterclockwise. To loosen the spring so that the door closes faster (or can no longer remain fully open), lift the locking pawl (6) and turn the toothed wheel (5) counterclockwise slightly. This can be done by turning the tightening tool (4) clockwise. IMPORTANT! Keep a firm grip on the handle of the tightening tool (4) when lifting the locking pawl as considerable weight and force are transferred when it is lifted.
After each adjustment, check to see whether the desired effect has been achieved. If not, repeat the process. If you have loosened the spring, we recommend holding the door handle when checking the effect for the first time to ensure that the spring has not become so loose that the door closes too fast with the risk of damaging the glass.
Please Note: You should always have a professional adjust, grease and repair these parts.
Surface
Normally, additional surface treatment will not be required. However, damage to the coating may be repaired with Senotherm spray.
Guarantee
The guarantee becomes void in case of insufficient maintenance!
Operating Problems
The window soots up
- Your firewood is too moist. Only use firewood which has been stored for at least 12 months under cover and with max 20% moisture.
- The door gasket may be leaking.
Smoke in the room when the door is opened
- The damper in the chimney may be closed. Open the damper.
Insufficient draught in chimney. See the section on the chimney, or call the chimney sweeper. - The soot door door is leaking or has fallen off. Replace or install the clean-out door.
- Never open the door when there are flames coming from the firewood.
Excessively rapid combustion
- The door gasket is leaking. Install another gasket.
- If the chimney draught is too powerful it may be necessary to turn the stove's regulator knob towards the minimum setting.
- Close all dampers when the stove is not being used.
In case of any operating problems that you cannot remedy yourself, please contact the dealer where you bought your stove.
Manufacturer:
HWAM A/S
Nydamsvej 53
DK-8362 Horning
Denmark
Tel.: +45 86 92 18 33
Fax: +45 86 92 22 18
E-mail: hwam@hwam.com
hereby declares that:
Product: Type:
Wood-burning stove HWAM 3310
HWAM 3320
was manufactured in accordance with the provisions of the following directive:
Reference no. Title:
89/106/EEC Construction Products Directive - CPD
and the following harmonised standards:
No: Title: Version:
EN I3240 Roomheaters fired by solid fuel 2001
EN I3240/A2 Roomheaters fired by solid fuel 2004
and other standards and/or technical specifications
No: Title: :
NS 3058 Enclosed wood heaters - Smoke emission
NS 3059 Enclosed wood heaters - Smoke emission
- requirement
Horning, 21. May 2007
| Roomheater, Type | HWAM 3310 |
| Thermal output: | 5,0 kW |
| Fuel types | wood |
| Distance to adjacent combustible materials: | |
| Back | 150 mm |
| Side | 250 mm |
| Front | 800 mm |
| Emission of CO in combustion products | 0,11 % / 1375 mg/m3 |
| Particles | 27 mg/m3 |
| Energy efficiency | 79,0 % |
| Flue gas temperatur | 280 °C |
| Laboratory registration number | 1625 |
| Test report | RRF - 40 05 957 |
| The appliance is capable of intermittent operation. | |
| The appliance can be used in a shared flue. | |
| Follow the user's manual and use only recommended fuel. | |
| Norge | NS 3058, NS 3059 | |
| Type | HWAM 3310 | |
| Brensel | ved | |
| Afstand til brennbart materiale | ||
| Bak | 150 mm | |
| Side | 250 mm | |
| Partikulaer utslipp | 3,70 g/kg | |
| SINTEF Produkt Dokumentasjon | 110-0236 | |
| Austria | Art. 15A | RRF - 40 05 957 |
| Switzerland | VKF zulassung | 16142 |
| HWAM A/S Nydamsej 53 - DK 8362 Hørning | HUwam | |
| Tel.: (+45) 86 92 18 33 | ||
| Fax: (+45) 86 92 22 18 | 2010 | |
| EAN | S.nr.: | |
S.nr.:
S.nr.:
| Roomheater, Type | HWAM 3320 |
| Thermal output: | 5,0 kW |
| Fuel types | wood |
| Distance to adjacent combustible materials: | |
| - Back | 150 mm |
| - Side | 250 mm |
| - Front | 800 mm |
| Emission of CO in combustion products | 0,11 % / 1375 mg/m3 |
| Particles | 27 mg/m3 |
| Energy efficiency | 79,0 % |
| Flue gas temperatur | 264 °C |
| Laboratory registration number | 1625 |
| Test report | RRF - 40 05 957 |
| The appliance is capable of intermittent operation. | |
| The appliance can be used in a shared flue. | |
| Follow the user's manual and use only recommended fuel. | |
Norge
NS 3058, NS 3059
| Type | HWAM 3320 |
| Brensel | ved |
| Afstand til brennbart materiale | |
| - Bak | 150 mm |
| - Side | 250 mm |
| Partikulaer utslipp | 3,70 g/kg |
| SINTEF Produkt Dokumentasjon | 110-0236 |
Austria
Art. 15A
RRF-4005957
Switzerland
VKF Zulassung
16142
HWAM A/S
Nydamsvej 53 - DK 8362 Høming
Tel.: (+45) 86 92 18 33
Fax: (+45) 86 92 22 18
Hwam
2010
EAN
S.nr.:
S.nr.: