
Swing 5 - Pets Ferplast - Free user manual and instructions
Find the device manual for free Swing 5 Ferplast in PDF.
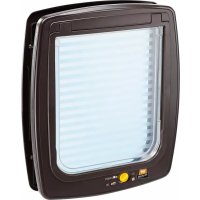
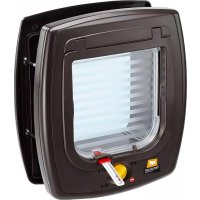
| Product type | Pet door (cats and dogs) |
| Model | Swing 5 |
| Brand | Ferplast |
| Closing system | 4 positions: entry only, exit only, entry and exit, locked |
| Last passage indicator | Yes (IN/OUT) with adjustable flag |
| Draft protection | Yes |
| Material | High quality plastic, reinforced flap |
| Power supply | None (mechanical) |
| Main functions | Allows free or controlled access for the animal, management with 4-position lock, position indicator |
| Installation | On wooden door, glass, metal or wall (max thickness 55 mm) |
| Maintenance | Clean with a damp cloth |
| Safety | Keep out of reach of children, periodically check condition of parts |
| Spare parts | Replaceable swinging door (remove screws) |
| Warranty | Against manufacturing defects, excluding normal wear and non-compliant use |
| Package contents | Door, tunnel, mounting template, screws, caps, instructions |
| Use | For domestic pets only, size suitable for the animal |
Frequently Asked Questions - Swing 5 Ferplast
User questions about Swing 5 Ferplast
0 question about this device. Answer the ones you know or ask your own.
Ask a new question about this device
Download the instructions for your Pets in PDF format for free! Find your manual Swing 5 - Ferplast and take your electronic device back in hand. On this page are published all the documents necessary for the use of your device. Swing 5 by Ferplast.
USER MANUAL Swing 5 Ferplast
natural_image
Abstract black silhouette of a dog-like shape on white background (no text or symbols)ferplast
new pet generation
natural_image
White portable electronic device with ventilation slots and a black arrow pointing to a cable (no visible text or symbols)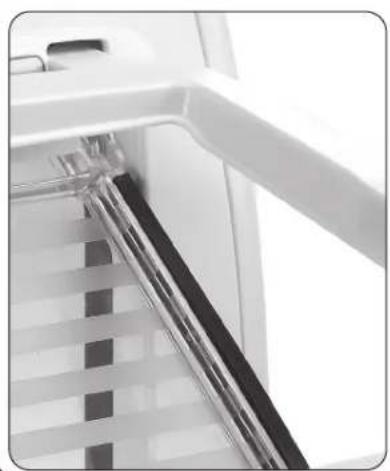
natural_image
Close-up of a mechanical component with a metallic rod inserted into a slatted structure (no visible text or symbols)3
IN/OUT INDICATOR4-WAY LOC
natural_image
Close-up of a white appliance control panel with icons and labels (no readable text or symbols)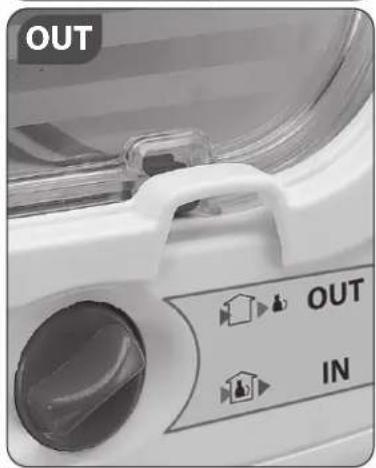
4
MAGNETIC KEY
natural_image
Product photo showing a headset attached to a control panel with a door and indicator lights (no text or symbols on the device itself)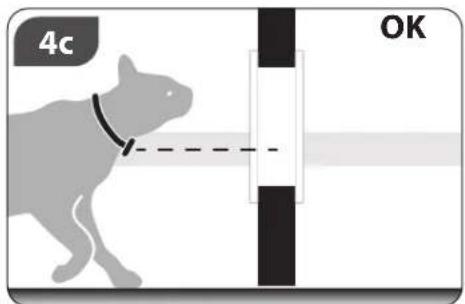
natural_image
Black-and-white photo of a white cat wearing a collar with an arrow pointing to its neck, alongside a close-up of the leather strap (no text or symbols visible)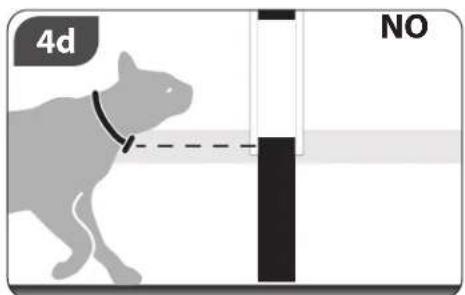
5
WOODEN DOOR
natural_image
Illustration of a hand using a screwdriver to draw a square hole on a wall, with no text or symbols present.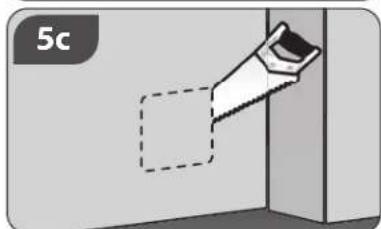
natural_image
Diagram showing a hand holding a tool near a door, with no visible text or symbols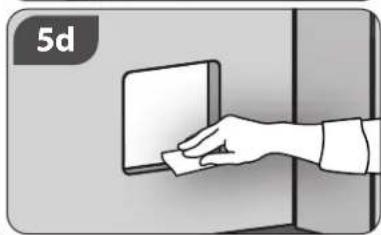
natural_image
Illustration of a hand placing a small object into a rectangular device (no text or symbols)6
GLASS DOOR


7
DOOR FITTING
WALL
natural_image
Illustration of a soldering iron with a square component inserted, no text or symbols present8
CUT THE TUNNEL
natural_image
Close-up of a white wall-mounted door handle with a small black clip attached, next to a wooden beam (no text or symbols visible)8b
natural_image
Close-up of a white electronic device with a black arrow pointing to a component, no visible text or symbols.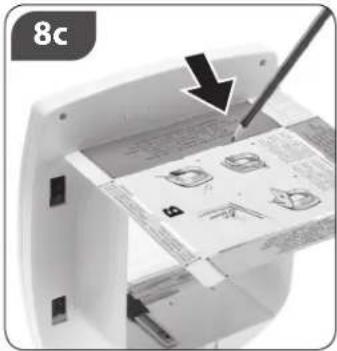
natural_image
Close-up of a printer's door panel with a black arrow pointing to the paper, showing no visible text or symbols.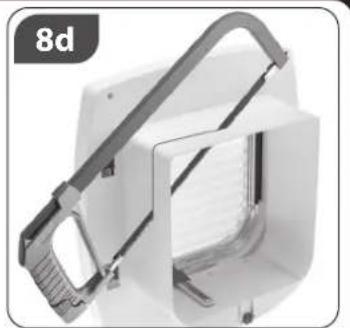
natural_image
Close-up of a white industrial machine with a curved handle and mesh chamber (no visible text or symbols)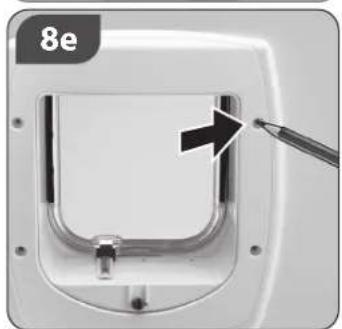
natural_image
Close-up of a U-shaped metal component with a black arrow pointing to a small hole, no visible text or symbols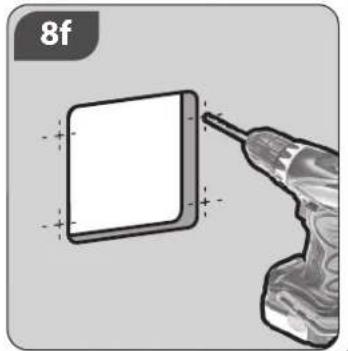
natural_image
Illustration of a power tool inserting into a square component (no text or symbols)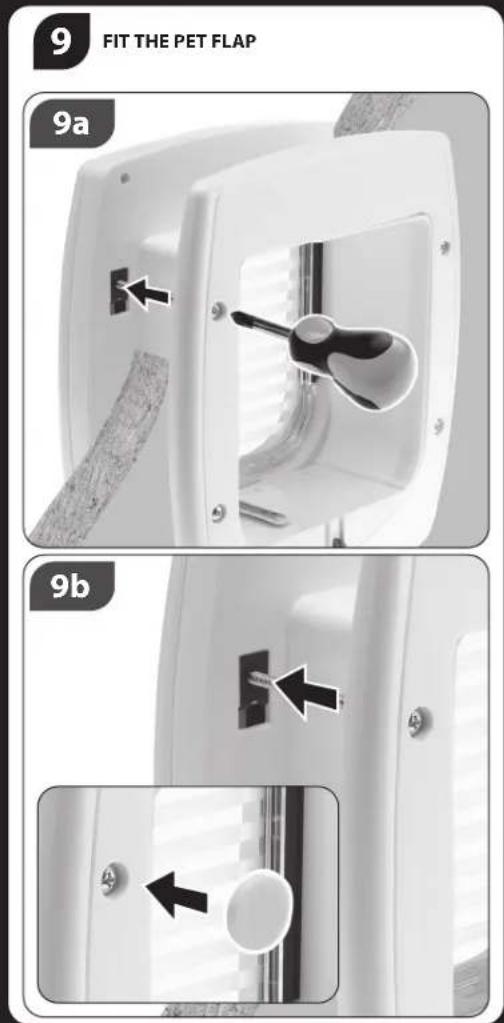
SWING 5 - 7 MAGNETIC
12a
WOODEN DOORS
Unit of measurement = mm
GLASS DOORS
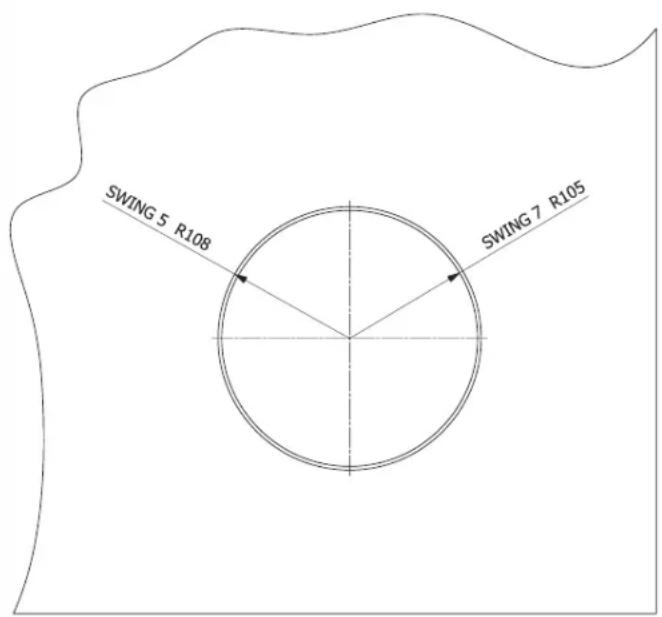
SWING 5 R = 108 mm
SWING 7 R = 105 mm
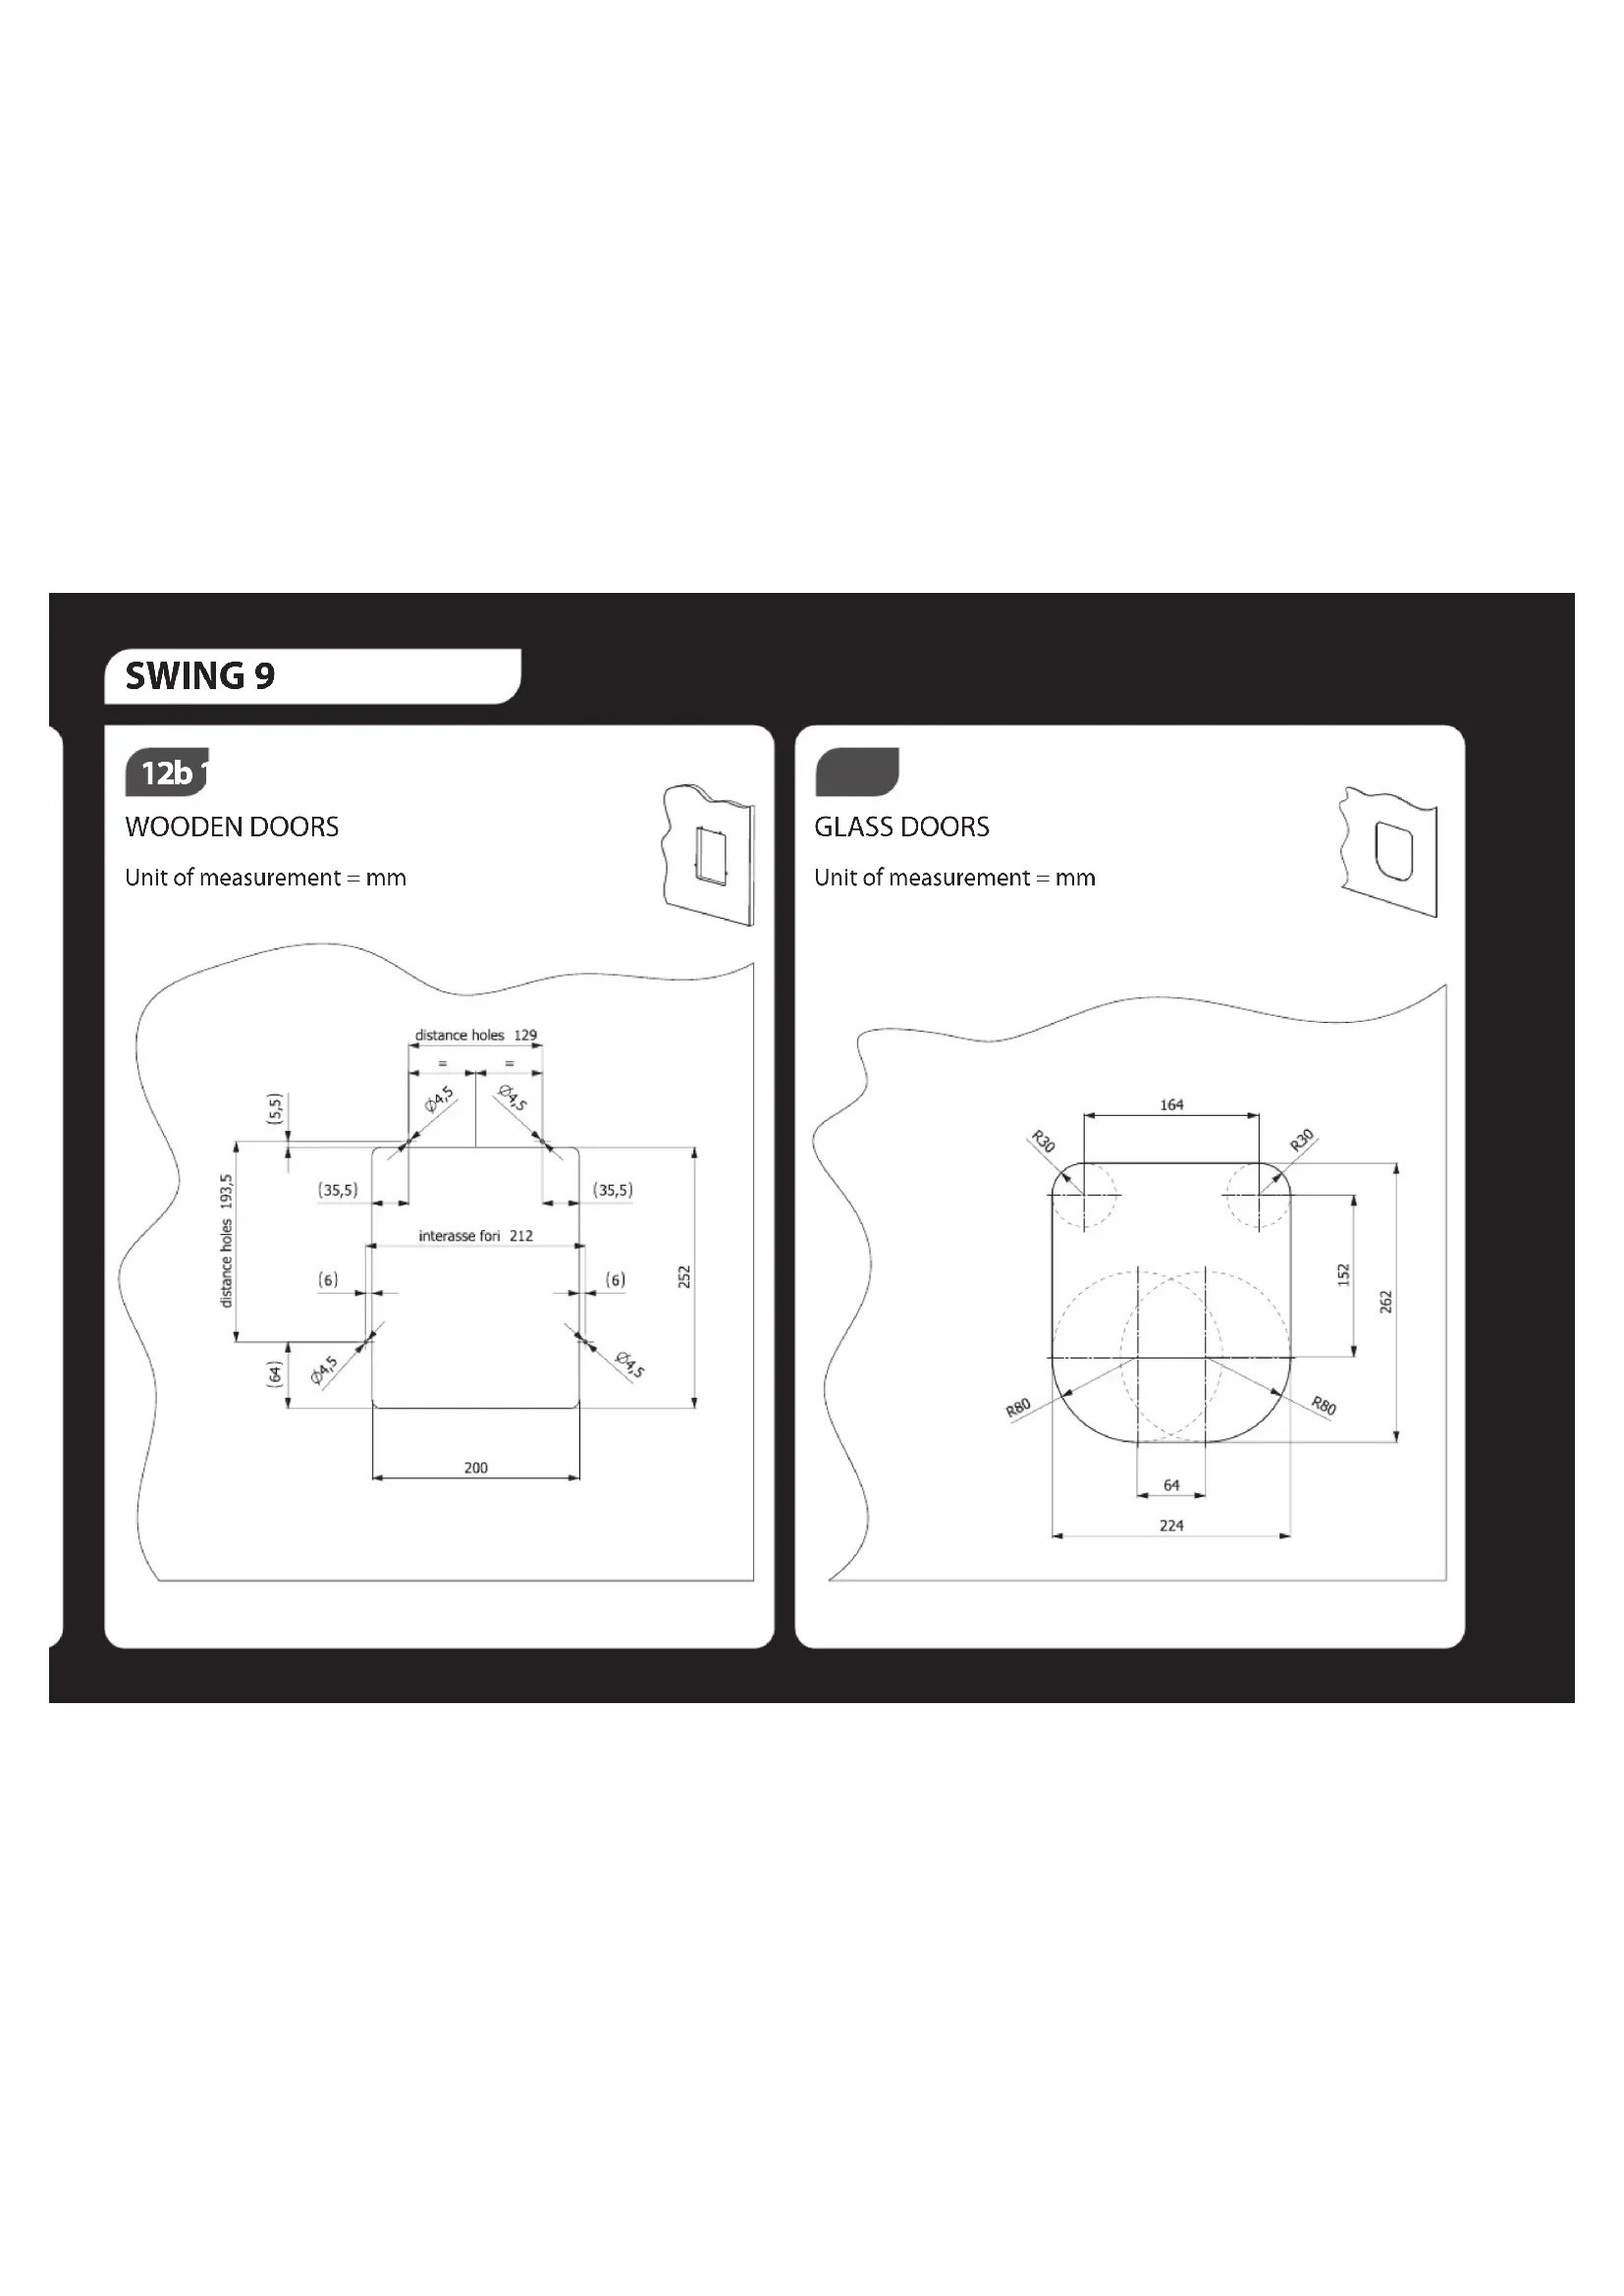
SWING 9
12b
WOODEN DOORS
Unit of measurement = mm

GLASS DOORS
Unit of measurement = mm

SWING 11
12c 1
WOODEN DOORS
Unit of measurement = mm
GLASS DOORS
Unit of measurement = mm
SWING 15
12d
WOODEN DOORS
Unit of measurement = mm
GLASS DOORS
Unit of measurement = mm
Please read all the instructions carefully before starting to install SWING pet flap.
Warning: For Pet use only. Choose the model in compliance with your pet's size. This product (included the lock mode) will not prevent unwanted animals or people (including children) from passing through the door. Ferplast will not be responsible for these unintended uses and the purchaser of this product accepts full responsibility for the opening it creates. Keep away from children; this product should not be used by person with any kind of disability. Keep small parts far from children for avoiding choking hazard. To be used by person of suitable age and discretion. Inspect regularly and replace if any part becomes damaged, loose or detached. Dispose properly of the product in accordance with the laws and regulations.
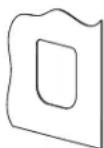
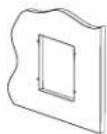
A door all to themselves. The SWING pet flap is as useful for them as it is for you. You can use it to leave your cat or dog free to come in and out of the garden, giving them freedom that would otherwise be denied. You can also use it to offer them their own 'personalised' door that allows them to come in or go out safely. With all its functions the SWING pet flap can be made to fit all yours and your pets requirements: you can allow your pets to re-enter but not to go back out. You can arrange it so that the flap opens just for them. You can even see, with just one glance, if they are indoors or outdoors. Let's see how.
THE WONDERS OF THE SWING PET FLAP
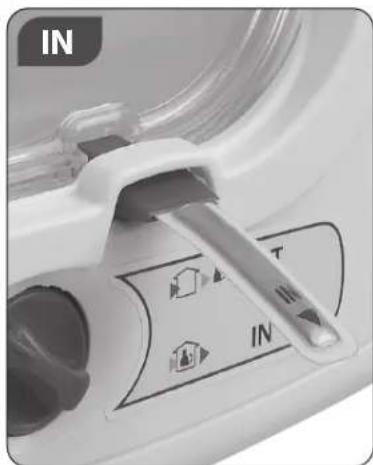
The 4-way locking system: It's so convenient! (1) The SWING pet flap has been designed to meet all your requirements and those of your pet. For this reason you can rely on the original 4-way locking system that enables you to control the usage by your pet. You can choose between the following: Access only / Exit only / Access and exit / Closed. For further safety, the SWING 11 and SWING 15 versions use a double locking system that is controlled by just one knob, all for the sake of simplicity.
Windstopper system (2)
Innovative system preventing draughts.
Antishocking system
End stroke shock absorber in the door maximum opening (only on SWING 9, 11, 15 versions).
The last IN or OUT direction indicator: You always know where they are (3)
The SWING 5 and SWING 7 MAGNETIC use the last IN or OUT direction indicator. It is a system that will help you know whether your pet is indoors or outdoors. This feature is useful if you have to go out and you can't find your pet. A quick glance is sufficient: the "flag" (see picture) on the bottom part of the pet flap will point in the last direction in
which your pet went through the flap after it closed. Warning! In severe weather conditions (wind, etc.) the total reliability of this system cannot be guaranteed. If your pet should open the flap without actually going through the tunnel, the indicator would not be reliable.
The magnetic system: a key all to themselves (4)
The SWING 7 MAGNETIC flap is also equipped with a magnetic key, being a small and handy tab to be attached to your pet's collar. The magnetic key allows your pet to open the flap simply by approaching it. The device is particularly useful, as it allows only your pet to come into the house, so you don't risk meeting up with unwanted guests
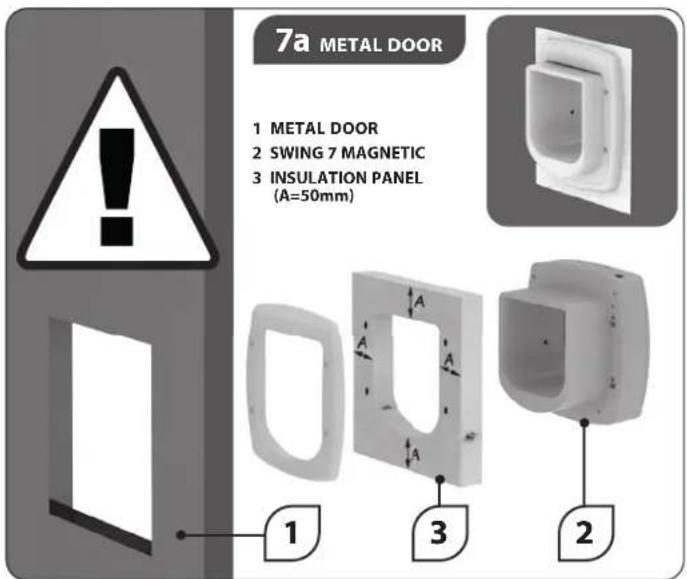
in your home. Warning! The magnetic system does not work near metal objects, which could interfere with the reliable operational efficiency of the mechanism. If installed in double-glazed doors, where there is a metal strip in between the panes, this must not be in contact with the flap, unless a plastic separation strip is required. The magnetic system does not work if the flap is installed to metal doors, for example metal doors covered in uPVC (Ultra Resistant Polyvinyl Chloride), doors with metal panels or security doors. The metal door must be isolated (7a).
HOW TO TEACH YOUR PET TO USE THE SWING FLAP. To teach your pet how to use the SWING flap is much easier than you think. It is important not to expect too much from your pet but to let it learn in its own time. The easiest way for your pet to discover it is to leave the flap completely open. Pets are curious by nature and will be quickly tempted to go through the open flap towards freedom. If this is not the case – and your pet isn't that adventurous – you can always fall back on a foolproof method: of blackmail, metaphorically speaking. Simply prepare their favourite food and put it in front of its nose, firstly on one side of the flap and then the other side. Your cat or dog will just not be able to resist the temptation.
And now... push! Once your pet has got used to going through the flap, it's time to face the next step. Leave the pet flap closed, but not locked: your pet, who now considers the flap to be its own, will not think twice about pushing it to get to the other side. And if this doesn't happen straight away, go back to the old food 'blackmail' method. One sniff and your dog or cat will naturally attempt to reach its target. It's a proven method. Often a move of house may provide another reason to install the pet flap. If you have just moved, remember that your pet also needs time to become familiar with their new surroundings too. Therefore don't rush: Only when your pet feels perfectly at home, will it feel the need to discover all the secrets and new adventures, amongst which, its own private door. As for the lock, you need a little patience: only start to lock the flap once your pet is used to coming in and going out of it. Cats and dogs will soon learn that the door is not always open, but it still remains a wonderful way of coming in and going out all on their own.
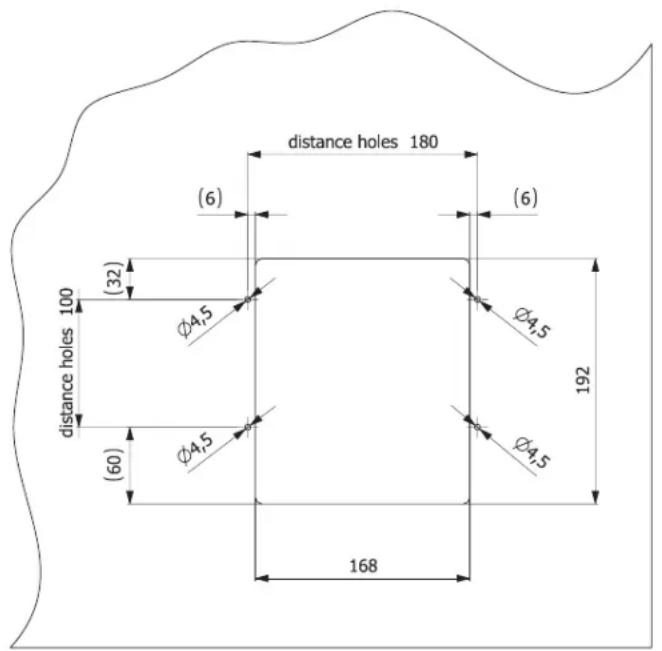
How to install: without mistakes. Read these instructions carefully and you will find that the pet flap is easier to install than you think. The tools required are the following: Pencil, Drill, Template (supplied in the pack), Jig saw, Screwdriver.
Wooden doors (5)
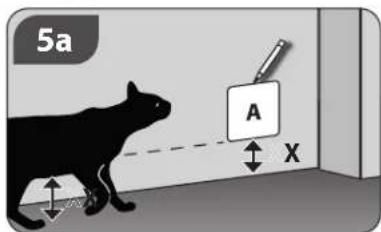
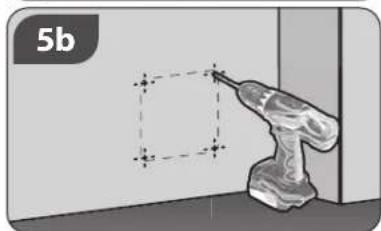
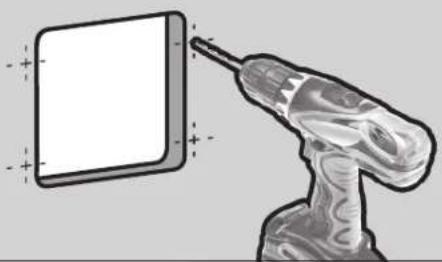
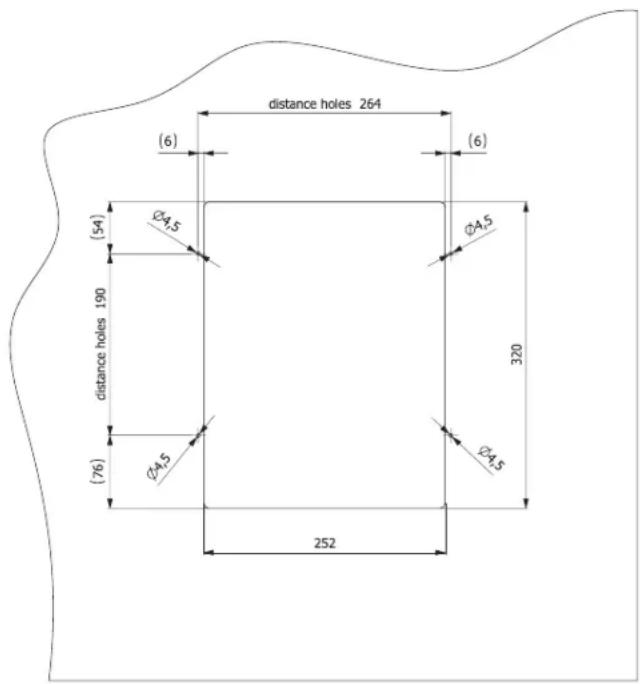
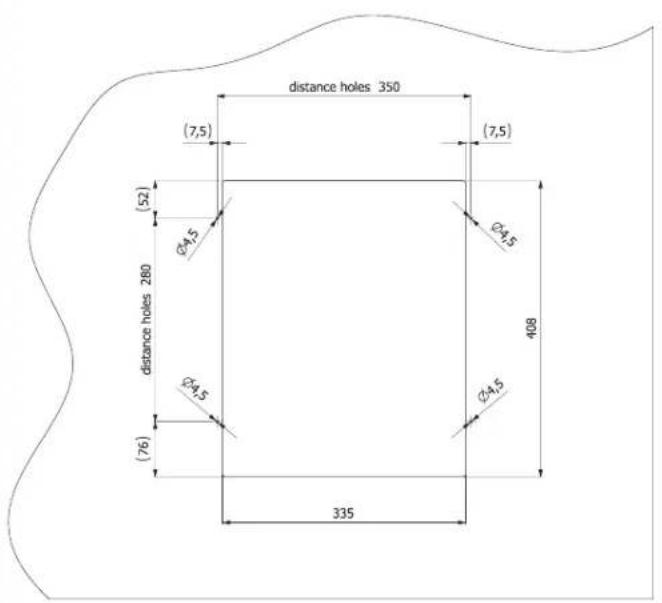
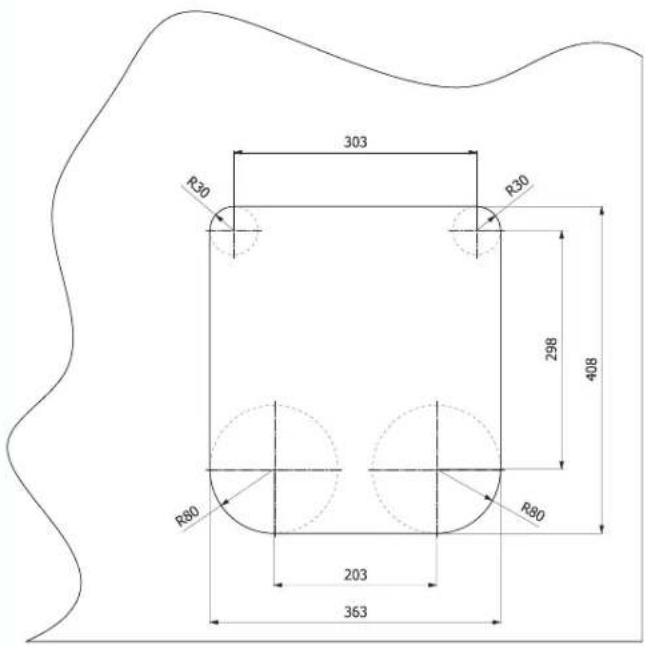
5a Measure the belly height of your pet from the floor and position the template (side A) on the door with the bottom at the same height. Mark around the perimeter of the TEMPLATE on the door using the marker. 5b Drill 4 holes in the corners of the marked area.
5c Cut along the perimeter using the jig saw to join the 4 holes. 5d Smooth the edges using a file or sandpaper. 12a/b/c/d
The biggest job is done. Go to paragraph "Cut the tunnel" Glass doors (6)
Warning! Cutting glass can be dangerous. You must consult a glass merchant before starting the job. It is impossible to drill holes in toughened safety glass or double-glazing unless they
have already been drilled when the panes are manufactured.
6a Measure the belly height of your pet from the floor and position the template (side A) on the door with the bottom at the same height. Mark the bottom side using a marker, you will use it as the base to center the compasses on the points marked on the template.
Then follow these instructions:
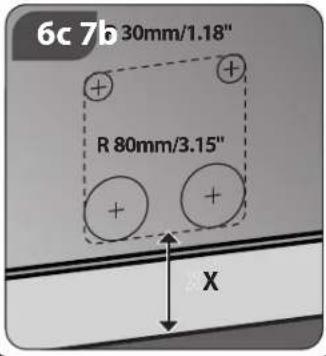
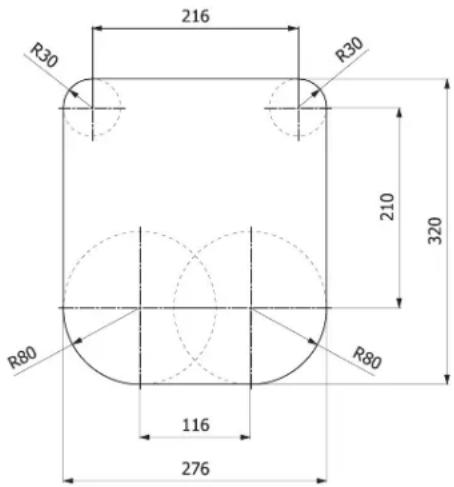
6b drill a circular hole with radius of 108 mm if your pet flap is SWING 5, of 105 mm if it is SWING 7 MAGNETIC (The centre of the hole is marked on the template). 13a
6c drill four circular holes in the four corners of the pet flap, if it is SWING 9, SWING 11 or SWING 15. Then cut the tangents of the 4 holes to obtain a unique opening on the glass. (The centre of the holes are marked on the template). 13b/c/d
The biggest job is done. Go to paragraph "Cut the tunnel"
Metal doors (7a)
Follow the same instructions as those for wooden doors. The only difference lies in the fact that the SWING 7 MAGNETIC needs to be isolated in metal doors for the key to be able to work. It is to be isolated using a non-metal material (wood or similar), which must have a minimum thickness of 40mm around the entire perimeter. This prevents any interference and ensures the correct operational efficiency of the magnetic mechanism. The biggest job is done. Go to paragraph
"Cut the tunnel"
Walls (7b)
Follow the same instructions as those for wooden doors. (Jobs 5b, 5c and 5d are to be done using suitable tools). The tunnel supplied can be installed in walls with a thickness of more than 55 mm. In this case the tunnel must be extended in cement plastering. The biggest job is done.
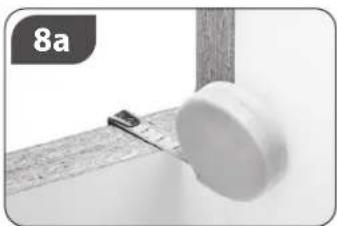
Cut the tunnel (8)
Warning! Do not cut the tunnel of the SWING 7 MAGNETIC because it contains delicate mechanism! Cut the tunnel to the required length, this only takes a few minutes and will hide all the uneven edges.
8a Measure depth "Y" of the support (door or wall) on which the pet flap is to be installed.
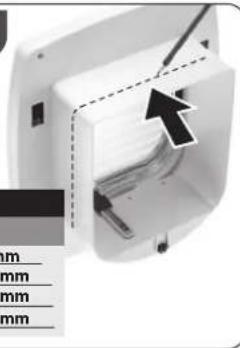
8b Mark a line along the outer surface of the tunnel at a distance "Y" plus 8 mm. You can use the template (side B) that has been printed with the 4 most common installations sizes (Tab 1) where "N" indicates the slit to be used to mark the line and "Y" indicates the thickness of the support on which the pet flap is to be installed. Place the template on the tunnel and mark a line by the slit relative to the required installation size.
8c Repeat the marking of a line on the other sides of the tunnel.
8d Cut the tunnel using a jig saw, starting from one of the corners and continuing along the perimeter. Do not cut two sides next to each other or parallel at the same time to avoid moving away from the references.
Warning! The tunnel supplied is suitable for installations from 0 to 55 mm in thickness. The outer surface has one or a number of grooves, depending on which version, positioned to match those of the most used installation sizes. The purpose of these is to make it easier to cut the tunnel. Before cutting along these grooves, ensure that the size of the tunnel you are about to cut is compatible with your wooden, glass, or walls thickness.
8e The 4-way locking system is to be fitted on the inner side of the door. Position the flap on the hole and using a marker, mark the positions where the screws are required.
8f Remove the flap and drill 4 holes using a drill with a 4.5 mm bit.
Fit the pet flap (9)
9a Fit the flap and secure it with the screws supplied, which may have to be cut and filed to remove any sharp edges. 4 short screws are supplied for fitting to glass doors and fly screens and 4 long screws for all other installations on a thickness of up to 55 mm. The 4 long screws will have to be shortened for installations on an intermediary thickness (i.e.: for installations on a thickness of 45 mm shorten the screws by 10 mm; for installations on a thickness of 35 mm shorten the screws by 20 mm, and so on). Instead, you could purchase a new set of screws to your specifications at your local hardware store. Too short a screw could strip the thread whereas too long a screw could break the front panel of the pet door.
9b To finish the job, cover the screw holes using the plugs supplied, making sure to match the rib to the seat.
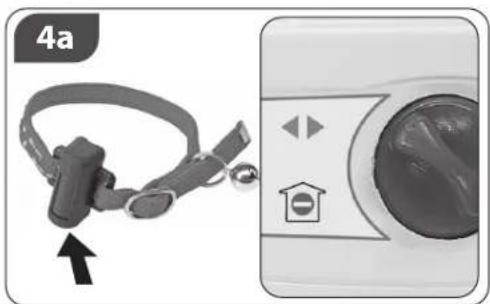
YOUR SWING PET FLAP IS NOW READY TO USE! A quick test for the magnetic key (4)
If you have purchased the SWING 7 MAGNETIC model we advise you to carry out this quick test to make sure it works.
4a From outdoors, ensure that the four-way locking system is in the "access and exit" position. Holding the magnetic key in front of you, with the name Ferplast at the bottom and the arrow pointing
towards the flap. The cat flap mechanism should trigger at roughly 10 cm from the flap.
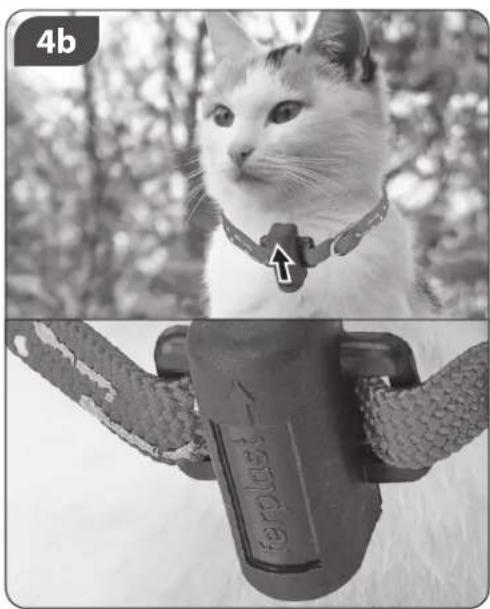
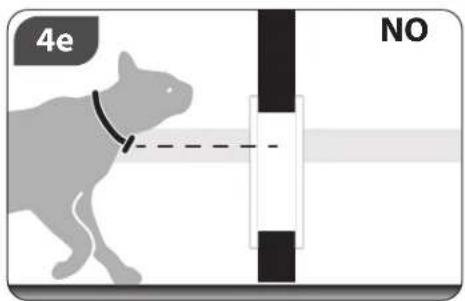
4b Secure the magnetic key to the collar with the arrow facing your pet's head (4b). Do not hang anything else but the magnetic key on the collar to avoid interference with the opening system. Ensure that the collar is neither too tight nor too loose (you should be able to slip the collar off your pet). The magnetic key should ideally hang so that the bottom part is just above the bottom edge of the tunnel when the cat approaches the pet flap (4c). If the magnet is not at a distance from the bottom edge of the tunnel of between 0-4 cm (0-1,5"), the cat could have difficulty in triggering the opening mechanism (4d-4e).
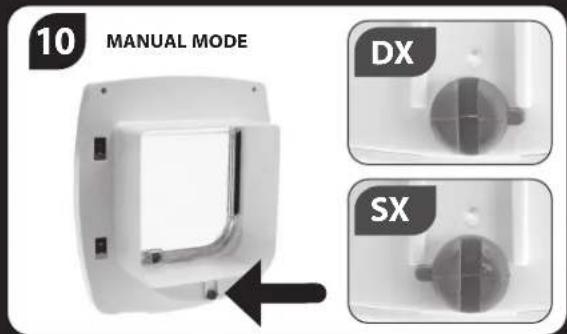
Manual mode (10)
If you do not wish to use the magnetic system, the cat flap can be converted to work manually. To do so, turn the cut-out screw situated on bottom edge of the tunnel by 180°, from the DX position (mechanism enabled) to the SX position (mechanism disabled) as
illustrated. Important! This procedure is extremely useful if your pet should loose the magnet.
Cleaning: effective, quick and easy
This pet flap is made of remarkable high quality plastic. The flap is reinforced and has been designed to last with time. To keep it in working order simply clean it now and again with a damp cloth.
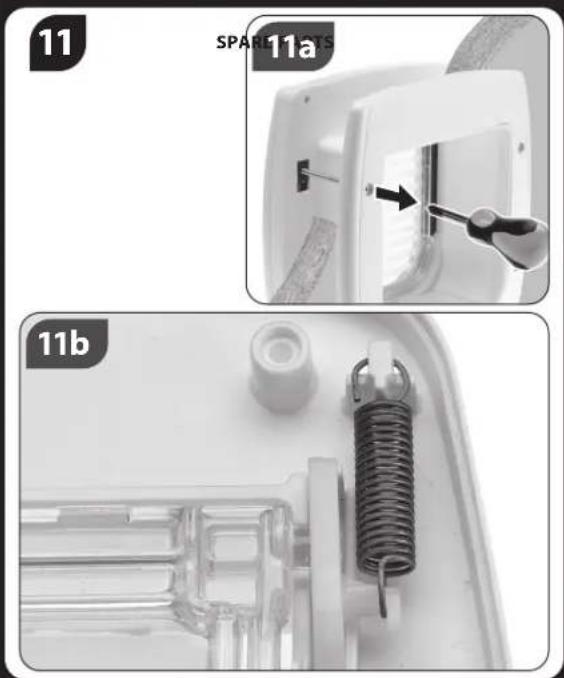
Spare parts (11)
The flap has been designed to allow every single damaged part to be replaced. In particular, the pivoting flap can be replaced taking away the screws of the rear part in the main door (11a). When placing a spare flap in SWING 11 and 15 models make sure that springs are correctly fitted in the hinges (11b).
Our after sales service.
In the rare case of accidental breakage, we are pleased to offer you our wide range of spare parts for the pet flap you have purchased. Please contact your local Ferplast dealer.
WARRANTY. This product all its parts and accessories are covered by warranty within the limits provided for in this paragraph and the legal regulations currently in force. The guarantee only covers manufacturing defects and includes the repair or replacement of the product free of charge. The guarantee does not cover damage and/or defects caused by carelessness, wear, unsuitable usage not complying with the instructions and warnings in this manual, accidents, tampering, incorrect use, bad repair work or purchases not accompanied by a fiscal receipt.
PIÙ LIBERI LORO, PIÙ SICURI VOI!
Windstopper system (2)
Windstopper system (2)
Windstopper system (2)
Windstopper system (2)
Windstopper system (2)
Windstopper system (2)


- ferplast
- 3
- IN/OUT INDICATOR4-WAY LOC
- SWING 5 - 7 MAGNETIC
- SWING 9
- 12b
- SWING 11
- SWING 15
- THE WONDERS OF THE SWING PET FLAP
- Windstopper system (2)
- Antishocking system
- The last IN or OUT direction indicator: You always know where they are (3)
- The magnetic system: a key all to themselves (4)
- Wooden doors (5)
- Metal doors (7a)
- "Cut the tunnel"
- Walls (7b)
- Cut the tunnel (8)
- Fit the pet flap (9)
- YOUR SWING PET FLAP IS NOW READY TO USE! A quick test for the magnetic key (4)
- Manual mode (10)
- Cleaning: effective, quick and easy
- Spare parts (11)
- Our after sales service.
- PIÙ LIBERI LORO, PIÙ SICURI VOI!
Brand : Ferplast
Model : Swing 5
Category : Pets