
BT1 - Hi-fi system MIDLAND - Free user manual and instructions
Find the device manual for free BT1 MIDLAND in PDF.
| Product Type | Wireless intercom for motorcycle |
| Brand | Midland |
| Model | BT1 |
| Bluetooth version | 2.0 stereo (Headset/Handsfree/A2DP/AVRCP) |
| Talk time | 8 hours |
| Standby time | Up to 2 days |
| Charging time | Approximately 4 hours (5-6 hours for first charge) |
| Power supply | Rechargeable lithium battery via mini USB wall charger |
| Dimensions (L x W x H) | 87 x 47 x 16 mm |
| Weight | Approximately 50 g (estimate) |
| Water resistance | Designed to withstand rain (protect connections with rubber caps) |
| Intercom range | Up to 10 m in open country |
| PMR446 radio range (with optional cable) | Up to 5 km |
| Main functions | Pilot-passenger intercom, phone, GPS, wired audio input (iPod/MP3), PMR446 radio, three-way communication, AGC, VOX |
| Package contents | 2 units (pilot and passenger), 2 audio kits (stereo speakers, boom mic + wire), 2 mounting systems (adhesive and clip), 2 audio cables, 1 dual mini USB charger, wind foam protection, Allen key, Velcro |
| Maintenance and cleaning | Clean with a soft, dry cloth. Do not use abrasive products. Check the sealing of connections. |
| Safety | Do not cover ears completely to hear road noises. Comply with local regulations. |
| Spare parts and repairability | Optional cables for transceiver available. For any repair, contact after-sales service. |
| General information | Compliant with RTTE Directive (99/5/EC). CE marking. |
Frequently Asked Questions - BT1 MIDLAND
User questions about BT1 MIDLAND
0 question about this device. Answer the ones you know or ask your own.
Ask a new question about this device
Download the instructions for your Hi-fi system in PDF format for free! Find your manual BT1 - MIDLAND and take your electronic device back in hand. On this page are published all the documents necessary for the use of your device. BT1 by MIDLAND.
USER MANUAL BT1 MIDLAND
Pruadil to impalaht the
14180027.430165986F01F
Piriforme diano. Appellate allentennata in the rostrale, be productus praecox bilabore non gilletis, not faecium disseccere in cordare: cuo facia, fuscum, coccoides, eutomeri, etiostaticum.
Prrnreerree
CINIRNATRANES 242215MnAeEgKEmiLc
unseen by
Unit 1: Calendar Redding Steve, Chelsey Park Session Witty, NW*WU, US
Read the instructions carefully before initial installation and use. It is the product of course, but it does not alter the other into it.
If this procedure is not performed, the accuracy of the results will be lost.
AN COMMUNICATIONS, SA
-
-
-
-
-
-
-
-
-
-
-
-
-
-
-
-
-
-
-
-
-
-
-
-
-
-
-
-
-
-
-
-
-
-
-
-
-
-
-
-
-
-
-
-
-
-
-
-
-
-
-
-
-
-
-
-
-
-
-
-
-
-
-
-
-
-
-
-
- 70.
-
-
-
-
-
-
-
-
-
-
-
-
-
-
-
-
-
-
-
-
-
-
-
-
-
-
-
-
-
-
-
-
-
-
-
-
-
-
-
-
-
-
-
-
-
-
-
-
-
-
-
-
-
-
-
-
-
-
-
-
-
-
-
-
-
-
-
Verrab durch
ALAN ELLISONS (MRS)
120 Broughton Street, 4-80 Broughton Drive, Dumbarton
25. Rambles, St. John's Square, St. John's Arood, Oxfordshire
26. The Royal Society of Chemistry is not an official or official repository for all the elements in the UK.
27. The Royal Society of Chemistry is not an official or official repository for all the elements in the UK.
paeep
Touyies articles present at sythoe sur le corps.
Temballage au manuel d'utilisation du calou ni ne pouvant pas furrier jétés dans des poulbes normaux, transée animes dans des centres de trêtlement scientifique. La, les différents matériaux seront séparés par cérétatiques et recyclées, permettant éadir de contributor à la protection de l'environnement.
Tosas a antiguo que acompremem Este symbio no esu compo, embatagao ou manuel de Instituiques, naovem ser eliminatede juntamente o o tae termel mes am connotados por certolmente da imiata de roa sotiva. O os socios e os socios dois sofo divididos por casaricos e recidados, realizarao esumer uma importante contribuiao para a protecao ambiental.
Oe 1 mipnncn nnnnneepnnn nnnnne eonnnnne ennnnnn neennnnnne nnnnnnne nnnnnnne nnnnnnne nnnnnnne nnnnnnne nnnnnnne nnnnnnne nnnnnnne nnnnnnne nnnnnnne nnnnnnne nnnnnnne nnnnnnne nnnnnnne nnnnnnne nnnnnnne nnnnnnne nnnnnnne nnnnnnne nnnnnnne nannnne nannnne nannnne nannnne nannnne nannnne nannnne nannnne nannnne nannnne nannnne nannnne nannnne nannnne nannnne nannnne nannnne nannnne nannnne nannnne nannnne nannnne nannnne nannnne nannnne nennnee
Kaikl kluotz, jossa oni merkara looteisie Ibaasainan pankakkaasa talKayllcoepaae, tue hivihia ooroanaan torokatikanen varutilasa kortarysekukaa. Siitai naret alentertion anornusukssien zu kortarslapansna mukaan, mii at tareha meinky ryeipniskusgelues.
INDICE
Technical specifications of Midland BT1. 3
Charging batteries 4
Description of the unit and installation brackets 4
Typical configurations of BT1 6
Switching your Midland BT1 on and off 6
Pairing with Bluetooth devices. 7
Adjusting the volume 8
Using the features of the Bluetooth devices 8
Using the wired audio input 11
Using a Two Way Radio transceiver. 11
Special configurations 11
Recommendations for specific uses. 12
Light and sound signals/Unit functions 14
Midland BT1 Intercom
Thank you for purchasing the Midland BT1 Intercom, the wireless Intercom system for bikers. The Midland BT1 is designed to be fitted directly on to your helmet and to be used for communications between driver and pillion. Besides, the driver's unit can be used to communicate with Bluetooth devices like mobile phones or GPS Sat-Navs.
Both devices are also supplied with a wired connection that can be used to connect an iPod/MP3 player or PMR446 transceiver, which will then enable bike-to-bike communications up to a maximum range of 5 km.
BT1 - Content of the packaging
2 devices: one for Driver and one for Pillion
2 audio kits with two stereo speakers, microphone with boom and wire microphone
2 plates with bi-adhesive strip to fix the unit onto the helmet
2 clamps to fix the unit onto the helmet
2 stereo audio cables to connect an iPod/ or other models of MP3 players
1 miniUSB wall-mounting power supply with double plug
Wind Suppressing Foam Microphone Cover, Allen key and Velcro strip for assembly
The units included in the packaging are already paired and can therefore be immediately used in the Intercom mode.
Technical specifications of Midland BT1
General:
Bluetooth ver. 2.0 stereo (Headset/Handsfree/A2DP protocol)
AGC system automatically controls the volume in relation to background noise
Voice (VOX) or manual communications option
Private or shared (3-way communications) call mode
Manual controls to enable: telephone, intercom and wire connection
Fully waterproof
Lithium battery with 8 hours talk time (up to 2 days in standby mode)
Recharge time: app. 4 hours
Dimensions.Length:87mm-Width:47mm-Thickness: 16mm
Bluetooth connections:
Driver's device:
- with pillion's unit, in Intercom mode Driver-Pillion
- with Mobile phone, GPS (Garmin Zumo and TomTom Rider 1 and 2)
With pillion's device:
- only with the driver's unit in Intercom mode Driver-Pillion
Wire connections for both units:
For stereo audio input (iPod/MP3 player)
For PMR446 transceivers (with optional cable)
Attention: before using BT1 for the first time, remember to recharge it for at least 4 hours.
Attention: Midland BT1 is designed to withstand rain and water. However, if it is raining, always verify that the rubber caps protecting the sockets are fully fitted.
Charging batteries
Make sure that the unit is fully charged before use. Allow at least 5-6 hours for a full charge before using the unit for the first time. Normally, after the first time, it takes 4 hours for a full charge.
Charge the unit by inserting the wall-charger into the charging socket (lift the rubber cover to insert the plug).
The red LED on the unit will start flashing when charging begins.
2. Allow the headset to charge until the red LED turns off.
When the charge is complete, release the headset from the charger.
Description of the unit and installation brackets
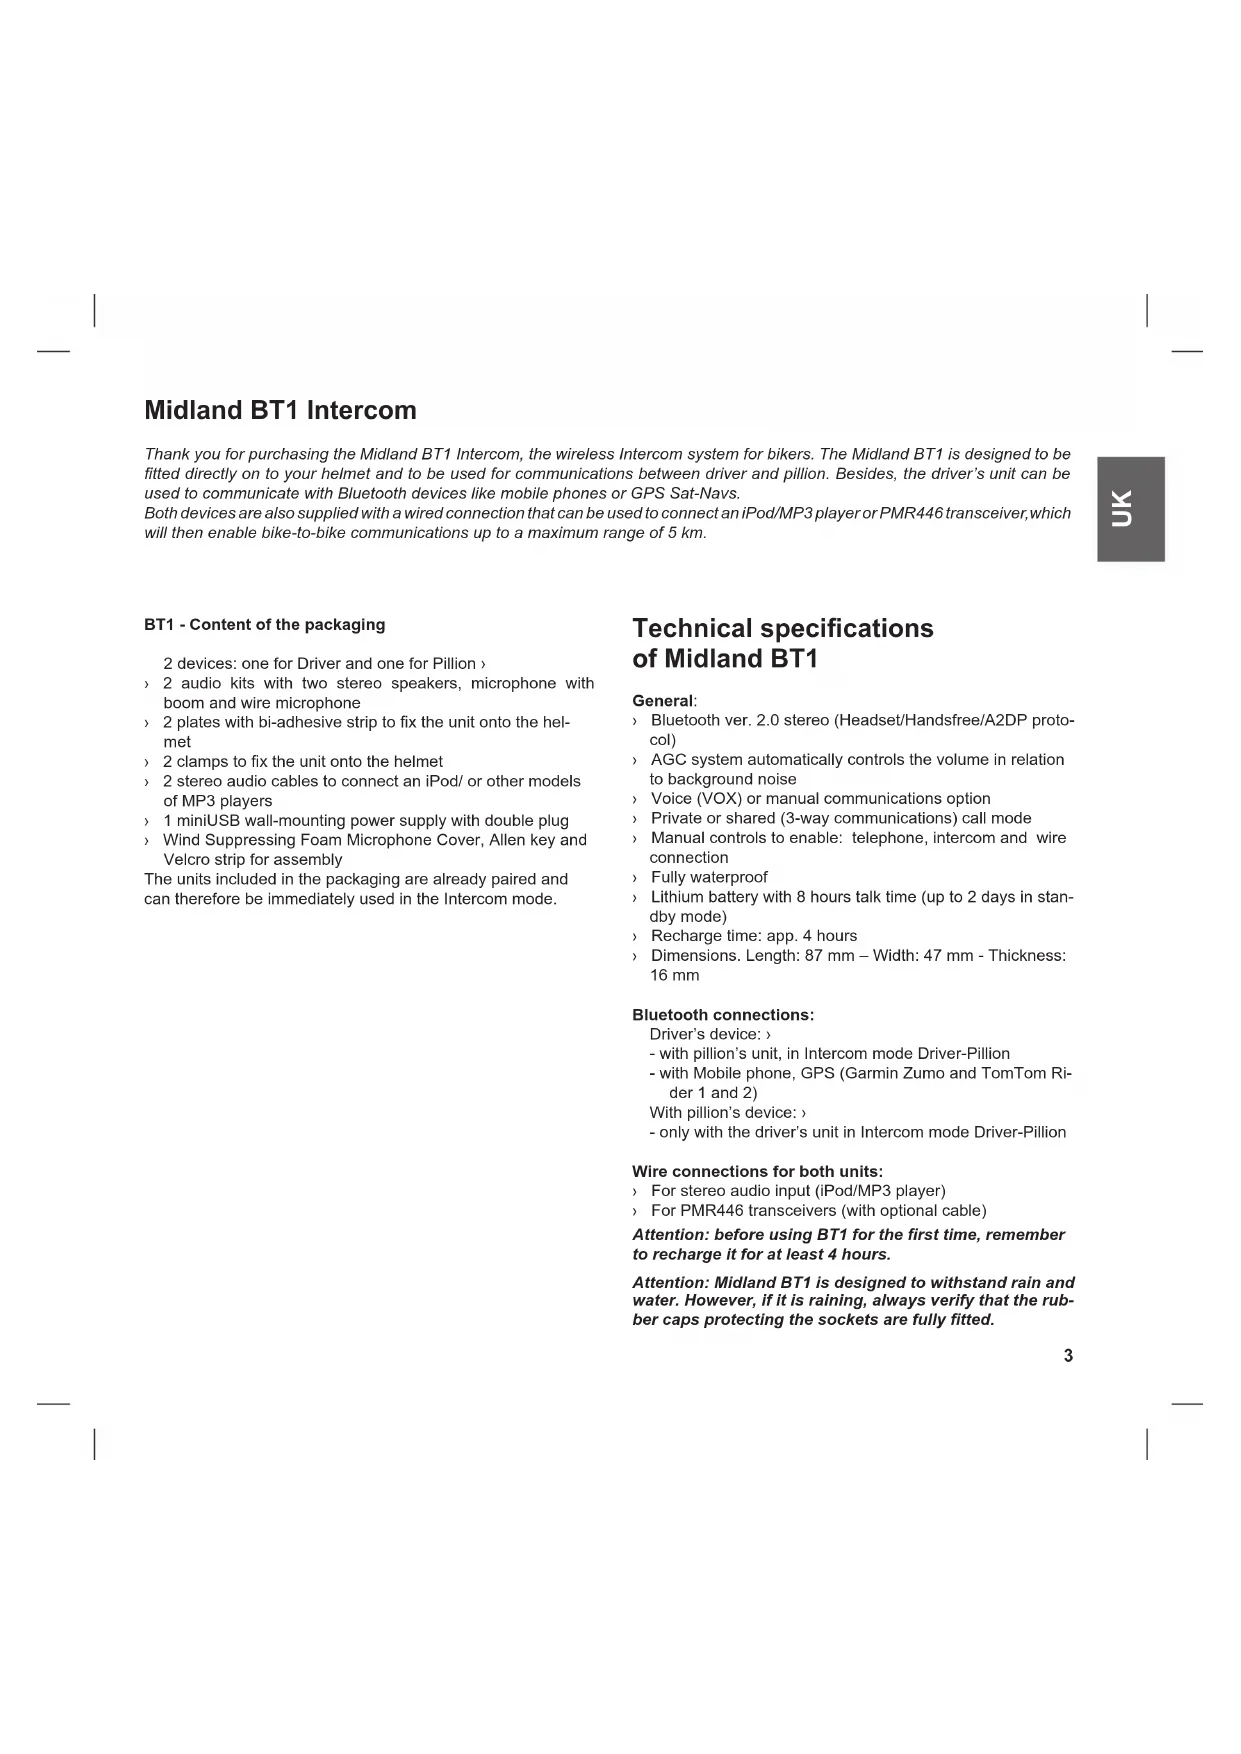
Description of the BT1 unit
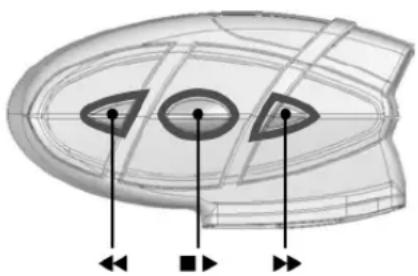
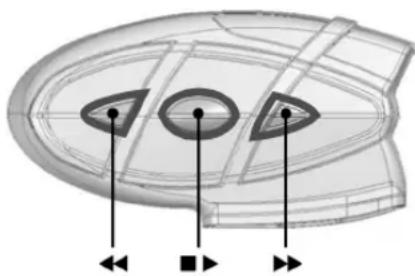
The BT1 has 5 multifunction buttons on the front and 3 wired connections in the lower section.
Description of the button features:
Telephone (for driver's unit only): can be used to enable/ disable and manage mobile phone features
Intercom: can be used to enable/disable the Intercom feature
AUX: can be used to enable/disable the wired audio input
Volume+:enablesyoutoincreasethevolume
Volume-:enablesyouto decrease the volume
Description of the wired connections
Charger jack: enables to recharge the unit using a standard miniUSB power supply
Audio kit jack: enable to connect an audio kit (stereo head-set and microphone)
Auxiliary audio jack (AUX): can be used to connect an audio source, like a stereo iPod/MP3 player or PMR446 transceiver
Description of the audio kit
The audio system includes two ultra-flat stereo speakers and two interchangeable microphones, which are both supplied with a bracket and wire connection.
Fixing the stereo speakers. The two stereo speakers have a Velcro/adhesive strip that aids their fixing to your helmet. Beware to not completely cover your ear with the speakers, you must always be able to listen to the traffic sound and indication.
The microphone can be fixed onto the helmet in two ways:
Boom Microphone. Place the section with the Velcro/adhesive strip between the padding and the rigid cover of the helmet, so that the microphone is correctly positioned in front of your mouth and that the white symbol is facing your mouth. This type of microphone is suited for Open Faced and Flip Front helmets.

Wire microphone. Using the Velcro/adhesive strip, place the microphone inside the helmet in front of your mouth. This type of microphone is more suited for Full Faced helmets. The mini connector on the microphone allows you choose the micro
phone that best suits the helmet you are using.

The audio kit must then be connected to the central jack of the Midland BT1 Intercom unit using the "L" shaped connector. This connector is very flexible and can be easily adapted to most commercial helmets.
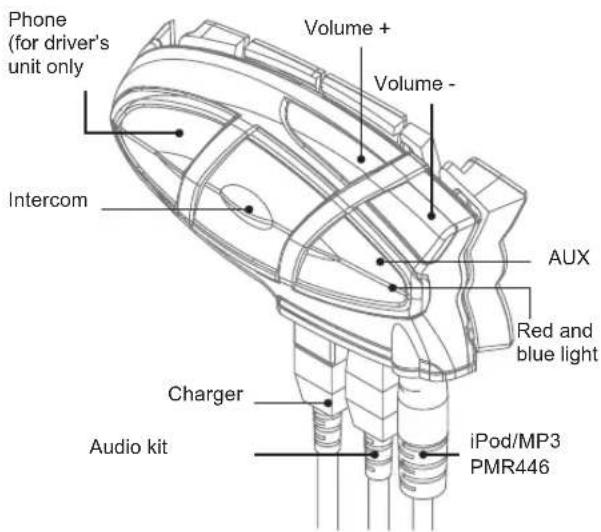
Description of the installation brackets
The Midland BT1 can be fixed onto the helmet in two different ways: By either using the plate with bi-adhesive strip, or the clamp. These methods allow you to safely "fix" the BT1 unit onto your helmet and to remove it at any time in order to recharge or store it.
Plate with bl-adhesive strip
The fixing plate has a bi-adhesive strip on one of its sides. To fix the plate in place, clean the application area on the helmet surface, remove the bi-adhesive film and place the fixing plate on the helmet by keeping it contact with the surface for a few seconds.
Clamp
Using the Allen Key, loosen the two screws on the clamp and place the rear plate between the helmet padding and the external rigid protection. Then, tighten the two screws in order to firmly fix the clamp in place.
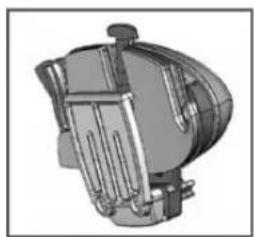
Fitting and removing your Midland BT1
The BT1 can be easily fitted onto the helmet by sliding it downwards so that it fits into the slot of the selected fixing device (plate with bi-adhesive strip or clamp).

BT1 is maintained in position thanks to the fixing clip located on the upper section (A).
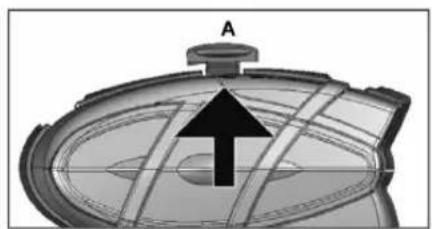
To detach the BT1, simply press the fixing clip and push the unit upwards.
Typical configurations of BT1 Switching your Midland BT1 on
and off

- MIDLAND BT1, "Driver only"
Bluetooth connection for mobile phone or GPS (in case of mobile phone with MP3 feature, you can listen to music in stereo mode)
Wired connection for iPod/MP3 player or with a transceiver for bike-to-bike communications up to a distance of 5km

- Midland BT1, "Driver and Pillion".
Rider to Pillion intercom feature
Bluetooth connections for the driver: Mobile phone or GPS and pillion's device for Intercom communications (in case of mobile phone with MP3 feature, the driver can listen to music in stereo mode).
Bluetooth connections for the pillion: > none; only with the driver's unit for Intercom communications.
BT1 can be switched on by means of the central button labeled "Intercom".
To switch off the unit you must use a combination of two buttons (intercom+AUX), thus lessening the chances that you might turn off the unit accidentally (especially whilst wearing heavy gloves).
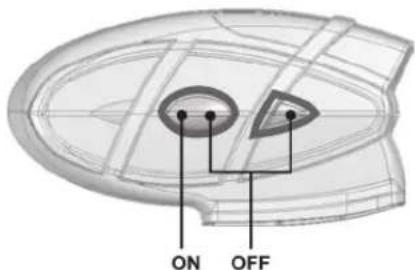
Switching the unit on:
Press and hold Intercom button down for approximately 3 seconds until the BLUE indicator lights.
Switching the unit off:
Press and hold both "Intercom" and "AUX" buttons together for approximately 3 seconds until the RED indicator flashes 3 times.
Pairing with Bluetooth devices
Your Midland BT1 is a Bluetooth unit that can be paired with other Bluetooth devices.
Before performing this procedure, it is necessary to set BT1 into "Pairing mode" (Setup).
The only operations permitted in this mode are the pairing ones. To use the BT1 unit after pairing it with the desired devices, it is necessary to quit the "Setup" mode and switch to the "Operating" mode.
Setup mode
Switch off the BT1 device. Press and hold down the central button (Intercom/on) for about 7 sec. until the red indicator switches on permanently. BT1 is now in "Setup" mode and can therefore be paired with other devices.
Pairing the unit with the pillion's device
The two units supplied in the kit, are already paired and ready for use, which means that it is not necessary to perform this procedure.
If the devices are not part of the same kit, you need to pair them in order to be able to use the Intercom function. Place both BT1 units in Setup mode (red indicator permanently on) Press the "Volume +" button on the first unit until the RED and BLUE lights begin to flash rapidly and alternately. Then press the "Volume -" button on the second unit until the RED and BLUE lights begin to flash rapidly and alternately.
Now both BT1 units are trying to pair to each other.
When successfully paired, each device will light the BLUE light for 1 sec and go back to setting mode (red light always on) waiting for additional pairing or setting procedures.
Pairing the unit with a mobile phone - only for the driver's device
-
Enable the Bluetooth device search feature on your mobile phone. As this procedure varies according to the brand and model of the mobile phone, refer to the manual supplied to your particular phone for further information.
-
Set the BT1 unit in "Setup" mode, then press the "Phone" button on the unit until the red and blue indicators start flashing.
-
After a few seconds the mobile phone will display "Midland BT1". Select it and follow the instructions provided in your mobile phone manual to accept the pairing. When prompted, enter the pairing code, which is 0000 (four zeroes). Your mobile phone should then display a confirmation message if the pairing operation has been successfully completed (In case of error message, complete anyway the procedure, exit the "setup" mode and try to use the BT1 with your phone).
4 The BT1 unit returns to the Setup mode (red indicator permanently on) to indicate that it is ready to be paired with other devices
If you pair the BT1 unit with a mobile phone, you will not be able to pair it with a GPS Sat-Nav, because both these devices are assigned (high) priority 1.
This problem can be easily solved by pairing your mobile phone directly with your GPS Sat-Nav and then pairing the GPS with your Midland BT1 using the above procedure. In this case, the mobile phone features will be managed by the GPS Sat-Nav.
Pairing the unit with a GPS Sat-Nav - only for the driver's unit
It is generally possible to pair the BT1 unit with all GPS SatNavs that support Bluetooth earpieces.
Midland BT1 has been successfully tested for use with GPS ZUMO Sat-Navs manufactured by Garmin and TOMTOM Rider 1 and 2 Sat-Navs.
- On your GPS Sat-Nav, enable the Bluetooth earphone search feature. As this procedure varies according to the brand and model of GPS, we recommend you refer to the manual supplied with your GPS Sat-Nav for further information.
- Ensure that the BT1 is in Setup mode (Red light on) & Press the "Phone" button on the BT1 unit until the red and blue indicators start to flash.
- After a few seconds the GPS Sat-Nav will display "Midland BT1". Select it and follow the instructions provided in the GPS Sat-Nav manual to accept the pairing. When prompted, enter the pairing code, which is 0000 (four zeroes).
The GPS should then display a confirmation message if the pairing operation has been successfully completed.
- The BT1 unit returns to the Setup mode (red indicator permanently on) to indicate that it is ready to be paired with other devices.
If you pair the BT1 unit with a GPS Sat-Nav, you will not be
able to pair it with a mobile phone, because both these devices are assigned (high) priority 1.
This problem can be easily solved by pairing the mobile phone directly with the GPS Sat-Nav and by then pairing your GPS with the Midland BT1. In this case, the mobile phone features will be managed by the GPS Sat-Nav.
Resetting all paired devices
Sometimes you may find it necessary to delete all the pairing references stored in the BT1 unit (reset operation).
To perform this operation, simultaneously press and hold down the "Volume +" and "Volume -" buttons for 4 seconds. The Blue Light will be lit on for 1 sec.
This procedure deletes all the paired Bluetooth devices stored in the memory and it is therefore possible to start a new "clean" pairing session.
Exiting from the Setup mode
After you have paired the desired Bluetooth devices, you must quit the "Setup" mode in order to be able to use your BT1.
Press and hold the Intercom button (centre button) for 3 seconds.
The red indicator switches off and the blue one starts to flash. You can now use your BT1.
Reconnecting the unit to bluetooth devices
After successfully pairing your devices, you can switch them off and on without having the repeat the pairing procedure. If a connection failure occurs between the two devices (for example because one device is switched off or you are not within the maximum range), it is not necessary to repeat the pairing procedure.
Simply switch the device on again or move within the maximum range. If the connection cannot be re-established automatically, select the device from the "devices menu" of your Bluetooth device (for example mobile phone, GPS, etc...) and re-enable the connection.
Adjusting the volume
Your Midland BT1 uses AGC technology, which automatically adjusts the listening volume in relation to background noise.
However, it is also possible to manually adjust the volume by means of the "Volume+ and "Volume -"buttons.
For example, you can manually adjust the maximum volume in very noisy environments (for example when travelling at high speeds), to allow the AGC automatic system to change the volume and use the manually set volume as maximum setting. This operation is useful because each type and standard of helmet is influenced in different ways by wind and background noise.
Using the features of the bluetooth devices
Using the intercom feature
To use the Intercom feature, be sure both units are turned on and correctly paired together.
Priority: Intercom communications always have a higher priority, compared to other communications, with the only exceptions being Telephone and GPS Sat-Nav. Therefore, the Intercom feature automatically disables all other communications.
The Intercom feature is disabled only when an incoming call or voice communication is received from the GPS Sat-Nav, and is automatically re-enabled as soon as these communications end.
Attention: some mobile phone release the line after a few seconds, which means that the Intercom feature may not be immediately available.
The Intercom feature can be enabled in two ways:
Manual activation:
Press "Intercom" button, on one of the two units. Communication is enabled and remains active until you press the "Intercom" button again. You will hear 1 audio tone when the Intercom feature is enabled and 2 audio tones when it is disabled.
Voice activation (VOX):
This is the default enabling mode. To start an Intercom communication, simply start talking. The communication
will remain active for all the time you are talking. If there is no conversation, the Intercom feature is automatically disabled after 20 seconds. To re-enable it, simply start talking again. When the Intercom is "VOX" activated, you can decide to disable it before the predefined time, simply by pressing the Intercom button once.
To disable the voice enabling mode, follow the instructions provided in the "Special configurations" section.
Attention: when you use the Intercom feature, the first time you activate it (voice or manual) the communication will be established with a short delay because of the fact that the devices must first recognize each other. After that the communication will be immediately established.
Two Midland BT1 units can communicate up to a maximum range of approximately 10 meters outdoors.
Using the telephone feature
To use the Telephone feature, be sure the units are correctly paired together, following the pairing procedure described in section "Pairing the unit with a mobile phone".
Attention: information provided in this section refers to the establishment of a direct communication between the mobile phone and the BT1 unit. If the mobile phone is connected via the GPS Sat-Nav, the mobile phone features can only be managed via the GPS itself.
Priority: Calls are always private and have a high priority, which means that all other communications are temporarily disabled when a call arrives and automatically reenabled once the call ends.
Answering a call
When you hear the phone ring, you can answer in two different ways:
Vocally:
Simply say one word to answer the call and start talking. Remembering that you can only do this if you answer the call after the third Ring. (Be aware that some phones may not support voice answering)
Manually:
Tap the "Phone" button and start speaking.
Attention: Remember that you can answer the call only after the third Ring.
Rejecting a call
If you don't wish to answer, you can let the mobile phone ring
or press the "Telephone" button for a few seconds (you will hear one audio confirmation tone).
Making a call
There are several ways to make a call.
From the mobile keypad:
Dial the number on the mobile keypad:
Press "Send" on the mobile phone.
This way of calling should never be carried out whilst in charge of a moving vehicle.
To redial the last number:
Press and hold "Telephone" button for 3 seconds in order to radial the last number (you will hear one audio confirmation tone).
To make a voice call:
Briefly press "Telephone" button. If your mobile phone supports voice calls, you will be asked to spell the name of the contact you wish to call.
The correct operation of this feature depends on the type of helmet used (Open or closed faced) and on the speed you are travelling at. We suggest you perform a few tests to determine the best settings for you as an individual.
Attention: if you are listening to music with the MP3 Player of your mobile phone, you will not be able to use the "Dial last number" and "Voice call" commands, because these buttons are used to control the MP3 player. Therefore, if you want to make a call, you must first disable the music by pressing the "Intercom" button for 1 second (you will hear two audio confirmation tone) before making the call.
Ending a call
There are several ways to end a call:
Wait for the called person to end the call.
Press the Telephone" button for 3 seconds (you will hear an audio confirmation tone).
Press "End" button on the mobile phone. (This way of ending a call should never be carried out whilst in charge of a moving vehicle)
3-way telephone communications
The Intercom feature is temporarily disabled when a phone call is in progress. However, it is possible to add other parties to the conversation by simply enabling the 3-way communication feature. After the initial call has been established, briefly press the "Intercom" button on the driver's device (you will hear an audio confirmation tone). To re-establish a private
conversation, press the "Intercom" button again (you will hear two audio confirmation tones).
Using the MP3 player feature of the mobile phone
Many mobile phones are now designed to be used as stereo MP3 players. The BT1 driver's device fully supports the A2DP and AVRCP protocols that enable you to listen to stereo music and remotely control your mobile phone's MP3 player. You can even use the buttons on the BT1 unit to control the following play options:
Play, Pause, Forward and Backward.
Attention: the Bluetooth mobile phone must support the AVRCP protocol.
Available controls:
To enable your connected MP3 Player, press and hold down the "Intercom" button for 3 seconds.
To play/pause music, briefly press the "Intercom" button.
To skip forward to the next song, briefly press the "Telephone" button.
To skip backwards to the previous song, briefly press the "AUX" button.
To disable the MP3 player, press and hold down the "Intercom" button for 3 seconds (2 beeps will confirm it).
To open the Intercom communication just talk or, for a manual activation, disable first the MP3 player, pressing the "Intercom" button for 3 seconds and then press it again to open the Intercom.
The music listening mode has the lowest priority. Therefore, it will always be disabled when another type of communication is enabled.
Using the features of your GPS sat-nav
To use the features of your GPS Sat-Nav, be sure both units are turned on and correctly paired together, following the pairing procedure described in the "Pairing the unit with a GPS Sat-Nav" section.
Priority: communications with the GPS Sat-Nav have the highest priority, which means that the enabling of these communications causes the temporary disabling of all other communications (Intercom, music or two way radiotransceiver).
Once the GPS communications have ended, all other communications are automatically reenabled.
Listening to voice instructions from your GPS Sat-Nav
Traffic directions from your GPS Sat-Nav will always be immediately transmitted by temporarily disabling all other active communications. Once these voice directions have been transmitted, your BT1 will automatically re-enable all existing communications.
Listening to music from your GPS Sat-Nav
The most popular GPS devices usually enable you to listen to music when no directions are being given. In this case, the communication with the GPS is always active and has the highest priority compared to all other active devices.
However, it is possible to enable the Intercom feature at any time, while listening to music, simply by pressing the "Intercom" button to open a 3 way communication. For further information, see the "3-way communications with the GPS Sat-Nav" section below.
Using a mobile phone with a GPS Sat-Nav
If you have connected a GPS Sat-Nav to your Midland BT1, you will not be able to connect the mobile phone directly to the unit; you must instead, connect the phone to the GPS Sat-Nav. By doing so, all the mobile phone features will be managed directly by your GPS Sat-Nav. For information on how to pair a mobile phone and answer/make calls, see the manual supplied with your particular Sat-Nav.
3-way communications with your GPS Sat-Nav
The Intercom feature is temporarily disabled when communication with your GPS Sat-Nav is active (street indication or music). However it is possible to allow the passenger to listen, by enabling a "3-way communication".
When the communication with the GPS is active, briefly press the "Intercom" button on the BT1 device connected to the GPS Sat-Nav (you will hear an audio confirmation tone). The
pillion will now be able to listen to the same information/music that the rider hears. To return to the private mode, press the "Intercom" button once more.(you will hear two audio confirmation tones).
Using the wired audio input
Your Midland BT1 is also fitted with a wired audio input (labeled AUX), that can be used to connect a stereo audio source, like an iPod (or any other MP3 Player) or a PMR446 transceiver for bike-to-bike communications.
Priority: the wired audio input has the lowest priority when compared to the other Bluetooth connections (including the Intercom) and will therefore always be disabled when another Bluetooth communication is opened.
Listening to music
To listen to music from the wired input, connect the audio source using the cable supplied with the BT1 unit. The volume level is automatically adjusted by the AGC system, which means that you only need to adjust the volume of your iPod/ MP3 player to a level that will allow you to listen to music in normal speed.
Attention: never set the volume of the MP3 Player to the maximum possible.
Hint: We recommend that you perform a few tests adjusting the volume of your iPod/MP3 player so at the normal speed the Headset volume is suited to your needs.
The AGC system will automatically increase the volume on higher speed. Make a note to remember this setting for future trips.
Attention: the volume adjustment, ("Volume+") and "Volume -") buttons, cannot be used to adjust the volume of the wired audio source(eg MP3 player), only the volume of the BT1 that the device is connected to.
Enabling/disabling the wire input
The wire input can be enabled and disabled by means of the "AUX" button.
Disabling: briefly press the "AUX" button (you will hear two audio confirmation tones).
Enabling: briefly press the "AUX" button (you will hear one audio confirmation tone).
Using a Two Way Radio transceiver
To be able to use the transceiver, it is necessary to purchase a specific cable (sold separately) in order to connect the radio to your Midland BT1:
NB, Some manufacturers radios use a different pin configuration, so we recommend that you ask your dealer as to which cable is best suited to your needs
To communicate via the attached radio, press the transmission Press To Talk (PTT) button to speak and release it to listen. It is not possible to talk and listen simultaneously. The cable connected to the transceiver has a PTT button that can be placed on the handlebar of your bike or held in your hand (If you are the pillion rider).
Adjust the volume of the transceiver to your needs, remembering that the volume adjustment is controlled by the automatic AGC system and that it will therefore be automatically increased in relation to background noise.
Special configurations
Some Midland BT1 features can be configured to suit the specific needs of bikers.
Permanently enable 3-way communications
Voice enable Intercom (VOX)
Adjust the microphone sensitivity
Disable the VOX feature
Permanently enabling 3-way communications
The music coming from the wired connection is interrupted by default when the Intercom feature is enabled.
By enabling this feature, what is heard from the wired connection is not interrupted but switched to the pillion's device.
This feature can be useful, for example, if you wish to maintain Intercom communications and simultaneously talk using a transceiver radio connected with a wired connection.
In addition it also allows you to share the music between Rider and Pillion. Considering that the music quality is "mono" for the second person who will share the music (see the chapter "Share the music between driver and passenger" below).
Enabling/disabling 3 way communications
Enter the Setup mode:
Switch your BT1 off. Press and hold down the central but
ton (Intercom/on) until the red light switches on permanently. Your BT1 is now set in Setup mode.
Simultaneously press and hold down the "Telephone" and "AUX" buttons for at least three seconds.
If the feature was enabled, it will be disabled (steady blue light for 2 seconds).
If it was disabled, it will be enabled (blue light long flashes).
Quit the Setup mode by pressing the "Intercom" button for a minimum of 3 seconds. The red light switches off and the blue light starts flashing. You can now use the BT1.
Attention: only the audio/music coming from the device connected by wire can be shared. The music heard via Bluetooth will be interrupted.
Enabling the intercom by voice (vox)
The Intercom feature can be enabled both manually and vocally (VOX). The VOX activation is influenced by the background noise and therefore by the speed, type of bike and soundproof features of your helmet.
For optimum results, it is possible to choose one of the following four microphone sensitivity levels: high, medium, low and very low. The high settings suited for noiseless and protected bikes like scooters and fully fared/screened bikes. The low setting is more suited for naked/noisy bikes. The default setting of BT1 is "medium".
It is also possible to disable the VOX feature in order to activate the Intercom and phone call answering features in manual mode only.
Adjusting the sensitivity of the microphone (VOX)
- Enter the Setup mode: Switch your BT1 off. Press and hold down the central button (Intercom) until the red indicator switches on permanently. Your BT1 is now in "Set up mode".
- Briefly press the "AUX" button once, the red indicator will turn to steady Blue
- Now, press "Volume +" or "Volume -to increase or reduce sensitivity. Every time you press the Volume buttons the RED light will flash for confirmation. When you reach the end of the upper and lower limit, the RED light will not flash.
- Press again the AUX button and the Blue light will flash several times, in order to let you know the selected sensitivity: once = VOX disabled / Twice = very low sensitivity
/3 times = low sensitivity / 4 times = medium sensitivity / 5 times = high sensitivity / Default = medium sensitivity
- The light indicator is now back to steady RED ("Set up mode") and the changes are confirmed
- If needed, you can adjust again the sensitivity repeating the steps from point 2.
- Now quit the Setup mode by pressing and holding down the "Intercom" button for at least 3 seconds. The red light switches off and the blue light starts flashing. You can now use the BT1.
Disabling the VOX feature (Intercom and telephone)
In addition to the 4 microphone sensitivity levels, there is a fifth state that allows you to turn off the VOX feature. Follow the same procedure used to adjust the sensitivity of the microphone (see above) and on step 3 press the "Volume -" to reduce the sensitivity till the RED light stop flashing. Press now the "AUX" button and the Blue light will flash one time, this means that the VOX feature is disabled. Follow now the procedure above from the point 5.
To enable it again, perform the complete procedure above, choosing one of the other four sensitivity levels available (from 2 to 5).
Recommendations for specific uses
The section that follows, provides a few useful suggestions on how to achieve maximum performance from your BT1 unit.
Using a PMR446 transceiver with the Intercom feature (Rider to Pillion)
If you wish to use a PMR446 transceiver for group communications and simultaneously maintain the Intercom feature enabled between the pilot and passenger, you must remember that the Intercom feature is enabled every time you speak by means of the BT1's VOX feature.
Consequently, radio communications will be disabled whilst you are talking with your pillion, because they have a lower priority compared to Intercom communications.
This can be prevented in two ways, which are:
Disabling the VOX feature
Disable the VOX feature, as explained in the previous section, to make sure that the intercom will not automatically be activated when you speak on the PMR446. To enable the In
tercom feature when using this configuration, you will have to press Intercom button manually. (This operation disables radio communications that will be automatically re-enabled when the Intercom feature is disabled).
Attention! If you disable the VOX feature, you will only be able to answer incoming phone calls by pressing the "Phone" button.
Permanently enabling 3-way communications
If you enable this feature (as explained in the previous section), every time you talk the Intercom is enabled, but the two-way radio transceiver communications are not disabled. This means that you can share two-way radio communications between Rider and Pillion.
Share the music between Rider and Pillion
If you wish to share the same music between the Rider and the Pillion you must follow these simple steps:
Connect the music player to the Rider or Pillion unit, via wired connection trough the AUX plug
Enable the "3 way communications feature" (see the chapter above) on the unit which has the music player connected
Activate the Intercom, now the music is shared.
Attention: Only those who are connected to music by wire can listen to it in stereo mode.
Attention: It is not possible to share music if the source is Bluetooth Stereo (A2DP)
LIGHT AND SOUND SIGNALS
| LED indication Status | |
| GENERAL | |
| None Unit is switched off or full charged when connected to the power supply | |
| Single Blue flash every 3 seconds Unit being turned on | |
| Triple red flash Unit being turned off | |
| Single Blue flash every 3 seconds | Standby |
| Single Red flash every 3 seconds | Standby - low battery |
| RED and BLUE (together) every 3 seconds | Active (Intercom, phone call or Bluetooth connection in progress) |
| RED and BLUE (together) and one flash of RED light every 3 seconds | Active but low battery |
| Single red flash every 2 seconds Unit in charge when connected to the power supply | |
| SETUP | |
| Steady Red Setup mode | |
| Rapid Red-Blue alternating flash Pairing mode (searching for devices) | |
| Steady Blue for two second Successful pairing/ Reset paired devices/Three way enabled | |
| Blue light two time long flash Three way disabled | |
| Audio signals | Status |
| Ascending tone (low-high) Unit being turned on | |
| Descending tone (high-low) Unit being turned off | |
| Enable/Disable the Intercom 1 tone = enabled / 2 tones = disabled | |
| 1 tone Specific feature turned on | |
| 2 tones Specific feature turned off | |
UNIT FUNCTIONS
| If you want to... | ...do this |
| GENERAL | |
| Turn on the unit | Press the Intercom button for 3 seconds at least (start Blue flash) |
| Turn off the unit | Press the Intercom and AUX button together for 3 seconds (triple Red flash) |
| Increase the volume | Short or continues press on the Volume Up control |
| Decrease the volume | Short or continues press on the Volume Down control |
| MOBILE PHONE (only driver's unit) | |
| Answer a call | Short press of the Phone button / say a word |
| Reject a call | Long press the Phone Button / remain silent until the rings stop |
| Terminate a call | Short press the Phone Button |
| Voice Dial (in stand by mode) | Short press the Phone button and state the name of the person to call. |
| Redial Last number (in stand by mode) | Long press of the Phone button |
| Conversation among passenger, driver and the phone | During a phone call, short pressure of the Intercom button on the unit which received the call |
| Release the ‘extended’ conversation above | Short pressure of the Intercom button |
| GPS Navigator (only for driver's unit) | |
| The control is done only by the GPS | |
| INTERCOM | |
| Start using the Intercom | Start talking/short press the Intercom button |
| Stop using the Intercom | Stop talking (after 20 sec. you will return to stand by mode)/Short press the Intercom button |
| BLUETOOTH MP3 player of the mobile phone (only driver's unit) | |
| Activate the MP3 player/Play and Pause | Press and hold down the “Intercom” button for 3 seconds. |
| Forward (next song) | While the music play, short press of the Phone button |
| Backword (previous song) | While the music play, short press of the AUX button |
| Deactivate the MP3 Player | Press and hold down the “Intercom” button for 3 seconds. |
| WIRED CONNECTION | |
| Activate /Deactivate | Short press of the AUX button |
| SETUP/PAIRING | |
| Enter SETUP mode | Press the Intercom button for 7 seconds while the unit is off |
| Pairing a Phone or a GPS Navigator | While in Setup mode, press the phone button until the LED light flash Red and Blue alternately |
| Pairing the BT1 pillion's device | While in Setup mode, press the Volume + on one unit (the light will flash Red and Blue alternately), press the Volume - on the other unit (the light will flash Red and Blue alternately). On a successful pairing, both light turn to Blue for one second. |
| Reset all paired devices | While in Setup mode, long press he Volume + and he Volume - . On a successful reset, the Blue light will turn on for two second. |
| SPECIAL SETUP CONFIGURATION | |
| 3 way conversation always on | While in Setup mode, press the Phone and AUX buttons for 3 sec.Steady Blue for two seconds= activated Double long flash = deactivated |
| Change VOX sensitivity or disable it | While in Setup mode, press short the AUX buttons (blue light on). Now, press “Volume +” or “Volume -” to increase or reduce sensitivity. Press again the AUX button to confirm the new setting and go back to the SETUP mode (Red light always on).Blue light flashing:Once = VOX disableTwice = very low sensitivity3 times = low sensitivity4 times = medium sensitivity.5 times = high sensitivity |
| Exit SETUP mode | While in Setup mode, long press the Intercom button. The Red light will turn off and the Blue light starts flashing. |
European CE Notice Certification and Safety Approvals Information
This product is CE marked according to the RTTE Directive (99/5/EC) and is free use in all the EU countries.
Users are not permitted to make any changes or modifications to the device. Modifications which are not expressly approved by the producer invalidate the warranty card. For further information, please go to our website
www.cte.it
INHALT
© ALAN COMMUNICATIONS, SA.
Description kit audio
Activation/Désactivation
Carregar as baterias 4
Carregando as baterias
Xpnoiopoiowvtac nV aeitoupyia MP3 player Tou KIVnTOu TnAeewvou oac
IooA kivnta nleepwva twpa eivai axeioaoueva yia va xpoioutoinbouv wc stpeopovik MP3 players. H oukeun Midland BT1 tou oynoyu utoontpiei t npws ta Tpwtokolaa A2DP kai AVRCP Tou oac ETITPEIOUVA aKOOTETe stpeopovki houoikn kai va biaxeipiotite atto aTTOtaon ta kupia xapaktnpiotika tou MP3 player tou KIVNTOU tneepwouoac.
Enionc evai duvato va xpnoiotoinoovu ta nktpa otn oukeun BT1 yia va diaxepioteite nacokoue c aeitoupyiec: Evapn, Taon, eptpoc kai niow.
Ppooyn: To kivnto nleepwvo Bluetooth npenvva urootnpici to npwrkoAvo VRCP.
Aiaeoipaonueia eEyxou:
Tia va evpyoioeTe to ouvodεeμevo MP3 player oac, TIEATE KAI kpatnoTe tnatnevo To nKtpo "Intercom" ia
3δειτρόλεπτα.
Tia va evapn/tnaon nC mouokns, TIEOTy auvtoo Xpoviko diateta to PAnktpo "Intercom".
Tia va Tpoxwpnoe Tpoc Ta eptpoc, oTo Etoevo > Tpaoyo, Tiote yia ouvtopo xpviko diatnma to TAnktpo "Phone".
Tia va tate TPOs Ta Tio TPOnyouevo TpaoyoDi, TIEATE ia uvtopo XpvIKo diaOTma To TAnktoPo "AUX". Tia va aTEVEpyoITIOHoeTe to MP3player, TIEOTE KAI KpatnoTe TATnpevo To TAnkToPo "Intercom" ia 3 DseUtePoiAETTA (2 beep 0a to ETIIEBaiowov).
Tia va avoileTe nTv eikovwia Intercom aIa Iahte, yia xeipokivtn evpyoioinan, atvepyoioiote Tpwa to MP3 player tieovtac to nnktpo "Intercom" ia 3 deutepoAeTTa KaI meta gavatneTo yia va avoileTe n aeitoupyia Intercom.
H kataaon akpoaons mouikns exe t xanotepn TPOTEpaIOTra. ETOUevw, 0a aTVEpyoTIOEITAI rVTA otav evpyoTIOEITAI evac aaoc tuTc eTKIOIVWvic.
Xpnoiopoioiwvto GPS pAnyo oac
Tia va xpnoiotoinoTeTo GPS TAnoyo oac, OiyoupeuteIe OTi Kai OI duo ouakeuec evai EvpyoToinvecs kai Zeuayapwueces owta metaTOUs, AkoAouThetaVtac Tn diaikacia Zeuayapwato tsou Tepiypapetai 0To Kepalaio "ZeuayapwovTAC n oukeun eva GPS".
PnorepaioTna: oEikoivwies to GPS exouv nviuynan nporepaioTna, to onoio onmaivei on n dieukoluvon autuw twv EIKIOIVWiwv npokalei pooovipn anevepyoioiog oaw twv aalww EIKIOIVWiwv (Evooovevvon, uouikn n mptosektns).Molis teaiowouv oEikoivwies eewGPS, oaes oAless EIKIOIVWiec emavepeyonoiouvta autoupata.
AkooyovTc Tc Qwnntke c obnyies tou GPS
Ondyies ato GPS oac yia tvn metakivnan oac navta 0a metabodovtai aTvepyoioiwvTac TPOOWPVA OAE TIS AALES EVEPYE ETIKOVWIEc. MoIg akouote OEg TIG WNTIKEs Ondyies, to BT1 oac 0a EvpyoioeI autouata OAE TIC UTOAOITc LEIOUPYIEs.
Akouyovtacouoikn aTto GPS oas
Oi OIOAIOEATEC OOKeUC GPS OAC EITIpeTouv ouviWCS va akoute pouikn otav devivetaia odnyia. e autyn TIV TEPITIWON, n ETIKOIVWvia eTO GPS elvai TAVTA evepyk KAI EXI TNY TNO UPNAN TPOTepaioNTa evavTI OAwTwAALW
Eepyw oukeuwv.
Evtoic, evai duvato va eivai evpyoioinveyn n aeitoupyia Intercom oioiaotne otiyun, evw akoute pouikn, atla tieovtac to pntpo "Intercom" ia v avoiEtemu Etikoivwvia ouviackeyns (3-way).Tia Tepioootepec tnpopoe, feTE to kepalaio "Etikoivwivec ouviackeyns (3-way) eaw GPS" npakatw.
Xpnoiopoiowvct eva kivnto nIeepwvo e vga GPS
Eav exete auvdoeieva GPS oTo BT1 0aC, dV th eite 0e
theon va uovdoeteto kivnto tnaepwvo aea ae Tn ouakeun
TpeTei avt'autou, va uuvdoeteto tnapewvo 0to GPS. Me autov toptotto, oec ai leitoupyiec tou kivntou nnepovou
ta puutilcovtai kateuheiafv anto to GPS. Iia nnnpopoe iya to TTswa zevuyapawote eva kivnto tnaepwvo kai va
attvtnae/ npaypatottonae tKaaneic, dite to eyxepidio
Tou napexetai e To GPS 0ac.
Etnkoivwvie ouvdiokekys (3-way) eou GPS
H IeIoupyia Intercom aTVEpyoToieftai Tpoospiva otav n EITKOIVWvia eTO GPS elvai evpyn (EvOeIg Oovn houoiKn). EvTOIOc eVai duvato va eTTipatei OTov ETiBatn va akouoei, EVepyoTOIWvTAC ia EITKOIVWvia ouviakekys (3-way).
Otau n eTikoivwiae to GPS eivai evepn, TIEOTyia ouvtuo xpoviok diaotma to PAnktpo "Intercom" otn ouakeun BT1 tou ouvodetai e to GPS (0a akouoeteeav nxntko tovo etiBaeaiowns). O auvetiBatnc 0a eivai oE thon twpa va akouei tic ioc kukloopopiakcs onyiec/ouovikn Tou o onyoc akouei. Iia va eTiotpepsiete 0iWiTK ouvoulia, TIEOTE to PAnktpo "Intercom" akoua miA popa. (0a akouoeteduo nxntkouc tovouc etiBaeaiowns).
Xapaktnpiotikα kai tpoTioC λeIToupyiaç evuupμaTωv ouokewv nxou
To Midland BT1 exi evomegaatwve n tio nua uTOOx h eooou evupaunns oukeu n xou AUX),nou mtope va xnoioutoinhe iia va ouvdethetae ie ia oteepovikn Tny n xou, otwsc eva iPod (ntoiohntote aallo MP3 player) n evac npTIOEKTNC PMR446 yia tic etikoivwviec "mXavnc emxavn".
IporepaioTn: n uno0x n eodou evuuparns oukeunxou exi th xanlotepn nporepaioTnEv oukypioe iE tss aalces ouvdeaeic Bluetooth (oumuepiaauavovns tsvdoovevvnoans) kai enouevc anevpyonoiirat naivra otav laabavetai ia aannn EIKOIVWvia Bluetooth.
Akooyovtacouoikn
Tia va akouoete Pouikn antv utoox eioou evupatnc oukeun hou, uovote nTv nynhou xpoioutowvtac to kalwoio Tou TApexetai me tn oukeun BT1. To etnte do Evtaon pOuIcetai autopata ato to ouotna AGC, to oIoIO onaivei otipettei mvo va puoiote nTv evtaon tou iPod/ MP3 player oac oe eva emiteo Tou tha etitpeei oac va akoue Pouikn oe kavovikn taxutnta.
Npoox: Note puoigere nV evraon tou IPod/ MP3 player oTo eviTo duvaro einnEso.
Euouh: Uoivoue va eKteAoeTe eepikeosokiepuOioVraTnv evraon rou iPod/MP3 player oas etoi wote ME KAVOVIKI raxutnta, n Evraon Tou Kepalakouotikou Oas va Kaunnti Tc avaykcs a.
To ouotma AGC 0a auagavei autoupa tnv evraon ooo
peyalutepn eivai n taunna. Na exeTe um' oyiv oac autn
tnv pueoian yia eeAovtika rafdia.
Ppoox: nppuoan nTc evtaoans, (nAiktpa "Volume+ Kai "Volume-), mnpoei va xpnaiomoine iya va puoiiaevvaon Tc evuaopauatns nyin cXou (n.x. MP3 player), mvo nTv evtaoan rou BT1 u to onio n ouakeun suvEetai.
Evpeytooin/ aTevpeytooin nC uToboxn EIOBDou evupatns oukeunxou
H uiooxyi eiofoevuupatns oukeunxoumuopeiva evepytooine/ aievepeyoitoine i eou Tou nAkpou "AUX".
AtevepyoioiOn: TIOETo TnKtpo "AUX" ia epiKa
eutepoAeTTa (Oa aKOoEte duo nXNTIKoUs ToVouc ETIpeBaiowns).
Evepytoinq: Tiote to nKtpo "AUX" yia epiKa > deutepoaleTTa (0a akoouete evav nxntiko tovo etiBaeaiowns).
XpnoiopoToiwVtac evav TOnTOBektn
Tia va eioe oEoan va xpnaioutoane to TIOIOTekn, evai aTapalntnovaayopaeEva ouykepiévo kaawdo (Tou TTwelaitai wpiot) PPOKeiEvou va ouvOeoi O IOITOKNTGt o Midland BT1:
European CE Notice Certification and Safety Approvals Information
To Tpioov exi onuavon CE, oumuopuwvetai e nTv Odyia RTTE (99/5/EC) kai npnou evai eveepn o aes tnc wpec tnc EE.
Dev etipetetai otouc xnoctc va Tpoaliovv o alayec n tpottoinoeic nC oukeunc. OI Tpotttonieic Tou Ev evai pnta
evyekipeves atto tv kataoakeuaatn theouv aeos to Tpioov ekoc yvunons.
Tia TepiooTepec TAnpoopopiec, TapaKaaloue avaeptheta otyniotoeiaidea www.cte.it
- INDICE
- Midland BT1 Intercom
- BT1 - Content of the packaging
- Technical specifications of Midland BT1
- General:
- Bluetooth connections:
- Wire connections for both units:
- Charging batteries
- Description of the unit and installation brackets
- Description of the BT1 unit
- Description of the button features:
- Description of the wired connections
- Description of the audio kit
- Description of the installation brackets
- Plate with bl-adhesive strip
- Clamp
- Fitting and removing your Midland BT1
- Typical configurations of BT1 Switching your Midland BT1 on
- and off
- Switching the unit on:
- Switching the unit off:
- Pairing with Bluetooth devices
- Setup mode
- Pairing the unit with the pillion's device
- Pairing the unit with a mobile phone - only for the driver's device
- Pairing the unit with a GPS Sat-Nav - only for the driver's unit
- Resetting all paired devices
- Exiting from the Setup mode
- Reconnecting the unit to bluetooth devices
- Adjusting the volume
- Using the features of the bluetooth devices
- Using the intercom feature
- Manual activation:
- Voice activation (VOX):
- Using the telephone feature
- Answering a call
- Vocally:
- Manually:
- Rejecting a call
- Making a call
- Dial the number on the mobile keypad:
- To redial the last number:
- To make a voice call:
- Ending a call
- 3-way telephone communications
- Using the MP3 player feature of the mobile phone
- Available controls:
- Using the features of your GPS sat-nav
- Listening to voice instructions from your GPS Sat-Nav
- Listening to music from your GPS Sat-Nav
- Using a mobile phone with a GPS Sat-Nav
- 3-way communications with your GPS Sat-Nav
- Using the wired audio input
- Listening to music
- Attention: never set the volume of the MP3 Player to the maximum possible.
- Enabling/disabling the wire input
- Using a Two Way Radio transceiver
- Special configurations
- Permanently enabling 3-way communications
- Enabling/disabling 3 way communications
- Enabling the intercom by voice (vox)
- Adjusting the sensitivity of the microphone (VOX)
- Disabling the VOX feature (Intercom and telephone)
- Recommendations for specific uses
- Using a PMR446 transceiver with the Intercom feature (Rider to Pillion)
- Disabling the VOX feature
- Share the music between Rider and Pillion
- LIGHT AND SOUND SIGNALS
- UNIT FUNCTIONS
- European CE Notice Certification and Safety Approvals Information
- INHALT
- Description kit audio
- Activation/Désactivation
- Carregando as baterias
- Xpnoiopoiowvtac nV aeitoupyia MP3 player Tou KIVnTOu TnAeewvou oac
- Aiaeoipaonueia eEyxou:
- Xpnoiopoioiwvto GPS pAnyo oac
- AkooyovTc Tc Qwnntke c obnyies tou GPS
- Akouyovtacouoikn aTto GPS oas
- Xpnoiopoiowvct eva kivnto nIeepwvo e vga GPS
- Etnkoivwvie ouvdiokekys (3-way) eou GPS
- Xapaktnpiotikα kai tpoTioC λeIToupyiaç evuupμaTωv ouokewv nxou
- Akooyovtacouoikn
- XpnoiopoToiwVtac evav TOnTOBektn
Brand : MIDLAND
Model : BT1
Category : Hi-fi system