
BT Next 2.0 - Walkie-talkie MIDLAND - Free user manual and instructions
Find the device manual for free BT Next 2.0 MIDLAND in PDF.
| Product type | Intercom for motorcyclists (Bluetooth communication system) |
| Brand | Midland |
| Model | BT Next 2.0 |
| Power supply | Rechargeable lithium battery, 10 hours talk time, full charge in 6 hours (first charge: 8 hours) |
| Bluetooth | Version 3.0 stereo (headset/hands-free/A2DP/AVRCP protocols) |
| Intercom range | Up to 1.6 km (1 mile) in open field with antenna extended |
| Number of users | Up to 6 people (3 Midland modules + 2 Talk2All) |
| Main functions | Intercom, Talk2All (other brand intercoms), stereo FM radio with RDS, phone, GPS navigation, A2DP music, wired AUX input, voice control (VOX) |
| Antenna | Retractable, deploy for maximum range |
| Waterproofing | Waterproof (resistant to rain, check connector caps) |
| Connectors | Mini USB charging jack, audio kit jack, 2.5 mm auxiliary jack |
| Box contents (Twin kit) | 2 BTNext modules, 2 audio kits (stereo earphones, boom mic and wired mic), 2 adhesive mounts, 2 fixing clips, 2 audio cables, 1 dual output wall charger, foam pads, Allen key, Velcro strips |
| Maintenance and cleaning | Clean with a soft dry cloth. Protect connectors from moisture. Check rubber caps. |
| Safety | Use at reasonable volume to avoid hearing damage. Do not use if it alters perception of surrounding noises (driving). |
| Spare parts and repairability | Battery, chargers, earphones, microphones, mounts, cables available. Firmware update via PC (software at www.midlandradio.eu). Warranty: 24 months device, 6 months accessories. |
| General information | CE certification compliant with RTTE directive. IC (Industry Canada) marking for Canada. Do not dispose with household waste, recycle at a specialized center. |
Frequently Asked Questions - BT Next 2.0 MIDLAND
User questions about BT Next 2.0 MIDLAND
0 question about this device. Answer the ones you know or ask your own.
Ask a new question about this device
Download the instructions for your Walkie-talkie in PDF format for free! Find your manual BT Next 2.0 - MIDLAND and take your electronic device back in hand. On this page are published all the documents necessary for the use of your device. BT Next 2.0 by MIDLAND.
USER MANUAL BT Next 2.0 MIDLAND
Multi Rider Intercom System

Bluetooth®
MANUALE D'USO
INSTRUCTION GUIDE
BEDIENUNGSANLEITUNG
MANUAL DE INSTRUÇÕES
Οδηγίες Χρησης
GEBRUIKERS HANDLEIDING
käyTTöOpAS

MIDLAND®
Sommario
Multi rider intercom system
natural_image
Technical line drawing of a mechanical component with a handle and mounting holes (no text or symbols)natural_image
Abstract diagram with curved lines and circles, no text or symbols presentAltoparlanti stereo
natural_image
Line drawing of a helmet with a small circular mark on the side (no text or symbols)natural_image
Technical line drawings of mechanical components including a motor and clamping tool (no text or symbols)Inserimento e sgancio del Midland BTNext
Technical specifications of Midland BT NEXT 16
Charging batteries....17
Unit and fixing system description....17
Switching your Midland BT NEXT on and off....19
Operative 'mode'....19
Maximum distance 19
How to pair two BT NEXT....20
Talk2All 22
Pairing the BT NEXT to Bluetooth devices....22
How to listen to the FM Radio 25
How to use the wired audio input....25
Using a PMR446 transceiver with cable connection 26
Setup and special configurations 26
Setup and firmware update ....27
Warranty 28
European CE Notice Certification and Safety Approval Information 28
FCC Compliance information 28
MIDLAND BTNEXT
Multi rider intercom system
BTNext is an intercom communication system solution for motor cyclists. The design is very slim and aerodynamic, all the main functions are easy to operate thanks to the big three buttons placed on the front of the unit.
BTNext is fixed on the helmet using the adhesive plate or the screw mounting clamp. Thanks to the audio kit with ultra slim speakers you can enjoy high quality stereo music while riding.
Main features
Intercom distance up to 1 mile (1,6Km).
Connect up to six people for intercom communication
Talk2All features to connect other brand intercom
Listen to stereo FM Radio with RDSConnect your phone to receive and place phone call and listen to stereo music
Connect your GPS for voice street indication
Connection for PMR466 radio with internal or external Bluetooth
AUX wired connection for MP3 player and PMR446 radio
Setup and Firmware update via USB connection to a PC
Midland BTNext is available in two versions:
Single BTNext Intercom kit with one unit only
Twin BTNext Intercom kit with with two units
Depending on the model purchased, the package contains the following parts:
BTNext single
1 BTNext communication unit
1 audio kit with two stereo speakers, microphone with boom and wired microphone
1 plate with bi-adhesive strip to fix the unit onto the helmet
1 clamp to fix the unit onto the helmet
1 stereo audio cable for iPod/ or other MP3 players
1 miniUSB wall-mounting power supply
Wind Suppressing Foam Microphone Cover, Allen key and Velcro strip for assembly
BTNext Twin
2 BTNext communication units
2 audio kits with two stereo speakers, microphone with boom and wired microphone
2 plates with bi-adhesive strip to fix the unit onto the helmet
2 clamps to fix the unit onto the helmet
2 stereo audio cable for iPod/ or other MP3 players1 miniUSB wall-mounting power supply with double plug
Wind Suppressing Foam Microphone Cover, Allen key and Velcro strip for assembly
The units included in the TWIN kit are already paired and can therefore be immediately used in Intercom mode.
Technical specifications of Midland BTNext
General:
Bluetooth ver. 3.0 stereo (Headset/Handsfree/A2DP protocol)
AGC system automatically controls the volume in relation to background noise Voice (VOX) or manual communications activation
Manual controls to enable: telephone, intercom and wire connection
Stereo FM Radio with RDS
Fully waterproof
Lithium battery with 10 hours talk time
Recharge time: app. 6 hours
Bluetooth connections:
With identical device for Rider to Pillion or Bike-to-Bike Intercom mode, up to a maximum distance range of 1 mile (1,6km)
Attention: You can reach 1 mile (1,6Km) intercom distance if the flip up antenna is up and if you are in line of site without obstructions and interferences (the riders must be always in sight).
Bluetooth devices:
Mobile phone with MP3 player Stereo (A2DP protocol), GPS (Garmin Zumo and TomTom Rider 1 and 2)
PMR446 transceivers (with built-in or external Bluetooth connection) for group bike-to-bike communications
Wire connections:
For stereo audio input (iPod/MP3 player)
For PMR446 transceivers (with optional cable)
Attention: Midland BTNext is designed to withstand rain and water. However, if it is raining, always verify that the rubber caps protecting the sockets are fully fitted.
Charging batteries
Attention: Make sure that the unit is fully charged before use. Allow at least 8 hours for a full charge before using the unit for the first time.
Charge the unit by inserting the wall-charger into the charging socket (lift the rubber cover to insert the plug).
The red LED on the unit will start flashing when charging begins.
Allow the headset to charge until the unit stops flashing or the blue LED turns on.
When the charge is complete (the red LED is not flashing), release the headset from the charger.
Normally, after the first time, it takes 6 hours for a full charge.
Attention: every time the mini USB recharging plug is inserted (or detached), the device is automatically turned off. To use it while it is in charge, you should turn the device on with the plug already inserted.
Unit and fixing system description
BT Next description
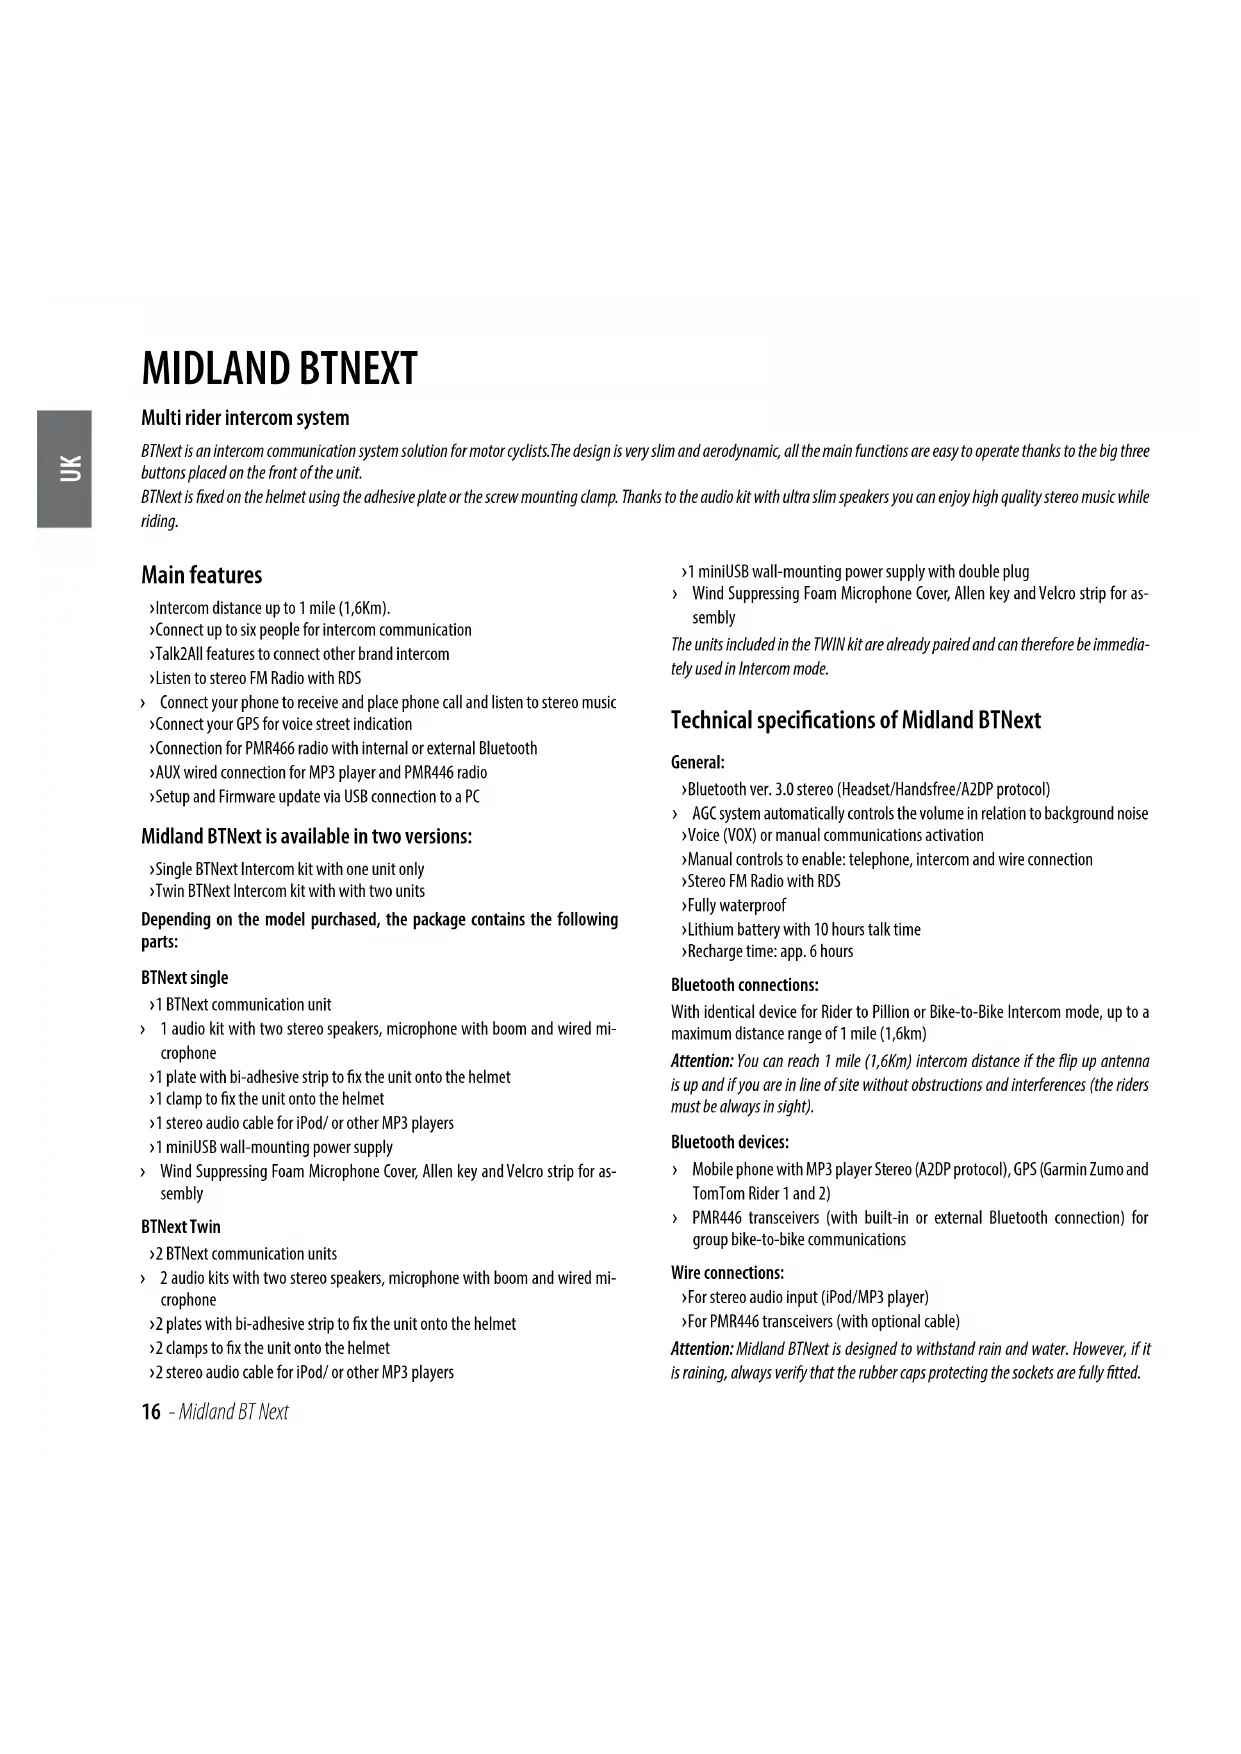
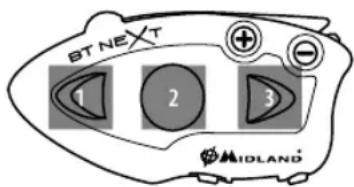
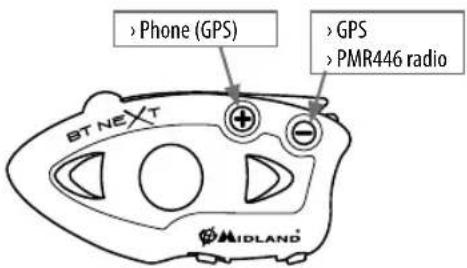
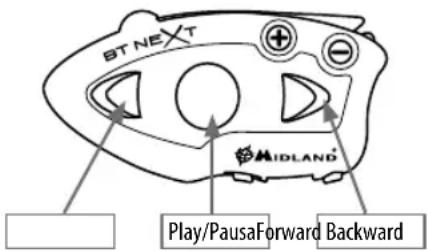
The BTNext has five buttons on the front; the main three big button are multi functions buttons: the Forward (on the left), the middle button and the Rear (on the right), the two small rounded buttons are the Volume + and Volume -.
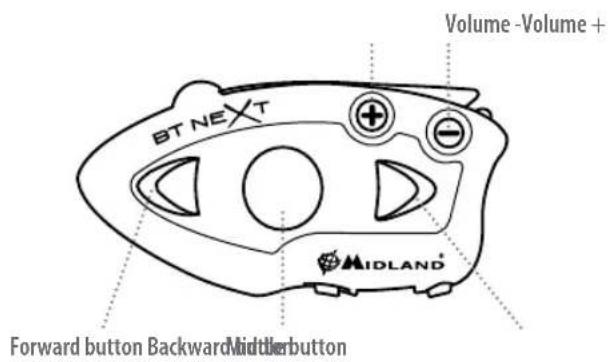
Description of the wired connections
On the bottom of the unit you can find three wired connection:
Charger jack: enables to recharge the unit using a standard miniUSB power supply
Audio kit jack: enable to connect an audio kit (stereo headset and microphone)
Auxiliary audio jack (AUX) 2.5mm: can be used to connect an audio source, like a stereo iPod/MP3 player or PMR446 transceiver
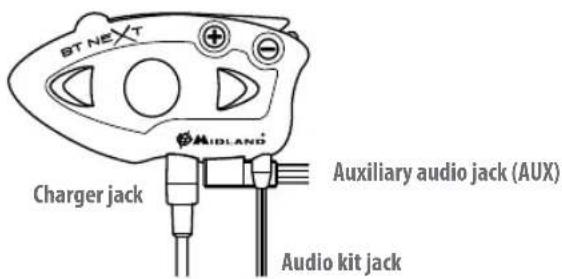
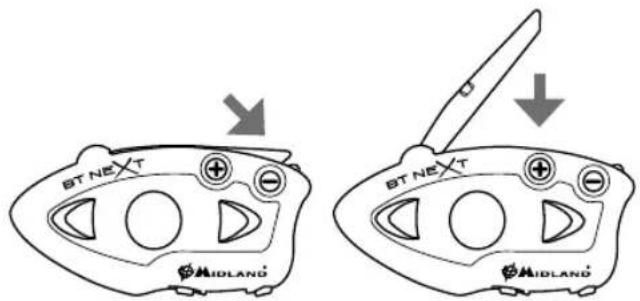
In addition the BTNext has a flip up antenna on the top for maximum distance performance.
To lift the antenna, press gently backward and the antenna will automatically lift up.
natural_image
Technical line drawing of a mechanical component with an arrow indicating direction (no text or symbols)To close the antenna just press it down and be sure to move it back into the closed position.
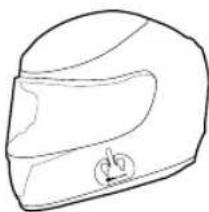
Description of the audio kit
The audio system includes two ultra-flat stereo speakers and two interchangeable microphones, which are both supplied with a bracket and wired connection.

natural_image
Abstract diagram with curved lines and circles, no text or symbols presentFixing the stereo speakers
The two stereo speakers have a Velcro/adhesive strip that aids their fixing into your helmet.
Beware not to completely cover your ear with the speakers, you must always be able to listen to the traffic sound and your indicators.
The microphone can be fixed onto the helmet in two ways:
Boom Microphone
Place the section with the Velcro/adhesive strip between the padding and the rigid cover of the helmet, so that the microphone is correctly positioned in front of your mouth and that the white symbol is facing your mouth. This type of microphone is suited for Open Faced and Flip Front helmets.

Wired microphone
Using the Velcro/adhesive strip, place the microphone inside the helmet in front of your mouth. This type of microphone is more suited for Full Faced helmets. The mini connector on the microphone allows you choose the microphone that best suits the helmet you are using.

Audio kit jack
The audio kit must then be connected to the central jack of the Midland BTNext unit using the "L" shaped connector.
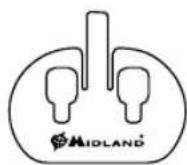
Description of the installation brackets
The Midland BTNext can be fixed onto the helmet in two different ways: By either using the plate with bi-adhesive strip, or the clamp. These methods allow you to safely "fix" the BTNext unit onto your helmet and to remove it at any time in order to recharge or store it.
natural_image
Line drawing of a helmet with a small circular mark on the side (no text or symbols)Plate with bi-adhesive strip
The fixing plate has a bi-adhesive strip on one of its sides. To fix the plate in place, clean the application area on the helmet surface, remove the bi-adhesive film and
place the fixing plate on the helmet by keeping it contact with the surface for a few seconds.
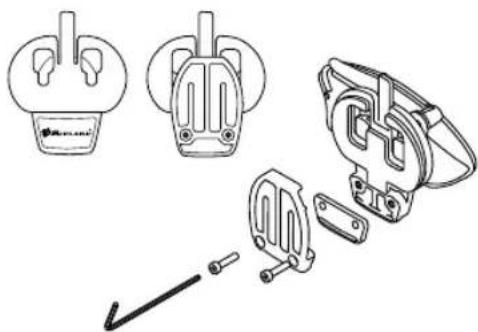
Screw Clamp
Using the Allen Key, loosen the two screws on the clamp and place the rear plate between the helmet padding and the external rigid protection. Then, tighten the two screws in order to firmly fix the clamp in place. Inside the clamp is included a small plastic spacer that can be removed to give a tighter fit if required.
natural_image
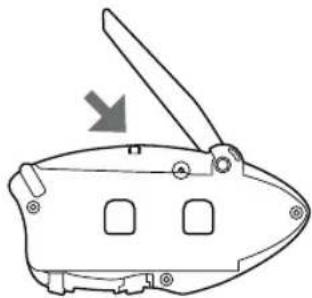
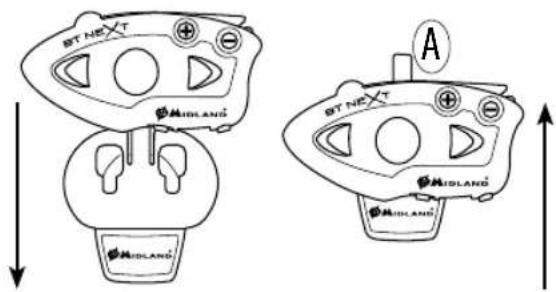
Technical line drawing of mechanical components including a plug, bracket, and clamping tool (no text or symbols)Fitting and removing your Midland BTNext
The BTNext can be easily fitted onto the helmet by sliding it downwards so that it fits into the slot of the selected fixing device (plate with bi-adhesive strip or clamp). BTNext is maintained in position thanks to the fixing clip located on the upper section:
To detach the BTNext, simply press the fixing clip (A) and push the unit upwards.
Switching your Midland BTNext on and off
Switching the unit on:
Press and hold "Middle" button down for approximately 3 seconds until the BLUE indicator lights.
Switching the unit off:
Press and hold both "Middle" and "Rear" buttons together for approximately 3 seconds until the RED indicator flashes 3 times, thus lessening the chances that you might turn off the unit accidentally (especially whilst wearing gloves).
Operative "mode"
The BTNext can operate in three main "mode": Intercom, Phone and FM Radio. The 3 multi function buttons can have different functionality depending on which mode the unit is at that moment.
In "Intercom mode" the buttons lets you manage communications with up to 6 people, talking one by one. Just press one of the three buttons to open the intercom.
In "Phone mode" you can manage your Bluetooth cellular phone to place/answer a phone call or to listen to the music (in stereo mode). Please use your phone responsibly and safely.
In "FM Radio mode" you can listen to your favourite radio station in stereo, seek for a specific radio station and save it (6 memory are available).
You can switch (toggle) from one mode to the other simply pressing the Middle button for 3 seconds. A voice announcement will tell in which mode you are on. The toggle sequence is the following:
Intercom mode (if another unit has been paired)
FM Radio mode
Phone mode (if a phone has been paired)
Every time you turn on the unit, the default mode is Intercom (if it was previously paired to another unit), otherwise it will be Phone (If was paired to a phone). If no pairing was made – the only possible mode is FM.
For example if you are in Intercom mode, you can use the three buttons to open and close the intercom connection to up to three other units. When you are in FM Radio mode the same buttons lets you scan the radio station frequency and turn on and off the radio.
If you want to change mode, you just press long the middle button and listen to the voice announcement, until you reach the one you are looking for.
If you need to know in which mode the unit currently is, just press the "Volume +" and "Volume—" button together for 3 second. A voice announcement will tell you the current mode.
Maximum Distance
You can reach 1 mile (1,6Km) intercom distance if the flip up antenna is up and if you are in line of site without obstructions and interferences (the riders must be always in sight).
Here is an example of the buttons main functionality based on the mode you are on.
| Mode Forward (Left button) Middle button Rear (Right button) | ||
| Intercom Open/close the intercom to the first rider | Open/close the intercom to the second rider Open/close the intercom to the Third rider | |
| Phone | Redial last number/accept or reject incoming call | |
| Phone (while music play) Forward the song Play/pause Backward the song | ||
| FM Radio Scan up | FM Radio On/off | Scan down |
How to pair two BT Next unit
The two units supplied in the same BTNext box, are already paired and ready to use, which mean you don't need to perform this procedure. The unit are already paired using the Middle button.
If the devices are not part of the same kit, or the units has been purchased separately, you need to first pair it in order to use it.
To pair the BTNext to another BTNext unit
To pair the BTNext to another BTNext unit, you must first enter the setup mode:
- Turn off the unit
- Press and hold down the middle button about 7 sec., until the Red light is on permanently.
- Now press the Middle button for 3 seconds. The Blue and Red light will flash.
- Do the same procedure on the other unit, When successfully paired, each unit will have the Blue light on for one second and then go back to the setup mode (Red light always on).
- Now the pairing procedure is complete, you just need to exit the setup mode before you can use the units:
- Double click on the Middle button, the Red light will turn off and the Blue light will start flashing.
You can use now your BTNext.
Attention: remember to switch off all the other Bluetooth device, only the two devices involved in the pairing must be turned on.
How to use the Intercom with two units
To use the intercom feature, be sure the both units are turned on and correctly paired together.
Attention: For intercom communication between Driver and Passenger, there is no need to keep the flip up antenna in the up position. For Bike-to-Bike intercom the antenna must be in the upper position.
Manual activation
Press the Middle button on one of the two units. Communication is enabled and remains active until you press again the middle button. The intercom need some second to activate, you will hear a beep tone when the intercom is open.
Voice activation (VOX)
Simply start talking, after some seconds the communication will be opened and will remain active for the time you are talking. If there is no conversation the intercom will be closed after 40 seconds. If needed you can close the intercom manually without waiting 40 seconds (just press the middle button).
If needed, you can disable the VOX feature simply by pressing the Backward button for 7 sec. A voice announcement will advise you when the VOX is disabled. To turn the VOX on again, just press the same button and a voice announcement will advise you
that the VOX is now active. This setting is remembered also in you turn off the unit.
Attention: The Voice activation (VOX) can open the intercom communication only to the unit that was paired with the Middle button. If you chose to use a different button (Rear or ), you will be able to active the intercom only manually.
Adjusting the volume
Your Midland BTNext uses AGC technology, which automatically adjusts the listening volume in relation to background noises.
However, it is also possible to manually adjust the volume by means of the "Volume +" and "Volume -" buttons.
Attention: volume can be adjust only when an audio connection is active.
How to pair the BTNext to more than two units
One BTNext unit can be paired to maximum five other BT unit, that mean six in total (3 Midland unit + 2 Talk2All).
The BTNext has three main buttons (Forward, Middle and Rear). It is up to you which button use to pair and activate the intercom, you are totally free to choose the button you like more. The same button you will use to pair the unit will be also used to activate the intercom communication.
Remember that each device can always be paired with other 3 units at your choice; as shown in the picture here below, also 'crossed' pairing can be done.

flowchart
graph TD
    A["Rider1"] --> B["MTL"]
    A --> C["MTL"]
    A --> D["MTL"]
    A --> E["MTL"]
    F["Passenger1"] --> G["MTL"]
    F --> H["MTL"]
    F --> I["MTL"]
    F --> J["MTL"]
Rider2 Rider3
For example you can decide to pair one motorbike rider unit to the Forward button, your passenger to the Middle button and another rider to the Rear button.
In this way you can have in total 5 units paired together and talk to each person, one by one, simply by pressing the corresponding button (the same used for the pairing). Every time you open the intercom connection to one person, the previous connection will be closed.
The connection is not a "chain", when two person are talking it is not possible to break (interrupt) the communication by one of the other two units riding out of the maximum distance range.
Pair the BTNext to another BTNext unit
To pair the BTNext to another BTNext unit, you must first enter the setup mode:
- Turn off the unit
- Press and hold down the middle button about 7 sec., until the Red light is on permanently.
-
Now press one of the three buttons (Forward, Middle or Rear) for 3 seconds depending on which button you would like use to open the intercom to the other unit. The Blue and Red light will flash.
-
Repeat the same procedure on the other unit, you don't need to use the same button, you can choose one of the three buttons not previously used.
-
When successfully paired, each unit will have the Blue light on for one second and then go back to the setup mode (Red light always on). Now the unit is ready for another pairing procedure, and you can pair another BTNext unit following the same procedure, but using a different button.
If you don't have more devices to pair, you must exit the setup mode before you can use the units:
Double click on the Middle button, the Red light will turn off and the Blue light will start flashing.
You can use now your BTNext.
How to use the Intercom with more than two units
To use the intercom feature, be sure that all the units are turned on and correctly paired together
Attention: For intercom communication between Driver and Passenger there is no need to keep the flip-up antenna in the up position. For Bike to Bike intercom the antenna must be in the upper position.
Manual activation
Press the button corresponding to the unit you would like to communicate with. After about 4 seconds the intercom communication will open.
The communication remains active until you press again the same button. To quickly open the intercom to another person, just press the button corresponding to the other unit, the intercom will be automatically closed and the new connection will be open (see Table A).
Voice activation (VOX)
The voice activation feature can open the intercom only to the unit paired to the Middle button. While no other communication is open, simply start talking and the communication will be open and remain active for all the time you are talking. If there is no conversation the intercom will be closed after 40 seconds. If needed you can close the intercom manually without waiting 40 seconds, pressing the Middle button.
If needed, you can disable the VOX feature simply by pressing the Backward button for 7 sec. A voice announcement will advise you when the VOX is disabled. To turn the VOX on again, just press the same button and a voice announcement will advise you that the VOX is now active. This setting is remembered also in you turn off the unit.
Hint: this feature is very useful when you have a specific person that you like to talk to more often (for example your passenger). In this way you don't need to press a button to open the communication.
Unit already busy
If you try to open a intercom connection to another person that is already busy talking with some one else (or is in a middle of a phone conversation), you will hear a "busy" double beep tone. Just wait sometime and try again, maybe this time the "line" is not busy.
The person who is called, will be advised that someone is trying to call and will hear a voice announcement with the number of the button from which the request is coming.
In this way as soon as the first conversation is over, the person can easily contact the caller by opening the intercom of the specific button number (indicated by the voice announcement).
A- Manual activation
| Mode Forward button Middle button Rear button | ||
| Intercom Short press: Open/Close intercom to paired raider | Short press: Open/Close intercom to paired raider | Short press: Open/Close intercom to paired raider |
| Long press: Change mode | Long press: Toggle on/off wired | |
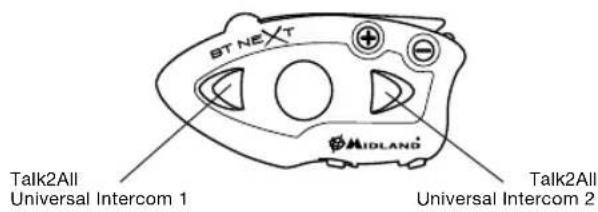
Talk 2 All - Pairing to a different brand intercom.
Thanks to the "Talk2 All - Universal Intercom" feature it is now possible to pair your BTNext to a different brand intercom available on the market.
You can pair a maximum of two not Midland Intercom, one on the "Forward" button and one on the "Backward" button.
- On the BTNext enter the setup mode: (with the unit OFF press and hold down the Middle button about 7 sec. until the Red light is on permanently).
- Keep pressed the "Forward" button or the "Backward" button for 7 seconds: the Red and Blu LED light will start flashing fast, than (while you still keep the button pressed) the Red and Blu LED light will change to slow flashing. Now you can stop pressing the button.
On the other intercom (not Midland brand) follow the procedure to pair to a phone, because the BT Next is paired as a Phone.
If successfully paired the red/blue light will stop flashing and the blu light will slowly flash instead.
Attention: remember to switch off all the other Bluetooth device, only the two devices involved in the pairing must be turned on.
To open the intercom communication on the BTNext press long (3 sec) the Forward or Backward button (depending on which button you used for pairing). On the other intercom just press the phone redial button. Maybe it will be necessary to press the redial button two times, depending on the model of the not Midland intercom.
Attention: In order to use the "Talk2All-Universal Intercom" feature the pairing on the other unit must be done as a phone. The other intercom (not Midland brand) will not be able to be paired to a phone.
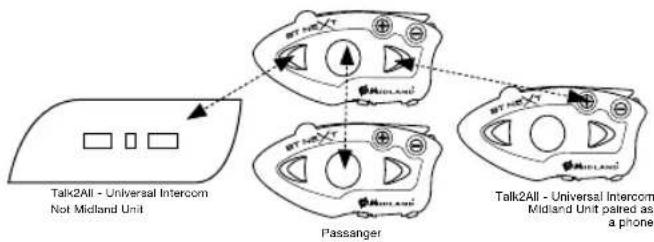
You can pair also a Midland unit as Talk2All, that mean the pairing must be done as a phone (one unit use the Talk2All procedure and the other unit use the pairing to "Phone" procedure).
flowchart
graph TD
    A["Talk2All - Universal Intercom Midland Unit"] --> B["Passenger"]
    A --> C["Talk2All - Universal Intercom Midland Unit paired as a phone"]
    B --> D["Bidirectional arrow to central device"]
    C --> E["Bidirectional arrow to central device"]
How to pair the BTNext to previous BT line unit
The BTNext is compatible with all the BT line unit from Midland. You can pair the BTNext to a BT2, BT1, BTCity/Eva, BTX1, BTX2 or BTNext unit and the max distance of the intercom is defined from the lower possible.
To pair the BTNext to another BT line unit, you must first enter the setup mode:
-
Turn off the unit
-
Press and hold down the Middle button about 7 sec., until the Red light is on permanently.
-
Now press long (3 sec) one of the three buttons (Forward, Middle or Rear) depending on which button you will like to use to open the intercom to that unit. The Blue and Red light will flash.
-
Follow the procedure on the other unit's instruction manual (normally you can use the "Volume +" button on all the previous BT line units).
-
When successfully paired, each unit will have the Blue light on for one second and than go back to the setup mode (Red light always on).
Now the BTNext unit is ready for other pairing procedure, and you can pair another BT line unit following the same procedure, but using a different button on the BTNext.
If you don't have more devices to pair, you must exit the setup mode from both units before you can use them: for BT NEXT double click on the Middle button, the Red light will turn off and the Blue light will start flashing. For the other devices of BT line, please refer to their own user manual.
Pairing the BTNext to Bluetooth devices
The BTNext unit can be paired to other Bluetooth devices, like Phone, GPS Navigator or PMR446 Radio with built-in or external Bluetooth.
The pairing procedure must be done using the "Volume +" or the "Volume -" buttons.
Pairing to the "Volume +" button: for Phone with music (A2DP stereo). All devices paired to "Volume +" button has higher priority and will interrupt all the other communication (like Intercom, FM Radio and Music).
Pairing to the "Volume -" button: for GPS navigators and other devices which the audio must be always in background.
Attention: The "Volume -" button does not support the pairing with a phone.
Pairing to a phone
The cellular phone can be paired only to the "Volume +", in this way it is possible to manage all the phone functionalities and listen to the stereo music. An incoming call has the higher priority, that means all other communications will be closed (Intercom, FM Radio, Music).
Pairing to a GPS navigator
The GPS can be paired to the "Volume +" or "Volume -" button. If the GPS is paired on "Vloume +", the street voice announcement will interrupted all the other communications (Intercom, Music, FM Radio...). If the GPS is paired on "Volume -" all the street announcement will be in background (and will not interrupted the Intercom communications). In this case the GPS street voice announcements are always in background (the intercom is not closed).
Attention: If you need to connect both Phone and GPS, you must pair the GPS to the "Volume—" button and the Phone to the GPS it self (not anymore to the "Volume +" button). In this case the GPS street voice announcement and the phone calls are always in background and will not interrupt the Intercom conversation.
Attention: remember to switch off all the other Bluetooth device, only the two devices involved in the pairing must be turned on.
GPS Navigator with stereo music player
If the GPS is also a stereo MP3 player and you want to listen to stereo music, you
must pair the GPS to the "Volume +" button. In this configuration the GPS street voice announcements will interrupt all other communication (Intercom, FM Radio, Music).
When the GPS is paired to the "Volume +" button the "Phone" mode is activated.
Attention: It is possible to listen A2DP Stereo music from the GPS only in "Phone Mode".
Pairing to a PMR446 radio with integrated or external Bluetooth
The PMR446 Radio must be paired to the "Volume—" button, so that the PMR446 radio is always in the background even when you talk on the intercom.
Attention: in addition to a PMR446 transceiver, if you want to connect also a GPS navigator you must pair the GPS to the "Volume +" button. In this configuration the GPS street voice announcements will interrupt all other communication (Intercom, FM Radio, Music).
When the GPS is paired to the "Volume +" button the "Phone" mode is activated.
How to pair the BTNext to a Phone
To pair the BTNext to a Phone, you must first enter the setup mode:
- Turn off the unit
- Press and hold down the middle button about 7 sec., until the Red light is on permanently.
- Now press for 3 seconds the "Volume +" button, the Blue and Red light will flash.
- Enable the Bluetooth device search feature on your mobile phone
- After some seconds, "Midland BT NEXT" will be displayed on your mobile phone. Follow the pairing procedure of your Phone. If a pin code is requested you must enter "0000" (four time zero).
When successfully paired, the Blue light of the unit will be on for one second and than the unit will exit the setup mode and switch to the working mode (the Blue light will start flashing).
You can use now your BTNext together with the Phone.
B-Phone mode
| Mode Forward button Middle button Rear button | ||
| Phone Short press: Voice dial /accept or close if it is in progressLong press: redial last number/ or reject incoming call | Long press: Change mode Very long press: toggle VOX on/off | |
| Phone (when music play) Short press: Forward the song | Short press: Play/pauseLong press: Change mode | Short press: Backward the song |
How to use a Phone
After pairing your phone to the BTNext unit you must switch to the "Phone" mode in order to use it. Press the middle button until you hear "Phone" from the voice announcement. Now all the three main button are dedicated to the phone (see Table B)
Answering a call
When you hear the phone ring, you can answer in two different ways:
Vocally:
Simply say one word to answer the call and start talking.
Manually:
Tap the "Forward" button and start talking.
Rejecting a call
If you don't wish to answer, you can let the mobile phone ring or press the "Forward" button for 3 seconds (you will hear one audio confirmation tone).
Making a call
There are several ways to make a call.
From the mobile keypad:
Dial the number on the mobile keypad:
Press "Send" on the mobile phone.
To redial the last number:
Press "Forward" button for 3 seconds in order to redial the last number (you will hear one audio confirmation tone).
To make a voice call:
Briefly press "Forward" button. If your mobile phone supports voice calls, you will be asked to speak the name of the contact you wish to call.
Priority: Calls have a high priority, which means that all other communications are temporarily disabled when a call arrives.
Ending a call
There are several ways to end a call:
Wait for the called person to end the call.
Press the "Forward" button (you will hear an audio confirmation tone).
Press "End" button on the mobile phone.
Using the MP3 player feature of the mobile phone
Many mobile phones are now designed to be used as stereo MP3 players. The BT-Next device fully supports the A2DP and AVRCP protocols that enable you to listen to stereo music and remotely control your mobile phone's MP3 player. You can even use the buttons on the BTNext unit to control the following play options: Play, Pause, Forward and Backward.
Available controls:
To play/pause music: click on the "Middle" button.
To skip forward to the next song: press the "Forward" button.To skip backwards to the previous song: press the "Rear" button..
Priority: the music listening mode has the lowest priority. Therefore, it will always be disabled when another type of communication is enabled.
Attention: It is possible to listen A2DP Stereo music only in "Phone Mode"
How to pair the BTNext to a GPS
In general is possible to pair the BTNext to all the GPS for motorbike that support Bluetooth headset connection.
To pair the BTNext to a GPS, you must first enter the setup mode:
- Turn off the unit
- Press and hold down the "Middle" button about 7 sec., until the Red light is on permanently.
- Now press firmly (3 sec) the "Volume +" or "Volume -" button, the Blue and Red light will flash.
- Enable the Bluetooth device search feature on your GPS
- After some seconds, "Midland BT NEXT" will be displayed on your GPS.
- Follow the pairing procedure of your GPS. If a pin code is requested you must enter "0000" (four times zero).
C-Radio FM mode
| Mode Forward button Middle button Rear button | ||
| FM Radio Short press: seek station up | Short press: On/off | Short press: seek station up |
| Long press: Scan recorded | Long press: Change mode | Long press: Scan recorded |
- When successfully paired, the Blue light of the unit will be on for one second and then the unit will exit the setup mode and switch to the working mode (the Blue light will start flashing).
You can now use your BTNext and the GPS street voice announcement are always in background.
If you pair the GPS to the Volume + button (because for example the "Volume -" button was already used), you loose the possibility to pair the phone to the BTNext unit. You can overcome this limit by pairing the phone directly to the GPS and then the GPS to the BTNext unit. All the phone features are therefore managed by the GPS itself.
How to use a GPS
When paired using the "Volume -" button the GPS will be automatically connected and the voice announcement are always in background also if the intercom is active. When the GPS is paired to the "Volume +" button, the street voice announcement will always interrupt the intercom. In addition, remember to switch to "Phone" mode in order to listen and control the music (play/pause - backward and forward). If the phone is connected thru the GPS you must use the control buttons on the GPS screen in order to control the phone functionality.
How to pair PMR446 transceiver with integrated Bluetooth
If your PMR446 trasceiver has an integrated Bluetooth (like the G8BT), you must pair the trasceiver using the "Volume—" button:
Turn off the unit
Press and hold down the "Middle" button about 7 sec., until the Red light is on permanently.
Now press firmly (3 sec) the "Volume -" button, the Blue and Red light will flash.
Follow now the pairing procedure explained on the manual of the transceiver itself
Attention: If you are pairing to a G8BT transceiver, just when the BTNext finish the pairing (only the Blu LED is flashing) you must follow this procedure to activate the Bluetooth connection:
Turn off and on the G8BT and then press for 3 sec. the "BT" button.
Follow the same procedure every time you need to reconnect the G8BT to the BTNext (no need to make the pairing procedure again)
How to listen to the FM Radio
The FM Radio receiver is integrated inside the unit. You just need to switch to the "FM Radio" mode in order to use it. Long press the middle button until you hear "FM radio" from the voice announcement. Now all the three main button are dedicated to the FM Radio (See Table C).
Press short the Forward or the Backward button to seek the FM Radio station. When you press long the Forward or the Backward button, you can scan up or down the 6 recorded stations. A voice announcement will tell you the number of which memory you are entering. A double beep tone will be played when the last or the first recorded station is reached.
To save the station you are listening, press the Forward and Rear buttons together for 3 sec. You will hear a beep tone for confirmation.
The station is saved over the last recorded station used.
Thanks to the RDS system, the FM Radio will choose the strongest signal available for the radio station you like to listen.
The RDS system is OFF by default, if needed you can toggle on/off the RDS pressing together the "Volume +" and "Volume −" buttons for 3 sec when the radio is on. A voice announcement will tell you the RDS status.
FM Radio with intercom
When you are in "FM Radio" mode is not possible to manually open the intercom, you can only open it using VOX feature (just talk) to the unit paired on the "Middle" button. To manually activate the intercom you must switch to "Intercom" mode.
How to use the wired audio input
Your Midland BTNext is also supplied with a wired audio input (AUX), that can be used to connect an audio source, like an iPod (or any other MP3 Player) or a PMR446 transceiver for group communication or for a coverage increase.
Listening to music
To listen to music from the wired input, connect the audio source using the cable supplied with the BTNext unit. The volume level can be adjusted using the Volume + and Volume - button, or automatically adjusted by the AGC system, which means that you only need to adjust the volume of your iPod/MP3 player to a level that will allow you to listen to music in normal speed.
Attention: never set the volume of the MP3 Player to the maximum possible. Normally the best level is about the 70% of the maximum.
Hint: We recommend that you perform a few tests adjusting the volume of your iPod/MP3 player so at the normal speed the Headset volume is suited to your needs. The AGC system will automatically increase the volume on higher speed. Make a note to remember this setting for future trips.
Enabling/disabling the wired input
If needed the wired input can be enabled or disabled:
Enabling/Disabling: Make a Long press on the "Forward" and "Middle" button (you will hear one audio beep tone for enabling confirmation and two audio beep tone for disabling).
Priority
The BTNext manage the different connection/audio sources based on the following priority rules.
Changing of the operative mode
Every time you change mode (long press of the middle button to toggle between Intercom/ FM Radio / Phone), the previous audio is closed and the control goes to the new mode.
Intercom
The Intercom has always a higher priority against the music from the FM Radio or Phone (including GPS in music play mode). Every time you open the intercom the music from a Bluetooth source is stopped. Only the audio/Music from the "AUX wired connection" is always in background by default.
Phone calls
The phone call has always the higher priority and will interrupt every connection, like music, intercom. Only the AUX wired connection can be still on if the setting "Wired connection always in background" was enabled.
GPS voice announcement
When the GPS is paired to the "Volume +" button,(high priority) the street voice announcement will always interrupt the intercom.
When paired using the "Volume -" button, (lower priority) the voice announcement are always in background also if the intercom is active.
AUX wired connection
Music or audio from the AUX wired connection, by default it is always in the background also when the intercom is open or during a phone call. It is possible to change this beaver following the procedure described in the "Setup and Special configuration" chapter.
Using a PMR446 transceiver with the cable connection
In order to connect the transceiver to your Midland BTNext, you need to purchase the specific 2.5mm plug AUX cable, sold separately. Some manufacturers radios use a different pin configuration, so we recommend that you ask your dealer as to which cable is best suited to your needs
The cable connected to the transceiver normally has also a PTT button that can be placed on the handlebar of your bike or held in your hand (If you are the pillion rider).
To communicate via the attached radio, press the PTT button to speak and release it to listen. It is not possible to talk and listen simultaneously.
Adjust the volume of the transceiver to your needs, remembering that the volume adjustment is controlled by the automatic AGC system and that it will therefore be automatically increased in relation to background noise.
If you wish to use a PMR446 transceiver for group communications and simultaneously maintain the Intercom feature enabled between two or more BTNext devices, you must remember that every time you talk to communicate with the PMR 446 transceiver (pressing the PTT button), you will also activate the intercom of the BTNext to the unit connected to the "Middle" button (thanks to the VOX feature).
To avoid the Intercom activation when you speak on the PMR446, you can decide to pair the BTNext unit on the "Rear" or "Forward" (where the VOX is not active) or if you still want to use the "Middle" button, you must disable the VOX feature, as explained in the previous section.
Setup and special configurations
Resetting all paired devices
Sometimes you may find it necessary to delete all the pairing references stored in the BTNext unit (reset operation).
To perform this operation you must first enter the setup mode:
Turn off the unit
Press and hold down the "Middle" button about 7 sec., until the Red light is on permanently.
Than simultaneously press and hold down the "Volume +" and "Volume -" buttons for 3 seconds. The Blue Light will be lit on for 1 sec and then back to steady RED.
Double click on the "Middle" button to exit the "Setup" mode and use the BTNext.
This procedure deletes all the paired Bluetooth devices stored in the memory and it is therefore possible to start a new "clean" pairing session.
Back to factory setting
Sometimes you may find it necessary to go back to the factory setting, to reset all the changes/setup already made and have a "clean" unit.
To perform this operation you must first enter the setup mode:
Turn off the unit
Press and hold down the "Middle" button about 7 sec., until the Red light is on permanently.
Than simultaneously press and hold down all the three buttons "Forward" - "Middle" - "Rear" for 3 seconds. The Blue Light will be lit on for 1 sec and than back to steady RED.
Double click on the "Middle" button to exit the "Setup" mode and use the BTNext.
Adjusting/ Disabling the VOX feature (Intercom and telephone)
The Intercom feature can be enabled both manually and vocally (VOX). The VOX activation is influenced by the helmet type, the background noise and therefore by the speed.
For optimum results, it is possible to choose one of the following four microphone sensitivity levels: high, medium, low and very low. The default setting of BTNext is "low". It is also possible to disable the VOX feature in order to activate the Intercom and phone call answering features in manual mode only.
Adjusting the sensitivity of the microphone (VOX)
To perform this operation you must first enter the setup mode:
- Turn off the unit
- Press and hold down the "Middle" button about 7 sec., until the Red light is on permanently.
- Your BTNext is now in "Set up mode".
- Press the "Rear" button shortly and the red light changes to a steady blue.
- Now, press "Volume +" or "Volume -" to increase or reduce sensitivity. Every time you press the Volume buttons the RED light will flash for confirmation. When you reach the end of the upper and lower limit, the RED light will not flash.
- Press again the "Backward" button shortly; the Blue light will flash several times, in order to let you know the selected sensitivity:
One flash = VOX disabled
Twice = very low sensitivity
3 times= low sensitivity
4 times= medium sensitivity (default setting)
5 times = high sensitivity
The light indicator is now back to steady RED ("Set up mode") and the changes are confirmed - If needed, you can adjust again the sensitivity repeating the steps from point
1, otherwise exit the Setting mode by double clicking the "Middle" button. Once the red light turns off, the blue led starts blinking. Now you can use your BTNext.
Disabling the VOX feature (Intercom and telephone)
Follow all the procedure described in the previous steps and choose the option of only one flash (VOX disabled).
Attention! If you disable the VOX feature, you will be able to answer incoming phone calls only by pressing the "Forward" button.
Wired connection always in background
This feature let you keep the wired connection always on, even when the phone or the intercom is open. This feature can be useful when you connect a PMR446 transceiver.
By default this option is on.
Disabling:
Enter the "Setup" mode:
Turn off the unit
Press and hold down the "Middle" button about 7 sec., until the Red light is on permanently.
Press the "Forward" and "Middle" button together for 3 seconds. The blue LED will flash three times. twice.
Double click on the "Middle" button to exit the "Setup" mode and use the BTNext.
Enabling: Follow the same procedure up described; now the blue LED will flash once. To exit the "Setup" mode, double click the "Middle" button.
Setup and Firmware update
It is possible to configure and update the firmware of your BTNext using the USB connection to your PC. On the Midland web site www.midlandradio.eu in the BTNext page you can find the PC software and the new firmware updates if available.
ATTENTION DO NOT CONNECT THE UNIT TO THE PC BEFORE you DOWNLOAD AND INSTALL THE SOFTWARE
Use at your own risk
The use of the device will impair your ability to hear other sounds and others around you.
Listening to music or speaking on a telephone may prevent you from hearing others around you and distract you from riding safely. The use of such device while riding may endanger you and others, and its use, in some areas, could not be allowed.
Using this device at a high volume may result in permanent hearing loss.
If you experience ringing in your ear or any other hearing related pain, reduce the volume or discontinue using this device. With continued use at high volume, your ears may become accustomed to the sound level, which may result in permanent damage to your hearing.
Please use this device at a safe volume level.
Warranty
This product is covered by European warranty rulings and should be returned to the place where purchased for repair or replacement if not repairable. In the event it that it is returned to us by your supplier then we will either repair or replace within 15 working days from receipt.
European CE Notice Certification and Safety Approval Information
This product is CE marked according to the RTTE Directive (99/5/EC) and is free use in all the EU countries.
Users are not permitted to make any changes or modifications to the device.
Modifications which are not expressly approved by the producer invalidate the warranty card.
For further information, please go to our website: www.cte.it
FCC Compliance Information
This device complies with Part 15 of the FCC Rules. Operation is subject to the following two conditions: (1) this device may not cause harmful interference, and (2) this device must accept any interference received, including interference that may cause undesired operation.
You are cautioned that changes or modifications not expressly approved by the part responsible for compliance could void the user's authority to operate the equipment.
"This device complies with Industry Canada licence-exempt RSS standard(s). Operation is subject to the following two conditions: (1) this device may not cause interference, and (2) this device must accept any interference, including interference
that may cause undesired operation of the device."
"This equipment complies with Industry Canada radiation exposure limits set forth for an uncontrolled environment."
NOTE: This equipment has been tested and found to comply with the limits for a Class B digital device, pursuant to part 15 of the FCC Rules. These limits are designed to provide reasonable protection against harmful interference in a residential installation. This equipment generates, uses and can radiate radio frequency energy and, if not installed and used in accordance with the instructions,
may cause harmful interference to radio communications. However, there is no guarantee that interference will not occur in a particular installation. If this equipment does cause harmful interference to radio or television reception, which can be determined by turning the equipment off and on, the user is encouraged
to try to correct the interference by one or more of the following measures:
» Reorient or relocate the receiving antenna.
» Increase the separation between the equipment and receiver.
» Connect the equipment into an outlet on a circuit different from that
» to which the receiver is connected.
» Consult the dealer or an experienced radio/TV technician for help.
Inhalt
Hauptmerkmale....30
natural_image
Line drawing of a mechanical component with a handle and mounting holes (no text or symbols)natural_image
Abstract diagram with curved lines and circles, no text or symbols presentnatural_image
Technical line drawing of mechanical components including a base, housing, and clamping tool (no text or symbols)Multi Rider Intercom System
natural_image
Technical line drawing of a mechanical component with a handle and mounting holes (no text or symbols)natural_image
Abstract diagram with curved lines and dots, no text or symbols presentAltavoces estéreo
natural_image
Line drawing of a helmet with a small crown detail (no text or symbols)natural_image
Technical line drawing of a mechanical component assembly (no text or symbols)
Multi pairing communication system
natural_image
Technical line drawing of a mechanical component with a handle and mounting holes (no text or symbols)Description du kit audio
natural_image
Abstract diagram with curved lines and circles, no text or symbols presentnatural_image
Technical line drawings of mechanical components including a motor, gear, and clamping tool (no text or symbols)74 - Midland BT Next
Περιεχόμενα
natural_image
Line drawing of a mechanical device with a handle and mounting holes, showing no text or symbols.natural_image
Abstract diagram with curved lines and circles, no text or symbols presentΜικρόφωνο με boom
natural_image
Technical line drawing of mechanical components including a switch, bracket, and housing (no text or symbols)Carregar as baterias....93
92 - Midland BT Next
Carregar as baterias
natural_image
Line drawing of a mechanical device with a handle and mounting holes, showing no text or symbols.natural_image
Abstract diagram with curved lines and dots, no text or symbols presentFixar os altifalantes estéreo
natural_image
Technical line drawing of mechanical components including a motor, gear assembly, and tool (no text or symbols)Instalar e remover o seu Midland BTNext
Como emparelhar o BTNext à unidade anterior da linha BT
Multi rider intercomsysteem
natural_image
Technical line drawing of a mechanical component with a handle and mounting holes (no text or symbols)natural_image
Abstract diagram with curved lines and circles, no text or symbols presentnatural_image
Line drawing of a helmet with a small circular detail on the side (no text or symbols)natural_image
Technical line drawing of mechanical components and fasteners (no text or symbols)natural_image
Technical line drawing of a mechanical component with an arrow indicating direction (no text or symbols)Audiosarjan seloste
natural_image
Abstract diagram with curved lines and dots, no text or symbols presentnatural_image
Technical line drawing of mechanical components including a plug, valve, and clamping tool (no text or symbols)DECLARATION OF CONFORMITY N° 2013052703 Rev 2
Manufacturer: C.T.E. International S.r.l.
Address: Via Sevardi 7 - ZONA INDUSTRIALE MANCASALE - 42124 REGGIO EMILIA
Products Name: BT NEXT
Product Type: BLUETOOTH HEADSET INTERCOM
Brand : MIDLAND
The product described above is in conformity with the following Specifications based on sample testing:
| Item of 99/05/CE | Standard | Title | Edition or date of 2002 |
| 3.1a | EN 60065 :2002+A1:2006+A11 :2008+A2 :2010+A12 :2011 | Audio, video and similar electronic apparatus - Safety requirements | 2002 |
| 3.1.a | EN 50371 | Generic standard to demonstrate the compliance of low power electronic and electrical apparatus with the basic restrictions related to human exposure to electromagnetic fields (10 MHz - 300 GHz) - General public | 2002 |
| 3.1b | EN 301 489-1 | Electromagnetic compatibility and Radio spectrum Matters (ERM);electroMagnetic compatibility (EMC) standard for radio equipment and services; Part 1: Common technical requirements | V.1.9.2 |
| 3.1b | EN 301 489-17 | Electromagnetic compatibility and Radio spectrum Matters (ERM);Electromagnetic Compatibility (EMC) standard for radio equipment;Part 17: Specific conditions for Broadband Data Transmission Systems | V.2.1.1 |
| 3.2 | EN 300 328 | Electromagnetic compatibility and Radio spectrum Matters (ERM);Wideband transmission systems; Data transmission equipment operating in the 2,4 GHz ISM band and using wide band modulation techniques; Harmonized EN covering essential requirements under article 3.2 of the R&TTE Directive | V1.7.1 |
Supplementary information to the conformity assessment result on which the declaration is based:
Conformity assessment procedures are referred to art. 10(4) linked with Annex III of Directive 1999/5/ec.
The test sample fulfils the requirements specified above, on the basis of test result and their evaluation.
The product herewith complies with the essential requirements of EC Directive 99/05/EC, 2004/108/EC and
following implements and modifications, 2006/95/EC and following implements and modifications, 93/97/EC.
Reference to any marking or other indication (e.g. on the product) is exhibited in attachment to this declaration.
CTE International srl
Quality Assurance Manager
Peterlini Stefano
0246 954
This document is owned by Cte International snl. It is forbidden to reproduce or diffuse it without the authorisation of the Quality
Assurance Manager of CTE International srl.
- All articles displaying this symbol on the body, packaging or instruction manual of same, must not be thrown away into normal disposal bins but brought to specialised waste disposal centres. Here, the various materials will be divided by characteristics and recycles, thus making an important contribution to environmental protection.
Produced or imported by:
CTE INTERNATIONAL s.r.l.
Via. R.Sevardi 7 42124 Mancasale Reggio Emilia Italy
Importado por:
ALAN COMMUNICATIONS, SA

- Sommario
- Multi rider intercom system
- Altoparlanti stereo
- Inserimento e sgancio del Midland BTNext
- MIDLAND BTNEXT
- Main features
- Midland BTNext is available in two versions:
- Depending on the model purchased, the package contains the following parts:
- BTNext single
- BTNext Twin
- Technical specifications of Midland BTNext
- General:
- Bluetooth connections:
- Bluetooth devices:
- Wire connections:
- Charging batteries
- Unit and fixing system description
- BT Next description
- Description of the wired connections
- Description of the audio kit
- Fixing the stereo speakers
- Boom Microphone
- Wired microphone
- Audio kit jack
- Description of the installation brackets
- Plate with bi-adhesive strip
- Screw Clamp
- Fitting and removing your Midland BTNext
- Switching your Midland BTNext on and off
- Switching the unit on:
- Switching the unit off:
- Operative "mode"
- Maximum Distance
- How to pair two BT Next unit
- To pair the BTNext to another BTNext unit
- How to use the Intercom with two units
- Manual activation
- Voice activation (VOX)
- Adjusting the volume
- How to pair the BTNext to more than two units
- Pair the BTNext to another BTNext unit
- How to use the Intercom with more than two units
- Unit already busy
- Talk 2 All - Pairing to a different brand intercom.
- How to pair the BTNext to previous BT line unit
- Pairing the BTNext to Bluetooth devices
- Pairing to a phone
- Pairing to a GPS navigator
- GPS Navigator with stereo music player
- Pairing to a PMR446 radio with integrated or external Bluetooth
- How to pair the BTNext to a Phone
- How to use a Phone
- Answering a call
- Rejecting a call
- Making a call
- Ending a call
- Using the MP3 player feature of the mobile phone
- Available controls:
- How to pair the BTNext to a GPS
- How to use a GPS
- How to pair PMR446 transceiver with integrated Bluetooth
- How to listen to the FM Radio
- FM Radio with intercom
- How to use the wired audio input
- Listening to music
- Enabling/disabling the wired input
- Priority
- Changing of the operative mode
- Intercom
- Phone calls
- GPS voice announcement
- AUX wired connection
- Using a PMR446 transceiver with the cable connection
- Setup and special configurations
- Resetting all paired devices
- Back to factory setting
- Adjusting/ Disabling the VOX feature (Intercom and telephone)
- Adjusting the sensitivity of the microphone (VOX)
- Disabling the VOX feature (Intercom and telephone)
- Wired connection always in background
- Setup and Firmware update
- Use at your own risk
- Warranty
- European CE Notice Certification and Safety Approval Information
- FCC Compliance Information
- Inhalt
- Altavoces estéreo
- Multi pairing communication system
- Description du kit audio
- Περιεχόμενα
- Μικρόφωνο με boom
- - Midland BT Next
- Carregar as baterias
- Fixar os altifalantes estéreo
- Instalar e remover o seu Midland BTNext
- Como emparelhar o BTNext à unidade anterior da linha BT
- Multi rider intercomsysteem
- Audiosarjan seloste
Brand : MIDLAND
Model : BT Next 2.0
Category : Walkie-talkie