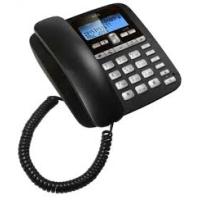
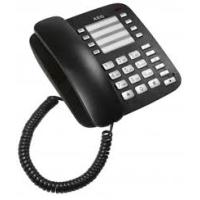
C115 - Phone AEG-ELECTROLUX - Free user manual and instructions
Find the device manual for free C115 AEG-ELECTROLUX in PDF.


| Product type | Corded telephone with answering machine and caller ID |
| Brand | AEG-ELECTROLUX |
| Model | C115 |
| Base power supply | Input 100-240 V AC, 50/60 Hz, 150 mA; Output 7 V DC, 420 mA |
| Directory | 120 names and numbers (max. 15 characters for name, 24 digits for number) |
| Incoming call list | 99 entries with date and time |
| Outgoing call list | 50 entries with duration |
| Answering machine recording capacity | Up to 40 minutes or 59 messages (depending on compression) |
| Announcements | 2 pre-recorded greeting messages (OGM1 and OGM2), possibility to record your own |
| Memo | Record memos directly on the base |
| Remote access | Yes, with 3-digit personal code (default 321) |
| Telephone functions | Hands-free, mute, redial, recall (flash), pre-dial |
| Direct memories | 3 keys M1, M2, M3 for speed dial numbers |
| Display | Backlit LCD screen with icons |
| Operating temperature | 0 °C to 40 °C |
| Warranty | 24 months |
| Cleaning | Damp cloth, no solvents |
Frequently Asked Questions - C115 AEG-ELECTROLUX
User questions about C115 AEG-ELECTROLUX
0 question about this device. Answer the ones you know or ask your own.
Ask a new question about this device
Download the instructions for your Phone in PDF format for free! Find your manual C115 - AEG-ELECTROLUX and take your electronic device back in hand. On this page are published all the documents necessary for the use of your device. C115 by AEG-ELECTROLUX.
USER MANUAL C115 AEG-ELECTROLUX
Thank you for purchasing this product. This product has been designed and assembled with utmost care for you and the environment. This is why we supply this product with a quick installation guide to reduce the number of paper (pages) and therefor save trees to be cut for making this paper. A full and detailed user guide with all the features descripted can be found on our website www.aegtelephones.eu . Please download the full user guide in case you want to make use of all the advanced features of your product. To save the environment we ask you not to print this full user guide. Thank you for supporting us to protect our environment.
2 IMPORTANT SAFETY INSTRUCTIONS
When using your telephone, basic safety precautions should always be followed to reduce the risk of fire, electric shock and injury, including the following:
- Read and understand all the instructions.
- Follow all warnings and instructions marked on the product.
- Unplug the power adapter from the wall outlet before cleaning. Do not use liquid cleaners or aerosol cleaners. Use a damp cloth for cleaning.
- Keep your phone away from hot, humid conditions or strong sunlight, and don’t let it get wet or use this product near water (for example, near a bath tub , kitchen sink, swimming pool).
- Do not overload wall outlets and extension cords as this can result in the risk of fire or electric shock.
-
Unplug this product from the wall outlet under the following conditions:
-
When the power supply cord or plug is damaged or frayed.
- If the product does not operate normally by following the operating instructions.
- If the product has been dropped and the cabinet has been damaged.
-
If the product exhibits a distinct change in performance.
-
NEVER use your phone outdoors during a thunderstorm-unplug the base from the telephone line and the mains socket when there are storms in your area. Damage caused by lightning is not covered by the guarantee.
- Do not use the telephone to report a gas leak in the vicinity of the leak.
- Use only the supplied NiMH (Nickel Metal Hydride) batteries!
- The use of other battery types or non-rechargeable batteries/primary cells can be dangerous. These may cause interference and/or damage to the unit or surroundings. The manufacturer will not be held liable for damage arising from such non-compliance.
- Do not use third party charging bays. Damage may be caused to the batteries.
- Please ensure the batteries are inserted in the correct polarity.
- Dispose of batteries safely. Do not immerse them in water, burn them, or put them where they could get punctured.
3 INTENDED USE
This telephone is intended to be connected to a public analogue telephone network or to an analogue extension of an approved compatible PBX system.
4 UNPACKING YOUR PHONE
In the box you will find:
- 1 Base unit
1 Handset - 1 Coiled handset cord
- 1 Mains power adaptor for the base station
- 1 Telephone line cord for the base station
- 1 User manual
Keep the packing materials in a safe place in case you later need to transport the device.
5 GETTING TO KNOW YOUR PHONE
5.1 Base station (see P1)
| # | Meaning | |
| 1 | □ | Ringer light ·This flashes when the phone is ringing for an incoming call. |
| 2 | △△△ | Volume+, volume- (up / down) buttons ·During speakerphone or TAM operation, press to adjust the volume. ·In lists, press to step through options |
| 3 | ◎ | Message light ·Turns on when the TAM is on. ·Flashes when you have new TAM messages. |
| 4 | 0/□ | On/off button ·During recording or playback, press to stop. ·In standby, press and hold to switch the answering machine on or off. ·When the TAM is on press to select OGM1 or OGM2. |
| 5 | × | Delete button ·Press to delete individual messages, memos, stored numbers or caller display records. |
| 6 | ⊗ | Mute button ·During a call, press to mute the microphone or mouthpiece. |
| 7 | ▷ MEMO | Memo button ·In standby, press and hold to record a memo. ·During message playback, press to skip to the next message. |
| 8 | R | Recall / exit button ·You may need the recall function if your phone is connected to a PBX, or if you use BT calling features ·When in menus or pre-dialling, press to exit from the function. |
| 9 | ◎ | Redial / pause button ·In standby, press to access the radial list. ·During dialling, press to insert a pause. |
| 10 | ◎ | Speakerphone light ·Turns on when the speakerphone is on. |
| 11 | Speakerphone button • Press to make, answer, or end a call using the speakerphone. | |
| 12 | Microphone • For speakerphone use and answering machine OGM and memo recording. | |
| 13 | ▷ || | Play / pause button • Press to play back messages and memos. • Press to pause playing of a memo or message. |
| 14 | Phonebook button • Press to access the phonebook records. | |
| 15 | ▲ ▲ | OGM button • In standby, press to play your current OGM, or press and hold to record a new outgoing message. • During playback, press once to repeat the current message or press twice to skip back to the previous message. |
| 16 | OK/国 | OK / menu button • In standby, press to enter the options menu to set the date, time and other phone/TAM settings. • When setting options, press to confirm a choice. |
| 17 | ▲ | Caller display button • In standby, press to access the caller display records. |
| 18 | ▲ ▲ | Ringer hi/low switch |
| 19 | 7VDC ●●+ | Power cable jack |
| 20 | Phone line jack |
5.2 Display icons and symbols (see P2)
| Meaning | |
| P | Phone You are connected to the telephone line - your handset is off hook. |
| 88:88 | Time Displays the time. |
| 88/88 | Date/month Displays the date and month. |
| CALL | Caller display record Shows the position in the caller display list of the caller display record being received or viewed. |
| NEW | New Appears when viewing new caller display records. |
| ○○ | Message Appears when viewing a caller display entry where an answering machine message was recorded. |
| ⊗ | Mute Flashes when you press the mute button to mute the mouthpiece or microphone. |
| Speakerphone Appears when the speakerphone function is turned on. | |
| XX MESSAGES YY CALLS | Indicates the total number of answering machine messages recorded (XX from 00 to 59) and the total number of caller display records saved (YY from 00 to 99) |
| XX NEW YY NEW | Flashing alternately with the screen above, indicates the number of new answering machine messages recorded and the number of new caller display records received. |
6 INSTALLATION
- Locating the base unit (see P2 and P3).
The base unit should be placed on a level surface, in a position where:
- The mains adapter plug will reach an easily accessible 230-V AC switched mains supply socket - never try to lengthen the mains power cable.
- The telephone line cable will reach your telephone line socket or extension socket.
- It is not close to a sink, bath or shower, or anywhere else where it might get wet.
-
It is not close to other electrical equipment - fridges, washing machines, microwave ovens, TVs, fluorescent lights, etc.
-
Plug the coiled handset cord into the handset. Plug the other end into the socket on the side of the base unit.
- Place the handset on the base unit.
- Plug the telephone line cord into the phone line socket at the back of the base unit. Plug the other end into your telephone line socket or extension socket.
- Plug the power supply cord into the power jack at the back of the base unit. Plug the other end into a 230 V AC, 50 Hz mains socket, with the switch on the socket set to off.
- Switch on the mains power at the socket. Wait while the display shows “INITIALISATION”, then the announcement “Answering machine on. Announcement one.” before the display changes to the standby screen.
- Lift the handset and check for dial tone in the earpiece.
Note:
- The base unit doesn't require a battery.
- Always use the telephone line cord supplied with your phone. Other telephone line cords may not work.
7 WALL MOUNT INSTALLATION
To place the Voxtel C110 on a wall, connect the wall mount bracket to the bottom of the phone in the slots near the front of the base as shown below
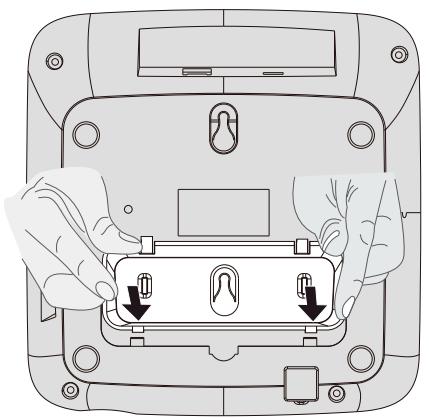
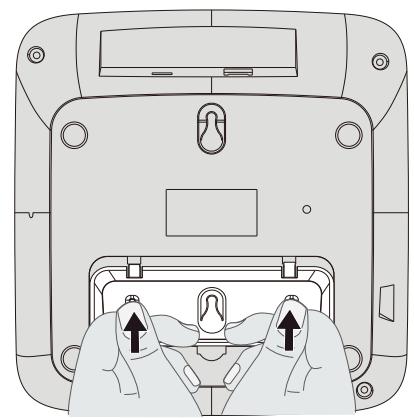
Insert the rigid clips of the bracket into the slots on the bottom of the phone (nearer the front of the base). Press down firmly until the flexible clips click into place in the slots nearer the centre of the base. To remove the bracket, (1) pinch the flexible clips, (2) back the bracket, and then (3) slide up and forward as shown below.
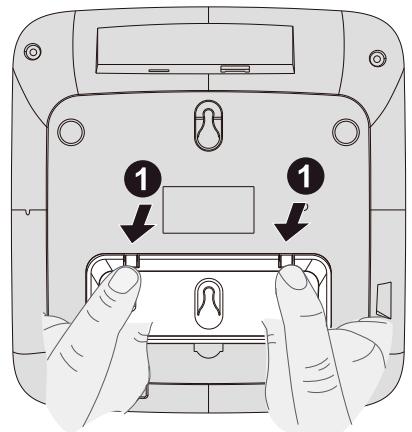
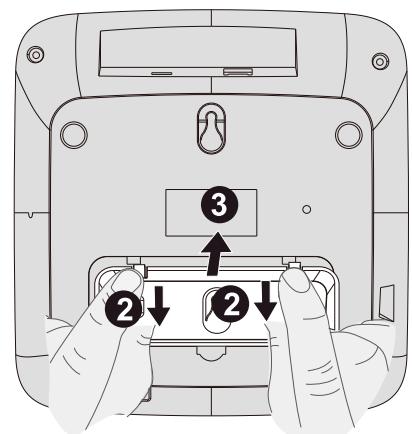
Mark two points on the wall that are 80 ~mm apart to lay the fixing centres as shown below.
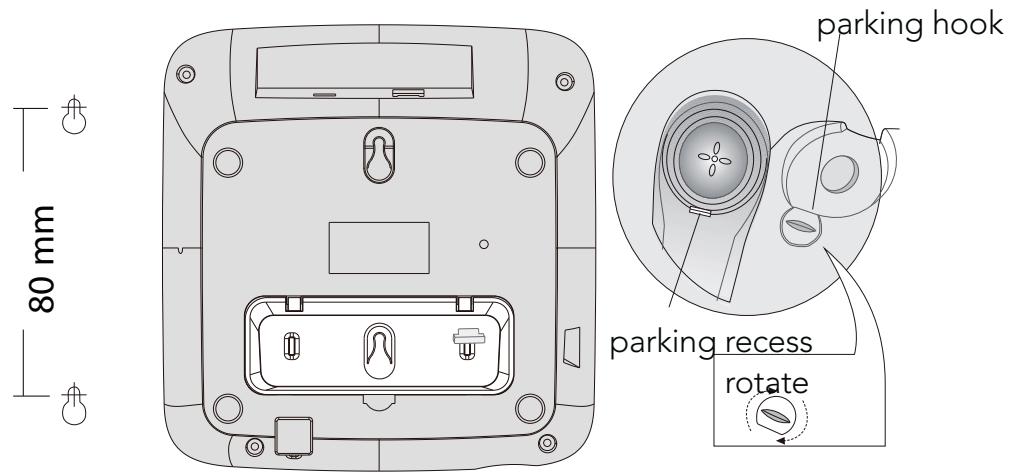
BE CAREFUL to check that there are no pipes or electrical wires hidden in the wall.
Fix two screws (7 mm head screws required, not supplied) at the marked locations, leaving approximately 7 mm between the wall and the screw head.
Hang the telephone on the screws using the wall mount slots. You may need adjust the screws so that the telephone is securely fixed and does not wobble.
Place the handset on the cradle with the parking hook on the cradle arranged to fit in the parking recess under the earpiece on the handset.
8 SETTING UP YOUR TELEPHONE
Note:
The system will time out if you leave more than 10 seconds between key presses.
8.1 Set language
With the phone in standby mode;
- Press the menu button.
The display shows "OPTIONS MENU".
- Press the up button to go to the language setting.
The display shows "SET LANGUAGE"
- Press the OK button OK to confirm.
- Press the up or down button to select "ENGLISH" (default), "FRANCAIS" or "DEUTSCH".
- Press the OK button OK to confirm.
- Continue with programming, or press the stop button ① / to return to standby mode.
8.2 Set time / date
Note:
If you subscribe to the caller display service the time and date will be set automatically, but the year may still need to be adjusted to ensure the answering machine time stamp gives the correct day.
- Press the menu button.
The display shows "OPTIONS MENU".
- Press the up or down button until de display shows "SET TIME/DATE".
- Press the OK button OK to confirm.
The "year" will be blinking.
- Press the up or down button to set the year.
- Press the OK button OK to confirm.
The "month" will be blinking.
- Press the up or down button to set the month.
- Press the OK button OK to confirm.
The "date" will be blinking.
- Press the up or down button to set the date.
- Press the OK button OK to confirm.
The "hour" will be blinking.
- Press the up or down button to set the hour.
When setting the 'hour it is in 24 hour mode only.
- Press the OK button OK to confirm.
The "minutes" will be blinking.
- Press the up or down button to set the minutes.
- Press the OK button OK to confirm time and date setting.
- Continue with programming, or press the stop button 1 / to return to standby mode.
8.3 Set flash time
You may need the recall function if your phone is connected to a PBX or if you use BT calling features. Flash is another name for the recall button R and the normal UK requirement is for 100 ms, but some PBX may need a longer time, in which case you can change the setting from the options menu.
- Press the menu button.
The display shows "OPTIONS MENU".
- Press the up or down button until de display shows "SET FLASH TIME".
- Press the OK button OK to confirm.
-
Press the up or down button to select "100MS" (default), "300MS", "600MS" or "1000MS".
-
Press the OK button OK to confirm.
- Continue with programming, or press the stop button ① / to return to standby mode.
8.4 LCD contrast
- Press the menu button.
The display shows "OPTIONS MENU".
- Press the up or down button until de display shows "LCD CONTRAST".
- Press the OK button OK to confirm.
- Press the up or down button to select your comfortable display viewing level (1-5). The default setting is 3.
- Press the OK button OK to confirm.
- Continue with programming, or press the stop button 0 / to return to standby mode.
8.5 Message length
To set the maximum recording time for each incoming message or memo message on the answering machine.
- Press the menu button.
The display shows "OPTIONS MENU".
- Press the up or down button until de display shows "MESSAGE LENGTH".
- Press the OK button OK to confirm.
- Press the up or down button to select 1 or 2 minutes.
The default setting is 2 minutes.
- Press the OK button OK to confirm.
- Continue with programming, or press the stop button ① / to return to standby mode.
8.6 Rings to answer
To set the number of rings before the machine answers a call.
- Press the menu button.
The display shows "OPTIONS MENU".
- Press the up or down button until de display shows "RINGS TO ANSWER".
- Press the OK button OK to confirm.
- Press the up or down button to select "TOLL Saver", "2", "3", "4", "5", "6", "7", "8" or "9" rings.
The default setting is 5.
Use "TOLL Saver" when checking your Voxtel C115 for messages from a remote location using a long distance service or from a pay phone. The answering machine responds after the 2nd ring only if you have a new message recorded. If there are no new messages, the phone will answer after the 4th ring. You can then hang up after the 3rd ring to avoid paying for the call.
- Press the OK button OK to confirm.
- Continue with programming, or press the stop button ① / to return to standby mode.
8.7 Remote access
The remote access requires a three-digit code that you need to enter if you call when away from home to check your messages. The default is "321". You can change it to any three digits you want.
- Press the menu button.
The display shows "OPTIONS MENU".
- Press the up or down button until de display shows "REMOTE ACCESS".
- Press the OK button OK to confirm.
The current three-digit code is shown, with the first digit blinking.
- Press the up or down button to set the first digit of the remote access code.
- Press the OK button OK to confirm.
The second digit of the code will be blinking.
-
Press the up or down button to set the second digit of the remote access code.
-
Press the OK button OK to confirm.
The third digit of the code will be blinking.
- Press the up or down button to set the third digit of the remote access code.
- Press the OK button OK to confirm the new remote access code setting.
- he stop button ① / to return to standby mode.
8.8 TAM HD on/off setting
Two different compression rates (on and off) are provided for you to select the recording quality / total recording time of incoming messages. With the compression rate set to on the recording quality will be higher, but it will only save up to about 20 minutes of messages. With the compression rate set to off the recording quality will be lower, but it will save up to about 40 minutes of messages.
- Press the menu button.
The display shows "OPTIONS MENU".
- Press the up or down button until de display shows "TAM HD: ON" (or "TAM HD: OFF").
- Press the OK button OK to confirm.
The "ON" (or "OFF") will be blinking.
- Press the up or down button to select "ON" or "OFF".
- Press the OK button OK to confirm the TAM HD setting.
The ringer high / low switch located at the back of the base unit, allows you to adjust the volume of the ringer.

High volume

Low volume
9.2 To make a call
- Lift the handset or press the speakerphone button on the base unit.
Check for dial tone.
- Dial the telephone number.
The display shows the duration of the call in minutes and seconds.
OR Using pre-dialling:
- Dial the telephone number.
If you make a mistake you can correct it by using the delete button × to delete digits and then adding the right ones.
- Lift the handset or press the speakerphone button on the base unit to dial out the number.
9.3 To answer a call
- When the phone rings, lift the handset or press the speakerphone button on the base unit.
The display shows the duration of the call in minutes and seconds.
9.4 To adjust the speakerphone volume
- During a call, adjust the volume of the speakerphone to your comfortable volume level using the volume buttons located on the top of the base unit.
The display shows the volume level from 1 to 6 in the lower left corner of the LCD screen.
9.5 To end a call
Replace the handset on the base unit cradle or press the speakerphone button on the base unit.
9.6 To switch between the handset and the speakerphone
- During a phone conversation through the handset press the speakerphone button to speak hands-free.
The Speakerphone icon on the display and the speakerphone light next to the button will turn on, but conversation remains through the handset until the handset is replaced on the base unit cradle. While in speakerphone mode, lift the handset to enable a private conversation.
9.7 To mute the mouthpiece or microphone
During a call, you can mute the microphone or the mouthpiece so that the person on the other end cannot hear you.
- Press the mute button.
While the microphone is muted, "MUTE" will flash in the lower right corner of the display, and the mute icon will also flash.
- Press the mute button again to get back to the call.
9.8 LCD screen backlight
The display backlight will turn on for 15 seconds every time any button is pressed or when ringing is received.
10 ONE TOUCH MEMORY
10.1 Store (M1, M2, M3) memory
- In standby mode, key in the telephone number you wish to store, up to a maximum of 24 digits.
- Press the menu button.
The display shows "ENTER LOCATION".
- Press the M1, M2, or M3 button to store the number in the selected memory.
10.2 Dial out stored number memory
- Press the M1, M2, or M3 button.
The programmed memory number will be displayed.
- Lift the handset or press the speakerphone button.
The phone automatically redials the number using handset or speakerphone mode selected.
11.1 Last number redial
- Lift the handset or press the speakerphone button.
- Press the radial button
The phone automatically redials the last number you called.
Note:
- This will not work straight after a mains power disconnection, but „Making a call from the outgoing call record“ below will still be ok.
- Dialled numbers are only saved in the last number radial memory if the number has started dialling out.
11.2 Viewing the outgoing call records
- The telephone remembers the last 50 outgoing calls.
- In standby mode, press the redial button
The most recent outgoing call record will be displayed with both the number and the call duration shown.
- Press the up or down button to view the other records.
11.3 Making a call from the outgoing call record
- In standby mode, press the redial button
- Press the up or down button to find the record you wish to call.
When the number is displayed,
- Either lift the handset or press the speakerphone button.
- The phone automatically redials the number using handset or speakerphone mode selected.
11.4 Deleting an outgoing call record
- In standby mode, press the redial button
- Press the up or down button to find the record you wish to delete.
- When the record is displayed, press the delete button X . >The display prompts "DELETE CALL"?
- Press the OK button OK to confirm.
The display shows the next record.
11.5 Storing an outgoing call record into the phonebook memory
- When viewing the outgoing call records, press the up or down button to find the record you wish to store.
- When the record is displayed, press the phonebook button.
The display shows the cursor blinking on the first digit of the number.
- To modify the number, press the up or down button to move the cursor to the number you want to change, then input the new one or press the delete button × to delete.
- Press the OK button OK to confirm.
- Input the name. See "12.2 To add a new record into the phonebook" for entering letters.
To modify an existing name, press the up or down button to move the cursor to the character you want to change then input the new one or press the delete button × to delete.
- Press the OK button OK again to save the record into the phonebook memory.
12 PHONEBOOK
The phonebook can store up to 120 names (max. of 15 characters) and telephone numbers (max. of 24 digits) in the memory.
12.1 To view the phonebook records
- Make sure the handset is idle (not connected to a call).
- Press the phonebook button.
The display shows "SEARCH ADD", with the "SEARCH" option blinking.
- Press the OK button OK to confirm.
If the phonebook memory is empty, the phone will automatically return to the standby display.
Otherwise, the first alphanumeric phonebook entry will be shown.
- Press the "NUMERIC" key (2/ABC~9/WXYZ) button that corresponds to the first letter of a name and the search will jump to the first entry in the phonebook beginning with that letter.
- Press the up or down button to scroll through the other records.
- Press the stop button ① / repeatedly to return to standby mode or wait until the program times out.
12.2 To add a new record into the phonebook
- Press the phonebook button
The display shows "SEARCH ADD", with the "SEARCH" option blinking.
- Press the up or down button to select "ADD".
- Press the OK button OK to confirm.
The display shows the cursor blinking on the number field.
- Input the telephone number, up to a maximum of 24 digits.
- Press the OK button OK to confirm.
The display shows the cursor blinking on the name field.
- Input the name, up to a maximum of 15 characters using keypad buttons 2/ABC to 9/WXYZ, and 1 or 0 for punctuation or spaces.
- Press the OK button OK to confirm.
- Press the stop button ① / repeatedly to return to standby mode or wait until the program times out.
12.3 To make a call from the phonebook
- When viewing the phonebook records, press the up or down button to find the record you wish to call.
- Lift the handset or press the speakerphone button.
The phone automatically dials the displayed record using the handset or speakerphone mode selected.
12.4 To edit a stored number and/or name
When viewing the phonebook records, press the up or down button to find the record you wish to edit.
When the record is displayed, press the phonebook button.
The display shows the cursor blinking on the first digit of the telephone number.
Press the up or down button to move the cursor to the digit you wish to change then input the new one or press the delete button × to delete.
The caller display feature of this product requires a subscription to the caller display service from your telephone company. If you subscribe to the caller display service you can see the phone number of the person calling you before you answer, and in the calls list afterwards. The caller display information includes:
- The caller's number (max. 24 digits).
- The date and time of the call.
- The caller's name (max. of 15 characters) if the received number matches one in your phonebook. It will also show the name if the network sends it.
"WITHHELD" will be displayed if the call is from someone who has withheld their number.
"UNAVAILABLE" will be displayed if the number of the caller is unavailable, for example from an international call.
Withheld and Unavailable calls are saved in the calls list and show as missed calls.
13.1 Caller display list
This phone automatically stores the last 99 calls received. The calls list is saved even if the mains power is removed, but new caller information will not be displayed or saved unless the mains power is on. When the caller display list is full, the new caller display entry will replace the oldest record.
"NEW/CALLS" will alternate on the display to show that you have a new caller display call stored in memory. The alternating "NEW" display will only stop after all new caller display records have been viewed.
13.2 Viewing the caller display list
- With the phone in standby mode, press the caller display button.
The display shows the most recent record. If there are no caller display records, the display will show "NO CALLS".
The message icon will be on if the caller has recorded a message on the answering machine. - Press the up or down button to scroll to the next caller display record.
The display shows "END OF LIST" upon reaching the end of the first and last record
- Press the stop button ① / to return to standby mode or wait until the program times out.
13.3 To return a call from the caller's list
- When the caller display record is displayed, lift the handset or press the speakerphone button
The phone automatically dials the displayed record, using the handset or speakerphone mode selected.
13.4 Storing an incoming call record into the phonebook memory
- When viewing the caller display records, press the up or down button to find the record you wish to store.
- When the record is displayed, press the phonebook button
The display shows the cursor blinking on the first digit of the number.
To modify the number, press the up or down button to move the cursor to the number you want to change, then input the new one or press the delete button × to delete.
- Press the OK button OK to confirm.
- Input the name. See „12.2 To add a new record into the phonebook" for entering letters.
To modify an existing name, press the up or down button to move the cursor to the character you want to change then input the new one or press the delete button × to delete.
- Press the OK button OK again to save the caller display record into the phonebook memory.
13.5 To delete a caller display record
- When the caller display record is displayed, press the delete button X.
The display prompts "DELETE CALL?"
- Press the OK button OK to confirm.
- Press the stop button ① / to return to the standby mode.
13.6 To delete all caller display records
- When the caller display record is displayed, press and hold the delete button X.
The display prompts "DEL ALL CALLS?"
- Press the OK button OK to confirm.
The display automatically returns to standby mode.
- OR press the stop button ① / to cancel and return to the standby mode.
14 ANSWERING MACHINE SYSTEM
An OGM is the announcement callers will hear when the machine answers a call. The Voxtel C115 has two pre-recorded announcements available if you choose not to record your own OGMs.
- OGM1 - this invites callers to leave a message after the tone. The default is "Please leave your message after the beep".
- OGM2 - this informs callers to call later and does not give them the opportunity to leave a message. The default is "Please call later".
The machine has enough memory to record up to about 40 minutes of messages (including OGMs, incoming messages and Memos), up to a maximum of 59 messages. When there is no further memory available to record, it will answer after 15 rings and the machine will announce, "Memory full, please call later." The display shows "MEMORY FULL" alternating with "XX MESSAGES" and "XX NEW".
Note:
- You will need to delete some messages before the answering machine can record any further messages.
When the answering machine is turned on the message light will be on, or flashing if there are new messages, and the display will show "ANSWER A1" or "ANSWER 2", depending on whether announcement 1 or announcement 2 is selected, alternating with the calls status.
Note:
- If you want callers to be able to leave messages it must show "ANSWER A1".
14.1 To play the current OGM
- Make sure the machine is switched on.
- Press the OGM button
The display shows "PLAY OGM", and plays the current announcement.
14.2 To record OGM 1
- Make sure the answering machine is turned on.
Note:
Each OGM must be at least 3 seconds and no more than 1 minute long.
- Press the stop button ① / briefly until you hear "Announcement 1".
- Press and hold the OGM button until you hear a beep.
The display shows "OGM RECORDING" and the message counter starts to count.
- Start recording your OGM1. Speak directly into the base unit's microphone from a distance of about 15 cm (6 inches).
- When you finish speaking, press the stop button 0 / to stop recording.
The display shows "PLAY OGM", and your recorded message will be played back for your approval.
14.3 To record OGM 2
After setting the OGM1, briefly press the stop button ① / again. You will hear "Announcement 2."
- Press and hold the OGM button until you hear a beep.
The display shows "OGM RECORDING" and the message counter starts to count.
- Start recording your OGM2. Speak directly into the base unit's microphone from a distance of about 15 cm (6 inches).
- When you finish speaking, press the stop button 0 / to stop recording.
The display shows "PLAY OGM", and your recorded message will be played back for your approval.
Note:
The machine does not record messages with announcement 2 selected, make sure announcement 1 is selected if you want callers to leave messages.
14.4 To switch between OGMs
- Press and release the stop button ① / to switch between OGM1 and OGM2.
The machine does not record messages with OGM2 (announcement 2) selected; make sure OGM1 is selected if you want callers to leave messages.
14.5 To turn the answering machine on / off
- Press and hold the on/off button ① / to turn on the answering system.
"You will hear," Answering machine on. Announcement one."
The display shows "ANSWER A1" alternately with the calls information, and the message light will turn on.
- Press and hold the on/off button ① / again to turn off the answering system.
"You will hear," Answering machine off.
The display shows "ANSWER OFF" alternately with the calls information, and the message light will turn off.
Note:
- Once turned off, you can still call the machine and it will answer after 15 rings, so you can enter remote access mode, if required.
14.6 To record a memo
You can record a memo directly into the machine. The length of the memo message recording depends on the message length setting (see “8.5 Message length”). The memo message will be played back together with any messages from callers.
- With the handset on hook, press and hold the memo button MEMO until you hear a beep.
The display shows "MEMO RECORDING" and the message counter starts to count.
- Start recording your memo. Speak directly into the Base unit's Microphone from a distance of about 15 cm (6 inches).
- To end your memo recording, press the stop button ① / to stop recording.
The day and time are automatically added at the end of the message, when played back.
14.7 To playback your message/s
If you have messages or memos, the display shows the total number of messages "XX MESSAGES". If you have new messages or memos, the display shows "XX NEW" and it will be shown alternately with the total messages and the message light flashes.
14.8 Playback and pause
- Press the play/pause button II.
The machine will play all new messages/memos.
While a message is being played, the display shows the caller display information (if subscribed), "PLAYMESSAGE" for received messages or "PLAY MEMO" for recorded memos.
If there are no messages/memos present, you will hear "You have no messages".
-
To pause a message playback, press the play/pause button II again.
-
Press the play/pause button again to restart message playback, otherwise it will restart automatically after a 30-second pause.
While playback is paused, "PAUSE" flashes on the screen.
- After playing all new messages they will be saved as old messages and to hear these or other old messages, press the play/pause button II again.
The system will play all of its messages/memos.
14.9 Repeat/rewind
- To repeat the current message from the beginning, press the OGM button.
- To replay the previous message, press the OGM button twice.
14.10 Skip/fast forward
- To skip to the next message, press the memo button MEMO.
14.11 Stop playback
- To stop the message playback, press the stop button ① / .
14.12 Volume Control
- Use the volume buttons to adjust the volume of the loudspeaker during playback, from the 6 levels available.
The display shows the volume level setting on the screen when it is being adjusted.
14.13 To intercept a call
- If you hear the answering machine recording a message, you can intercept the call and speak to the caller, either by lifting the handset, or pressing the speakerphone button on the answering machine, or by answering the call with another phone connected to the same line.
- After intercepting a call any recording up to the intercept will be saved as a new message.
If you intercept a call within 3 seconds of its start, you may sometimes need to press the stop button ① / to stop recording.
14.14 To delete a recorded message
- During message playback, press the delete button X.
The display prompts "DELETE?"
- Press the OK button OK to confirm.
After the erasure is complete, the numeric order of the remaining messages will be rearranged.
14.15 To delete all old messages
- After playing back all of your messages, press and hold the delete button X.
The display prompts "DELETE ALL?"
- Press the OK button OK to confirm.
The display shows "DELETE ..." and after a short delay you will hear "All messages erased".
The machine will not delete any new messages that have not been played.
The display automatically returns to standby mode.
14.16 To go back to the default OGM
If you no longer want callers to hear the OGM's that you have recorded, you can delete them and revert to the pre-recorded defaults as follows:
- Make sure the machine is switched on.
If necessary, press and release the stop button ① / to switch to the OGM you want to delete.
- Press the OGM button to play the current announcement.
- While the announcement is playing, press the delete button × followed by the OK button OK.
The display automatically returns to standby mode.
- Press the OGM button to play the pre-recorded OGM for confirmation.
15 REMOTE OPERATION
Your Voxtel C115 lets you check your messages, or otherwise operate your answering machine, by calling the answering machine when you are away from home. To protect your privacy, access is only possible if you enter the three-digit remote access code. The base will display "REMOTE" while the Voxtel C115 is being accessed remotely.
15.1 To check remote access code
- In standby mode, press the OK/MENU button.
- Press the up or down button until the display shows "REMOTE ACCESS".
- Press the OK button OK to display your code setting.
The default code is "321".
- Press the stop button ① / to return to standby mode.
See „8.7 Remote access" for how to change your code.
15.2 To check your messages from a remote location
- Using a tone dialling phone, dial your home phone number.
- Press during the OGM to stop it playing, or wait until the OGM finishes.
- Enter your remote access code.
If the code is accepted, a list of options will be heard.
If the code is not recognised you will hear no feedback, and you will need to enter it again. Please note that if the code is entered incorrectly three times consecutively, the call will be terminated automatically.
- Press 2 to playback your messages.
For other instructions, see next section.
Notes:
- During remote operation and when messages are not being played, you must press a key within 10 seconds, otherwise the machine will cut off your call.
- During remote operation, the playback is paused automatically after about 3 minutes, and to continue the 2 key must be pressed within 10 seconds, or the machine will cut off your call.
15.3 Using the remote instruction codes
When you first enter remote access mode, and after each remote action, you will hear a list of options. The available remote instruction codes are:
- Press 2 to start playing new recorded messages, or if there are no new messages to start playing old messages.
After playing back new messages, press 2 again to play all recorded messages.
To pause and restart during message playback, press 2. Playback can be paused for up to 30 seconds, but after that the playback automatically restarts.
- Press 1 to repeat the current message.
- Press 1 twice to skip back to the previous message.
- Press 3 to skip forward to the next message.
- Press 4 to play the current announcement.
- Press 5 to record a new announcement.
- Press 6 to stop a recording or playback.
- Press 7 to delete the current message.
- Press 8 to turn the answering machine off.
- Press 9 to turn the answering machine on.
When the answering machine is on, press 9 to switch between OGM1 and OGM2,
- Press 0 twice quickly to delete all old messages.
There could be a delay while the delete is being done, before you hear a beep and the menu list again.
- Press # to disconnect the call.
15.4 Switching on from a remote location
If the answering machine is switched off, it will answer your call after 15 rings allowing you to switch the machine on from a remote location.
- Using a tone dialling phone, dial your home phone number.
- When you hear the outgoing message, key in a , followed by your remote access code.
- Press keypad 9 to switch on.
16 GUARANTEE AND SERVICE
The phone is guaranteed for 24 months from the date of purchase shown on your sales receipt. This guarantee does not cover any faults or defects caused by accidents, misuse, fair wear and tear, neglect, faults on the telephone line, lightning, tampering with the equipment, or any attempt at adjustment or repair other than through approved agents.
Please keep your sales (till) receipt this is your proof of guarantee.
16.1 While the unit is under Guarantee
- Disconnect the base unit from the telephone line and the mains electricity supply.
- Pack up all parts of your phone system, using the original package.
- Return the unit to the shop where you bought it, making sure you take your sales receipt.
- Remember to include the mains adapter.
16.2 After the Guarantee has expired
If the unit is no longer under Guarantee, contact us via www.aegtelephones.eu
17 TECHNICAL DETAILS
| Model | Cored telephone with caller display and answering machine |
| Temperature range | Operating 0°C to 40°C, Storage -20°C to 60°C |
| Electrical power | Base unit: Input: 100 - 240 V AC, 50/60 Hz, 150mA. Output: 7 V DC, 420 mA. |
18 CE DECLARATION
CE
This product is in compliance with the essential requirements and other relevant provisions of the R&TTE directive 1999/5/EC.
The Declaration of conformity can be found on: www.aegtelephones.eu
19 DISPOSAL OF THE DEVICE (ENVIRONMENT)

At the end of the product lifecycle, you should not throw this product into the normal household garbage but bring the product to a collection point for the recycling of electrical and electronic equipment. The symbol on the product, user guide and/or box indicate this. Some of the product materials can be re-used if you bring them to a recycling point. By reusing some parts or raw materials from used products you make an important contribution to the protection of the environment. Please contact your local authorities in case you need more information on the collection points in your area.
20 CLEANING AND CARE
Do not clean any part of your phone system with benzene, thinners or other solvent chemicals as this may cause permanent damage which is not covered by the Guarantee.
When necessary, clean it with a damp cloth.
Keep your phone system away from hot, humid conditions or strong sunlight, and don't let it get wet.
© 2012 Binatone Electronics International Limited
All rights reserved
Subject to availability. Rights of modification reserved.
AEG is a registered trademark used under license from AB Electrolux (publ)
www.aegtelephones.eu




- IMPORTANT SAFETY INSTRUCTIONS
- INTENDED USE
- UNPACKING YOUR PHONE
- GETTING TO KNOW YOUR PHONE
- Base station (see P1)
- Display icons and symbols (see P2)
- INSTALLATION
- Note:
- WALL MOUNT INSTALLATION
- SETTING UP YOUR TELEPHONE
- Set language
- Set time / date
- Set flash time
- LCD contrast
- Message length
- Rings to answer
- Remote access
- TAM HD on/off setting
- To make a call
- To answer a call
- To adjust the speakerphone volume
- To end a call
- To switch between the handset and the speakerphone
- To mute the mouthpiece or microphone
- LCD screen backlight
- ONE TOUCH MEMORY
- Store (M1, M2, M3) memory
- Dial out stored number memory
- Last number redial
- Viewing the outgoing call records
- Making a call from the outgoing call record
- Deleting an outgoing call record
- Storing an outgoing call record into the phonebook memory
- PHONEBOOK
- To view the phonebook records
- To add a new record into the phonebook
- To make a call from the phonebook
- To edit a stored number and/or name
- Caller display list
- Viewing the caller display list
- To return a call from the caller's list
- Storing an incoming call record into the phonebook memory
- To delete a caller display record
- To delete all caller display records
- ANSWERING MACHINE SYSTEM
- To play the current OGM
- To record OGM 1
- To record OGM 2
- To switch between OGMs
- To turn the answering machine on / off
- To record a memo
- To playback your message/s
- Playback and pause
- Repeat/rewind
- Skip/fast forward
- Stop playback
- Volume Control
- To intercept a call
- To delete a recorded message
- To delete all old messages
- To go back to the default OGM
- REMOTE OPERATION
- To check remote access code
- To check your messages from a remote location
- Notes:
- Using the remote instruction codes
- Switching on from a remote location
- GUARANTEE AND SERVICE
- While the unit is under Guarantee
- After the Guarantee has expired
- TECHNICAL DETAILS
- CE DECLARATION
- CE
- DISPOSAL OF THE DEVICE (ENVIRONMENT)
- CLEANING AND CARE
Brand : AEG-ELECTROLUX
Model : C115
Category : Phone