
Basic 8TDTS - Log splitter Güde - Free user manual and instructions
Find the device manual for free Basic 8TDTS Güde in PDF.
| Product type | Hydraulic wood splitter |
| Brand | Güde |
| Model | Basic 8TDTS |
| Order number | 02030 |
| Motor power | 3.6 kW (P1/S6 40%) |
| Power supply | 400 V ~ 50 Hz, three-phase |
| Maximum splitting force | 8 tons |
| Maximum hydraulic pressure | 210 bars |
| Advance speed | 4-5 cm/s |
| Return speed | 10-12 cm/s |
| Maximum log diameter | Approx. 400 mm |
| Split wood lengths | 590 / 860 / 1330 mm |
| Maximum lifting height | 490 mm |
| Table dimensions | Approx. 360 x 270 mm |
| Net weight | Approx. 125 kg |
| Oil tank capacity | 6 liters (type HLP 46) |
| Number of transport wheels | 2 |
| Safety devices | Two-handed control, emergency stop, motor overheating protection |
| Routine maintenance | Lubrication of wedge and column, oil level check, wedge sharpening if necessary |
| Spare parts available | Splitting wedge, extension, handling arms, etc. (references in manual) |
| Certification | CE (conforms to standards EN 609-1, EN 55014, etc.) |
Frequently Asked Questions - Basic 8TDTS Güde
User questions about Basic 8TDTS Güde
0 question about this device. Answer the ones you know or ask your own.
Ask a new question about this device
Download the instructions for your Log splitter in PDF format for free! Find your manual Basic 8TDTS - Güde and take your electronic device back in hand. On this page are published all the documents necessary for the use of your device. Basic 8TDTS by Güde.
USER MANUAL Basic 8TDTS Güde

WOOD SPLITTER
Français F - 18
Deutsch D-4
Translation of original operating instructions

Traduction du mode d'emploi d'origine
FENDEUSE DE BUCHES
Cestina CZ-25
Překlad originího námovu k provozu
STIPAC SPALKU
Slovencina SK - 31
Preklad originalneho navodu na prevádku
STIEPACKKA KLATOV
Nederlands NL - 37
Vertaling van de originele gebruiksaanwijzing
HOUTSPLIJTER
Italiano I-44
Traduzione del Manuale d'Uso originale
SPACCATRICE DEI TRONCHI
Magyar H-51
Az eredeti hasznalati utasitas forditasa
RONKHAI O

1
Einleitung
Please read thoroughly this operation manual and attached safety instructions to enjoy your machine. We further recommend to retain the operation manual for future references.
We reserve right to make technical changes for the purpose of improvement in the course of continuous product development.
This is the original operation manual.
Scope of supply
Unpack the appliance and check completeness and delivery of the following components:
Wood splitter
- 2 operating arms
2 travelling wheels
- Splitter table
- Protective arch
- Lock nut
Cotter
- Operating Instructions and warranty certificate
Please contact your seller if you either miss some components or the components are damaged.
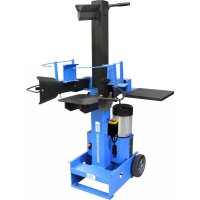
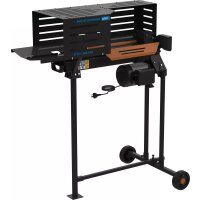
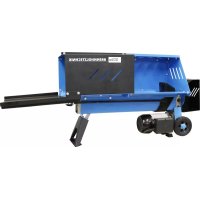
Appliance description
Heavy steel design. Special steel splitter knife. All steel parts with high-quality powder coating. High-quality hydraulic pump. Deep slide-in piece including auxiliary turntable and removable basic table. Engine featuring overheating protection.
Pic. 1:
- Handle
- Splitting knife
- Clamping plate
- Operating arm
- Handle cover
- Splitter table
7.Wheels - Switch / plug
- Lift adjustment rod
- Splitting post
- Filler plug
Technical specifications
Basic
Connection: 400 V 50 Hz
Engine output: 3.6kW P1/ S6 40%
Engine speed: 1,400 revs per minute
Max. hydraulic pressure: 210 bar
Max. splitting force: 8 tons
Forward movement speed: 4-5 cm per second
Backward movement 10-12 cm per second
speed:
Splitting post: 120 × 120 ~mm
Hydraulic oil tank: 61 (HLP 46 oil)
Max. split wood diameter: App. 400 mm
Max. splitting lift: 490 mm
Split wood length: 590 mm/7860 mm/1,330 mm
Basis table dimensions: App. 360mm× 270mm
Weight: App. 125 kg
Art.No. 02030
General safety instructions
Please read carefully the below safety regulations and Operating Instructions before working with the appliance. If the appliance is to be given to other persons, provide such persons with the Operating Instructions, too. Keep the Operating Instructions in a safe place for future reference!

Check the oil level every time the appliance is to be used. Add oil if necessary.
The appliance may only be operated by one person!
- Check the appliance visually every time the appliance is to be used. Do not use the appliance if any safety equipment is damaged or worn. Never put the safety equipment out of operation.
- Do not switch the appliance on if turned over or not in the operating position.
- Keep the place of your work clean. Mess in the place of work may result in injuries.
Work under adequate visibility only.
- Protect the appliance against moisture and rain.
- Do not use electric devices where there is a risk of fire or explosion.
The appliance to be used in broad daylight or under adequate artificial lighting only.
- Avoid any contact of your body with grounded parts (e.g. tubes, heaters, cookers, fridges).
- Never leave the appliance unattended.
- Keep the appliance out of reach of other persons, especially children and animals and prevent them from touching the cable.
If the appliance is not being used, keep it in a dry place inaccessible to children.
- Do not overload the appliance. It works better and safer within the specified operating range.
The appliance to be used for purposes mentioned in these Operating Instructions only.
- Do not use appliances of poor output for demanding works.
- Do not wear loose clothing or jewels as they could get caught by the rotating parts.
Wear shoes with a non-slip sole for outdoor works.
Wear a hairnet if you have long hair.
- Protective glasses and headphones to be worn at all times.
Make sure your posture is safe - keep balance at all times.
- Follow the lubrication instructions.
Check regularly the electric device feeder cable and extension cables and have them replaced by an expert if damaged.
- Keep the handles dry, clean and with no oil and fat.
- Unplug the appliance if not being used, before any servicing or adjusting.
- Avoid unintentional starting. Make sure the switch is off when plugging the appliance.
Approved and properly marked extension cables to be used outdoors only.
Pay attention to what you are doing. Use common sense when working. Do not use the electric device when you are not concentrated.
Before using the electric tools the next time, it is necessary to carefully check whether the protective equipment or slightly damaged parts work perfectly and as required and replace them if necessary.
- All parts on the appliance must be regularly checked for any signs of damage or aging. The appliance must not be used if not in a perfect state.
- Do not use electric devices where the switch cannot be put on or off.
Original spare parts for repairs to be used only.
- Repairs may only be executed by an electrician.
- Check the appliance for any signs of wear or damage before putting it into operation and after any impact and have it repaired if necessary.
Make sure that other items do not cause short circuit on the appliance contacts. - The appliance must not be used by persons who are not able to operate the appliance due to their physical, sensory or mental skills or inexperience or lack of knowledge.
- If the appliance is visibly damaged, it must not be put into operation.
- Unauthorised repairs may result in significant risks.
- The same regulations apply to accessory equipment.
Güde GmbH & Co. KG will not be liable for the following damages:
- Damage to the appliance as a result of mechanical influences and overvoltage
Changes to the appliance - Use for purposes other than those specified in the Operating Instructions.
- All safety instructions must necessarily be followed to prevent any injury and damage.
Appliance-specific safety instructions
- Be sure to know that wood is a natural raw material and may therefore get uncontrolled when being split (pieces of wood thrown away suddenly).
- It is necessary to keep your hands out of the front of the wood or, to be more specific, out of the area with the splitting knife.
- Fronts of the split wood must be rectangular if possible to make sure the wood on the basic table is steady and could not slide down.
- The safety equipment on the appliance must not be removed or put out of operation.
- Remove any wood, wood waste and bark from the place of appliance operation.
- Check whether the two-handed operation works properly before putting the appliance into operation.
- Wear closefitting clothing. Put any jewel, ring and wristwatch aside.
- Wear protective clothing.
- Caution when working: Risk of injury of fingers and hands posed by the splitting tool.
- All protective equipment and covers must be fitted and work properly when the appliance is being operated.
- Tools must only be replaced, appliance adjusted, cleaned, serviced and troubles removed when the engine is off. Unplug the appliance!
- All protective and safety equipment must be immediately refitted after repairs and servicing works are finished.
- Before using the wood splitter, put it on a level and non-slip working area. Make sure you can move freely.
- The wood splitter must never be used when raining.
- The system voltage must correspond to details on the appliance type label.
- When a cable drum is used, unwind the cable to the full extent to prevent it from heating.
- When working outdoors, the outlet must be fitted with a safety switch against stray current.
- The processed piece of wood must always be put steadily on the appliance surface to prevent it from shifting.
- Soaked wood not to be split.
- Only one piece of wood to be split at all times.
- Do not split wood including undesirable items.
Use as designated
The wood splitter has only been designed to split firewood in dimensions given in the technical specifications; upright, in the fibres direction.
Any other use will be considered a use in conflict with the designation. The manufacturer will not be liable for any consequential damage - the risk is borne by the user.
Area of use
The appliance may only be used to split wood. The split material must have the following dimensions:
- Minimum diameter: 120 mm
Maximum diameter: 400 mm - Splitting wood along the fibre is only allowed.
- If a branchy wood is split, there is a risk of getting jammed when splitting.
- A jammed piece of wood is released by tapping at the wood.
- Cutting the split wood out is not allowed!
Split wood length adjusting
Depending on the splitter type, various wood lengths may be split:
Fitting of operating arms, wheels, splitting cross and table (pic. 3, 4, 8, 9)
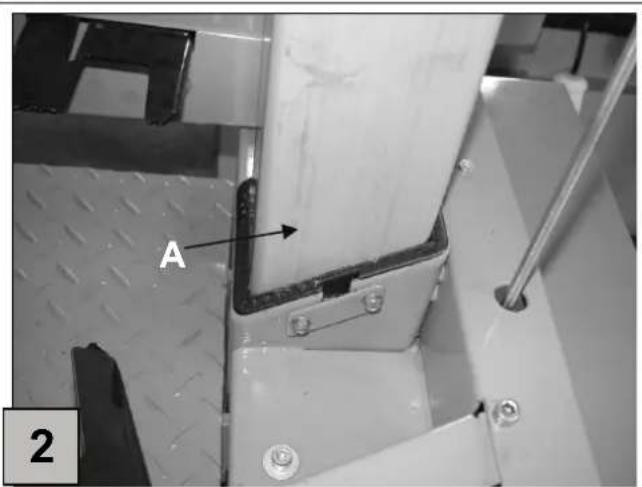
Fitting the operating arms (pic. 3)
Insert the operating arm in the switching rocker (C) and screw it using the socket-head screw (D), washer (E) and lock nut. Tighten the lock nut so that the operating arm can still be moved. Now connect the operating arm to the right as described. Connect the protective arches (F) to both operating arms using 2 cross screws (G).
TIP: Before that, lubricate the metal couplings with fat from above and from below!
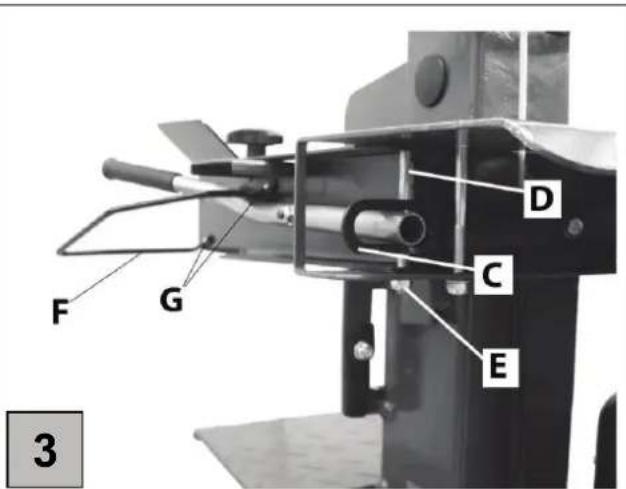
Fitting the wheels (pic. 4)
Insert the wheel axis in both holes on the oil tank.
Put the M6 socket-head screw (B) through the wheel axis and fasten it to the coupling (C) using the lock nut. Then fit the travelling wheels on both sides and secure them with the cotter (D). Bend the cotter slightly to prevent it from falling out.
Fitting the worktable (pic. 8/9)
There are three table presetting options for the wood splitter. Various wood lengths may be split due to the adjustable table position.
- Make sure the hooks securing the table on the post are directed upwards.
- Insert the table in one of the three fixtures (pic. 9/A).
- Fix the table by letting the hook (pic. 8/B) on the worktable guide snap in on both sides.
Lift adjusting (pic. 5)
With logs smaller than app. 50~cm and in case of more logs the working output can be increased by shortening the backward movement of the splitting knife.
Proceed as follows:
Put a short log on the splitter table and move the splitting knife as low as 2cm above the log. Switch the splitter off (red button on the switch and unplug the appliance). Now you can shorten the backward movement using the attached rod (pic. 5/B) by fixing the rod in the required height using the adjusting screw (pic. A./5).
Electric connection (pic. 6)
Plugging
All switches have been fitted with an undervoltage release included in the switch in accordance with provisions of specialised professional organisations "CE", etc. The undervoltage release prevents appliance self-starting in case supply is interrupted as a result of supply failure, unintentional unplugging, defective fuse, etc. The appliance must necessarily be restarted by pressing the green On/Off button.
- The appliance meets EN 61000-3-11 requirements and is subject to special connection conditions. That means using the appliance on any connection points is not allowed.
The appliance may cause temporary voltage fluctuations in case of unfavourable network conditions. - The appliance has solely been designed to be used on connection points not exceeding the maximum allowable system impedance of Z_ = 0.233 .
- Being the user, you must make sure - after an agreement with your energy supplier if necessary - that your connection point on which you want to operate the appliance meets the above-mentioned requirement.
Plugging
Check regularly the feeder cables for any damage. Make sure the feeder cable is not plugged during the check. Feeder cables must meet the appropriate VDE and DIN provisions. Feeder cables with H 07 RN marking to be used only. Providing a type designation on the feeder cable is required.
Defective feeder cables
Insulation gets often damaged on the feeder cables. Possible causes include:
- Grinding if feeder cables are fed in gaps below windows or doors.
- Breaks as a result of unauthorised fastening or feeding of feeder cables.
- Breaking off or jamming caused by running over the feeder cables.
Insulation damage by pulling the cable out of the socket in the wall. - Cracks as a result of insulation aging.
These defective feeder cables must not be used and are dangerous to life due to the insulation damage!
400 V/ 50 Hz three-phase engine
- 400 V/50 Hz system voltage.
The connection to the network and extension cable must have 5 cores = 3P + N + SL - (3/N/PE). - Extension cables must have a minimum cross section of 2.5mm^2
- Connection to network is protected by at least a 16 A steady fuse.
Only for 400 V appliances: It is necessary to respect the engine running direction (see the arrow on the engine) as operation with a wrong running direction may damage the oil pump. In such a case, all claims arising from the warranty do not apply. If necessary, have an electrician to change the running direction by changing the plug poles. See pic. 6! (for three-phase models only!)
Safety instructions to the operator
When repairing, servicing or leaving the wood splitter it is necessary to interrupt the power supply by pressing the red button on the switch and unplugging the appliance. Interrupting the power supply just by turning the switch to the OFF position is not enough. The GÜDE wood splitters are always supplied with hardened splitting knives. However, if you identify any slight deformation of the splitting knife edge after splitting wood containing invisible undesirable items, e.g. out of concrete, steel, etc., remove the deformation with a file or grinding off. Keeping the splitting knife sharp at all times increases the working output.
TIP: From time to time, lubricate the splitting knife with fat (for problem wood).
Before putting the splitter into operation for the first time, it is necessary to check whether the safety equipment (two-lever operation, in particular) is working properly.
CAUTION! Before putting the appliance into operation, make sure the splitting table is fitted safely on the splitter.
Operation (pic. 1)
Bleed the tank by unscrewing and re-screwing the filling bolt (pic. 1/11) every time the appliance is to be operated.
Caution: Make sure wood is split at right angle and closely sits on the splitting table if possible. Wood split sideways or extremely branchy wood may slide down or bend the operating arms.
! Wood to be put on platforms (tables) designed for that purpose (never on the frame). That could damage the splitter.
- Start the engine by pressing the green button.
Caution: Respect the engine running direction! - At low temperatures, let the splitter run idle for app. 15 minutes so that oil gets warm to the proper temperature.
- Put the split material on the table and hold it using the clamping plates on the lever.
- Splitting is initiated by pressing both levers down (as soon as the splitting knife enters the wood, tip the lever slightly out while pressing it down. This will prevent the clamping plates (arms) from bending.
- After finishing splitting, lift at least one lever - the splitting post will get automatically up.
!Operating the wood splitter by two persons with one holding the wood and the other applying pressure on the clamping plates is strictly prohibited. Blocking the lever (clamping plate) is prohibited, too.
Transport and storing
- The appliance may only be transported with the engine switched off.
- Clean the appliance thoroughly before storing.
- Keep the appliance in a clean and dry place.
Oil may leak when the appliance is being transported. Please secure the appliance adequately and take environment protection measures.
Transport:
The wood splitter has been fitted with big wheels. To transport the splitter, hold the handle on the splitting post with one hand and the handle above the engine with the
other hand and tip the splitter slightly to you. It is now possible to easily move the appliance in this position. During transport, lower the splitting knife to the very bottom.
Installation:
The appliance has been designed for works on level surfaces. It must be installed on a hard surface to provide the necessary stability.
Residual risks and protective measures

Caution!!
Putting out of operation, change, blocking, disassembly, changeover or fitting of all parts on the safety and protective equipment of the appliance is strictly prohibited and it may result in serious or life threatening injuries if not respected.
The manufacturer cannot be liable for any material and personal damage arisen as a result of such negligence. Any warranty claim towards the manufacturer will not apply in case of any of the above-mentioned negligence.
The splitter may only be operated by one person. When operating the appliance, remove from around the splitter and place of your work any wood remains that could block or negatively influence the safety and operating elements.
Mechanical residual risks:
- Jamming:
1 When splitting, parts of body may get jammed or amputated as a result of hydraulic knife lowering.
The two-hand safety operation to be necessarily used. Do not interfere in the splitting process. Any worn or damaged aid must be immediately replaced.
2 There is a risk that the split wood gets jammed. Please be sure to know that the wood is very tense when being removed and your fingers can get jammed in the split gap.
Never work with the appliance in two people. Watch bystanders!
Jammed wood to be knocked out. Watch out for falling wood as your legs could get injured as a result. Safety shoes to be worn for all works with the appliance.
- General injuries:
1 Fierce splitting of dry wood may result in serious injuries.
Never interfere in the splitting process.
Keep a sufficient safe distance at all times.
Appliance to be operated carefully and cautiously at all times.
2 Blocks of wood produced during the splitting process may fall down and injure the legs of the operator, in particular.
Wear the specified protective clothing at all times and work cautiously.
Protective glasses to be worn whenever working with the appliance.
Safety shoes should also be worn along with the specified protective clothing.
3 The splitting wedge extension may run in the table and damage the appliance or cause serious injuries to persons.
The table to be disassembled before working with the splitting wedge extension.
- Getting caught, winding-up:
1 Loose clothing, jewels and long hair may get caught by the rotating parts.
Closefitting clothing to be worn at all times. Do not wear any jewels. Protect your hair with a hairnet.
Electrical residual risks:
- Direct electrical contact:
1 Defective cable or plug may be the cause of electric shock.
Have any defective cables or plugs replaced by an expert. Appliance to be used with a safety switch against stray current (FI) only.
Check the feeder cable every time the appliance is to be used.
- Indirect electrical contact:
1 Injury by conductive parts at exposed electrical or defective construction parts.
Unplug the appliance for any servicing work.
To be operated with a safety switch against stray current (FI) only.
Exposure to noise:
- Hearing damage:
1 Long work with the appliance may damage hearing.
Headphones to be worn at all times.
Neglecting the ergonomic principles:
- Negligent use of personal protective aids:
1 Operating the appliance without proper protective aids may cause serious external or internal injury.
Specified protective clothing to be worn at all times. Work cautiously.
- Inadequate local lighting:
1 Insufficient lighting poses a high safety risk.
Adequate lighting to be provided when working with the appliance.
Other risks:
- Thrown-away items or spraying liquids:
1 Eyes may get injured by small mechanical particles when splitting.
Protective glasses to be worn for all works with the appliance.
Marking on the appliance
Product safety:
| CE | |
| Product corresponds to appropriate EU standards |
Prohibitions:
| General prohibition (in connection with any other icon) | No touching inside! |
| No pulling the cable! | Not to be used in closed rooms! |
Warning:
| ! | |
| Warning/CAution | Warning against dangerous voltage |
| Keep sufficient safety distance! | Warning! Risk of getting jammed! |
| Warning against tripping! | Warning against flying items! |
Commands:
| Read the Operating Instructions before using the appliance | Use protective glasses and headphones. |
| Use protective gloves Use safety shoes! | |
Environment protection:
| PAP | |
| Dispose waste not to harm your environment. | Packaging material from cardboard can be recycled in a collection point. |
| Defective and/or disposed electric or electronic devices must be delivered to relevant collection points. |
Packaging:
| Protect against moisture | Packaging must direct upwards |
| Interseroh Interseroh Interseroh | |
| Attention - brittle Interseroh-Recycling | |
Technical specifications:
| Connection | Engine |
| Engine speed Max. splitting force | |
| Max. split wood length Max. split wood diameter | |
| Table dimensions Weight | |
EU DECLARATION ON CONFORMITY
The company
Güde GmbH & Co. KG
Birkichstrasse 6
D-74549 Wolpertshausen
Germany
hereby declares that the design and structure of the devices listed below and in designs marketed conforms to applicable basic requirements of the EU directives on safety and hygiene.
This declaration on conformity becomes void in case of a change to the device not consulted with us.
Identification of the devices: Wood Splitter
Order No.: #02030
Applicable EU directives:
2004/108/EG
2006/42/EG
Harmonized standards used
EN 609-1/A2:2009
EN 55014-1:2006
EN 55014-2/A1:2001
EN 61000-3-2:2006
EN 61000-3-11:2000
Date/signature of manufacturer: 09.06.2011
Information about signer: the executive
Mr
Technical documentation: J. Burkle FBL; QS
Warranty
The warranty applies exclusively on material or production defects. For warranty claims, please submit an original proof of purchase with date of purchase indicated. The warranty does not cover unprofessional use, such as overloading, violent use, damage caused by third party or a thing. The warranty also does not cover failure to comply with the operation manual and normal wear and tear.
Emergency procedures
For reasons of potential injury, a first aid box according to DIN 13164 must be available on workplace. Replenish immediately material used from the first aid box.
If you require assistance, please give the following details:
Place of accident
Type of accident
Number of injured persons
Type of injury
Administer first aid according to injury and call for qualified medical assistance. Protect injured person against other injuries and keep him/her in rest.
Disposal
Disposal instructions are illustrated in the form of pictograms on the device or packaging. Description of the pictograms is given in "Identification" chapter.
Disposal of transport packaging
Packaging protects the device against damage during transport. Packaging materials are usually selected according to their effect on environment and disposal methods and can therefore be recycled. Returning of the packaging back to circulation saves resources and costs for packaging disposal. Parts of the packaging (e.g. foil, styropor) may be dangerous for children. Risk of suffocation! Keep these parts of the packaging out of reach of children and dispose as soon as possible.
Operator requirements
The operator must carefully read the Operating Instructions before using the appliance.
Qualification
No special qualification is necessary to use the appliance apart from detailed instructions by an expert.
Minimum age
The appliance may only be operated by persons over 18 years of age who have been instructed in handling and operating the appliance. Young people between 16 and 18 years of age may only work with the appliance when supervised by an adult.
An exception includes youngsters operating the appliance within their professional education to achieve necessary skills under trainer's supervision.
Training
Using the appliance only requires appropriate instructions by an expert or reading the Operating Instructions. No special training necessary.
Inspections and servicing (pic. 1+2+10)
Safety instructions for inspections and servicing:
Only a regularly serviced and treated appliance may be a satisfactory aid. Inadequate servicing and maintenance may lead to unforeseen accidents and injuries.
- Never use aggressive cleaning agents to clean the appliance. That could damage or destroy the appliance.
- Unplug the appliance.
- Have any repairs and servicing of the electrical equipment provided by electricians only.
- All protective and safety equipment must be immediately refitted after repairs and servicing works are finished.
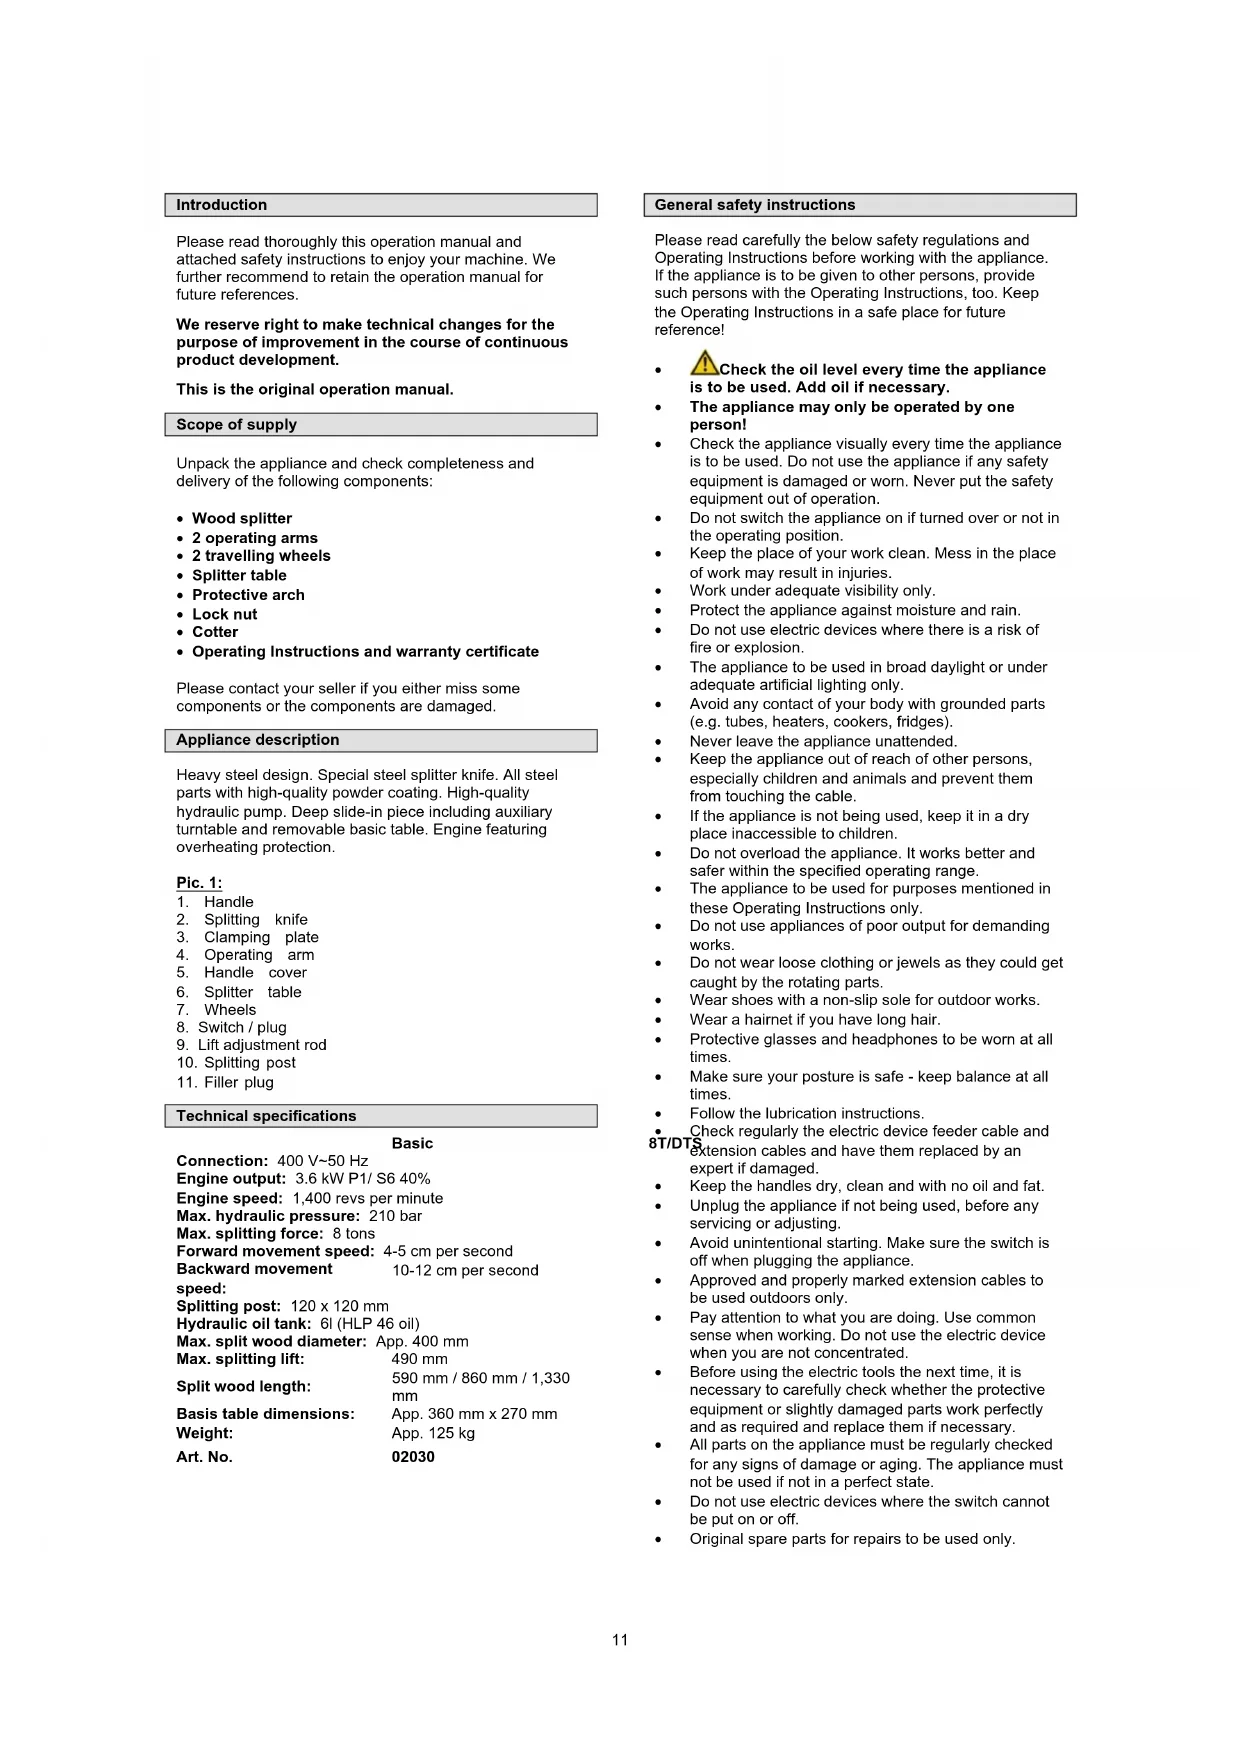
The following is recommended (pic. 2):
- Splitting knife
The splitting knife is a component that is subject to quick wear and must be ground down additionally if necessary. That will increase the splitting output and protect the splitter. Tip: lubricate the splitting knife with fat!
- Two-hand protective equipment
The combined holding and clamping equipment must run easily. From time to time, lubricate it with a few drops of oil.
- Splitting post
Every time the appliance is to be used, lubricate the splitting post with fat. That will increase the service life of the sliding jaws (pic. A./2). Pull the splitting post out to the full extent and equally apply multi-purpose fat to all 4 sides of the splitting post.
- Movable parts
Keep the splitting knife guide clean (remove any dirt, splinters, bark, etc.). Slide rails to be lubricated with fat.
- Hydraulic equipment
Hydraulic connections screwing should be checked for leaking and wear. Tighten the screwing if necessary.
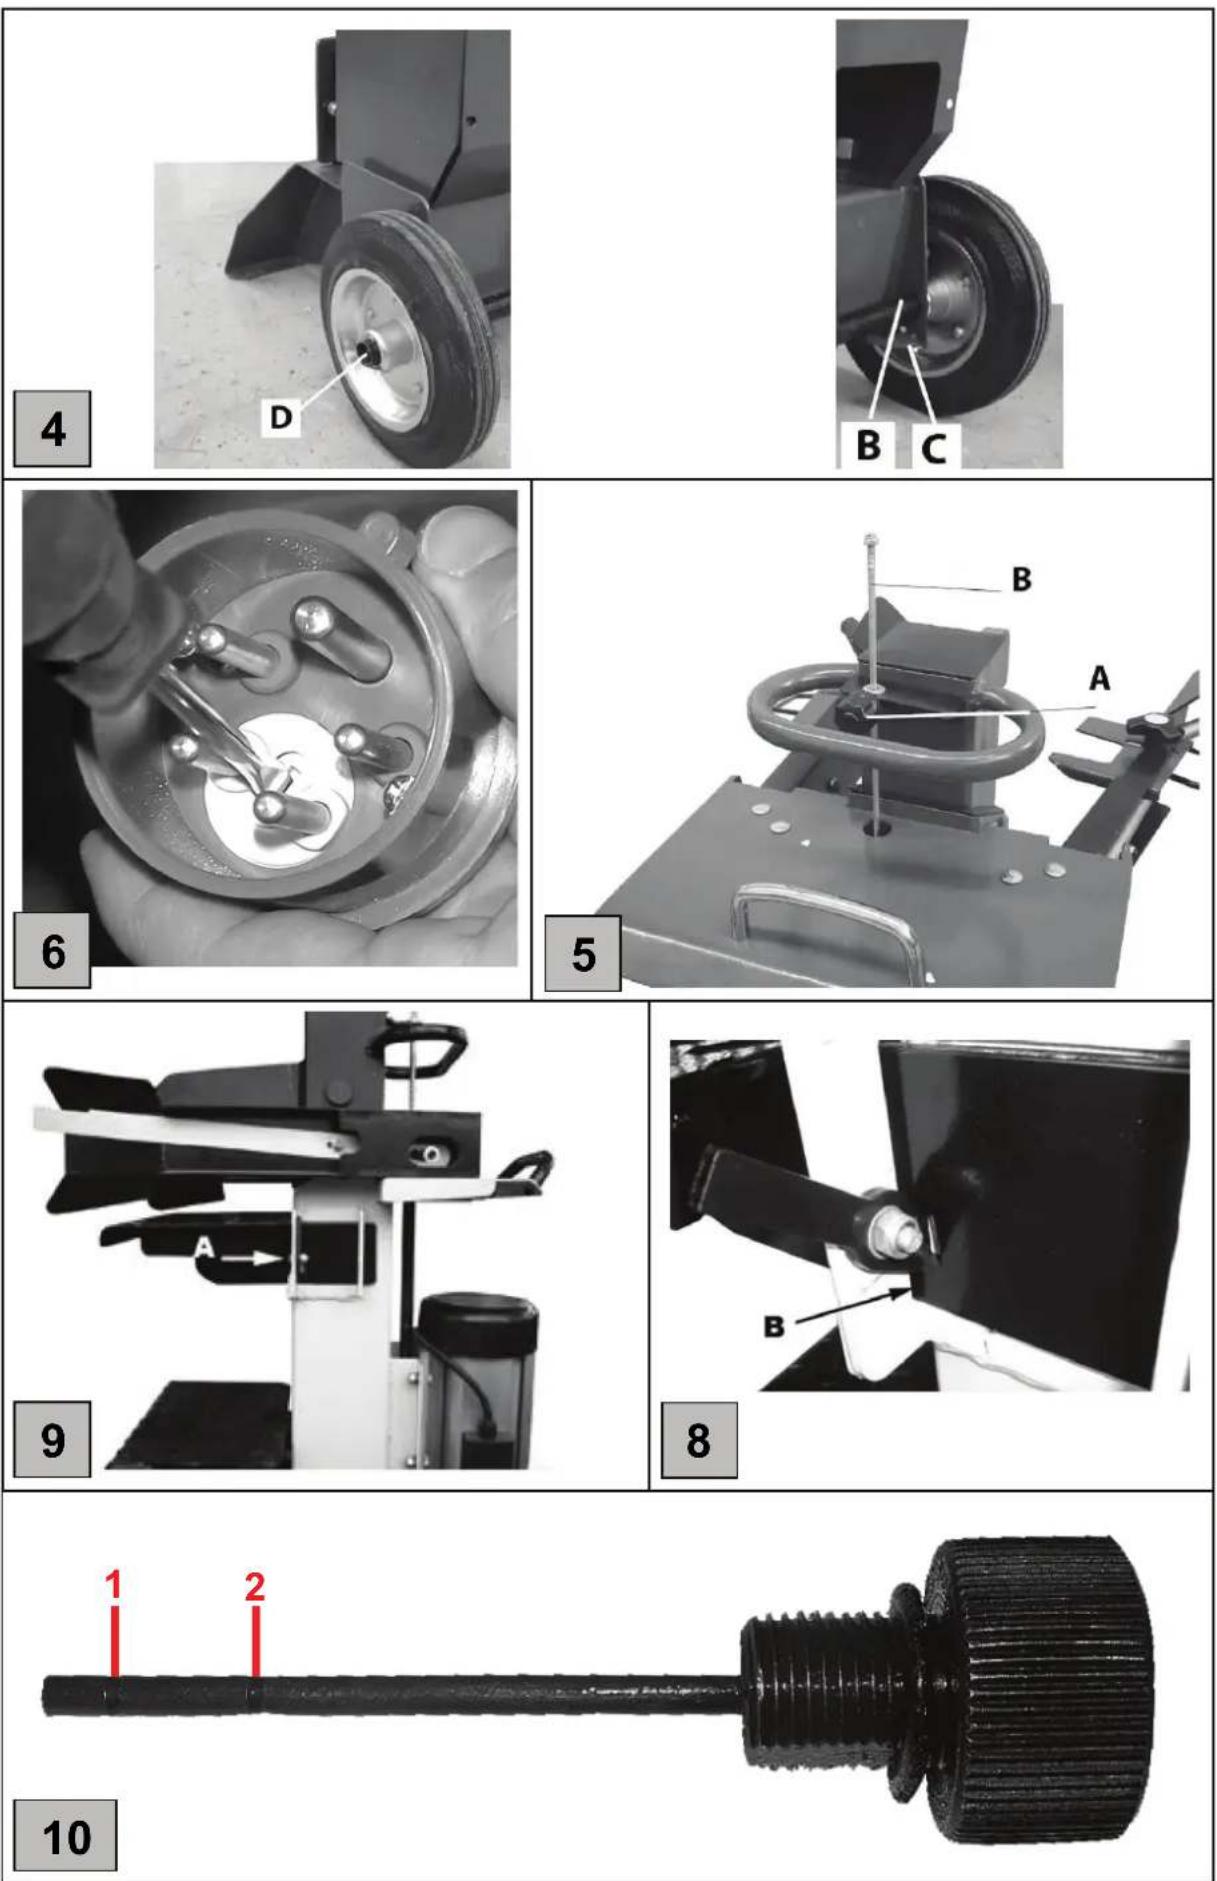
Checking the hydraulic oil level (pic. 1+10):
Check the hydraulic oil level only when in a cold condition, feeder cable disconnected and splitting post pulled in.
On the oil level dipstick there are two notches - the lower (pic. 10/1) is the minimum hydraulic oil limit level in the tank and the upper notch (pic. 10/2) is the maximum limit.
- Unscrew the oil level dipstick (pic. 1/11) from the opening.
- Wipe the oil from the dipstick with a non-felt cloth.
- Re-screw the dipstick in the opening.
- Unscrew the filling screw with the dipstick again and check whether the hydraulic oil upper limit is between both notches.
Change the oil once a year (pic. 1+10):
- Unscrew the oil drain plug (pic. 1/11).
- Catch the waste oil (every model with different amount)
- Dispose the waste oil in an environment-friendly manner
- Re-screw the oil drain plug. No particles of dirt may get in the oil tank.
- Add the hydraulic oil up to the upper notch on the dipstick (pic. 10/2)
- Try the wood splitter with no load several times.
Recommended hydraulic oil: DIN ISO HLP 46
Güde Art. No. 42004
Viscosity: 46
Oil amount: (see Technical specifications)
Oil to be added only when the splitting post is in the engaged position.
Hydraulic equipment:
Hydraulic hoses and couplings must be checked after app. 4 hours of operation whether tight and must be tightened if necessary.
Checking the appliance whether it is working properly
The hydraulic wood splitter is supplied in a ready-to-operate state. The following functional checks need to be carried out every time the appliance is to be used.
- Let both switching handles go down and the splitting knife as low as app. 5 cm above the table
- Lower one switching handle at a time - the splitting knife will remain in the selected position
Optional supply
Basic 8T/D-8T/DTS splitting cross
Art. No. 02027
Basic 8T/D-8T/DTS splitting wedge extension
Art. No. 02033
Basic 8T/DTS splitting wedge extension
Art. No. 02032
Troubleshooting
| Problems | Possible causes | Remedy |
| Engine not starting | 1. No current in the outlet2. Defective extension cable3. Wrong feeder cable4. Defective switch, condenser | 1. Check the network protection2. Pull out the plug - check it and replace it if necessary3. Connection with 5 cores with a cross section of 2.5 mm24. Have the appliance checked by an electrician |
| Wrong engine running direction | 1. Wrong connection 1. Turn the phase changes in the appliance plug using a screwdriver | |
| Splitting knife not moving | 1. Two-hand switching lever adjustment | 1. → Check the oil level→ Defective control valve must be replaced in a service centre only |
| Splitter has no power | 1. Wrong rotation direction2. Too little hydraulic oil3. Starting rod is bent; the hydraulic lifter is not pressed to the full extent4. Wood with too many knots - splitting knife gets jammed5. Operating arm is bent | 1. Change the rotation direction2. Add hydraulic oil3. → Check all screws on the starting rod mechanism → Adjust the pull rod (pic. 10/B); by this, → the hydraulic lifter will be pressed to the full extent4. Lubricate the splitting knife with fat5. Return the operating arm to the starting position. |
| After being pressed, the green switching button not staying in place | 1. Defective fuse, etc.2. 2 phase running | 1. Check the cable |
| Hydraulic pump whistling; splitting knife running jerky | 1. Oil loss, surface is dirty2. Too little hydraulic oil in the tank | 1. → Tighten the screwing→ Replace the hoses2. Add hydraulic oil |
Introduction
Causes probabilities :
The guarantee solely covers inadequacies caused by material defect or manufacturing defect. Original payment voucher with the sales date needs to be submitted for any claim in the guarantee period.
The guarantee does not cover any unauthorised use such as appliance overloading, use of violence, damage as a result of any unauthorised interference or caused by foreign items. Failing to follow the operating and assembly instructions and common wear are also not included in the guarantee.


- Einleitung
- Scope of supply
- Appliance description
- Pic. 1:
- Technical specifications
- Basic
- General safety instructions
- Use as designated
- Area of use
- Split wood length adjusting
- Fitting of operating arms, wheels, splitting cross and table (pic. 3, 4, 8, 9)
- Fitting the operating arms (pic. 3)
- TIP: Before that, lubricate the metal couplings with fat from above and from below!
- Fitting the wheels (pic. 4)
- Fitting the worktable (pic. 8/9)
- Lift adjusting (pic. 5)
- Proceed as follows:
- Electric connection (pic. 6)
- Plugging
- Defective feeder cables
- These defective feeder cables must not be used and are dangerous to life due to the insulation damage!
- V/ 50 Hz three-phase engine
- Safety instructions to the operator
- Operation (pic. 1)
- !Operating the wood splitter by two persons with one holding the wood and the other applying pressure on the clamping plates is strictly prohibited. Blocking the lever (clamping plate) is prohibited, too.
- Transport and storing
- Oil may leak when the appliance is being transported. Please secure the appliance adequately and take environment protection measures.
- Transport:
- Installation:
- Residual risks and protective measures
- Caution!!
- Mechanical residual risks:
- Electrical residual risks:
- Exposure to noise:
- Other risks:
- Marking on the appliance
- EU DECLARATION ON CONFORMITY
- Mr
- Warranty
- Emergency procedures
- Disposal
- Disposal of transport packaging
- Operator requirements
- Qualification
- Minimum age
- Training
- Inspections and servicing (pic. 1+2+10)
- Safety instructions for inspections and servicing:
- The following is recommended (pic. 2):
- - Splitting knife
- - Two-hand protective equipment
- - Splitting post
- - Movable parts
- - Hydraulic equipment
- Checking the hydraulic oil level (pic. 1+10):
- Check the hydraulic oil level only when in a cold condition, feeder cable disconnected and splitting post pulled in.
- Change the oil once a year (pic. 1+10):
- Oil to be added only when the splitting post is in the engaged position.
- Hydraulic equipment:
- Checking the appliance whether it is working properly
- Optional supply
- Basic 8T/D-8T/DTS splitting cross
- Basic 8T/D-8T/DTS splitting wedge extension
- Basic 8T/DTS splitting wedge extension
- Introduction
Brand : Güde
Model : Basic 8TDTS
Category : Log splitter