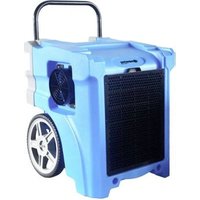
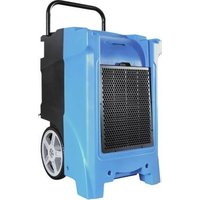
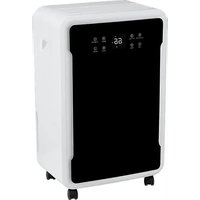
Aero - Air purifier Sonnenkönig - Free user manual and instructions
Find the device manual for free Aero Sonnenkönig in PDF.
| Product type | Air purifier |
| Brand | Sonnenkönig |
| Model | Aero |
| Maximum coverage area | 75 m³ |
| Filtration | Pre-filter, catalyst filter, activated carbon + diatomaceous earth filter, True HEPA filter |
| Air quality sensor | Built-in, color-coded indicator (blue, green, purple, red) |
| Operating modes | Automatic, night, silent, manual speed (3 levels + boost) |
| Adjustable sensor sensitivity | Standard, sensitive, extra sensitive |
| Power supply | 230 V ~ 50 Hz |
| Power consumption | Not specified, but designed for low consumption in night mode |
| Filter maintenance | Pre-filter washable, other filters non-washable, periodic replacement |
| Sensor cleaning | Every 2 months with a damp cotton swab |
| Safety lock | Healthy Air Protect Lock: automatic shutdown if filters not replaced |
| Warranty | 24 months from date of purchase |
| Weight | Not specified |
| Dimensions | Not specified |
Frequently Asked Questions - Aero Sonnenkönig
User questions about Aero Sonnenkönig
0 question about this device. Answer the ones you know or ask your own.
Ask a new question about this device
Download the instructions for your Air purifier in PDF format for free! Find your manual Aero - Sonnenkönig and take your electronic device back in hand. On this page are published all the documents necessary for the use of your device. Aero by Sonnenkönig.
USER MANUAL Aero Sonnenkönig
Festnetz 14 Cent/Minute
standard
- sensible
- extra sensible
Modifications techniques
Festnetz 14 Cent/Minute
1 Safety Information 76
2 Product introduction 79
2.1 Introduction 80
2.2 5-Step Air Purification 81
3 Electromagnetic fields (EMF) 82
4 Before first use 82
4.1 Placing / Replacing the filters 82
4.2 Using the appliance. 83
4.3 Air quality indication 84
4.4 Fan speed lights/filter replacement lights 84
4.5 Adjusting the air quality sensor sensitivity. 85
4.5.1 Auto mode 86
4.5.2 Night mode 86
4.5.3 Fan speed 87
4.5.4 Silent mode 87
4.5.5 Body of the appliance 87
5 Filter maintenance 88
5.1 Cleaning and Maintenance 88
5.1.1 Cleaning the unit 88
5.1.2 Cleaning the Built-in Air Quality Sensor 88
5.1.3 Cleaning the pre-filter 89
5.1.4 Replacing the Filters 90
5.2 Filter replacement lock 91
6 Storage 91
7 Troubleshooting 92
8 Warranty / Disposal / Technical change 95
1 Safety Information
GB
Please read before first commissioning the safety instructions carefully and observe the safety instructions to prevent damage due to misuse, improper operation, and improper environmental conditions to be avoided. Keep these for later reference.
Check the device after removing the packaging for damage. Do not put the unit in case of suspected corruption in operation and consult a specialist. The recyclable packaging material must not be stored or disposed accessible for young children, but must be disposed of properly.
This appliance is only for the purpose for which it was explicitly developed. Any other use is regarded as improper and therefore dangerous. The supplier is not liable for damage to persons and / or property damage due to an improper or incorrect use.
This appliance can be used by children aged from 8 years and above and persons with reduced physical, sensory or mental capabilities or lack of experience and knowledge if they have been given supervision or instruction concerning use of the appliance in a safe way and understand the hazards involved. Children shall not play with the appliance. Cleaning and user maintenance shall not be made by children without supervision. Please make sure to place the device on a suitable and waterproof surfaces, so that spilled liquids can not cause harm.
Repairs to electrical appliances must only be carried out by trained personnel only. Improperly performed repairs and alterations to the equipment can have dangerous consequences for the user according to what the warranty will be rejected.
For safety precaution, please read all of the following safety instructions before using. The appliance is designed for domestic use and may only be operated in accordance with these instructions.
- Read all instructions before using this appliance.
- Ensure that the voltage indicated on the appliance corresponds with the voltage of your electrical outlet.
- Do not use the appliance near gas appliances, heating devices, fire eplaces, lit hting devices or direct sunlight.
-
Do not operate the appliance if it has a damaged power cord or plug, if it is not working properly, or if it has been damaged in any manner. The appliance should be serviced only by qualified service personnel. Return the appliance to our service centre for examination, re pair or adjustment.
-
If the power cord is damaged, it must be replaced by the service center in order to avoid a hazard.
- Do not expose the appliance to water or handle the power plug with wet hand.
- Do not clean or spray the appliance with water, liq uid, d etergent or any flammable materials such as insecticides or fragrances to avoid electric shock or fire hazard.
- Do not obstruct the air inlet or/and outlet.
- Do not use extension power cord set unless with approval by competent authority.
- Do not use the appliance when it is damaged or performs abnormally.
- Do not use the appliance when indoor smoke-type insect repellents are used or in places with oily residues, burning incense or chemical fumes.
- Do not use the appliance in a location with major temperature change to avoid condensation inside the appliance.
- Do not use the appliance in humid or high temperature environment such as ba -throom,to ilet or kitchen.
- If the appliance produces a strange noise, b urning smell or smoke, u nplug the power plug from the electrical outlet and call our service centre.
- Do not use the appliance for anything other than its intended use.
- The appliance is not a substitute for proper ventilation, regular vacuum cleaning or extractor hood or fan during cooking.
- Ensure the power plug to be in good condition and good connection; whether the appliance properly connected or not; the plug is not overloaded or overheated.
- Always place and use the appliance on a dry, stable and level surface.
- Leave at least 50cm gap distances away from walls or adjacent objects.
- Do not push or lean against, exert excessive force or shock any part of the appliance or stick sharp or hard objects such as screw driver into any part of the appliance.
-
If any filter or front panel casing is not properly installed, the appliance would not be operated.
-
Maintain a good air circulation when using the appliance.
- Unplug the appliance from electrical outlet when not in use, before assembling or taking off parts, and before cleaning.
GB
- Do not use the appliance for anything other than its intended use.
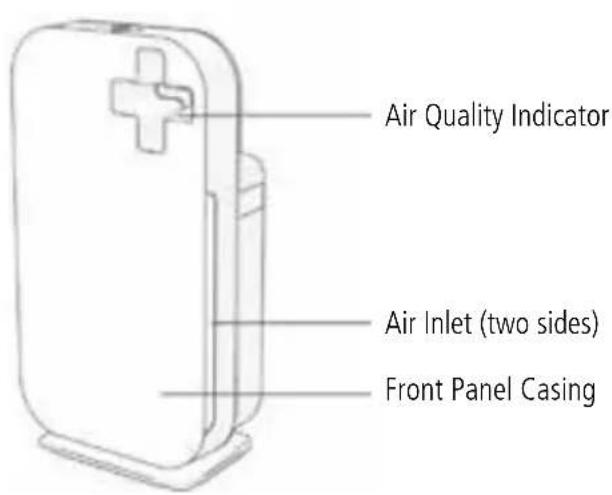
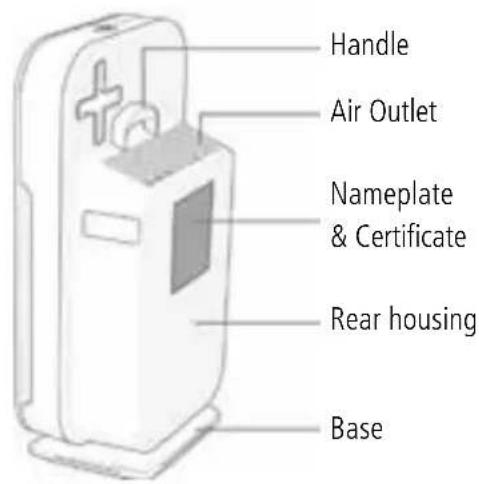
2 Product introduction
GB
| Blue | Excellent | |
| Green | Good | |
| Purple | Moderate | |
| Red | Bad |
ATTENTION: If you want to turn off air quality sensor indicator, please press the "AIR QUALITY" button.
2.2 5-Step Air Purification
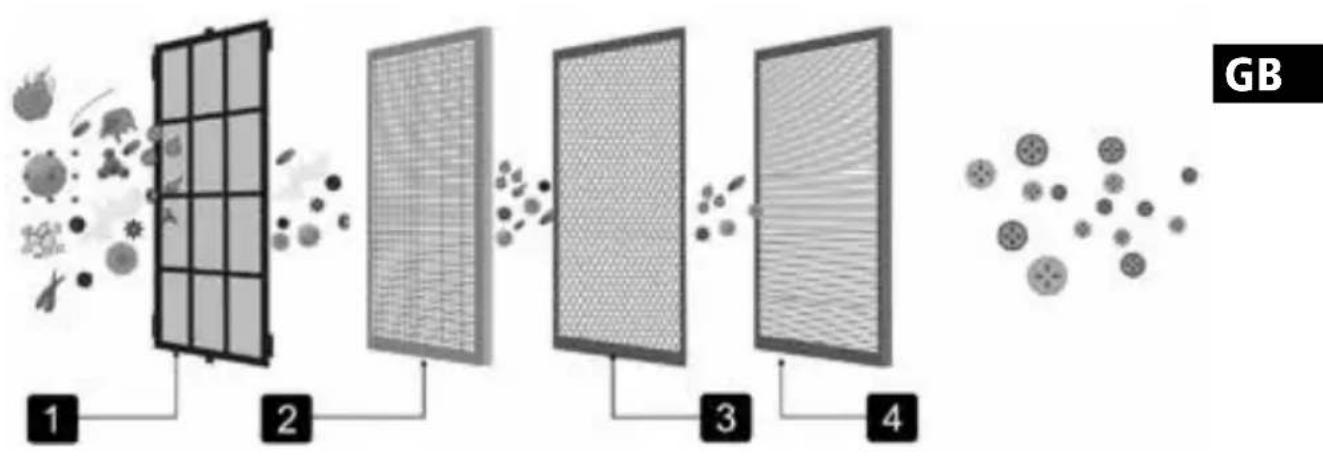
- First step:Pre-filter:It uses micron mesh filter, effectively resists fiber particulate matter which is bigger than 0.28mm, the blocking rate is over 99.90%. It is convenient to wash and clean over tens of thousands of times.
Function: It can prevent big particles in the air, such as hair, dandruff, coarse grains and fine dust. Also, it can protect the other inside filter. - Second step: Catalyst Filter: can remove up to 99.00% of Formaldehyde and Benzene and dimethylbenzene and toluene and TOVC ect.harmful gas. Such as dust, smoke, pollen, pet dander, bacteria and mold spores.
- Third step:3MM coconut-shell active carbon+diatomooze:can more remove 99.00% free Formaldehyde, benzene, ammonia and TOVC etc. harmful substance, characteristic mix and adsorptive capacity can be comprehensive purify air.
- Fourthly step:3M Ture HEPA:can be remove up to 99.97% of diameter above 0.3 micron particulate, such as fine dusts, haze and smoke particulates, pet dander, mold spores, pollen, some bacteria and viruses.
3 Electromagnetic fields (EMF)

This Sonnenkönig appliance complies with all standards regarding electromagnetic fields (EMF). If handled properly and according to the instructions in this user manual, the appliance is safe to use based on scientific evidence available today.
4 Before first use
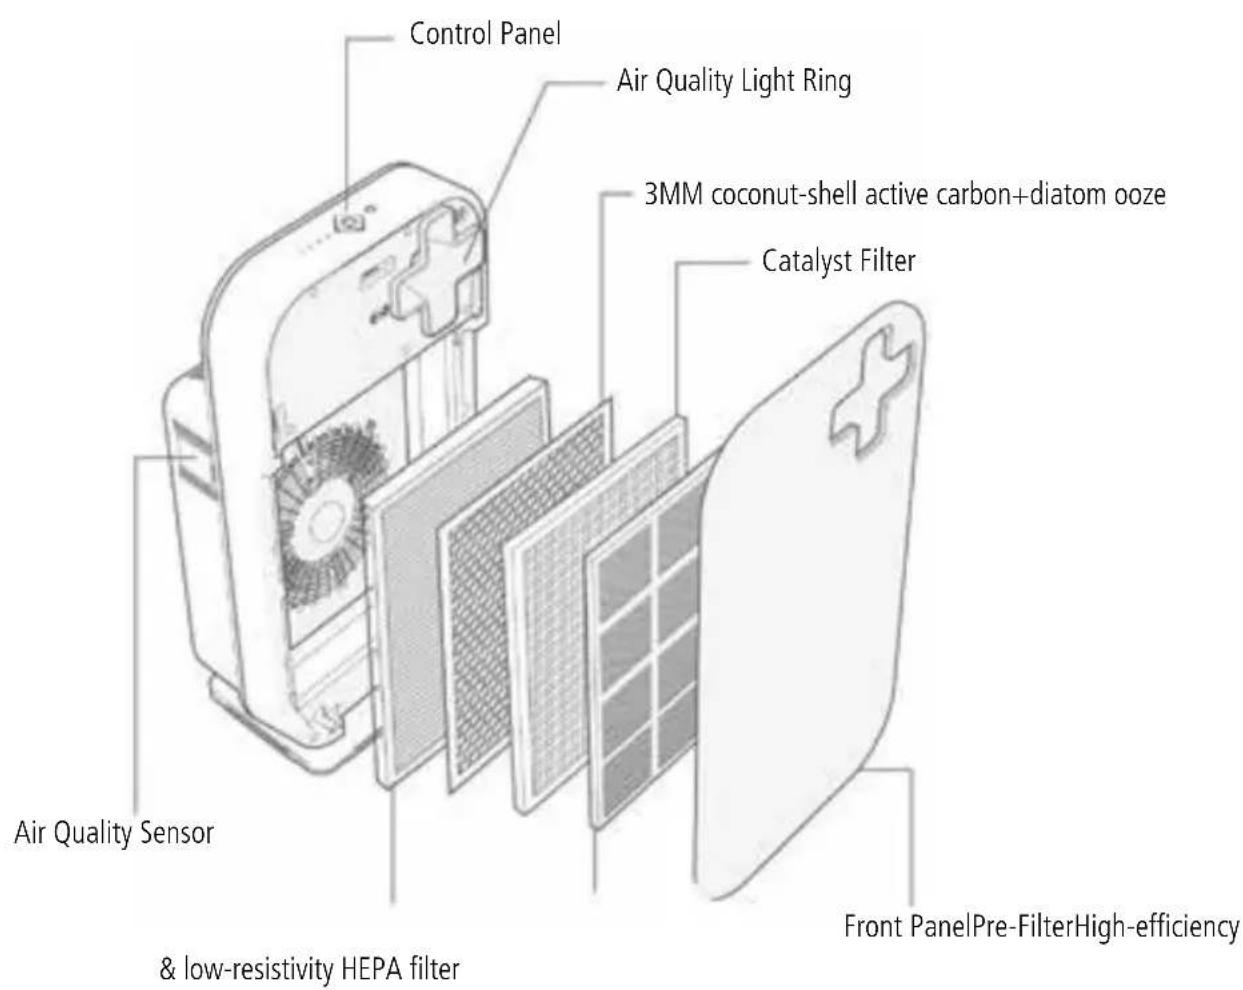
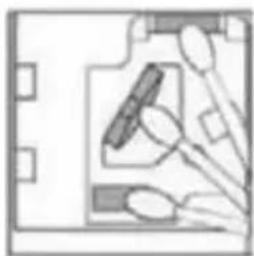
4.1 Placing / Replacing the filters
The appliance comes with all filters fitted inside, but you have to remove the packaging of the filters before you use the appliance. Remove all filters, unpack them and place them back into the appliance as described below.
Tip: Place the appliance against a wall for more stability when you remove or insert filters.
Note: You should make sure the filters are inserted in the right position.
-
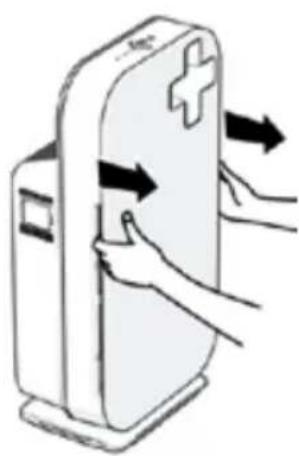
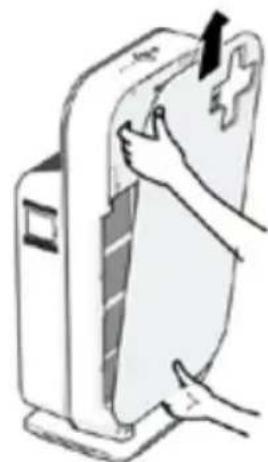
Place your fingers in the recesses of the side panels and gently pull the top part of the front panel towards you. Then lift the hooks at the bottom of the panel out of the bottom of the appliance.
-
Remove all the filters from the appliance.
- Remove all packaging material from the filters.
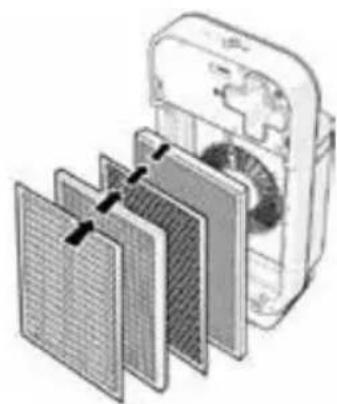
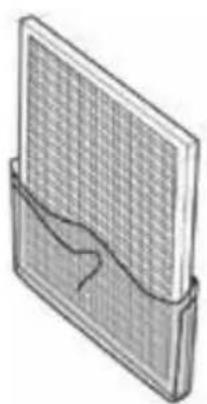
- Put the four filters back into the appliance. Note: Make sure that the side with tag is outwards.
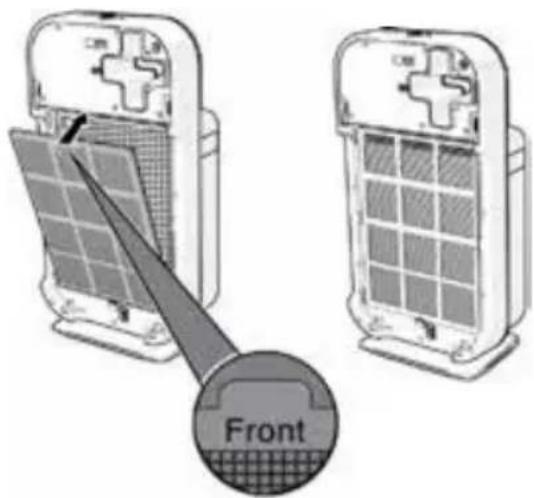
- Place filter 1 (pre-filter) in the appliance. Note: Make sure that the side with the two projections is pointing towards you. Note: Make sure that all hooks are properly attached to the appliance.
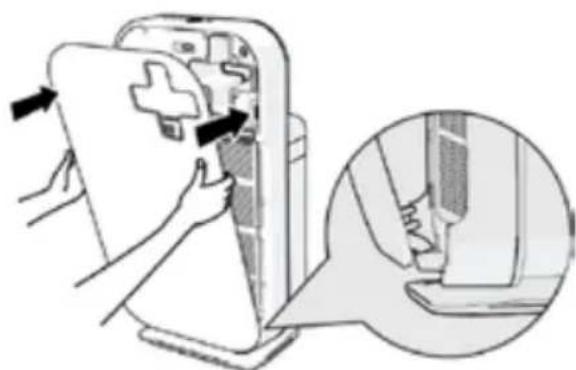
- To reattach the front panel, insert the bottom hooks into the bottom of the appliance first. Then push the panel against the body of the Appliance.
4.2 Using the appliance
- Put the plug in the wall socket, all lights go on twice and you hear a beep. Then the lights go out again.
- Press and hold the on/off button for 2 seconds to switch on the appliance.
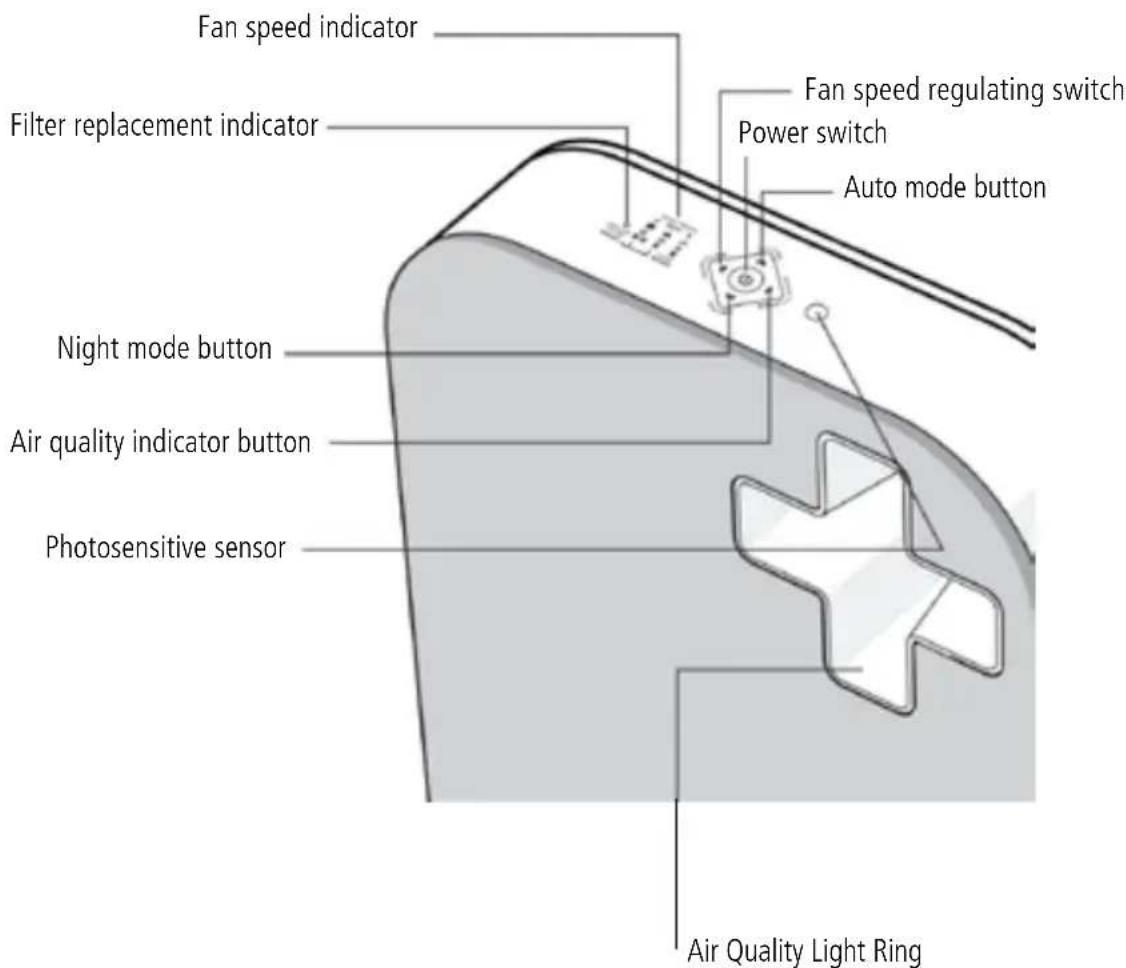
The power switch indicator and the AIR QUALITY light on the control panel go on.
GB
4.3 Air quality indication
To switch off the air quality light ring, press the AIR QUALITY button.
Note: The air quality light ring automatically goes on when the appliance is switched on.
The appliance automatically starts operating in the AUTO mode. To switch off the appliance, press and hold the on/off button again until the power-on light goes out and unplug the appliance.
Note: When the humidity level in the room is very high, it is possible that condensation develops on the air quality sensor. As a result, the AIR QUALITY light on the control panel and the air quality light ring may indicate that the air quality is bad eventhough the air quality is good. In this case, the auto mode causes the appliance to run at high fan speed. You can solve this by cleaning the air quality sensor. If condensation develops frequently during periods of high humidity, we advise you to use one of the manual speed settings.
Air Quality Light Ring
| Blue | Excellent | |
| Green | Good | |
| Purple | Moderate | |
| Red | Bad |
ATTENTION: If you want to turn off air quality sensor indicator, please press the
"AIR QUALITY" button.
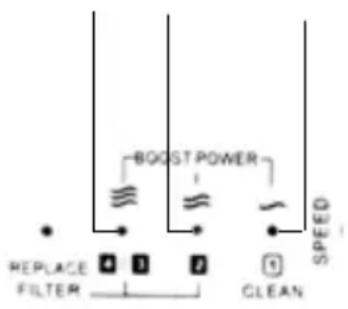
4.4 Fan speed lights/filter replacement lights
- The lights on the right-hand side of the control panel have a dual function: they either indicate the fan speed or they indicate that the filters should be replaced or cleaned.
- When lights 1 to 3/4 light up continuously, they indicate the current fan speed.
- When light 1 flashes, you have to clean the pre-filter. When lights 2 and/or 3/4 flash, you have to replace these filters. If lights 2 and/or 3/4 flash, the REPLACE FILTER light also flashes (see chapter 'Filter replacement' for more information).
- When lights 2, 3/4 and the REPLACE FILTER light are on continuously, the appliance is locked (see chapter 'Filter replacement lock' for more information).
4.5 Adjusting the air quality sensor sensitivity
People with certain health problems (e.g. allergies or asthma) have a greater need for healthy air. For this reason, the air cleaner allows you to adjust the sensitivity of the air quality sensor. When it is set to a higher Sensitivity level, the appliance already starts cleaning the air at lower pollution levels to make the air even cleaner. There are 3 sensitivity levels:
standard
sensitive
- extra sensitive
The pollution sensor is set to standard sensitivity. You can adjust the Sensitivity of the air quality sensor in the following way:
1: If the appliance is already plugged in, unplug the appliance and wait for a few minutes.
2: Press the AIR QUALITY button and simultaneously put the mains plug in the wall socket. The appliance beeps twice and one of the fan speed lights flashes to show the current sensitivity level of the air quality sensor.
Sensitivity level
Normal Sensitive Extra sensitive
3: Press the FAN SPEED button to adjust the sensitivity level of the air quality sensor. One of the fan speed lights flashes to show the set sensitivity level of the air quality sensor.
4: Press and hold the on/off button to switch off the appliance
Note: When you change the sensitivity level, the appliance automatically starts operating at the set sensitivity level whenever you switch on the appliance.
4.5.1 Auto mode

When the appliance is switched on, the built-in air quality sensor automatically measures the ambient air quality. When the auto mode is activated, the appliance selects the most appropriate fan speed for the measured air quality.
1: Press and hold the on/off button for 2 seconds to switch on the appliance.
2: Press the AUTO button to activate the auto mode.
Note: When the appliance is operating in another mode and you want to activate the auto mode, simply press the AUTO button. The AUTO light goes on. The FAN SPEED light indicates at which fan speed the appliance is operating.
Note: When the air quality is very good and the appliance operates at a very low fan speed, the FAN SPEED light for the lowest speed setting does not go on. In this case only the power-on light and the AUTO light are on.
Note: The built-in air quality sensor measures the air quality and automatically selects the appropriate speed setting to guarantee the best possible air quality in your room. When the air is clean, the appliance stops running. When the air quality deteriorates, the appliance starts running at a low fan speed and noise level so that the energy consumption is minimized.
4.5.2 Night mode
The appliance works in harmony with its surroundings. In auto mode, the appliance automatically switches to night mode when the room in which it is operating becomes dark. When the room has been dark for 3 minutes, the lights of the appliance go out, the fan speed and noise level are reduced and the energy consumption is minimized. If the room becomes bright again for 5 minutes or longer, the appliance resumes normal operation. In night mode, the automatic control is still active. If the air is clean, the lights and the fan are off. If the air quality deteriorates, the appliance is activated and the lights and the fan come on again.
Note: The night mode only works when the appliance is operating in the auto mode.
4.5.3 Fan speed
If you do not use the auto mode, you can select the desired fan speed yourself.
1: Press and hold the on/off button for 2 seconds to switch on the appliance.
2: Press the FAN SPEED button one or more times to select the desired fan speed. The corresponding fan speed light and the indications above the Lights show the set fan speed (1,2,3 or boost power).
Note: Select boost power if you need an extra strong airflow when the air in the room is very dirty. All three fan speed lights go on.
4.5.4 Silent mode
When you use the appliance in silent mode, it operates very quietly.
1: Press and hold the on/off button for 2 seconds to switch on the appliance.
2: Press the SILENT button to activate the silent mode. The SILENT light goes on.
If you want to go back to the FAN SPEED mode or AUTO mode, simply press the FAN SPEED or AUTO button.
Always unplug the appliance before cleaning or other maintenance. Never immerse the appliance in water or any other liquid. Never use aggressive or flammable cleaning agents such as bleach or alcohol to clean any part of the appliance. Only the pre-filter is washable. All other filters are NOT washable.
4.5.5 Body of the appliance
Regularly clean the inside and outside of the body to prevent dust from collecting on the inside and outside.
1: Wipe away dust with a soft dry cloth from the body of the appliance.
2: Clean the air inlet and the air outlet with a soft dry cloth.
5 Filter maintenance

This air cleaner is equipped with the Healthy Air Protect Lock feature to ensure that the filters are in optimal condition when the appliance is operating. When one of the filters is almost full and has to be cleaned or replaced, the appropriate filter replacement light starts to flash. If you do not replace filter, the appliance will stop operating and the appliance is locked. When the appliance is locked, the filter replacement light of the filter concerned lights up oncontinuously.
Note: Only replace a filter when the corresponding filter replacement light flashes. If you replace the filter before the filter replacement light starts flashing, the lifetime counter will not be reset but will continue counting the lifetime of the previous filter. As a result, the filter replacement light will start flashing much too soon.
5.1 Cleaning and Maintenance
Caution: Always unplug the unit from the electrical outlet before cleaning the unit.
5.1.1 Cleaning the unit
1 Use dry and soft cloth to wipe the exterior of the unit.
Note: Use damp cloth or mild cleansing detergent to remove heavy dirt.
2 Clean the Air Inlet and Air Outlet with a soft brush 2 or vacuum cleaner.
5.1.2 Cleaning the Built-in Air Quality Sensor
Use damp swab to clean the Built-in Air Quality Sensor every 2 months to ensure the bestoperation performance of the unit.
Note: If the unit is located in a more dusty environment, it is recommended to clean the Air Quality Sensor more often.
- Use soft brush to clean the Air Outlet and Air Inlet of the unit.
- Remove the protective cover of the Air Quality Sensor.
- Use a damp swab to clean the air quality sensor, the air inlet and outlet. Use a dry swab to wipe them if necessary.
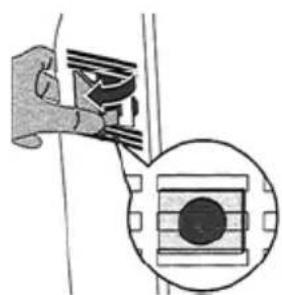
- Press the replacement filters button (5/6 seconds)
5.1.3 Cleaning the pre-filter
- Clean the Pre-Filter with vacuum cleaner.
Note: Use the vacuum cleaner at low speed to prevent damage to the filter. Do not rinse or soak the filter with water.
GB
5.1.4 Replacing the Filters
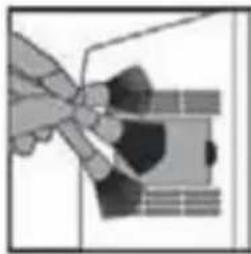
- Rasp both recess sides of the Front Panel Casing and pull outwards to release the magnetic catch. Gently lift up the grooves at the bottom to remove the Front Panel Casing.
- To remove the Pre-Filter, hold and pull both tabs, located at the middle of the Pre-Fil -ter, outwards.
- To remove the other filters, lift the tag on the top of the filter and pull outwards to remove.
Note: Remove one filter at a time.
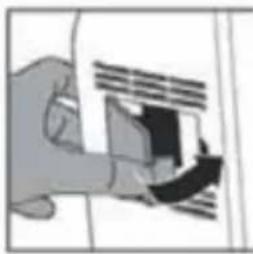
- Attached the cleaned Pre-Filter by inserting its grooves into the designated slot at the side of the internal housing of the unit.
- Reattach the Front Panel Casing, align and insert the grooves at the bottom into the designated slot. Then exert some pressure to the bottom body of the unit to secure the Front Panel Casing towards the magnetic catch.
- Insert the power plug into the electrical outlet and switch on the power supply.
- Press Power On/Off button to switch on the unit.
- Press Filter Reset button 8 to reset the unit.
5.2 Filter replacement lock
If you do not replace the filter in time, the appliance stops operating approx. 2 weeks after the filter replacement light started flashing. When the appliance is locked, it does not operate until you have replaced the full filter and pressed the reset button.
Note: When filter replacement lights 2 or 3/4 and REPLACE FILTER on the control panel are on continuously, the appliance is locked (see section 'Filter maintenance' in this chapter for more information).
How long it takes before the appliance is locked depends on the operating time and speed level selected after the filter replacement alert. Approximately 1 day before the appliance locks, it beeps every 30 minutes to inform you that one of the filters needs to be replaced. When the appliance is locked, you hear a beep when you press any button. You can switch off the appliance by pressing and holding the on/off button.
If the appliance is locked:
1: Check which filter needs to be replaced.
2: Switch off the appliance and unplug it.
3: Replace the appropriate filter (see section 'placing / Replacing the filters').
6 Storage
To store the mains cord, windit round the cord storage facility at the bottom of the appliance.
7 Troubleshooting
GB
| Condition Possible cause | Possible solution | |
| Unit cannot be switched on | The faceplate is not properly placed. | Remove the front panel and put them back on Device. |
| Power plug is not properly inserted into the electrical outlet. | Remove the power plug and insert it into the electrical outlet again. | |
| Power plug or cord is damaged. | Contact service centre. | |
| Filter efficiency Shield is activated and unit stops operating because exhausted filters are not replaced. | Clean the Pre-Filter and replace with a new set of filter unit. Refer to Cleaning and Maintenance on page 10. | |
| Fan not working | Unit is not switched on. | Ensure the power plug is properly inserted into the electrical outlet and switch on the unit. |
| Motor has broken down. Contact | service centre. | |
| Fan Speed does not adjust automatically when the Auto Mode is activated | Air Quality Sensor is faulty and alarm will be heard with Air Quality Indicator licking in green. | Contact service centre. |
| Night Mode is activated when the ambience lighting dimmed for 3 minutes. | Press Auto Mode button or Fan Speed button. Unit will resume its normal operation when ambience light sensor detects ambience lighting for 3 minutes. | |
| Poor performance or not purifying at optimum capacity | Filter unit is due for replacement. | Replace with a new set of filter unit. |
| Blockage at Air Inlet or Air Outlet of the unit. | Contact service centre. | |
| Plastic packaging on filters are not removed. | Remove plastic packaging on each filter before using. | |
| No adequate clearance and space around the unit for air ventilation. | Ensure the Air Inlet on both sides of the unit has a clearance of at least 50cm and at least 10cm at the back of the unit where the Air Outlet is located |
GB
| Condition Possible cause Possible solution | ||
| Poor performance or not purifying at optimum capacity | Missing filters or wrong filters sequence are placed into the unit. | Ensure all filters are placed into the unit according to the instructed sequence. |
| Exceeded expected room coverage area. | Maximum room coverage area for Aero is 75 m3. | |
| Fan not working | Loose or foreign particles inside the unit. | Contact service centre. |
| Motor is loose. Contact service centre. | ||
| Plastic packaging on filters are not removed. | Remove plastic packaging on filter before using. |
8 Warranty / Disposal / Technical change
Warranty
The Products are controlled just before delivery. If despite a lack of your product, try trustfully your seller. Please bring your receipt, as this is to be submitted for each warranty. The guarantee period is 24 months from date of purchase
Disposal
The device must be disposed of properly. The device can be distributed free of charge for disposal at each dealer.
Technical changes
Reserving technical changes in technology and design
Please save the packaging materials of the unit.
CE declaration of Conformity
This device complies with the following standards
EN 60335-2-65:2003+A1:2008
EN 60335-1:2002 +A11:2004 +A1:2004 +A12:2006 +A2:2006 +A13:2008
+A14:2010 +A15:2011
EN 62233:2008
Firma
Armin Schmid
Olensbachstrasse 9-15
CH-9631 Ulisbach
Tel. Int. +41 71 987 60 60
Tel.Nat.0848870850
Festnetz 14 Cent/Minute