1412060 - Ladder BRENNENSTUHL - Free user manual and instructions
Find the device manual for free 1412060 BRENNENSTUHL in PDF.

| Brand | Brennenstuhl |
| Model | 1412060 |
| Product type | Multi-function ladder |
| Intended use | Working at height, max load 150 kg |
| Available ladder types | Leaning ladder, sliding 2-section, double-sided with steps, transformable 3-section, transformable Premium 3-section, telescopic, multi-position Brenette 6-joint |
| Maximum load | 150 kg |
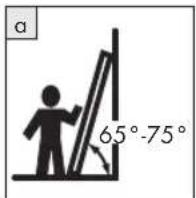
| Correct installation angle | 65° - 75° to the horizontal |
| Maximum number of users | 1 |
| Safety | Locks, locking hooks, lift protection, snap-in joints |
| Cross foot | Can be mounted for stability |
| Platform | Can be used with original board ref. 1430070/1420080 |
| Maintenance | Oil the joints regularly with non-resinifying machine oil |
| Storage | Protect from harmful influences |
| Repairs | By qualified person |
| Manufacturer | H. Brennenstuhl S.A.S., 5 rue de l'Artisanat, F-67460 Souffelweyersheim |
| Compliance | Safety pictograms |
| Package contents | User manual and safety instructions |
| Customer service | www.brennenstuhl.com |
Frequently Asked Questions - 1412060 BRENNENSTUHL
User questions about 1412060 BRENNENSTUHL
0 question about this device. Answer the ones you know or ask your own.
Ask a new question about this device
Download the instructions for your Ladder in PDF format for free! Find your manual 1412060 - BRENNENSTUHL and take your electronic device back in hand. On this page are published all the documents necessary for the use of your device. 1412060 by BRENNENSTUHL.
USER MANUAL 1412060 BRENNENSTUHL
natural_image
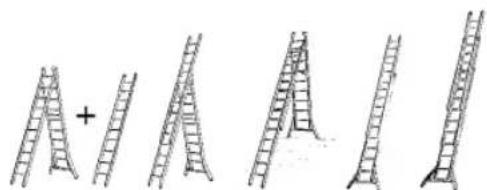
Three aluminum double ladders arranged in a triangular formation (no text or symbols visible)
Operation and Safety Notes

Before reading, unfold both pages containing illustrations and familiarise yourself with all functions of the device.
FR
GB Operation and Safety Notes Page 15
natural_image
Simple line drawing of a ladder leaning against the vertical axis (no text or symbols)natural_image
Three ladder-like structures arranged vertically (no text or symbols)natural_image
Metal ladder structure with no text or symbols visibleAnlegeleiter:
○ Teleskopleiter
natural_image
Illustration of four different ladder arrangements with one ascending and one ascending, showing a staircase (no text or symbols)natural_image
Diagram showing various ladder structures arranged in a row (no text or labels)- Leiter benutzen
Intended use....Page 16
Parts description Page 16
Ladder types......Page 16
Safety advice
Please consider the following safety information before using the ladder:....Page 16
Positioning and erecting of the ladder
Straight ladder Page 17
Extension ladder, 2 parts....Page 17
Twin stepladder....Page 17
Multi ladder, 3 parts....Page 18
Multi ladder, Premium, 3 parts....Page 18
Telescopic ladder....Page 19
Brenette multi ladder, 6 hinges Page 20
Using the ladder ......Page 21
Pictograms Page 21
Repairs, maintenance and storage......Page 23
Disposal Page 23
Manufacturer......Page 23
Make yourself familiar with the product before use. Please read the following instructions and safety advice. Only use the product as described and for the purposes mentioned. Retain this instruction. Please include all documents when handing the Product to third parties.
○ Intended use
This product is suitable as working equipment to reach higher working places. It is also suitable as standing place during easy short-term tasks. The maximum load of 150 kg must not be exceeded. Other usage than mentioned above and changing of the product are not permitted as this can cause injury and / or damage of the product. The manufacturer cannot be held liable for damage from improper use.
○ Parts description
1 Rung
2 Ladder base
3 Highest allowed standing rung
4 Safety hinge
5 Hinge lock
6 Cross foot
7 Guide plate
8 Joint
9 Retaining pin
10 Tension belt
11 Locking grip
12 Rung hook
13 Lifting lock
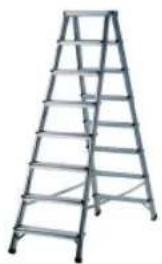
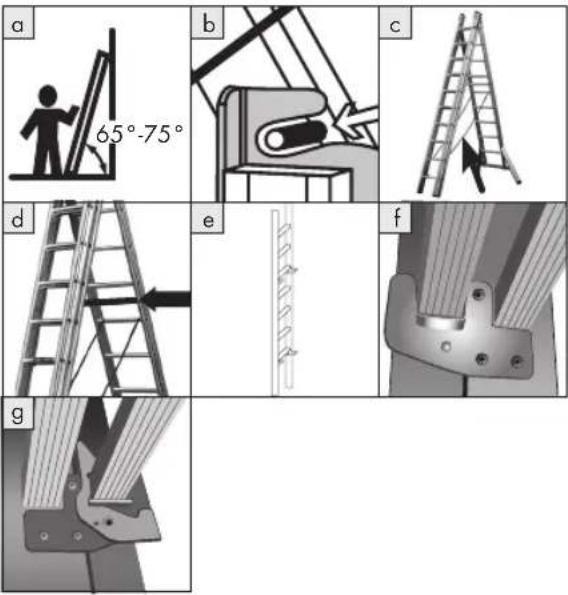
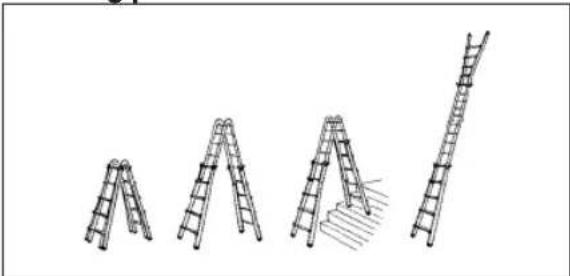
○ Ladder types
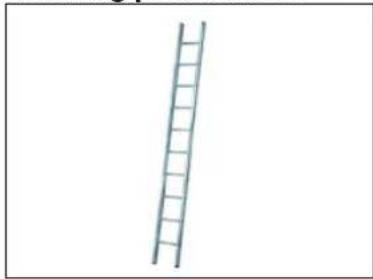
Fig. A: Straight ladder
Fig. B: Extension ladder, 2 parts
Fig. C: Twin stepladder
Fig. D: Multi ladder, 3 parts
Fig. E: Multi ladder, Premium, 3 parts
Fig. F: Telescopic ladder
Fig. G: Brenette multi ladder, 6 hinges
● Safety advice
Please consider the following safety information before using the ladder:
a) Use the ladder only if your health permits it. Some health conditions, medicine, alcohol or drug abuse may impair your safety when using the ladder.
b) In order to avoid damage, make sure that the ladder is sufficiently fixed / secured when transporting it on a roof rack or in a lorry.
c) Check the ladder for condition and functioning of all parts after delivery and before the first use.
d) Check the ladder for damage and safety at the beginning of each working day on which the ladder is used.
e) Regular checks are required for professional usage.
f) Make sure the ladder is suited for the specific purpose.
g) Do not use a damaged ladder.
h) Remove all dirt from the ladder, e.g. wet paint, dirt, oil or snow.
i) Prior to using a ladder for work, evaluate the risks considering the legal regulations of the country of use.
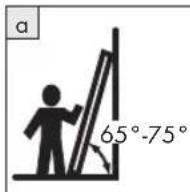
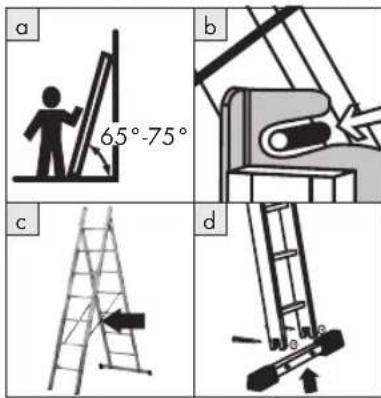
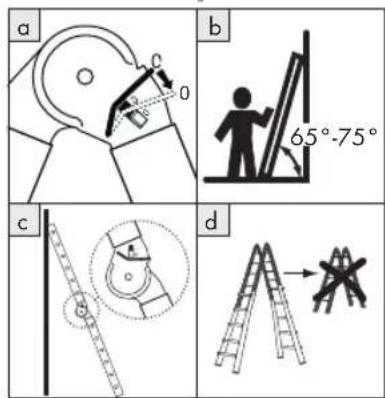
Positioning and erecting of the ladder
- Positioning and erecting of the ladder
a) Make sure the ladder is erected in the proper position, e.g. correct angle for leaning ladders (leaning ratio 1:4), rungs or steps in horizontal position and complete opening of a stepladder.
b) If applicable, secure the locking mechanisms 5, 8 completely before using the ladder.
c) Erect the ladder on even, level and stable ground.
d) Lean straight ladders against an even and stable surface and secure it prior to use, e.g. by fixing or using a suitable means to secure stability.
e) Only reposition the ladder from the ground.
f) Consider the risk of collision, e.g. with pedestrians, vehicles or doors when positioning the ladder. Lock the doors (but no emergency exits) and windows in the working area, if possible.
g) Assess all risks by electrical equipment in the working area, e.g. high voltage overhead lines or other electrical equipment.
h) Put the ladder on its feet, not on the steps or rungs.
i) Put the ladder only on stable surfaces (not on ice, slippery surfaces or very dirty surfaces). Take measures to prevent the ladder from slipping or make sure that dirty surfaces are sufficiently cleaned.
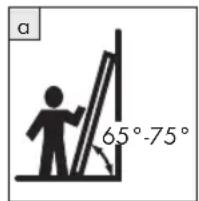
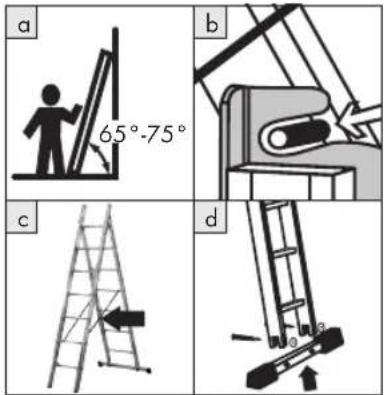
○ Straight ladder
Make sure the ladder is erected in the proper position.
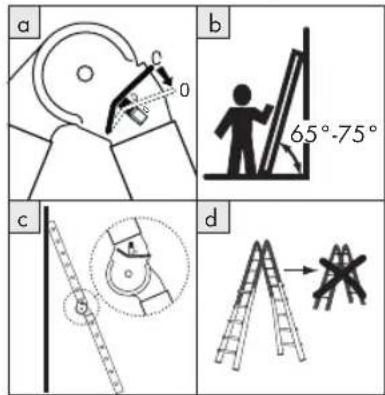
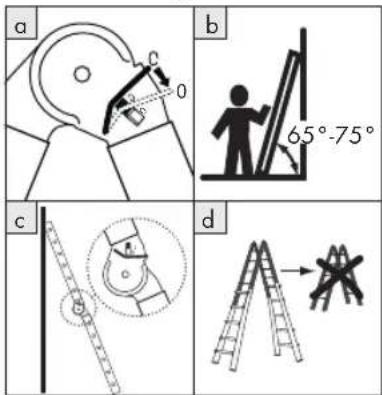
NOTE: An angle of 65^ to 75^ to the horizontal must be kept (see Fig. a).
Standing possibilities:
natural_image
Simple line drawing of a ladder on a plain background (no text or symbols)○ Extension ladder, 2 parts
Make sure that the rung hooks 12 and the lifting lock 13 are engaged.
NOTE: An angle of 65^ to 75^ to the horizontal must be kept (see Fig. a).
- Disengage the lifting lock 13 before retracting.
Standing possibilities:
natural_image
Three ladder-like structures arranged vertically (no text or symbols)○ Twin stepladder
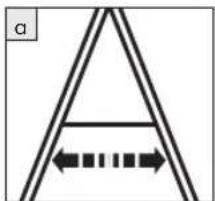
Open the ladder until the holding belts are pulled tight (see Fig. a).
Positioning and erecting of the ladder
Standing possibilities:
natural_image
Metal ladder structure with multiple ladders (no text or symbols visible)○ Multi ladder, 3 parts
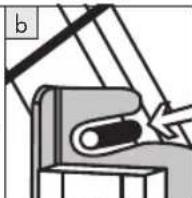
Insert the two upper retaining pins (see Fig. b) into the hinge stop slots.
Open the ladder until the holding belts are pulled tight (see Fig. c).
○ Multi ladder, Premium, 3 parts
Standing possibilities:

Straight ladder:
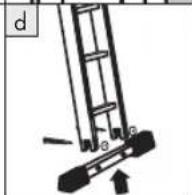
- Mount the cross foot 6 (see Fig. d). - Make sure that the rung hooks 12 and the lifting lock 13 are engaged.
NOTE: An angle of 65^ to 75^ to the horizontal must be kept (see Fig. a).
Stepladder:
- Mount the cross foot 6 (see Fig. d). - Lift both sliding parts and spread them.
Straight ladder:
Make sure that the rung hooks 12 and the lifting lock 13 are engaged.
NOTE: An angle of 65^ to 75^ to the horizontal must be kept (see Fig. a).
Stepladder:
- Lift both sliding parts and spread them.
Insert the two upper retaining pins (see Fig. b) into the hinge stop slots.
Open the ladder until the holding belts are pulled tight (see Fig. c).
Bolt the side cross bar to the supporting part (see Fig. d).
Stepladder with attached extension ladder up:
- Bolt the side cross bar to the supporting part (see Fig. d).
NOTE: When the sliding part is extended, at least 3 rungs must overlap.
Positioning and erecting of the ladder
NOTE: Rung hooks and the lifting lock 13 must be engaged.
Stepladder with attached extension ladder down:
- Bolt the side cross bar to the supporting part (see Fig. d).
Take out the sliding part downwards and turn it around, so that the open side of the rung hooks points up (see Fig. e, f). Note that the lifting locks must engage (see Fig. g).
NOTE: All 4 rung hooks and the lifting lock 13 must be engaged and locked.
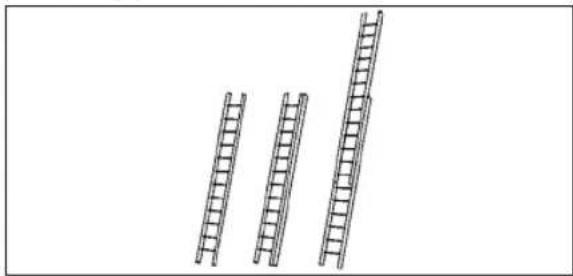
Standing possibilities:
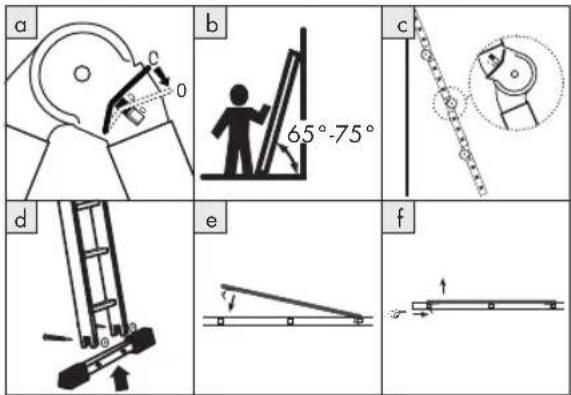
○ Telescopic ladder
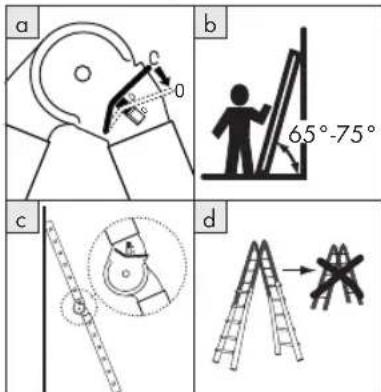
Erecting: Straight/leaning ladder
- Spread the ladder parts - the hinges will lock automatically in the next position.
- Unlock again for further spreading (Fig. a).
- Check the position of the pin: 0 = unlocked, C = engaged (see Fig. a).
- Cover the hinges during dirty work.
Check if the hinges are properly engaged before mounting the ladder (pin position »C«, see Fig. a).
Collapsing:
- Unlock the hinges.
- NOTE: The ladder can now be collapsed in one step.
Straight ladder:
NOTE: An angle of 65^ to 75^ to the horizontal must be kept (see Fig. b).
Make sure that the hinges are facing the wall and the locking pin is in position "C" (see Fig. c).
NOTE: The "C" must be positioned down.
Using the Telescopic ladder:
NOTE: Use of the inner part of the ladder as stepladder is not permitted (see Fig. d).
Pull both locking grips 11 outwards and fixate them on the side.
Bring the telescopic part of the ladder to the required rung height and engage both locking grips [11].
Make sure that the locking grips 11 are engaged properly.
NOTE: The telescopic part of the ladder must not be extended to the last rung.
Standing possibilities:
natural_image
Line drawings of four different ladder arrangements, showing a stepwise increase from left to right (no text or symbols)Positioning and erecting of the ladder
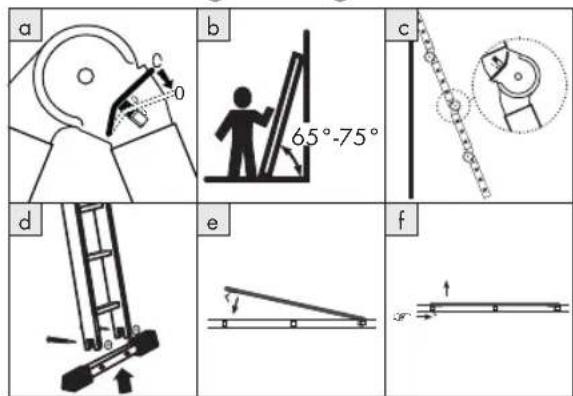
○ Brenette multi ladder, 6 hinges
Erecting: Straight/leaning ladder
- Mount the cross foot 6 (see Fig. d).
- Spread the ladder parts - the hinges will lock automatically in the next position.
- Unlock again for further spreading (Fig. a).
- Check the position of the pin: 0 = unlocked, C = engaged (see Fig. a).
- Cover the hinges during dirty work.
- Check if the hinges are properly engaged before mounting the ladder (pin position "C", see Fig. a).
Collapsing:
- Unlock the hinges.
- NOTE: The ladder can now be collapsed in one step.
NOTE: The hinges do not lock in the middle positions when the ladder is being collapsed.
Straight ladder:
NOTE: An angle of 65^ to 75^ to the horizontal must be kept (see Fig. b).
Make sure that the middle pair of hinges is facing away from the wall and that the locking pins are facing down in position "C" (see Fig. c).
NOTE: The "C" must be positioned down.
Mounting the plank:
NOTE: Use the working scaffold and step scaffold only with the original plank.
- Plank product number: 1430070 for ladder product number: 1420070
- Plank product number: 1430080 for ladder product number: 1420080
Mount the plank to the appropriate rungs. Push the plank down. The safety hook engages on the rung (see Fig. e).
- Push the spring back to unlock the plank. Remove the plank towards the top (see Fig. f).
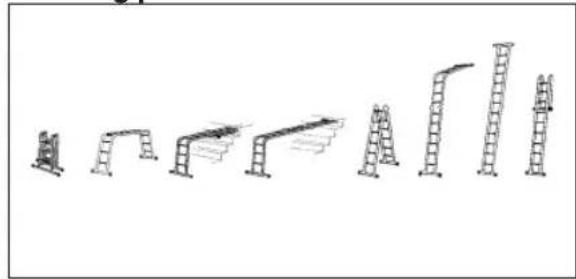
Possible use:
- Folded ladder
- Stepladder
- Long ladder
- Standoff ladder
- Attic ladder
- Step scaffold (use only with original plank) (maximum load 150 kg)
- Working scaffold (use only with original plank) (maximum load 150 kg)
Standing possibilities:
natural_image
Illustration of various ladder structures arranged in a row (no text or symbols)● Using the ladder
a) Do not exceed the maximum load of the specific ladder type.
b) Do not lean off too far. Ensure that your belt buckle (navel) remains between the rails and that booth feet are standing on the same step / rung.
c) Do not step off a leaning ladder at great height without additional safety measures. Tie the ladder or use a suitable ladder-stability device.
d) Do not use stepladders to climb to another working platform.
e) Do not stand on the upper three steps / rungs of a leaning ladder.
f) Do not stand on the upper two steps / rungs of a stepladder without platform or holding device for hands or knees.
g) Do not stand on the upper four steps / rungs of a stepladder with attached extension ladder.
h) Use ladders only for short and easy tasks.
i) Use non-conducting ladders for unavoidable work with live equipment.
j) Do not use the ladder outdoors under adverse weather conditions, e.g. strong wind.
k) Take precautions that children do not play on the ladder.
I) Lock the doors (but no emergency exits) and windows in the working area, if possible.
m) Climb up or down facing towards the ladder.
n) Hold onto the ladder while climbing up or down.
o) Do not use the ladder as bridge.
p) Wear suitable shoes when climbing on a ladder.
q) Avoid excessive lateral loads, e.g. while drilling in brick or concrete walls.
r) Do not stay on the ladder for excessive periods of time without break (fatigue is dangerous).
s) In order to access a higher working level, slide the leaning ladder at least 1 m beyond the supporting point.
t) Make sure that objects to be carried on the ladder are not too heavy but can be easily handled.
u) Avoid work that causes lateral loads on step-ladders, e.g. drilling in solid materials (brick wall, concrete).
v) Hold onto the ladder with one hand while working off a ladder or, if this is impossible, take additional precautions.
w) On stairs, use stepladders with attached extension only if the rungs are on the same height or the ladder is standing horizontally, otherwise the ladder can tilt over.
x) Do not use the ladder as a scaffold.
y) Never use a stepladder as leaning ladder.
z) Do not climb onto the horizontal part of the ladder when using the ladder as attic ladder.
- Pictograms
WARNING! Consider the pictograms on the attached labels before using the ladder. Non-observance can cause injuries and / or material damage.
 | Read the instructions. |
 | Maximum load of the working platform: 150 kg |
 | Maximum load |
 | Correct angle |
 | Open completely before use |
 | Check if the spreading locks / locking mechanisms are engaged |
 | Visual check of the ladder before use |
 | Check the ladder feet |
Pictograms
 | Secure the upper / lower ladder end |
 | Maximum number of users on the ladder |
 | Excess length beyond the supporting point of the ladder |
 | Erect on even ground. |
 | Avoid leaning off the ladder sideways. |
 | Eliminate dirt on the ground. |
 | Erect on solid ground. |
 | Leaving the ladder sideways is not permitted. |
 | Do not use the ladder as bridge. |
 | Do not stand on the upper step. |
 | Ensure proper support of the upper ladder end. |
 | Do not stand on the upper 3 rungs of a leaning ladder. |
 | Do not stand on the upper 2 rungs of a stepladder. |
 | Do not stand on the upper 4 rungs of a stepladder with attached extension ladder. |
 | On stairs, do not use stepladders with attached extension if the rungs are not on the same height or the ladder is not standing horizontally. |
 | Mount cross foot. |
 | Use of the hinges when erecting the ladder. |
 | Engaging/unlocking the hinges. |
 | Engage the rung hooks before use. |
 | Do not use the ladder as a scaffold. |
 | Always climb up or down facing towards the ladder. |
 | Do not carry heavy or difficult to handle objects when climbing the ladder. |
 | Do not use a stepladder as a leaning ladder. |
 | Stand on the same step / rung with both feet. |
 | Do not climb onto the horizontal part of the ladder when using the ladder as attic ladder. |
Repairs, maintenance and storage/Disposal/Manufacturer
● Repairs, maintenance and storage
- Regularly lubricate the hinges with a non-resinating oil.
- Have repairs and maintenance on the ladder done by a competent person and according to the instructions of the manufacturer.
Always store ladders according to the specifications of the manufacturer. Protect the ladders from damaging influences.
- Disposal
The packaging consists only of eco-friendly materials. It can be disposed of in the local recycling containers. Please ask your municipal administration for the current regulations to dispose of the disused product.
● Manufacturer
For further information, we recommend the Service / FAQ pages of our website www.brennenstuhl.com.


Introduction
Utilisation conforme aux dispositions....Page 26
natural_image
Simple line drawing of a ladder on a plain background (no text or symbols)- Échelle coulissante 2 plans
natural_image
Three ladder-like structures arranged vertically (no text or symbols)natural_image
Metal ladder structure with no text or symbols visible- Échelle transformable 3 plans
Échelle d'appui :
Escabeau :
natural_image
Illustration of four different ladder arrangements with one ascending and one ascending, showing a staircase (no text or symbols)- Échelle multipositions
Brenette 6 articulations
natural_image
Diagram showing various ladder structures arranged in a row (no text or labels)Monter une planche:
natural_image
Simple illustration of a ladder leaning against the vertical axis (no text or symbols)natural_image
Three ladder-like structures arranged vertically (no text or symbols)Ladder positioneren en opzetten
○ Dubbele ladder
natural_image
Diagram of a triangular structure with internal horizontal lines and directional arrows, no text or symbols presentnatural_image
Metal ladder structure with no text or symbols visible○ Multifunctionele ladder driedelig
Aanleunladder:
○ Telescooppladder
Opstellen: Staan-/Aanleunladder
natural_image
Illustration of four different ladder arrangements with one ascending and one ascending, showing a staircase (no text or symbols)○ Brenette - multifuctionele ladder 6-geledingen
Opstellen: Staan-/Aanleunladder
natural_image
Diagram of various ladder structures arranged in a row, no text or symbols present- Ladder gebruiken
natural_image
Simple line drawing of a ladder leaning against the vertical axis (no text or symbols)natural_image
Three ladder-like structures arranged vertically (no text or symbols)natural_image
Diagram of a triangular structure with internal horizontal lines and directional arrows, no text or symbols presentnatural_image
Metal ladder structure with no text or symbols visible○ Scala telescopica