USER MANUAL 320 EP2 STERWINS
natural_image
Abstract black and gray circular logo design with no text or symbols
STERWINS
320 EP-2
natural_image
Line drawing of a lawn mower with attached ladder (no text or symbols)
FR
Original Instruction
Electric Lawn Mower 1100W

STERWINS
text_image
Technical diagram of a device with labeled components and directional arrows, including a 2x x1 model and internal assembly details.
Image 2
text_image
Technical diagram of a lawn mower with numbered parts and an inset showing the blade motion path.
text_image
Image 3
2
1
text_image
Image 4
1
2
Image 5
natural_image
Technical line drawing of a mechanical housing or enclosure with directional arrows indicating movement (no text or symbols)
Image 6
text_image
Technical diagram showing a hand using a tool to adjust cable clips, with magnified insets highlighting the component details.
natural_image
Line drawing of a person using a tool to clean or remove a toy car, no text or symbols present

text_image
Image 9
1
2
1
0

flowchart
graph TD
    subgraph_a["Diagram a"]
        A1["2"] --> A2["3"]
        A2 --> A3["4"]
        A3 --> A4["1"]
    end
    subgraph_b["Diagram b"]
        B1["1"] --> B2["2"]
        B2 --> B3["3"]
        B3 --> B4["4"]
        B4 --> B5["1"]
    end
    A1 -.->|✓| B1
    B1 -.->|×| B4
natural_image
Technical line drawing of a mechanical assembly with no visible text or symbols
TABLE DES MATIÈRES
MISE EN MARCHE/ARRÊT (IMAGE 9)
ENTRETIEN (IMAGE 11)
text_image
Exploded view diagram of a cleaning machine with numbered parts for identification
GARANTIE
Machinery Directive 2006/42/EC
Low Voltage Directive 2006/95/EC
EMC Directive 2004/108/EC
NOISE Directive 2000/14/EC
text_image
Technical diagram of a device with labeled components and directional arrows, including a 2x x1 model and a 1x x2 component.
FIG 2
text_image
Technical diagram of a lawn mower with numbered parts and an inset showing the blade path and airflow direction.
text_image
FIG 3
text_image
FIG 4
1
2
FIG 5

natural_image
Technical line drawing of a mechanical housing or enclosure with internal components and directional arrows indicating motion (no text or symbols)
S
FIG 6

text_image
Technical diagram showing a hand using a tool to adjust cable clips, with magnified insets highlighting the component details.


natural_image
Line drawing of a person using a cart to handle a net, with no text or symbols present
text_image
FIG 9
1
2
1
0
text_image
FIG 10
2
a
3
4
1
b
X
natural_image
Technical line drawing of a mechanical assembly with no visible text or symbols
CONTENIDO
Contenido....09
text_image
Exploded view diagram of a cleaning machine with labeled parts in Chinese
S
GARANTÍA
text_image
Technical diagram of a device with labeled components and directional arrows, including a 3D box, internal views, and a 1x2x scale.
Imagem 2
text_image
Technical diagram of a lawn mower with numbered parts and an inset showing airflow path
T
text_image
Imagem 3
natural_image
Technical line drawing of a mechanical housing or enclosure with directional arrows indicating motion (no text or symbols)
Imagem 6
text_image
Technical diagram showing a hand using a cable clamp to adjust cable neck, with inset images highlighting the component and assembly steps.
text_image
Imagem 8

natural_image
Technical line drawing of a mechanical assembly with no visible text or symbols
ÍNDICE
Âmbito de entrega....09
ÂMBITO DE ENTREGA (IMAGEM 1)
LIGAR E DESLIGAR (IMAGEM 9)
text_image
Exploded view diagram of a mechanical device with numbered parts for identification
GARANTIA
text_image
Technical diagram of a mechanical device with labeled components and directional arrows, including parts like 'i+' and 2x dimensions.
FIG 2
text_image
Diagram of a lawn mower with numbered parts and an inset showing the blade path and airflow direction.

text_image
FIG 3
text_image
FIG 4
1
2
FIG 5
natural_image
Technical line drawing of a mechanical housing or enclosure with internal components and directional arrows indicating motion (no text or symbols)
三
FIG 6

text_image
Technical diagram showing a hand using a cable clamp to adjust cable structure, with inset images highlighting the components.
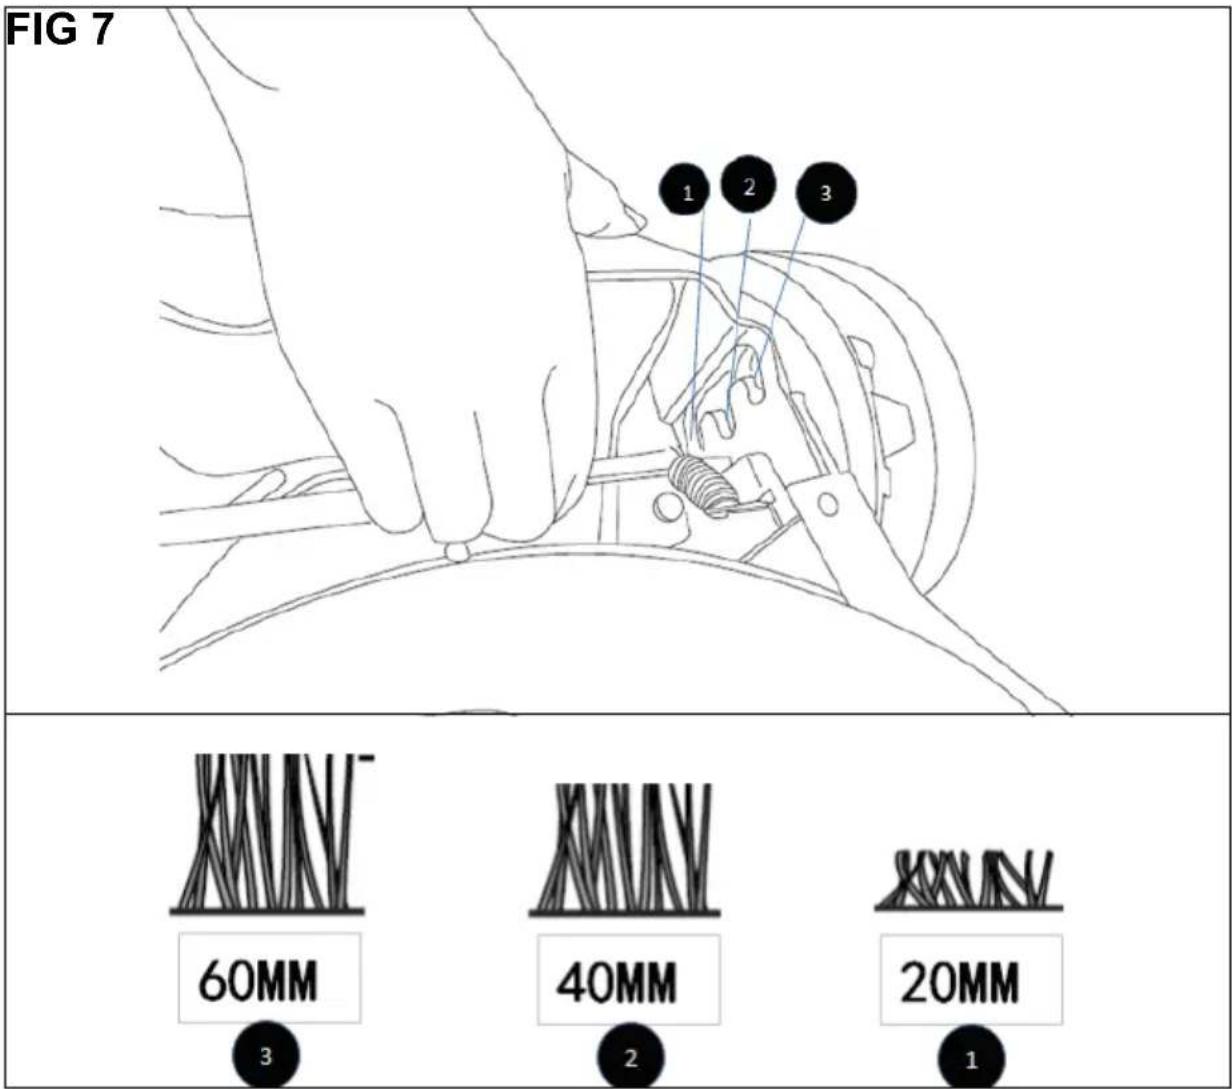
FIG 8
natural_image
Line drawing of a person using a tool to clean or adjust a small object, no text or symbols present

text_image
FIG 9
1
2
1
0

text_image
FIG 10
a
b
2
3
4
1
×
natural_image
Technical line drawing of a mechanical assembly with no visible text or symbols
CONTENUTO
text_image
Exploded view diagram of a cleaning machine with labeled parts in Chinese
GARANZIA
text_image
Technical diagram of a device with labeled components and directional arrows, including a 3D box, internal components, and a 1x2x scale.
ΣX. 2
text_image
Technical diagram of a lawn mower with numbered parts and an inset showing airflow path and component details.

text_image
ΣX. 3
2
1

text_image
ΣX. 4
1
2
ΣX. 5

natural_image
Technical line drawing of a mechanical housing or enclosure with internal components and directional arrows indicating motion (no text or symbols)
ΣX. 6
text_image
Technical diagram showing a hand using a tool to adjust cable clips, with magnified insets highlighting the component details.
text_image
ΣX. 7
1 2 3
60MM
40MM
20MM
1
text_image
ΣX. 8
text_image
ΣX. 9
1
2
1
0

flowchart
graph TD
    subgraph Scenario a
        A["1"] --> B["2"]
        B --> C["3"]
        C --> D["4"]
        D --> E["End"]
    end
    subgraph Scenario b
        F["End"] --> G["End"]
    end
    Note: Diagram includes a checkmark and a cross symbol indicating direction or failure.

natural_image
Technical line drawing of a mechanical assembly with no visible text or symbols
CONTENUTO
text_image
Exploded view diagram of a cleaning machine with numbered parts for identification
d
ΕΓΓΥΗΣΗ
Thank you have bought a STERWINS product. We are confident that this product meet your expectations for quality and reliability and will even surpass. Please take the time to read entire instruction manual carefully before using your new product, and observe the basic precautions contained therein.
Fig.1
text_image
Technical diagram of a device with labeled components and directional arrows, including a 3D box, internal components, and a 1x2x scale.
Fig.2

text_image
Diagram of a lawn mower with numbered parts and an inset showing the blade path and airflow direction.
E
text_image
Fig.3
text_image
Fig.4
1
2
Fig.5

natural_image
Technical line drawing of a mechanical housing or enclosure with internal components and directional arrows indicating motion (no text or symbols)
Fig.6

text_image
Technical diagram showing a hand using a cable clamp to adjust cable neck, with inset images highlighting the component and adjustment.
text_image
Fig.7
1 2 3
60MM
40MM
20MM
1

natural_image
Line drawing of a person using a tool to handle a small object, labeled 'Fig.8' (no text or symbols on the diagram itself)
text_image
Fig.9
1
2
1
0
text_image
Fig.10
2
a
3
4
1
b
X

natural_image
Technical line drawing of a mechanical assembly with no visible text or symbols
CONTENTS
Scope of supply....09
Your product at a glance....09
Description of symbols....09
General safety instructions....11
Work area safety....11
Electrical safety....12
Personal safety....13
Use and care....14
Special safety instructions....14
Intended use ....16
Assembly....16
Power connection....17
Switch on and off 17
Setting cutting height 17
Specification ....18
Maintenance and care ....18
Troubleshooting ....20
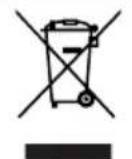
Exploded view....21
Warranty....22
CE Declaration of Conformity....23
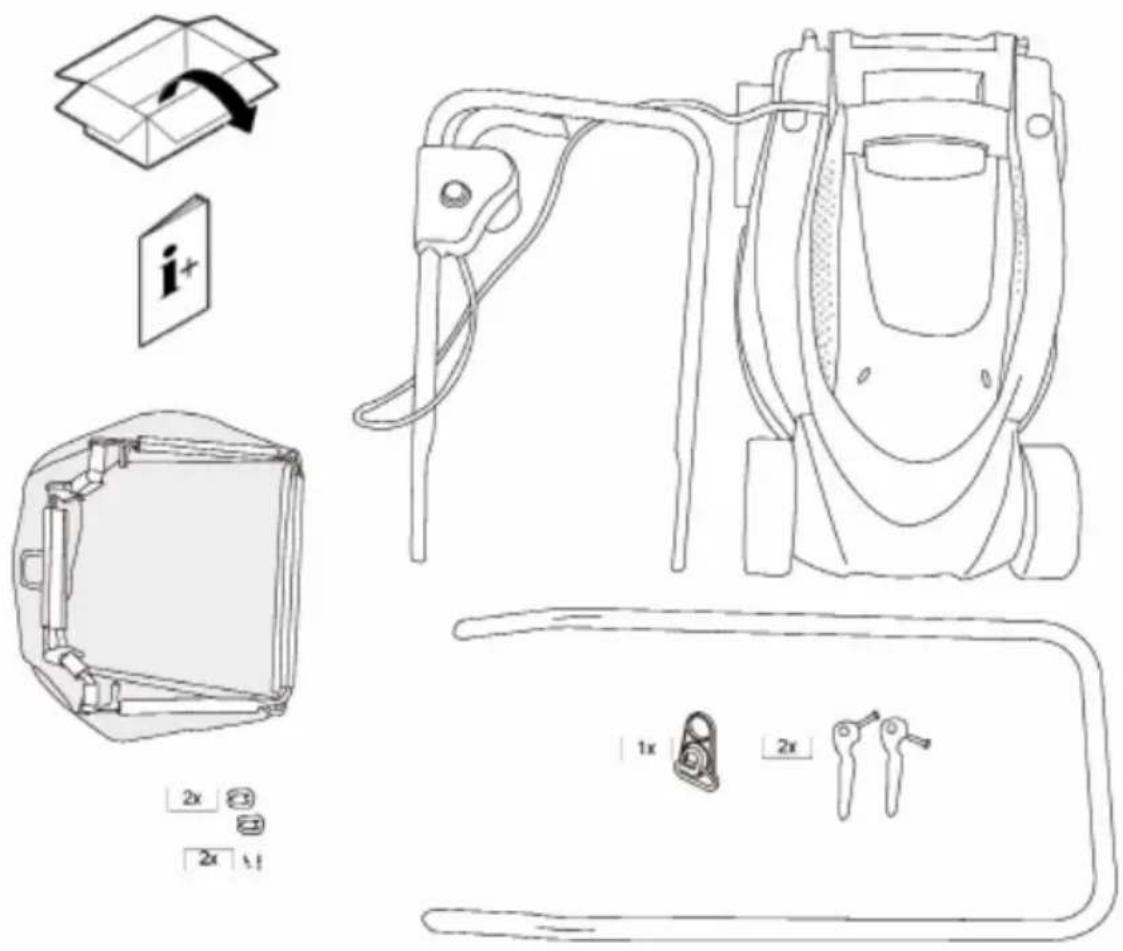
SCOPE OF SUPPLY FIG 1
- Instructions for use
- Mower and upper handle with switch box
- Lower handle
- Quick release lock x 2
- Grass bag
- Cord clip x2
- Cord grasper
- ST5 screw x 2
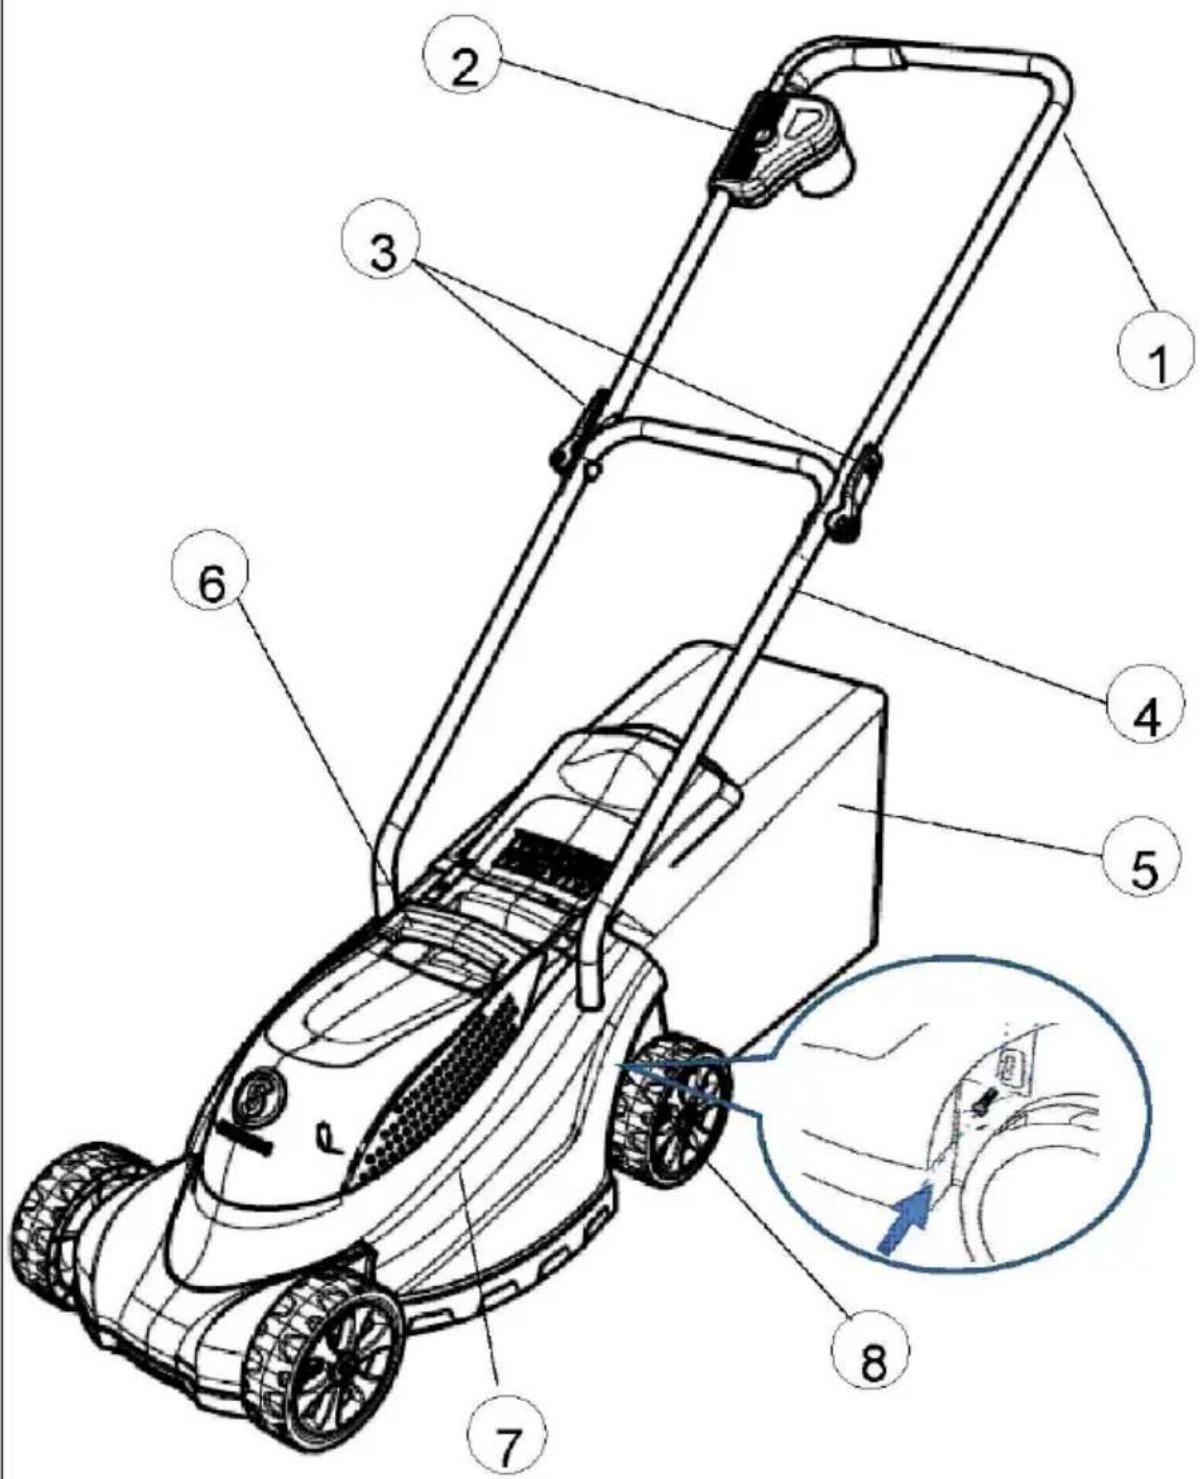
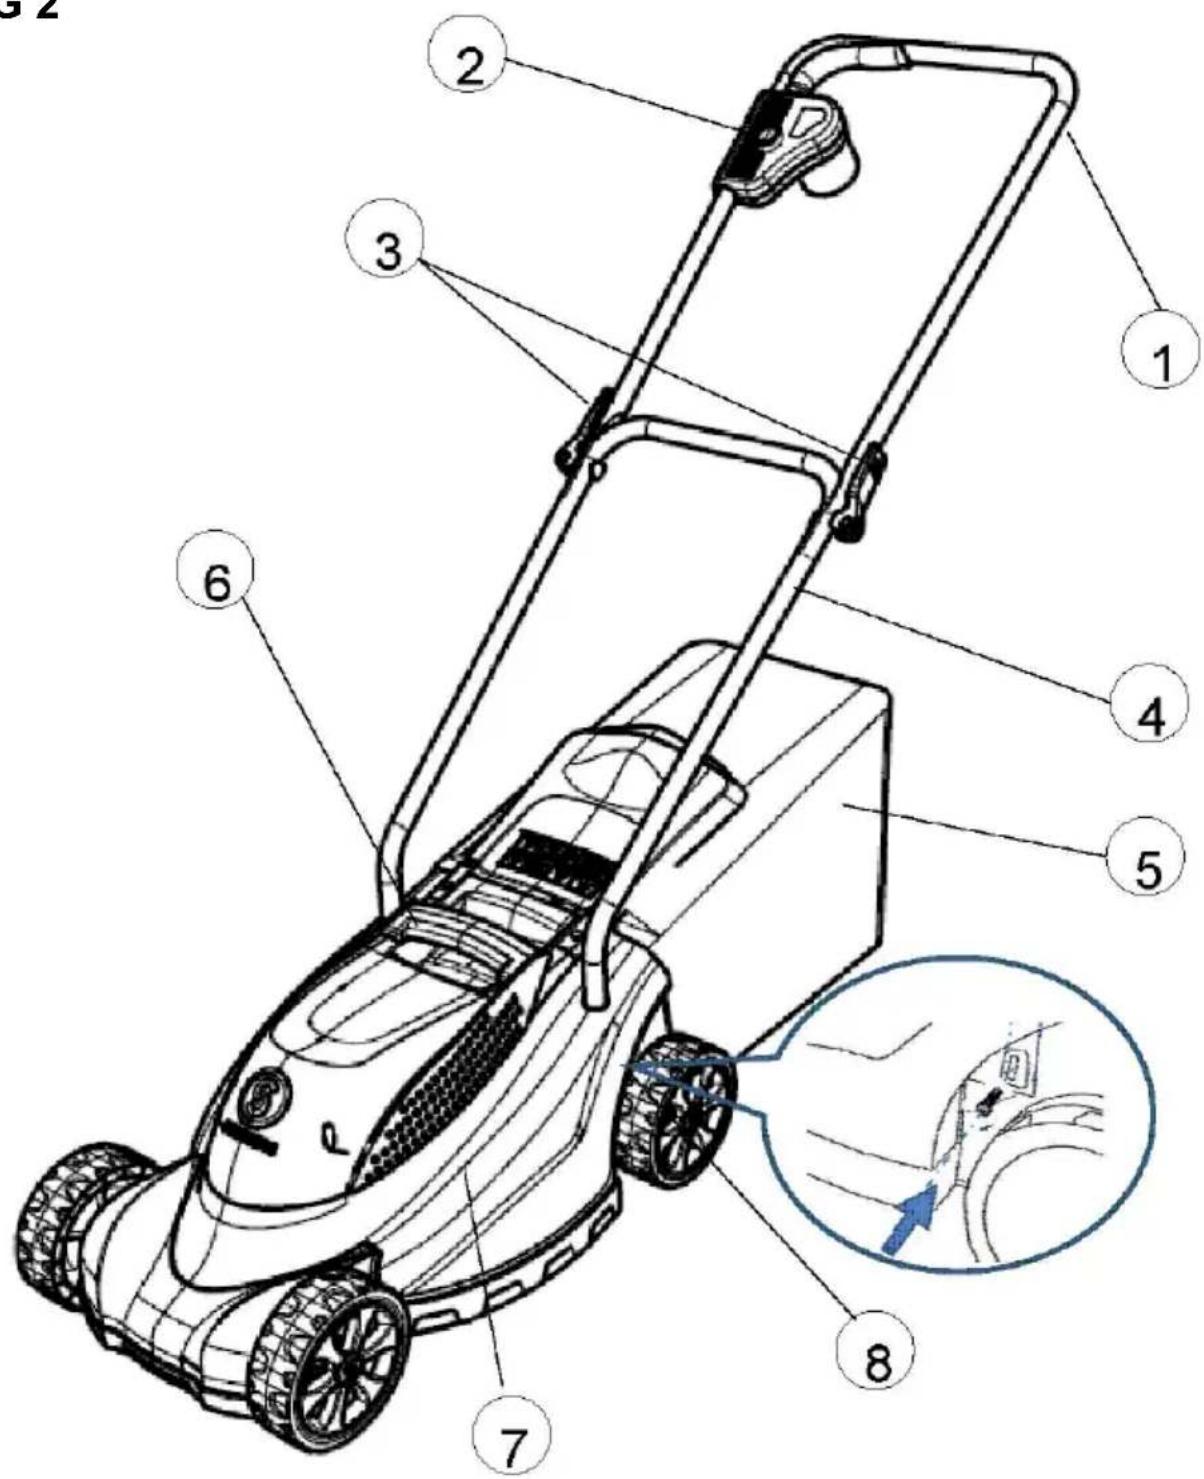
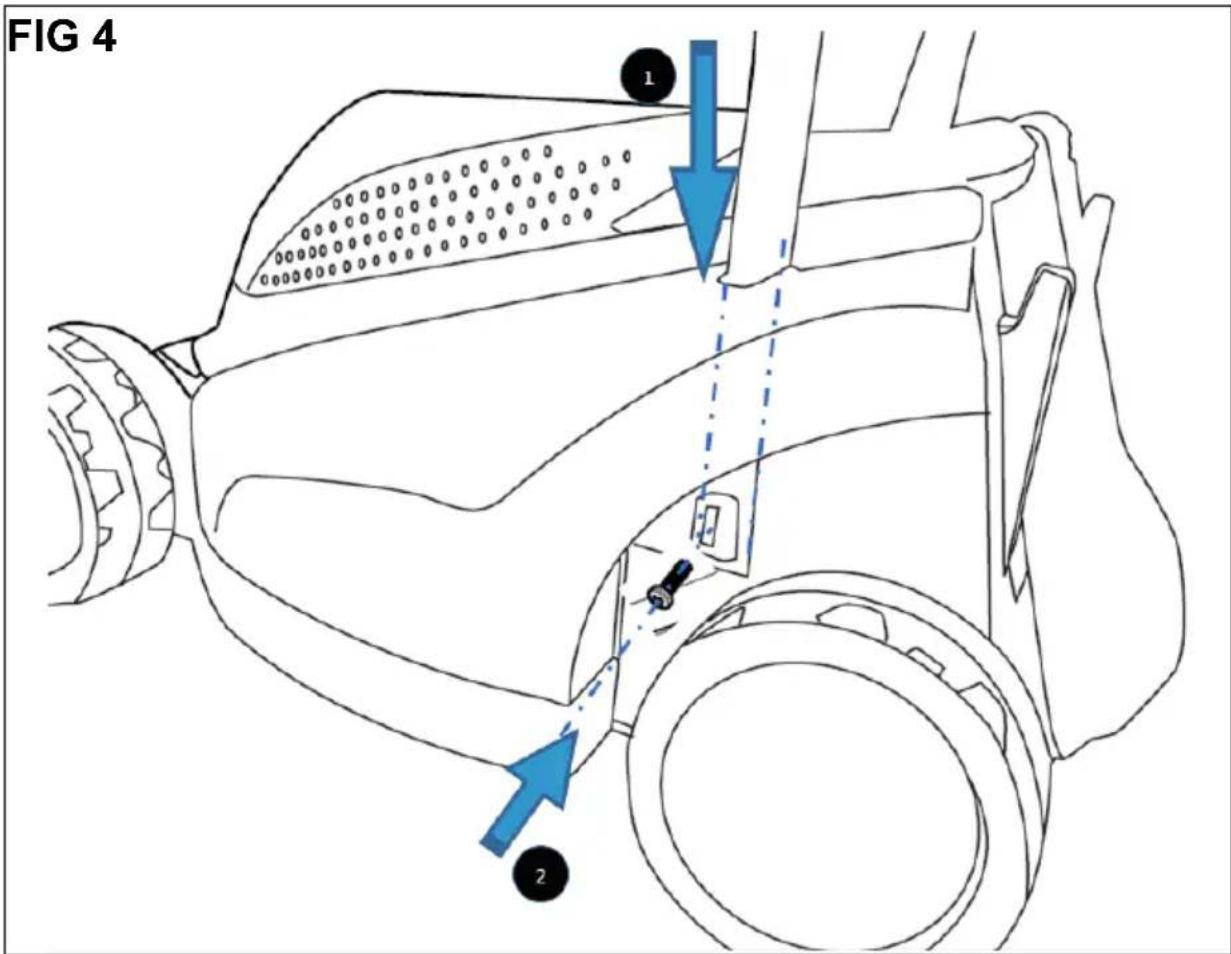
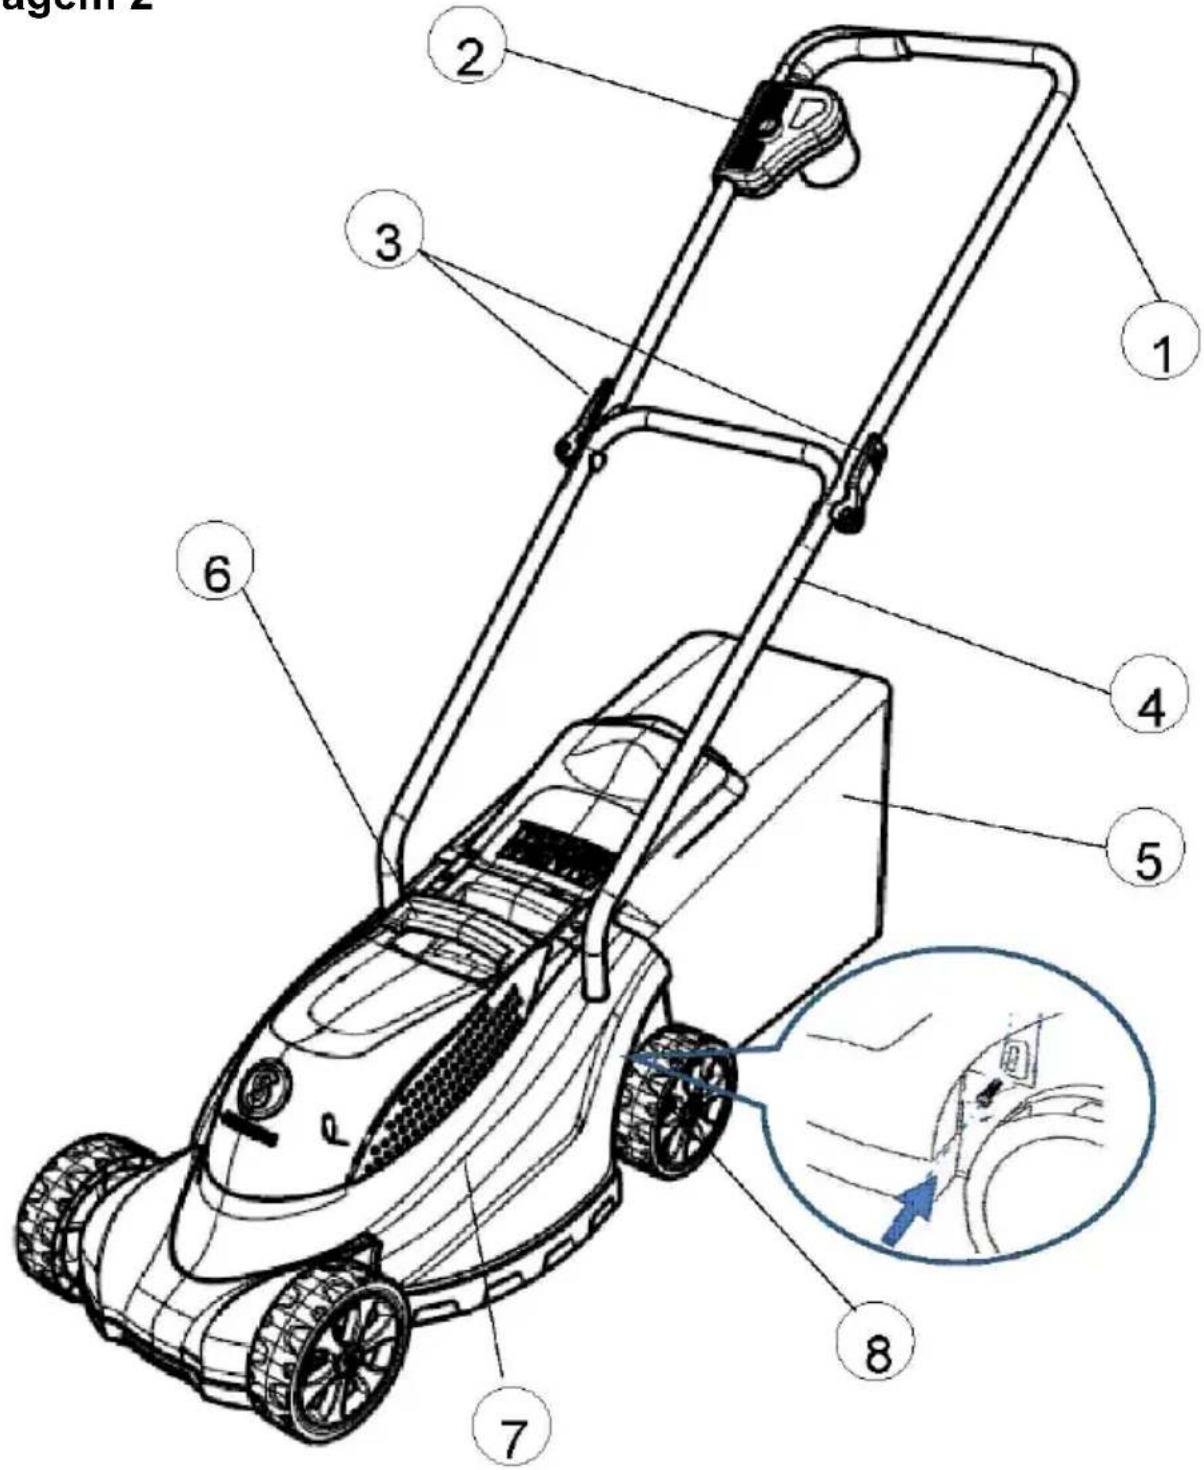
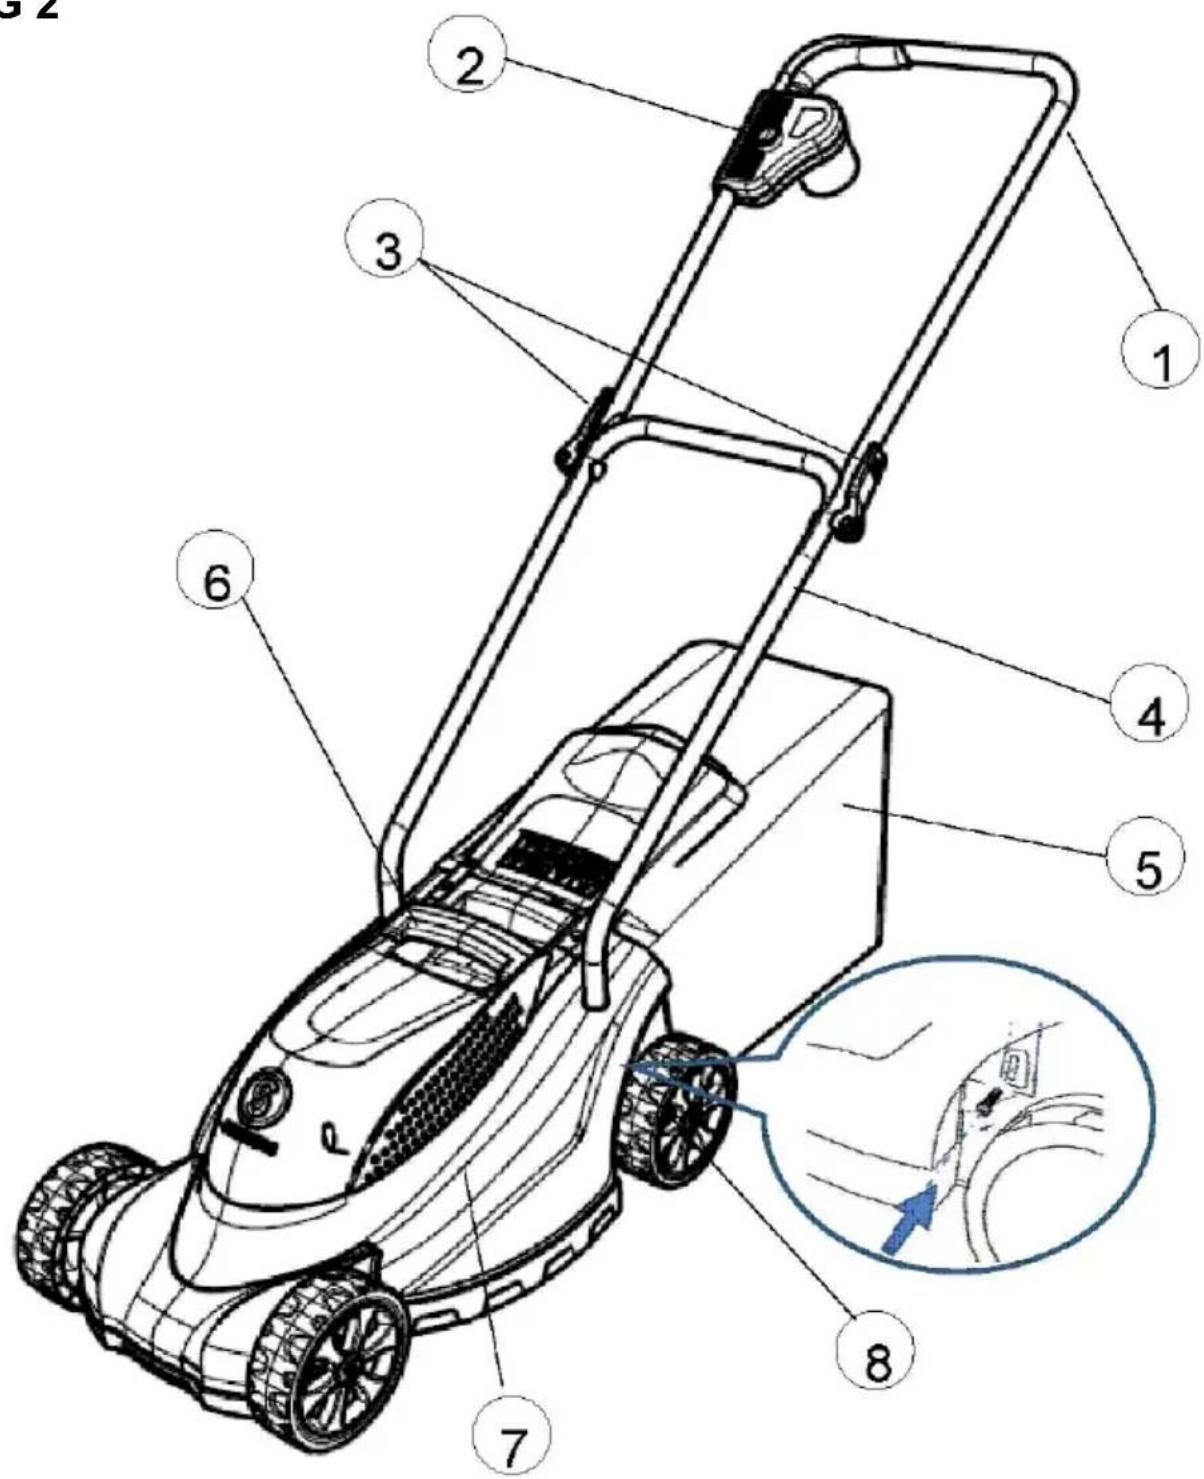
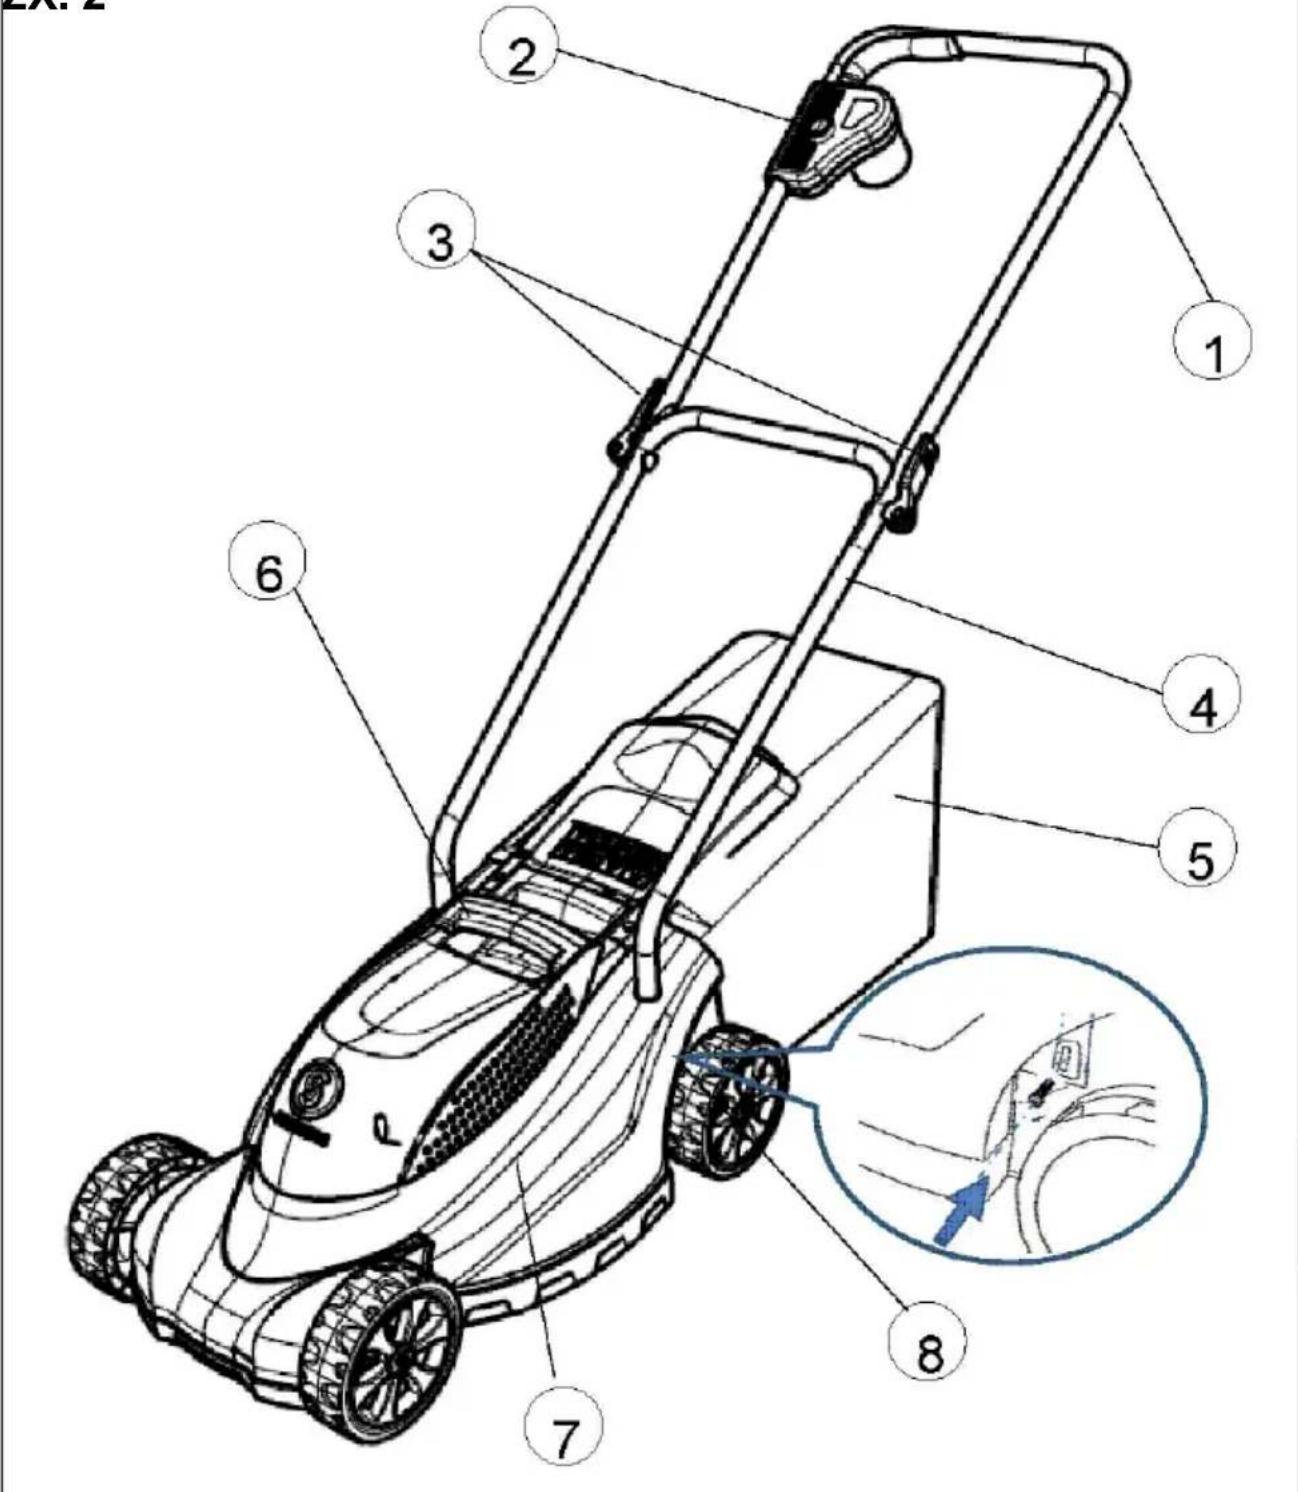
YOUR PRODUCT AT A GLANCE FIG 2 AND FIG 4 FIG 7
- Upper handle
- Switch box
- Quick release lock
- Lower handle
- Grass bag
- Lift handle
- Deck
- Fix screw for lower handle
- Wheel axel
DESCRIPTION OF SYMBOLS
Symbols are used in this manual to attract your attention to possible risks. The safety symbols and the explications which accompany them must be perfectly understood. The warning themselves do not prevent the risks and can not be a substitute for proper methods of avoiding accidents.

Before any use, refer to the corresponding paragraph in the present manual.

This symbol, before a safety comment, indicates a precaution, a warning or a danger. Ignoring this warning can lead to an accident for yourself or for others. To limit the risk of injury, fire, or electrocution always apply the recommendations indicated.


This symbol indicates the requirement of wearing ear protection, eye protection and gloves when using the product.

Do not expose and operate the tool in rain.
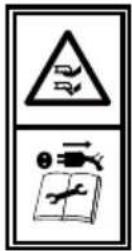
Remove the plug from the mains immediately if cable is damaged or cut.
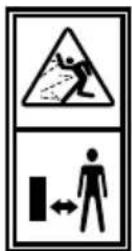
Keep other people out of the dangerous area.
Beware of sharp tines. Blades continue to rotate after the motor is switched off.
Remove plug from mains before maintenance or if cord is damaged.
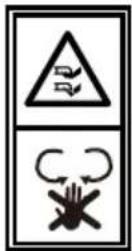
Keep hands and feet away from the cutters.

Double insulation.
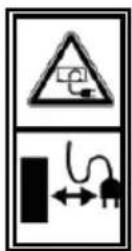
Keep the connection cable away from the cutters.
Keep supply flexible cord away form cutting means.
Recycle unwanted materials instead of disposing of them as waste. All tools, hoses and packaging should be sorted, taken to the local recycling centre and disposed of in an environmentally safe way.
GENERAL SAFETY INSTRUCTIONS

WARNING!
Read all safety warnings and all instructions. Be familiar with the controls and the proper use of the equipment. Failure to follow the warnings and instructions may result in electric shock, fire and/or serious injury.
Save all warnings and instructions for future reference.
Work area safety
- Keep work area clean and well lit. Cluttered or dark areas invite accidents.
- Do not operate the machine in explosive atmospheres, such as in the presence of flammable liquids, gases or dust. The machine creates sparks which may ignite the dust or fumes.
- Keep children, pets and bystanders away while operating the machine. Distractions can cause you to lose control.
Operation safety
- Never allow children or people unfamiliar with these instructions to use the machine. Local regulation may restrict the age of the operator. When not in use, store the machine out of reach of children. Always look after children to ensure they do not play with the machine appliance.
- This appliance can be used by persons with reduced physical, sensory or mental capabilities or lack of experience and knowledge if they have been given supervision or instruction concerning use of the appliance in a safe way and understand the hazards involved.
- The operator or user is responsible for the accidents or hazards occurring or other people.
- Inspect the area where the machine is to be used, remove all stones sticks, wires, bones and other foreign objects which can be thrown by the machine.
- Before using always visually check the blade, blade bolts and cutter assembly are not worn or damaged. Replace worn or damaged components in sets to preserve balance. Replace damaged or unreadable labels.
- Mow only in daylight or in good light.
- Walk, never run.
- Stop the blade if the machine has to be tiled for transportation when crossing surfaces other than grass and when transporting the appliance to and from the area to be mowed.
- Do not tilt the machine when starting or switching on the motor.
- Do not put hands or feet near or under the rotating parts. Keep clear of the discharge opening at all times.
- Never pick up the machine when the motor is running.
- Always be sure of your footing on slopes. Avoid operating the machine in wet grass.
- When mow across the face of slopes, never up and down.
- Exercise extreme caution when changing direction on slopes.
- Do not mow excessively steep slopes.
-
Use extreme caution when reversing or pulling the appliance towards you.
-
Never operate the appliance with defective guards or shields, or without safety devices, for example deflectors and/or grass catchers, in place.
- Switch on the motor according to instructions and with feet well away from the blade.
- Stop the machine, and remove the plug from the socket. Make sure that all moving parts have come to a complete stop.
• whenever you leave the machine,
- before cleaning a blockage or unclogging chute
- before checking, clean or working on the machine
- after striking a foreign object. Inspector the machine for damage and make repairs before restarting and operating the machine,
- If the machine starts vibrating abnormally (check immediately)
- inspect for damage
- replace or repair any damaged parts,
- check for and tighten any loose parts.
- Do not transport the machine while the power source is running.
Electrical safety
- The machine plugs must match the outlet. Never modify the plug in any way. Do not use any adapter plugs with earthed (grounded) the machine. Unmodified plugs and matching outlets will reduce risk of electric shock.
- Avoid body contact with earthed or grounded surfaces, such as pipes, radiators, ranges and refrigerators. There is an increased risk of electric shock if your body is earthed or grounded.
- Do not expose the machine to rain or wet conditions. Water entering the machine will increase the risk of electric shock.
- Do not abuse the cord. Never use the cord for carrying, pulling or unplugging the machine. Keep cord away from heat, oil, sharp edges or moving parts. Damaged or entangled cords increase the risk of electric shock.
- When operating the machine outdoors, use an extension cord suitable for outdoor use. Use of a cord suitable for outdoor use reduces the risk of electric shock.
- To connect the machine only to a supply circuit protected by a residual current device (RCD) with a tripping current of not more than 30mA.
- The voltage indicated on the rating plate must correspond to the voltage of the power source.
- Only use or replace power supply cables for this unit which correspond to the types indicated by the manufacturer. Never touch the mains plug with wet hands.
- Do not run over, crush or pull the power supply cable or extension lead, otherwise it may be damaged. Protect the cable from heat, oil and sharp edges.
- The extension lead must have a cross section in accordance with the operating instructions and be protected against splashed water. The connection must not be in water.
-
Before using the machine, check the supply and extension cord for signs of damage or ageing. If the cord becomes damaged during use, disconnect the cord from the supply immediately. DO NOT TOUCH THE CORD BEFORE DISCONNECTING THE SUPPLY.
-
Pulling the plug from the socket to disconnect the mains supply if it becomes damaged during use.
- To start the machine safely, especially with a view to necessary tilting of the machine and keeping both hands in the operating position before returning the machine to the ground.
- Do not to use the lawnmower if the cords are damaged or worn.
- Do not to connect a damaged cord to the supply or touch a damaged cord before it is disconnected from the supply. A damaged cord can lead to contact with live parts.
- Do not to touch the blades before the machine is disconnected from the supply and the blades have come to a complete stop.
- Keep extension cords away from the blades. The blades can cause damage to the cords and lead to contact with live parts.
Personal safety
-
Stay alert, watch what you are doing and use common sense when operating the machine. Do not use the machine while you are tired or under the influence of drugs, alcohol or medication. A moment of inattention while operating the machine may result in serious personal injury.
-
Use personal protective equipment. Always wear eye protection. Protective equipment such as dust mask, non-skid safety shoes, long trousers, hard hat, or hearing protection used for appropriate conditions will reduce personal injuries. Do not operate the machine when barefoot or wearing open sandals. Avoid wearing clothing that is loose fitting or that has hanging cords or ties
-
Prevent unintentional starting. Ensure the switch is in the off-position before connecting to power source and/or battery pack, picking up or carrying the tool. Carrying the machine with your finger on the switch or energizing the machine that have the switch on invites accidents.
-
Remove any adjusting key or wrench before turning the machine on. A wrench or a key left attached to a rotating part of the machine may result in personal injury.
-
Do not overreach. Keep proper footing and balance at all times. This enables better control of the machine in unexpected situations.
-
Dress properly. Do not wear loose clothing or jewellery. Keep your hair, clothing and gloves away from moving parts. Loose clothes, jewellery or long hair can be caught in moving parts.
-
The blades continue to rotate for a few seconds after the machine is switched off.
-
Our machine is double insulated for safety and requires no earth connection. The voltage (230-240V\~) indicated on the rating plate must correspond with the mains power supply. Only use approved extension cables. Extension cords/leads should only be used if they comply with H05VV-F, H05RN-F types or IEC type de-sign (60227 IEC53, 60245 IEC57). If you want to use an extension cable when operating your product, only the following cable dimensions should be used:
-1.0mm ^2 : max. length 40m
-1.5 mm ^2 : max. length 60m
-2.5 mm ^2 : max. length 100m
If in doubt contact a qualified electrician or the nearest Service Centre. WARNING! Inadequate extension cables can be dangerous. Extension cable, plug and socket must be of watertight construction and intended for outdoor use.
Use and care
- Do not force the machine. Use the correct machine for your application.
The correct machine will do the job better and safer at the rate for which it was designed.
- Do not use the machine if the switch does not turn it on and off. Any machine that cannot be controlled with the switch is dangerous and must be repaired.
- Disconnect the plug from the power source and/or the battery pack from the machine before making any adjustments, changing accessories, or storing the machine. Such preventive safety measures reduce the risk of starting the machine accidentally.
- Store the idle machine out of the reach of children and do not allow persons unfamiliar with the machine or these instructions to operate the machine. The machine is dangerous in the hands of untrained users.
- Maintain the machine. Check for misalignment or binding of moving parts, breakage of parts and any other condition that may affect the machine's operation. If damaged, have the machine repaired before use. Many accidents are caused by poorly maintained the machine.
- Keep cutting tools sharp and clean. Properly maintained cutting tools with sharp cutting edges are less likely to bind and are easier to control.
- Use the machine, accessories and tool bits etc. in accordance with these instructions, taking into account the working conditions and the work to be performed. Use of the machine for operations different from those intended could result in a hazardous situation.
Service
Have your machine serviced by a qualified repair person using only identical replacement parts. This will ensure that the safety of the machine is maintained.
SPECIAL SAFETY INSTRUCTIONS
Accident
- No person, especial children, or animals should be allowed to stand close to the mower while it is in use.
- Risk of injury due to ejected stones or other objects.
- If you happen to cut through the cable when mowing, there is danger to life or risk of injury. Slowly step away from the machine. Unplug from the mains socket. When mowing always make sure that the connection cable never gets into the area of the blade.
Falling over
- Operate the vehicle at walking speed only.
-
Be particularly careful when mowing in reverse and pulling the appliance towards you.
-
When mowing on steep slopes, there is a risk of the mower tipping over and you could be injured as a result. Mow crossways to the slope, never upwards and downwards. Do not mow on inclines greater than 20%.
- Be particularly careful when changing the direction and always pay attention to a good position.
- Mowing along perimeters involves a risk of injury. Mowing near edges, hedges, or steep inclines is dangerous. Keep a safe distance from perimeters when mowing.
- If the ground is wet the mower could slip due to reduced traction and overturn. Mow only when the grass is dry.
- Work only by daylight or in good artificial lighting.
Injury
- Always maintain a safe distance from the rotating tool by means of the steering handle.
- Never place your hands, feet, or other parts of the body near rotating parts.
- Stop the motor when the lawnmower has to be tilted and must travel over surfaces other than grass for transporting.
- Never lift or carry the appliance when the motor is running. Remove the mains plug from the socket before hand.
- Switch off the motor and take out the mains plug when you release any jams, remove blockages in the ejection channel or before checking, cleaning, transporting, adjusting or working on the lawnmower.
- If you remove the grass catcher, you or other persons might get injured due to ejected, mowed materials or foreign bodies.
- Never empty the grass sack while the engine is running. To do this, switch off the lawnmower.
- Check the surface on which the appliance is to be used and remove all objects that the appliance can take up and filing out.
- If a foreign body (e.g. stone) is hit by the cutting blade or if the lawnmower starts vibrating abnormally: stop the motor immediately and remove the mains plug. Check the appliance for damage, and have any damage repaired at a specialized garage.
- In the case of lawnmowers with rotating blades, never stand in front of the grass ejection holes.
Tripping over
-
While turning the machine around you could trip over the mains cable and injure you. Feed the cable behind you in such a way that it stays out of the path along which you are walking while mowing, and is kept away from the cutting blades.
-
Operate the vehicle at walking speed only.

Caution!
Damage to the machine
-
Stones, branches or other objects lying around can cause damage to the lawnmower and its operation. Remove all objects from the appliance's path before every use.
-
Do not operate the machine if it is not in perfect working order. The appliance wants to a thorough visual check before using it. In particular, check that protective equipment, Electrical controls, current-carrying cables and threaded connections are not damaged and are secure.
- Replace damaged parts before operating the unit.
INTENDED USE
This lawn mower has been designed for cutting grass. Any other use is not permitted. The lawn mower is suitable for private use in the garden only, lawn mowers for private use are those which are used for cutting grass and lawns in the garden, however not for cutting grass in public parks, playing fields or on farms or in forest.
Non-permitted users:
Persons who are not familiar with the operating manual, children, and young people under the age of 16 as well as persons under the influence of alcohol, drugs or medication must not operate the unit.
Working hours for electric lawn mower
While it is permitted to use a lawn mower at any time, operators should always show due consideration to others living nearby.
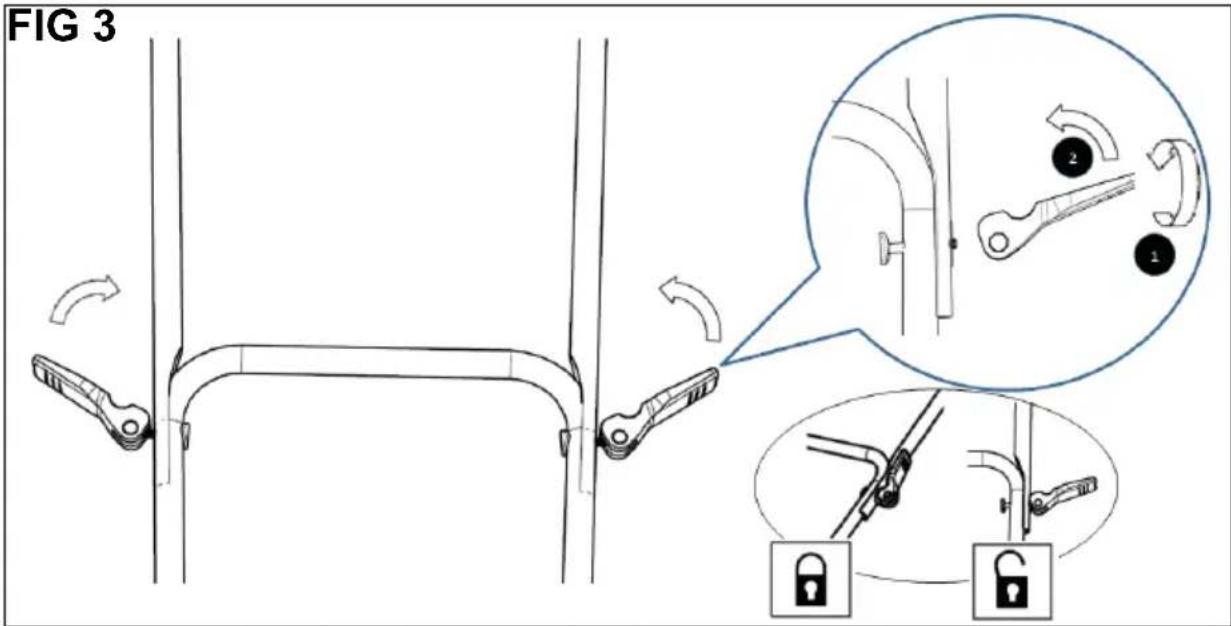
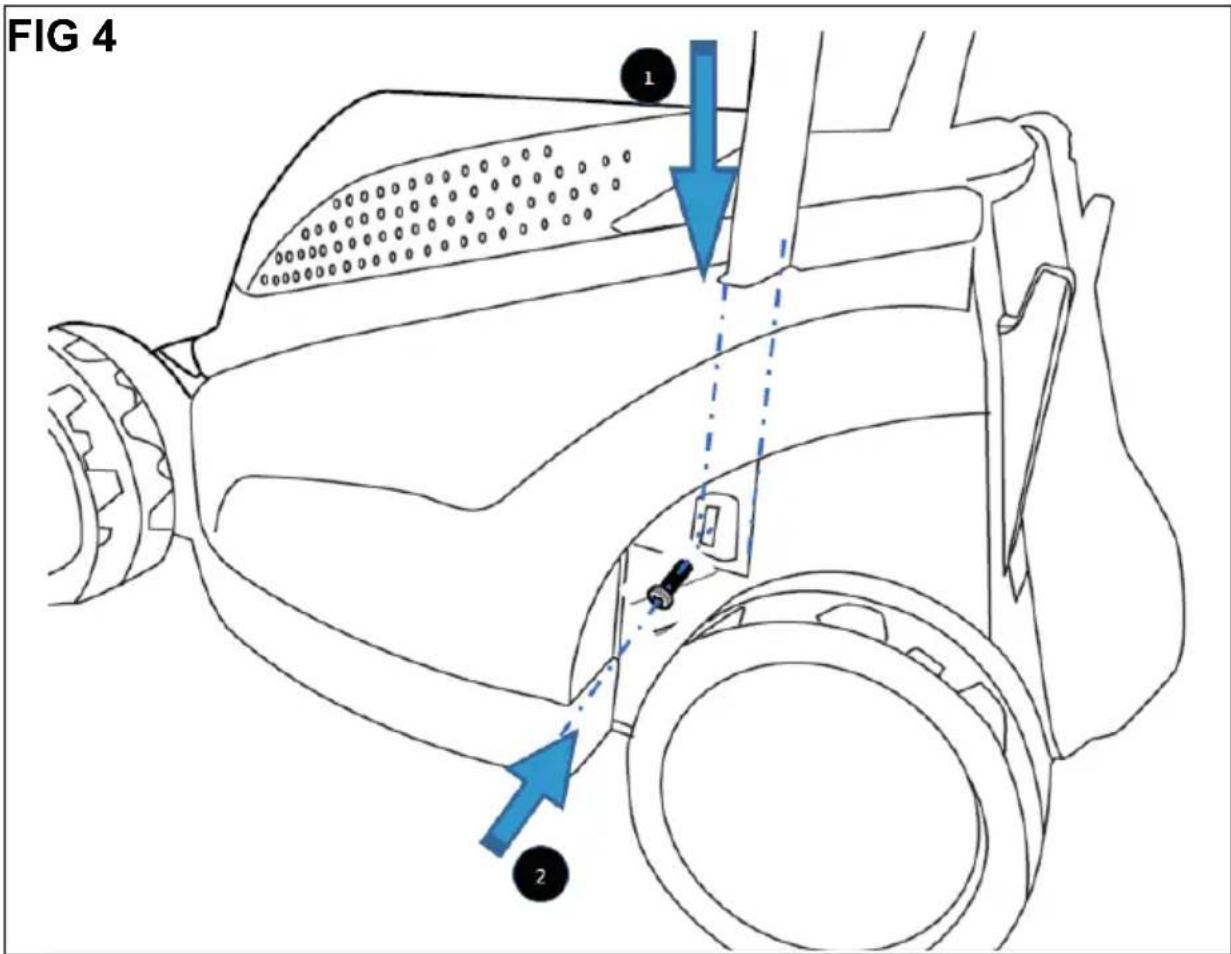
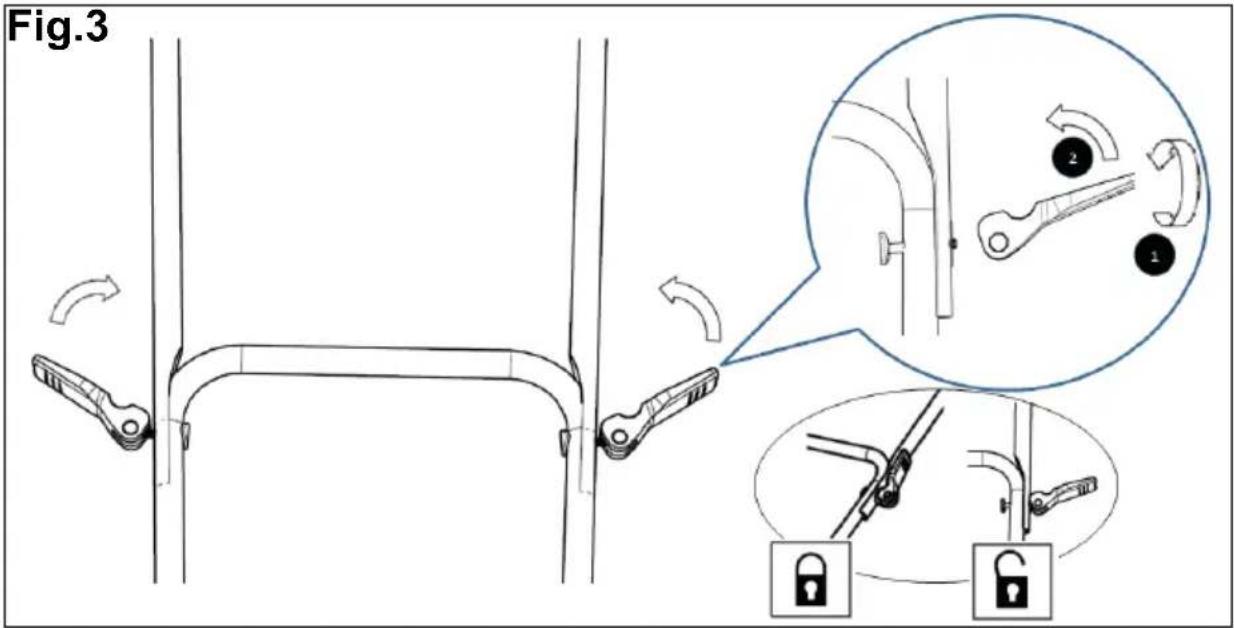
ASSEMBLY
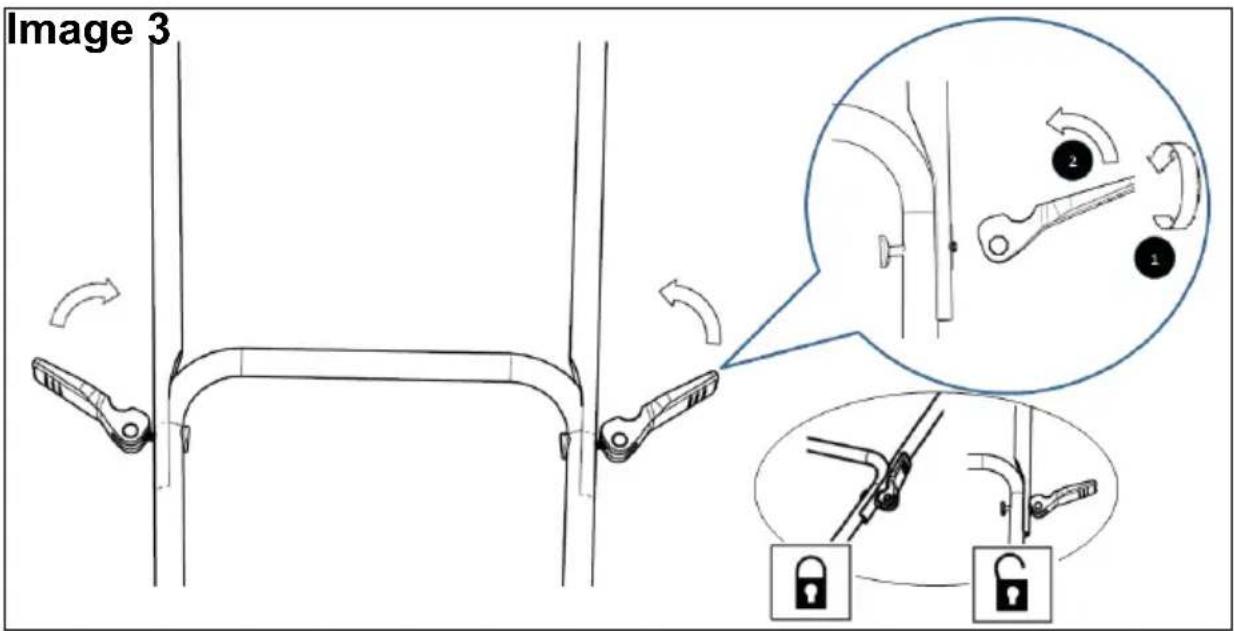
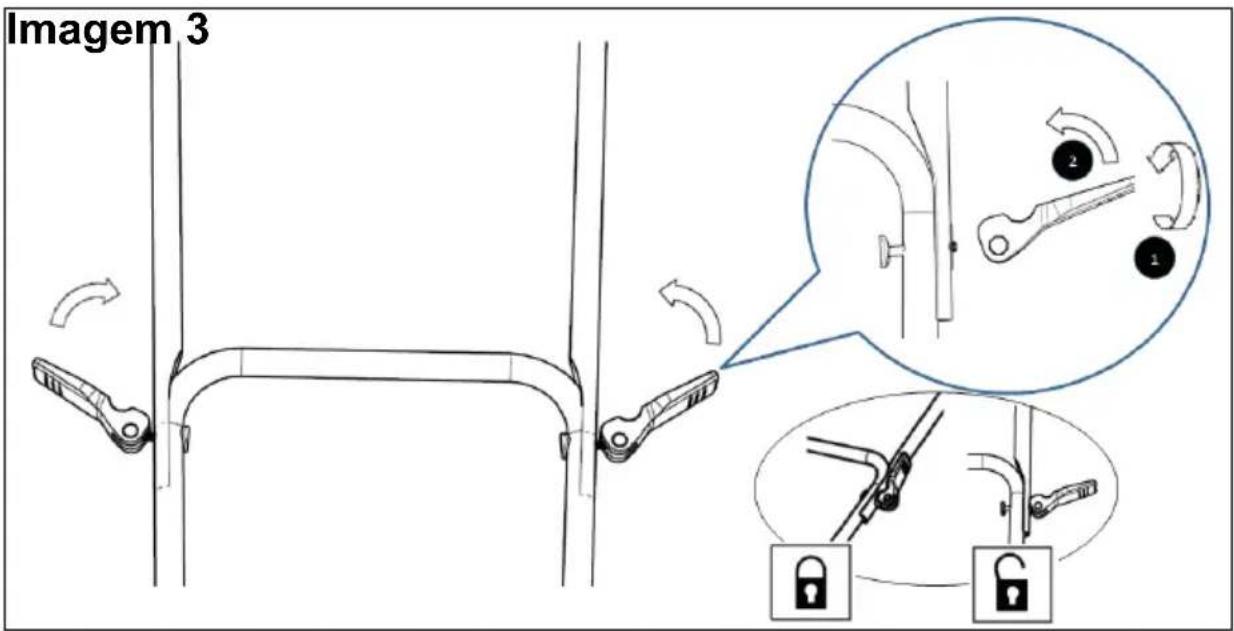
1. Handle assembly
When assembling this machine, please follow the instructions for assembly printed. Towards the front of the manual (fig 3, 4)
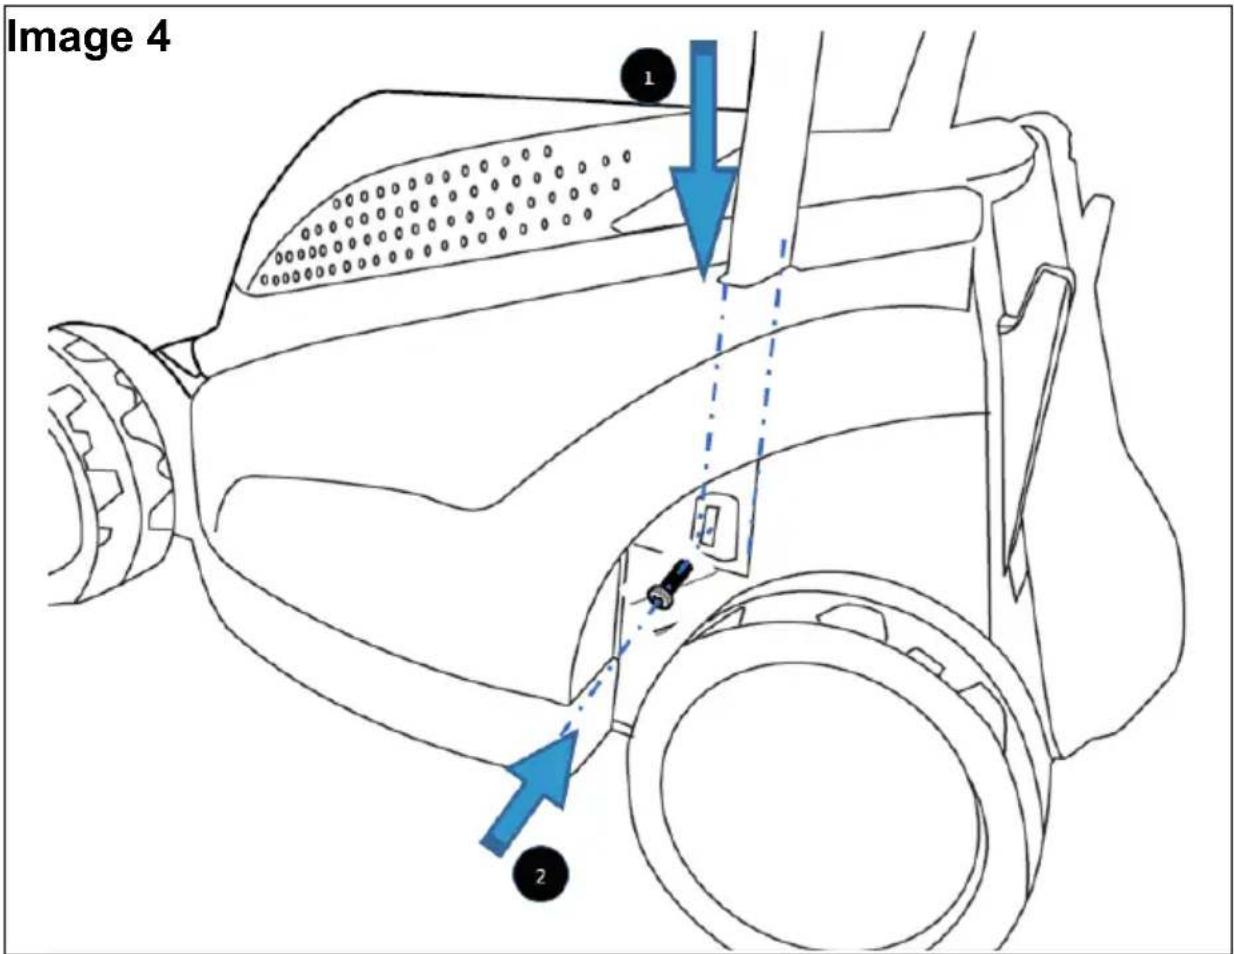
1). Fit the upper handle[1] and lower handle[4] together with the quick release lock[3] system. You can rotate the quick release lock[3] to adjust the tightness of lock.
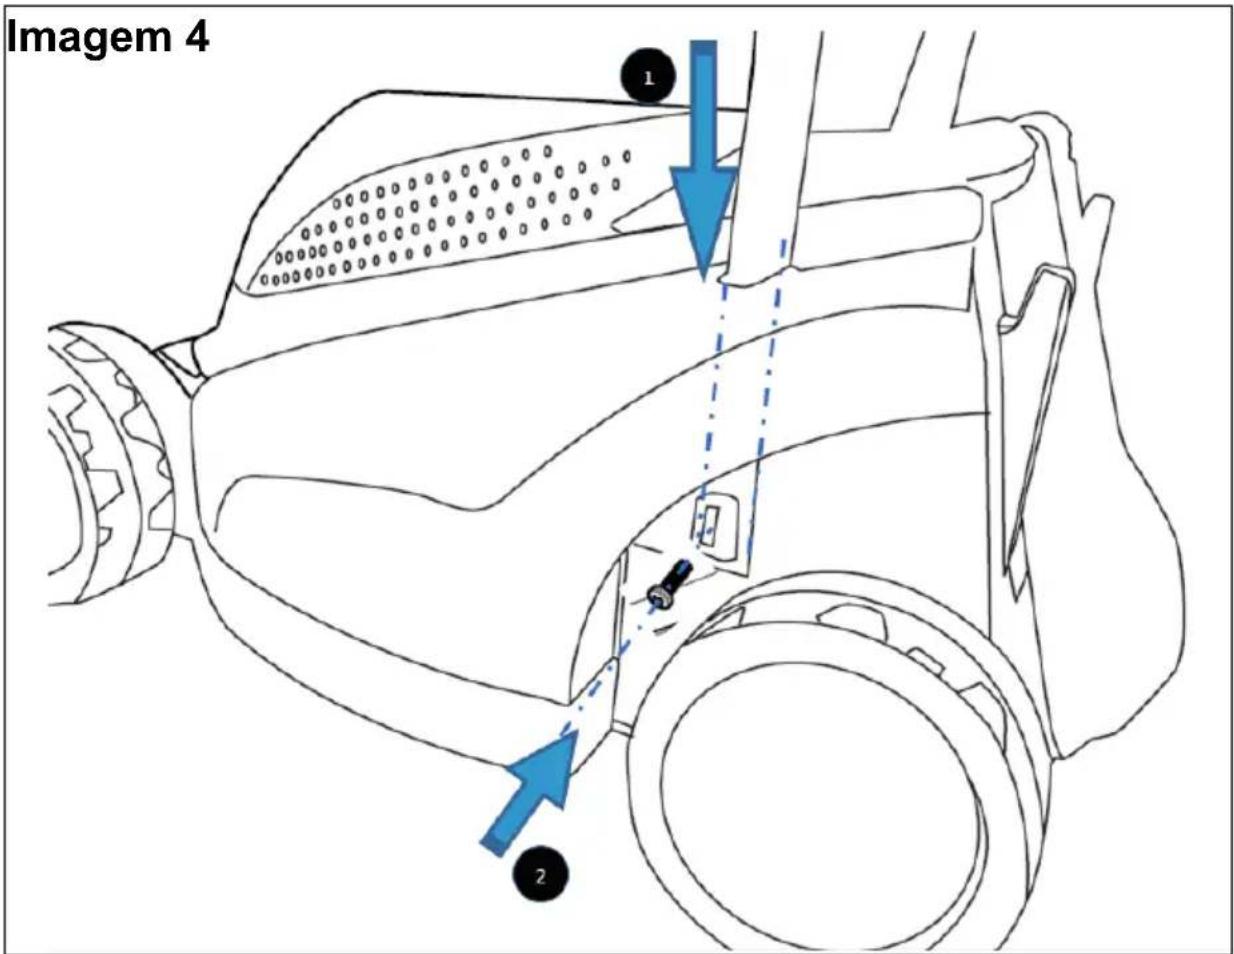
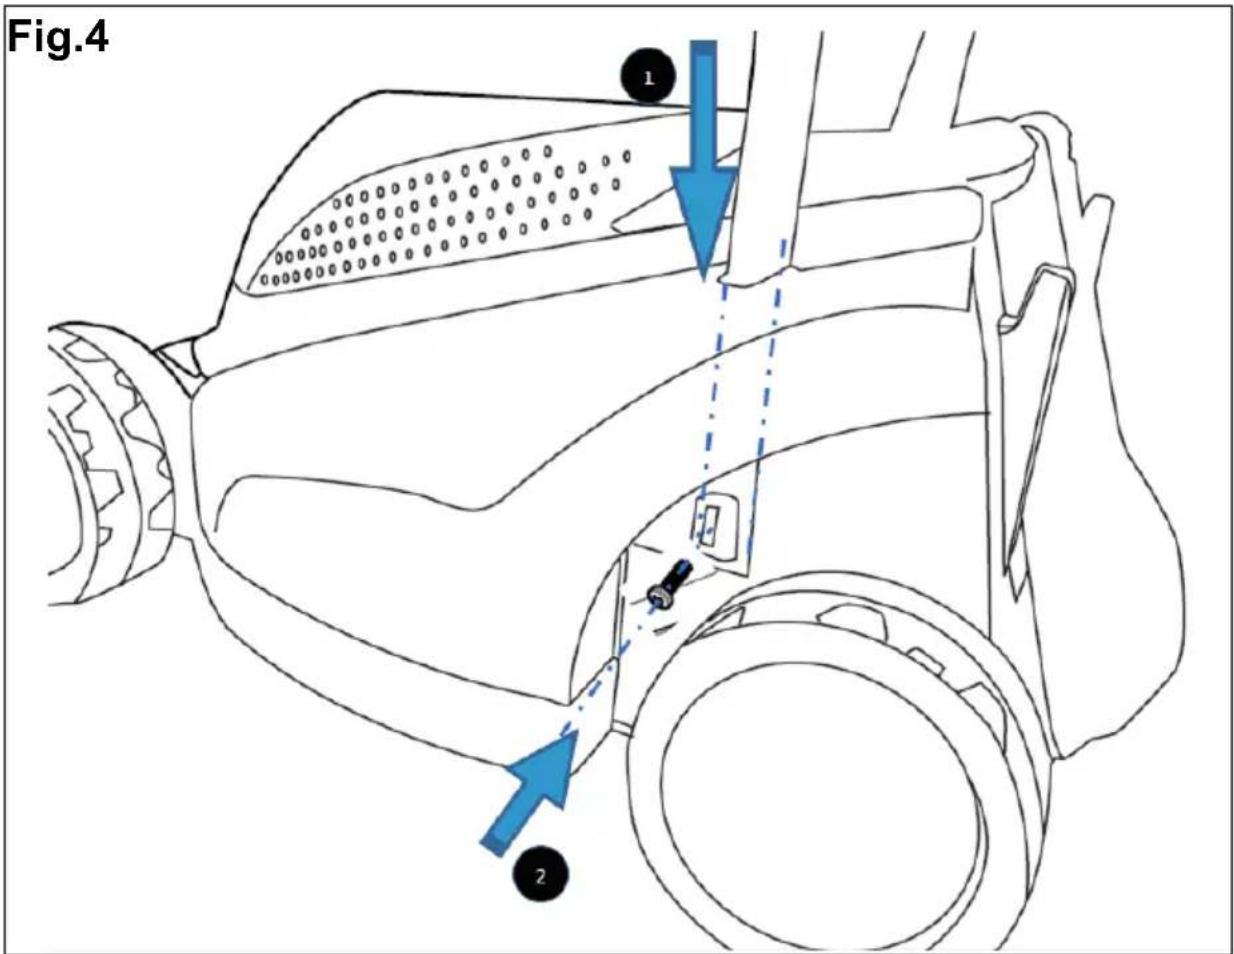
2). Insert the lower handle[4] into the hole on machine deck[7] and push the handle downwards to ensure the low handle[4] touch the bottom on the deck. And then screw the ST5.2 screw[8] in to fix the handle.
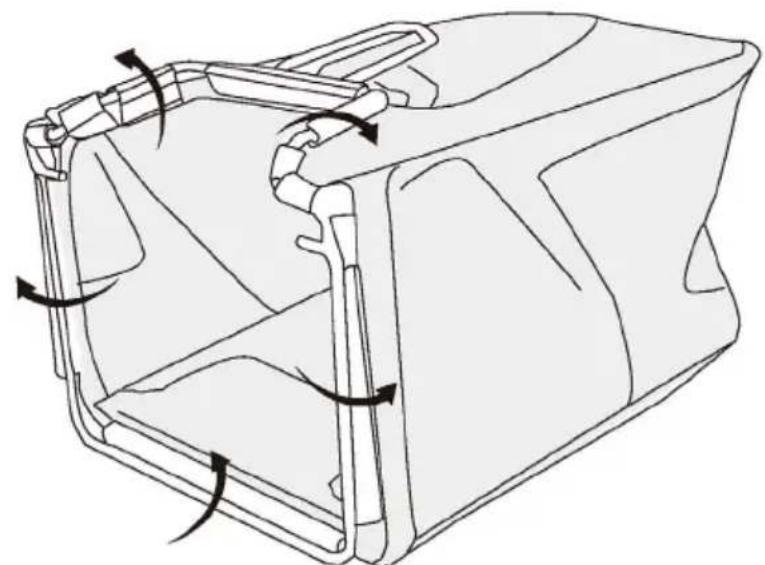
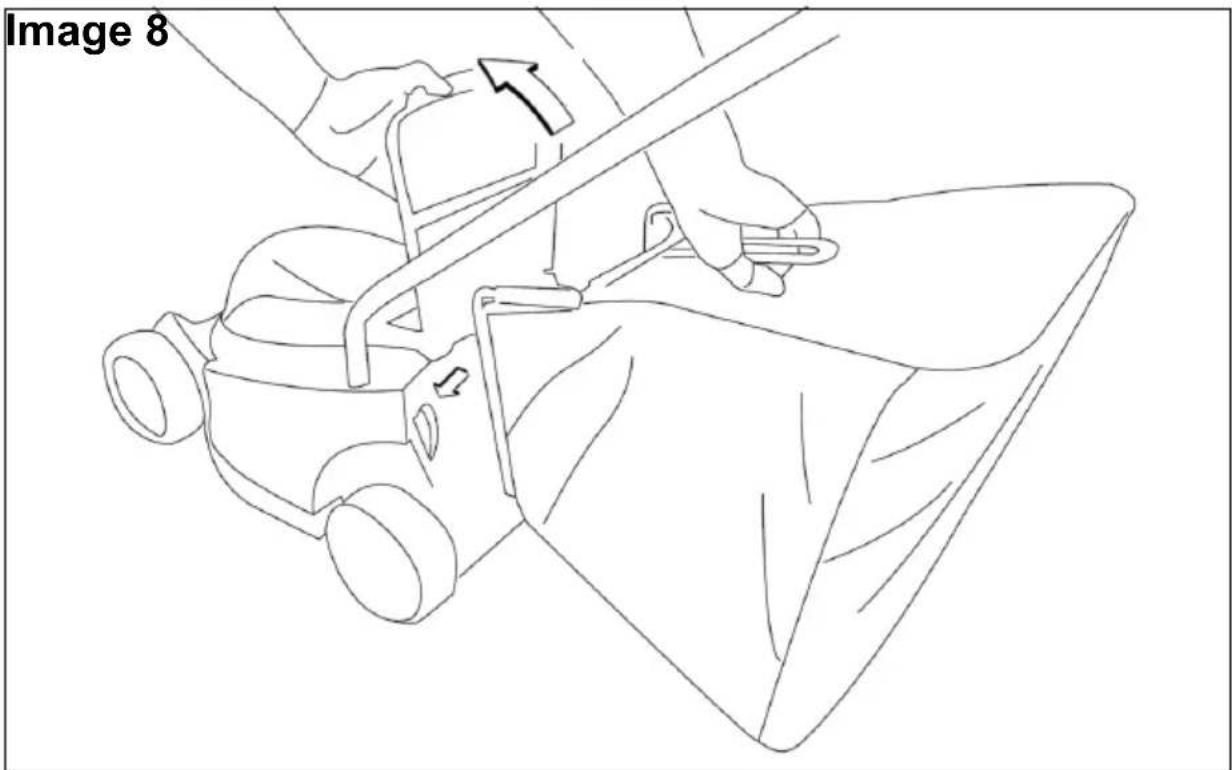
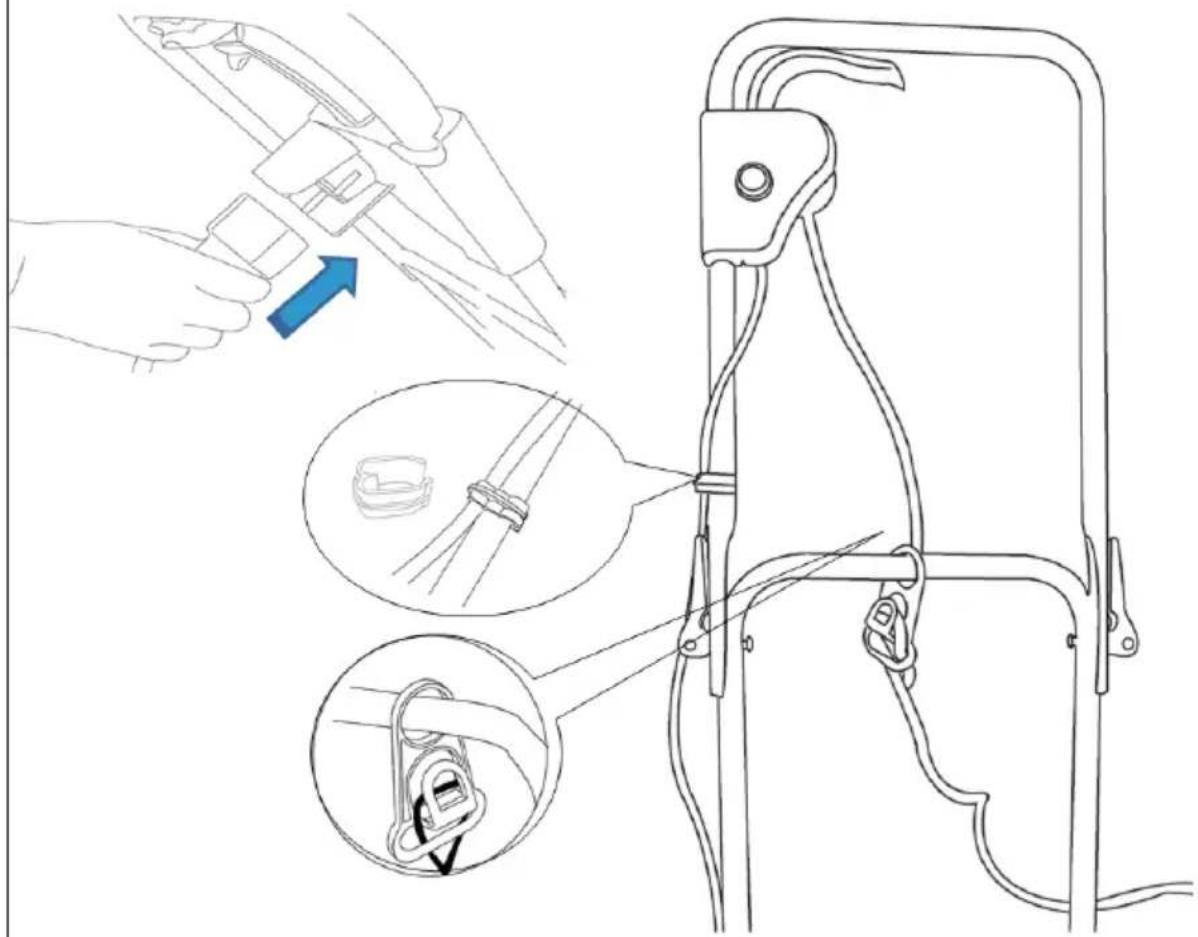
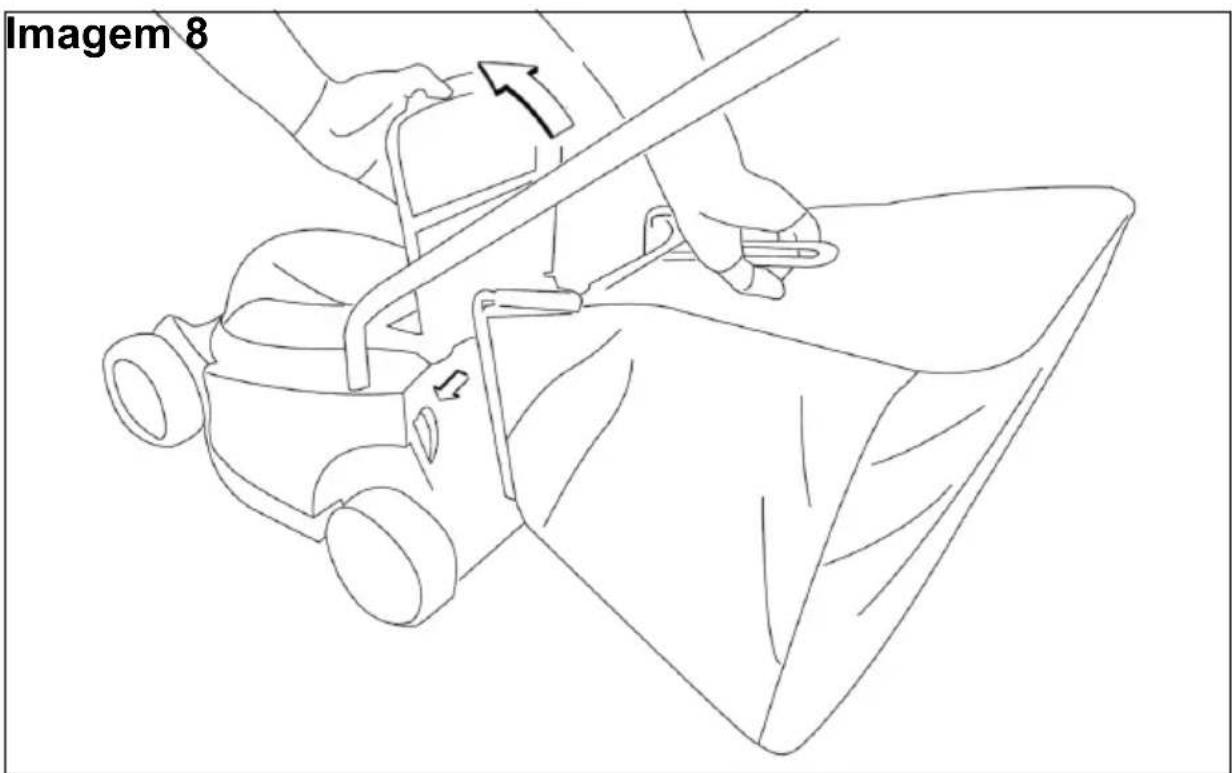
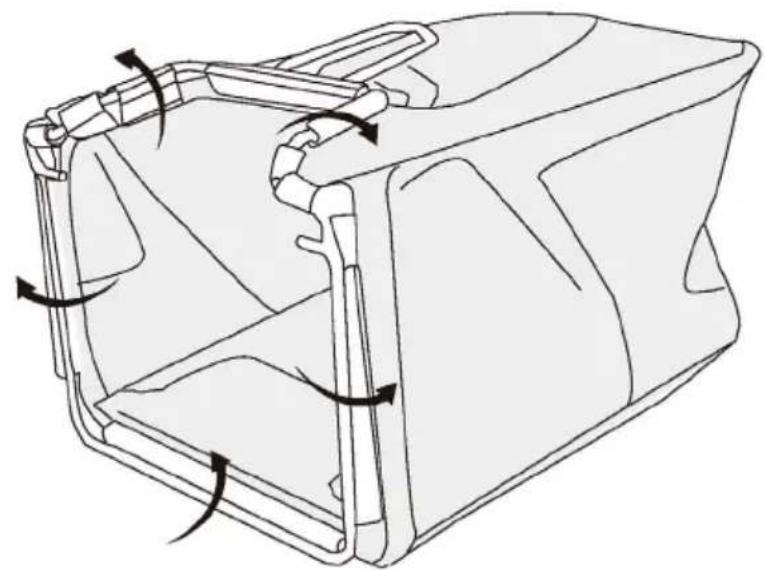
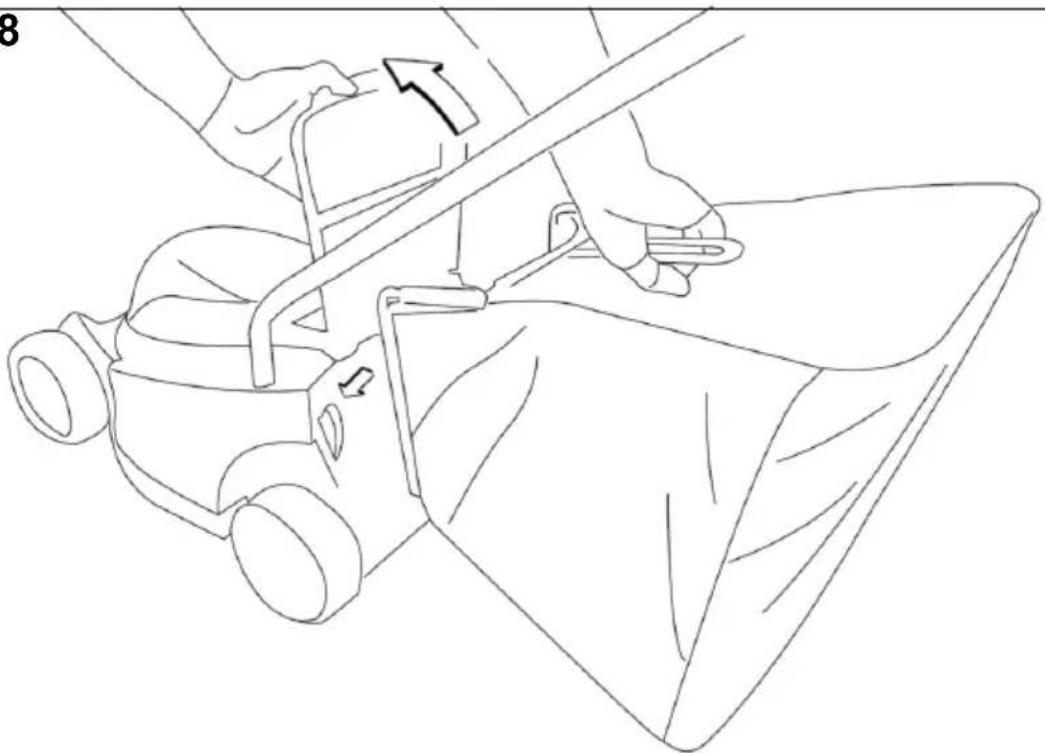
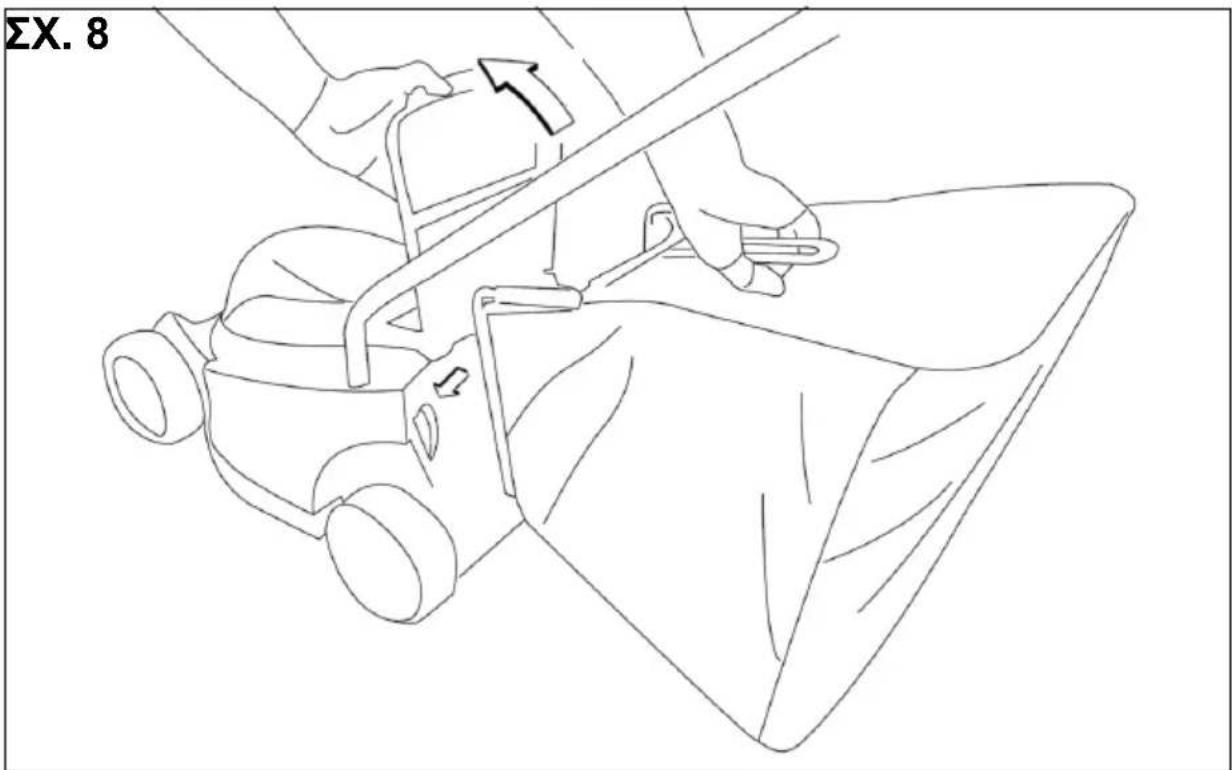
2. Grass bag assembly (FIG 5, 8)
1). Place the metal frame inside the grass collection bag[5].
2). Clip the plastic clips over the metal frame.
3). Make sure that these clips are fully secured to the metal frame.
4). Hang the collection bag[5] on the hook as shown in fig 8.
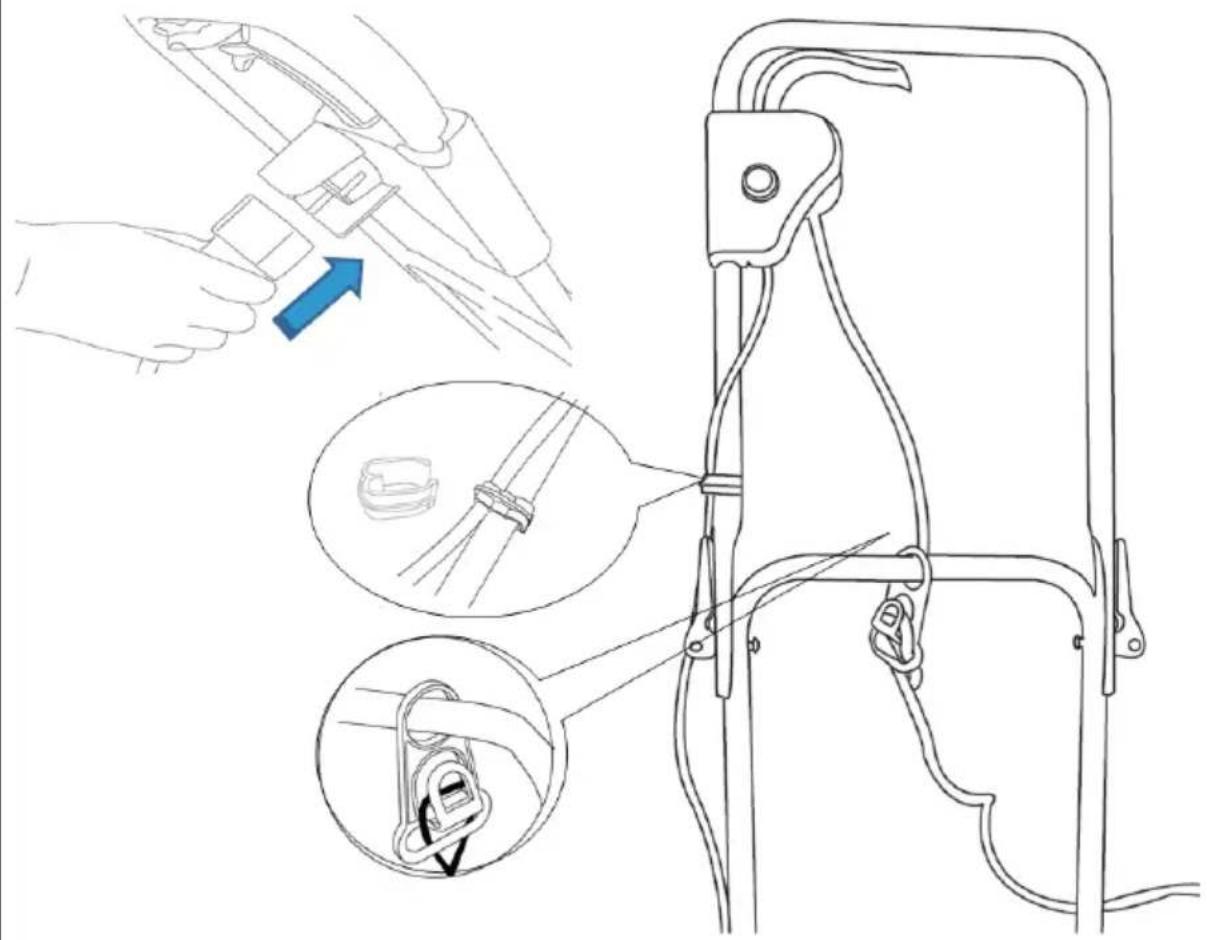
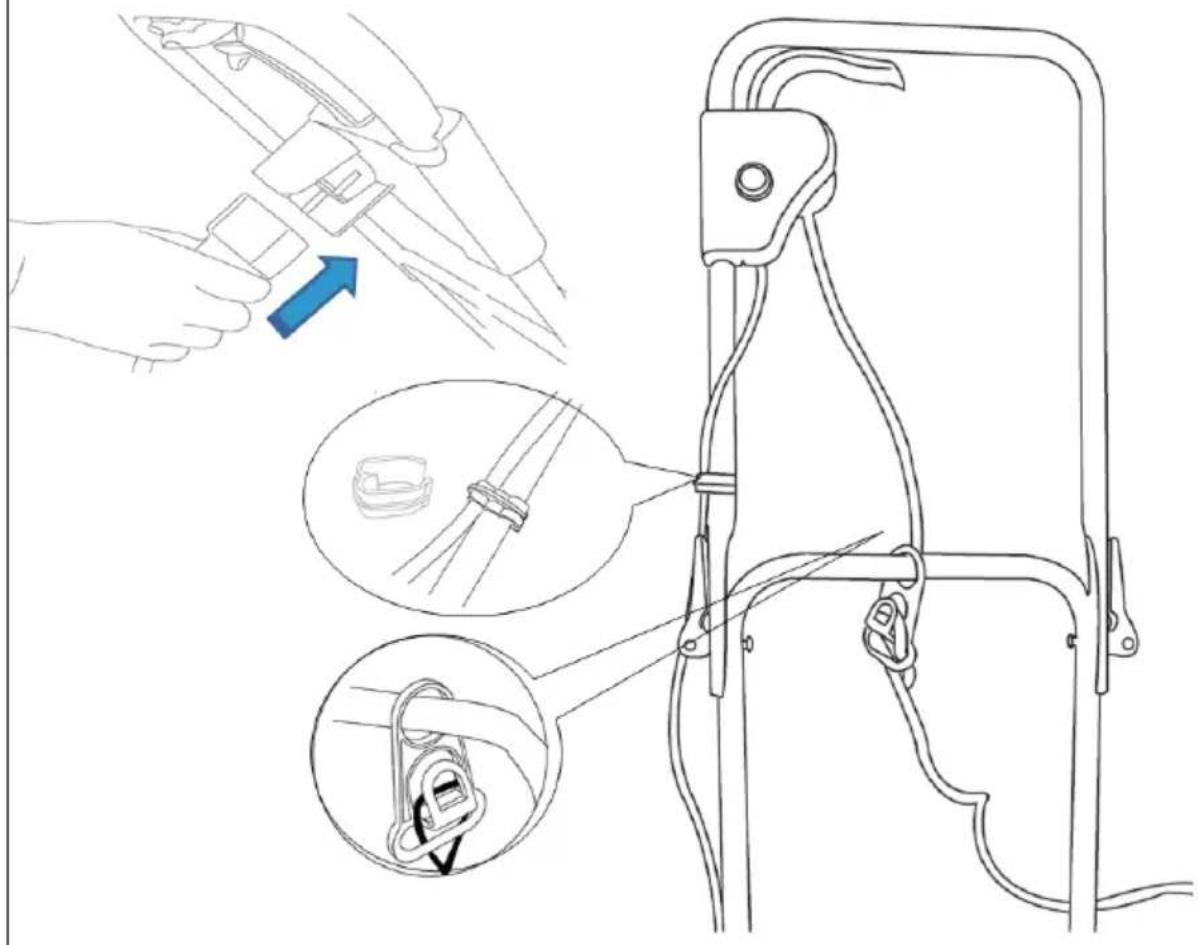
3. As fig 6 shows, fix the cord by the cord clip and cord grasper
Note: The packaging material is made of recycle materials. Dispose of packaging materials in accordance with regulations.
POWER CONNECTION

CAUTION!
Do not switch on the unit until it has been completely assembled. Before switching on the unit, always check the connection cable for signs of damage; only on undamaged connection cable may be used.
Note: Damaged connection cables are highly dangerous!
The mains voltage (230-240V\~) indicated on the rating plate must correspond with the mains power supply. Mains connection fuse: min.10A.
- Insert the mains plug of the unit connection cable into the combined switch/plug. (As fig 5 show)
- Secure with the cable grip. The loop of the mains cable must be adequately long so that the cable grip can slide from one side to the other.
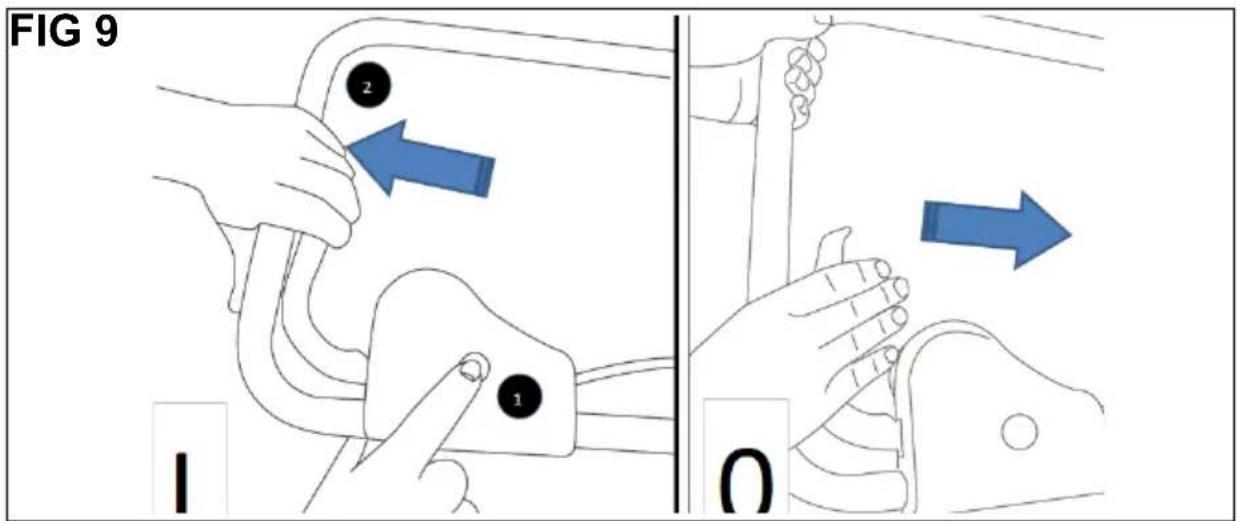
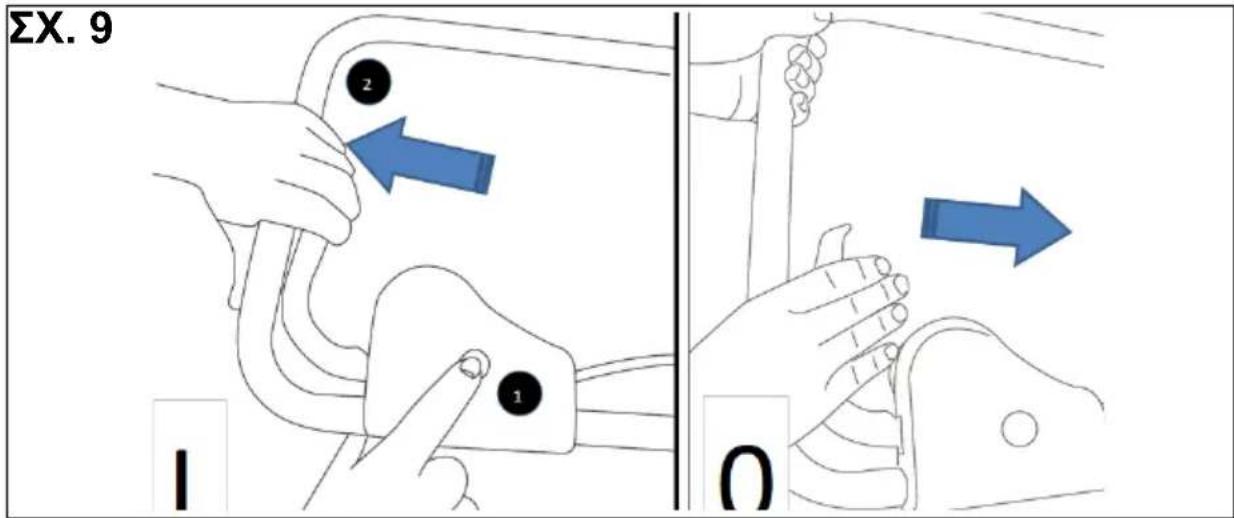
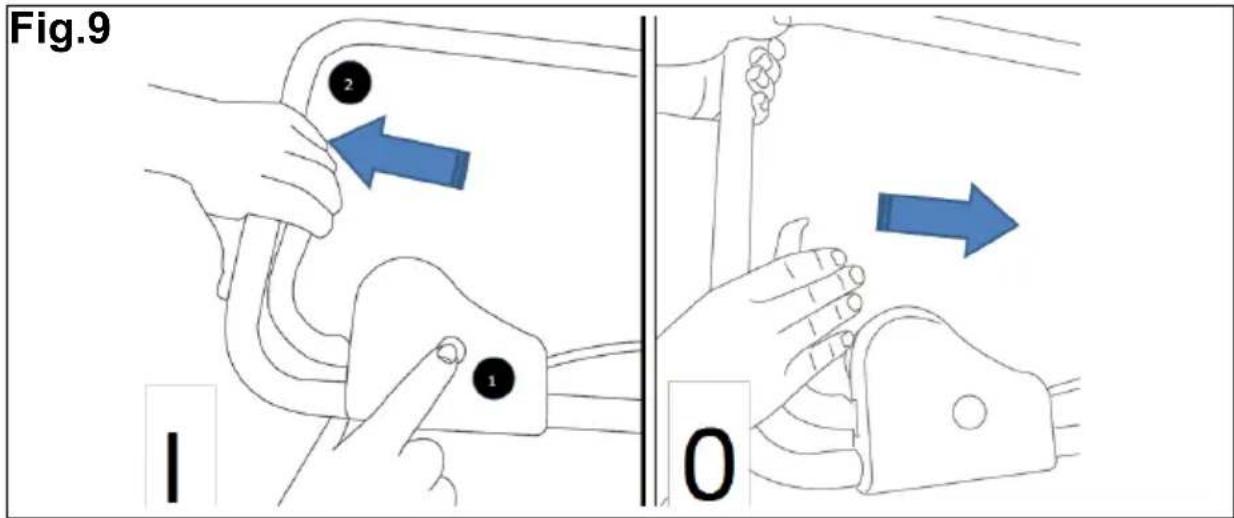
SWITCHING ON AND OFF (fig 9)
Do not start the motor in tall grass.
Switch on: press the button on the combined switch/plug. Hold down the on button 1 and pull the switch bar 2 towards the handle and hold in position
-the safety lever does into lock into position.
Switch off: release the switch bar.
Note: While mowing, lay the connection cable safely on footpaths and on areas which have already been mown.

WARNING!
When the motor has been switched off, the cutter continues running for several seconds therefore do not touch the underside of the mower until the cutter has come to a standstill!
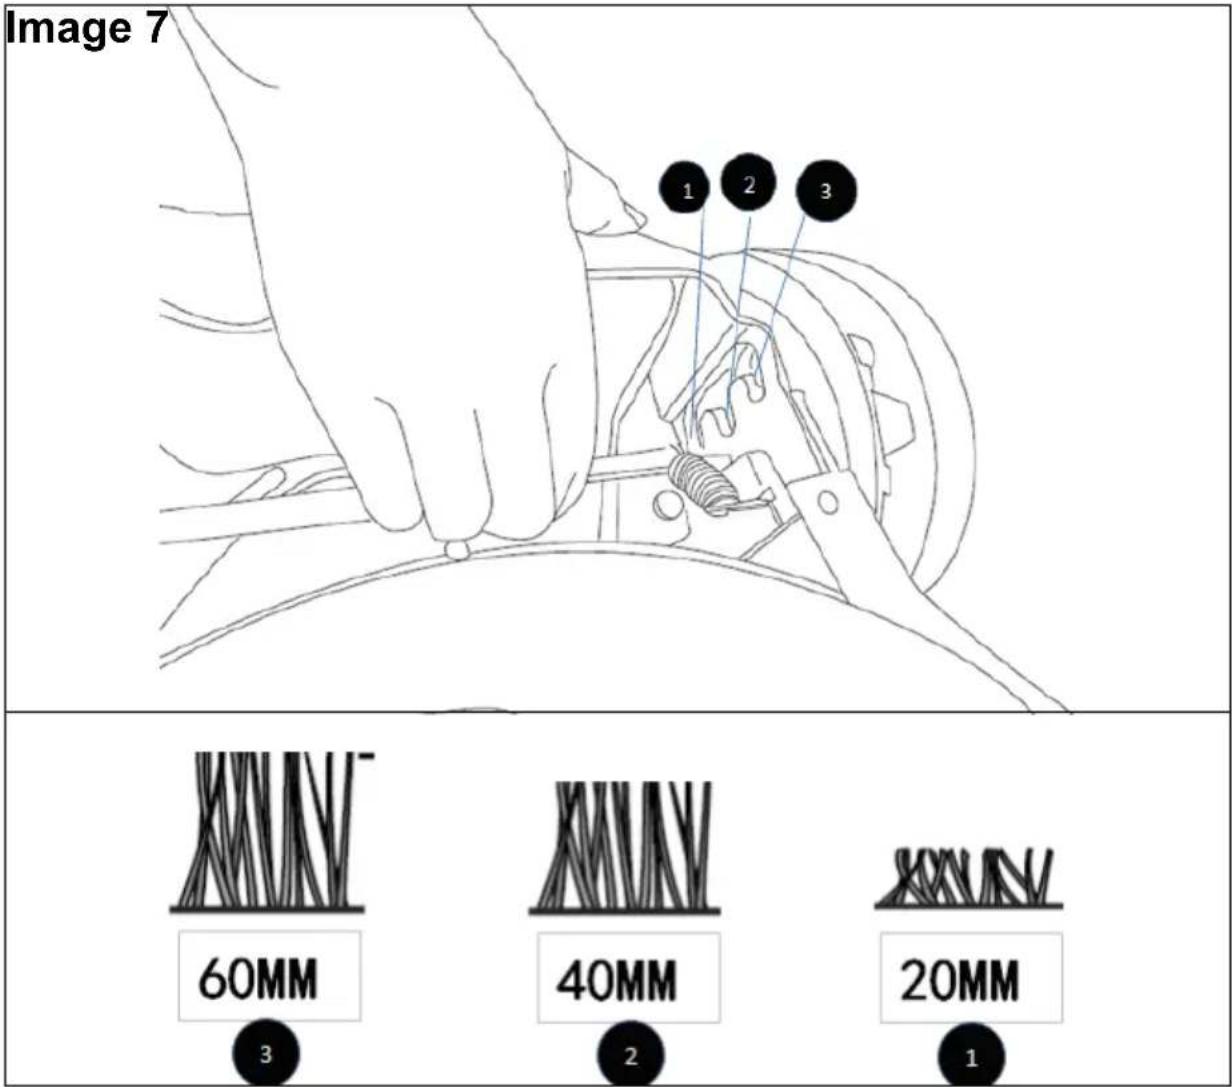
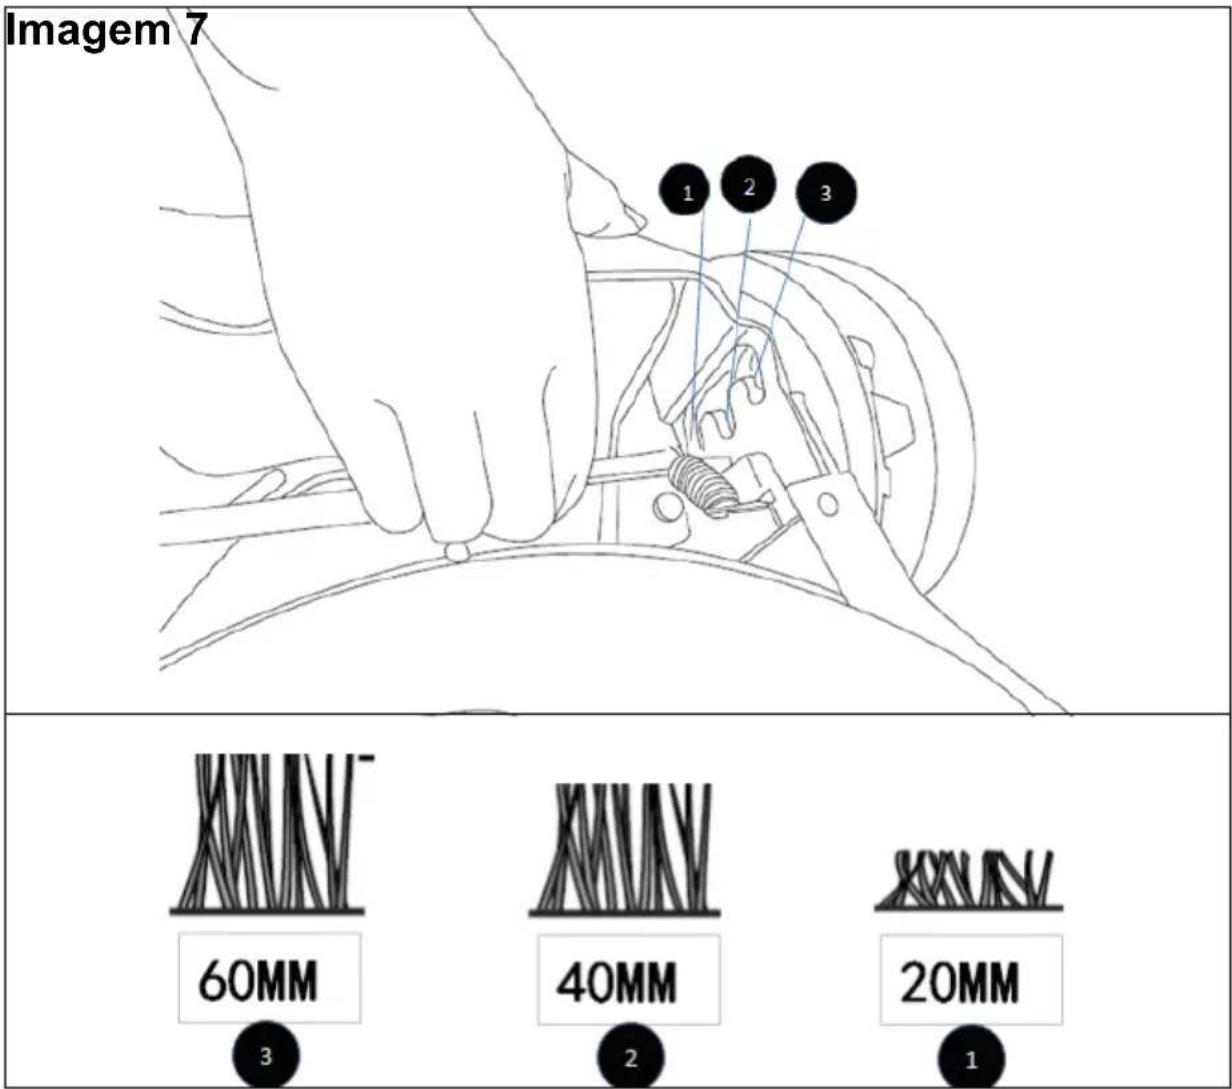
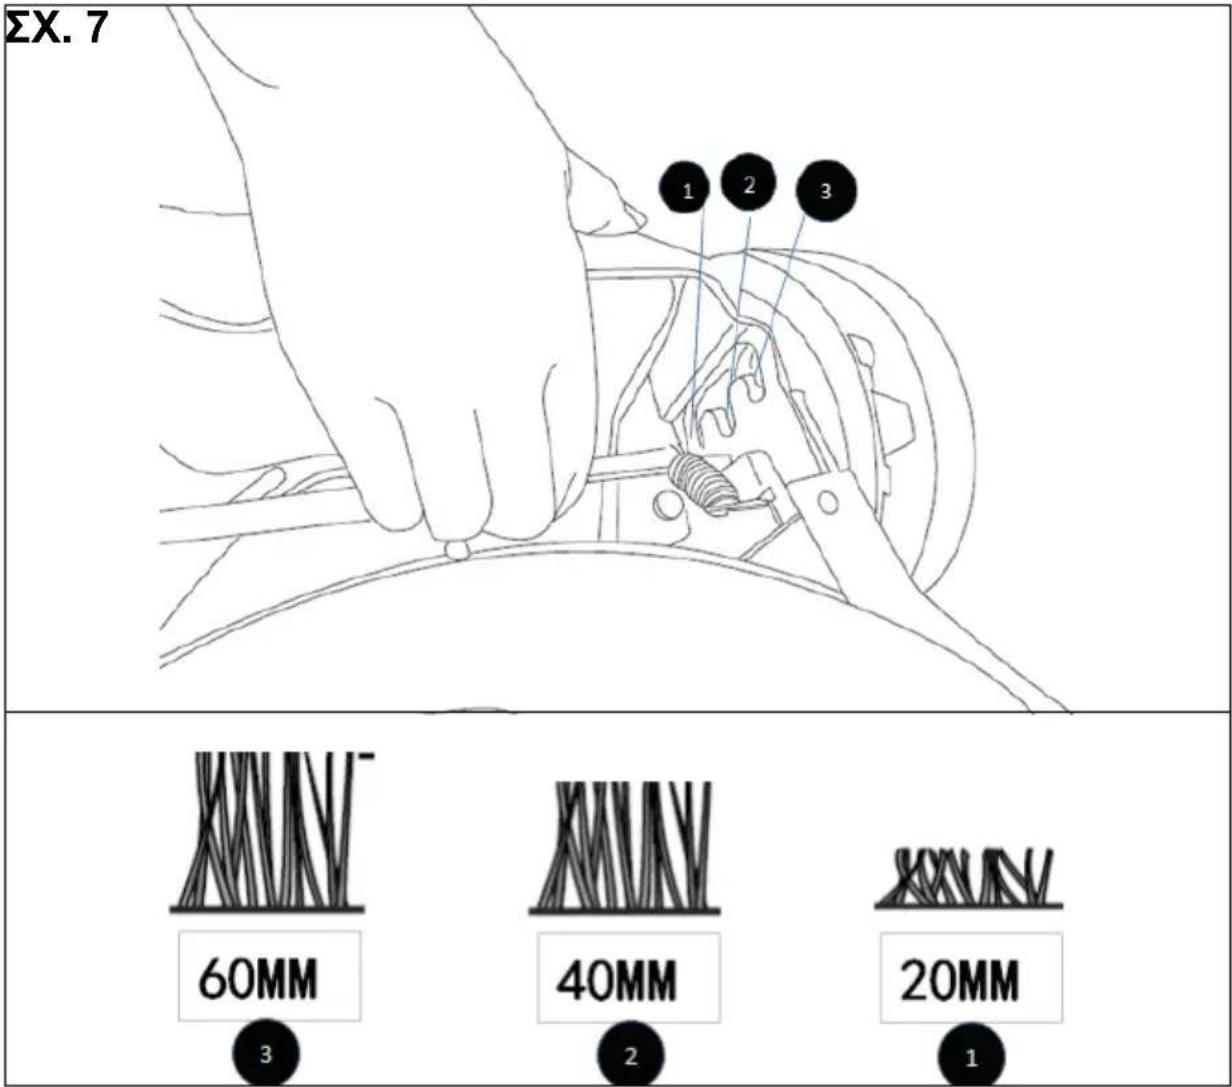
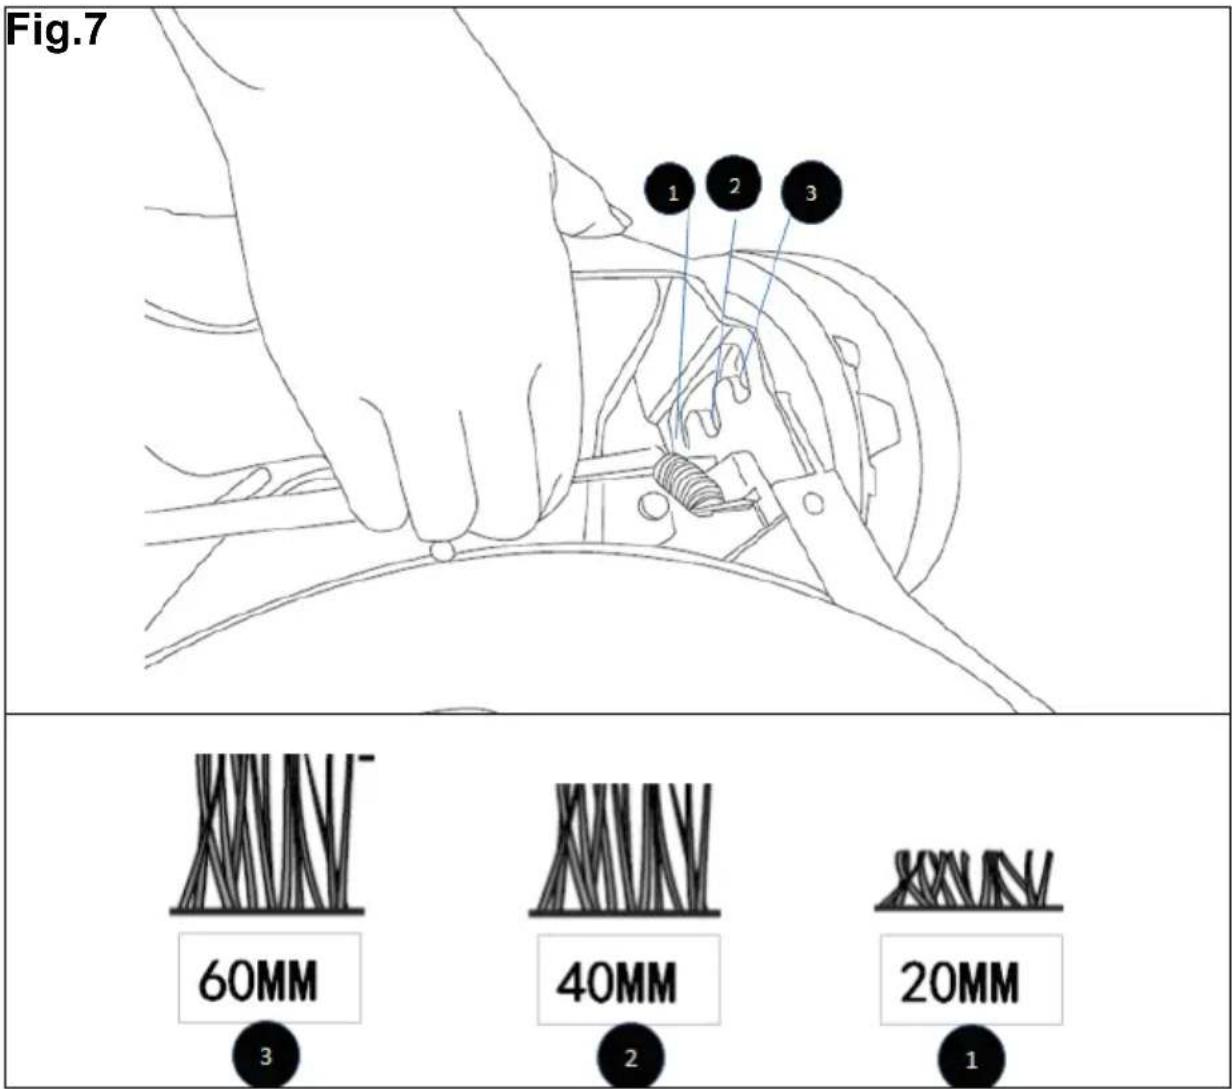
SETTING CUTTING HEIGHT (fig 7.)

Note:
Comply with the national/municipal regulations concerning the times when the mower may be used (if required, contact your local authority).
If you want to change the cutting height, please put the machine upside down.
Warning!
Before you turn the machine upside down be sure that the machine is stopped and not power connected onto the switch. If not danger might be occurred.
You can pull the real axle near the wheel out of the gear position, against the spring force, and set in the position you want. There are 3 positions there. You should repeat these on both rear wheels and both front wheels.

Note: Be sure that the rear/ front wheels are in same position.
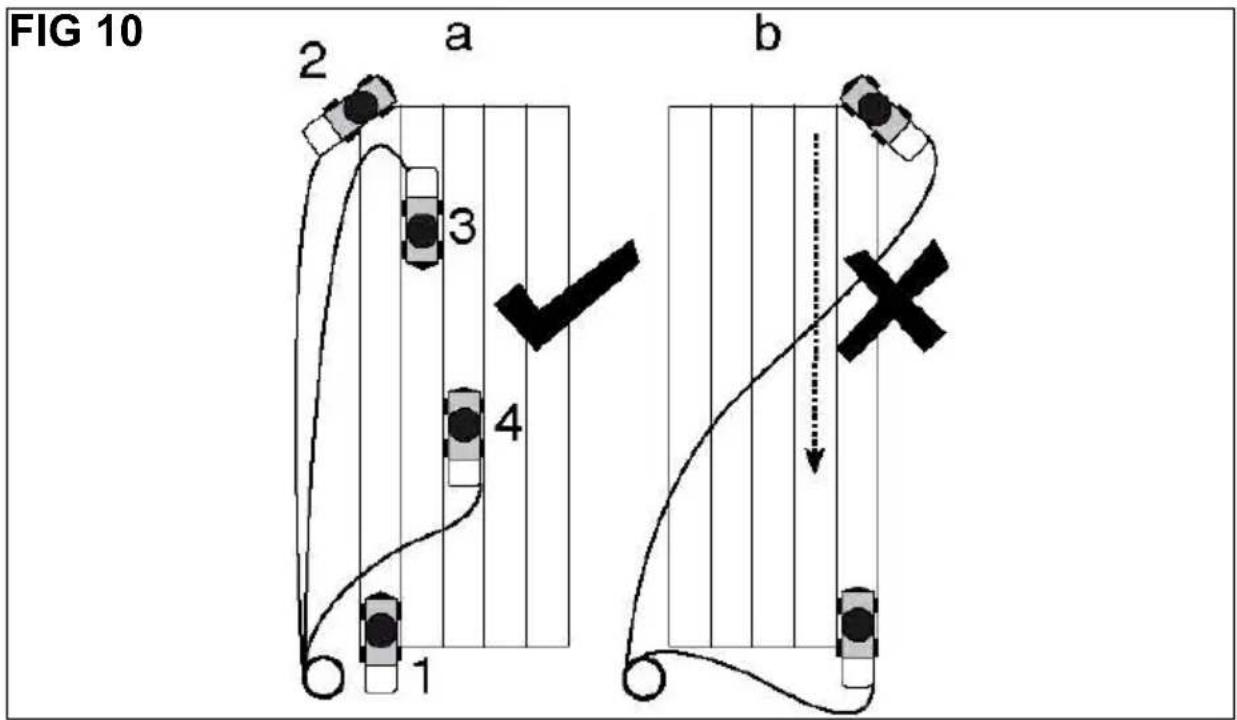
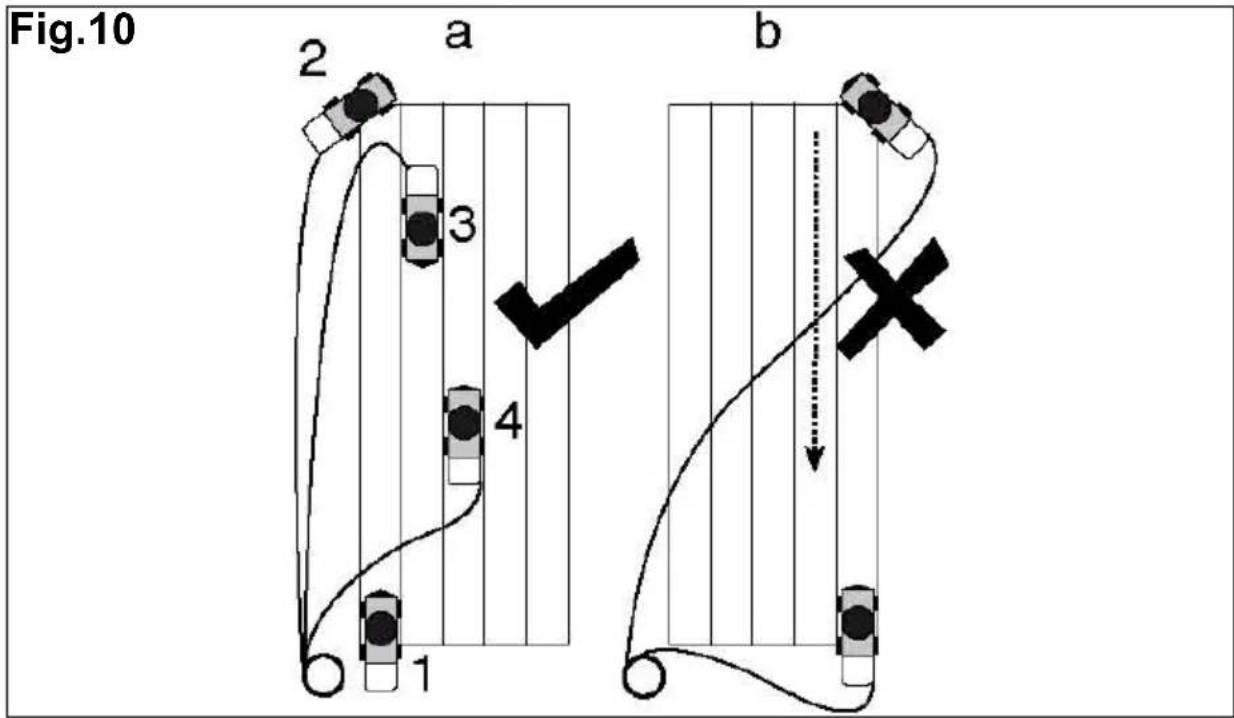
Mowing direction FIG.10
When you begin to mow please follow the arrow on fig 12, so that you can avoid twist your extension cord or cut the cord.
SPECIFICATIONS
| 320 EP-2 |
| Voltage 230-240V~ | |
| Power 1100 W | |
| Speed 2850/min | |
| Cutting Width 32cm | |
| Sound Pressure 76.1dB(A) K=3dB(A) | |
| Sound Power 86.5dB(A) K=2.01dB(A) | |
| Cutting Height 20mm~60mm | |
| Degree Of Protection Against Liquids IP24 | |
| Mass Of Unit 11.8Kg | |
| Blade No. 1405206 | |
| Vibration Level (K=1.5M/S ^2 ) 1.561m/s | ^2 |
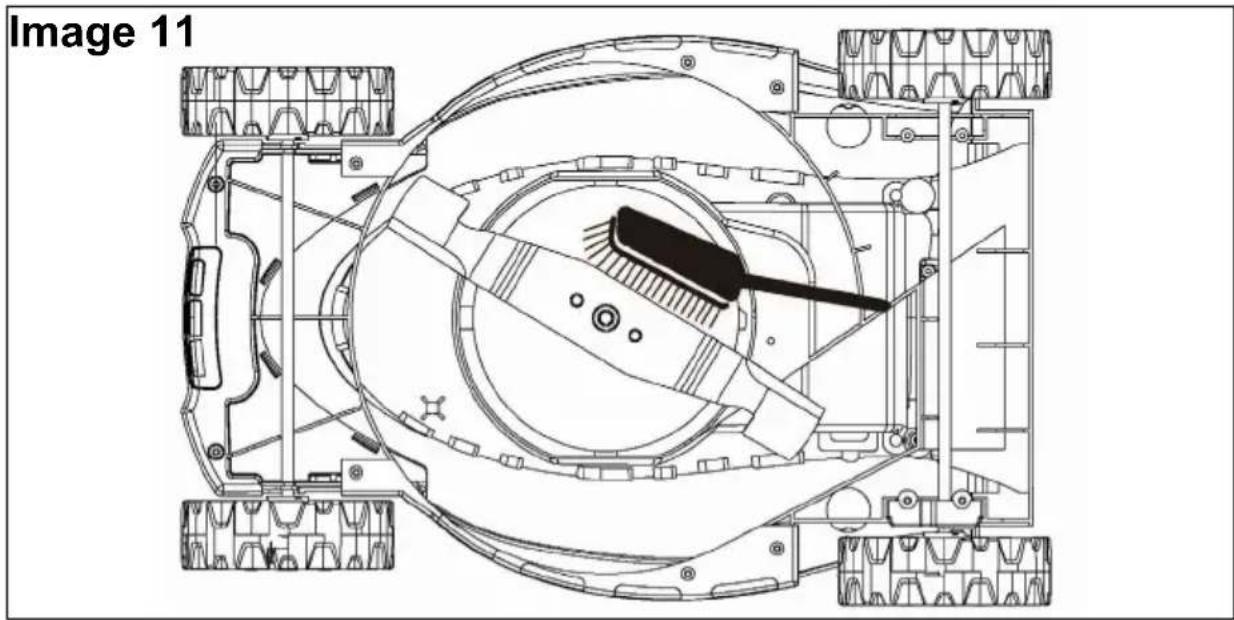
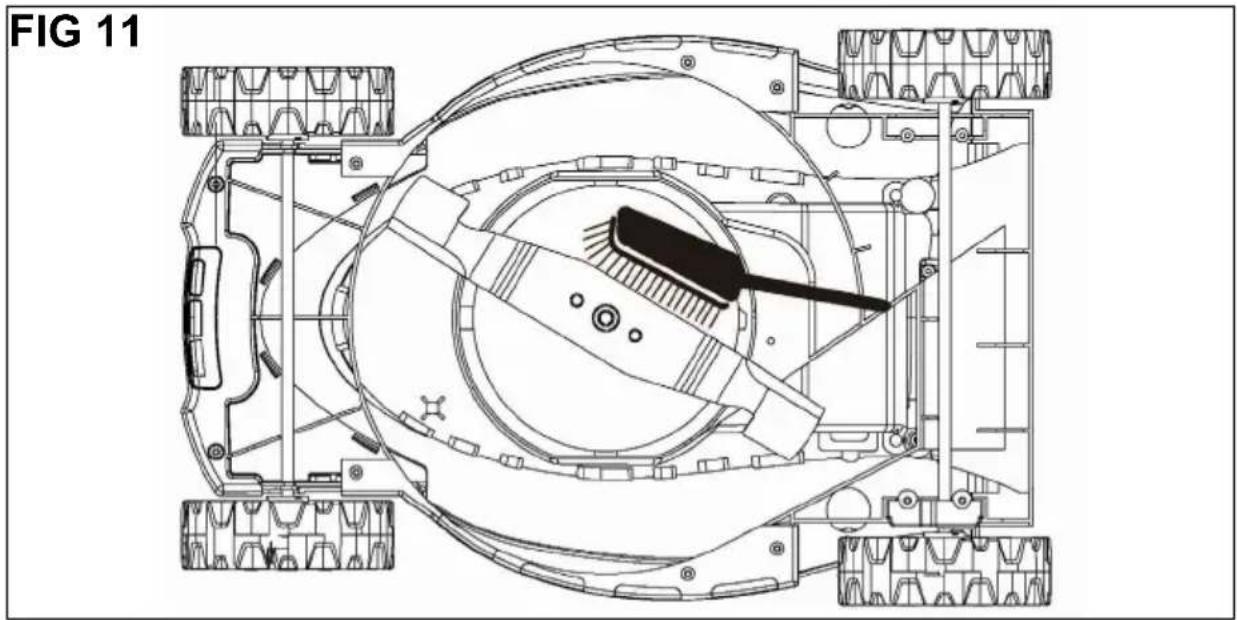
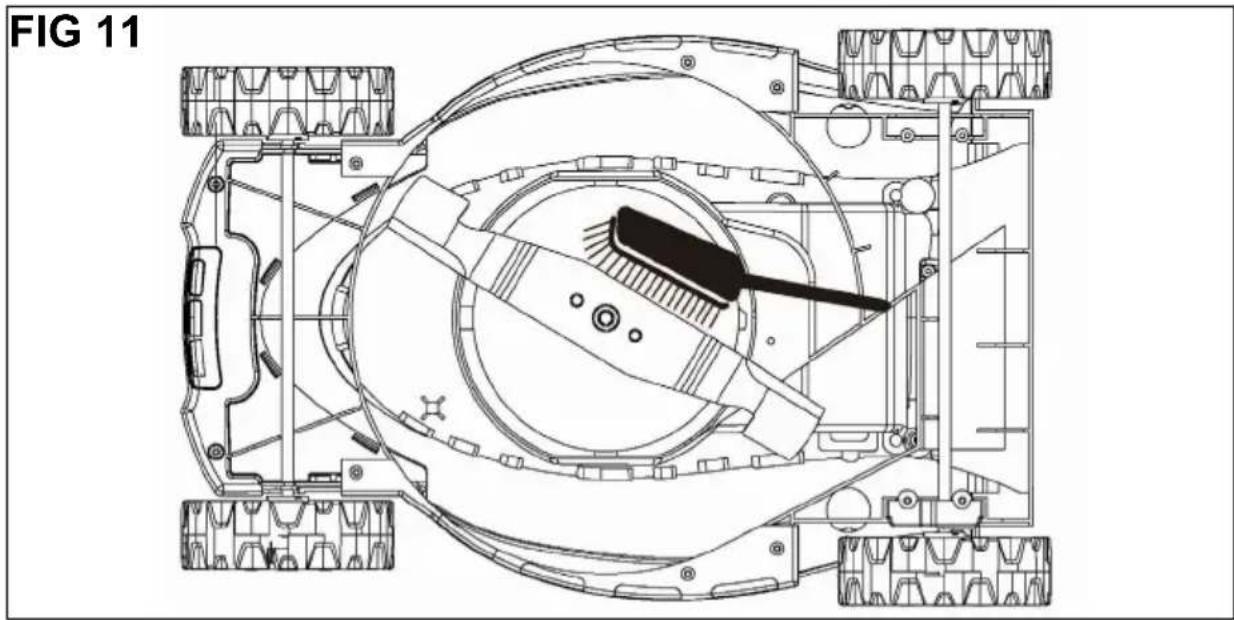
MAINTENANCE AND CARE FIG.11
WARNING! Before you carry out any repairs or servicing work on the mower, you must ensure that the blades is not turning and that the mower has been disconnected from the mains supply. The lawn mower shall not be operated without either the entire grass collection bag or safety flap in place.
1. Service and storage.
To ensure long and reliable service, carry out the following maintenance regularly. Servicing and cleaning work on the lawn mower and the removal of the guards may only be carried out after the motor has been switched off and the plug disconnected from the power supply.
1). Regularly check for obvious defects such as loose, dislodged or damaged chain and guide bar, loose fixings and worn or damaged components.
2). Check that covers and guards are undamaged and correctly fitted. Carry out necessary maintenance or repairs before using the lawn mower.
3). If the clown mowe should happen to fail despite the care taken in manufacturing and testing, repair should be carried out by an authorized customer service agent.
4). Do not clean the lawn mower when it is running.
5). Ensure that all the fastening elements (screws, nuts, etc.) are tight at all times so that you can work with the lawn mower in safety.
6). Check the grass collection device frequently for signs of wear. Replace worn or damaged parts.
7). Store your lawn mower in a dry place. To ensure it has a long life all the screw parts and the wheels and axles should be cleaned and then oiled.
8). Providing your lawn mower with regular care will not only extend its life and performance but also help you to mow your lawn mower properly and easily.
9). Clean the lawn mower with a brush or cloth. Do not use any solvents or water to remove dirt.
10). The component that is subject to most wear is the blade. You should therefore check the condition of the blade and its mounting at regular intervals.
- If the blade is worn or blunt it must be replaced or ground immediately;
- If the lawn mower starts to suffer from excessive vibrations, this means that the blade has not been balanced correctly or has suffered deformation due to impacts. In this case it must be repaired or replaced.
11). Keep all nuts, bolts, and screws tight to be sure the appliance is in safe working condition.
12). Check the grass catcher frequently for wear or deterioration.
13). Replace worn or damaged parts for safety.
14). For rotary mowers, ensure that only replacement cutting means of the right type are used.
15). Be careful during adjustment of the machine to prevent entrapment of the fingers between moving blades and fixed parts of the machine.
16). Always allow the machine to cool down before storing.
17). When servicing the blades be aware that, even through the power source is switched off, the blades can still be moved.
18). Replace worn or damaged parts for safety. Use only genuine replacement parts and accessories.
2. Replacing the blade.

WARNING! For safety reasons, we recommend having the blade replaced by an authorized professional. Never carry out any assembly operations or adjustments with the power connected to the mower. Always ensure that the power button is in the off position and that the power plug is disconnected from the supply. Always handle the blade with gloves for care-sharp edges could cause injury.
Carry out the following steps to change the blade:
- Undo the fastening screw.
- Remove the blade and replace with a new one.
- When fitting the blade, make sure it is installed in the right direction. The blade's air vanes must jut into the motor compartment.
brushes should not be rep laced by anyone but a qualified electrician.
3. Maintenance.
There are no parts inside the equipment which require additional maintenance.
4. Ordering replacement parts.
Please quote the following data when ordering replacement parts:
- Type of machine
- Article number of the machine
- Identification number of the machine
- Replacement part number of the part required
TROUBLESHOOTING
Before performing any maintenance or cleaning work, always pull out the mains plug and wait until the cutter has come to a standstill.
1) Motor does not run:
- Check mains connection cable and circuit-beaker (fuse).
- Start on short grass or on an area which has already been mown.
- Clean discharge channel/housing (the mowing blade must rotate freely.
- Correct the cutting height.
2) Motor power drops:
- Correct the cutting height.
- Clean discharge channel/housing.
- Have mowing blade re-sharpened /replaced (customer service centre).
3) Grass catcher is not filled sufficiently
- Correct the cutting height.
- Allow the lawn to dry.
- Have mowing blade re-sharpened /replaced (customer service centre.
- Clean the grille on the grass catcher.
- Clean the discharge channel /housing.
4) Wheel drive does not function
- Adjust the flexible cable.
- Check the V-belt / gears.
- Check the drive wheels for damage.
Faults which cannot be rectified with the aid of this table (e.g. abnormal vibration) may be rectified by a specialist company only (customer service centre).
EXPLODED VIEW
text_image
Exploded view diagram of a cleaning machine with numbered parts for identification
WARRANTY
- STERWINS products are designed to highest DIY quality standards. STERWINS a 36-month warranty for its products, from the date of purchase. This warranty applies to all material and manufacturing defects which may arise. No further claims are possible, of whatever nature, direct or indirect, relating to people and/or materials. STERWINS products are designed to highest DIY quality standards.
- In the event of a problem or defect, you should first always consult your STERWINS dealer. In most cases, the STERWINS dealer will be able to solve the problem or correct the defect.
- Repairs or the replacement of parts will not extend the original warranty period.
- Defects which have arisen as a result of improper use or wear are not covered by the warranty. Amongst other things, this relates to switches, protective circuit switches and motors, in the event of wear.
- Your claim upon the warranty can only be processed if:
• Proof of the purchase date can be provided in the form of a receipt
- No repairs and/or replacements have been carried out by third parties
- The tool has not been subjected to improper use (overloading of the machine or fitting non-approved accessories).
- There is no damage caused by external influences or foreign bodies such as sand or stones.
- There is no damage caused by non-observance of the safety instructions and the instructions for use.
- The warranty stipulations apply in combination with our terms of sale and delivery.
- Faulty tools to be returned to STERWINS via your STERWINS dealer will be collected by STERWINS as long as the product is properly packaged. If faulty goods are sent directly to STERWINS by the consumer, STERWINS will only be able to process these goods if the consumer pays the shipping costs.
- Products which are delivered in a poorly packaged condition will not be accepted by STERWINS.
We:
ADEO Services
Declare that the Product detailed below:
Electric Lawn Mower 1100W
Model: 320 EP-2
Batch No.: XXXXXX
Satisfy the requirement of the Council Directives:
EC RoHS directive 2011/65/EU
Machinery Directive 2006/42/EC
Low Voltage Directive 2006/95/EC
EMC Directive 2004/108/EC
NOISE Directive 2000/14/EC
(Measured sound power level:86.5dB(A))
Guaranteed sound power level:95dB)
And conforms with the norms:
EN 60335-1:2012
EN 60335-2-77:2010
EN 62233:2008
EN 55014-1/A2:2011
EN 55014-2/A2:2008
EN 61000-3-2/A2:2009
EN 61000-3-3:2008
IEC 62321:2008
Notified Body Of Noise Directive
TÜV SÜD Industrie Service
Position of Signatory:
Director of international buying ADEO SERVICES
Date: 07-03-2014
Bruno POTTIE
Last two numbers of CE printing: 14