
TC40 - Phone SWITEL - Free user manual and instructions
Find the device manual for free TC40 SWITEL in PDF.

| Product type | Corded telephone |
| Brand | Switel |
| Model | TC40 |
| Power supply | Via phone line |
| Handset amplification | +40 dB with dedicated key |
| Direct selection | 6 programmable keys (M1-M6) |
| Speed dialing | 10 numbers (memory key + 0-9) |
| Ringtone volume | Adjustable via slider (3 levels) |
| Handset volume | Adjustable via wheels (hidden under premium earpiece) |
| Tone | Adjustable via slider |
| Transmission volume | Adjustable via slider (SLR) |
| R key | Adjustable flash (100 ms or 300 ms) for PABX |
| Dialing pause | approx. 3 seconds after line digit |
| Hearing aid compatibility | Yes (premium earpiece) |
| Wall mounting | Possible with provided mounting bracket |
| Warranty | 24 months from date of purchase |
| Maintenance | Clean with a soft, lint-free cloth. Do not use solvents. |
| Safety | Do not open the device. Avoid smoke, dust, vibrations, humidity, direct heat. |
Frequently Asked Questions - TC40 SWITEL
User questions about TC40 SWITEL
0 question about this device. Answer the ones you know or ask your own.
Ask a new question about this device
Download the instructions for your Phone in PDF format for free! Find your manual TC40 - SWITEL and take your electronic device back in hand. On this page are published all the documents necessary for the use of your device. TC40 by SWITEL.
USER MANUAL TC40 SWITEL
COMMUNICATIONPRODUCTS
Notruftelefon
Telephone de secours
Operating Instructions
SWITEL
TC40
Bedienungsanleitung 3
Mode d'emploi 15
Istruzioni per l'uso 27
Operating Instructions 39
Declaration of Conformity 52
Inhaltsverzeichnis
Installations PABX / Services comfort
6 Installations PABX / Services comfort
Touche R et services comport
Selection directe, 20, 23
Services comfort, 22
Sonnerie, 21
Touche R et services conform, 22
1 Safety Information 40.
2 Putting the Telephone into Operation 41. . .
3 Operating Elements 42.
4 Operating the Telephone 43.
5 Telephoning 44.
6 PABX / Supplementary Services 46. . . . .
7 One-touch Dialling 47.
8 In Case of Problems 48
9 Maintenance / Guarantee 49. . .
10 Index 50
Safety Information
1 Safety Information
Please read this operating instruction manual thoroughly.
Intended use
The telephone is suitable for telephoning within a public telephone network system. Any other use is considered unintended use. Unauthorised modification or reconstruction is not permitted. Under no circumstances open the device or complete any repair work yourself.
Installation location
Prevent excessive exposure to smoke, dust, vibration, chemicals, moisture, heat and direct sunlight.
Hearing aid compatible
Using the premium receiver, the telephone is perfectly adapted for hearing aids and is compatible with most commercially available hearing aids. However, due to the wide range of hearing aids available, there is no guarantee that the telephone will function problem-free with every model.

Attention: This telephone is capable of producing very high volume levels when the amplifier is switched on and the volume control is set to maximum. Extreme caution should be taken if the handset is shared by users with normal hearing and others with impaired hearing.
Disposal
You are obliged to dispose of consumable goods properly in accordance with the applicable legal regulations. The adjacent symbol on the telephone indicates that electrical and electronic apparatus and batteries no longer required must be disposed of separate from domestic waste.
Electrical and electronic devices must be disposed of at a suitable collection point provided by the public waste authorities.
Batteries must be disposed of at the point of sale or at the appropriate collection points provided by the public waste authorities.
Packaging materials must be disposed of according to local regulations.


2 Putting the Telephone into Operation
Safety information
Attention: It is essential to read the Safety Information in Chapter 1 before starting up.
Checking the package contents
The package contains:
| Content | TC 40 |
| Telephone 1 | |
| Premium receiver 1 | |
| Helix cable for receiver 1 | |
| Telephone connection cable 1 | |
| Wall installation bracket 1 | |
| Operating instructions 1 |
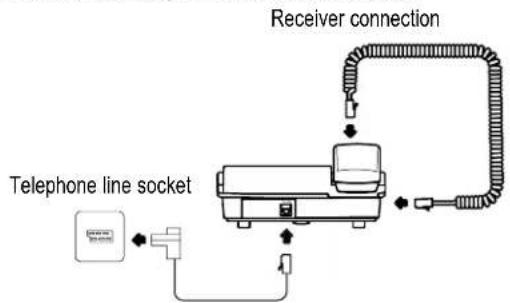
Connecting the base unit
Connect the telephone as illustrated in the diagram. Only use the telephone connection line supplied because the equipment may not function if another telephone connection line is used.
Wall installation
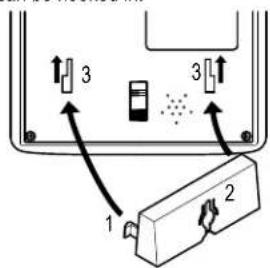
The telephone can also be installed on a wall. You require two screws in order to fix the telephone on a wall.
Feed the guide tabs (1) on the wall-mounting bracket (2) in the slots (3) on the rear side of the telephone. Slide the wall bracket (2) 10 mm upwards until it audibly snaps into place.
Warning: Ensure that there are no cables or pipes etc. in the wall where you want to drill the holes.
Drill two holes whose distance apart corresponds to the bracket to be used, insert the screws and allow them to project 5mm from the wall. Position the telephone on the bracket, fit the screws in the slots and slide the telephone downwards a little.
Turn the receiver hook (4) in the receiver cradle 180^ so that the receiver can be hooked in.
Operating Elements
3 Operating Elements
Telephone
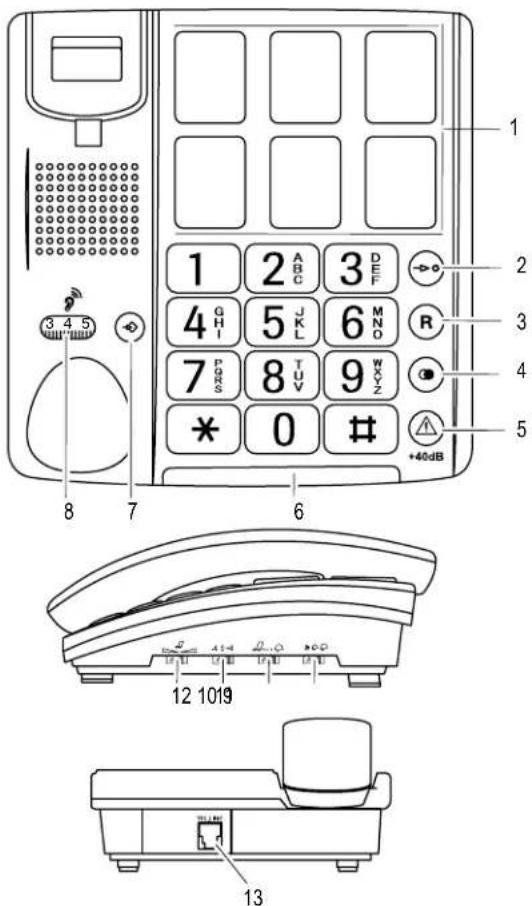
1 One-touch dialing buttons
2 Quick dial button
3 R-button
4 Redialling, Dialling
5 Increase receiver volume +40 dB
6 LED, incoming call
7 Save number
8 Receiver volume knob (hidden under premium receiver)
9 "Ringing volume" slide control
10 "Ringing tone" slide control
11 "Sending loudness rating" SLR slide control
12 "Tone" slide control
13 Telephone connection cable socket
The buttons in this operating manual are depicted with a uniform contour. Variations in the symbols on the telephone buttons compared to those depicted here are possible.
4 Operating the Telephone
Operating the Telephone
Display and explanation of operation sequences
Enter digits or letters
* Press the button depicted briefly
2x Press the button depicted twice, briefly
2 sec. Press the button depicted for 2 sec.
Press and hold Press and hold the button depicted
Release Release the button depicted
Telephone rings
Lift the receiver
Replace the receiver on-hook
Telephoning
5 Telephoning
Taking a call
Take the call
Ending a call
End the call
Making a call
Lift the receiver
Enter the phone number (max. 32
digits)
Redialling
Your telephone stores the last phone number dialled.
Dial the last number dialled
One-touch dialling
You can use the one-touch dialling buttons for normal direct dialling or as memory locations for the emergency call function. Be sure to store phone numbers for one-touch dialling first; Page 47.
Lift the receiver
M1 - M6 Press the required one-touch dialling
button
Quick dialling
It is possible to store 10 phone numbers so that they are dialled simply by pressing two buttons (quick dialling).
Programming quickdial buttons
Lift the receiver
Press the Memory button
Enter the phone number (max. 16 digits) and confirm it
0 Enter the required memory location number (e.g. in this case for memory location 0)
Replace the receiver on-hook
Dialling using quick dial buttons
Lift the receiver
Press the quick dial button
0 Enter the required memory location
number (e.g. in this case for memory location 0)
The phone number stored is automatically dialled.
You cannot delete the phone numbers stored on the quick dial buttons. Existing numbers are overwritten when new phone numbers are stored.
Increasing the receiver volume to +40 dB
The receiver volume can be increased to +40 dB by pressing the button.
1+40dB Increase the receiver volume
Setting the receiver volume
You can adjust the receiver volume using a rotary knob when the +40 dB amplification is activated.
123 Adjust the volume with the knob
Tone control
You can adjust the tone produced in the receiver using a slide control on the right-hand side of the housing.

Adjust the tone using the slide control
The tone control only works when the 40 dB amplification is activated.
Ringing volume
You can adjust the ringing volume using a slide control on the right-hand side of the housing.

Adjust the volume using the slide control
Telephoning
Ringing tone
You can adjust the ringing tone using a slide control on the right-hand side of the housing. There are 3 ringing tones for selection.
Change the ringing tone using the
slide control
Sending loudness rating
You can increase or reduce the sending loudness rating for the microphone in the receiver by means of a slide control on the right-hand side of the housing.
-40+4
Adjust the volume using the slide
control
PABX / Supplementary Services
6 PABX / Supplementary Services
R button on private branch exchanges
If the telephone is connected to a private branch exchange, functions such as transferring calls and automatic call back can be used via the R button. Please refer to the manual provided with your private branch exchange.
The sales outlet where you purchased the exchange can provide information as to whether the telephone will work properly with the exchange.
Dialling pause
When using private branch exchanges, it is necessary to dial an access code to obtain the dialling tone for an outside line. When using some older private branch exchanges, it takes a little time before the dialling tone becomes audible. In the case of such private branch exchanges, a dialling pause can be inserted after the number for an outside line in order to continue dialling directly without having to wait for the dialling tone.
Insert a dialling pause
After dialling the number for the outside line, the telephone waits approx. 3 seconds before dialling the actual phone number.
R-button and supplementary services
Your telephone supports supplementary services provided by your telephone network provider, such as brokering, call waiting and conference facilities. These supplementary services can be used by implementing the
R button. Contact your telephone network provider with regard to enabling supplementary services.
Setting the Flash time
Set the required Flash time using the sliding switch located on the underside of the telephone. You can select between 100 ms and 300 ms.
7 One-touch Dialling
Saving one-touch dialling numbers
You can use the one-touch dialling buttons M1 - M6 for normal direct dialling or as memory locations for the emergency call function.
Lift the receiver
Initiate the programming function
Enter the phone number (max. 16 digits)
M1 - M6 Press the required one-touch dialling button
The entry is saved
You can insert photos or symbols under the transparent covers of the 6 one-touch dialling buttons to label them.
You cannot delete the phone numbers assigned to the one-touch dialling buttons. The existing phone numbers are overwritten when new numbers are assigned to them.
In the case of a power failure over a period in excess of approx. 1 hour, the numbers programmed in the one-touch dialling but-tons are lost!
Dialling with the one-touch dialling buttons
Lift the receiver
M1 - M6 Press the required one-touch dialling button
Removing the covers from the one-touch dialling buttons
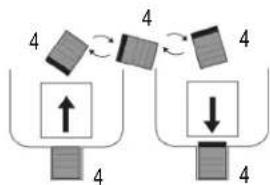
Use your thumb and forefinger to grip the cover and remove it, as illustrated in the diagram. Place the required label or photo under the cover and replace it on the button.
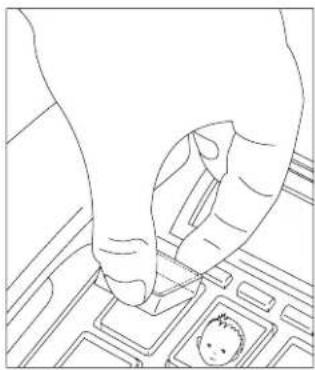
Example illustration
In Case of Problems
8 In Case of Problems
Service Hotline
Should problems arise with the telephone, please refer to the following information first. In the case of technical problems, you can contact our hotline service, Tel. 0900 00 1675 within Switzerland (cost via Swisscom at time of going to print: CHF 2.60/min). In the case of claims under the terms of guarantee, contact your sales outlet. There is a 2 year period of guarantee.
Problems and solutions
Problems Solutions
No telephone calls possible -
The telephone line is not connected properly or is defective. Only use the telephone connection cable supplied.
9 Maintenance / Guarantee
Maintenance
Clean the housing surfaces with a soft, fluff-free cloth.
- Never use cleaning agents or solvents.
Guarantee
SWITEL equipment is produced and tested according to the latest production methods. The implementation of carefully chosen materials and highly developed technologies ensure trouble-free functioning and a long service life. The terms of guarantee do not apply where the cause of equipment malfunction is the fault of the telephone network operator or any interposed private branch extension system. The terms of guarantee do not apply to the batteries or power packs used in the products. The period of guarantee is 24 months from the date of purchase.
All deficiencies related to material or manufacturing errors within the period of guarantee will be redressed free of charge. Rights to claims under the terms of guarantee are annulled following tampering by the purchaser or third parties. Damage caused as the result of improper handling or operation, normal wear and tear, incorrect positioning or storage, improper connection or installation or Acts of God and other external influences are excluded from the terms of guarantee. In the case of complaints, we reserve the right to repair defect parts, replace them or replace the entire device. Replaced parts or devices become our property. Rights to compensation in the case of damage are excluded where there is no evidence of intent or gross negligence by the manufacturer.
If your device does show signs of a defect within the period of guarantee, please contact the sales outlet where you purchased the SWITEL device, producing the purchase receipt as evidence. All claims under the terms of guarantee in accordance with this agreement can only be asserted at the sales outlet. No claims under the terms of guarantee can be asserted after a period of two years from the date of purchase and hand-over of the product.
Declaration of Conformity
This device fulfils the requirements stipulated in the EU directive:
1999/5/EC directive on radio equipment and telecommunications terminal equipment and the mutual recognition of their conformity. Conformity with the above mentioned directive is confirmed by the CE symbol on the device.
To view the complete Declaration of Conformity, please refer to the free download available on our web site www.switel.com.

Index
10 Index
B
Base unit, 41
D
Declaration of Conformity, 49
Dialling pause, 46
Dialling using quick dial buttons, 44
Dialling with the one-touch dialling buttons, 47
Display, 43
E
Ending a call, 44
Explanations, 43
F
Flash time, 46
G
Guarantee, 49
1
Increasing the receiver volume to +40dB 44
Inserting labels, 47
M
Maintenance, 49
Making a call, 44
0
One-touch dialling, 44, 47
Operating elements, 42
Operating the telephone, 43
P
Package contents, 41
Private branch exchanges, 46
Problems, 48
Problems and solutions, 48
Programming quickdial buttons, 44
Q
Quick dial, 44
R
R button on private branch exchanges, 46
R-button and supplementary services, 46
Receiver volume, 44
Redialling, 44
Ringing tone, 45
Ringing volume, 44
S
Safety information, 40
Saving one-touch dialling numbers, 47
Sending loudness rating, 45
Service-Hotline, 48
Starting up, 41
Supplementary services, 46
T
Taking a call, 44
Telephoning, 44
Tone control, 44
Troubleshooting, 48
W
Wall installation, 41
Notes
Notes
SWITEL
C
Declaration of Conformity
These Anlage entspricht der europäischen R&TTE Richtlinie.
Für die komplette Konformitätserklarung nutzen Sieitte den kostenlosen Download von unserer Website www.switel.com
Cet équipement est conforme à la directive européen R&TTE.
Pour obtaining la déclaration de conformité intégrale, veuillez vous servir du téléchargement gratuite de notre site Internet www.switel.com.
Quest'apparecchiatura é conforme alla direttiva europea R&TTE.
Per la dichiarazione di conformità completa si prega di voter usfuisure del servizio Gratis di download dal nostro site Internet www.switel.com.
This equipment complies with the European R&TTE directive.
To view the complete Declaration of Conformity, please refer to the free download available at our web site: www.switel.com.
Service Hotline
In the event of technical problems, you can contact our hotline service, Tel. 0900 00 1675 within Switzerland (cost via Swisscom at time of going to print: CHF 2.60/min).