
HI994 - Medical thermometer PHILIPS - Free user manual and instructions
Find the device manual for free HI994 PHILIPS in PDF.

| Product Type | Steam Iron with Boiler |
| Brand | PHILIPS |
| Model | HI994 |
| Water Tank Capacity | 0.62 liter |
| Boiler Capacity | Approximately 0.3 liter (first automatic fill) |
| Supply Voltage | 220-240 V (estimated) |
| Power | 2000-2400 W (estimated) |
| Device Weight | Approximately 4-5 kg (estimated) |
| Ironing Functions | Dry ironing, continuous steam, steam jet, steam spray, vertical ironing |
| Settings | Rotary thermostat (MIN, ●, ●●, MAX), rotary steam control (0-3), steam button pressed |
| Indicator Lights | Iron on/off, boiler on/off, boiler heating, tank empty, iron heating |
| Soleplate Type | Not specified (probably ceramic or stainless steel) |
| Power Cord Length | Approximately 2 m (estimated) |
| Iron Rest | Detachable, can become hot |
| Safety | Do not immerse, grounded plug, keep away from children |
| Maintenance and Cleaning | Clean with a damp cloth after cooling |
| Storage | Cord storage compartment, carrying handles |
| Recommended Water Type | Tap water (if hard, mix with demineralized water) |
Frequently Asked Questions - HI994 PHILIPS
User questions about HI994 PHILIPS
0 question about this device. Answer the ones you know or ask your own.
Ask a new question about this device
Download the instructions for your Medical thermometer in PDF format for free! Find your manual HI994 - PHILIPS and take your electronic device back in hand. On this page are published all the documents necessary for the use of your device. HI994 by PHILIPS.
USER MANUAL HI994 PHILIPS
- Keep page 3 open when reading these operating instructions.
Français
Page 12
- Please read these instructions for use carefully in conjunction with the illustrations before using the appliance.
- Never use the appliance if damaged in any way. Regularly check if the mains cord and the supply hose are still in a good and safe condition.
- If the mains cord of this appliance is damaged, it must only be replaced by Philips or their service representative, as special tools and/or parts are required.
- Check if the voltage rating on the typeplate (under the steam tank) corresponds to the mains voltage in your home.
- Only connect the appliance to an earthed mains wall socket.
- Never immerse the iron or the steam tank in water.
- Never fill the water tank with perfumes, vinegar, descaling agents or other chemicals.
- Take care that children cannot touch the iron when hot and that they cannot pull the mains cord or supply hose.
- When leaving the iron, even for a short while, always remove the mains plug from the wall socket and place the iron on the stand.
- Always place the steam tank on a stable flat and horizontal surface. Do not place the steam tank on the soft part of the ironing board.
- Always place the iron on the iron stand. Do not place the hot iron on the steam tank, the supply hose or the mains cord. The cordset should not be allowed to touch the soleplate when it is hot.
- The appliance is equipped with an electric pump. This pump can be heard from time to time when automatically refilling the boiler system. This is quite normal.
- The iron stand can become hot during use. If you want to move it, touch only the two lateral edges of the stand.
General description (fig. 1)
A Removable water tank
Water tank cap filling opening
Switch "Iron On/Off" with built-in pilot light
Switch "Steam tank On/Off" with built-in pilot light.
Pilot light "Steam tank heating-up". (The pilot light goes out when the appliance is ready for steam-ironing.)
Pilot light "Water tank empty". (The pilot light comes on when the water tank is empty or not placed correctly into the appliance.)
G "Jet of Steam" button (press)
“Shot of Steam” button (press)
0 Steam control (rotate)
0 = dry ironing
3 = maximum steam
1 Steam activator (press-in for steam ironing)
Temperature dial (rotate)
Pilot light "Iron heating-up"
Supply hose with ball swivel
Storage compartment sliding door
Storage compartment for mains cord and supply hose
P Mains cord
Soleplate
Iron stand (removable)
Steam tank
Making the appliance ready for use
- Before using the first time remove any sticker or protective foil from the soleplate. Clean the soleplate with a soft cloth.
- Fully unwind the mains cord and supply hose.
- Do not insert the mains plug into the wall socket until the steam tank has been filled with water.
- Place the steam tank on a stable flat surface.
- Place the iron on the iron stand.
Filling with water (for steam-ironing, "Shot-of-steam" and "Jet-of-steam")
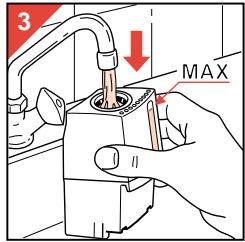
- Please fill with normal tap water before using for the first time. Maximum filling is 0.62 litre.
- Also use tap water to refill the tank. If the tap water is very hard (over 10^ ), it is advisable to mix it with demineralised or distilled water (50% tap water and 50% demineralised or distilled water).
- Never use perfumes, vinegar, descaling agents or other chemicals.
- Do not use water from a water softener.
- During steam-ironing, the system will automatically pump water from the water tank into the steam tank.
Filling before you start ironing
- Make sure that the steam tank and the iron are both switched off. Remove the mains plug from the wall socket.
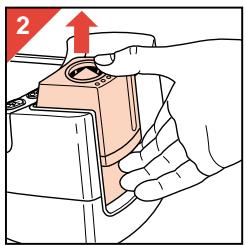
- For easy and safe filling the water tank can be removed (fig. 2) and filled under the tap (fig. 3).
| Table | |||||
| Label with ironing instructions | Kind of textile | Temperature dial | Steam-ironing | Shot of steam | Jet of steam |
| Synthetic e.g. acetate, acrylic, viscose, polyamide, polyester. Silk | MIN | • | | | - | - | 32 | 32 |
| Wool | | • | | | MIN MAX | MIN MAX | 32 | 32 |
| Cotton Linen | | • • MAX | MIN MAX | MIN MAX | 32 | 32 |
| Please note: This article cannot be ironed! | |||||
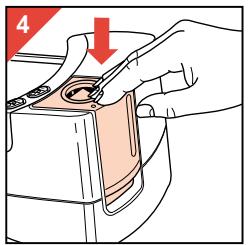
- When replacing the filled water tank, push down firmly to make sure it is well-seated (fig. 4).
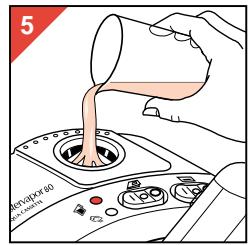
- On the other hand, it is also possible to leave the water tank in place when filling it. Use a beaker with spout to avoid spillage (fig. 5).
Filling during ironing
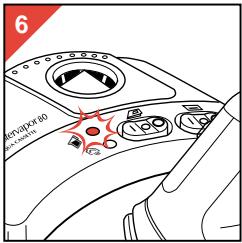
After steam ironing for some time (switch (D) in position "on" and corresponding pilot light illuminating), the water tank will become empty. To indicate that the water tank needs refilling, pilot light (F) will illuminate (fig. 6).
- Switch the iron and the steam tank off and remove the mains plug from the wall socket.
- Refill the water tank as indicated in the previous section.
Please note: pilot light (F) will also illuminate if the water tank is not correctly placed.
Steam tank heating up

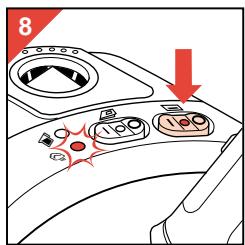
- Plug in and switch the steam tank on (fig. 7). (Please note: If you do not intend to use steam you of course need not switch the steam tank on.)
- The pilot light in switch comes on to indicate that the steam tank is switched on. Also, pilot light comes on to indicate that the steam tank is heating up (fig. 8).
As soon as the steam tank is heated up and steam is ready, pilot light goes out.
Please note: When using the appliance for the first time, an initial amount of 0.3 litre of water will automatically be pumped from the water tank into the steam tank to start the system.
It is advisable to switch off, unplug and fill the water tank fully up before you continue.
Then the full capacity of the water tank is available for steam ironing.
Tips
- Always check first if a label with ironing instructions is attached to the article to be ironed. Follow these ironing instructions in all cases.
- If ironing instructions are missing but you know the kind of fabric, then refer to the fabric table.
- The fabric table is valid for the fibre materials only. If some kind of finish has been applied (gloss, wrinkle, relief etc.), the textile can best be ironed at a lower temperature.
- First sort out the fabrics according to ironing temperature: wool with wool, cotton with cotton, etc.
- The iron heats up quicker than it cools down. Therefore, start ironing the articles requiring the lowest temperature such as those made of synthetic fibres. Then progress to the higher temperatures.
- If the article is made of a mixture of different fibres, you must always select the lowest ironing temperature of the composition of those fibres.
(E.g. an article consisting of "60% polyester and 40% cotton" should be ironed at the temperature indicated for polyester (●) and without steam.)
If you do not know what kind(s) of fabric(s) the article has been made of, find a spot which will be invisible when wearing or using the article to try out the ironing temperature.
(Always start at a low temperature and increase to one which gives the required results.)
- Pure woollen fabrics (100% wool) may be pressed with the iron set to a steam position. It is recommended to apply shot-of-steam and use a dry pressing cloth.
When steam-ironing woollen fabrics, shining of the fabric may occur. This can be prevented by turning the article inside out and ironing the inside.
- Velvet and other textures which rapidly acquire
shiny spots should be ironed in one direction only (with the nap), applying only light pressure. Always keep the iron moving.
- Iron the reverse side of synthetic materials and silk to prevent shining spots.
- When ironing coloured silk, it is not advisable to use steam as this may cause stains.
How to set the ironing temperature
- As indicated on the temperature dial (K) and the table, steam-ironing is only possible at higher ironing temperatures:
- For maximum steam high ironing temperatures are required.
For that reason, set the temperature dial (K) to - and the steam control (I) to positions 2 or 3.
- For moderate steam you may select a somewhat lower ironing temperature.
You can then set the temperature dial (K) to
or and the steam control (I) to position 1. - For dry ironing, however, you may select any suitable ironing temperature.
You can then set the temperature dial (K) to
or and the steam control (I) to position
0.
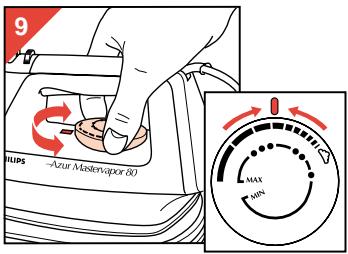
- Select the required ironing temperature with the

temperature dial (K) (fig. 9).
- Set switch "Iron On/Off" (C) to position "On" (fig. 10).
The pilot light in the switch as well as pilot light "Iron heating up" (L) will come on (fig. 11).
- After a few minutes, pilot light "Iron heating up"
(L) will go out.
This indicates that the soleplate has reached the set temperature.
After this pilot light has gone out and come on again you can start ironing.
- During ironing pilot light "Iron heating up" (L) will come on from time to time.
When this happens, the soleplate is being heated-up to the required temperature again.
You can continue ironing.
Steam-ironing
- When pilot light "Steam tank heating-up" (E) goes out, this indicates that the steam tank is heated up and that steam is ready. You can
now start steam ironing.
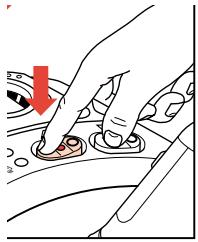
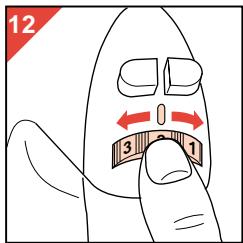
- To select the required steam output rotate the steam control (I) (fig. 12).
The further the control is rotated clockwise, the more steam is produced. - While steam-ironing keep the steam activator (J) pressed-in (fig. 13).
During steam-ironing the two pilot lights (E) and (L) will come on from time to time.
When this happens, either the iron or the steam tank is being heated-up to the required temperature. You can continue ironing.
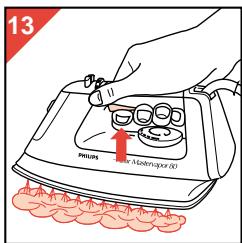
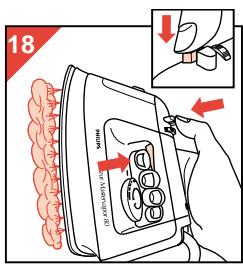
"Shot-of-steam"
- Applying "Shot-of-steam" (i.e. high steam output coming from a limited number of holes in the soleplate) can help remove stubborn wrinkles over a large area.
- Always set the temperature dial (K) to the steam range ( or ).
Otherwise the
soleplate is not hot enough so that water may drip from it.
- Press button (H) and the steam activator (J) (fig. 14).
"Jet of steam"
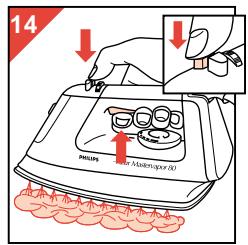
- Applying "Jet-of-steam" can help remove stubborn wrinkles.
- Press button (G) and steam activator (J) (fig. 15).
- It is not necessary to set the temperature dial (K) to the steam range for "Jet-of-steam".
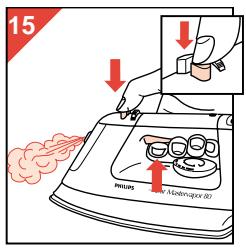
Steaming in a vertical position
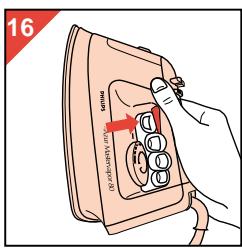
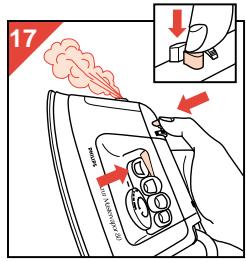
Hanging curtains and clothing (jackets, woman's suits, coats) can be steamed by holding the iron in a vertical position (fig. 16). "Jet of steam" (fig. 17) and "Shot-of-steam" (fig. 18) can be applied as well in a vertical position
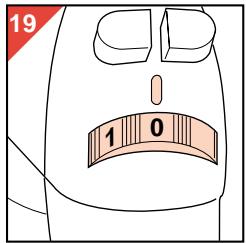
Dry-ironing
For ironing without steam set the steam control (I) to position O (fig. 19). Steam activator (J) is now blocked and no steam can come to the iron. Also "Shot-of-steam" and "Jet-of-steam" do not function. You can also switch off the steam tank (D).
When finished ironing
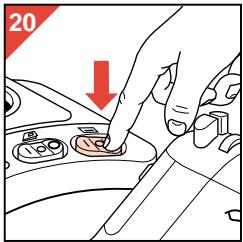
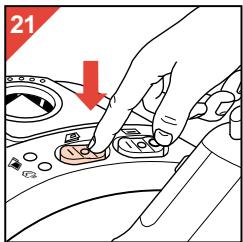
- Switch off the steam tank and the iron (fig. 20, 21).
- Remove the mains plug from the wall socket.
- Place the iron on the stand and let it cool down.
Cleaning
- Before cleaning remove the mains plug from the wall socket and allow the iron to cool down sufficiently.
- The appliance can be cleaned with a damp cloth.
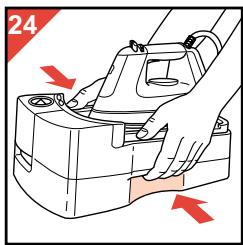
Storage


- Arrange the supply hose and mains cord in the storage compartment (fig. 22, 23).
- For transport there are handgrips on either side of the steam tank (fig. 24).
Assistance guide
| Situation | Likely cause | What do to |
| When placing the water tank into the appliance some water is spilt over the cap. | Too much water in the water tank. | Do not fill the water tank higher than indication “MAX” and place it carefully. |
| The water tank is filled with water and placed into the appliance. But yet pilot light (“Water tank empty”) remains on. | The water tank has not been placed correctly into the appliance. | Check if the water tank is in the correct position. Then press the tank downwards until well-seated (fig. 4). |
| The appliance is noisy. | The appliance vibrates on the surface it is placed on. | Move the appliance or place it on a different surface. |
| The water tank is not correctly placed into the appliance. | Check if the water tank is in the correct position. Then press the tank downwards until well-seated (fig. 4). | |
| When switched on for the first time, the water tank suddenly becomes half-empty (although you have not yet used any steam). | This is a normal phenomenon. Only with first use the steam tank is automatically filled with 0.3 litre of water. | Switch off, unplug and refill the water tank to maximum level before you start steam ironing. |
| The appliance produces steam, but the sound of the pump is not regular. | This is a normal phenomenon. A microcomputer controls the pump which automatically transfers small quantities of water from the water tank into the steam tank. | Nothing. |
| After switching on for the first time some smoke comes from the appliance. | This is a normal phenomenon. Some parts of the iron have been greased lightly in the factory. | Nothing. (After a short while this phenomenon will stop.) |
| Drops of water come from the soleplate. | The temperature dial (K) has been set to a temperature which is too low for steam ironing. | Select the required ironing temperature as indicated in these instructions. (Also refer to the table.) |
| The steam tank is placed on an unstable and/or uneven surface. | Place the steam tank on a stable and even surface. | |
| When starting steam ironing the supply hose is too cold. Steam condenses in the hose and escapes from the soleplate. | This is a normal phenomenon. Just place the iron on an extra piece of cloth. This will catch the drops of water while you “steam iron” it. After a few seconds the iron will start producing steam. | |
| Water leaks from the under side of the steam tank. | Particles inside the water tank may obstruct the valve of the pump. | Remove and rinse the water tank. |
| You cannot see steam coming from the soleplate. | Superheated (i.e. high quality!) steam is hardly visible, especially when the temperature dial is set to maximum position, and even more at relatively high ambient temperature. | To verify steam output you can hold a (cold) mirror in front of the soleplate vents. |
| The soleplate is dirty. | Impurities or chemicals contained in the water have deposited on to the soleplate. | Clean the soleplate with a damp cloth, if required with some washing-up agent. |
| Ironing at too high temperatures. | Clean the soleplate with a damp cloth, if required with some washing-up agent. Select the advised ironing temperature. |
Français
Important
- Para planchar en seco, sin embargo,SEO,SEO,SEO,SEO,SEO,SEO,SEO,SEO,SEO,SEO,SEO,SEO,SEO,SEO,SEO,SEO,SEO,SEO,SEO,SEO,SEO,SEO,SEO,SEO,SEO,SEO,SEO,SEO,SEO,SEO,SEO,SEO,SEO,SEO,SEO,SEO,SEO,SEO,SEO,SEO,SEO,SEO,SEO,SEO,SEO,SEO,SEO,SEO,SEO,SEO, SEO, SEO, SEO, SEO, SEO, SEO, SEO, SEO, SEO, SEO, SEO, SEO, SEO, SEO, SEO, SEO, SEO, SEO, SEO, SEO, SEO, SEO, SEO, SEO, SEO, SEO, SEO, SEO, SEO, SEO, SEO
- Français
- Page 12
- General description (fig. 1)
- Making the appliance ready for use
- Filling with water (for steam-ironing, "Shot-of-steam" and "Jet-of-steam")
- Filling during ironing
- Steam tank heating up
- Tips
- How to set the ironing temperature
- Steam-ironing
- "Shot-of-steam"
- "Jet of steam"
- Steaming in a vertical position
- Dry-ironing
- When finished ironing
- Cleaning
- Storage
- Important
Brand : PHILIPS
Model : HI994
Category : Medical thermometer