
Precision Cut HC5300 - Lawn mower REMINGTON - Free user manual and instructions
Find the device manual for free Precision Cut HC5300 REMINGTON in PDF.

| Product Type | Hair Clipper |
| Brand | Remington |
| Model | Precision Cut HC5300 |
| Power Supply | Rechargeable (AC adapter 3.2V 1500mA) |
| Wireless Runtime | Up to 40 minutes |
| Charging Time | 14 to 16 hours |
| Number of Cutting Guides | 2 adjustable guides |
| Cutting Lengths - Small Guide | 1, 3, 6, 9, 12, 15, 18, 21 mm |
| Cutting Lengths - Large Guide | 24, 26, 29, 32, 35, 38, 41, 44 mm |
| Zero-Gap Cutting Without Guide | 1 mm (0.5 mm if blade perpendicular) |
| Corded Use | Possible (adapter plugged in) |
| Blade Cleaning | Brush, regular oiling (sewing machine oil) |
| Periodic Maintenance | Disassemble blade unit every 6 months for cleaning |
| Safety | Do not immerse, keep away from water, use specific adapter |
| Charge Indicator | LED stays on while charging and when fully charged |
| Operating Temperature | 10°C to 35°C |
| Battery Type | Rechargeable battery (removable for recycling) |
| Blade Material | High quality steel |
Frequently Asked Questions - Precision Cut HC5300 REMINGTON
User questions about Precision Cut HC5300 REMINGTON
0 question about this device. Answer the ones you know or ask your own.
Ask a new question about this device
Download the instructions for your Lawn mower in PDF format for free! Find your manual Precision Cut HC5300 - REMINGTON and take your electronic device back in hand. On this page are published all the documents necessary for the use of your device. Precision Cut HC5300 by REMINGTON.
USER MANUAL Precision Cut HC5300 REMINGTON
natural_image
Black Remington 11 hairbrush with toothed head and metal clip (no text or symbols visible)Thank you for buying your new Remington® product. Please read these instructions carefully and keep them safe.
Remove all packaging before use.

IMPORTANT SAFETY INSTRUCTIONS
WARNING – TO REDUCE THE RISK OF BURNS, ELECTROCUTION, FIRE OR INJURY TO PERSONS:
1 This appliance can be used by children aged from 8 years and above and persons with reduced physical, sensory or mental capabilities or lack of experience and knowledge if they have been supervised/instructed and understand the hazards involved. Children shall not play with the appliance. Cleaning and user maintenance shall not be done by children unless they are older than 8 and supervised. Keep the appliance and cable out of reach of children under 8 years.
2 The adaptor contains a transformer. Do not cut off the adaptor to replace it with another plug, as this causes a hazardous situation.
3 Use this appliance only for its intended use as described in this manual. Do not use attachments not recommended by Remington®.
4 Do not use this product if it is not working correctly, if it has been dropped or damaged, or dropped in water.
5 This appliance should never be left unattended when plugged into a power outlet, except when charging.
6 Keep the power plug and cord away from heated surfaces.
7 Do not immerse the appliance in liquid; do not use it near water in a bath-tub, basin or other vessel; and don't use it outdoors.
8 Make sure the power plug, cord and product unit do not get wet.
9 Do not plug or unplug the appliance with wet hands.
10 Do not reach for an appliance that has fallen into water. Unplug it immediately.
11 Always place and use the appliance on a surface that is fluid-resistant.
12 Always put the headguard on the product to protect the cutting heads whilst travelling.
13 Do not use the appliance, adaptor or any other part if it is damaged, as this may cause injury. Always replace a damaged adaptor or charging stand with one of the original type.
14 Do not twist or kink the cable, or wrap it round the appliance.
15 Charge, use and store the product at a temperature between 10°C and 35°C.
16 This appliance is not intended for commercial or salon use.
17 WARNING: Keep the appliance dry.
18 This appliance should be supplied with approved safety isolating adaptors PA-3215E (Europe), PA-3215U (UK) with the output capacity of 3.2V dc; 1500mA.
KEY FEATURES
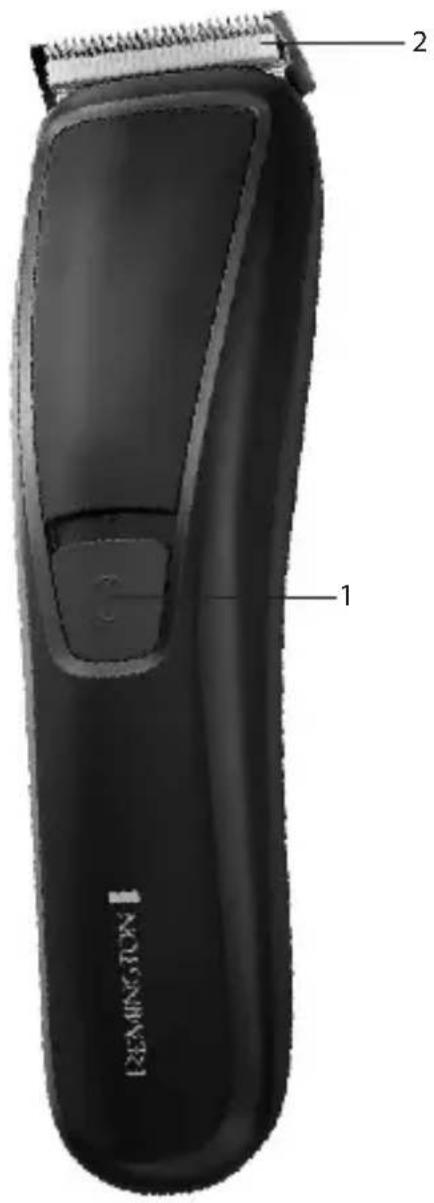
1 On / Off Switch
2 Blade set
3 2 attachment guide combs: 1 -21mm and 24-44mm (not shown)

GETTING STARTED
CHARGING YOUR APPLIANCE
- Ensure the product is switched off.
- Connect the charging adaptor to the product and then to the mains.
- If the product is not going to be used for an extended period of time (2 – 3 months), unplug it from the mains and store.
- Fully recharge your hairclipper when you would like to use it again.
- Allow 14-16 hours for a complete charge.
- When charging the LED indicator will be illuminated and will remain illuminated once the product is fully charged.
CORDED USE
- Connect the charging adaptor to the product then to the mains.
CAUTION
- Extended mains only use will result in the reduction of the battery life.
- Keep the appliance dry.
CORDLESS USE
- When the unit is switched on and fully charged, the product can be used in cordless mode for up to 40 minutes.

INSTRUCTIONS FOR USE
BEFORE STARTING THE CUT
- Inspect the clipper making sure that it is free from hair and dirt.
- Seat the person so that their head is approximately at your eye level.
- Before cutting, always comb the hair so it is tangle free and dry.
★ TO ATTACH A COMB
- Hold the comb with its teeth upward.
- To attach a comb, align the legs of the comb with the holes in the top of the clipper on each side of the blade and slide the legs into the trimmer until they click.
- To remove, firmly pull the comb straight up away from the clipper.
HAIR CLIPPER COMB SETTINGS
- The clipper comes with two adjustable combs, a short length adjustable comb (indicated by 1-21mm on the back of the comb) and a longer length adjustable comb (indicated by 24-44mm on the back of the comb).
- Please see table below for different cutting lengths available on each comb
| Shorter LengthAdjustable Comb | Longer LengthAdjustable Comb |
| 1mm 24mm | |
| 3mm 26mm | |
| 6mm 29mm | |
| 9mm 32mm | |
| 12mm 35mm | |
| 15mm 38mm | |
| 18mm 41mm | |
| 21mm 44mm |
- On the slide select switch there is a silver indicator which, when the short length adjustable comb is on the product, shows the corresponding length setting on the left of the slide select switch. On the other side of the slide select switch there is another silver indicator which shows the corresponding length setting when the longer length adjustable comb is on the product, on the right side of the slide select switch.
- To adjust the length settings, you must press the upper half of the slide select switch to release the locking mechanism, then apply force upwards on the slide select switch to increase the length setting. To decrease the length settings press the upper part of the slide select switch down and slide downwards.
- Use the clipper without any fixed combs for trimming hair close to the skin.
- This will trim hair to 1mm, holding the clipper so the blades are perpendicular to the skin will trim hair to 0.5mm.
★ INSTRUCTIONS FOR CUTTING HAIR
- To turn the product On or Off slide the switch. To locate the On/Off switch please refer to the key features section.
- For even cutting, allow the comb attachment/blade to cut its way through the hair. Do not force it through quickly. If you are cutting for the first time, start with the maximum comb attachment.
STEP 1 – Nape of the neck
- Set the comb to 3mm or 6mm.
- Hold the clipper with the blade teeth pointing upwards. Begin starting at the centre of the head at the base of the neck.
- Slowly lift the clipper, working upwards and outwards through the hair, trimming just a little at a time.
STEP 2 – Back of the head
• With the comb set at 12mm or 18mm, cut the hair at the back of the head.
STEP 3 – Side of the head
- With the comb set at 3mm or 6mm, trim sideburns. Then change to the longer 9mm guide comb and continue to cut the top of the head.
STEP 4 – Top of the head
- Use the longer length comb attachment and set it to 24mm or 27mm then cut hair on top of the head against the direction in which the hair normally grows.
- For longer hair on top, use the longer length comb attachment (24 – 44mm) to achieve the desired style.
• Always work from the back of the head.
STEP 5 – The finishing touches
- Use the clipper without an attachment comb for close trimming around the base and sides of the neck.
• To produce a clean straight line at the sideburns, reverse the hair clipper. - Place the reversed clipper at right angles to the head, tips of the blades lightly touching the skin and then work downwards.
CARE FOR YOUR HAIRCLIPPER
- Your clipper is fitted with high quality blades.
- To ensure long lasting performance of your clipper, clean the blades and unit regularly.
• Always keep the attachment guide comb on the trimmer blade.
\* AFTER EACH USE
- Ensure the appliance is switched off and unplugged from the mains before cleaning.
-
Brush the accumulated hair from the blades and body of the clipper. Do not submerge the clipper in water.
-
To clean unit, wipe with a damp cloth and dry immediately.
- Place a few drops of cutter or sewing machine oil onto the blades. Wipe off excess oil.
EVERY SIX MONTHS
- Remove the 2 screws retaining the fixed blade with a screwdriver.
- Remove the blade set.
- Brush out hairs from between the blades with a soft cleaning brush. Do not remove the lubricating grease from the blades. It is not necessary to remove the small moving blade from the unit.
- If the moving blade has been removed this can be re-fitted by slotting the moving blade holder over the pin in the centre of the interior product head. The groove on the moving blade just below the teeth should rest on the plastic pressure arm which rides inside the groove. The fixed blade should be assembled with the bevelled edge of the 2 screw holes facing outward and fixed with screws.
- Note that if the blades are not correctly aligned then cutting efficiency will be impaired.
CLEANING CAUTIONS
- Cleaning should only be done with a soft brush, such as the brush supplied with the product.
- Do not rinse under water.
- Do not use harsh or corrosive cleaners on the units or their blades.
- Ensure the appliance is switched off and unplug from the main outlet before cleaning

BATTERY REMOVAL
- The appliance must be disconnected from the supply mains when removing the battery.
- Turn the trimmer on and discharge all remaining power.
- Remove the comb attachment.
- Remove the blade.
- Pry the decorative panel off the top housing to expose the internals and printed circuit board.
- Remove the assembly of battery and printed circuit board.
- Disconnect the battery from the circuit board.
- The battery is to be disposed of safely.

ENVIRONMENTAL PROTECTION
To avoid environmental and health problems due to hazardous substances in electrical and electronic goods, appliances marked with this symbol must not be disposed of with unsorted municipal waste, but recovered, reused or recycled.
UW APPARAAT VERZORGEN
\* OPLAD DIT APPARAT
INNAN DU BÖRJAR KLIPPA
UŻYWANIE Z PRZEWODEM SIECIOWYM
Remington ^® is a Registered Trade Mark of Spectrum Brands, Inc., or one of its subsidiaries
VARTA Consumer Batteries GmbH & Co. KGaA, Alfred-Krupp-Str. 9, 73479 Ellwangen, Germany
www.remington-europe.com
© 2016 Spectrum Brands, Inc.

- IMPORTANT SAFETY INSTRUCTIONS
- WARNING – TO REDUCE THE RISK OF BURNS, ELECTROCUTION, FIRE OR INJURY TO PERSONS:
- KEY FEATURES
- GETTING STARTED
- CHARGING YOUR APPLIANCE
- CORDED USE
- CAUTION
- CORDLESS USE
- INSTRUCTIONS FOR USE
- BEFORE STARTING THE CUT
- ★ TO ATTACH A COMB
- HAIR CLIPPER COMB SETTINGS
- ★ INSTRUCTIONS FOR CUTTING HAIR
- STEP 1 – Nape of the neck
- STEP 2 – Back of the head
- STEP 3 – Side of the head
- STEP 4 – Top of the head
- STEP 5 – The finishing touches
- CARE FOR YOUR HAIRCLIPPER
- \* AFTER EACH USE
- EVERY SIX MONTHS
- CLEANING CAUTIONS
- BATTERY REMOVAL
- ENVIRONMENTAL PROTECTION
- UW APPARAAT VERZORGEN
- \* OPLAD DIT APPARAT
- INNAN DU BÖRJAR KLIPPA
- UŻYWANIE Z PRZEWODEM SIECIOWYM
Brand : REMINGTON
Model : Precision Cut HC5300
Category : Lawn mower