
Vacuum HC6550 - Lawn mower REMINGTON - Free user manual and instructions
Find the device manual for free Vacuum HC6550 REMINGTON in PDF.

| Product type | Hair clipper with integrated vacuum system |
| Brand | Remington |
| Model | Vacuum HC6550 |
| Power supply | Rechargeable via 12 V DC, 1.2 A mains adapter (100-240 V) |
| Full charge time | 4 hours |
| Cordless run time | Up to 60 minutes |
| Blade type | Removable stainless steel blades |
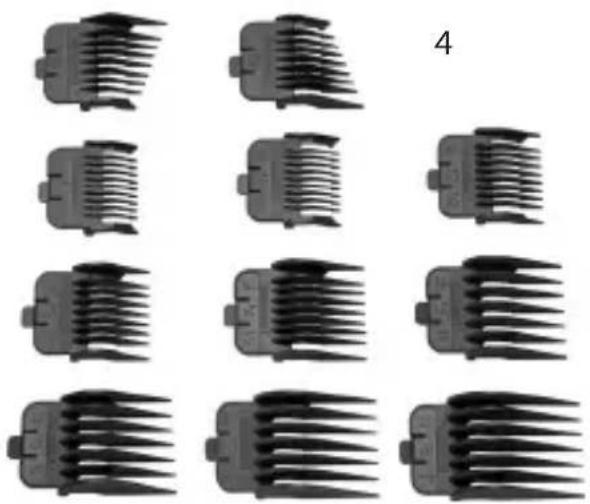
| Number of combs | 11 built-in combs (1.5 mm to 25 mm) |
| Cutting length without comb | 1 mm (0.5 mm in perpendicular position) |
| Vacuum reservoir capacity | 2.25 g of hair (approx. 6 mm of growth) |
| Charge indicator | LED indicator (blinks slowly while charging, quickly if empty, steady when fully charged) |
| Blade cleaning | Washable under running water; drying required before reassembly |
| Body cleaning | Wipe with a damp cloth; do not immerse |
| Blade lubrication | Recommended after cleaning (sewing machine oil) |
| Corded use | Possible with adapter plugged in (reduces battery life) |
| Storage temperature | 15°C to 35°C |
| Included accessories | Cleaning brush, oil bottle, travel case, adapter |
| Approximate weight | Approximately 200 g (estimation) |
| Approximate dimensions | 18 x 5 x 5 cm (estimation) |
| Safety | Do not use near water; unplug before cleaning |
Frequently Asked Questions - Vacuum HC6550 REMINGTON
User questions about Vacuum HC6550 REMINGTON
0 question about this device. Answer the ones you know or ask your own.
Ask a new question about this device
Download the instructions for your Lawn mower in PDF format for free! Find your manual Vacuum HC6550 - REMINGTON and take your electronic device back in hand. On this page are published all the documents necessary for the use of your device. Vacuum HC6550 by REMINGTON.
USER MANUAL Vacuum HC6550 REMINGTON
Thank you for buying your new Remington® product. Please read these instructions carefully and keep them safe. Remove all packaging before use.

IMPORTANT SAFEGUARDS
1 This appliance can be used by children aged from 8 years and above and persons with reduced physical, sensory or mental capabilities or lack of experience and knowledge if they have been supervised/instructed and understand the hazards involved. Children shall not play with the appliance. Cleaning and user maintenance shall not be done by children unless they are older than 8 and supervised. Keep the appliance and cable out of reach of children under 8 years.
2 Do not immerse the appliance in liquid; do not use it near water in a bath-tub, basin or other vessel; and don't use it outdoors.
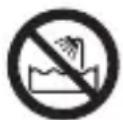
WARNING: Keep the body of the appliance dry.
3 Keep the power plug and cord away from heated surfaces.
4 Make sure the power plug and cord do not get wet.
5 An appliance should never be left unattended when plugged into a power outlet, except when charging.
6 Do not use attachments other than those we supply.
7 Do not twist or kink the cable, or wrap it round the appliance.
8 Do not use the appliance if it is damaged or malfunctions.
9 Do not use the product with a damaged cord. A replacement can be obtained via our International Service Centres.
10 Store the product at a temperature between 15^ and 35^
11 This appliance is not intended for commercial or salon use.

KEY FEATURES
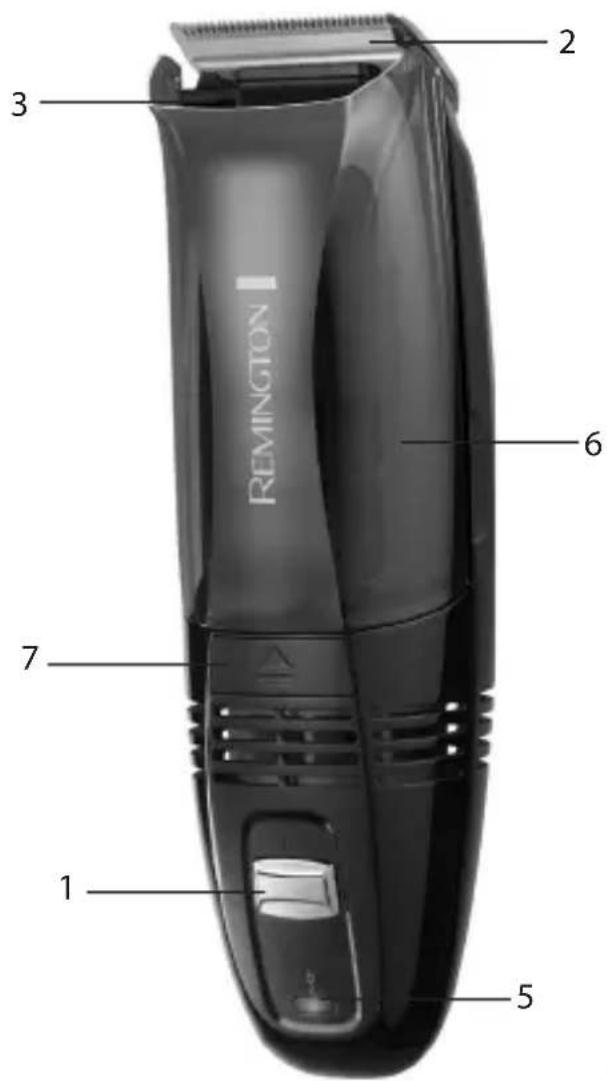
1 On/off switch
2 Blade set
3 Vacuum intake
4 11 attachment guide combs
5 Charging indicator
6 Easy removable vacuum chamber
7 Vacuum chamber release button
8 Travel pouch (not shown)
9 Adaptor (not shown)
10 Cleaning brush (not shown)
11 Oil bottle (not shown)
VACUUM FEATURE
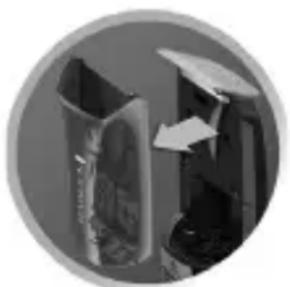
The Vacuum technology captures the majority of head hair as it is cut. The hairs are vacuumed into an easy empty vacuum chamber located on the front of the clipper. It is recommended that you empty the vacuum chamber one it becomes full by pushing the vacuum chamber release button, pulling the chamber away from the clipper (See Figure A) and emptying the trimmings into a bin.
To reattach the bin, angle the bin down towards the blade to engage the single latch near the blade. Then rotate the back end until the release latch is reengaged and clicks into place
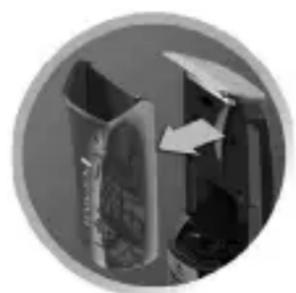
Fig. A
GETTING STARTED
CHARGING YOUR APPLIANCE
Note: It is recommended to fully charge your appliance before using for the first. Please refer to the charge times shown in this book.
- Ensure the product is switched off.
- This appliance should be supplied with approved safety isolating adaptors HKP18-1201200dV (EU), HKP18-1201200dB (UK) with the output capacity of 12 Vdc; 1.2A (adaptor output).
- The adaptor automatically adjusts to a main voltage between 100V and 240V.
- Connect the charging adaptor to the product then to the mains.
CHARGE LEVEL INDICATORS
| Charge Level Indicator | |
| Charging LED flash slowly | |
| Empty LED flash rapidly | |
| Fully Charged LED solid |
- Run time from fully charged is up to 60 mins.
- Charge time from empty is 4 hours.
- To preserve the life of your batteries, let them run out every 6 months then recharge for 4 hours.
INSTRUCTIONS FOR USE
- For corded use connect the product to the adaptor, then to the mains.
Caution: Extended mains only use will result in the reduction of the battery life. - Cordless use - when the product is switched on and fully charged it can be used in cordless mode for up to 60 minutes.
- Switch the product on by sliding up the on/off switch.
BEFORE STARTING THE CUT
Inspect the clipper making sure that it is free from hair and dirt.
- Seat the person so that their head is approximately at your eye level.
Before cutting, always comb the hair so it is tangle free and dry.
| Guide Comb Cutting Length |
| 0 (Grade 0) 1.5mm |
| 1 (Grade 1) 3mm |
| 2 (Grade 2) 6mm |
| 3 (Grade 3) 9mm |
| 4 (Grade 4) 12mm |
| 5 (Grade 5) 16mm |
| 6 18mm |
| 7 22mm |
| 8 25mm |
Each comb attachment is marked accordingly on its outside middle surface.
- Use the clipper without any fixed combs for trimming hair close to the skin.
- This will trim hair to 1mm , holding the clipper so the blades are perpendicular to the skin will trim hair to 0.5mm .
TO ATTACH A COMB
- Hook the front edge of the comb to the front teeth of the wide trimmer blade. Then push the back of the comb down until it snaps in place.
TOREMOVE THE COMB
- Push up the back of the comb until it clicks off the clipper blade.
INSTRUCTIONS FOR CUTTING HAIR
Vacuum Feature
- To maximise the amount of hair clippings collected in the vacuum, please do not move the clipper too quickly when clipping from the sides to the crown of the head.
- This vacuum chamber is capable of collecting 2.25g of hair, this equates to 6mm of hair growth.
- A typical 1 month's growth of (12mm) haircut would require the bin being emptied 2-3 times in total when cutting the hair.
- Ensure you monitor the bin whilst cutting your hair to maximise the efficiency of the vacuum performance. Empty the bin before it gets full to ensure hair clippings continue to be effectively collected in the vacuum chamber.
- When cutting hair, always keep the unit on when holding the clipper upside down.
- For optimum performance do not trim hair 18mm or longer with one pass of the clipper.
- When cutting hair 18mm or longer use a finger on your free hand in between the comb and clipper to guide hair into the blade by applying slight pressure. As you move the clipper up to cut, your finger will help keep the longer hairs from slipping away before they can be cut. If the hair extends well past the hair collection chamber opening, place your finger on top of the chamber near the opening.
- For even cutting, allow the comb attachment/blade to cut its way through the hair. Do not force it through quickly. If you are cutting for the first time, start with the maximum comb attachment.
STEP 1 - Nape of the neck
- Set the comb to 3mm or 6mm .
- Hold the clipper with the blade teeth pointing upwards. Begin starting at the centre of the head at the base of the neck.
- Slowly lift the clipper, working upwards and outwards through the hair, trimming just a little at a time.
STEP2-Backofthehead
- With the comb set at 12 mm or 18 mm ,cut the hair at the back of the head.
STEP3-Side of the head
- With the comb set at 3mm or 6mm , trim sideburns. Then change to the longer 9mm guide comb and continue to cut up to the top of the head.
STEP 4 - Top of the head
- With the 18mm or 22mm guide comb attached, cut hair on top of the head against the direction in which the hair normally grows.
Note: For longer desired lengths of more than 22mm , place finger over hair and guide into the guide comb and blade to better guide the hairs trimmings into the vacuum chamber.
Always work from the back of the head.
STEP 5 - The finishing touches
- Use the clipper without a guide comb for close trimming around the base and sides of the neck.
To produce a clean straight line at the sideburns, reverse the hair clipper. - Place the reversed clipper at right angles to the head, tips of the blades lightly touching the skin and then work downwards.
SHORT TAPERED STYLES - "FLAT TOPS" & SHORT CUTS
- Starting with the longest guide comb attached (25mm), cut from the back of the neck to the crown. Hold the guide comb flat against the head and slowly move the clipper through the hair.
- Use the same procedure from the lower side to the upper side of the head.
- Then cut the hair against the direction in which it grows and level with the sides.
To give a "flat top" look, the hair on top of the head must be cut over the top of a flat comb. - Use a closer guide comb to taper the hair down to the neckline as desired.
CARE FOR YOUR HAIRCLIPPER
To ensure long lasting performance of the clipper, clean the blades and unit regularly.
- Ensure the appliance is switched off and unplugged from the mains outlet before cleaning
- Do not use harsh or corrosive cleaners on the units or their cutters.
- Cleaning should be done with a soft brush.
哭 AFTER EACHUSE
Brush the accumulated hair from the blades.
To clean the unit, wipe with a damp cloth and dry immediately.
Note: To maintain the effective vacuum performance of the clipper, regularly brush or rinse fine hairs in the mesh panel found at the base of the vacuum chamber.
- The mesh panel is hinged and can be swung open when the chamber is removed from the clipper.
- Ensure the mesh panel is dry before re-using the clipper.
We recommend oiling the blades after cleaning with a little sewing machine oil.
WASHABLE CLEANING
NOTE: Only the blades on this clipper and the mesh panel of the vacuum chamber can be washed under running water.
- To remove the blades ensure the unit is off. Grab underneath the blade with your thumb and push the top of the blade away from the clipper.
- Use enough force to move the blade off the retaining snaps and rotate the blade off the bottom tab. Pull the blade away from the clipper.
- To reattach once the blades are cleaned and dry, align the bottom of the blade with the bottom blade housing tab and push down onto the retaining snaps until the blade clicks into place.
- Do not run the entire unit under the tap, only the blade set is meant to be submerged in water.
- Place a few drops of cutter or sewing machine oil onto the blades. Wipe off excess oil.
BATTERY REMOVAL
- The battery must be removed from the appliance before it is scrapped.
- The appliance must be disconnected from the supply mains when removing the battery.
- Ensure the clipper is discharged of all power.
- Remove vacuum chamber and blade.
- Using a small screwdriver, remove 3 screws top of clipper where the vacuum chamber was.
- Using a small screwdriver, remove 2 screws bottom of unit near the back (plug end).
- Pry the top housing starting from the back (plug end). There are snaps helping to hold down the housing at the side grips on both sides. Once the snaps are disengaged then rotate housing up this will allow the panel to be removed off the latches near the front (blade end).
- The PCB and batteries are located underneath this panel.
- Cut or break the wire stamps on the both end of the batteries and remove the batteries.
- The battery is to be disposed of safely.

ENVIRONMENTAL PROTECTION
To avoid environmental and health problems due to hazardous substances in electrical and electronic goods, appliances marked with this symbol must not be disposed of with unsorted municipal waste, but recovered, reused or recycled.
KORTE GESTRUCTUREERDE KAPSELS - "FLAT TOPS" EN KORT HAAR
INNAN DU BÖRJAR KLIPPA
POKa OTnnpaIOUm MExaHn3M He 3aueIITc8 3a np6Op n He 3aueKHeTc8 Ha MeCTe.
Pnc.A

HAUJIO PABOTBI

3APRAKA YCTPOINCTBA
PnmeuHne. Ipeep nepBbIM nCnoJb3ObaHnem np6opa peKomeHnyeTcI NOHocTBIO 3apAINTb erO. Cm. 3NaueHnra BpeMeHn 3apAaKn, npUBeJeHHbIe B HaCToAeM pyKOBOdCTBe.
- y6eIntecb, uTO n3dJIne BblKIOUcHcO.
- B KOMNJIeKT NOCTaBKn yCTpOJcTbA BXODr T YTBepXdEHHbIe N3OJIuPObaHHbIe aAnTepbI HKP18-1201200dV (ДЯЕВОпь) n HKP18-1201200dB (ДЯ BeNIko6pITaHn) c BbIXoJHOm MOUHOCtBJ 12 B NOCTOJHHOro ToKa; 1,2 A (BbIXoJ aAnTepa).
- PerexodnK aBtOMaTnueckn NOcTpaNBAeTcR NOd HapjKeHne cETN B npedeJax 100—240 B.
- Поdkлючпге зарднь перхODнК ИЗДELNIO, a 3aTeM - К рОзТke.
HДИKATOPbI UPOBHA 3APJDKN
PENTRU A INDEPARTA PIEPTENELE
IHCTPyKlIa3 EKCnIyATAU
- Дя ekсп lyatai npunaу i3 kublenham BiД Мерекi cnoaTky 3'EDhaIte Noro 3 aadantepom, a NOTIM i3 Mepexe oelktpoxkBleHHra.
- O6epexHo:HaMipHe BnKOpNCTaHnI npncTpoU B pexmI KnBleHnB iD MepeXi npn3BOdntb Do 3MeHweHHr TepmiHy cnyK6n 6aTapei.
EkCnlyatai6e3 niklueHHaO MepeKi -yBIMKHeHni i NobHicTIO 3apJxHn npictpi MoXHa BnKOpncTOByBatn 6e3 nikluoyehn shHypa XNBLeHH npotarom do 60 XBnHn. - YbIMKHiTb npnlaD, nepeBIBuN nepemKau yBIMKHeHHa/BIMKHeHHa Bropy.
PEIPOYATKOMCTPUNKKN
- IpepebiTe MaunHKy Ha BiCyTHicTb 3aIIuKIB BOLocra Ta 6pydy.
- Пocады особу,якnotpi6ностргтп, tak,юб ii roLoBa po3taшовьалас npi6n3Ho ha pIBhi Baushx oue.
- Пешд поаTKOM стпжки сдд розесати BOLOССТАКИМ YHOM, SO6 BOHO 6уно розпунтунм та cyхим.
| Напраимнх гребийсяви насадOK | Довжина Ст pineхи |
| 0 (позначka 0) 1.5 мm | |
| 1 (позначka 1) 3 мm | |
| 2 (позначka 2) 6 мm | |
| 3 (позначka 3) 9 мm | |
| 4 (позначka 4) 12 мm | |
| 5 (позначka 5) 16 мm | |
| 6 18 мm | |
| 7 22 мm | |
| 8 25 мm |
KoKHy rpe6iHuaCTy hacaIky no3HaueHO BiIIOBIDHO do cepeHbOi rIINHn IIT 3OBHIHbOI NOBepxHi.
Дястпжкв Влосьdoшкipи Внорстову Te Maшинky 6e3 rpe6iHuactoi HacaIGN. TaKIM YINHom DoBxHa CTprxKKn cKnaDe 1 MM.ЯКо Tpimatn le3a nepneHdkyIapHO do shkp,doBxHa cTprxKKn cKnaDe 0,5 MM.
()afoafofofofofofofofofofofofofofofofofofofofofofofofofofofofofofofofofofofofofofofofofofofofofofofofofofofofofofofofofofofofofofofofofofo
. 1
y
a jil yll al gall oj baill al gall ayall ayall jslwl
yio 1000000000000000000000000000000000000000000
100 100
"abwosg" -yalllll 1
bwaol g.25) 25 1000000000000000000000000000000000000000000000000000000000000000000000000
.
.
.
m = 311 ;
.
.
.
.
aaii iiaaa aiee
:
J 1 J 1 J 1 J 1 J 1 J 1 J 1 J 1 J 1 J 1 J 1 J 1 J 1 J 1 J 1 J 1 J 1 J 1 J 1 J 1 J 1 J 1 J 1 J 1 J 1 J 1 J 1 J 1 J 1 J 1 J 1 J 1 J 1 J 1 J
a
a
6 2.25 12
jai li
aalllg jyj yj. 150000000000000000000000000000000000000000000
i j 1
aall g y j 18 jy j 1
a a a a a a a a a a a a a a a a a a a a a a a a a a a
eay g w jaiil gic y jaiol oie . jab biyj ajjg jaiil ay gil
J 1
aill jy jally yjg jg gdo
Jds 150
a
(1)
6 3 baii
a
J 1
[{\omega i}\mathbin{\text{且}}\frac{\mathrm{i}\Delta \mathbf{i} - 2\mathrm{i}\mathbf{g}\mathbf{i}\mathbf{i}}{}_{\mathrm{i}}]
18 12 12
-3
Jdall bia 6 6 3 dall Jdall bia a b
1-4
y 22 18 1
1
4 22 22 22 22 22 22 22 22 22 22 22 22 22 22 22 22 22 22 22
Jia 1
. wii 11 cali si laiilo lae!
5
aill jg 100
Gg 1
Jae Jae 1
J 1
a
Lg 1
e jll gaii i 1jg aolal jilwly baill ayolal aiall b
biol
1

Fig. A
j_L = 2
1 1
iiill 1olj no sli
HKP18-
1201200dV (J) HKP18-1201200dB
12 1.2
73479 Ellwangen, Germany.
I3roToBnteJb: CdeJaHO B Kntae JnVARTA Consumer Batteries GmbH & Co. KGaA,
AInbfoepd-KpynnItpacce9,3nBbaHreH,73479,RepaHna
IMnopTeB PΦ: AO «CneKtpymБрнс>
IOp.aDpec: Pocn, 119048, MockBa, yJ.YcaueBa, d.33, cTp.1, T/Φ +7 495 933 31 76
I3dennne nCNOB3OBaTb NO Ha3HaueHnIO B COOTBeTCTBn C NHCTpyKcnne no
Kcnpnyatau
ДаТа n3roTOBNeHЯ:сm.нappoуКTeВфОрмATE XXXrr(rdeXXX-дeHb roda,rr-roD)
100-240B\~50/60Γu
15/INT/ HC6550 T22-0003093 Version 04/15
Remington® is a Registered Trade Mark of Spectrum Brands, Inc.,
or one of its subsidiaries
VARTA Consumer Batteries GmbH & Co. KGaA, Alfred-Krupp-Str. 9, 73479 Ellwangen,
Germany
www.remington-europe.com
© 2015 SBI