
Back - Child bike seat Qibbel - Free user manual and instructions
Find the device manual for free Back Qibbel in PDF.
| Product type | Child bike seat |
| Brand | Qibbel |
| Model | Back |
| Recommended age | 9 months to 6 years |
| Maximum child weight | 22 kg |
| Mounting | Rack (according to NEN 14872) or frame (seat tube 22-40 mm) |
| Safety harness | 3-point, height-adjustable, removable |
| Sleep position | Yes, adjustable via red button |
| Footrest adjustment | Yes, tool-free, by notches |
| Included accessories | Basic set (foot straps, arm supports) or luxury set (with cover) |
| Warranty | 2 years (manufacturing defects) |
| Maintenance | Clean with water and soap; cover hand washable, mild detergent |
| Regular check | Check mounting, bolts, and absence of damage |
| E-bike compatibility | Yes (frame mounting) |
| Number of manual pages | 23 |
Frequently Asked Questions - Back Qibbel
User questions about Back Qibbel
0 question about this device. Answer the ones you know or ask your own.
Ask a new question about this device
Download the instructions for your Child bike seat in PDF format for free! Find your manual Back - Qibbel and take your electronic device back in hand. On this page are published all the documents necessary for the use of your device. Back by Qibbel.
USER MANUAL Back Qibbel
natural_image
Woman and two children riding a bicycle in a wooded area (no visible text or symbols)
neobution
2014年1月1日,中国证券报、上海证券报、证券时报、证券日报、证券日报、证券时报、证券日报、证券时报、证券日报、证券时报、证券日报、证券时报、证券日报、证券时报、证券日报、证券时报、证券日报、证券时报、证券日报、证券时报、证券日报、证券时报、证券日报、证券时报、证券日报、证券时报、证券日报、证券时报、证券日报、证券时报、证券日报、证券时报、证券日报、证券时报、证券日报、证券时报、证券日报、证券时报、证券日报
M. 51(0740-21239) email:ir@irubai.com

Qibbel
natural_image
Smiling young boy wearing a blue shirt and black seatbelt, seated in a chair with green foliage background (no visible text or symbols)NL Gebuiksaarwiping aortertje
GB User instructions rear bike seat
DE Geopuchsanleitung Kinoerhabrausitz hinten
ER. Notice cui likazilac di spiae oriera po terfani
DK. Er anesuplo al hossengio
IT, stromial positive drug resistance parameters
natural_image
Colorful patterned fabric with floral and polka-dot designs (no text or symbols)
natural_image
Close-up of a mechanical component with a black textured base and metallic frame (no visible text or symbols)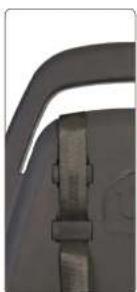
natural_image
Close-up of a curved mechanical component with a textured grip (no visible text or symbols)
natural_image
Close-up of a black and purple athletic helmet with visible grip and seat (no text or symbols)6.2011 Survey of the 2017 Annual Report on Internal Control
INSTALLATION INSTRUCTIONS
INSTALLATION INSTRUCTIONS

20

[Non-Text]

INSTALLATION INSTRUCTIONS


2011.11.16


© 2011 www.86 Finopac.com LLC, The Kewwwest


natural_image
Close-up of a bicycle frame with visible structural components and no text or symbols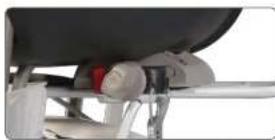
natural_image
Close-up of a bicycle seat with visible wheel and seatbelt mechanism (no text or symbols)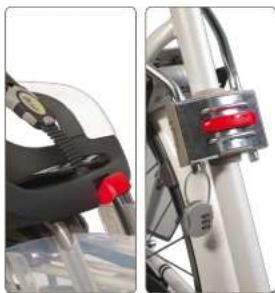
natural_image
Close-up of a black bicycle clamp and metallic bracket with red LED indicators (no text or symbols visible)© 2011 USA Technologies Inc.

natural_image
Product display of a NBbel brand motorcycle seat with accessories and accessories (no visible text or labels)- 2017年 ,
[Unreadable]


natural_image
Cross-sectional illustration of a baby water safety device with meshed casing and handle (no text or symbols)PRODUCTBESCHRIJVING
Congratulations on the purchase of your Qibbel bike seat. You have not only chosen a seat that you can create entirely to your own liking, you have also chosen a safe seat that will bring you and your child lots of cycling pleasure. The seat can be easily fitted to your bike and adjusted to the size of your child. The seat can be adjusted stepwise so that you can always choose the most comfortable position for your child. (see instructions for use)
The seat is suitable for children of approximately nine months to six years of age, who weigh at the maximum 22 kg. Only use the seat once your child is able to sit without assistance for the entire bicycle ride. Read these installation instructions carefully before installing the seat. Please address any questions you have to your supplier.
The seal is available in two versions, for attachment to the carrier or to the frame. You choose the right attachment for your bike to accompany the basic element.
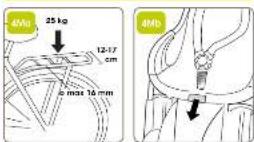
You can choose the carrier attachment if the carrier meets the requirements laid down in the NEN 14872 standard (carrying capacity 25 kg, width between 12 and 17 cm, frame diameter between 8 and 16 mm). You can choose the attachment for the frame if this has a round or oval cross section of 22 to 40 mm. This is also the case for many electric bikes.
Two-year guarantee: We give a two-year guarantee on manufacturing and/or material defects. The guarantee starts on the date of purchase, please keep your purchase receipt.
In addition to these seat installation Instructions, you can also refer to the instruction films on the Qibbel website. www.qibbel.nl/en/service/instructional-films

SEAT INSTALLATION INSTRUCTIONS
Follow these instructions to safely and correctly install the seat to your bike.
Figure 1M | Tools
To mount the Qlbbel seat, you need the following tools:
→ Standard Allen keys 2.5, 4, and 6
WHAT DO YOU NEED?
Figure 2M | For a safe child's seat you require
1 Rear seat basic element
2A Carrier attachment
or
2B Frame attachment and
2C Frame attachment bracket
3A Styling set Basic rear (foot straps/ armrests)
or
3B Styling set De-luxe rear (foot straps/ armrests/ seat upholstery)
Figure 3M | You can enhance your Qibbel seat with the following
accessories
4 Lock
CARRIER ATTACHMENT
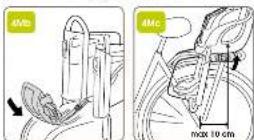
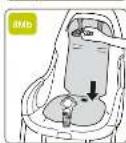
To be able to attach the seat to your carrier you require, in addition to the rear seat basic element (1), just 1 part, the carrier attachment (2A). No tools are needed.

Figure 4Mb | Carrier attachment
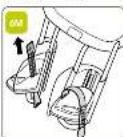
To be able to attach the carrier attachment to the basic element, you must first pull out the red knob on the front of the seat. Then slide the carrier attachment under the seat from the rear, in a circular motion. Ensure that the securing strap is at the front of the attachment. Slide the attachment until it reaches the end of the recess and clicks firmly into place. You can then lock the attachment by pressing the red knob on the front.
Then attach the seat to the carrier by adjusting the clamping mechanism to the width of the carrier. To Increase the width, turn the adjuster anti-clockwise. You must press the red safety lip to do this. To fix the clamp, turn the adjuster clockwise. Ensure that the hooks are correctly positioned around the sides of the carrier.
Figure 4Mc | Check whether the seat is correctly mounted
Check that the centre of gravity of the seat is no more than 10 cm behind the rear axle of the bicycle. Place your child in the seat and check that there is sufficient distance between the saddle and the front of the seat to allow your child to sit comfortably. To change the position of the seat, loosen the clamping mechanism of the attachment block and move the seat forward or backward along the carrier. Then tighten the clamping mechanism as tightly as possible.
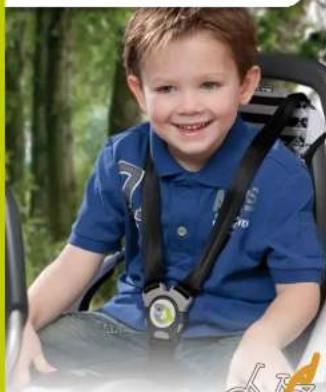
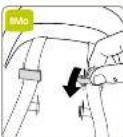
Figure 4Md | Additional safety
The carrier attachment must be additionally secured by fitting the securing strap around the frame. When you take the attachment from the packaging, open the buckle by pressing the three-point fastener (on the side and on the top). Fix the strap around the frame of the bicycle and close the buckle.
Figure 4F | Additional wheel protectors
Use the additionally supplied transparent wheel protectors to extend the barrier between the wheel and the legs of the child. Slide the extension over the transparent foot support guard until it clicks into place. This increases the safety of the child while cycling.
FRAME ATTACHMENT
To attach the seat to the frame of your bicycle, you need three components: The rear seat basic element (1), the frame attachment (2B) and the frame attachment bracket (2C).
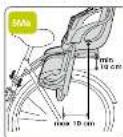
Figure 5Ma | Frame attachment
Mount the frame attachment. Ensure that the round holes are at the top. Tighten the nuts firmly (torque 6.0 Nm) using Allen key 6. Tighten the bolts diagonally and evenly. Suitable for round and oval saddle tubes ∅ 22-40 mm. Using the movable inner ring, adjust the angle of the clamp to the angle of the frame to ensure that the seat is positioned horizontally above the rear wheel. The red knob at the front is used to unlock the seat attachment.

Tip: If you want to use the seat on more than one bike, purchase an additional frame attachment. (2B)
Figure 5Mb | Checking the frame attachment
Check whether the attachment has been installed at the right height by clicking the frame attachment bracket into the frame attachment. First remove the retaining ring from the bracket. The bracket must be positioned horizontally above the rear wheel, the distance between the bracket and the rear wheel must be at least 10 cm. If this is not the case, you must move the attachment or change its angle by adjusting the movable inner ring.
Figure 5Mc | Installing the frame attachment bracket
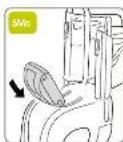
The frame attachment bracket consists of two parts, a plastic block and a metal bracket. First remove the block from the bracket by undoing the two
nuts holding the metal retaining plate and removing the plate. Then attach the block to the bottom of the base element. To be able to attach the block to the basic element, you must first pull out the red knob on the front of the seat. Slide the block under the seat from the rear, in a circular motion with the red arrow pointing forwards. Start the movement from the back of the seat. Slide the block through until it reaches the end of the recess in the seat and clicks firmly into place. You can then lock the block into place by pressing the red button on the front. Now insert the metal bracket into the opening in the block and retain it using the metal retaining plate that you had previously removed. Tighten the two nuts (torque 5 Nm) using the Allen key 4. The position of the block depends on the centre of gravity of the seat with respect to the rear axle.
Figure 5Md | Positioning the seat on the frame attachment
Remove the retaining ring from the bracket. Slide the ends of the bracket through the openings in the frame attachment until the bracket clicks into place. If necessary, press the red release knob to be able to slide the bracket completely into the clamp. Insert the retaining ring through the bracket to secure the seat in place.
Figure 5Me | Check whether the seat is correctly mounted
To ensure that the seat is correctly attached, you need to:
A) Check that the centre of gravity of the seat is no more than 10 cm behind the rear axle of the bicycle.
B) Check that the bottom of the seat is at least 10 cm above the rear wheel.
C) Check that the seat is mounted in a straight ahead position by turning the bicycle's handlebars to the straight ahead position and drawing an imaginary line from the middle of the seat via the saddle to the middle of the handlebars.
To adjust the position of the seat, you need to change the position of the frame attachment, either by adjusting its angle or its height on the saddle tube. Place your child in the seat and check that there is sufficient distance between the saddle and the front of the seat to allow your child to sit comfortably. To increase the distance between the saddle and the seat, you must adjust the position of the block on the bracket.
Figure 4F | Additional wheel protectors
Use the additionally supplied transparent wheel protectors to extend the barrier between the wheel and the legs of the child. Slide the extension over the transparent foot support guard until it clicks into place. This increases the safety of the child while cycling.
INSTALLING THE STYLING SET
The choice of styling set allows you to determine the look of your child's seat. You can choose between a Basic or a De-luxe styling set.
Figure 6M | Attaching the foot straps (styling set Basic or De-luxe rear)
Insert the foot straps with the Qibbel logo on the inside through the opening. Pull them through from the bottom to the top until they click into place.
Figure 7M | Attaching the armrests (styling set Basic or De-luxe rear)
Click the armrest into the opening. Attach the armrest using the supplied screws, tighten them gently (torque 1 Nm) using Allen key 2.5. Do this on both sides of the seat.
Figure 8Ma | Adjusting the height of the safety belt
Dependent on the size of your child, you use the clamps that are present to raise the position of the safety belt. This can be done easily by filling the clips with a coin, which releases the harness. You can now fix the safety belt in another position. Do not use sharp objects, including screwdrivers, as these can damage the clips.

For larger children, it is also possible to run the belts via the top of the seat back. Pull the belts backwards through the recess in the seat back. Then put the belts into place via the guides over the top of the seat.
Figure 8Mb | Attaching the seat upholstery (styling set De-luxe rear)
Check that the safety belt is clamped firmly at the right height before you fill the upholstery. The belt needs to match the height of your child's shoulder. Undo the safety belt (three point - light grey - push simultaneously) and split it into two parts (light grey). Pull the two split parts of the safety belt through the holes in the upholstery from the back to the front, then ensure that the upholstery is correctly positioned. Push the seat drain plug through the drain hole, which fastens the upholstery in place.
INSTRUCTIONS FOR USE
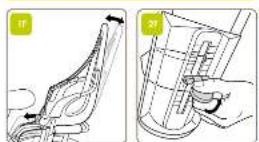
Figure 1F | Adjusting the seat to the sleeping position
Pulling out the red knob at the front of the seat allows you to adjust the seat to the sleeping position. Various positions are possible. When the seat is in the correct position, push the knob at the front back in. Note: you can only press the knob back in when the seat is in one of the preselected positions.
Figure 2F | Adjusting the footrests
The footrests are easy to adjust without the use of tools. Adjust the footrest by rotating the clip upwards through 90 degrees then sliding it up or down into the preformed positions. When the footrest is at the correct height, push the clip down to lock it.
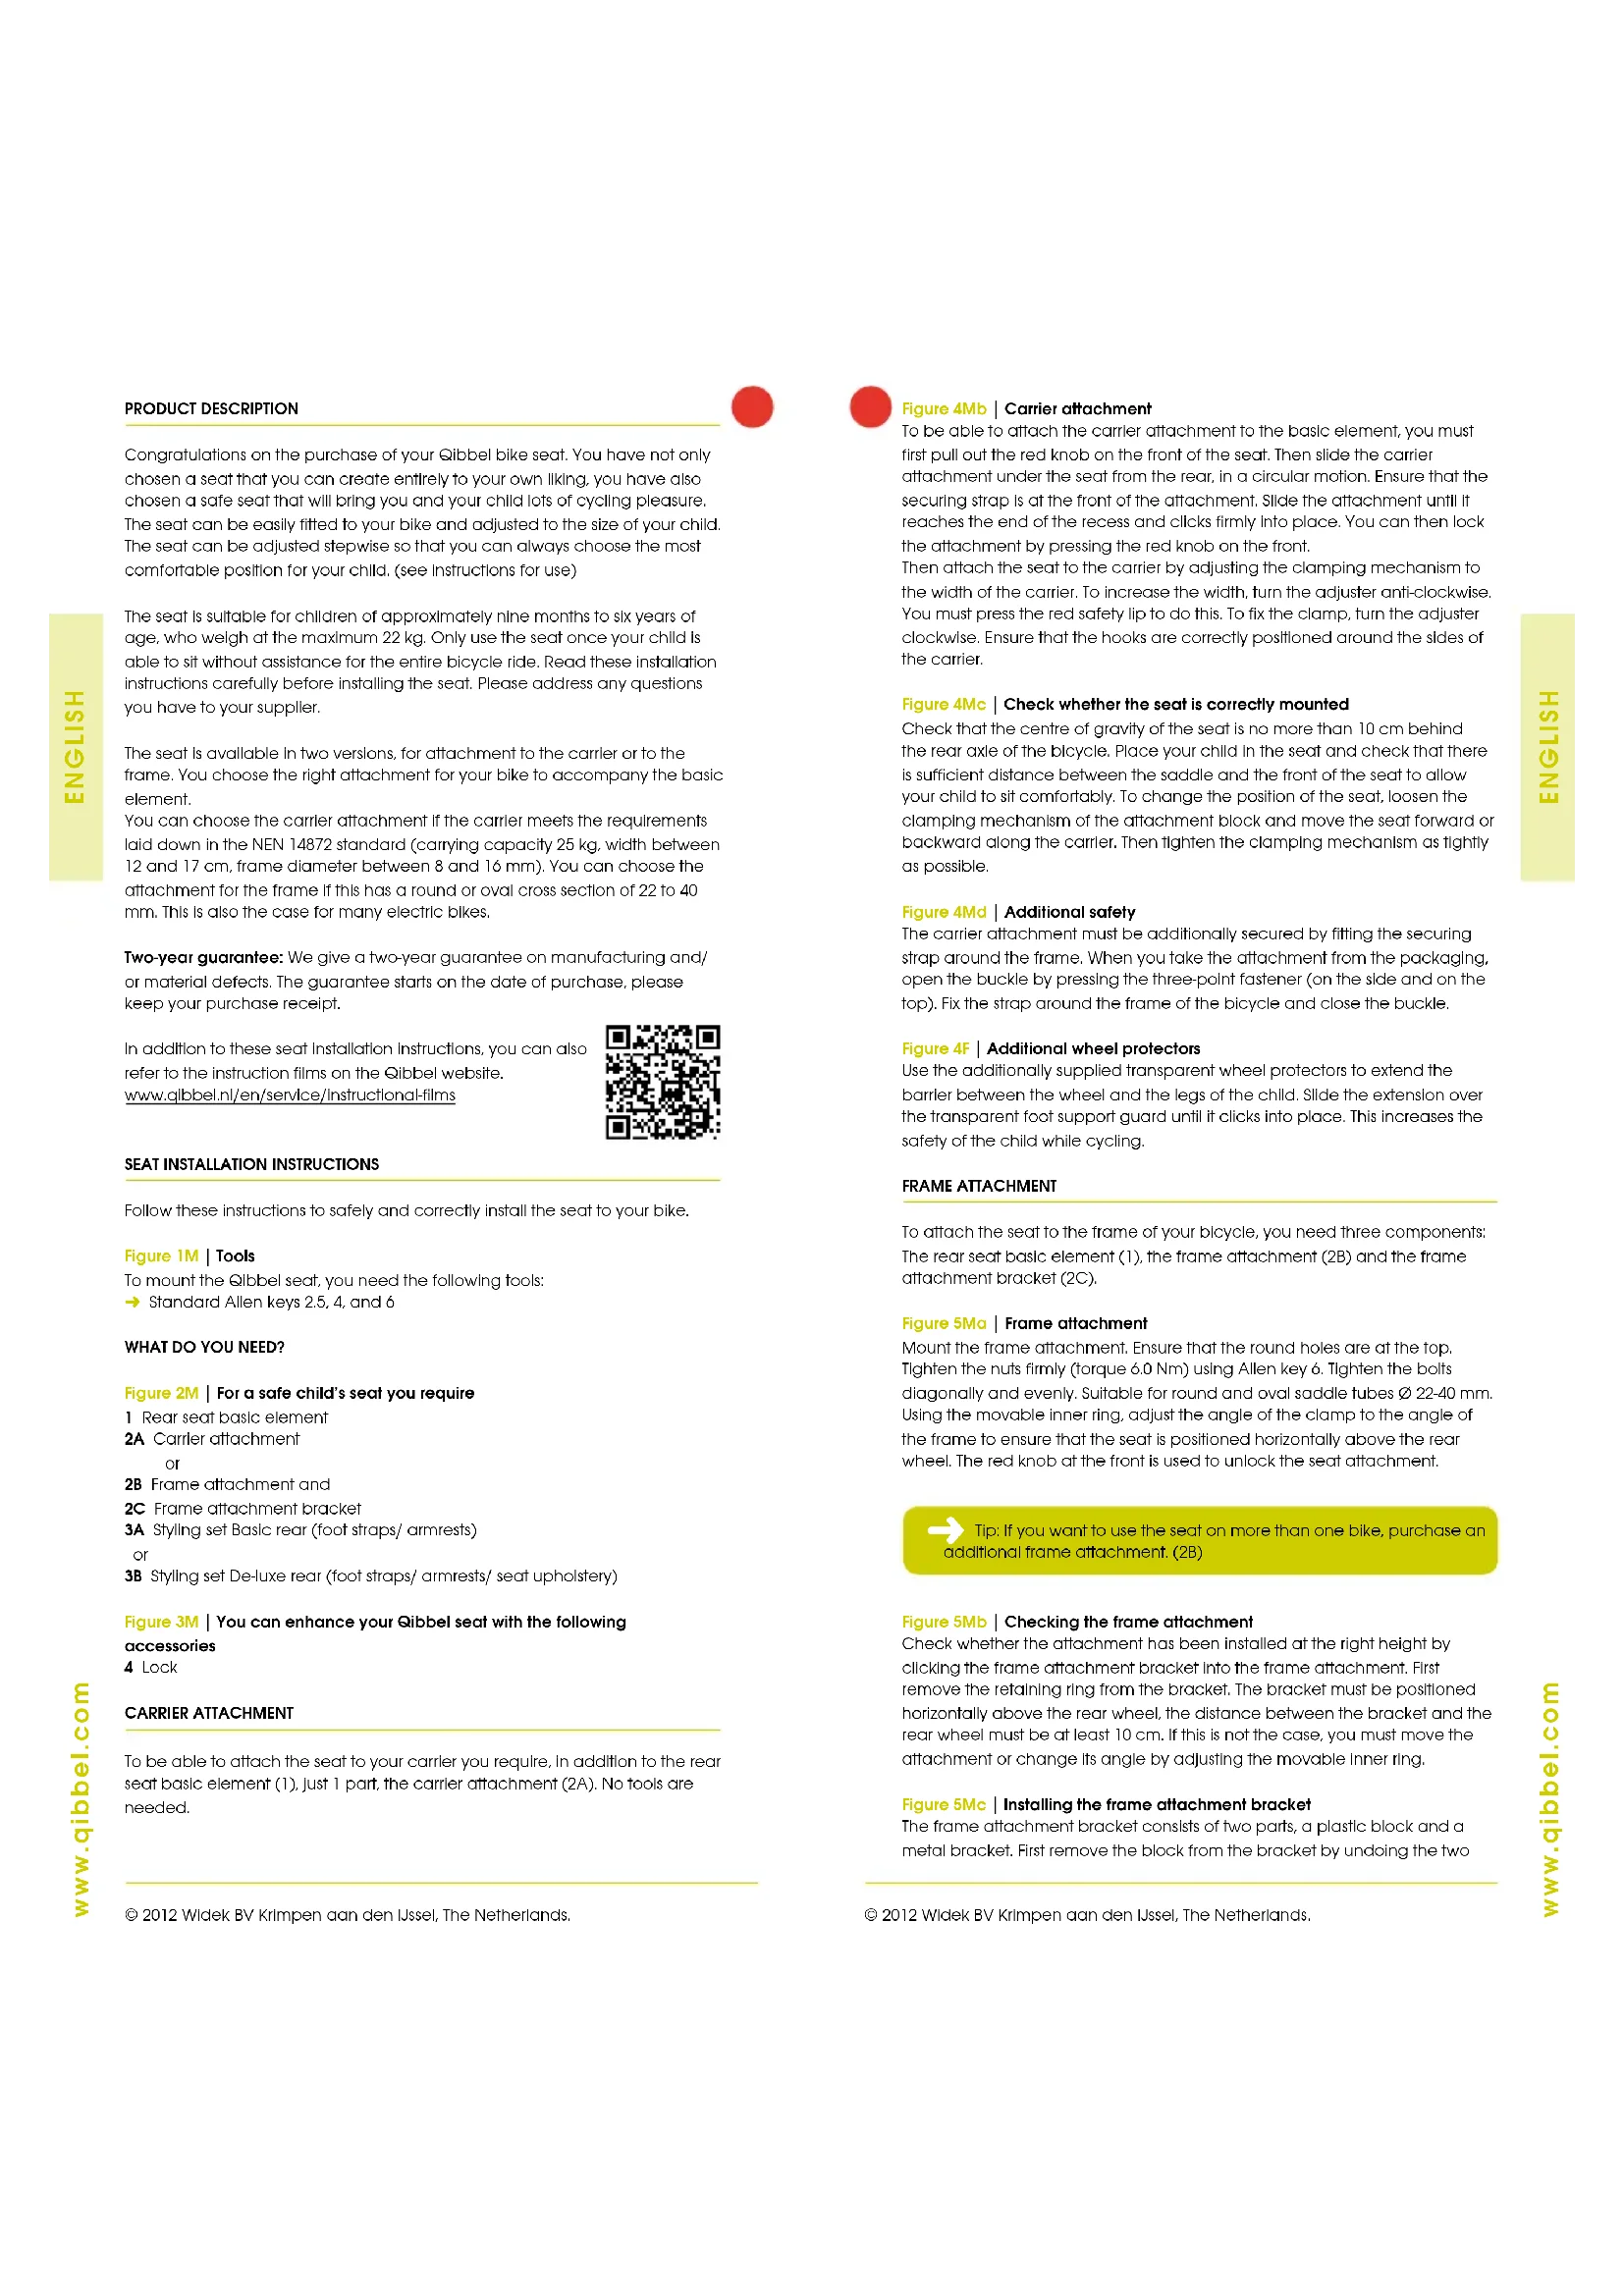
Figure 3F | Using the safety belt
To undo the safety belt: press the three light grey points simultaneously and slide the belt clasp upward. If required, you can separate the two shoulder straps by sliding the light grey parts of the clasp apart, for instance when your child is wearing a helmet or when you want to change the height of the safety belt. Do up the safety belt by first sliding the two light grey parts together and then sliding them into the clasp body. Tighten the belt until it is comfortably tight when your child is sitting straight in the seat. You can loosen the belt by pressing the grey button on the adjuster, which you then tilt and slide. When the shoulders of your child are higher or lower than the normal belt attachment point, you can use the clamps that are present to clamp the belt at another height. Use a coin to undo the clips by tilting them from the top. Do not use sharp objects, including screwdrivers, as these can damage the clips. The safety belt must normally align to the child's shoulders. When using the De-luxe styling set, pull the two shoulder straps of the safety belt through the corresponding openings in the upholstery from the back to the front and ensure that the upholstery is correctly positioned. If your child's shoulders are higher than the highest normal attachment points, you can reroute the shoulder straps over the top of the seat. To do this, first pull the shoulder straps through the openings in the seat back, then route them via the guides on the top of the seat over the shoulders of your child.
MOUNTING INSTRUCTIONS FOR ACCESSORIES
Figure 3M | Lock
To protect the seat being stolen, you can lock it in place using the available lock. If the seat is attached to the carrier, lock it to the carrier, if the seat is attached to the frame lock it by attaching the lock through the hole at the end of the bracket.
WARNING: INSTRUCTIONS FOR SAFE USE
USE
* The block of both attachments - carrier (2A) and frame (2B) - can only be used once. Removing the block once this is fixed in place can damage the block, as a result of which safe use is no longer possible.
* Check whether the use of the Qibbel seat is legally permitted in the
country where you want to use it.
* The seat is intended for children of approximately nine months to six years of age, who weigh at the maximum 22 kg.
• Regularly check that the weight of your child does not exceed the maximum allowable weight.
* The total weight of the cyclist, the child and the seat must not exceed the total maximum load of the bicycle. Check the information from the bicycle manufacturer.
* When Installing the seat, follow the Instructions for tightening the bolts (torque) that are included in the installation instructions (Figures 5M and 7M).
* After installing the seat, check that it does not tilt forward, to prevent the child from slipping out of it. Make sure that the backrest leans somewhat backwards.
* If the seat is attached to the carrier, ensure that the front of it is always anchored with the safety belt to the frame of the bicycle (not to the carrier).
* After Installing the seat, take a test ride with your child. Check that all parts of the bike work as normal after the seat has been installed. Check that the bike rides well, that your child is correctly seated, that all components have been securely installed and that the footrests are at the correct height.
* Adjust your saddle to a height that allows you to easily put your feet on the ground when getting on and off your bike.
* Always use the safety belt and the foot straps.
* When riding, check that no part of your child's body or clothing gets near to rotating or moving parts of the bike, for instance a foot in the spokes or a finger near the brake mechanism. Regularly recheck this as the child gets older.
* If you use a sprung saddle, ensure that your child's fingers cannot be pinched between the spring coils by installing guards around the springs. These guards are available from quality bicycle shops.
* Make sure that the child cannot come in contact with sharp objects, like a frayed cable.
* Always close the three-point safety belt, also if there is no child in the seat. If there is no child in the seat, closing the belt avoids loose parts of it ending up in moving parts when cycling.
* Ensure that your child is dressed sufficiently warmly and is protected from rain. During a bicycle ride, your child sits still and is therefore more susceptible to the cold.
* Preferably let your child wear a correctly fitting safety helmet to increase his/her safety.
* If the seat is left in the sun a long time, it can become very hot. Therefore, check this before putting your child in the seat.
- Remove the seat when transporting your bike on a car bike carrier. Due to air turbulence, the seat or its attachment can become detached and possibly cause an accident.
WARNING
* Do not attach additional baggage to the child's seat. If you want to carry baggage, use a carrier attached to the handlebars.
* Never change anything to the seat or the supplied attachment, otherwise you will influence safety when the seat is used and the guarantee will lapse.
* Take into account that the bike handles differently when you transport a child, in particular the balance, the steering and the braking.
* Never leave your child unattended in the seat if you park your bike somewhere.
* Do not use the seat if there are visible damage or defects present.
MAINTENANCE
* Regularly clean the seat using a soap solution. You can wash the upholstery by hand using a mild detergent.
* Regularly check whether all of the fastenings, etc. are still tight.

* After an accident, the seat must always be replaced, also if there is no visible damage. Contact your supplier for more information.
* If a part of the seat is defect or damaged, contact your supplier for advice or repair.
PRODUKTBESCHREIBUNG

FIXATION DU SET D'ENJOLIVEMENT
Illustration 3M | Cadenas
Illustration 3M | Lås
natural_image
Black and white photo of a baby boom chair with patterned backrest and matching seat, no visible text or symbols- Qibbel
- PRODUCTBESCHRIJVING
- SEAT INSTALLATION INSTRUCTIONS
- Figure 1M | Tools
- WHAT DO YOU NEED?
- Figure 2M | For a safe child's seat you require
- Figure 3M | You can enhance your Qibbel seat with the following
- CARRIER ATTACHMENT
- Figure 4Mb | Carrier attachment
- Figure 4Mc | Check whether the seat is correctly mounted
- Figure 4Md | Additional safety
- Figure 4F | Additional wheel protectors
- FRAME ATTACHMENT
- Figure 5Ma | Frame attachment
- Figure 5Mb | Checking the frame attachment
- Figure 5Mc | Installing the frame attachment bracket
- Figure 5Md | Positioning the seat on the frame attachment
- Figure 5Me | Check whether the seat is correctly mounted
- INSTALLING THE STYLING SET
- Figure 6M | Attaching the foot straps (styling set Basic or De-luxe rear)
- Figure 7M | Attaching the armrests (styling set Basic or De-luxe rear)
- Figure 8Ma | Adjusting the height of the safety belt
- Figure 8Mb | Attaching the seat upholstery (styling set De-luxe rear)
- INSTRUCTIONS FOR USE
- Figure 1F | Adjusting the seat to the sleeping position
- Figure 2F | Adjusting the footrests
- Figure 3F | Using the safety belt
- MOUNTING INSTRUCTIONS FOR ACCESSORIES
- Figure 3M | Lock
- WARNING: INSTRUCTIONS FOR SAFE USE
- USE
- WARNING
- MAINTENANCE
- PRODUKTBESCHREIBUNG
- FIXATION DU SET D'ENJOLIVEMENT
- Illustration 3M | Cadenas
- Illustration 3M | Lås
Brand : Qibbel
Model : Back
Category : Child bike seat