
HRX476C - Lawn mower Honda - Free user manual and instructions
Find the device manual for free HRX476C Honda in PDF.
| Product type | Walk-behind lawn mower |
| Brand | Honda |
| Model | HRX476C (variants HYE, VKE, VYE, QYEJ) |
| Dimensions (L × W × H) | 1 580 × 530 × 995 mm (HYE) / 1 610 × 530 × 1 035 mm (VKE, VYE) / 1 445 × 497 × 980 mm (QYEJ) |
| Dry weight | 39 kg (HYE) / 42 kg (VKE, VYE) / 44 kg (QYEJ) |
| Cutting width | 470 mm |
| Cutting height adjustment | 7 positions (25 to 79 mm) |
| Engine | Honda GCV170, 4-stroke, 166 cm³, forced air |
| Rated power | 3.1 kW at 2 800 rpm |
| Fuel | Unleaded petrol 95 or 98 (E10 max) |
| Fuel tank capacity | 0.95 L |
| Engine oil | SAE 5W-30 or 10W-30, 0.40 L |
| Spark plug | NGK BPR5ES (gap 0.7‑0.8 mm) |
| Transmission | Self-propelled: hydrostatic (HYE) or variable speed (VKE, VYE) or 1-speed gearbox (QYEJ) |
| Grass bag capacity | 69 L (HYE, VKE) / 73 L (VYE, QYEJ) |
| Main features | Variable mulching (Rotostop), rear discharge, blade brake (except HYE), Select Drive |
| Safety | Blade brake, control lever, discharge chute, grass bag with closure |
| Maintenance | Dry air filter, engine oil change (every 50 h), spark plug check, deck cleaning |
| Spare parts | Grass bag, air filter, spark plug, cutting blade, belt, cables (available at Honda dealers) |
| Warranty | Manufacturer's warranty (see document provided by dealer) |
| Guaranteed sound level | 95 dB(A) (HYE, VKE) / 94 dB(A) (VYE) / 95 dB(A) (QYEJ) |
Frequently Asked Questions - HRX476C Honda
User questions about HRX476C Honda
0 question about this device. Answer the ones you know or ask your own.
Ask a new question about this device
Download the instructions for your Lawn mower in PDF format for free! Find your manual HRX476C - Honda and take your electronic device back in hand. On this page are published all the documents necessary for the use of your device. HRX476C by Honda.
USER MANUAL HRX476C Honda
You have just purchased a Honda pedestrian-controlled lawnmower and we thank you for your confidence in us.
This manual has been written to familiarize you with your lawnmower, to enable you to use it in the best possible conditions and to carry out its maintenance.
Our aim is to make you benefit to the full from technological advances, from new equipment and materials and from our experience. This is why we regularly make improvements to our models. Thus, the specifications and information contained in this manual may be modified without prior notice and without obligation to update it.
If you have a problem, or if you have any questions concerning the lawnmower, contact your supplying dealer or authorized Honda dealer.
Keep this manual handy so you can refer it at any time. If you sell the lawnmower, be sure that the manual accompanies it.
We recommend that you read the guarantee policy to fully understand your rights and responsibilities. The guarantee policy is a separate document provided by your dealer.
No reproduction, even partial, may be made of this publication without prior written authorisation.
SAFETY INSTRUCTIONS
For your own safety and operating comfort, it is highly recommended that you read this manual in full.
Pay attention to these symbols and their meaning:
WARNING
Indicates a high risk of severe personal injury or death if instructions are not followed.
CAUTION:
- Indicates a possibility of personal injury or equipment damage if instructions are not followed.
NOTE: Source of useful information.
DESCRIPTION OF THE CODES USED IN THIS MANUAL
| HRX476C | H Y E | V K E | V Y E | Q Y E J |
| Hydrostatic drive Selfpropelled . . . . . . . . . . . . . . . . . . . . . . . . . . . . . . . . . . . . . . . . . . . . . . . . . . . . . . . . . . . . . . . . . . . . . . . . . . . . . . . . . . . . . . . . . . . . . . . . . . . . | • | • | • | • |
| Self-propelled with variable speed transmission . . . . . . . . . . . . . . . . . . . . . . . . . . . . . . . . . . . . . . . . . . . . . . . . . . . . . . . . . . . . . . . . . . . . . . . . . . . . . . . . . . . . . . . . . . . . . . . . . . .. | • | • | • | • |
| Cutting-means brake . . . . . . . . . . . . . . . . . . . . . . . . . . . . . . . . . . . . . . . . . . . . . . . . . . . . . . . . . . . . . . . . . . . . . . . . . . . . . . . . . . . . . . . . . . . . . . . . . . . . Rotostop . . . . . . . . . . . . . . . . . . . . . . . . . . . . . . . . . . . . . . . . . . . . . . . . . . . . . . . . . . . . . . . . . . . . . . . . . . . . . . . . . . . . . . . . . . . . . . . . . . .. • | • | • | • | • |
The model of your machine is indicated on its "identification label", by a series of letters and figures (see page 4).

2018 - Honda France Manufacturing S.A.S. - Pôle 45 - Rue des Châteigniers 45140 ORMES - FRANCE - All rights reserved
HONDA
OWNER'S MANUAL
Original instructions
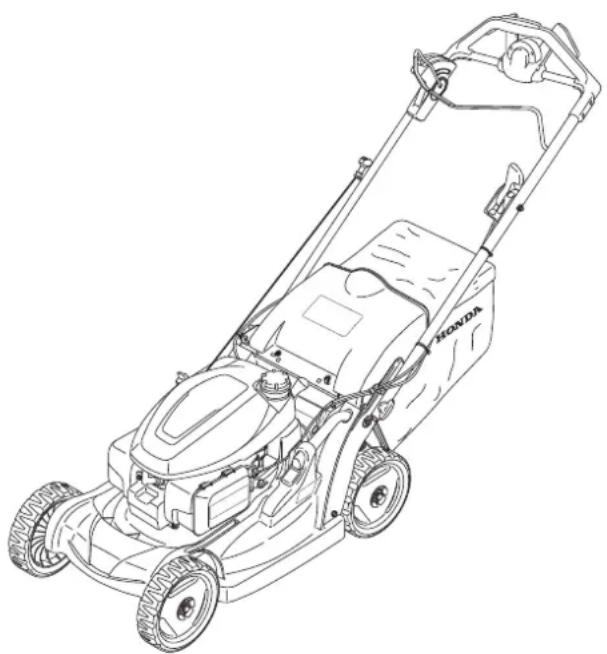
HRX476C
Pedestrian-controlled lawnmower
CONTENTS
Foreword 1
Safety instructions. 2
Safety stickers. 4
Identification of machine 4
General description 4
Preparation and checks before use 5
Selecting the cutting mode (HYE, VKE, VYE types) 8
Starting and stopping the engine 9
Operating hints and tips 9
Maintenance 12
Troubleshooting 17
Storage 17
Transport. 18
Useful information 19
Technical specifications 20
Major Honda distributor addresses 21
"EC Declaration of Conformity" CONTENT OUTLINE 22
SAFETY INSTRUCTIONS
For your own safety and operating comfort, it is highly recommended that you read this manual in full. Pay attention to these symbols and their meaning:
WARNING
Indicates a high risk of severe personal injury or death if instructions are not followed.
CAUTION:
- Indicates a possibility of personal injury or equipment damage if instructions are not followed.
NOTE: Source of useful information.

This sign means that you must take care during certain operations. Refer to the safety instructions on the following pages, to the point(s) indicated in the box.
TRAINING
A1. Read the instructions carefully. Be familiar with the controls and the proper use before using the equipment. Know how to stop the engine rapidly.
A2. Use the lawnmower for the purpose it is intended for, that is mowing and collecting grass. Any other use could be dangerous or damage the equipment.
A3. Never allow children or people unfamiliar with these instructions to use the lawnmower. Local regulations may restrict the age of the operator.
A4. Never mow when people, especially children or pets are nearby. Never use the machine in cases of fatigue or illness of the user, or after consumption of medications, drugs, alcohol or dangerous substances which might interfere with his ability regarding reflexes and concentration. Never operate the machine if there is a risk of adverse weather such as lightning or a storm, stop operation.
A5. Keep in mind that the owner or user is responsible for accidents or hazards occurring to other people or their property.
A6. Never attempt to modify the mower. It can cause an accident as well as damage to the mower. Tampering with the engine voids the EU type-approval of this engine.
- Do not connect an extension to the muffler.
- Do not modify the intake system.
- Do not adjust the governor.
A7. The machine is equipped with safety devices that must never be modified or removed, otherwise the warranty may be void and the manufacturer released from any liability. Always check that the safety devices work before using the machine.
PREPARATION
B1. When using the machine, always wear safety shoes that are strong and non-slip and long trousers. Do not use the machine with bare feet or wearing open shoes. Avoid wearing chains, bracelets or baggy clothes with loose parts or with lacing or neck ties. Long hair must be tied back. Always wear an anti-noise helmet.
B2. Thoroughly inspect the area where the equipment is to be used and remove all objects which may be thrown by the machine (stones, branches, wires, bones, etc...).
B3. WARNING - Petrol is highly flammable.
- Store fuel in containers specifically designed for this purpose.
- Refuel outdoors only, before starting the engine and do not smoke while refuelling or handling fuel.
- Never remove the cap of the fuel tank or add petrol while the engine is running or when the engine is hot.
- If petrol is spilled, do not attempt to start the engine but move the machine away from the area of spillage and avoid creating any source of ignition until petrol vapours are dissipated.
- Replace all fuel tanks and container caps securely.
- Before tipping the lawnmower to maintain the cutting means or drain oil, remove fuel from tank.
B4. Replace faulty silencers.
B5. Before use, always visually inspect the machine, especially to see that the cutting means, cutting-means bolts and cutting-means assembly are not worn or damaged. Replace worn or damaged cutting means and cutting-means bolts in sets to preserve balance.
OPERATION
C1. Do not operate the engine in a confined space where dangerous carbon monoxide fumes can collect.
C2. Mow only in daylight or in good artificial light. Make sure to comply with legal regulations which may vary from one region to another.
C3. If there is a risk of adverse weather such as lightning or a storm, stop operation.
C4. Avoid operating the equipment in wet grass, where possible.
C5. While mowing, always keep the safety distance to the cutting means, which is provided by the handle length.
C6. Do not run. Do not let yourself be pulled by the lawnmower.
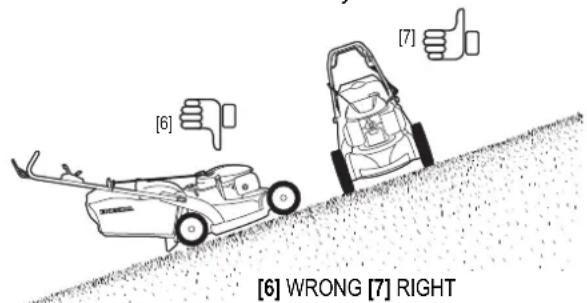
C7. Always be sure of your footing on slopes. Mow across the face of slopes, never up and down.
C8. Keep in mind that the operator or user is responsible for any accidents or unexpected events that may occur to other persons or their property. The user is responsible for checking on possible risks due to the ground to be worked on, and for taking all precautions necessary for ensuring his own safety and that of others, in particular on sloping ground, rough, slippery or unstable terrain, or near holes, ditches or banks.
C9. Do not mow slopes of more than 20^ (36%) .
C10. Use extreme caution when pulling the lawnmower towards you.
C11. Stop the cutting means if the lawnmower has to be tilted for transportation when crossing surfaces other than grass, and when transporting the lawnmower to and from the area to be mowed.
C12. Never operate the lawnmower with defective guards or cutting-means enclosures, or without safety devices such as discharge cover and/ or grass catchers.
C13. Do not change the engine governor settings or overspeed the engine.
C14. Disengage all cutting-means control (models equipped with Rotostop) and drive clutch (self-propelled models) before starting the engine.
C15. Start the engine carefully according to instructions and with feet well away from the cutting means.
C16. Do not tilt the lawnmower when starting the engine. Start the lawnmower on a level surface, free of high grass or obstacle.
C17. Keep hands and feet away from the rotating parts. Do not start the engine when standing in front of the discharge opening.
C18. Never pick up or carry a lawnmower while the engine is running.
C19. Stop the engine and disconnect the spark plug cap in the following cases:
- Before any operation under the cutting-means enclosure or the discharge chute.
- Before checking, cleaning or working on the lawnmower.
- After striking a foreign object. Inspect the lawnmower for damage and make repairs before restarting and operating the lawnmower again.
- If lawnmower starts to vibrate abnormally. Check immediately the cause of the vibration and perform the necessary repair.
C20. Stop the engine in the following cases:
- Whenever you leave the lawnmower unattended.
- Before refuelling.
C21. Stop the cutting means (models equipped with Rotostop) or the engine in the following cases:
- When installing or removing the grass catcher.
- Before adjusting the cutting height.
C22. Reduce the throttle setting during engine shut-down. Close the fuel shut-off valve by turning the fuel shut-off valve.
C23. Using any attachments other than those recommended in this manual may cause damage to your lawnmower, and such damage will not be covered by your guarantee.
C24. CAUTION
The levels for noise and vibration indicated in this manual are the maximum values for using the machine. The use of an unbalanced cutting means, an excessive speed of movement and a lack of maintenance have a significant effect on sound emissions and vibration. It is therefore necessary to take preventive measures to eliminate all possible damage due to high noise levels, and stresses due to vibrations; please ensure that the machine is well maintained, wear an anti-noise helmet. Take breaks during the work.
MAINTENANCE AND STORAGE
D1. Keep all nuts, bolts and screws tight to be sure the equipment is in safe working condition. Regular maintenance is an essential aid to user's safety and retaining a high level of performance.
D2. Never store the equipment with petrol in the tank inside a building when vapours may reach an open flame, spark or high temperature source.
D3. Allow the engine to cool before storing in any enclosure.
D4. To reduce the fire hazard, keep the lawnmower, especially the engine and silencer, the petrol storage area as well, free of grass, leaves, or excessive grease. Do not leave containers of grass cuttings in or near a building.
D5. If the fuel tank has to be drained, this should be done outdoors, with a cold engine.
D6. Check the grass catcher frequently for wear or deterioration.
D7. Do not use the machine with worn or damaged parts. Parts must be replaced, not repaired. Replace worn or damaged parts with Honda genuine parts. Cutting means must always bear the mark Honda and the reference number. Non equivalent quality parts may damage the machine and be prejudicial to your safety.
D8. Wear thick gloves when removing or installing the cutting means or when cleaning the cutting-means enclosure. When tightening or loosening the cutting-means screws, use a wooden block to prevent the cutting means from rotating.
D9. Always make sure the correct balance of the cutting means when sharpening.
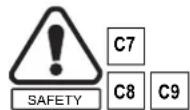
SAFETY STICKERS
Your lawnmower must be used with care. Therefore, decals have been placed on the machine, to remind you pictorially of main precautions to take during use. Their meaning is explained below. These decals are considered as a part of the lawnmower. Should one become detached or unreadable, contact your Honda dealer for its replacement.
We also recommend that you read the safety advice carefully (see page 2).
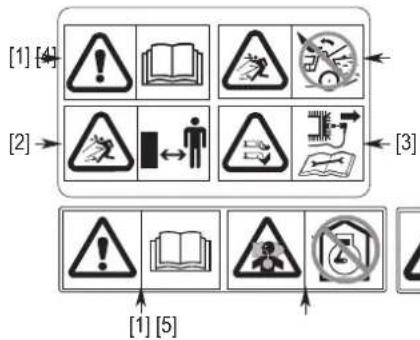
[1] WARNING: Read the owner's manual before using the lawnmower.
[2] Risk of projections: Keep third persons away from the area during use.
[3] Risk of cuts. Rotating cutting means: Do not put hands or feet inside the cutting-means enclosure. Disconnect the spark plug cap before performing any operation of maintenance or repairs.
[4] Do not operate without either discharge cover or grass catcher in place.
[5] The engine emits toxic carbon monoxide. Do not run in an enclosed area.
[6] Petrol is highly flammable. Stop the engine before refuelling.
IDENTIFICATION OF MACHINE
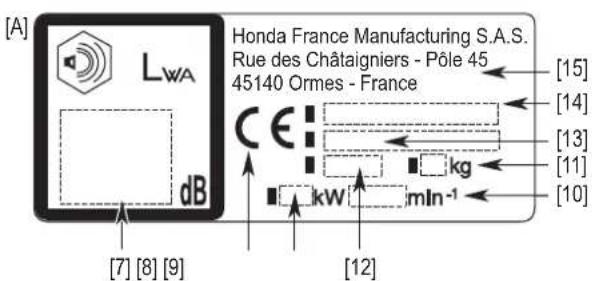
[7] Sound power level
[8] CE marking
[9] Nominal power in kilowatt
[10] Recommended engine speed in min -1
[11] Mass in kilograms (with empty tanks)
[12] Year of manufacture
[13] Serial number
[14] Model - Type
[15] Name and adress of the manufacturer
GENERAL DESCRIPTION
EQUIPMENT IDENTIFICATION
CONTROLS FUNCTIONS
[16] Handle
[17] Cutting-means control lever (Rotostop) (^) . Couple and stops the cutting means
[18] Lever for adjusting the cutting height. Selects the desired cutting height
[19] Folding knob / adjusting the handle (^) . . . Allows you to adjust the height of the handle or to fold the handle
[20] Cutting-means control lever unlocking knob (^)
[21] Shift lever (^)
[22] Drive clutch lever ()
[23] Cutting-means brake lever (^)
Activates cutting-means control lever
Controls the maximum drive speed
Controls the transmission which drives the rear wheels or the rear roller
Stops the cutting means rotation and the engine / Authorises start-up
[24] Throttle lever (^)
Controls the engine speed
[25] Fuel tank
[26] Air filter
[27] Spark plug
[28] Engine oil reservoir
[29] Cutting height lever unlocking knob (^*)
[30] Grass catcher
[31] Discharge cover. Protects the projections
[32] Recoil
[33] Muffler
[34] Fuel valve
[35] Variable mulching control (^) .Controls the amount of grass ejected
[36] Select Drive control (^)
[37] Lever for folding / adjusting the handle (^*)
wheels. Controls the maximum drive speed
[38] Rear roller (*)
Allows you to adjust the height of the handle or to fold the handle
(*) For the models equipped
PREPARATION AND CHECKS BEFORE USE

Before each use, look around and underneath the engine for signs of oil or petrol leaks.
WARNING
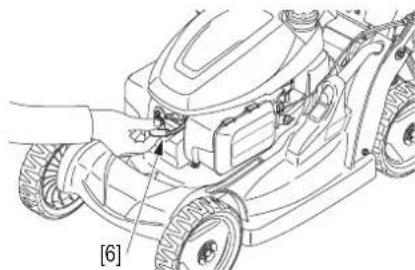
To carry out this series of checks, place the lawnmower on stable and level ground with engine stopped and spark plug [1] cap removed.
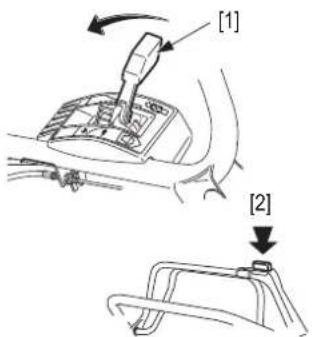
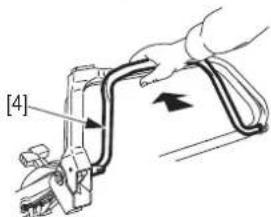
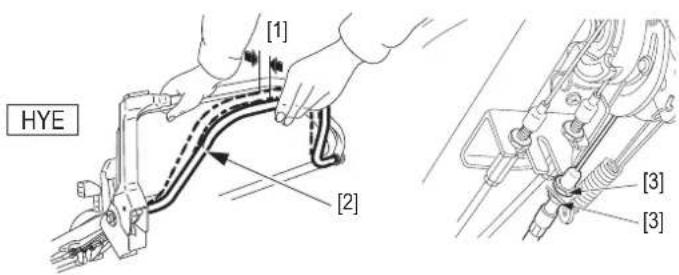
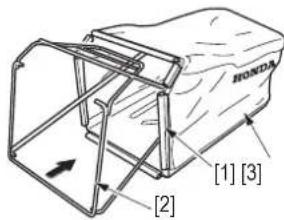
ASSEMBLY OF THE HANDLE
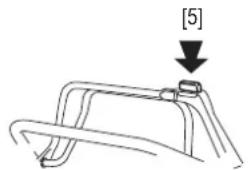
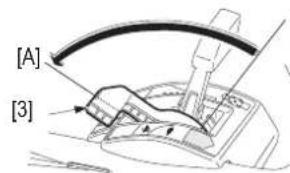
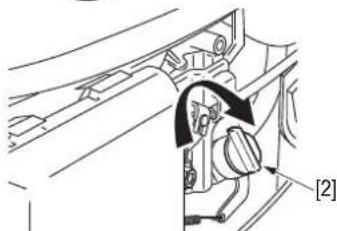
HYE, VKE, VYE types:
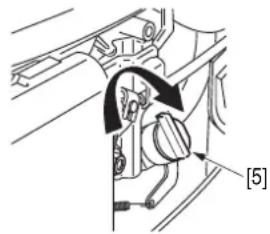
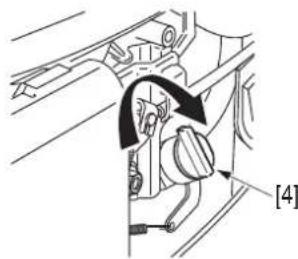
- Turn the folding/handle adjustment knobs [2] a quarter turn to unlocked position [3].
- Unfold the handle so that the folding knob axes line up with the top, intermediate or bottom holes [4], depending on the handle height required.
- Put the knobs back to locked position [5].
Ensure that the clamping rings for the cables on the handle are positioned correctly.
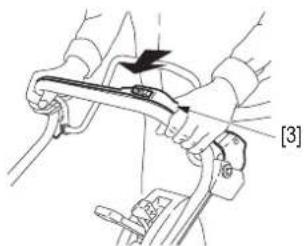
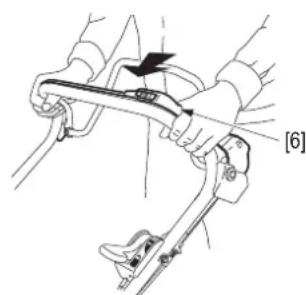
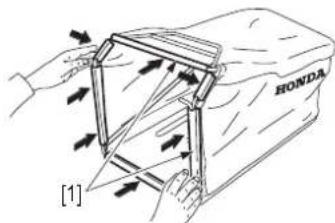
QYEJ type:
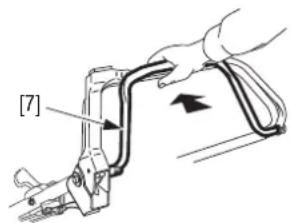
Before mounting the handle, ensure that the cables [6] are positioned outside the handle. Fit the components in the order indicated. Take care to position the cables above the handle [7]. Note the direction of assembly of the spring washers [8], with the convex side turned towards the nut [9].
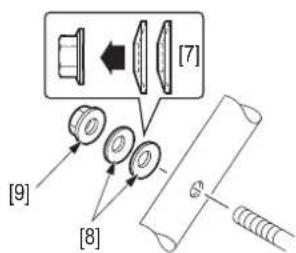
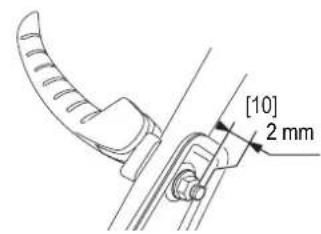
While holding the handle [7] in an open position, tighten the nut [9] until the thread is 2mm [10] longer than the nut [9].
Choose the appropriate height and tighten the handles to lock the handle. If the effort to close down the handles [7] seems too important, untighten slightly the nuts [9]. If the clamping of the handle seems too weak, tighten the nut [9].
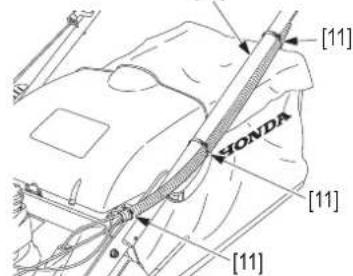
Make sure that the cable clamping rings [11] on the handle [12] is correctly positioned as shown.
[12]

To assemble the grass catcher, please refer to page 16.
CHECKING THE GRASS CATCHER
AWARNING
Before use, ensure that the grass catcher closing device is correctly locked (discharge cover).
Even in normal use, the grass catcher tends to wear. Regularly check that it is not frayed or torn. A worn out grass catcher must be replaced. Replace a damaged grass catcher with Honda Genuine parts.
Grass catcher removal:
- Stop the engine.
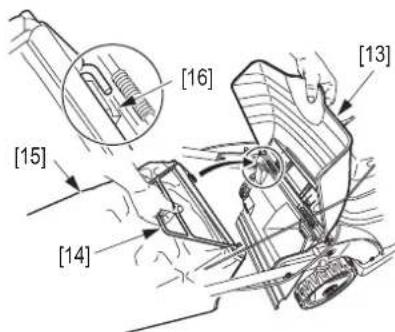
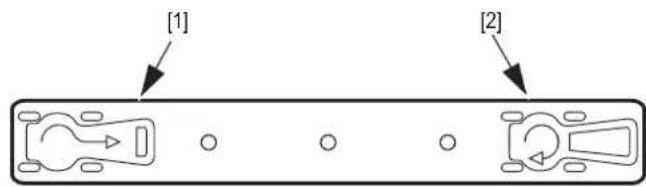
- Raise discharge cover [13], grasp handle [14] and remove grass catcher [15] while keeping it in an upright position.
Grass catcher fitting:
- Raise the discharge cover and hook the front of the grass catcher on the lawnmower's attach
NOTE:
- The lawnmower operates like a vacuum cleaner; it blows air into the grass catcher sucking up the grass cuttings. Empty the grass catcher before it is full to help emptying and minimizing the dropping of grass cuttings. Bagging performance will diminish after the grass catcher becomes about 90% full.
- Mulching is a natural fertilisation technique. The grass is no longer collected in the grass catcher, but is finely ground and deposited on the lawn. The grass cuttings chopped up in this way decompose in the sun and form a natural humus which can produce a quarter of the annual fertilisation requirement of your lawn.
- In addition to its fertilising role, mulching protects the ground, limits evaporation of water during hot periods and relieves you of the task of collecting the grass.
WARNING
Do not fill the fuel tank over the upper limit. When filling is completed, ensure that the tank filler cap is screwed fully on. Avoid getting fuel on the skin repeatedly or for long periods and avoid breathing fuel vapours. Keep fuel away from children.
CAUTION:
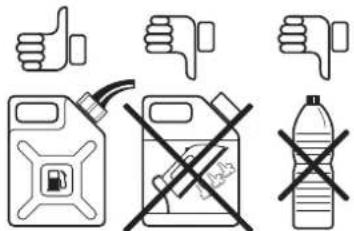
- Ensure that you use containers or drums specifically designed for hydrocarbons [1].
- Never use petrol that is stale, contaminated, or mixed with oil.
Only use unleaded petrol 95 or 98. - Do not let dirt, clippings, etc. get into the tank.
- Do not use dirty or contaminated fuel (water, dust, ..., or fuel which is too old. The quality of unleaded petrol deteriorates with time. Do not keep fuel for more than one month (see page 18).
[1]
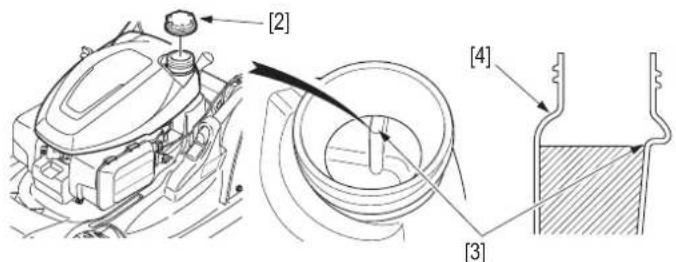
To check the fuel level:
- Remove filler cap [2] and check fuel level.
- Fill tank if level is low. Add fuel to the upper limit [3] of the fuel tank [4].
- Screw filler cap [2] fully on after filling.
NOTE: Fuel substitute products are not recommended. These may damage fuel system components.
FUEL CONTAINING ALCOHOL
If you intend to use fuel with alcohol, ensure that its octane number is at least as high as that recommended by Honda (95 octane). There are 2 types of fuel/alcohol mixtures: one contains ethanol and the other methanol.
Fuel specification(s) necessary to maintain the performance of the emissions control system: E10 fuel referenced in EU regulation.
Do not use gasohol that contains more than 10% ethanol.
Do not use petrol containing more than 5% methanol (methyl or wood alcohol) and that does not also contain co-solvents and corrosion inhibitors for methanol.
NOTE:
- Fuel system damage or engine performance problems resulting from the use of petrol that contains more alcohol than recommended is not covered under the warranty.
- Before buying petrol from an unfamiliar station, first determine if the petrol contains alcohol, if it does, find out the type and percentage of alcohol used.
If you notice any undesirable operating symptoms while using a particular petrol. Switch to a petrol that you know contains less than the recommended amount of alcohol.
CHECKING THE AIR CLEANER
CAUTION:
- Operating the engine without an air filter, with a damaged air filter, or with an improperly installed air filter cover will allow dirt to enter the engine, causing rapid engine wear.
To check the condition of the air cleaner:
- Press the latch tabs [5] on the top of the air cleaner cover and remove the cover [6].
- Check the cleanliness of filter element [7]. If the element is dirty, follow the cleaning procedure (see "Maintenance" chapter page 12).
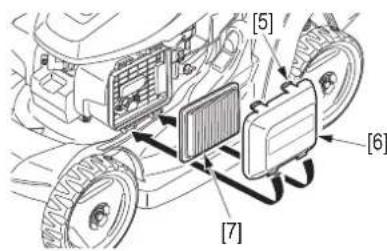
- Reinstall the filter [7] and air cleaner cover [6].
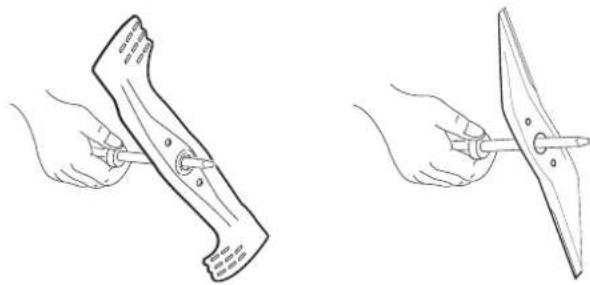
CHECKING CUTTING MEANS CONDITION
CAUTION:
- Do not tilt the lawnmower with the carburetor facing down; this will make the lawnmower difficult to start later, due to engine oil contaminating the air cleaner.
To check cutting means condition:
- Stop the engine.
- Pull off the spark plug cap.
-
Tilt the lawnmower to the right so the fuel cap is up [8].
-
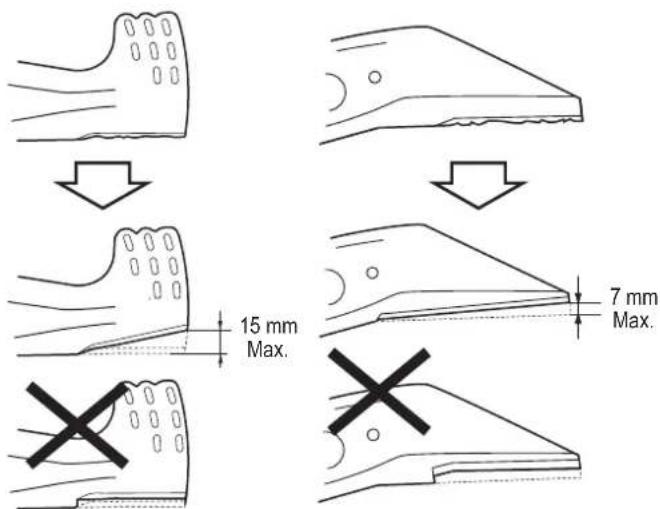
Check if the cutting means is showing signs of wear. It is necessary to replace the cutting means when the recesses join together, or when a crack appears.

NORMAL BENT
EXCESSIVELY WORN

CRACKED
- Check that cutting-means bolts are tight (see "Maintenance" chapter page 12).
- To replace or remove the cutting means, refer to the procedure described in the "Maintenance" chapter page 12.
WARNING
Never operate the lawnmower with a worn, damaged, split or dented cutting means. Pieces of cutting means which breaks off and is thrown outwards can cause serious personal injuries.
NOTE: Cutting means wear is increased when the lawnmower is used on sandy soils. Inspect the cutting means more often when the lawnmower is used in these conditions.
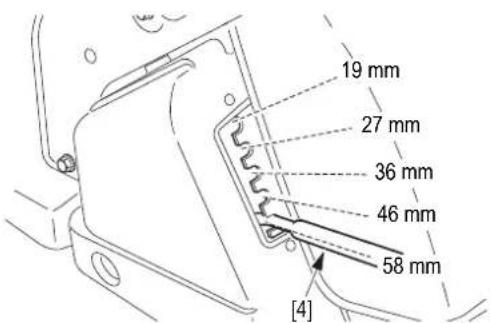
ADJUSTING CUTTING HEIGHT
To change the cutting height:
- Stop the engine.

HYE, VKE, VYE types:
- Keep the unlocking knob [1] pressed and raise or lower the lawnmower with the adjustment handle [2]. A height indicator [3] is near the front left wheel.
| Positions Height (mm) | |
| 1 | 25 |
| 2 | 34 |
| 3 | 43 |
| 4 | 52 |
| 5 | 61 |
| 6 | 70 |
| 7 | 79 |
QYEJ type:
- Pull the adjusting lever [4] towards the outside of the machine. Turn the adjusting lever [4] left or right to raise or lower the cutting height.
The cutting height settings are approximate values, the actual height of the cut grass varies with the lawn and ground condition. To choose the cutting height, check how the lawn looks after mowing a small area and adjust the cutting height where necessary.
NOTE:
- Do not cut more than 1/3 of the initial height of the grass in one passage as brown spots will appear. The cut will be cleaner and this will limit the possibility of cutting means and chute blackage.
- If the lawn is too high, mow at the maximum permissible height of the lawnmower. Mow the lawn again 2 or 3 days later.
- The depth of the roots is proportional to the height of the grass cuttings: the shorter the cut, the shallower the roots.
- Choose a cutting height suited to the use of the lawn: leisure, sport: 5 cm or more, ornamental: 1 to 3 cm.
- Only some species of lawn can endure short cuts. If a lawn is cut too short, it is fragile and susceptible to dryness. Please ask the advice of a specialist.
CHECKING ENGINE OIL LEVEL
CAUTION:
- The engine oil is an essential element which affects the performance and lifetime of the engine.
- The engine may be seriously damaged if run with insufficient oil. We recommend the use of Honda 4-stroke oil or an equivalent quality engine oil which is highly detergent. Oil viscosity must be appropriate for the average temperature in the zone where the lawnmower is to be used.
Lubrication oil specifications necessary to maintain the performance of the emissions control system: Honda genuine oil. Types of oil [5] adapted to the ambient temperature [6].
To check engine oil level:
- Put the lawnmower on flat, even ground.
- Remove and wipe oil filler cap/dipstick [7].
- Replace the oil filler cap/dipstick in the filler neck but do not screw it down.
- Check the level of the oil left on the oil filler cap/dipstick. If the level is near the low level mark [8], add the recommended oil up to the high level mark [9].
- Screw oil filler cap/dipstick.
SELECTING THE CUTTING MODE (HYE, VKE, VYE TYPES)
ADJUSTING THE VARIABLE MULCHING CONTROL
HYE, VYE types:
- Release the cutting-means control lever.
VKE type:
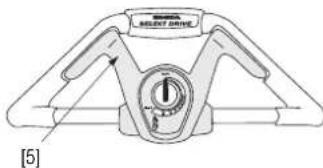
- Release the cutting-means brake lever.
- Turn the variable mulching control knob to one of the 5 positions to obtain the required mulching and ejection rate.
- Grass collection position [1]: all the grass cuttings are ejected at the back of the lawnmower, the grass cuttings are not mulched.
-
Mulching position [2]: the grass is no longer collected in the grass catcher, but is finely cut and deposited on the lawn. The grass cuttings chopped up in this way decompose and form a natural compost which can produce a quarter of the annual fertilisation requirement of your lawn.
-
To choose the position best adapted to your requirements, carry out a test. Install the grass catcher and start to mow in collection position [1]. Check the effect on the lawn. Turn the knob [3] one notch to the right. Turning the knob turned towards Mulching position [2] increases the quantity of grass ground and deposited on the lawn. Turn the control knob [3] until you obtain the required results.
NOTE:
- Mulching is a natural fertilisation technique. The grass is no longer collected in the grass catcher, but is finely cut and deposited on the lawn.
- In addition to its fertilising role, mulching protects the cut, limits evaporation of water during hot periods and relieves you of the task of collecting the grass.
REAR EJECTION
If you do not want to collect the cut grass, the lawnmower can be used without the grass catcher. In this case, the grass ejected is guided to the ground by the discharge cover. The quantity ejected varies depending on the position of the variable mulching control knob:
-maximal in position [1],
- zero in position [2].
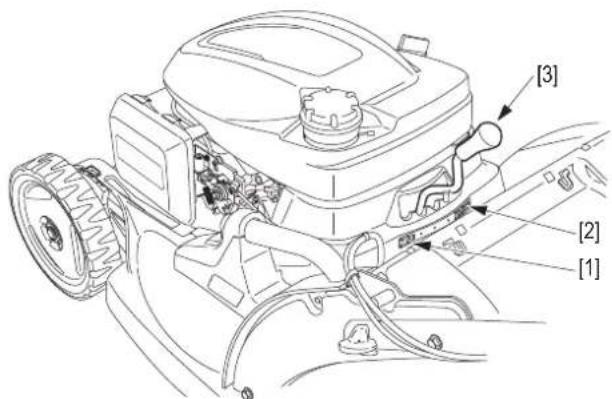
STARTING AND STOPPING THE ENGINE

STARTING THE ENGINE
CAUTION:
- Do not start the engine with the cutting-means control lever or the drive clutch lever engaged.

[A][B][C]
FAST
For restarting a hot engine and for mowing.

SLOW
Selects engine idling speed.

STOP
Stops engine (Rotostop models).
All models:
- Turn the fuel valve [1] to the ON (open) position.
HYE, VYE, QYEJ types: - Place the throttle lever [2] in "FAST" position [A].

VKE type:
- Keep the cutting-means brake lever [3] held firmly against the handle when starting the engine.
All models:
- Pull the starter [4] slowly until a resistance is felt; then pull sharply.
NOTE:
- Do not let the starter spring back suddenly on its own; guide it back slowly.
To adjust the engine speed when the lawnmower is running, the throttle lever can be set anywhere between the "FAST" position [A] and "SLOW" position [B]. (HYE, VYE, QYEJ types) However, the best results are obtained in the "FAST" position [A].
HYE, VYE, QYEJ types:
The engine may stall if the lever is in the "SLOW" position [B] when the cutting-means control is engaged.
To facilitate starting, place the lawnmower on a flat surface where the grass is not long.
NOTE: To ensure easy restarting and maximum performance from the Auto Choke System, start mowing as soon as the engine starts and allow the engine to run for at least 3 minutes before stopping the engine.
STOPPING THE ENGINE
HYE, VYE, QYEJ types:
- Move the throttle lever to the "STOP" position [C].
VKE type:
- Release the cutting-means brake lever. All models:
- Turn the fuel valve [5] to the OFF (close) position.
FLOODED ENGINE
If the engine still refuses to start after several pulls on the starter, the engine may be flooded.
To clear a flooded engine:
- Place the throttle lever in "STOP" position [C] (HYE, VYE, QYEJ types).
- Remove and dry the spark plug. For refitting the spark plug, refer to "CHECKING THE SPARK PLUG" (see page 13).
- Place the throttle lever in "FAST" position [A] and repeat the operations previously mentioned under the heading "STARTING THE ENGINE".
OPERATING HINTS AND TIPS
USING THE LAWNMOWER AT HIGH ALTITUDES
At high altitudes, the standard fuel/air mixture in the carburetor is much too rich: this will reduce performance and increase fuel consumption. It is possible to improve the high altitude performance by fitting the carburetor with a smaller diameter jet and by adjusting the pilot screw. If you use your lawnmower at an altitude of more than 1500 meters above sea level, we recommend that you have these modifications made by your authorized Honda dealer.
Even with the appropriate modifications made to the carburetor, engine power will be reduced by about 3.5% for every 300 meters of altitude. However, the altitude will have a much greater effect on power if these modifications are not carried out.
CAUTION:
- Running the lawnmower at an altitude less than that for which the carburetor is adjusted may cause overheating and seriously damage the engine, due to the gas/air mixture being far too weak.

WARNING
Take special care when mowing on uneven or irregular ground. The lawnmower may tip over and cutting means may throw out objects which were hidden.
Keep the 4 wheels firmly on the ground.
Control the direction of the lawnmower using the handle and not by exerting pressure on the cutting-means enclosure with your foot.
CAUTION:
- When mowing around an obstacle, be careful that the cutting means does not hit it. Never push the lawnmower directly over an object.
- When mowing an uneven area, do not let yourself be pulled along by the lawnmower. Hold the handle firmly and control its movements.
NOTE: If the lawnmower speed becomes too slow when mowing on a slope, move the shift lever (HYE type) slightly towards the "FAST" position [A].

Read the safety instructions before starting to mow.
HYE type:
WARNING
Always release the cutting-means control lever and the drive clutch lever before starting the engine. Starting is more difficult when the cutting means is engaged. If drive clutch is engaged, the lawnmower will move when the engine is started.
- Select the suitable forward speed with the shift lever [1].
-
Engage the cutting means:
-
Press the yellow button [2] located on the top of the cutting-means control lever [3], and at the same time push it quickly and hold it against the handle.
-
Engage lawnmower forward drive when the motor has picked up speed:
-
The drive clutch lever [4] acts as a variable speed control according to its squeezed position. It makes the speed vary between zero and the maximal speed preset with the shift lever. The maximum speed can be reached when both levers [3] and [4] are pushed forward completely. The greater the height of the grass to be cut, the more it is necessary to reduce the drive speed of the machine. This will prevent overloading the engine and improve the quality of the cut.
-
To stop the lawnmower moving forward:
-
Release the drive clutch lever [4].
- To stop the cutting means rotating:
- Release the cutting-means control lever [3].
NOTE: It is possible to refrain from using the forward drive while mowing in areas with a narrow surface (lanes, borders, etc.). The drive clutch can be used to move the lawnmower without engaging the cutting-means control.
CAUTION:
- Move the cutting-means control lever quickly from one end of its travel to the other, so that the cutting means is always either fully engaged or fully disengaged. This is to avoid stalling the engine and increases the service life of the cutting-means control mechanism.
VKE type:
-
With the engine running and the cutting means rotating, slowly push the Select Drive control [5] to propel the mower forward.
-
Normal operation is with your hand comfortably around the handle bar and Select Drive control. Push the Select Drive control with your thumb into the indentation for boost operation (up a hill, or through thick grass).
- You can reduce the ground speed by partially releasing the Select Drive control.
Ground speed varies with terrain, grass height, slope, and grass catcher weight. Moving the Select Drive control knob [6] or varying how far you push the Select Drive control forward allows you to maintain the desired ground speed under constantly changing mowing conditions.
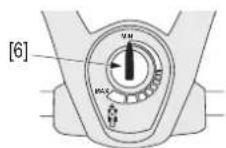
-
To adjusting the Select Drive control knob [6]:
-
The Select Drive control knob allows you to adjust the maximum ground speed when the Select Drive control is fully engaged. Adjustment is from MIN to MAX. With the Select Drive control fully engaged:
- MIN will propel the lawnmower at its slowest speed.
-
MAX will propel the lawnmower at its fastest speed.
-
To stop the lawnmower moving forward:
- Release the Select Drive control [5].
- To stop the cutting means rotating:
- Release the cutting-means brake lever [7].
NOTE: Releasing the cutting-means brake lever stops the cutting means rotating and stops the engine.
AWARNING
Always release the cutting-means control lever and the Select Drive control before starting the engine. Starting is more difficult when the cutting means is engaged. If the clutch is engaged, the lawnmower will move when the engine is started.
-
Engage the cutting means:
-
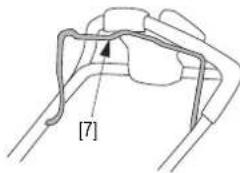
Press the unlocking knob [1] and keep it pressed.
- Pull the cutting-means control lever [2] towards you.
-
Release the unlocking knob [1] when the cutting means are engaged.
-
With the engine running and the cutting means rotating, slowly push the Select Drive control [3] to propel the mower forward.
-
Normal operation is with your hand comfortably around the handle bar and Select Drive control. Push the Select Drive control with your thumb into the indentation for boost operation (up a hill, or through thick grass).
- You can reduce the ground speed by partially releasing the Select Drive control.
-
Ground speed varies with terrain, grass height, slope, and grass catcher weight. Moving the Select Drive control knob [4] or varying how far you push the Select Drive control forward allows you to maintain the desired ground speed under constantly changing mowing conditions.
-
To adjusting the Select Drive control knob [4]:
-
The Select Drive control knob allows you to adjust the maximum ground speed when the Select Drive control is fully engaged. Adjustment is from MIN to MAX. With the Select Drive control fully engaged:
- MIN will propel the lawnmower at its slowest speed.
-
MAX will propel the lawnmower at its fastest speed.
-
To stop the lawnmower moving forward:
-
Release the Release the Select Drive control [3].
-
To stop the cutting means rotating:
- Release the cutting-means control lever [2].
NOTE: It is possible to refrain from using the forward drive while mowing in areas with a narrow surface (lanes, borders, etc.). Likewise, the Select Drive control can be used to move the lawnmower without engaging the cutting-means control.
CAUTION:
- Move the cutting-means control lever quickly from one end of its travel to the other, so that the cutting means is always either fully engaged or fully disengaged. This is to avoid stalling the engine and increases the service life of the cutting-means control mechanism.
AWARNING
Always release the cutting-means control lever and the drive clutch lever before starting the engine. Starting is more difficult when the cutting means is engaged. If the clutch is engaged, the lawnmower will move when the engine is started.
-
Engage the cutting means:
-
Press the yellow button [5] located on the top of the cutting-means control lever [6], and at the same time push lever quickly and hold it against the handle.
-
Engage lawnmower forward drive when the motor has picked up speed:
-
The drive clutch lever [7] acts as a variable speed control according to its squeezed position. It makes the speed vary between zero and the maximal speed preset with the shift lever. The maximum speed can be reached when both levers [6] and [7] are pushed forward completely. The greater the height of the grass to be cut, the more it is necessary to reduce the drive speed of the machine. This will prevent overloading the engine and improve the quality of the cut.
- To stop the lawnmower moving forward:
- Release the drive clutch lever [7].
- To stop the cutting means rotating:
- Release the cutting-means control lever [6].
NOTE: It is possible to refrain from using the forward drive while mowing in areas with a narrow surface (lanes, borders, etc.). The drive clutch can be used to move the lawnmower without engaging the cutting-means control.
CAUTION:
- Move the cutting-means control lever quickly from one end of its travel to the other, so that the cutting means is always either fully engaged or fully disengaged. This is to avoid stalling the engine and increases the service life of the cutting-means control mechanism.
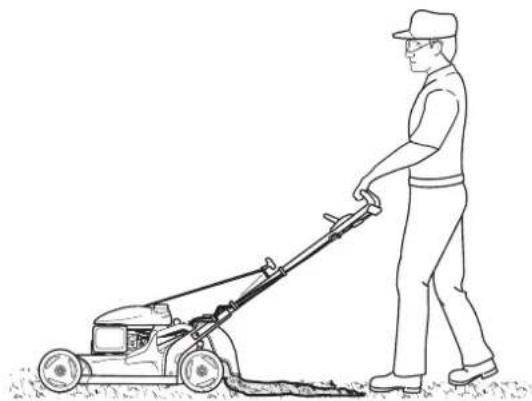
NOTE:
- Mowing frequency: once a week for a lawn intended for leisure purposes, twice a week for an ornamental lawn.
If possible, mow the lawn in the afternoon or evening before sprinkling, as the grass must be dry. If dust levels are too high, mow the lawn when the grass is dry, but the ground is still damp. - Choose a cutting height adapted to the terrain (see page 7).
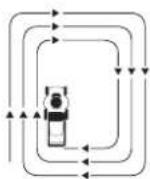
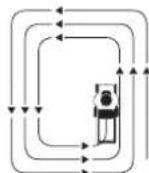
- For a regular cut, you should overlap the part that has already been cut by a few centimetres [1], and increase this overlap zone if the cutting height is high.
- To achieve maximum efficiency, follow the suggested path.
- If your terrain does not have a regular shape or involves several obstacles, divide it into internal parcels which you can mow in the recommended direction.
[2] Catching: turn in a clockwise direction to achieve the maximum efficiency.
[3] Mulching (optional, page 19): turn in an anti-clockwise direction.
[2]
[3]
EMPTYING THE GRASS CATCHER
When the grass catcher becomes full, grass collection is no longer efficient (the sound of the lawnmower changes and the grass catcher is no longer puffed up by the air from the cutting means).

HYE, VYE, QYEJ types:
- Release the cutting-means control lever.
VKE type: - Release the cutting-means brake lever.
All models: - Remove the grass catcher (see page 5).
-
Empty the grass catcher:
-
Hold the grass catcher by the metal handle [4].
- Grasp handle [5] and shake the grass catcher to remove the grass.
CAUTION:
- To reduce the fire risk, never leave grass cuttings or leaves in the grass catcher, or in or near buildings. Decomposing grass cuttings causes a high temperature rise.
WARNING
Before use, check that the grass catcher closing device is correctly positioned (discharge cover).
MAINTENANCE
Regular maintenance helps to extend the life of your lawnmower.
WARNING
To avoid the lawnmower starting accidentally, pull off the spark plug cap [6] before carrying out maintenance work.
CAUTION:
- The engine and the muffler reach temperatures high enough to cause burns and start fires if flammable materials are to be found nearby.
- Allow the engine to cool down for 15 minutes before carrying out maintenance operations.
NOTE: To assure a longer lifetime and more efficient operation, the underside of the lawnmower must be kept clean and free of grass debris by cleaning with a brush and scraper. After use the lawnmower must be cleaned thoroughly before being stored.
AIR CLEANER MAINTENANCE
A dirty air cleaner will reduce the flow of air to the carburetor. To prevent the carburetor operating inefficiently, the air cleaner must be regularly maintained.
WARNING
Never clean the air cleaner element using petrol or flammable solvents; this can cause a fire or an explosion.
- Press the latch tabs [7] on the top of the air cleaner cover, and remove the cover [9].
- Inspect air filter [8] and replace it if it is damaged.
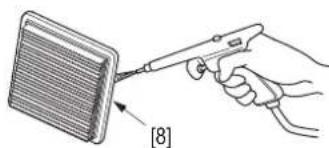
- Tap the filter several times on a hard surface to remove dirt or blow compressed air (not exceeding 2.1kgf/cm^2 , 30 psi) through the filter from the clean side that faces the engine.
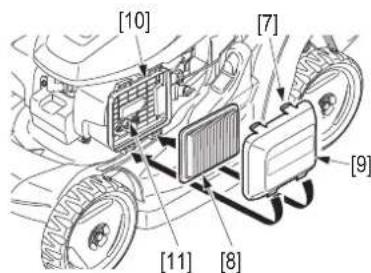
NOTE: The filtering element [8] must be dry in order to work correctly. Do not soak with oil.
4. Wipe dirt from the inside of the air cleaner cover [9] and air cleaner case [10], using a moist rag.
NOTE: Be careful to prevent dirt from entering the air duct [11] that leads to the carburetor.
5. Reinstall the filter [8] and air cleaner cover [9].
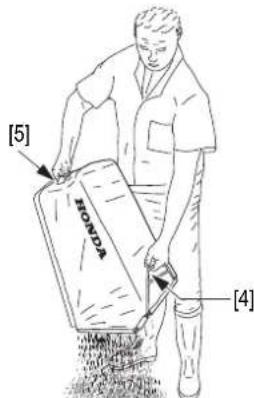
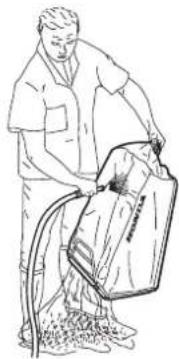
ENGINE OIL CHANGE
Drain the oil while the engine is still hot, so that the oil drains quickly and completely.

CAUTION:
-
Used engine oil can cause skin cancer if it remains in contact with the skin for long periods. Although this is highly unlikely unless you handle used oil every day, we recommend that you wash your hands thoroughly with soap and water each time you handle used engine oil.
-
Put the throttle lever in the STOP position and turn the fuel valve OFF. This will reduce the possibility of fuel leakage (see page 9).
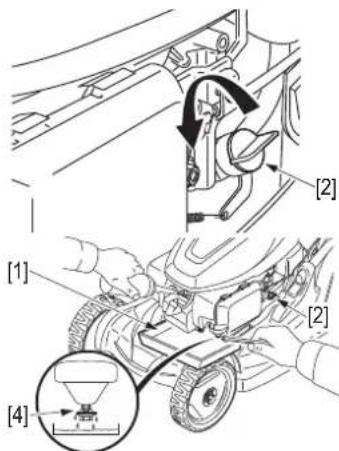
- Wipe the oil filler area clean, and then remove the oil filler cap/dipstick [1].
- Place a suitable container [2] next to the mower to catch the used oil, and then tilt the mower on its right side. The used oil will drain through the filler neck. Allow the oil to drain completely.
- Fill with the recommended oil (see page 7). Do not overfill. Engine oil capacity: 0.40e
-
After changing the engine oil and before starting the engine, check the oil level with the mower on a level surface. If the oil level is below the low level mark [3], add oil to reach the high level mark [4] on the dipstick.
-
Screw in the oil filler cap/dipstick securely.
NOTE: The used engine oil must be disposed of in a manner which respects the environment.
We recommend that you take it to a service station which will ensure that it is recycled. Never dispose of used engine oil in dustbins or pour it away on the ground, in the gutter or down the drains.
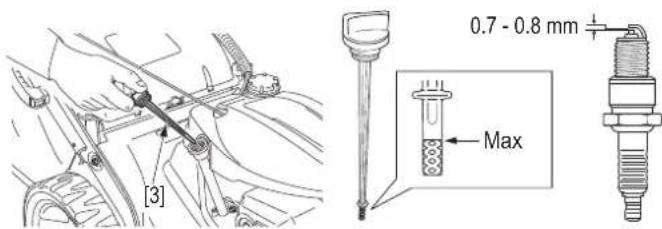
CHECKING THE SPARK PLUG
Recommended plug: NGK-BPR5ES
CAUTION:
- Use only recommended spark plug. Using spark plug with inappropriate temperature ranges may damage the engine.
WARNING
If the engine has just been run, do not touch the muffler and the spark plug which will still be hot.
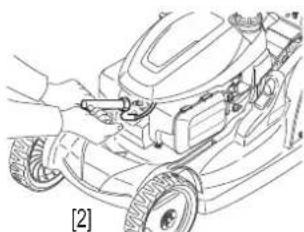
- Pull off spark plug cap [5] and remove spark plug [6] using a plug wrench [7].

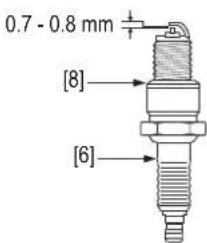
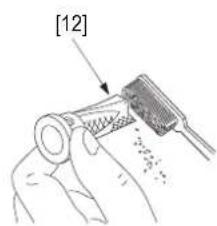
- Inspect the spark plug. Replace it if the electrodes are worn or if the insulator is cracked or chipped. Clean the spark plug with a wire brush if you are going to reuse it.
- Measure the plug gap using a set of feeler gauges; the gap must be between 0.7 and 0.8mm . If adjustment is necessary, carefully bend the side electrode.
- Install the spark plug carefully, by hand, to avoid cross-threading.
- After the spark plug seats, tighten with a spark plug wrench to compress the washer. If reinstalling the old spark plug, tighten 1/8 to 1/4 turn after the spark plug seats. If installing a new spark plug, tighten 1/2 turn after the spark plug seats to compress the washer [8].
- Refit the spark plug cap.
CAUTION:
- A loose spark plug can overheat and damage the engine. Overtightening the spark plug can damage the threads in the cylinder head.
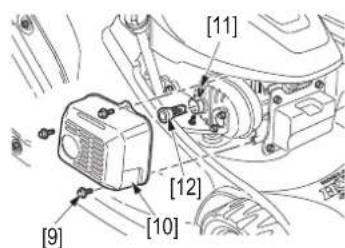
MAINTENANCE OF SPARK ARRESTER

(In Europe and other countries where the machinery directive 2006/42/EC is enforced, this cleaning should be done by your servicing dealer).
AWARNING
If the lawnmower has just been run, the silencer will still be very hot. Allow it to cool down before carrying out this operation. In some regions, it is prohibited to operate an engine without a spark arrester.
- Remove the 3 flange bolts [9] from the muffler protector [10] and remove the muffler protector.
- Remove the 2 tapping screws [11] from the spark arrester [12] and remove the spark arrester from the muffler.
- Check the carbon deposits around the exhaust port and spark arrester. Clean if necessary.
- Replace the spark arrester if there are any breaks or tears.
- Install the spark arrester [12] and muffler protector [10] in the reverse order of removal.
CARBURETOR ADJUSTMENT
CAUTION:
- It is recommended to ask your servicing dealer for adjustment.
Specified idle speed: 1700 ± 150 min^-1
Operating speed: 2800 +0 min-1
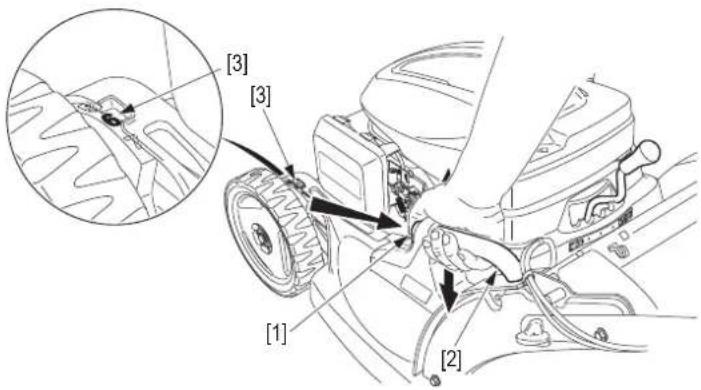
SHIFT CABLE ADJUSTMENT

HYE, QYEJ types:
Measure the free play [1] on the side of lever [2] as shown.
- Place the gear stick in the fastest position and loosen the locknuts [3].
- Relax or tighten the cable as necessary so that a free play of 1 to 5mm is achieved.
- Retighten the locknuts [3] and recheck the free play [1].
- Start the engine in the open air and operate the clutch lever. Check that the clutch engages and disengages correctly.
SELECT DRIVE CABLE ADJUSTMENT

VKE, VYE types:
Perform this procedure with the wheels on a level surface.
- Move the Select Drive control knob [4] in MIN position [5].
- Loosen the Select Drive clutch cable lock nut [6].
- Start the engine
- Without engaging the Select Drive control, turn the Select Drive clutch cable adjuster [7] in the "START" [A] direction until the lawnmower just begins to move forward.
- Turn the Select Drive clutch cable adjuster 1 2 turns in the "STOP" [B] direction.
- Tighten the Select Drive clutch cable lock nut.
All models:
NOTE: If the clutch does not engage correctly even when the cable is correctly adjusted, the system may need to be repaired. Take the lawnmower to an authorized dealer.
CUTTING MEANS FITTING AND REMOVAL
CUTTING MEANS REMOVAL
- Place the throttle lever in "STOP" position (Rotostop drive models).
- Turn the fuel valve to the OFF (close) position and disconnect the spark plug cap from the spark plug.
- Tilt the lawnmower so that the carburetor faces upwards [8].
- Use a 14 mm socket wrench and remove the 2 cutting-means bolts [9] and special washers [10] from the cutting-means holder [11].
Use a wooden block to prevent the cutting means from turning when removing the bolts.
HYE, VKE, VYE types:
- Remove the upper [12] and lower cutting means [13].
QYEJ type:
- Remove the cutting means [14] and spacer [15].
CUTTING MEANS INSTALLATION
- Clean dirt and grass from around the cutting-means mounting area.
HYE, VKE, VYE types:
WARNING
Operating this lawnmower with only one cutting means will result in an improperly seated cutting means that can be thrown from the lawnmower and seriously hurt or kill someone. Always install both cutting means as a set.
- Install both cutting means [3] and [4] using the 2 cutting-means bolts [1] and special washers [2] as shown.
Cutting-means bolt torque: 49 59~N· m
QYEJ type:
- Fit the spacer [7] then the cutting means [8] using the 2 bolts [1] and the special washers [2] as illustrated.
Cutting-means bolt torque: 54.0 ± 4.9 N·m
Fit the special washers with their convex side, marked "OUT", facing the bolts.
The cutting-means bolts are specially designed for this application and must not be replaced with other bolts.
- Tighten the cutting-means bolts with a torque wrench [5]. Use a wooden block [6] to prevent the cutting means from turning.
CAUTION:
- If you do not have a torque wrench, ask your authorized Honda dealer to tighten the cutting-means bolts for you before you use the lawnmower.
- If the cutting-means bolts are too tight or too slack, they may break or unscrew.
NOTE: Never tip the lawnmower so that the carburetor faces down; this will make starting difficult.
CUTTING MEANS REPLACEMENT
CAUTION:
- Cutting-means balance is critical to proper lawnmower performance. Replace any cutting means that is damaged or out of balance.
- Use only genuine Honda replacement cutting means.
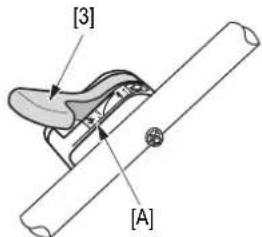
CUTTING MEANS SHARPENING
CAUTION:
- To avoid weakening the cutting means, causing it to become unbalanced or getting a bad quality of cut, the cutting means should be sharpened by competent personnel at your servicing dealer.
- Sharpen the cutting means cutting edges with a file. File the top side only. Maintain the original bevel for a fine cutting edge. File both ends evenly to maintain cutting-means balance.
- After sharpening, test the cutting-means balance using a screwdriver as shown above. If either side dips slightly below the horizontal, file that side. Replace the cutting means if it dips excessively.
GRASS CATCHER CLEANING AND REPLACEMENT
GRASS CATCHER FABRIC CLEANING
CAUTION:
- Washing with a high pressure water or steam jet will damage the grass catcher fabric.
- Blocked mesh will prevent the grass from entering the grass catcher fabric.
To clean the grass catcher fabric, we recommend washing it using a water jet directed from the outside to the inside of the grass catcher fabric. The grass catcher fabric must be completely dry before being used again. If the grass catcher fabric is damp, it will become clogged very quickly.
WARNING
Objects struck by the cutting means may be thrown through a torn or damaged grass catcher.
Objects thrown out by the cutting means can cause serious injuries. Always replace a torn or damaged grass catcher.
GRASS CATCHER FABRIC REPLACEMENT
The grass catcher fabric tends to wear even in normal conditions of use. Regularly check that it is not frayed or torn. Replace a damaged grass catcher fabric with Honda Genuine parts.
- Detach the plastic edges [1] of the worn grass catcher fabric [3] and remove the grass catcher's frame [2].
- Insert the frame into the new grass catcher fabric and fit the plastic edges [1] to the frame.
MAINTENANCE SCHEDULE
| Maintenance to be carried out at the intervals indicated in months or in operating hours which ever occurs first. | Frequency | ||||||
| Each use | First month or 5 hours | Every 3 months or 25 hours | Every 6 months or 50 hours | Every year or 100 hours | Once every 150 running hours | ||
| Engine oil | Check o | ||||||
| Replace o o (1) | |||||||
| Air cleaner | Check o | ||||||
| Clean o (1) | |||||||
| Replace o (1) | |||||||
| Flywheel brake shoe (4) | Check o (2) | ||||||
| Spark plug Check / Adjust | o | ||||||
| Spark arrester | Clean | o (6) | |||||
| Fuel tank and filter | Check / Clean | o (2) | |||||
| Inside of top cover | Clean | o (2) | |||||
| Valve clearance | Check / Adjust | o (2) | |||||
| Fuel tube | Check (replace as needed) | Every 2 years (2) | |||||
| Grass catcher | Clean | o | |||||
| Cutting-means screw tightness and cutting means condition | Check o | ||||||
| ROTOSTOP cable (3) | Check / Adjust | o (2) | o (2) | ||||
| Cutting-means brake cable (4) | Check / Adjust | o (2) | o (2) | ||||
| ROTOSTOP (3) | Check | o (2) | o (2) | ||||
| Shift cable (8) | Check / Adjust | o | o | ||||
| Select drive cable (7) | Check / Adjust | o | o | ||||
| Throttle cable Check / Adjust | o (2) | o (2) | |||||
| Drive belt (5) | Check o (2) | ||||||
| Lawnmower deck | Clean | o | |||||
(1) Increase cleaning frequency when lawnmower is used in dusty areas.
(2) Maintenance of these points must be carried out by your servicing dealer.
(3) HYE, VYE, QYEJ types
(4)VKE type
(5)HYE,VKE,VYE types
(6) In Europe and other countries where the machinery directive 2006/42/EC is enforced, this cleaning should be done by your servicing dealer.
(7)VKE, VYE types
(8) HYE, QYEJ types
TROUBLESHOOTING
ENGINE WILL NOT START
| Possible cause Correction | |
| Fuel valve OFF (closed). | Turn the fuel valve ON (open) (page 9). |
| Throttle lever (equipped models) in the wrong position. | Move the throttle lever to the "FAST" position (page 9). |
| Out of fuel. Refuel (page 6). | |
| Bad fuel; lawnmower stored without treating the petrol, or refuelled with bad petrol. | Refuel with fresh petrol (page 6). |
| Spark plug faulty, fouled, or improperly gapped. | Gap or replace the spark plug (page 13). |
| Spark plug wet with fuel (flooded engine). | Dry and reinstall the spark plug. Start the engine, with the throttle lever in "FAST" position (page 9). |
| Fuel tank vent blocked, carburettor clogged or ignition faulty. | Maintenance of these points must be carried out by a servicing dealer. |
| The cutting-means brake lever is not firmly held against the handle (models fitted). | The cutting-means brake lever must be held firmly against the handle for starting the engine (page 9). |
LOSS OF POWER
| Possible cause Correction | |
| Throttle lever (equipped models) not set to "FAST". | Move the throttle lever to "FAST" (page 9). |
| Grass is too tall to cut. | Raise the cutting height (page 7), cut a narrower swath, use a slower ground speed (page 10), or cut more frequently. |
| Lawnmower deck is clogged. | Clean out the lawnmower deck (page 14). |
| Air cleaner is clogged. | Clean or replace the air cleaner (page 12). |
| Bad fuel; lawnmower stored without treating the petrol, or refuelled with bad petrol. | Refuel with fresh petrol (page 6). |
| Fuel tank vent blocked, carburettor clogged or ignition faulty. | Maintenance of these points must be carried out by a servicing dealer. |
MOWING AND BAGGING PROBLEMS
| Possible cause Correction | |
| Engine speed is too slow to cut well. | Move the throttle lever (equipped models) to the "FAST" position (page 9). |
| Lawnmower is moving too "FAST" for lawn conditions. | Select a lower gear (equipped models) or push more slowly. |
| Grass catcher overfilled or clogged. | Empty the grass catcher. Wash the grass catcher if it is clogged with dirt (pages 12 and 16). |
| Lawnmower deck is clogged. | Clean out the lawnmower deck (page 14). |
| Cutting means dull, worn, or damaged. | Sharpen or replace the cutting means if necessary (page 15). |
| Wrong cutting means installed. | Install correct cutting means (page 15). |
VIBRATIONS
| Possible cause Correction | |
| Cutting means loose, bent, damaged, or unbalanced by improper sharpening. | Tighten loose cutting-means bolts. If cutting means are found to be bent or damaged, take the lawnmower to an authorized Honda servicing dealer for inspection (page 15). |
| Mechanical damage, such as a bent crankshaft. | Maintenance of these points must be carried out by a servicing dealer. |
STORAGE
PREPARATION FOR STORING THE LAWNMOWER
Carry out the following operations to protect the lawnmower each time it is to be stored for a period of more than 30 days.
WARNING
Do not drain the fuel tank while the muffler is hot.
HYE, VYE, QYEJ types:
Place the throttle lever [3] in "FAST" position [A]
All models:
- Drain the fuel tank and the carburettor into a suitable receptacle [1]:
a. Turn the fuel valve [2] to the ON (open) position.
b. Loosen the carburetor drain bolt [4] by turning 1 to 2 turns counterclockwise
c. After all fuel has drained, tighten the carburetor drain bolt securely, turn the fuel valve [2] to the OFF (close) position.
- Change the engine oil (see page 13).
- Pull the starter slowly until a resistance is felt. This closes the valves and protects them from dust and corrosion.
- Coat all surfaces liable to rust with a thin film of oil. Cover the lawnmower and store it on a flat surface in a dry, dust free place. Do not use a plastic cover since this retains dampness.
NOTE: If the lawnmower is to be stored for a period of more than 3 months, remove the spark plug and pour 5 to 10 cc of clean engine oil into the cylinder; then pull the starter slowly 2 or 3 times to spread the oil. Do not leave the lawnmower lying on its side over long periods. This may cause difficult starting and gear oil leaks.
FUEL STORAGE
NOTE:
- Petrol will oxidize and deteriorate in storage. Old petrol will cause hard starting, and it leaves gum deposits that clog the fuel system. If the petrol in your engine deteriorates during storage, you may need to have the carburetor and other fuel system components serviced or replaced.
- Ensure that you use containers or drums specifically designed for hydrocarbons [1]. This will prevent polluting the fuel through the dissolution of the container walls, which will lead to poor functioning of the engine.
- Store the fuel in a dark place, in a room at constant temperature (avoid garden sheds).
- The warranty does not cover a blocked carburetor or valves jammed by old or polluted fuel.
- The quality of unleaded petrol deteriorate very quickly (2 to 3 weeks in some cases). Do not use fuel more than 1 month old. Store the absolute minimum required for your monthly consumption.
USING THE LAWNMOWER AFTER A STORAGE PERIOD
- Remove the spark plug [2], check that it is clean and that the electrode gap is correct. Pull the starter several times.
- We recommend that the spark plug be screwed down as far as possible by hand until finger tight; then use a plug spanner to tighten it by an extra 1/8 or 1/4 turn.
- Check the level and condition of the engine oil [3].
- Fill the fuel tank and start the engine.
NOTE: If the cylinder has been coated with oil, the engine will smoke on start-up. This is normal.
TRANSPORT
TRANSPORTING THE LAWNMOWER
WARNING
Do not tilt the lawnmower since this may cause fuel or oil spillage; spilt fuel or even fuel vapours are a fire hazard.
To transport the lawnmower:
- Place the throttle lever in "STOP" position (except VKE type).
- Pull off the spark plug cap.
- Turn the fuel valve [4] to the OFF (close) position.
To facilitate the operation:
- Remove the grass catcher (see page 5).
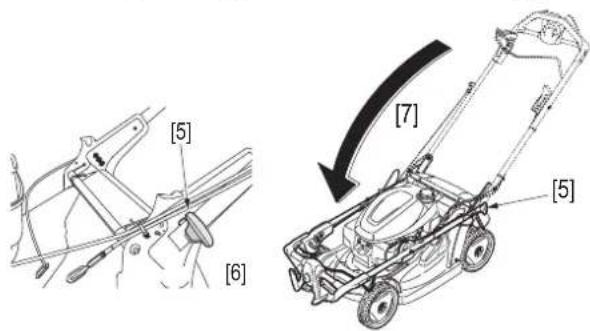
HYE, VKE, VYE types:
- Turn the folding/handle adjustment knobs [5] a quarter turn to unlocked position [6] and fold back the handle [7].
QYEJ type:
- Loosen the handle attachment knobs [8], pull out the adjustment stops [9] and fold the handle [10].
NOTE:
After folding the handle, check that the cables are not kinked, twisted or stretched.
- Be careful and press lever against handle pipe during folding to avoid touching the engine. (VKE, VYE types)
LOADING THE LAWNMOWER
CAUTION:
- To prevent losing control of or damaging the lawnmower, do not use the drive system when going up or down a loading ramp.
- To prevent damaging the drive system, do not engage the clutch when the lawnmower is rolling backwards.
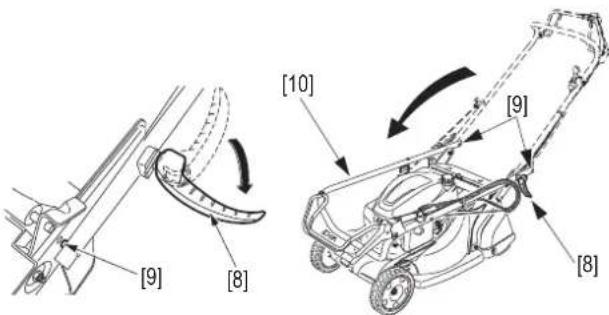
- Transport the lawnmower in normal horizontal position with its 4 wheels flat on the vehicle platform.
- We recommend that you use a loading ramp or that you get someone to help you load and unload the lawnmower.
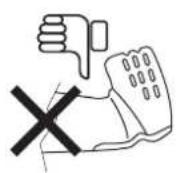
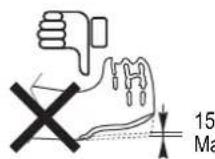
- Adjust the loading ramp so that it is inclined at an angle of less than 15^ (26%).
- When transporting the lawnmower, immobilise it using straps and place chocks under the wheels.
- The straps must not touch the following parts of the lawnmower: throttle lever, cutting-means control lever, gas tank and all the control cables.
USEFUL INFORMATION
FIND AN AUTHORIZATION DEALER
Please refer to the European Internet site: http://www.honda-eu.com
CURRENT PARTS, OPTIONAL ATTACHMENT AND CONSUMABLES
To buy one of the original parts listed below, or any other part, please contact an authorized Honda dealer.
| HRX476C | |||
| HYE, VKE, VYE QYEJ | |||
| Current parts | |||
| Grass catcher 81 | 320-VK8-J50 8132 | 0-VK8-003 | Grass catcher only (without frame) |
| Rear wheel 42710 | -VK8-J50 | ||
| Air filter 17211-Z8 | B-901 Filter paper | ||
| Front wheel 44710 | 0-VK8-J50 44700 | VK8-D00 | |
| Spark plug 98079 | 55846 | NGK (brand): BPR5ES (model) | |
| Standard cutting means | 72511-VK8-J50 | 2511-VK8-000 | Requires use of a dynamometric key |
| Recoil starter rope | 28462-Z0L-V71 | Ask your Honda dealer to replace these | |
| Consumables | |||
| Engine oil | 08221-888-061HE SAE 10W30, 0.6 l | Oil for 4-stroke engines | |
WARNING
For your safety, it is strictly prohibited to install any other attachment than the ones listed above and especially designed for your lawnmowers' model and type.
TECHNICAL SPECIFICATIONS
| MODEL HRX476C2 | ||||
| TYPES | VKE | VYE | HYE | QYEJ |
| GENERAL CHARACTERISTICS | ||||
| Description code MBUF | ||||
| Function Cutting of grass | ||||
| Dimensions L x W x h mm 1 580 x 530 x 995 1 610 x 530 x 1 035 1 445 x 497 x 980 | ||||
| Dry weight kg | 39 | 42 | 44 | 42 |
| Track FR/RR mm | 430 / 453 | 420 / 393 | ||
| Cutting width mm | 470 | |||
| Cutting heights settings mm | 7 positions (25 to 79 mm) | 5 positions (19 to 58 mm) | ||
| Rear/Front wheel diameter mm | 212 / 212 | 100 / 200 | ||
| Grass catcher capacity ℓ | 69 | 73 | ||
| Sound pressure level at operator's ears (in accordance with EN ISO5395-2:2013 + A1:2016 + A2:2017) dB(A) | 79 | 78.7 | 78.6 | 80.4 |
| Measuring uncertainty dB(A) | 1 | |||
| Measured sound power level (in accordance with directives 2000/14/EC, 2005/88/EC) dB(A) | 93.16 | 92.80 | 92.84 | 93.74 |
| Measuring uncertainty dB(A) | 1.59 | 0.89 | 0.77 | 1.13 |
| Sound power level guaranteed (in accordance with directives 2000/14/EC, 2005/88/EC) dB(A) | 95 | 94 | 95 | |
| Vibration test (in accordance with EN ISO5395-2:2013 + A1:2016 + A2:2017)(**) m/s2 | 4.63 | 4.69 | 4.09 | 5.72 |
| Measuring uncertainty m/s2 | 1.59 | 1.10 | 0.74 | 0.55 |
| ENGINE | ||||
| Model | GCV170 | |||
| Type | Air-cooled overhead valve 4-stroke engine | |||
| Displacement cc | 166 | |||
| Bore x Stroke mm | 60.0 x 59.0 | |||
| Cooling | Forced air | |||
| Lubrication | Spray lubrication | |||
| Compression ratio | 8.0 : 1 | |||
| Net power (*) kW/min-1 | 3.6 / 3 600 | |||
| Nominal power kW/min-1 | 3.1 / 2 800 | |||
| Operating speed min-1 | 2 800+ 0-100 | |||
| Idle speed min-1 | 1 700 ± 150 | |||
| Ignition | Transistorised magneto ignition | |||
| Spark plug | NGK : BPR5ES | |||
| Electrode gap mm | 0.7 to 0.8 | |||
| Air cleaner | Dry (paper) type | |||
| Recommended fuel | Unleaded 95 or 98 | |||
| Fuel tank capacity ℓ | 0.95 | |||
| Fuel consumption ℓ/h | 1.2 | |||
| Running time on tank of fuel (*) h | 0.8 | |||
| Recommended oil | SAE 5W-30, 10W-30 | |||
| Engine oil capacity ℓ | 0.40 | |||
| Carbon dioxide (CO2) emissions(*** ) Please refer to "CO2 Information List" on www.honda-engines-eu.com/co2 | ||||
| TRANSMISSION | ||||
| Type | Variable speed | Hydrostatic | 1 Speed fix type | |
| Engine to drive | V-belt | |||
| Final transmission | Gear | Chain | ||
| Number of speeds | Continuous variation | Single speed | ||
| Forward speed m/s | 0 ~ 1.4 | 1.0 | ||
| Lubrication | Oil bath and splash | |||
| Recommended oil | SAE 10W30 API Grade SL / SJ | Honda HST | 15W40 | |
| Oil capacity cc | 150 | 140 | 100 | |
() The power rating of the engine indicated in this document is the net power output tested on a production engine for the engine model GCV170 and measured in accordance with SAE J1349 at 3600 min ^-1 (Net Power). Mass production engines may vary from this value. Actual power output for the engine installed in the final machine will vary depending on numerous factors, including the operating speed of the engine in application, environmental conditions, maintenance, and other variables.
(^) Values for a machine equipped with a grass catcher, in a grass collector position.
(^*) The CO2 measurement results from testing over a fixed test cycle under laboratory conditions a(n) (parent) engine representative of the engine type (engine family) and shall not imply or express any guarantee of the performance of a particular engine.
AVANT-PROPOS
Types HYE, VKE, VYE:
Types HYE, VKE, VYE:
Types HYE, VYE, QYEJ:
Types HYE, VYE, QYEJ:
Types HYE, VYE, QYEJ:
Types HYE, VKE, VYE:
A ATTENTION
Types HYE, VYE, QYEJ:
Types HYE, VKE, VYE:
Tipos HYE, VKE, VYE:
Tipos HYE, VKE, VYE:
Tipos HYE, VKE, VYE:
- Retire las cuchillas de corte superior [12] e inferior [13].
TipQYEJ:
Tipos HYE, VKE, VYE:
ADVERTENCIA
Montazhnikov lane 4th,5-16
Minsk 220019
Republic of Belarus
Tel: +375172349999
Fax: +375172380404
Dudarevich@scanlink-by
BELGIUM
Honda Motor Europe Ltd
Doornveld 180-184
1731 Zellijk
Tel: +32 2620 10 00
Fax: +32 2620 10 01
http://www.honda.com
http://www.hondas.com BH_PE@HONDA-EU.COM
BULGARIA
Iium Motor Ltd.
Andrey Lyapchev Blvd no 34
1797 Sofia
Bulgari
Tel: +3592 423 5879
Fax: +3592 423 5879
http://www.hondamotor.bg
office@hondamotor.bg
CROATIA
Hongoldonia c
Vukovarska ulica 432a
31000 Osijek. HR
Tel.: +38531320420
Fax: +38531320429
p://www.hongoldonia
prodaja@hongoldonia.hr
CROATIA
Fred Bobek d.o.o.
HONDA MARINE
Put Gaceleza 5b
Purduceka 25
Tel.0038522444336
Fax:0038522440500
- centralaja@honda-croatia.com
DENMARK
TIMA A/S
Rytermarken 10
DK-3520 Farum
Tel: +45 36 34 25 50
Fax: +45 36 77 16 30
http://www.tima.dk
FINLAND
OY Brandt AB.
Tuupakantie 7B
01740Vantaa
Tel.: +358 207757200
Fax: +358 9 878 5276
http://www.brandt.fi
FRANCE
Honda Motor Europe Ltd
M50 Business Park, Ballymount
Dublin 12
Tel.: +353 1 4381900
Fax:+35314607851
http://www.hondairland.ie
sales@hondairland.ie
CYPRUS
Demstar Automotive Ltd
Mihail Giorgalla 14
2409 Engomi
Nicosia
Cyprus
Tel.: +357 22 792 600
ax: +357 22 430 313
CZECH REPUBLIC
BG Technik cs, a.s.
U Zavodiste 251/8
15900 Prague 5 - Velka
Chüchle
Tel.: +420 2 838 70 850
Fax: +420 2667 111 45
http://www.honda-stroje.cz
ISRAEL
Mayer's Cars and Trucks Co.Ltd. -
Honda Division
Shevach 5, Tel Aviv, 6777936
Israel
+972-3-6953162
OrenBe@mct.co.il
ITALY
Honda Motore Europe Ltd
Makpetrol A.D. Honda Centar
Bul.sv Kiril & Metodij br.4
- Skopje
Republic of Macedonia
aleksandar.stanojlovic@
etrol.com.mk
MALTA
The Associated Motors
Company Ltd.
New Street in San Gwakkin Road
Mobile:+47.47.80.90.00
Mobile: +47 64 97 68 69 68 Phone: +47 64 97 61 00
http://kellyx.net/
finn.hoge@kellox.no
POLAND
Arles Power Equipment
ulaws
02-844 Warszawa
Tel.: +48 (22) 861 43 01
Fax: +48 (22) 861 43 02
http://www.ariespower.pl
http://www.grow.com.pt
geral@grow.com.pt
ROMANIA
Hit Power Motor Srl
7-15 Arnonomici Bolueyard
Building N3.2
Entrance A
Apt 8, Floor 2
Sector 1
015141 Bucharest
Tel.: +40 21 637 04 58
Fax: +40 21 637 04 78
http://www.honda.ro/
http://honda-eu.ro
office@honda.ro
ROMANIA
Agrisorg
Sacadat 444/A
Bihor
Romania
417430
http://www.agrisorg.com
adrian@agrisorg.com
SERBIA &
MONTENEGRO
ITH Trading Co Doo
ajke Jevrosime 26
1100 Beograd
Serbia
Tel.: +381 11 3240627
Fax: +381 11 3240627
http://www.hondasrbija.co.rs
sstevanovic@ithtrading.co.rs
SLOVAK REPUBLIC
Honda Motor Europe Ltd
AS Domzale Moto Center D.O.O.
Blatnica 3A
1236Trzin
Tel.: +386 1562 3700
Fax: +386 1562 3705
http://www.honda-as.com
Infromacije@honda-as.com
N & all Provinces
Greens Power Products, S.L.
Poligono Industrial Congost -
Av Ramon Ciarans n°2
08530 La Garriga - Barcelona
Tel.: +34 93 860 50 25
Fax:+34938718180
http://www.hondaencasa.com
SWEDEN
Honda Motor Europe Ltd fillal
Sverige
Box 31002 - Llanghusgatan 4
215 86 Malmö
Tel.: +46 (0)40 600 23 00
Fax: +46 (0)40 600 23 19
http://www.honda.se
hpesinfo@honda-eu.com
SWITZERLAND
Honda Motor Europe Ltd., Slough
Succursale de Satigny/Genève
Rue de la Bergere 5
1242 Satigny
- SAFETY INSTRUCTIONS
- WARNING
- CAUTION:
- HONDA
- OWNER'S MANUAL
- HRX476C
- Pedestrian-controlled lawnmower
- CONTENTS
- TRAINING
- PREPARATION
- OPERATION
- MAINTENANCE AND STORAGE
- SAFETY STICKERS
- IDENTIFICATION OF MACHINE
- GENERAL DESCRIPTION
- EQUIPMENT IDENTIFICATION
- CONTROLS FUNCTIONS
- PREPARATION AND CHECKS BEFORE USE
- ASSEMBLY OF THE HANDLE
- QYEJ type:
- CHECKING THE GRASS CATCHER
- AWARNING
- Grass catcher fitting:
- NOTE:
- FUEL CONTAINING ALCOHOL
- CHECKING THE AIR CLEANER
- CHECKING CUTTING MEANS CONDITION
- ADJUSTING CUTTING HEIGHT
- HYE, VKE, VYE types:
- CHECKING ENGINE OIL LEVEL
- To check engine oil level:
- SELECTING THE CUTTING MODE (HYE, VKE, VYE TYPES)
- ADJUSTING THE VARIABLE MULCHING CONTROL
- REAR EJECTION
- STARTING AND STOPPING THE ENGINE
- STARTING THE ENGINE
- FAST
- SLOW
- STOP
- All models:
- VKE type:
- HYE, VYE, QYEJ types:
- STOPPING THE ENGINE
- FLOODED ENGINE
- To clear a flooded engine:
- OPERATING HINTS AND TIPS
- USING THE LAWNMOWER AT HIGH ALTITUDES
- EMPTYING THE GRASS CATCHER
- MAINTENANCE
- AIR CLEANER MAINTENANCE
- ENGINE OIL CHANGE
- CHECKING THE SPARK PLUG
- MAINTENANCE OF SPARK ARRESTER
- CARBURETOR ADJUSTMENT
- SHIFT CABLE ADJUSTMENT
- HYE, QYEJ types:
- SELECT DRIVE CABLE ADJUSTMENT
- VKE, VYE types:
- CUTTING MEANS FITTING AND REMOVAL
- CUTTING MEANS REMOVAL
- CUTTING MEANS INSTALLATION
- Cutting-means bolt torque: 49 59~N· m
- Cutting-means bolt torque: 54.0 ± 4.9 N·m
- CUTTING MEANS REPLACEMENT
- CUTTING MEANS SHARPENING
- GRASS CATCHER CLEANING AND REPLACEMENT
- GRASS CATCHER FABRIC CLEANING
- GRASS CATCHER FABRIC REPLACEMENT
- TROUBLESHOOTING
- ENGINE WILL NOT START
- LOSS OF POWER
- MOWING AND BAGGING PROBLEMS
- VIBRATIONS
- STORAGE
- PREPARATION FOR STORING THE LAWNMOWER
- FUEL STORAGE
- USING THE LAWNMOWER AFTER A STORAGE PERIOD
- TRANSPORT
- TRANSPORTING THE LAWNMOWER
- To facilitate the operation:
- LOADING THE LAWNMOWER
- USEFUL INFORMATION
- FIND AN AUTHORIZATION DEALER
- CURRENT PARTS, OPTIONAL ATTACHMENT AND CONSUMABLES
- AVANT-PROPOS
- Types HYE, VKE, VYE:
- Types HYE, VYE, QYEJ:
- A ATTENTION
- Tipos HYE, VKE, VYE:
- ADVERTENCIA
- BELGIUM
- BULGARIA
- Iium Motor Ltd.
- CROATIA
- Hongoldonia c
- DENMARK
- TIMA A/S
- FINLAND
- FRANCE
- CYPRUS
- CZECH REPUBLIC
- ISRAEL
- ITALY
- MALTA
- POLAND
- ROMANIA
- Agrisorg
- SERBIA &
- MONTENEGRO
- SLOVAK REPUBLIC
- N & all Provinces
- SWEDEN
- SWITZERLAND
Brand : Honda
Model : HRX476C
Category : Lawn mower