LD167 - Baby monitors Lindam - Free user manual and instructions
Find the device manual for free LD167 Lindam in PDF.
Frequently Asked Questions - LD167 Lindam
User questions about LD167 Lindam
0 question about this device. Answer the ones you know or ask your own.
Ask a new question about this device
Download the instructions for your Baby monitors in PDF format for free! Find your manual LD167 - Lindam and take your electronic device back in hand. On this page are published all the documents necessary for the use of your device. LD167 by Lindam.
USER MANUAL LD167 Lindam
GB p1
FR p14
NL p24
D p34
E p44
IT p54
44489-IB01-1
Lindam clarity digital video monitor

IMPORTANT! KEEP FOR FUTURE REFERENCE
Please read your instructions fully before you begin to ensure you get the best out of your new monitor. For assistance please call the Lindam careline on 0871 702 1000 or email careline@lindam.com (Mon-Fri, 10am - 4pm, UK Only. Calls cost 10 pence per minute from a BT Landline. Calls from other networks and mobiles may cost more.) Lindam Limited Hornbeam Park Harrogate HG2 8PA England www.lindam.com Model: LD167
YOU SHOULD HAVE
1 x Camera
1 x Camera Stand Base
1 x Camera Stand Cradle
1 x Camera Fixing Bolt
1 x Monitor
1 x Li-ion Monitor Battery (3.7V 1000mAh)
2 x Mains Power Adaptors
FEATURES
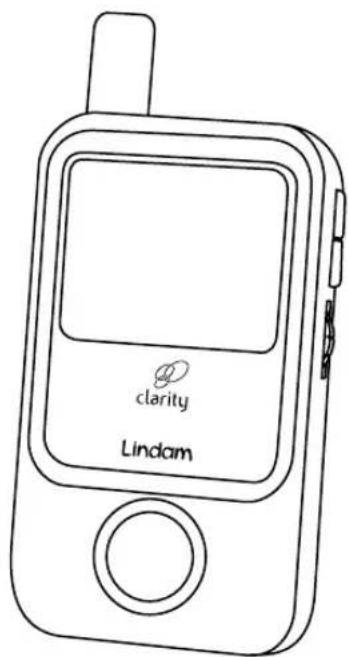
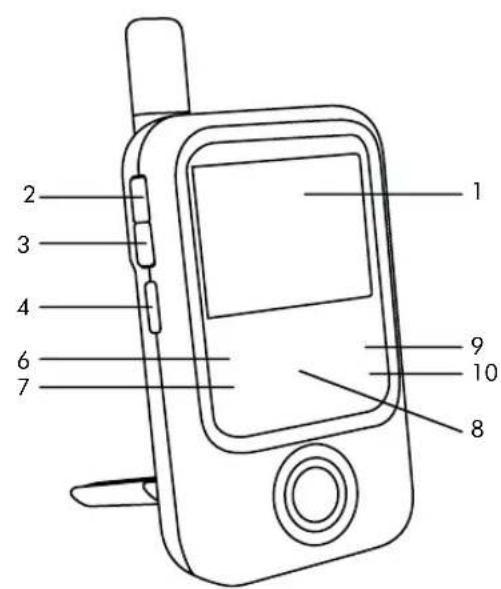
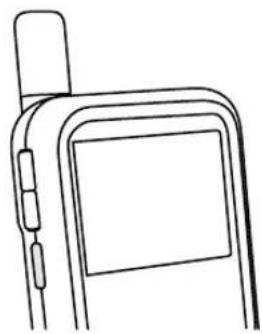
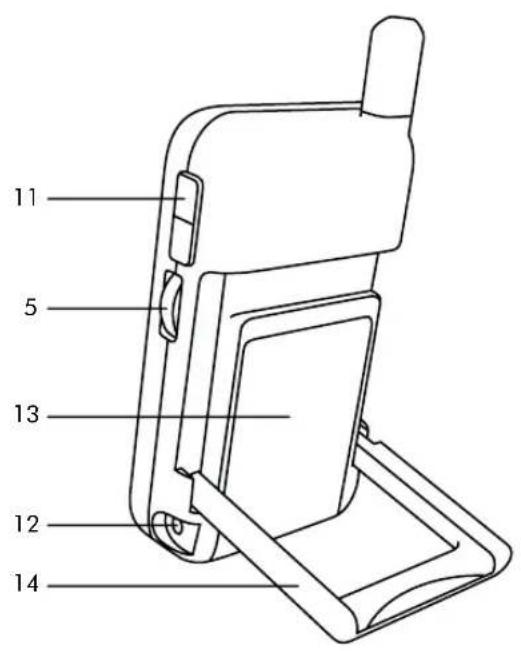
Parent Unit
1 LCD Screen
2 Play Button
3 Skip Button
4 VOX On / Off Button
5 Power On / Off and Volume Thumb wheel
6 Power Indicator
7 Link Indicator
8 Volume Indicator LEDs
9 VOX Indicator
10 Music Indicator
11 Brightness Up / Down Buttons
12 Power Adaptor Socket
13 Battery Compartment
14 Fold Down Stand
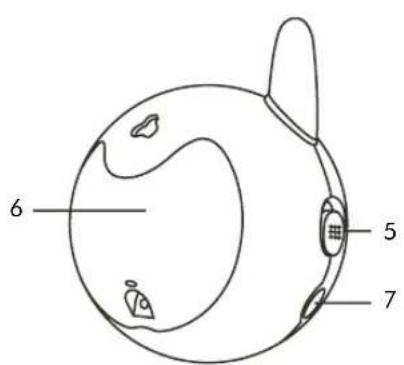
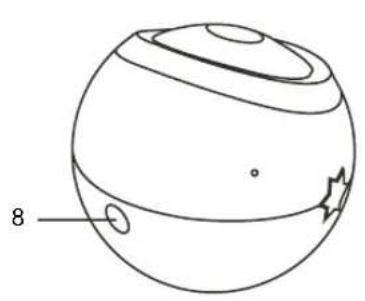
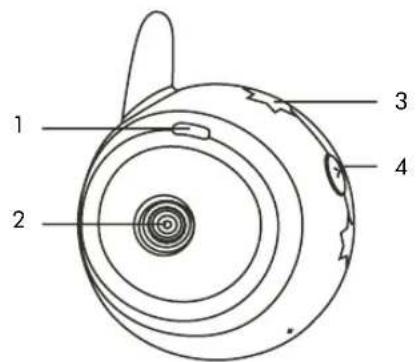
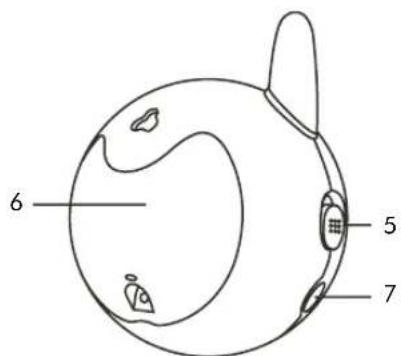
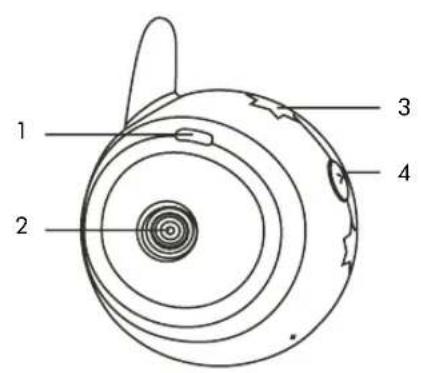
Baby Unit
1 Power Indicator
2 Infrared Lens
3 Night Lights
4 Night Light On / Off Button
5 Power On/Off Button
6 Battery Compartment
7 Power Adaptor Socket
8 Threaded Base
9 Camera Stand Base
10 Camera Stand Cradle
11 Camera Fixing Bolt

PARENT UNIT

BABY UNIT

SETTING UP THE BABY UNIT
MAINS POWER
- Plug your adaptor in to your mains socket and connect to your camera.
- Slide the On / Off Switch to the On position. The Power Indicator will illuminate red.
WARNING! Only use the Adaptors labelled OUTPUT: 6V DC that were supplied with your monitor. The use of other power supplies is not approved and may damage your product and will invalidate your warranty.
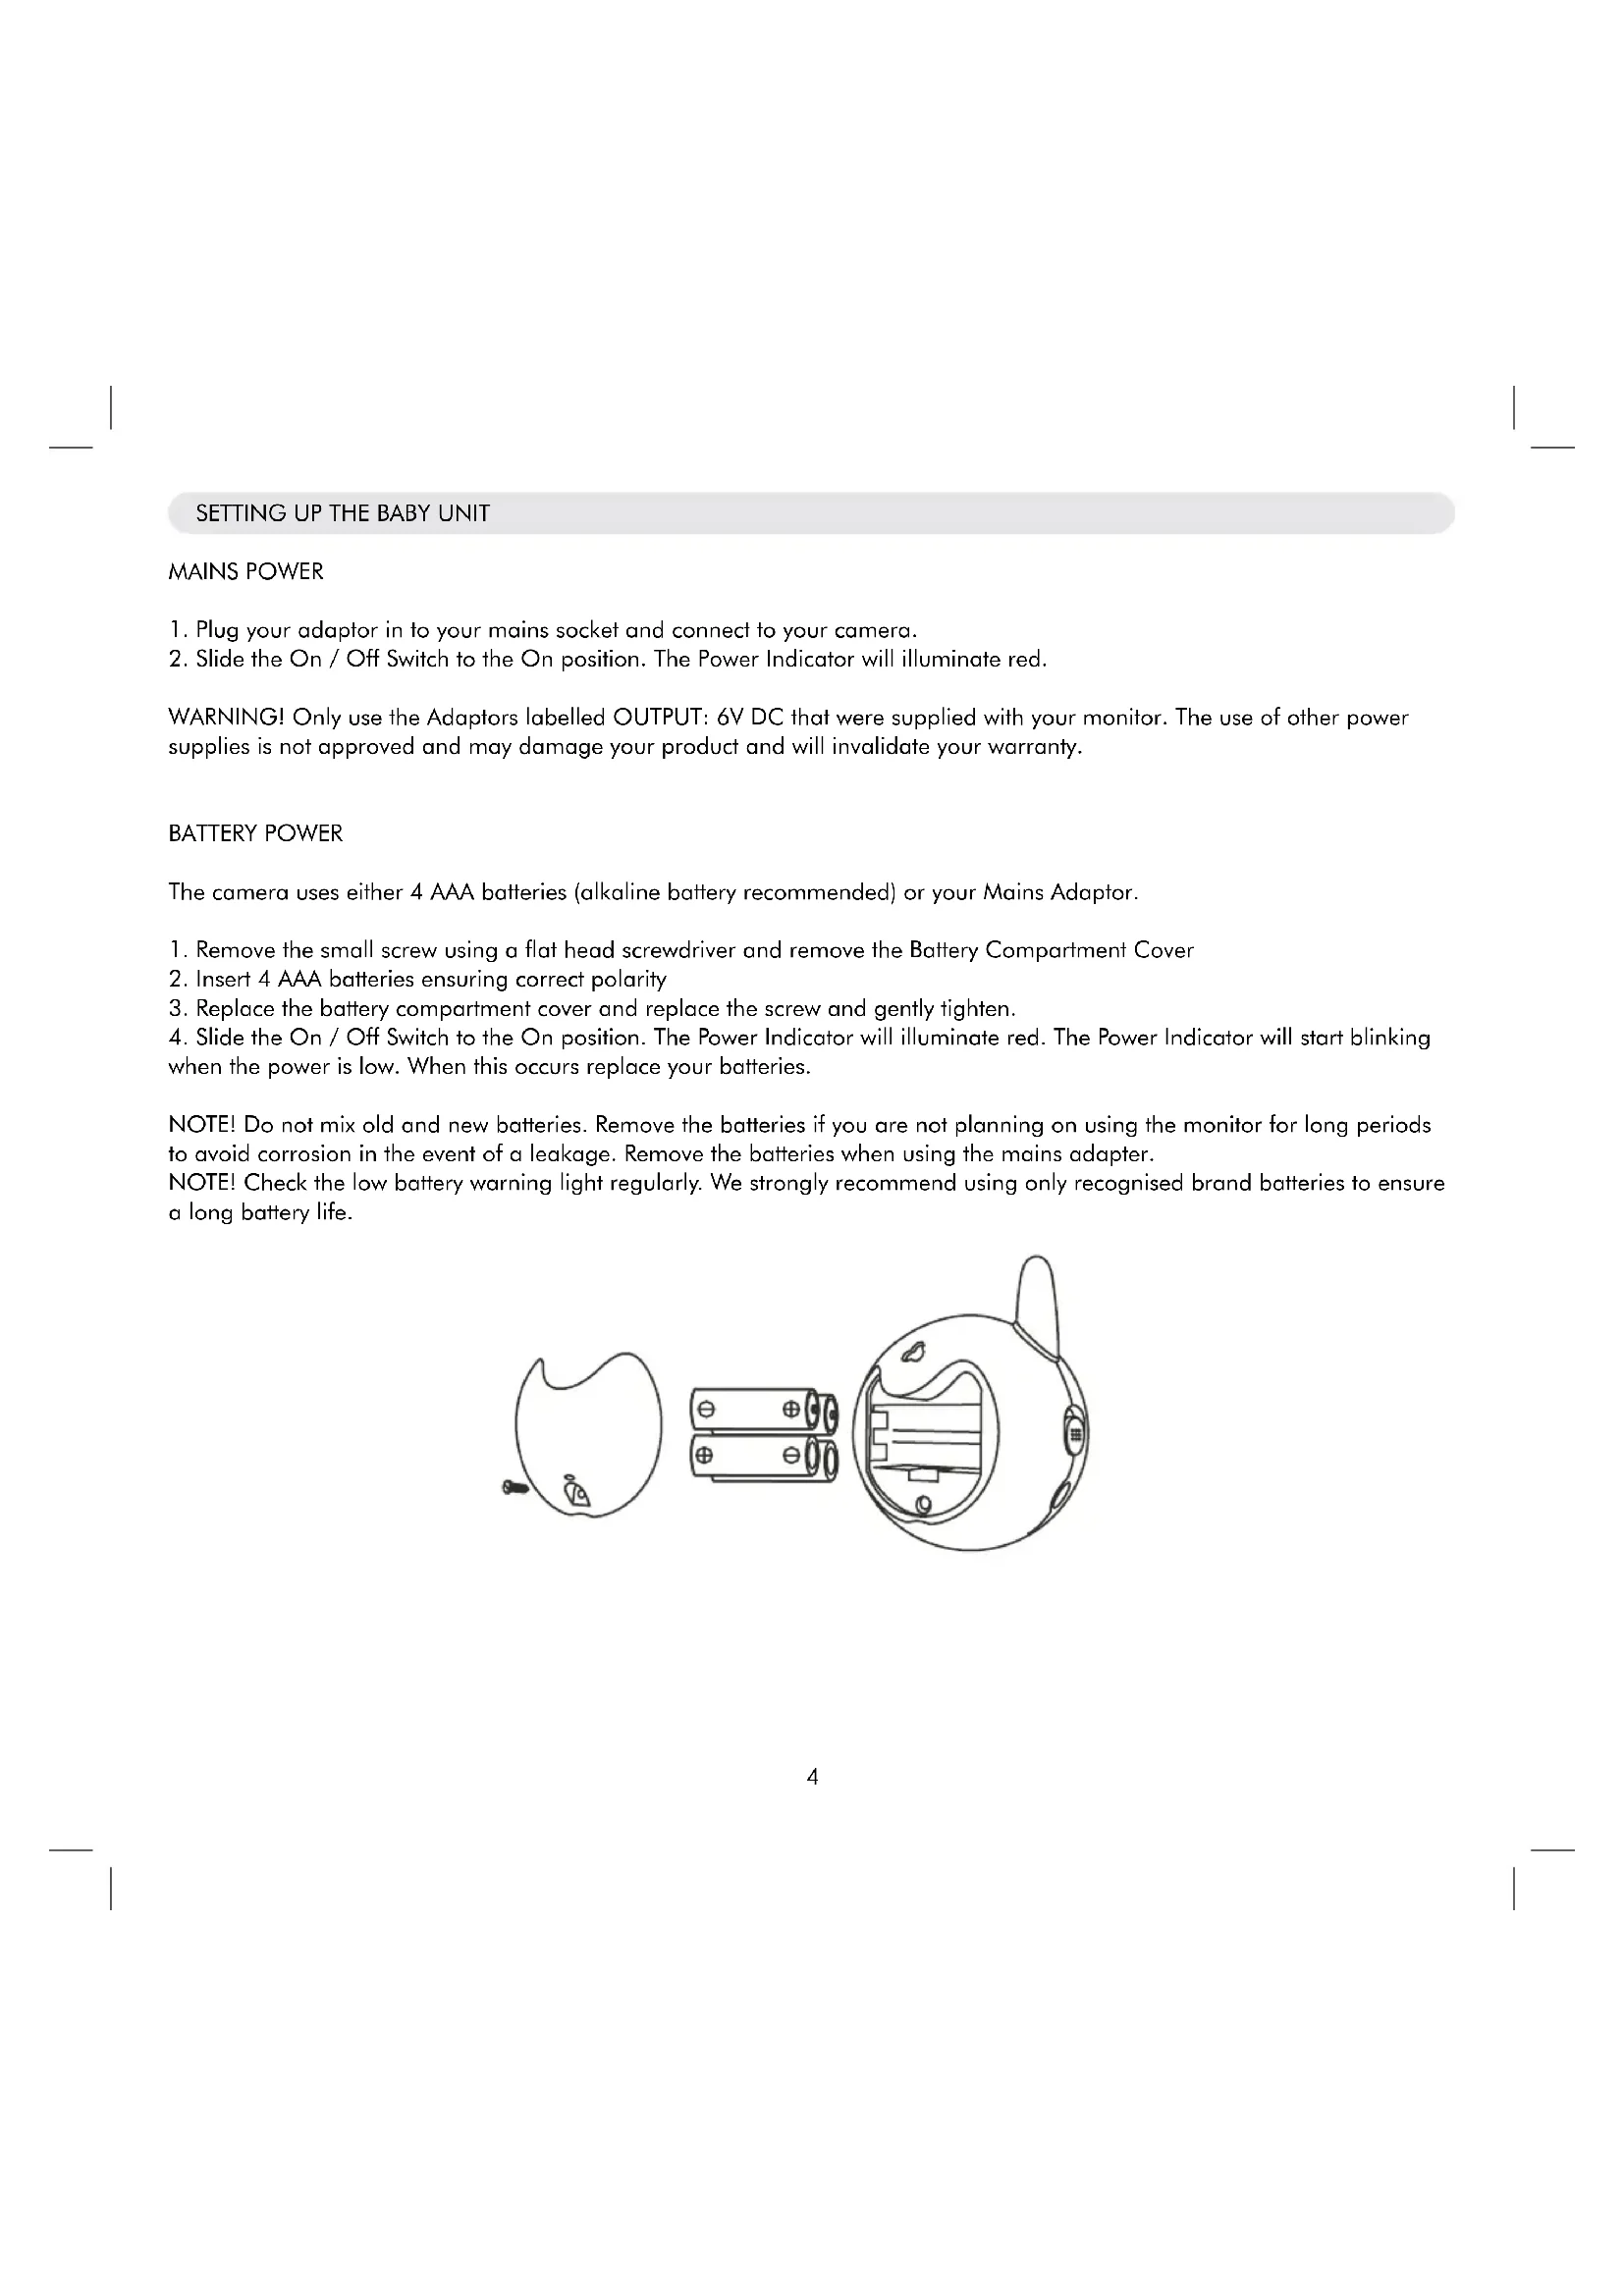
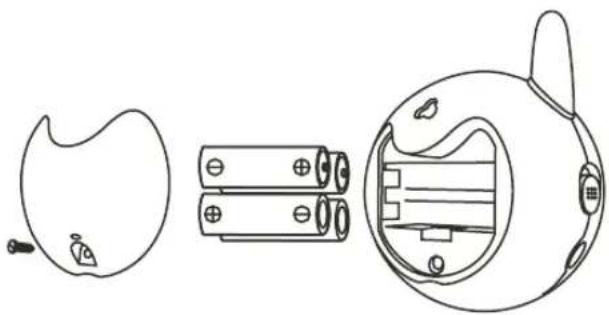
BATTERY POWER
The camera uses either 4 AAA batteries (alkaline battery recommended) or your Mains Adaptor.
- Remove the small screw using a flat head screwdriver and remove the Battery Compartment Cover
- Insert 4 AAA batteries ensuring correct polarity
- Replace the battery compartment cover and replace the screw and gently tighten.
- Slide the On / Off Switch to the On position. The Power Indicator will illuminate red. The Power Indicator will start blinking when the power is low. When this occurs replace your batteries.
NOTE! Do not mix old and new batteries. Remove the batteries if you are not planning on using the monitor for long periods to avoid corrosion in the event of a leakage. Remove the batteries when using the mains adapter.
NOTE! Check the low battery warning light regularly. We strongly recommend using only recognised brand batteries to ensure a long battery life.
NIGHT LIGHT
To illuminate your night light simply press the Night Light Button once. Press it again to switch off.
CAMERA STAND
ABOUT
The camera stand has been designed to be free standing or wall mountable to ensure you can position it in the best possible location for visibility and to pick up the best sound levels in the room.
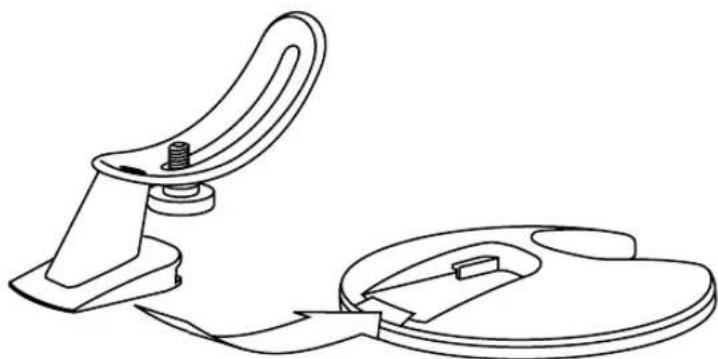
ASSEMBLY
- Slot the Camera Stand Cradle into the Base until it clicks into position.
- Place the Camera Fixing Bolt through the slot in the cradle and screw it into the Threaded Base of the camera.
- Pivot the Camera in the Cradle to the desired angle and lock its position by fully tightening the Bolt
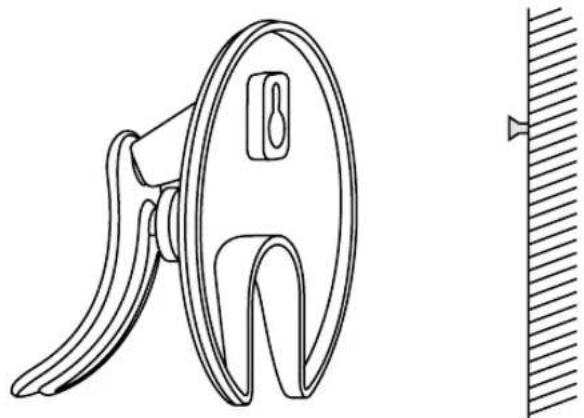
WALL MOUNTING
- Fix a suitable screw (not supplied) into an appropriate wall of your nursery. Ensure you use a suitable wall plug for your wall. Take your base to your local hardware store if you require assistance. Leave the screw head protruding 5mm from the wall.
- Slot the Keyhole in the base over the screw and slide down to secure the position.
WARNING! Do not choose a position where your child can reach the camera or the Mains Adaptor Cable.
SETTING UP THE PARENT UNIT
The monitor uses 3.7V 1000mAh Li-ion battery and the Mains Adaptor supplied
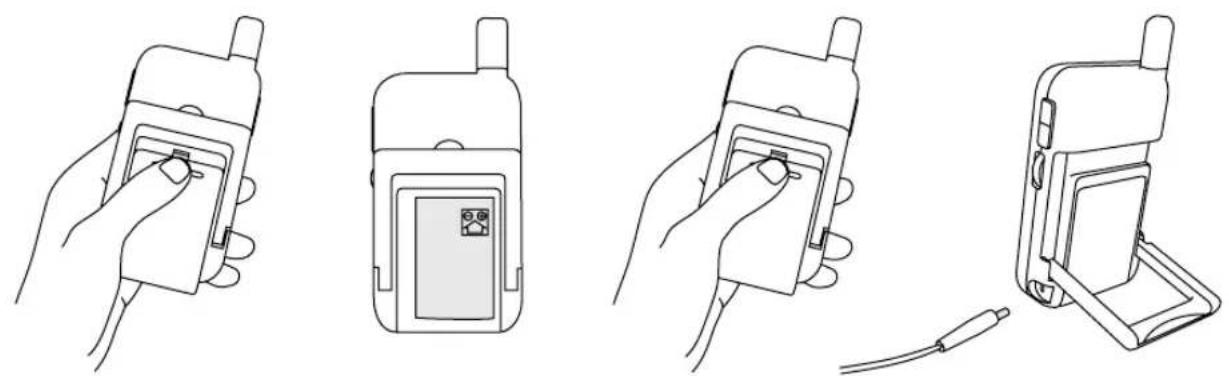
- Slide down the Battery Compartment Cover at the rear of the Parent Unit.
- Slot the battery in place from below ensuring the correct polarity.
- Slide the Battery Compartment Cover back into place until it clicks.
- Plug your Mains Power Adaptor into your mains socket and plug the other end into the Socket on your Parent Unit.
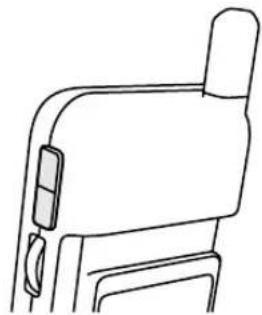
- Roll the Thumb Wheel upwards. When it clicks power is On. Continue to roll it upwards to increase the Volume.
WARNING! Only use the Adaptors labelled OUTPUT: 6V DC that were supplied with your monitor. The use of other power supplies is not approved and may damage your product and will invalidate your warranty.
CHARGING
Please charge the battery for 5 hours the first time it is used to ensure it's fully charged. Thereafter a full charge should take 4 hours. Once fully charged the battery will last approximately 6 hours.
The Li-ion rechargeable battery technology is similar to that used in today's mobile phones.
If the unit is switched Off when charging, the power light glows blue and will turn off when fully charged (no lights).
If the unit is switched On and charging, the power light glows blue and red. When fully charged the light will glow red only.
When the power is low the red light will flash as a warning.
TESTING THE CONNECTION
Place the parent and baby unit in the same room to test the connection.
Make sure the baby unit is at least 1 metre from the parent unit, otherwise you may experience audio feedback.
Switch on both units. The link light on the parent unit will turn green once a link is established. If no link is found the Link light will flash and stay red.
LINK RESETTING PROCEDURE
Sometimes the link between the Parent Unit and Baby Unit can be lost if there is disruption between the units. If this happens first check the power adapters are connected and the batteries are sufficiently charged. Also test the connection by following the procedure as described above. If you still experience link problems this can be corrected by following this reset procedure.
1 Simultaneously press and hold the VOx button on the Parent Unit and the Night Light Button on the Baby Unit for 5 seconds. 'Searching for signal' will appear on the Parent Unit screen.
2 Once the 2 units are linked the Parent Unit screen will start to function as normal
OPERATING RANGE
The operating range of the Lindam Video monitor is 150m in open air. This distance may be reduced when inside the home for example a brick wall could reduce the range by between 10% and 50% .
OUT OF RANGE ALERT
If the link between the parent and nursery unit is lost then and audio alarm will sound and 'Out of range' will be displayed on the parent unit screen. The Link light will also flash red.
BRIGHTNESS
Press the Brightness selection button to adjust brightness.
MUSIC FUNCTION
You can play the music from the camera (three pieces of music).
1 Press the Play Button and the music will begin to play in the nursery.

2 To pause the music press the Play Button again

3 To play the next melody in the sequence press the Skip Button

NOTE! If you activate the music function, the music button LED will remain ON (red).
NOTE! If you activate the music function while in 'AUTOMUTE On' mode (see next page) the monitors will turn the AUTOMUTE function off.
NIGHT VISION
The monitor will automatically switch from daylight mode (full colour) to night vision mode (black and white).
VOX (VOICE OPERATED TRANSMISSION) FUNCTION
The Clarity Video camera has 3 VOX modes, which can be activated by the VOX button on the side of the parent unit. By pressing the button repeatedly you can scroll through the sequence of modes outlined below:
| Mode | Visual indicator | Description |
| AUTOMUTE Off | LCD screen is on. | The Parent Unit shows video continuously. All sound is transmitted continuously from the nursery. |
| AUTOMUTE On | LCD screen is on. ‘AUTOMUTE' is displayed in the bottom of the LCD screen | The Parent Unit shows video continuously. The Parent Unit will turn off the speaker when there is a period of silence in the nursery and turn the speaker back on when your child makes any noise. |
| VOX mode | LCD Screen is off. ‘VOX' Light is illuminated | The screen only activates when sounds are heard in the nursery. |
NOTE! The position of your camera relative to your child may have an effect on how well the built in microphone picks up their sound. For a loud baby you may want to move the camera a little further away to reduce the sensitivity.
NOTE! The sound from the nursery is continuously monitored in all modes. The Volume Indicator LEDs show the sound levels in the room even when the volume is turned down. These are also very useful when you need to monitor the baby where there is background noise or in low light conditions.
NOTE! If you activate the music function while in 'AUTOMUTE On' mode the monitors will turn the AUTOMUTE function off.
TROUBLESHOOTING
If you are unable to receive a signal
Make sure both the camera and monitor are switched on.
- If using Mains Power ensure the plug is pushed all the way into the socket.
- If using batteries ensure they are not empty
If the signal is poor
- If there is a microwave oven in the signal path, move the microwave or switch it off.
- Make sure the Units are within range of each other (150 metres / 492 ft). Please be aware that walls and other large objects can reduce the transmission range.
For link problems please refer back to the 'link resetting procedure' section earlier in this booklet.
WARNING
- Keep the camera lens clean using a soft dry cloth and avoid touching the lens with your fingers.
- This monitor is not a substitute for direct adult supervision. Check in on your child regularly.
- Keep all parts and accessories out of young children's reach.
- Do not store or operate in damp, dusty or dirty areas.
- Do not expose to heat or mount the camera above a heat source.
- Do not store in cold areas. Condensation may form as the units warm back up.
- There are no user serviceable parts. Do not attempt to open your monitor's casings.
- Avoid dropping your monitors.
- Do not use any Mains Power Adapters other than those supplied with your monitor.
- Do not use an extension cord with your Power Adapters
- Do not overload electrical outlets or extension cords as there is a risk of fire or electric shocks.
- Remember you are using public airwaves and there is a small risk that the sound and vision transmitted could be received by other 2.4 GHz devices. To protect privacy turn the camera off when not in use.
- Do not leave exhausted batteries in your monitors. They may leak and cause corrosion.
- Dispose of exhausted batteries safely and never dispose of them in a fire.
- Never immerse any part of the baby monitor in water or any other liquid.
- Power cords should be routed so that they are not likely to be walked on or pinched.
- Only use the charger and adapter supplied. The use of third party adapters may damage your monitor.
- Your Parent Unit camera should only be mounted as instructed using the correct mounting attachment.
- Only replace rechargeable batteries with those recommended by Lindam.
- Never cover the Units with anything when in use.
- Never place the Baby Unit inside the baby's bed or cot.
- Do not place either Unit in direct sunlight.
- Retain these instructions for future reference.
- WARNING: STRANGULATION HAZARD!-Keep out of reach of children. Do not use with extension cords.
SPECIFICATION
BABY UNIT
Frequency: 2.4GHz
Antenna: Dipole antenna
Transmission distance: 150 Metres
Modulation: GFSK, FHSS
Image sensor: Colour CMOS image sensor
Lens: f 3.0mm, F 2.4
IR LED: 9 pcs
Power: DC 6V, 800mA or 4 x AAA batteries (not supplied)
Operating temperatures: 0^ - 40^ (32^ - 10.4^)
PARENT UNIT
Frequency: 2.4 GHz
Antenna: Dipole antenna
Modulation: GFSK, FHSS
Display: 2.36' TFT LCD Full colour
Brightness control: 5 levels
VOX: Voice activation
Power: DC 6V, 800mA or Li-ion battery
Operating temperatures: 0^ - 40^ (32^ - 104^)
DECLARATION OF CONFORMITY
Lindam Limited declares that the Clarity Digital Video Monitor is in compliance with the essential requirements and other relevant provisions of Directive 1999/5/EC.
C∈0413 F
This device is for indoor use only.
This equipment is intended to be operated in below countries
| AT | BE | BG | CY | CZ | DK |
| EE | FI | FR | DE | GR | HU |
| IE | IT | LV | LT | LU | MT |
| NL | PL | PT | RO | SK | SI |
| ES | SE | GB | IS | LI | NO |
| CH |
VOUS DEVRIEZ AVOIR

APPARAAT VOOR OUDERS
BABY EENHEID